Allow/restrict IP addresses
One way to secure AD360 and its integrated components is by allowing or restricting inbound connections to specific IPs or IP ranges. This adds an extra layer of security by allowing connection from only trusted sources and blocking unwanted and malicious traffic.
The IP restriction can be applied for the entire product, specific URLs of the product, or APIs.
Controlling access to the product
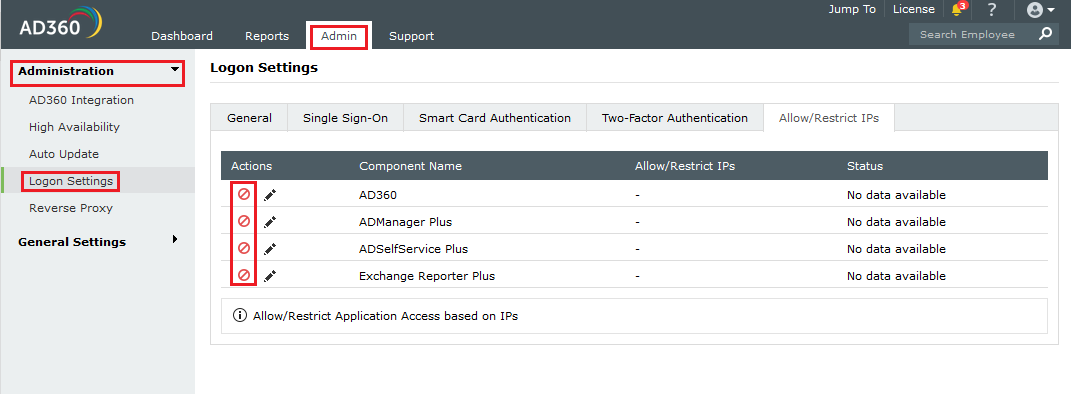
- Navigate to Admin → Administration → Logon Settings.
- Click the Allow/Restrict IPs tab.
- Under the Actions column, click the [
 ] icon to enable IP restriction.

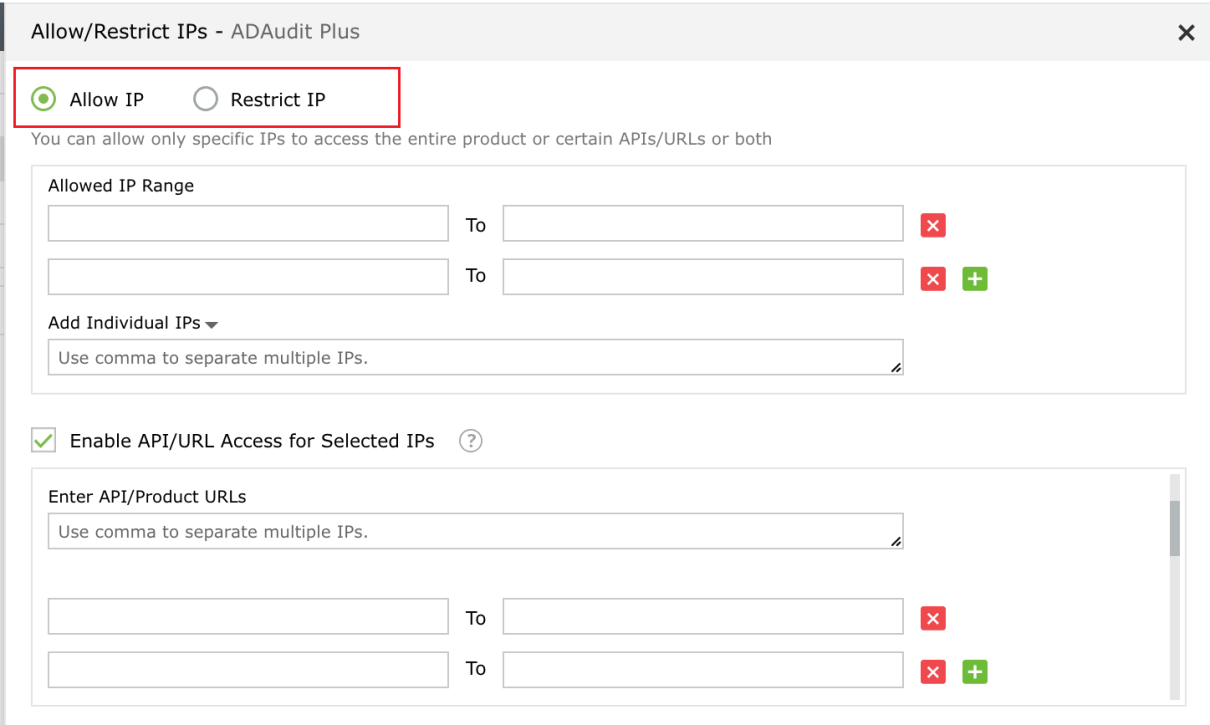
- In the pop-up that appears, select either Allowed IPs or Restricted IPs option.
- Enter the IP addresses as per your requirement.

- Finally, click Save to save the settings.
- If you have changed the proxy settings of AD360 or any of its integrated components for which you are enabling IP-based restriction, then:
- Add the following line to the server.xml file (default location: <InstallationDirectory>/conf/server.xml).
<Valve className="org.apache.catalina.valves.RemoteIpValve"
internalProxies="192\.168\.0\.10|192\.168\.0\.11"
trustedProxies="172\.168\.0\.10|176\.168\.0\.11" />
- Edit the values of internalProxies and trustedProxies as per your environment.
- Enter IP address while specifying the values for internalProxies and trustedProxies, and use the vertical bar (|) character to enter multiple values.
- Restart for the changes to take effect.
- Repeat steps a and b for the integrated components as well.
Controlling access to APIs and product URLs
- Navigate to Admin → Administration → Logon Settings.
- Click the Allow/Restrict IPs tab.
- Under the Actions column, click the [
 ] icon to enable IP restriction.

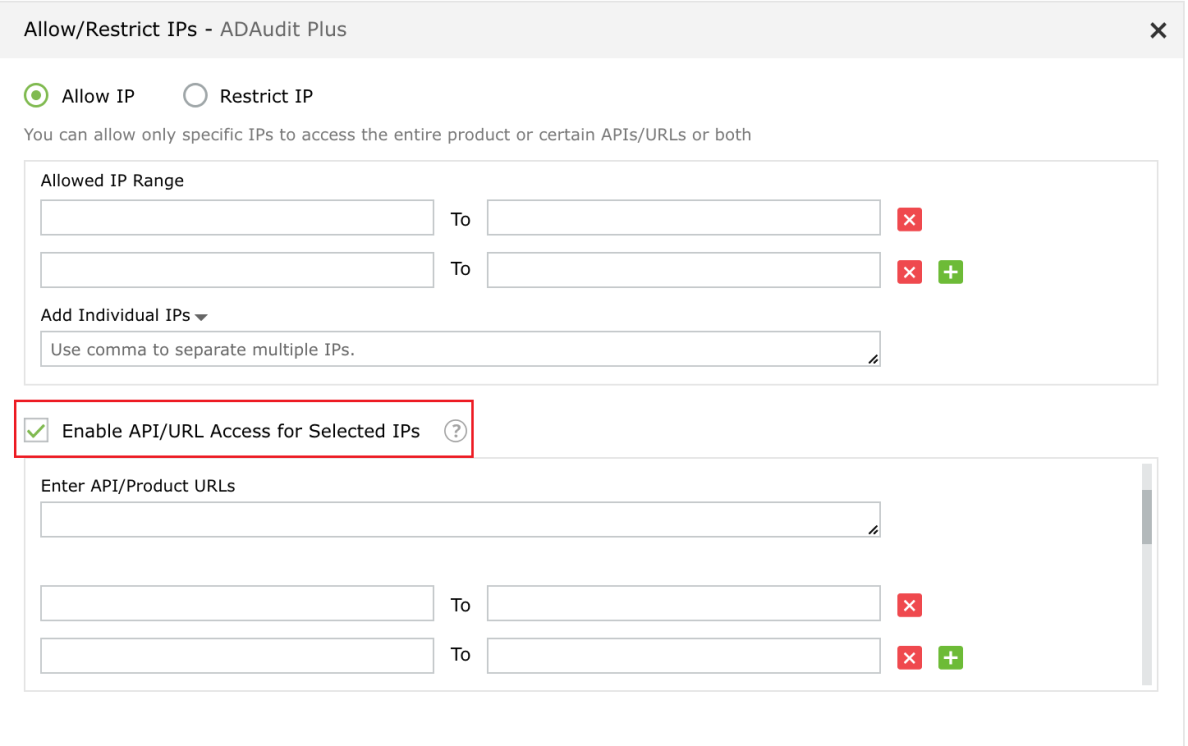
- In the pop-up that appears, check the Enable API/URL Access for Selected IPs box.

- Enter the API/Product URLs in the box provided.
Sample URL paths: /Admin.do, /Configuration.do, /Dashboard.do
Sample API paths: /RestAPI/WC/Integration, /RestAPI/WC/LogonSettings
Note:
- Use * as a wildcard character to restrict access to a broader range of APIs or URLs. For example, use /RestAPI/WC/* to restrict all API calls that start with /RestAPI/WC/.
- The API/URL path should start with /. For example, /Admin.do and /RestAPI/WC/.
- Enter only the path of the API or URL. For example, if the entire product URL is https:testserver:8082/Admin.do, then enter only /Admin.do.
- Only alphanumeric (A-Z,a-z, 0-9) and special characters—period (.), slash (/) and asterisk (*)—are allowed.
- Enter the IP addresses as per your requirement. Click [
 ] icon if you want to allow access to multiple IP address ranges.
- Finally, click Save to save the settings.
- If you have changed the proxy settings of AD360 or any of its integrated components for which you are enabling IP-based restriction, then:
Managing IP restriction
You can also make the following changes to this setting:
- Disable/enable IP-based restriction: Use the icon under the Actions column to enable or disable IP-based restriction. [
 ] icon means IP-based restriction is enabled for a component and [
 ] icon means IP-based restriction is disabled.
- Edit IP-based restriction settings: Click [
 ] icon to add, delete, or edit the IP ranges and individual IP addresses.
- Summary details: Click the link under the Allow/Restrict IPs column to view the IPs that are allowed or restricted from accessing a component.
Appendix
- Use * as wildcard character: Individual IP addresses can include wildcard characters, so that all addresses within a certain class of address will be restricted. For example, denying access to address 192.168.2.* denies access to all addresses for that subnet.
- You can also enter hostname instead of IP addresses.
- You can allow or restrict only IPv4 addresses. IPv6 is not supported.
Don't see what you're looking for?
-
Visit our community
Post your questions in the forum.
-
Request additional resources
Send us your requirements.
-
Need implementation assistance?
Try onboarding
 ] icon to enable IP restriction.

 ] icon to enable IP restriction.

 ] icon means IP-based restriction is enabled for a component and [
 ] icon means IP-based restriction is disabled.