Knowledge Base

A guide to backing up AD users using RecoveryManager Plus

Active Directory (AD) is the foundation of most enterprise networks, providing a central repository for authentication, authorization, and user management. User accounts in AD form the backbone of identity management, enabling secure access to resources, applications, and services. Without proper backup measures for the user objects, organizations are vulnerable to unauthorized access, data breaches, and operational disruptions.

Why backup AD users

Since most organizations rely extensively on AD to manage their user identities, losing this data can have significant consequences on business operations. If AD is compromised or corrupted due to a disaster or cyberattack, it could result in an organization losing critical data and access to essential applications and services, affecting productivity. A robust AD user backup strategy is not just about restoring individual user accounts but about safeguarding the entire organizational infrastructure.

How to backup AD users using RecoveryManager Plus

The following steps illustrate how you can backup AD users using RecoveryManager Plus.
  1. Log in to RecoveryManager Plus as an administrator.
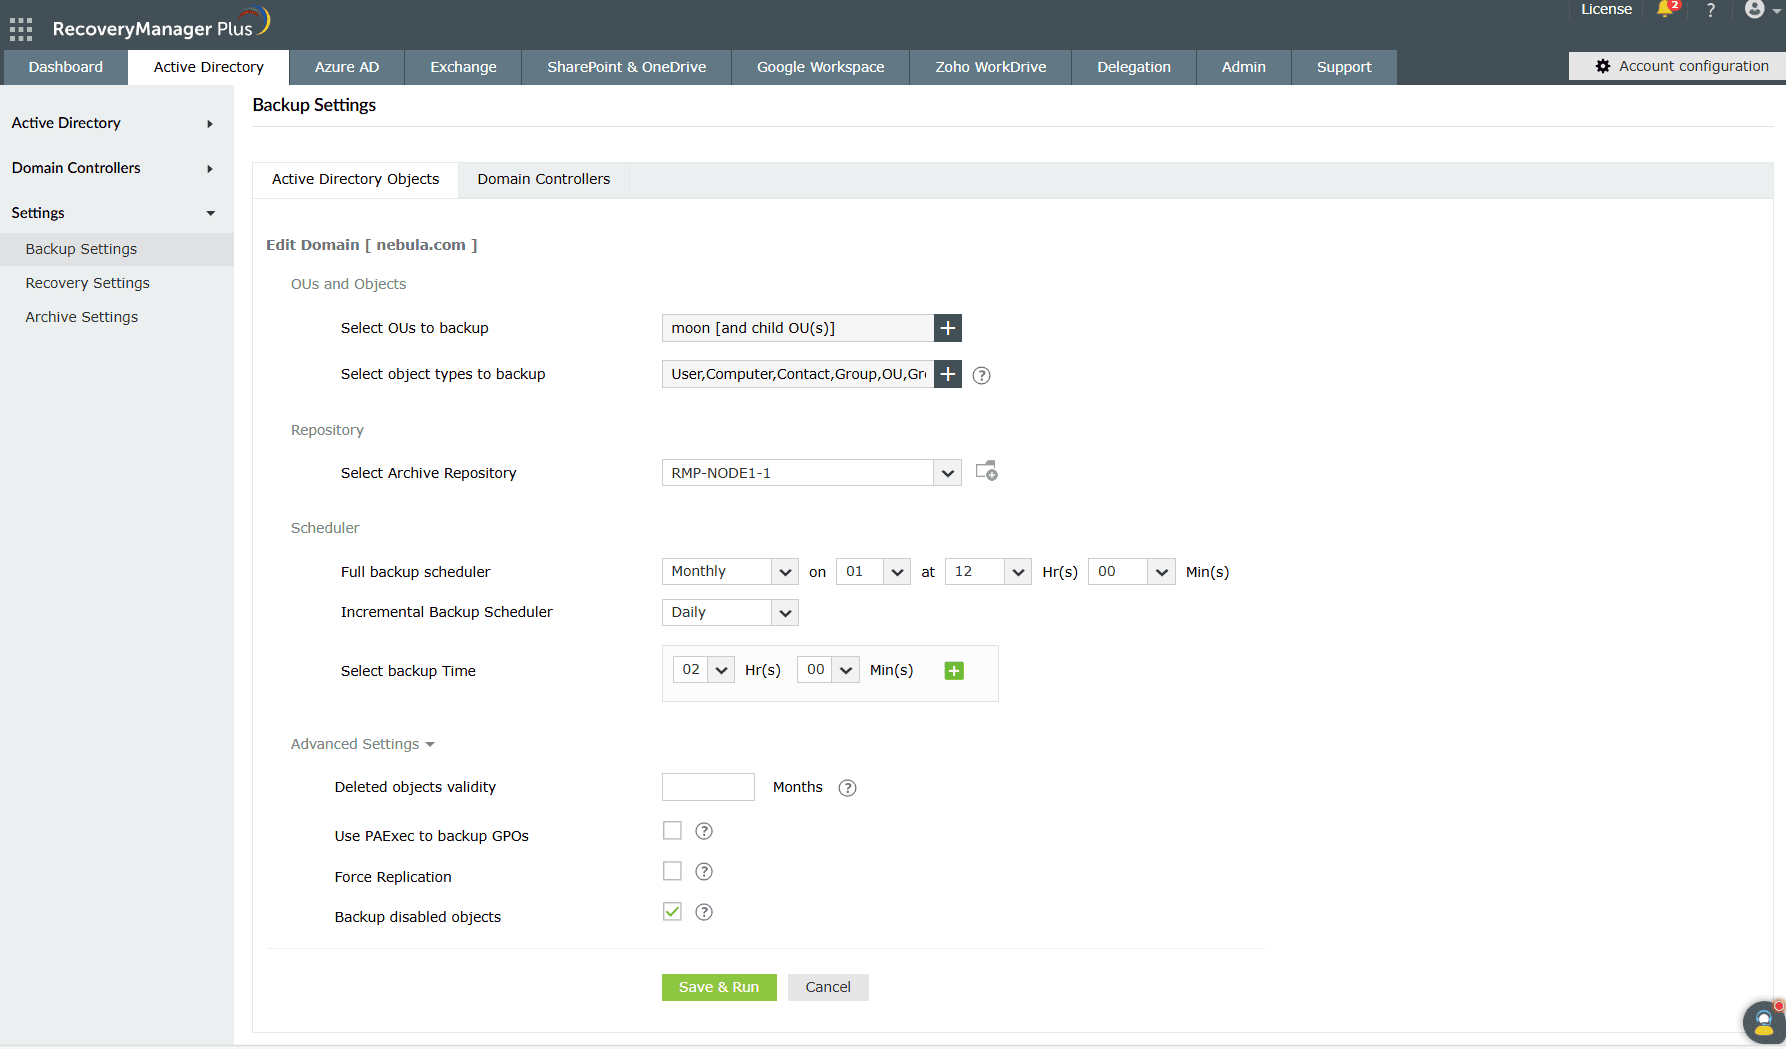
  2. Navigate to the Active Directory tab > Settings > Backup Settings > Active Directory Objects.

    Active directory user objects backupFigure 1: The Active Directory objects backup settings page in RecoveryManager Plus.

  3. From the Select OUs to backup drop-down, choose the OUs you want to back up.
  4. In the Select object types to backup drop-down, choose User as the object type.

    Selecting the object type as user for backupFigure 2: Selecting AD users for backup.

  5. From the Select Archive Repository drop-down menu, choose a repository to store backup archives.
  6. From the Full backup scheduler drop-down menu, set the frequency at which full backups must be taken to either weekly or monthly.
  7. From the Incremental backup scheduler drop-down menu, set the frequency at which incremental backups must be taken to either hourly, daily, or weekly.
  8. Schedule the time when backups must be generated from the Select backup time field.
  9. Specify the duration for which you wish to retain deleted AD objects in the Deleted objects validity field.
  10. If you wish to force replicate all changes made to domain controllers before any backup operation is initiated, select the Force Replication option.
  11. To include disabled objects in the backup, select the Backup disabled objects option.
  12. Click Save & Run.

After you have successfully backed up your AD users, you can restore them in the event of data loss or corruption. RecoveryManager Plus enables efficient restoration of user objects, ensuring swift recovery. Click here to learn more about restoring AD users.

Need further assistance?

Fill this form, and we'll contact you rightaway.

Request Support

  •  
  • *
     
  • *
     
  • *
     
  • By submitting you agree to processing of personal data according to the Privacy Policy.

"Thank you for submitting your request.

Our technical support team will get in touch with you at the earliest."

A single pane of glass for Active Directory, Azure Active Directory,
Microsoft 365, Google Workspace, and Exchange Backup.
  • » Personal WorkDrive backup
  • » Backup retention
  • » Incremental backup