
Endpoint Central MSP stores information like configuration details, status of deployed configurations, and details about reports, like User Logon reports and Active Directory reports, in a database. Creating a backup of this database and certain important files like configuration files is necessary to prevent loss of data.
You can back up data automatically, by scheduling a back up to happen at a specified time or by taking a back up manually. You can also restore this data when required. For example, assume that your hard disk crashes and you have to re-install Endpoint Central MSP. You can use the last back up you took to restore all the required information. Note that this is possible only if the backup file is stored in a computer other than yours.
These are the few best practices recommended for Back Up and Restore option.
Follow the appropriate steps to configure write permissions for the network share.

Note: It is recommended to configure the shared path in the same domain and to not provide write permission for Everyone to the shared path.
Ensure that your mail server settings are properly configured. This setup is necessary to send and receive email alerts. If you haven't set this up yet, please refer to your mail server documentation or contact your IT support for assistance.
You have scheduled an automatic data backup to take place automatically at a specified time.
You can manually back up and restore the database. You can do this using the Backup-Restore Utility GUI.
Opening the Backup-Restore Utility Graphical User Interface (GUI)
To open the Backup-Restore Utility GUI, follow the steps given below:
Right click Start >Explore > <Server Installed Directory>/UEMS_MSP CentralServer>bin.
(For example, right click Start >Explore > Local Disk (C:) > Program Files > UEMS_MSP CentralServer > binDouble-click backuprestore.bat
You've opened the Backup-Restore Utility GUI.
On the Backup-Restore Utility GUI, click the Backup tab
Select the location where you want to save the backup file
Click Backup
You can choose to encrypt the backup file by providing a password.
A backup file is created and saved in the specified location. The file will be named using the buildnumber-date-time.zip format.

In case you are using Endpoint Central MSP in bundled PGSQL DB, you can restore Endpoint Central MSP with the server machine via VM snapshot and start the server. Even then, Endpoint Central MSP's scheduled backup is the primary backup and cannot be stopped.
If you are using MSSQL or remote PGSQL you should not use this VM restore as the database will be in another machine. If you do so, the server will not start due to data inconsistency.
Follow the steps below to grant the necessary permissions for MSSQL BAK backup:
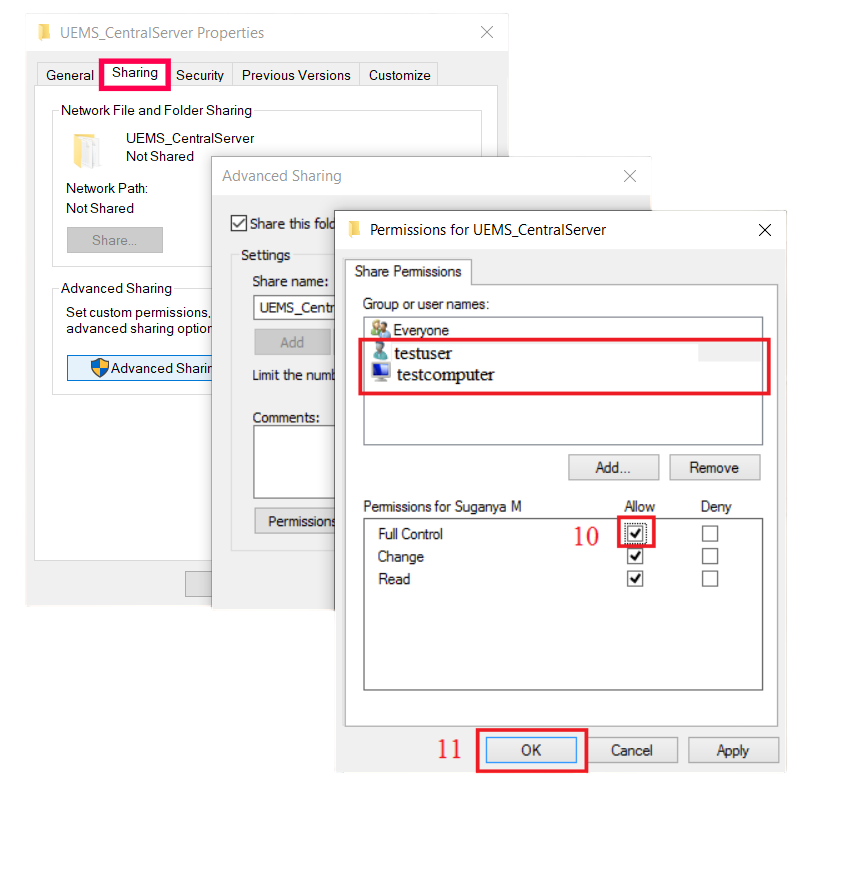
Follow the procedures below to grant write permission to the ScheduledDBBackup folder in the sql server's application server installation location. Note: We can provide permissions to a particular user or computer only when both the machines are in the same domain.
Follow the appropriate steps to configure write permissions for the network share.
Note: It is recommended to configure the shared path in the same domain and to not provide write permission for Everyone to the shared path.
Ensure that your mail server settings are properly configured. This setup is necessary to send and receive email alerts. If you haven't set this up yet, please refer to your mail server documentation or contact your IT support for assistance.
You have scheduled an automatic data backup to take place automatically at a specified time.
You can manually back up and restore the database. You can do this using the Backup-Restore Utility GUI.
Opening the Backup-Restore Utility Graphical User Interface (GUI)
To open the Backup-Restore Utility GUI, follow the steps given below:
Right click Start >Explore > directory where DC server folder is present >bin.
(For example, right click Start >Explore > Local Disk (C:) > Program Files > UEMS_MSP CentralServer > binDouble-click backuprestore.bat
You've opened the Backup-Restore Utility GUI.
On the Backup-Restore Utility GUI, click the Backup tab
Select the location where you want to save the backup file
Click Backup
You can choose to encrypt the backup file by providing a password.
A backup file is created and saved in the specified location. The file will be named using the buildnumber-date-time.zip format.
In case you are using Endpoint Central MSP in bundled PGSQL DB, you can restore Endpoint Central MSP with the server machine via VM snapshot and start the server. Even then, Endpoint Central MSP's scheduled backup is the primary backup and cannot be stopped.
If you are using MSSQL or remote PGSQL you should not use this VM restore as the database will be in another machine. If you do so, the server will not start due to data inconsistency.
Follow the steps below to grant the necessary permissions for MSSQL BAK backup:
The backup process will be automatically handled by the server and it includes the following steps:
Note:To ensure a smooth backup process, verify that the network path from the MSSQL machine to the server is accessible. It is a good practice to create a temporary network share to confirm that the server machine's network path is reachable from the MSSQL machine.
Note: This document only provides steps for backup restoration on an already working server. If you only have a backup file and want to re-install and setup the Endpoint Central MSP server, then please follow the instructions given in this document.
You can manually back up and restore the database. You can do this using the Backup-Restore Utility GUI.
Opening the Backup-Restore Utility Graphical User Interface (GUI)
To open the Backup-Restore Utility GUI, follow the steps given below:
Right click Start >Explore > Directory where UEMS_CentralServer folder is present >bin
(For example, right click Start >Explore >Local Disk (C:) >Program Files >UEMS_MSP CentralServer >binDouble-click backuprestore.bat
You've opened the Backup-Restore Utility GUI.
)")
Ensure that you have stopped the Endpoint Central MSP server service before restoring a backup file.
On the Backup-Restore Utility GUI, click the Restore tab
Browse and select the required backup file.
Click Restore
In case you have opted for encrypting the backup file, you will have to provide the password for restoring the backup.
The build number of the Endpoint Central MSP server should match the build number of the backup file you are restoring. Ensure that you choose the correct architecture of the installation, such as 32-bit or 64-bit. You can verify the details by viewing the Support tab, on the web console.
Note:The restoration time depends on the data stored on the database. The progress bar will provide the restoration status. In case of any errors in the restoration, an error message will be notified to the user.
This will restore the specified data to Endpoint Central MSP server.
If remote database is configured with the Endpoint Central MSP server, ensure that it is running on a remote machine. After restoration, the changes made after the backup date will not be available.