IDSecurity Agent installation via GPO

Here are the step-by-step instructions for deploying Identity360's IDSecurity Agent for Windows using Group Policy Object (GPO).

Note: The document is written for an IT admin with a basic understanding of the Windows operating system, Active Directory (AD), and enterprise software deployment.

IDSecurity Agent

The IDSecurity Agent is an extension of the standard credential provider from Microsoft. When installed, it can enable MFA for local Windows logins, RDP logins, and UAC actions to protect machines from credential-based attacks.

System requirements

The platforms supported by the IDSecurity Agent are listed below.

Windows Server versions Windows clients
Windows Server 2022 Windows 11
Windows Server 2019 Windows 10
Windows Server 2016 Windows 8.1
Windows Server 2012 R2 Windows 8

Prerequisites

  1. The MFA and SSO license for Identity360 is required to enable MFA for Windows logins. Visit our pricing page for more details.
  2. Currently, IDSecurity Agent is supported only for Windows devices that are joined to Azure AD or part of a hybrid Azure AD setup.
  3. Before installing the IDSecurity Agent, configure MFA settings in the Identity360 admin portal (Applications > Multi-factor Authentication > MFA for Endpoints > MFA for Windows machines).
  4. Create a custom computer group in your Active Directory environment with the necessary computers in which you wish to deploy the IDSecurity Agent.

Steps for installing the IDSecurity Agent using GPO

Step 1: Prepare the installer files

  1. Download the Identity360CloudIDSecurityAgent.msi file through Identity360's admin portal by navigating to Applications > Multi-factor Authentication > MFA for Endpoints > Install IDSecurity Agent > Step 1 > Download.
  2. Copy the Installation Key from the product UI. Locate the key in the Identity360 admin portal under Applications > Multi-factor Authentication > MFA for Endpoints > Install IDSecurity Agent > Step 2.
  3. Generate a transform file (MST) for the installer file using a table editor tool such as Orca (distributed as part of the Windows SDK) to deploy the IDSecurity Agent.
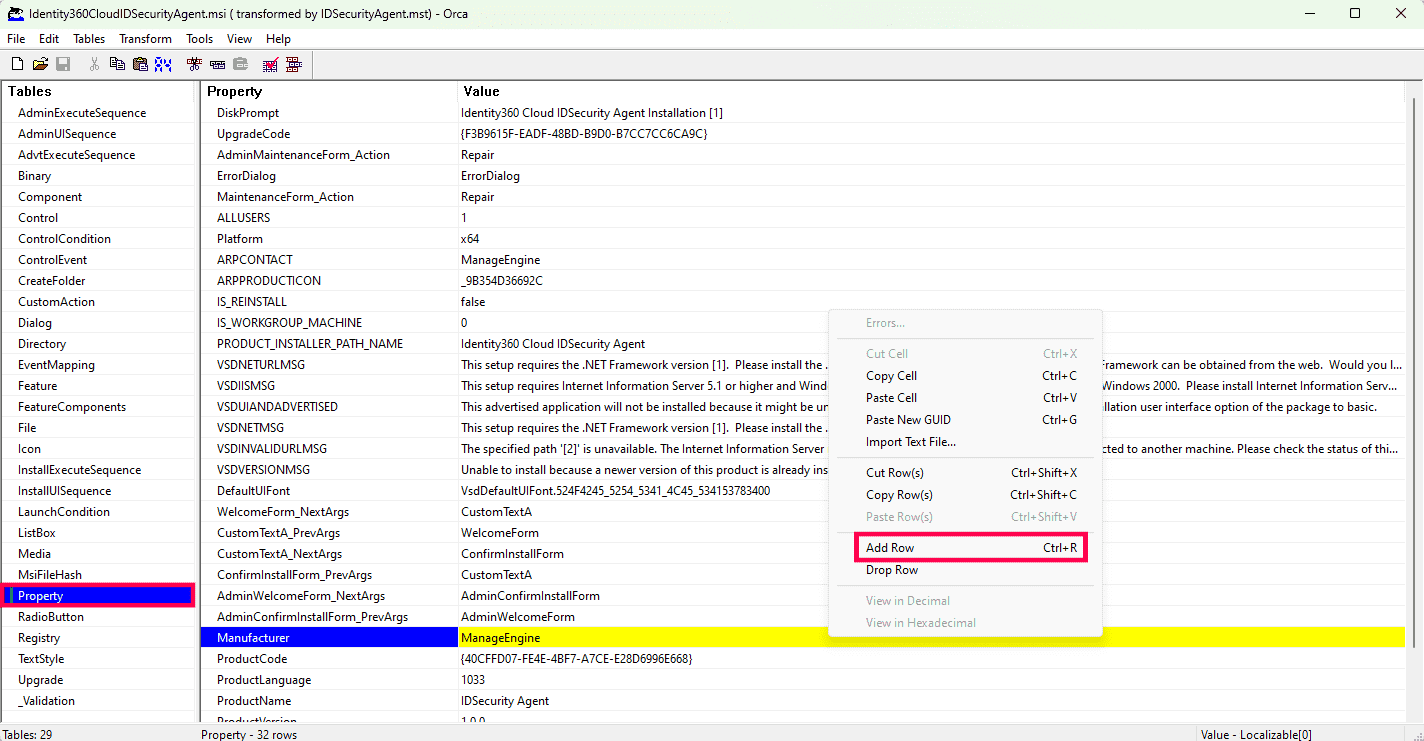
    1. Open the Identity360CloudIDSecurityAgent.msi file in Orca and navigate to Transform > New Transform.
    2. Select Property in the table and click Add Row.
    3. IDSecurity-Agent-installation-via-GPO
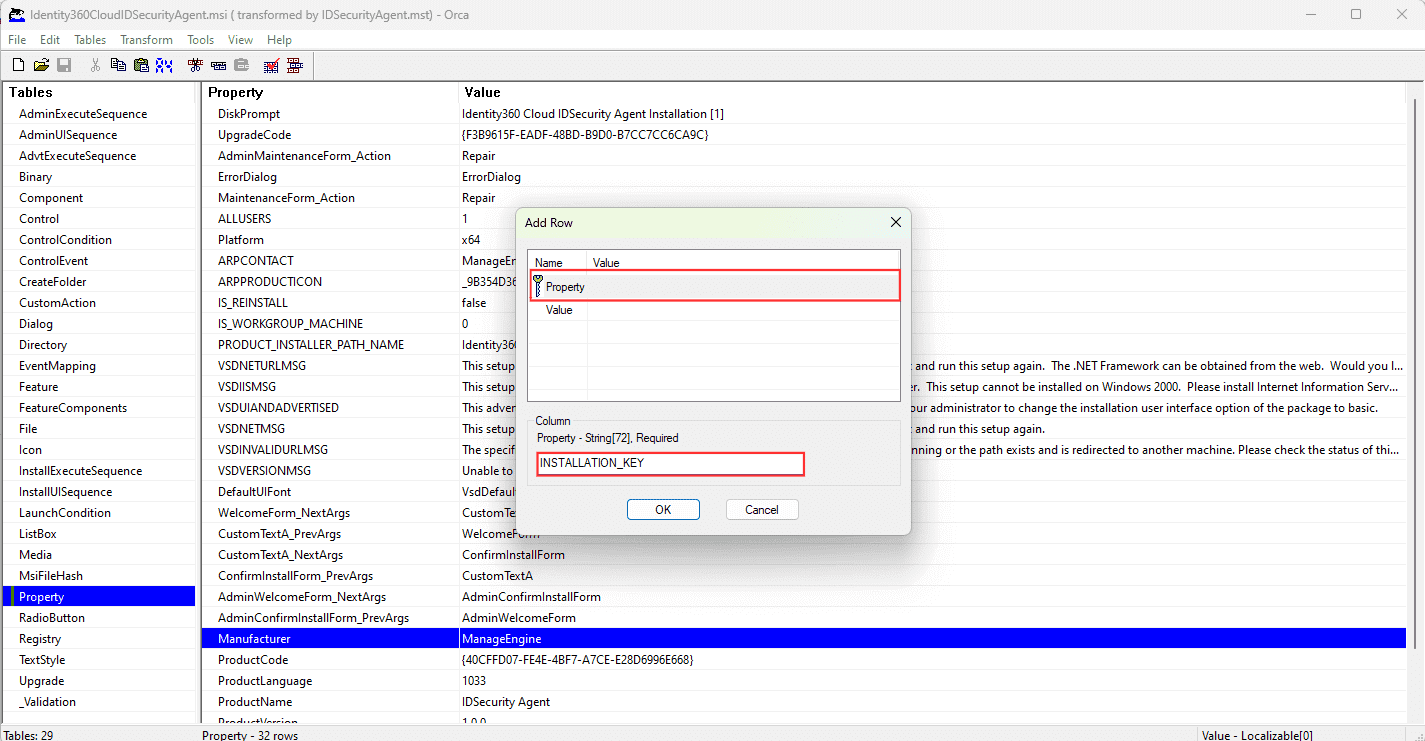
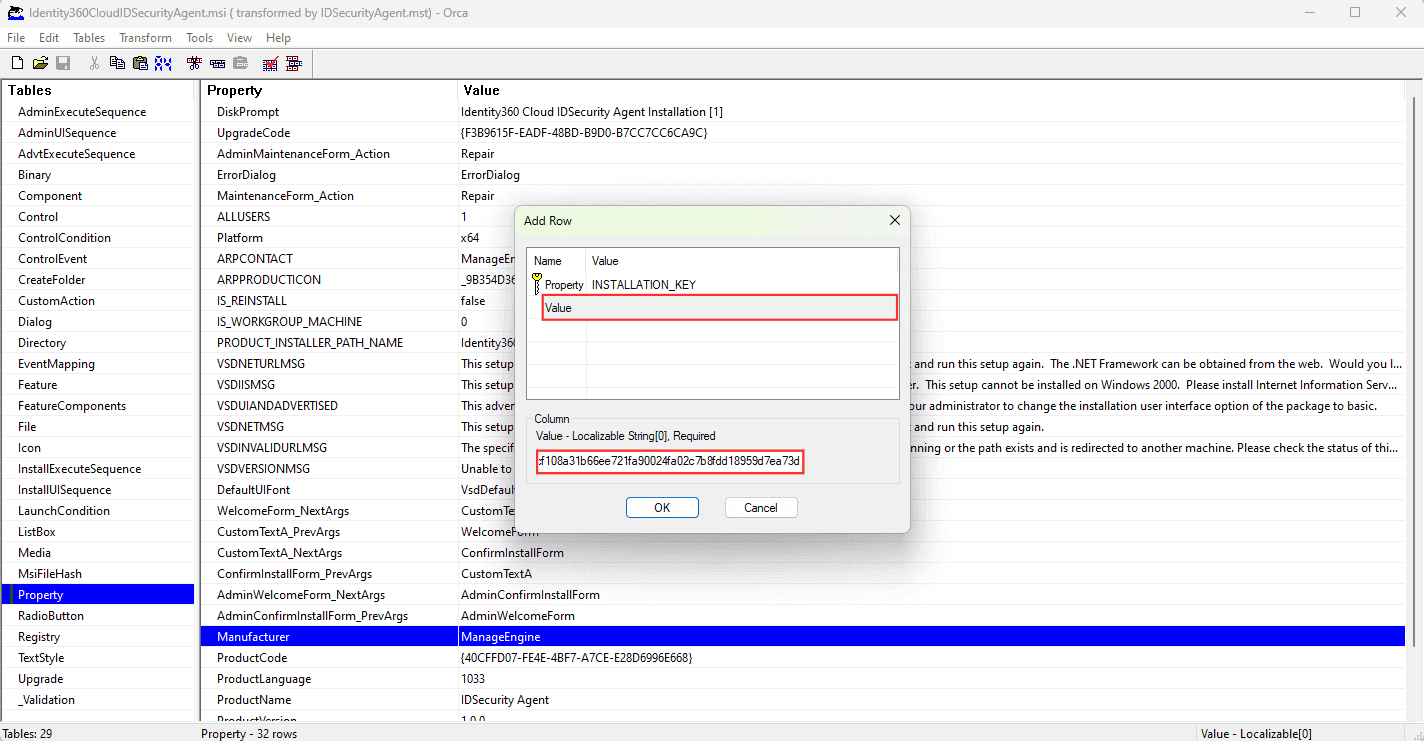
    4. Paste the property name and value mentioned in the table below and click OK.
    5. Property Value
      INSTALLATION_KEY Replace with the actual Installation Key copied from step 2.
      IDSecurity-Agent-installation-via-GPO
      IDSecurity-Agent-installation-via-GPO
    6. Navigate to Transform > Generate Transform... to create an MST file with the new Installation Key.
    7. After generating the transform file (MST), exit the Orca window without saving the changes made to the original MSI file.

Step 2: Create a network share

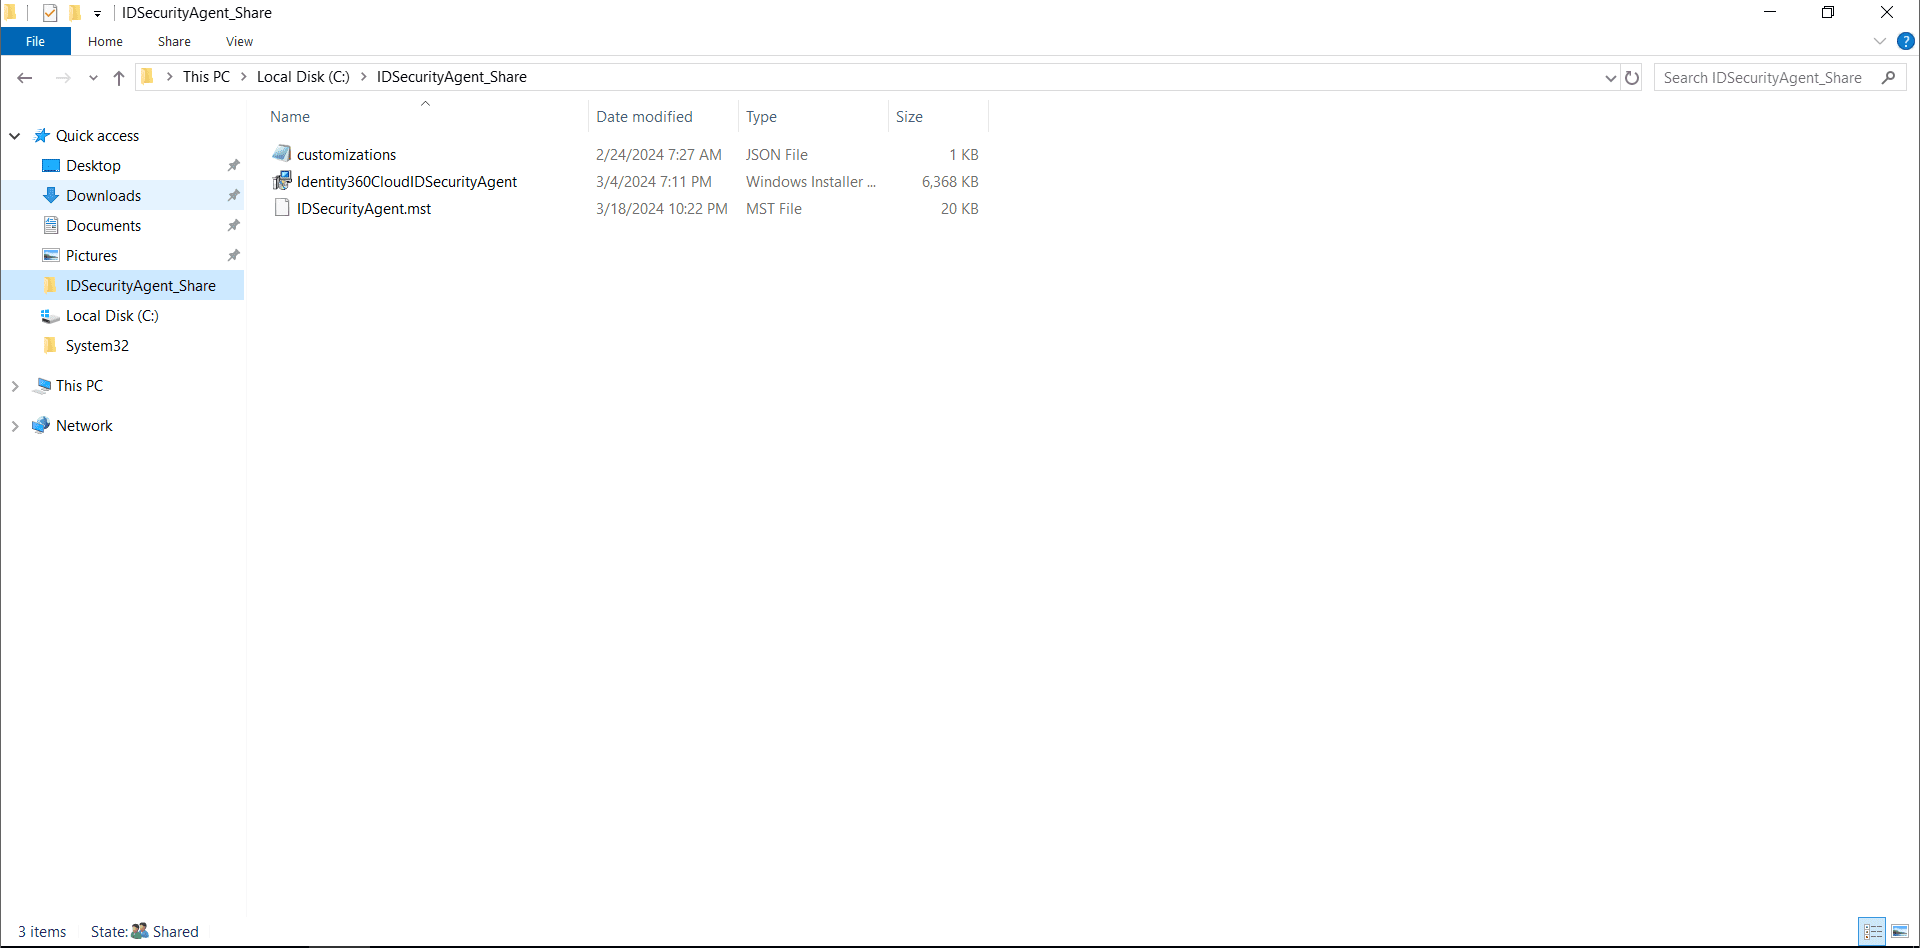
  1. Create a network-shared folder on your server and place the Identity360CloudIDSecurityAgent.msi file in the folder.
  2. Paste the newly created transform file during the step 3 of Prepare the installer files into the network share where the IDSecurity Agent MSI is located.
  3. IDSecurity-Agent-installation-via-GPO

Essential security permissions

Important note: Ensure that no unauthorized user accounts have access to the network-shared folder, and transform file (MST). Refer to the steps mentioned below to provide appropriate access permissions.
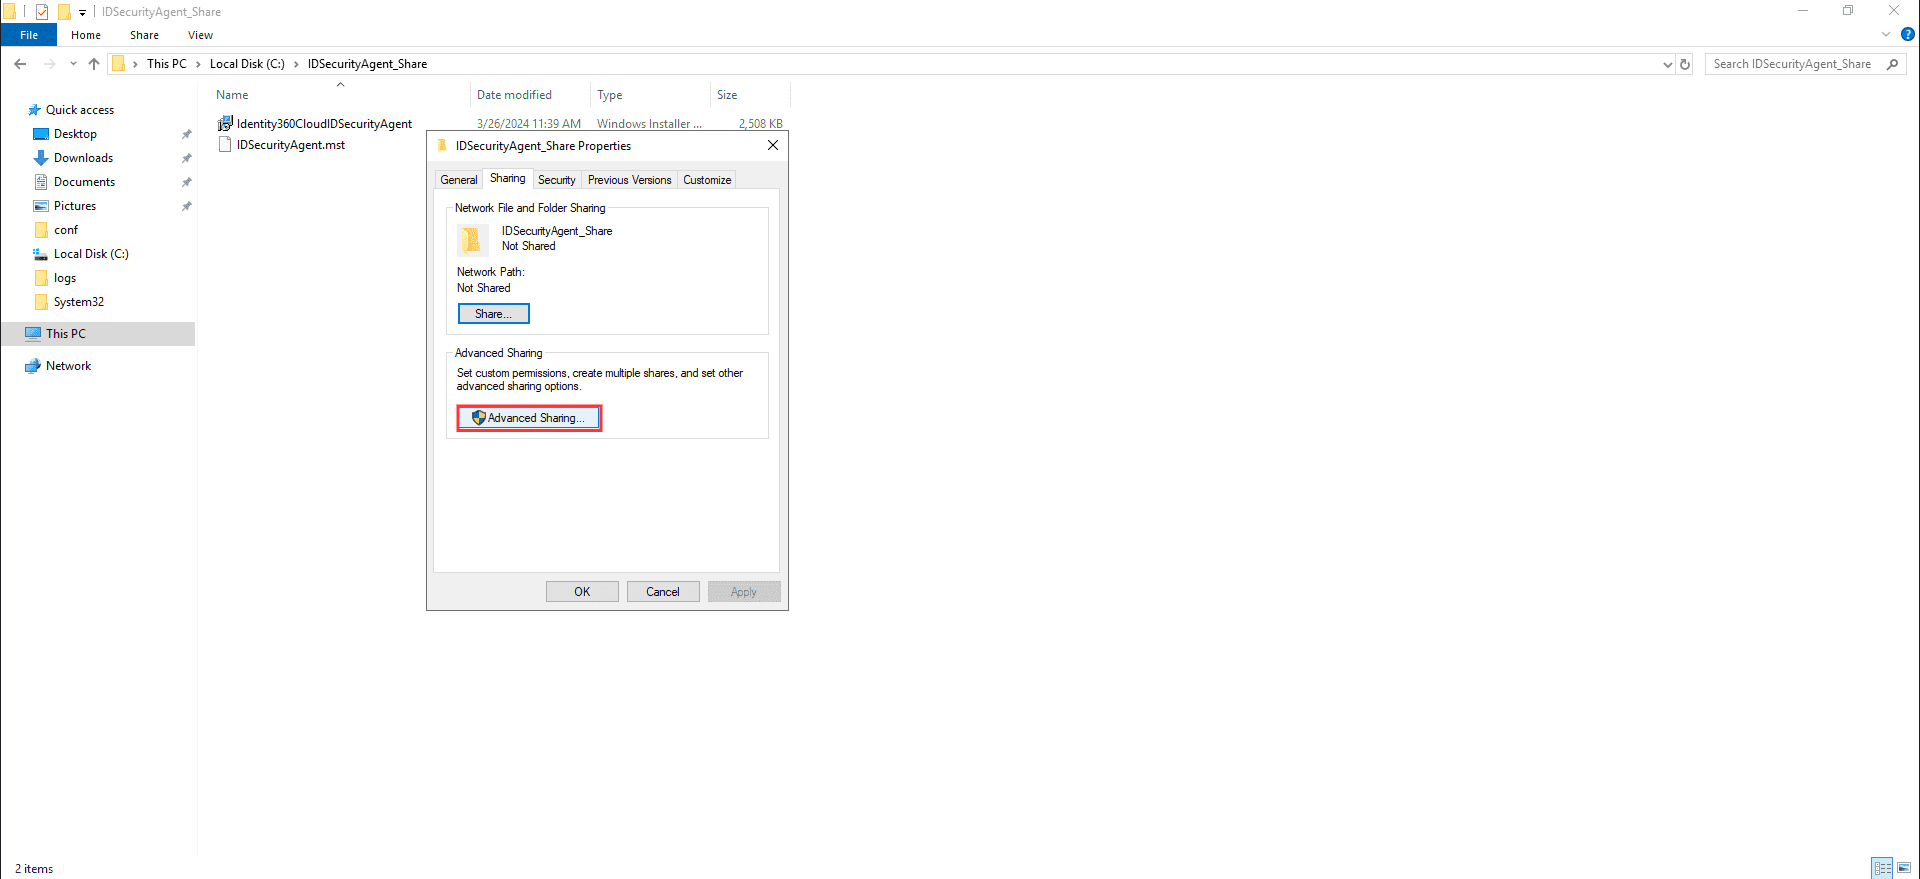
  1. Right-click the network-shared folder and select Properties > Advanced Sharing...
  2. IDSecurity-Agent-installation-via-GPO
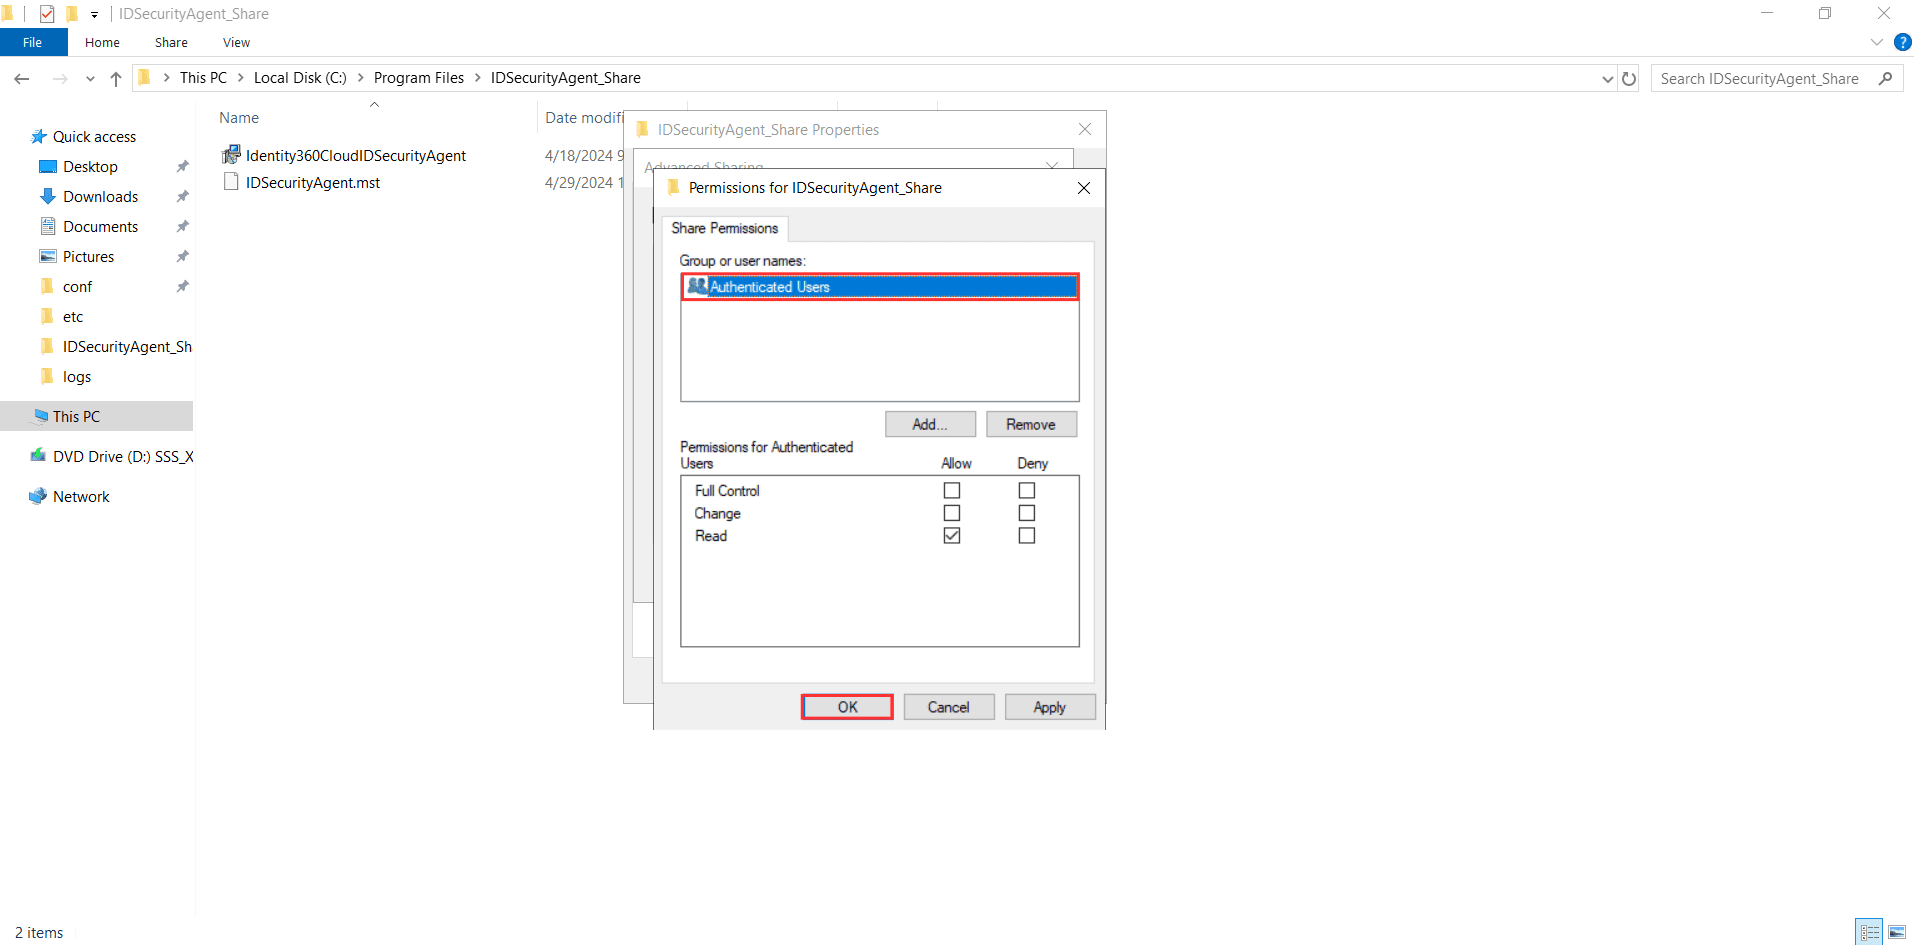
  3. Select Permissions and add only the Authenticated Users group. Ensure that only the Read permission is enabled by checking the box in the Allow column, and click OK.
  4. IDSecurity-Agent-installation-via-GPO
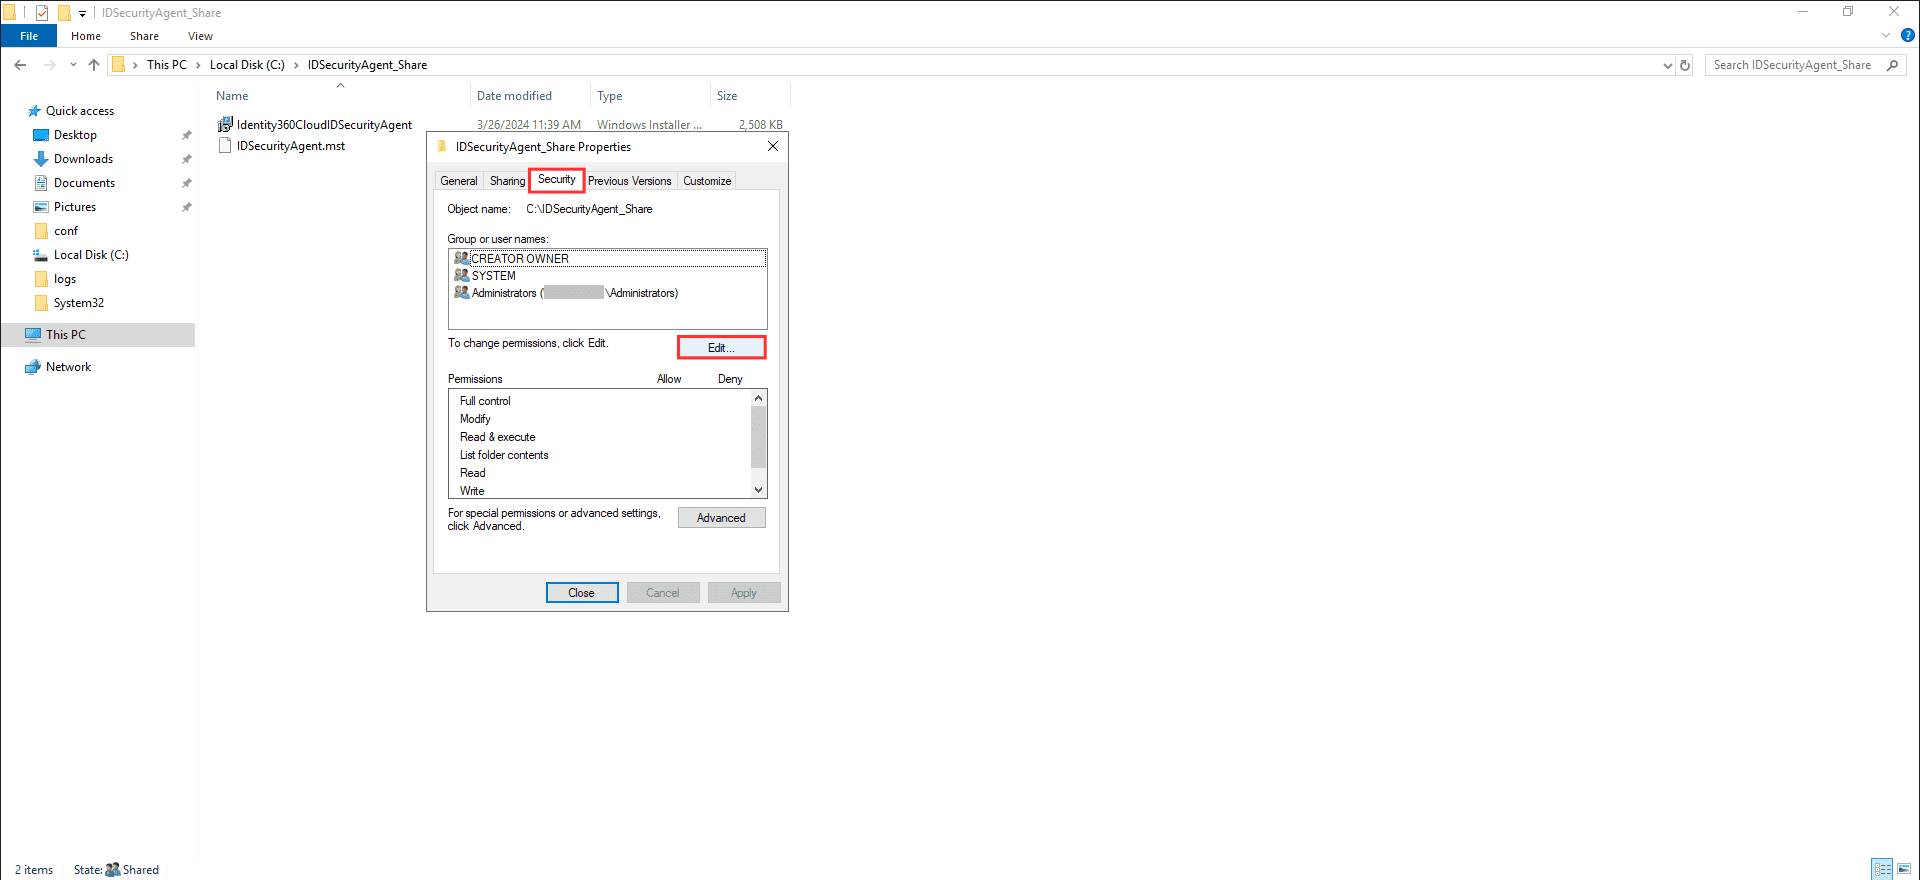
  5. Navigate to the Security tab and click Edit...
  6. IDSecurity-Agent-installation-via-GPO
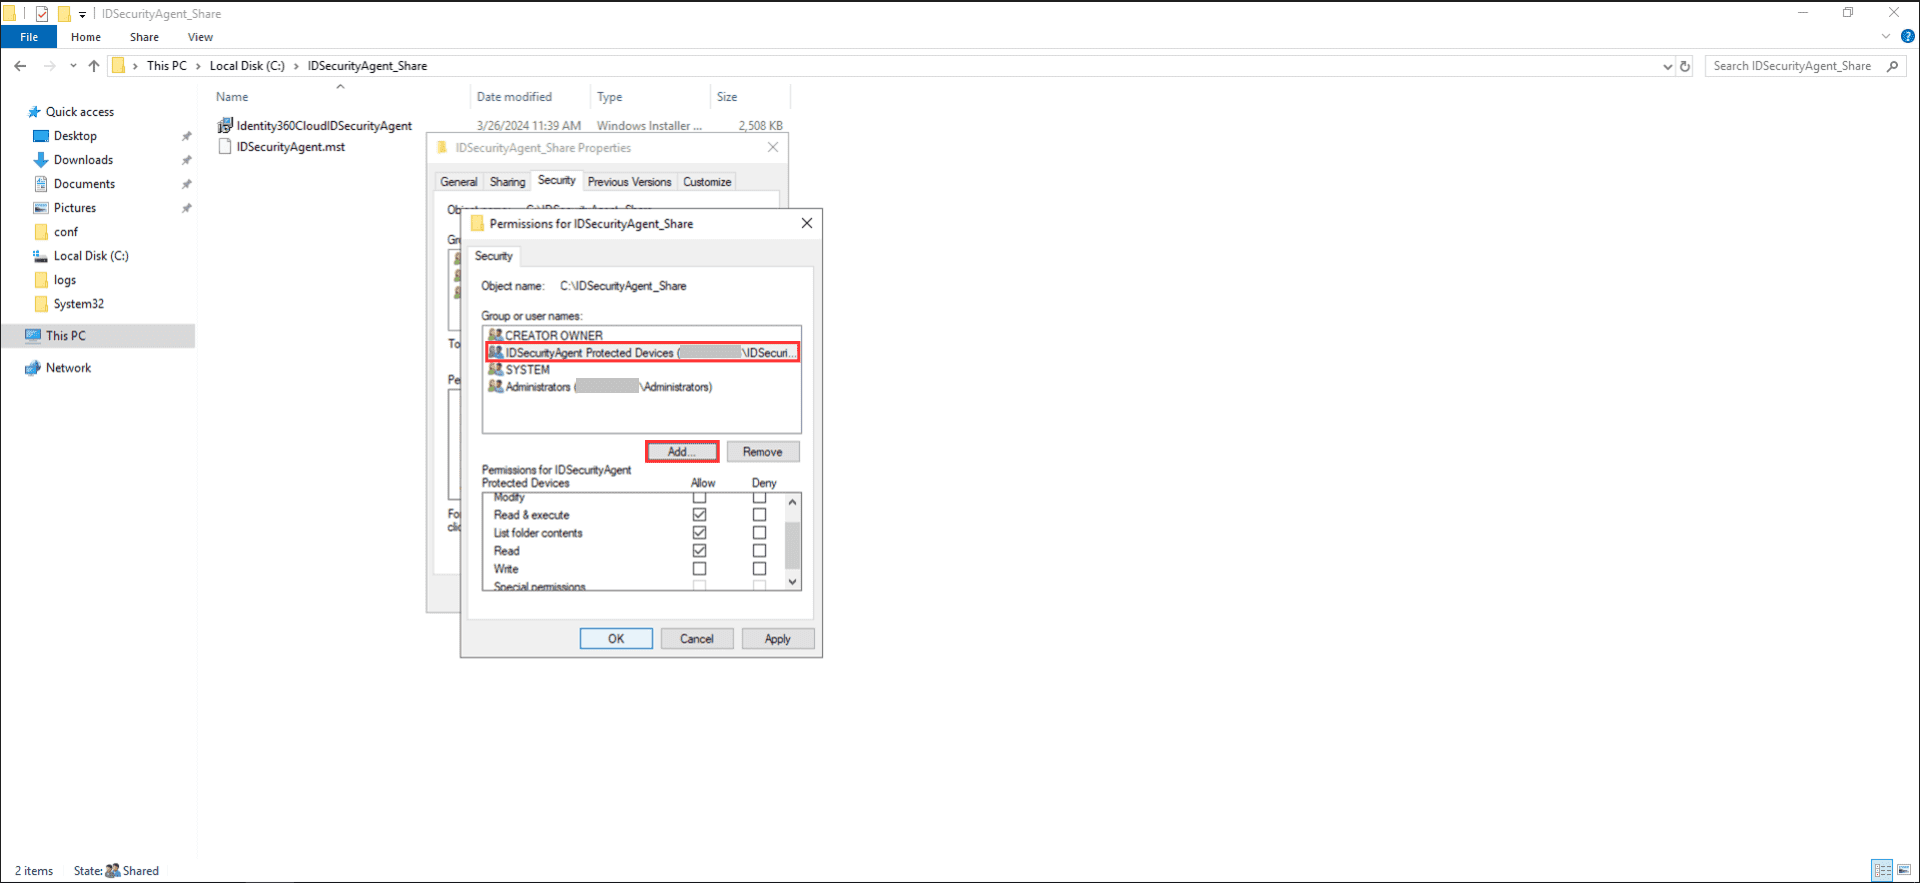
  7. Click Add... and select the custom computer group created (Refer to the Prerequisites section). Click OK.
Note:
  • Ensure that no users or groups other than CREATOR OWNER, SYSTEM, Administrators, and custom computer group have access to the network-shared folder.
  • Ensure that the transform file (MST) in the network-shared folder has identical security permissions.
IDSecurity-Agent-installation-via-GPO

Step 3: Create and link the GPO

  1. Open the Group Policy Management console.
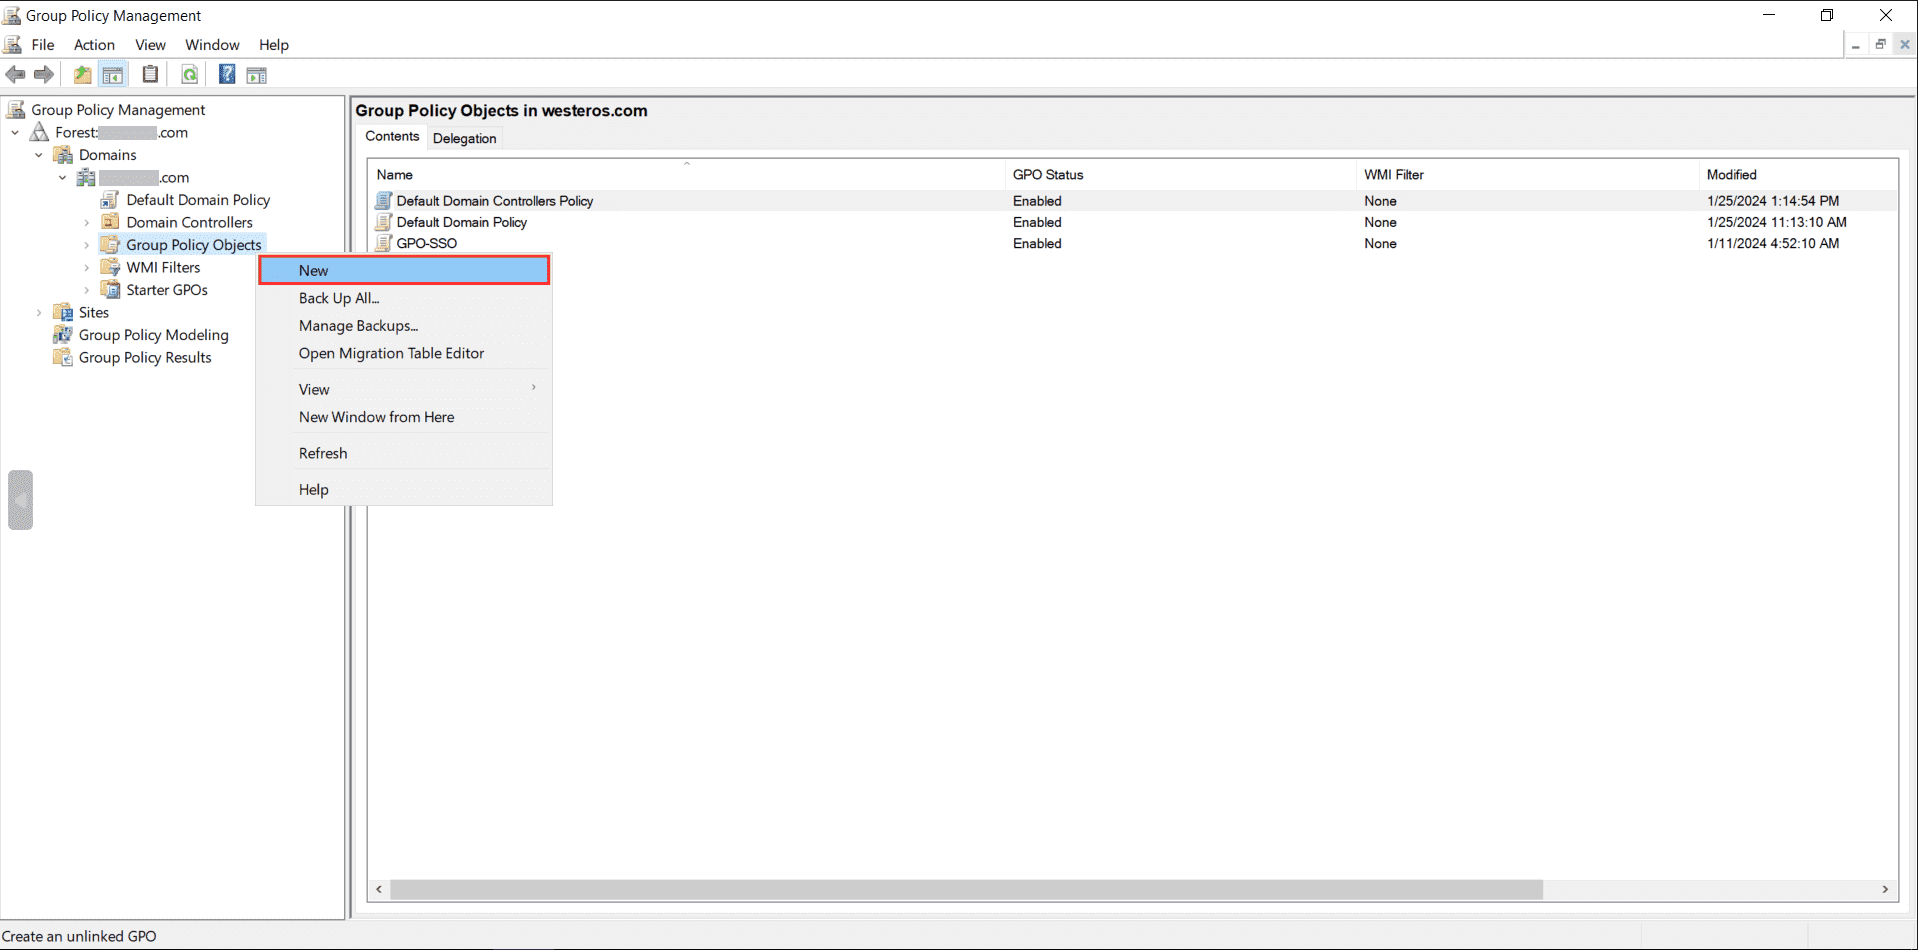
  2. On the left pane, right-click the Group Policy Objects container and select New.
  3. IDSecurity-Agent-installation-via-GPO
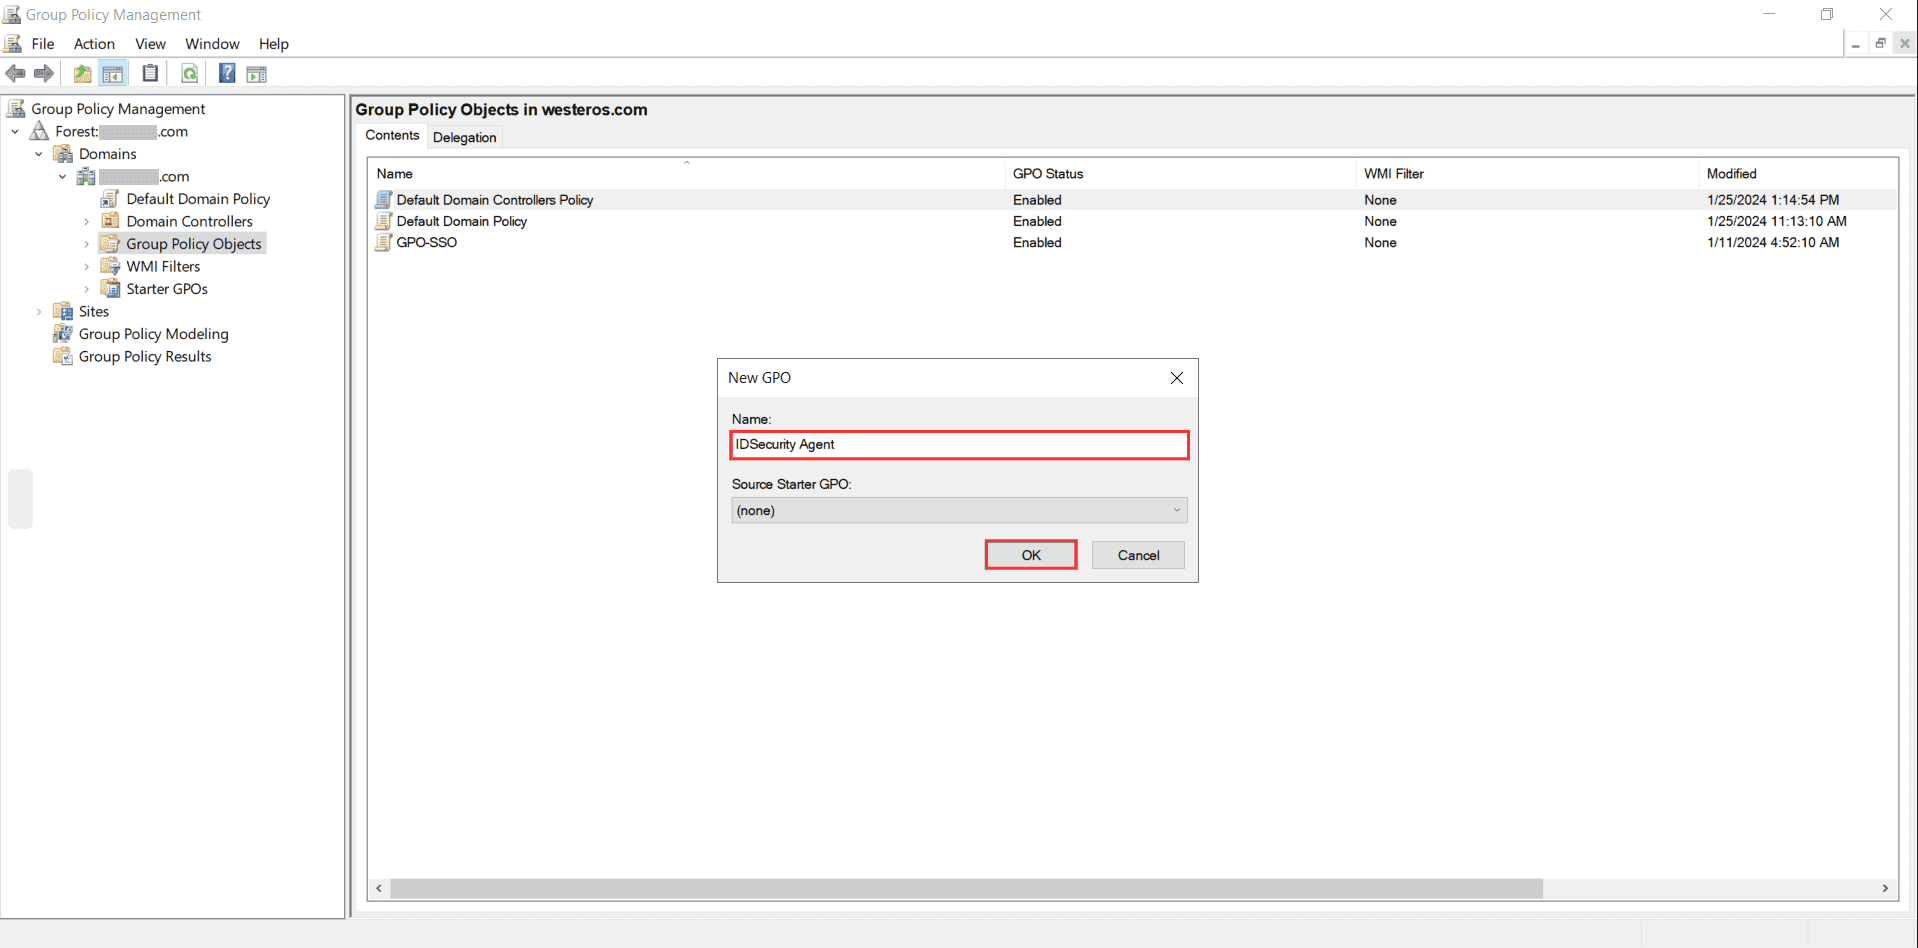
  4. Give a descriptive name to the GPO and click OK.
  5. IDSecurity-Agent-installation-via-GPO
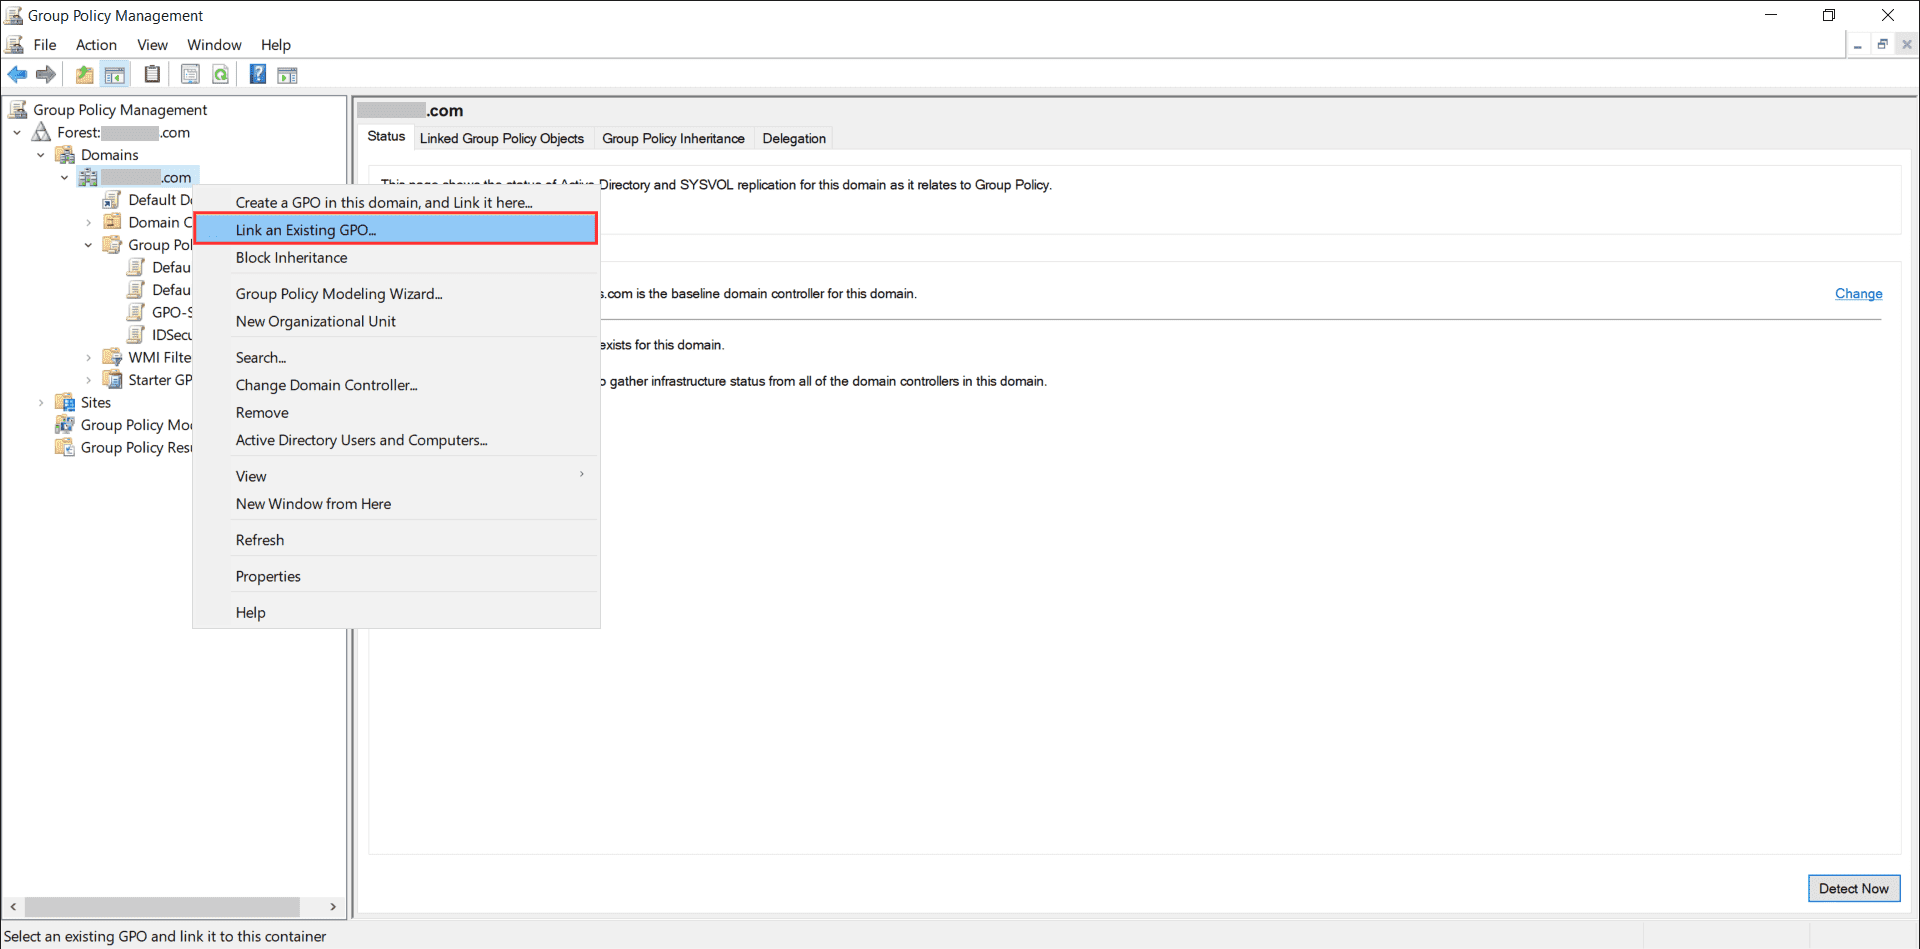
  6. To link the newly created GPO, right-click the preferred OU or domain and select Link an Existing GPO...
  7. IDSecurity-Agent-installation-via-GPO
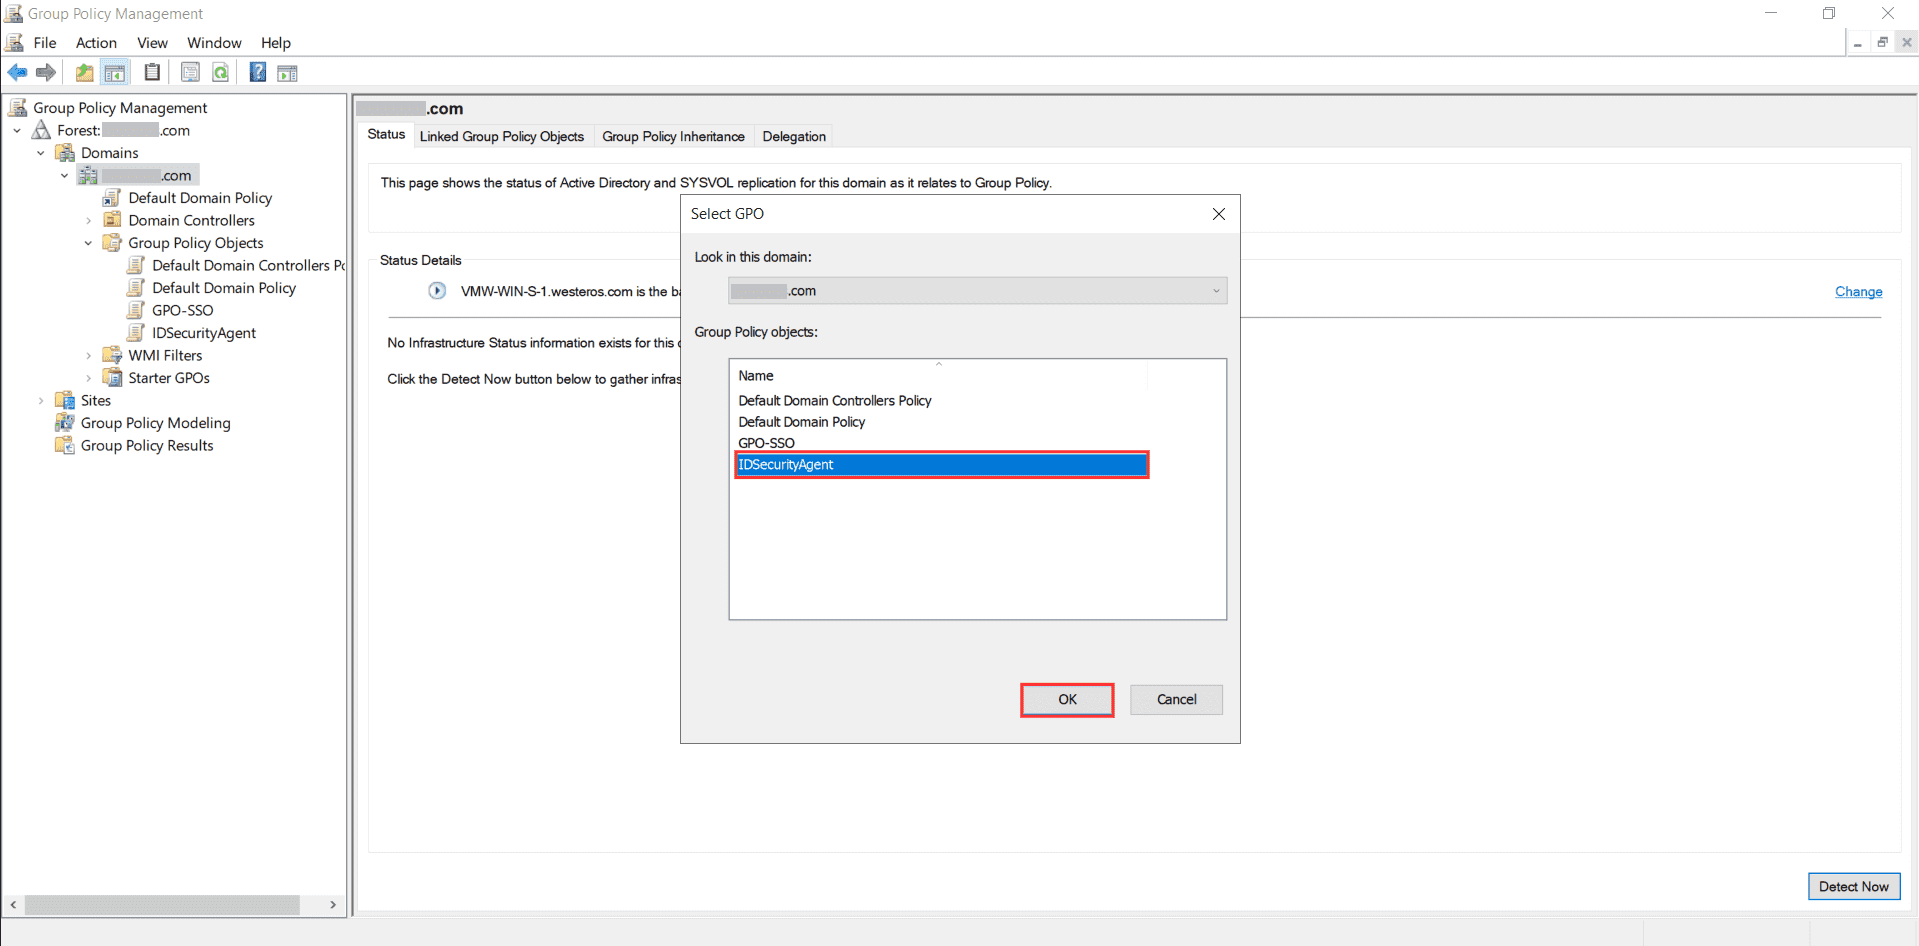
  8. In the Select GPO window, choose the GPO that needs to be linked and click OK.
  9. IDSecurity-Agent-installation-via-GPO
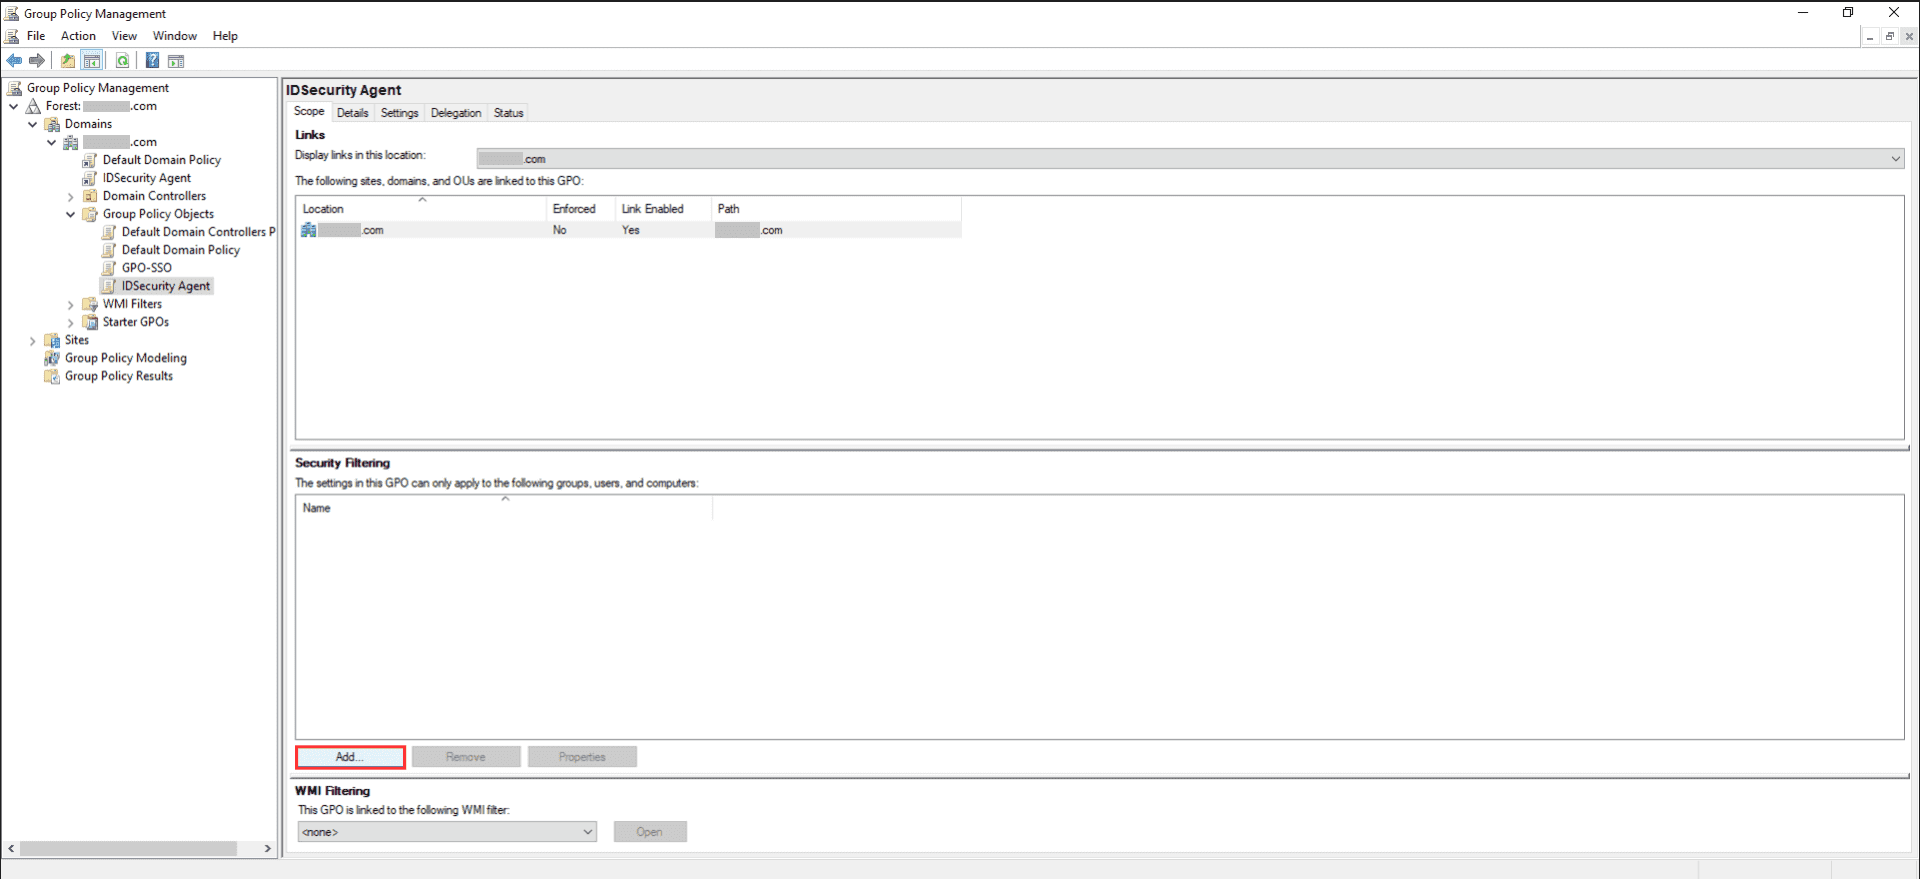
  10. Open the Group Policy Management console and select the GPO you created. In the Security Filtering tab, click Add...
  11. IDSecurity-Agent-installation-via-GPO
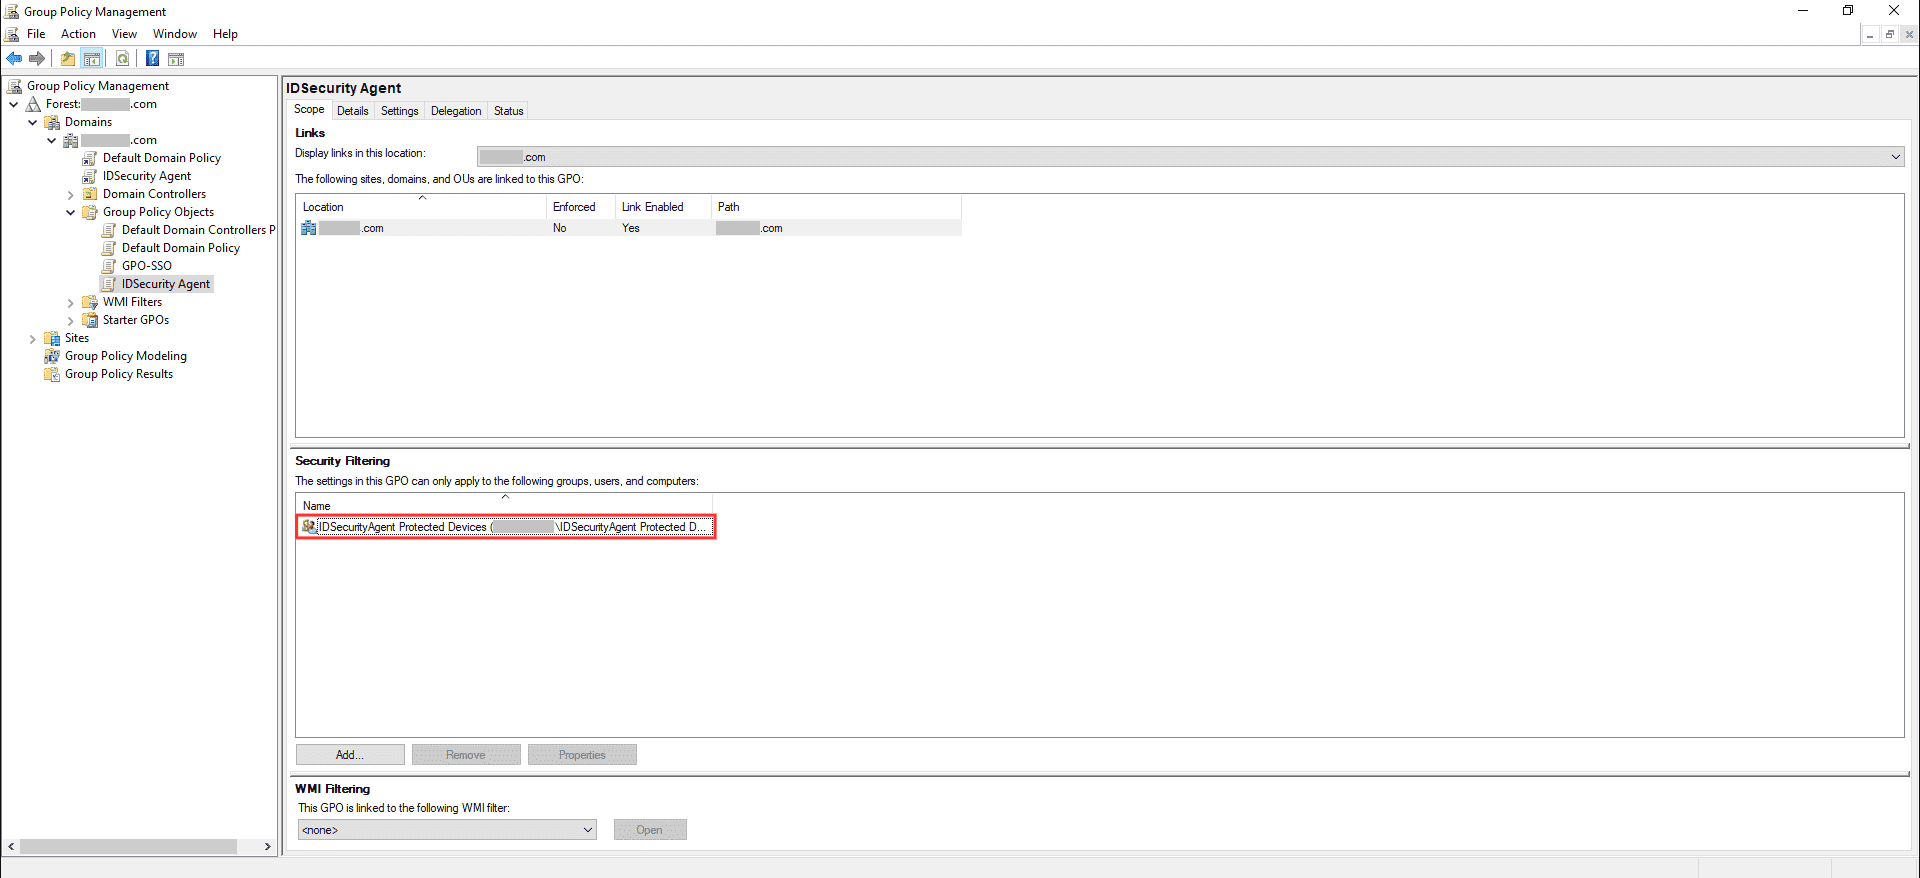
  12. Add the newly created custom computer group. Refer to the Prerequisites section.
  13. IDSecurity-Agent-installation-via-GPO
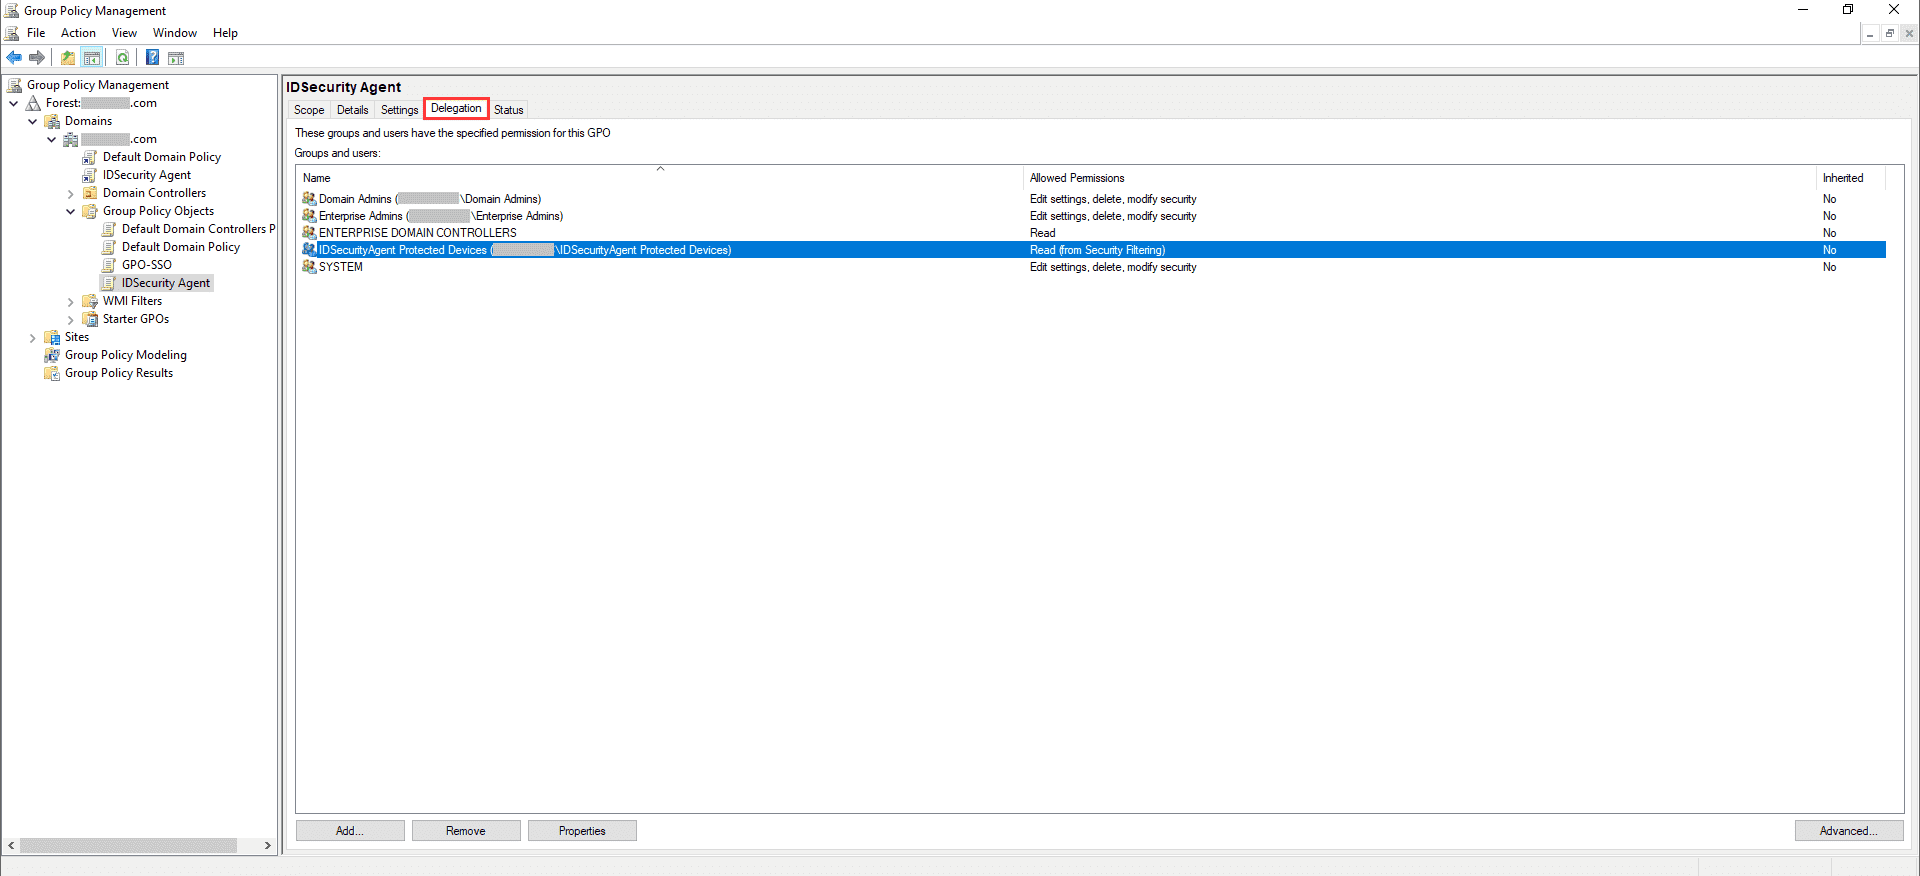
  14. After adding the custom computer group in the Security Filtering tab, ensure that the group has Read and Apply group policy permissions enabled in the Delegation tab.
  15. IDSecurity-Agent-installation-via-GPO

Step 4: Configure software installation settings

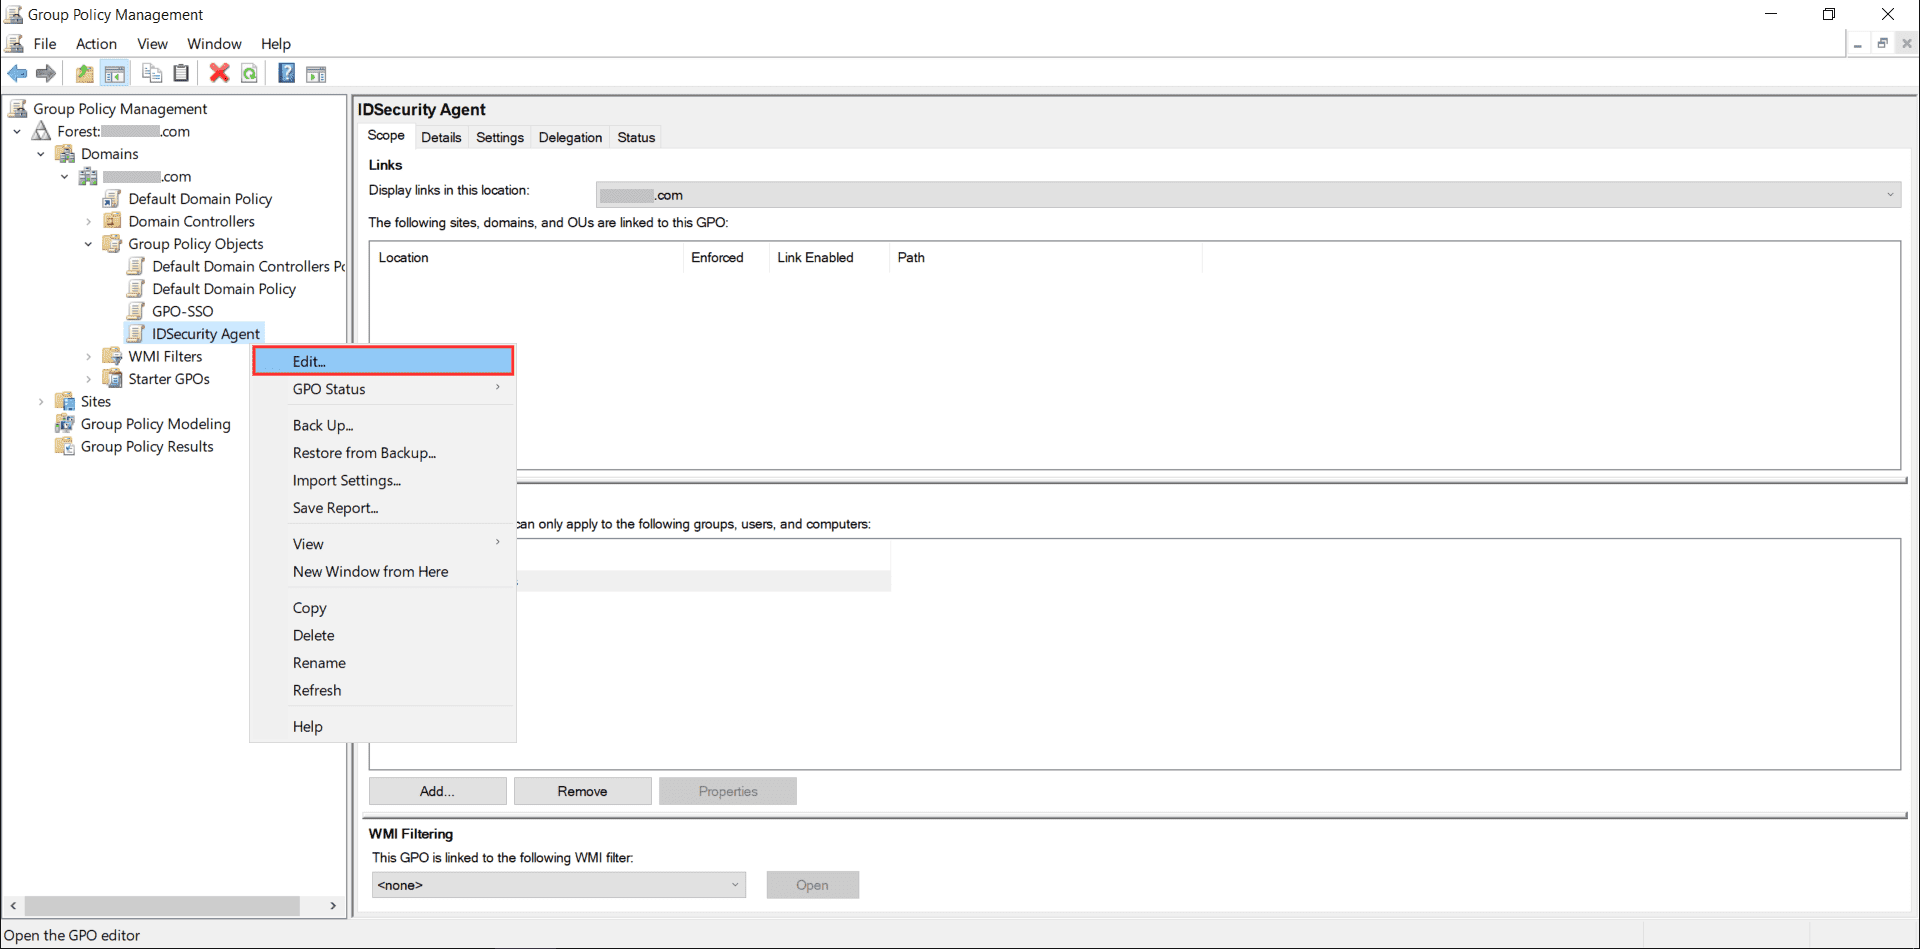
  1. Right-click the GPO you just created and click Edit... to open the Group Policy Object Editor.
  2. IDSecurity-Agent-installation-via-GPO
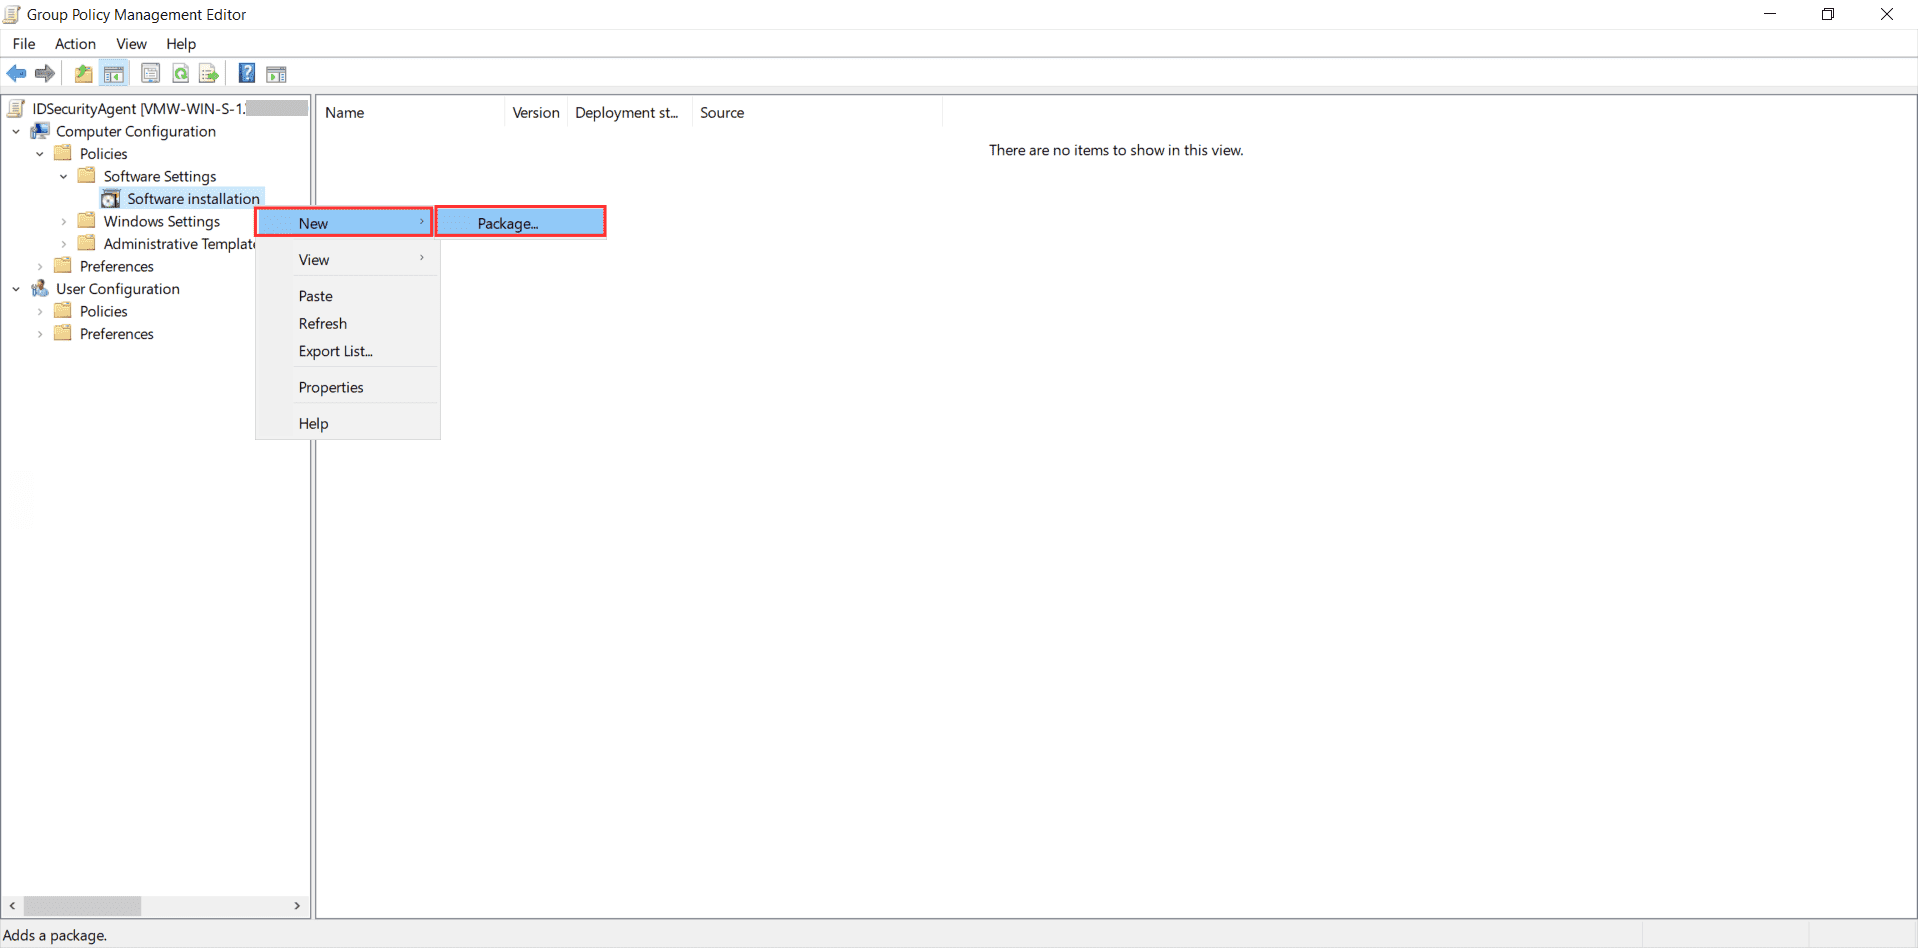
  3. Right-click Computer Configuration > Policies > Software Settings > Software installation > New > Package...
  4. IDSecurity-Agent-installation-via-GPO
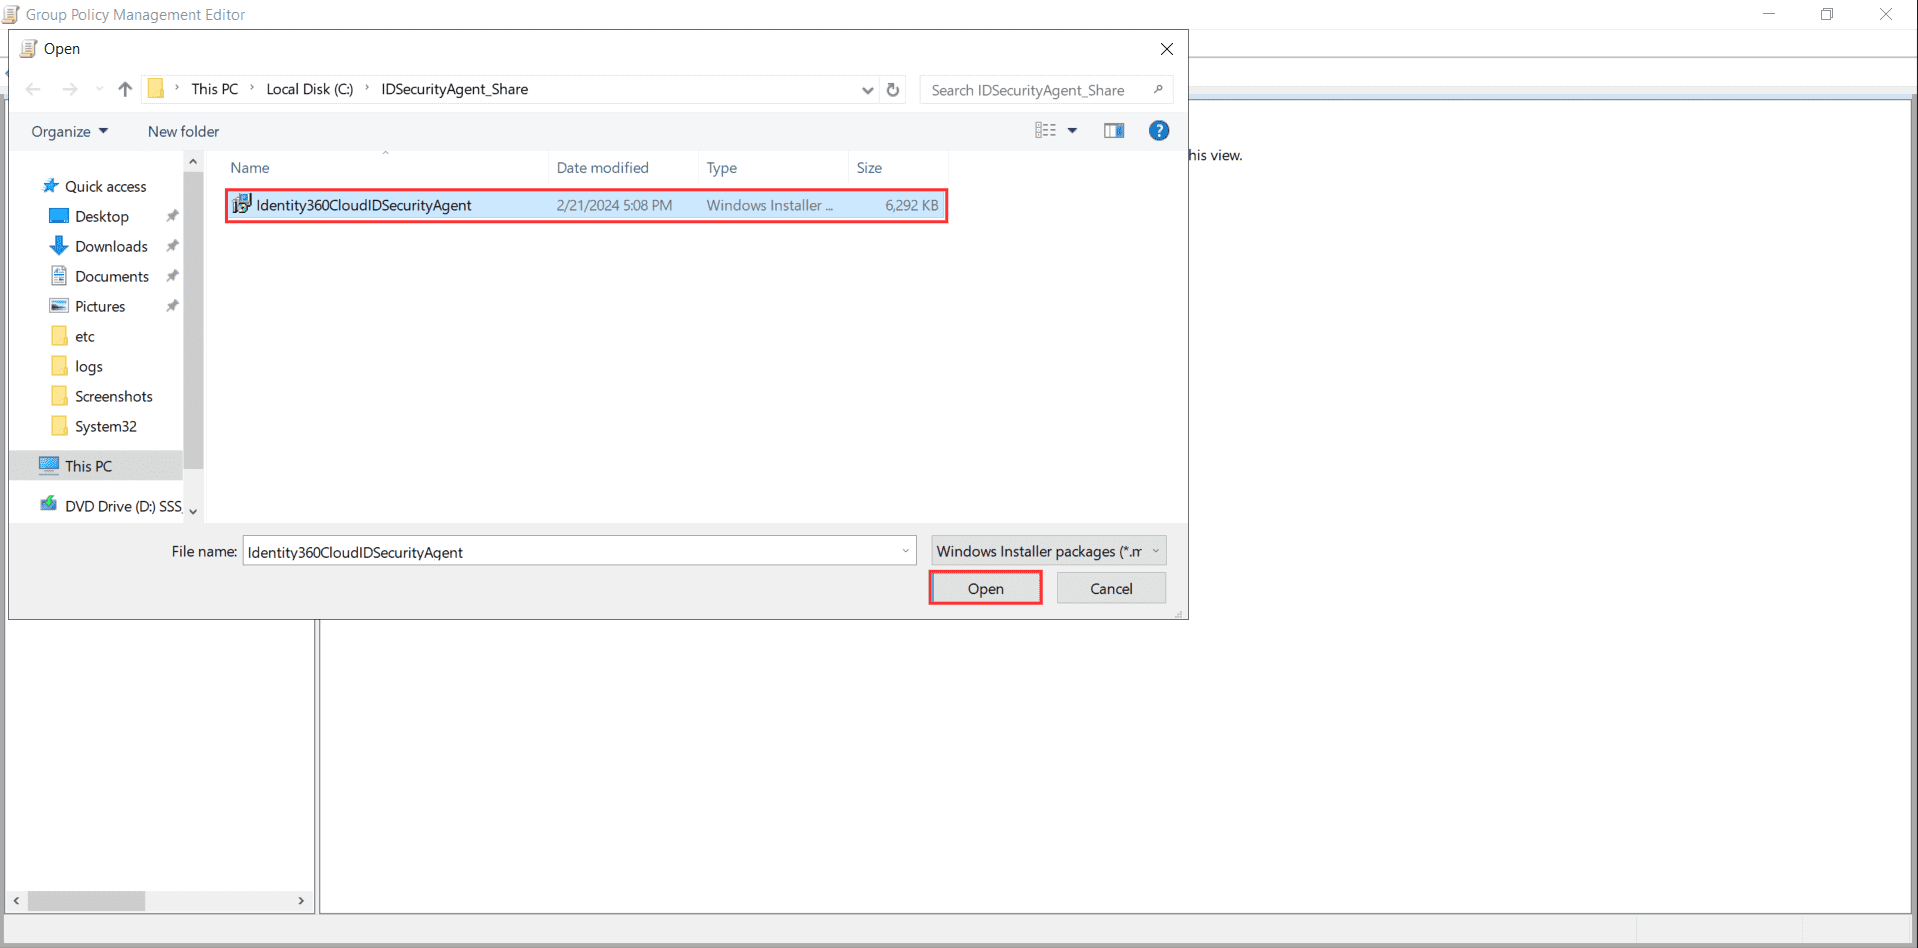
  5. Select the Identity360CloudIDSecurityAgent.msi placed in your network share and click Open.
  6. IDSecurity-Agent-installation-via-GPO
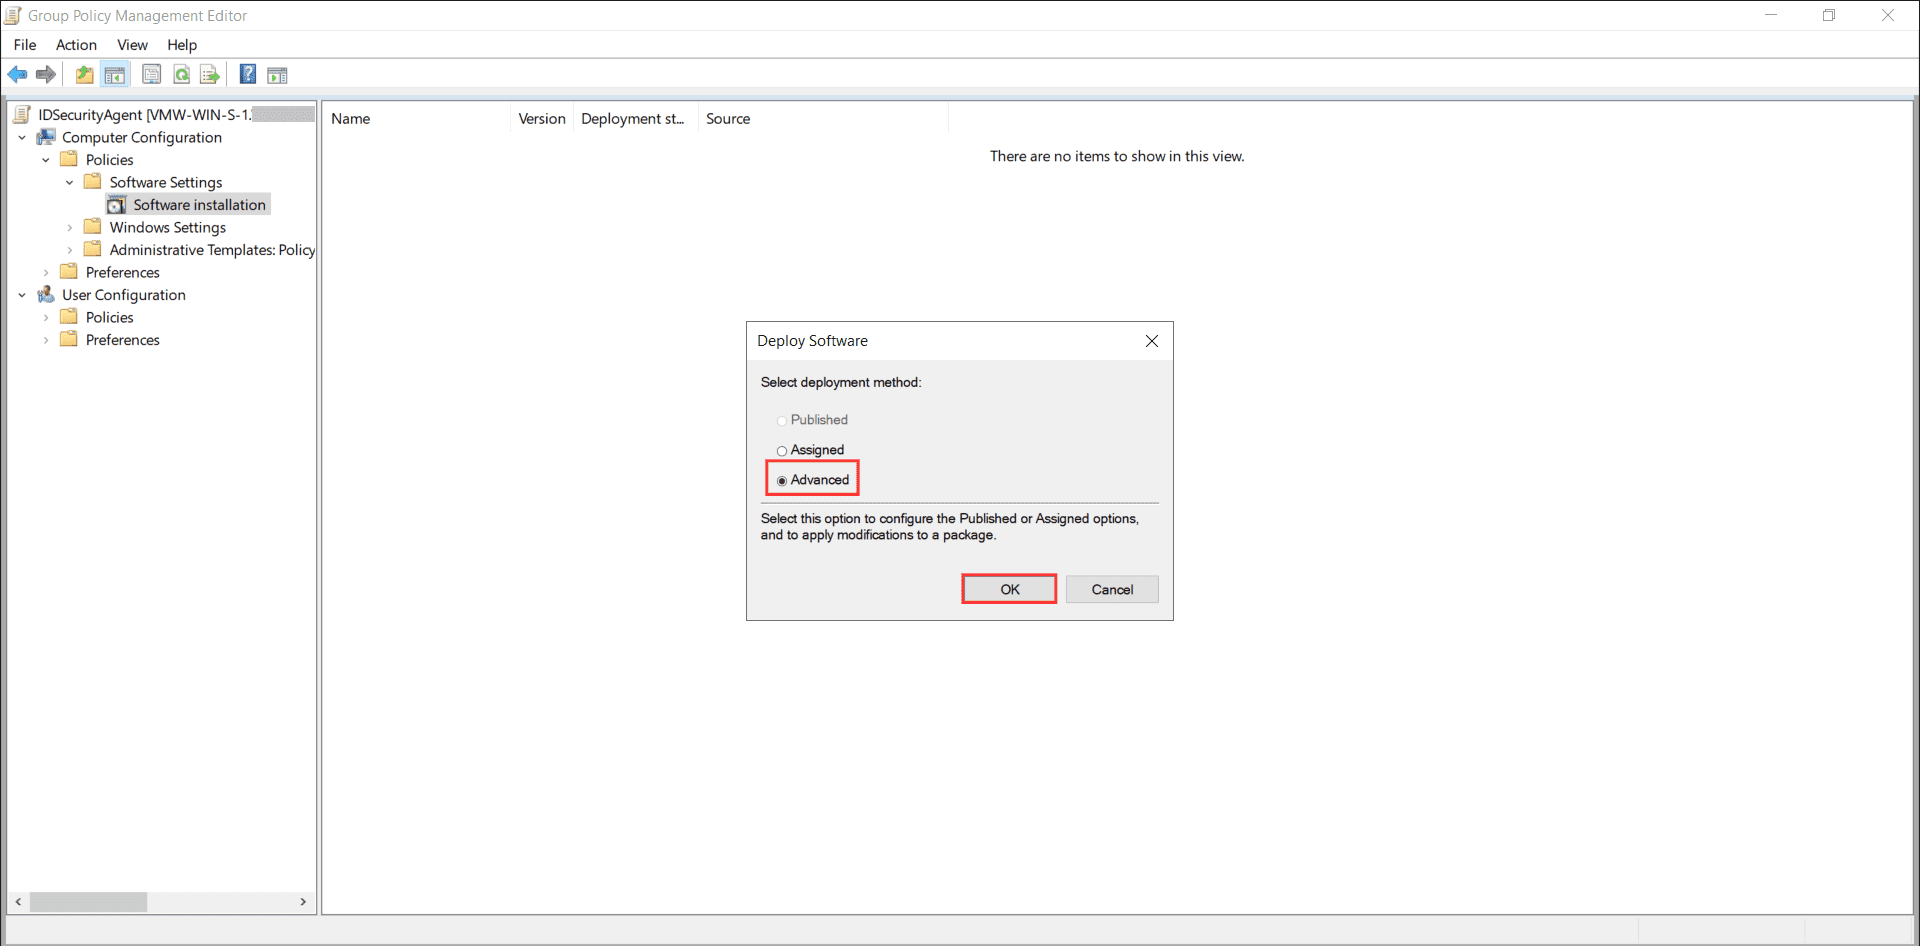
  7. In the Deploy Software window, select Advanced and click OK.
  8. IDSecurity-Agent-installation-via-GPO
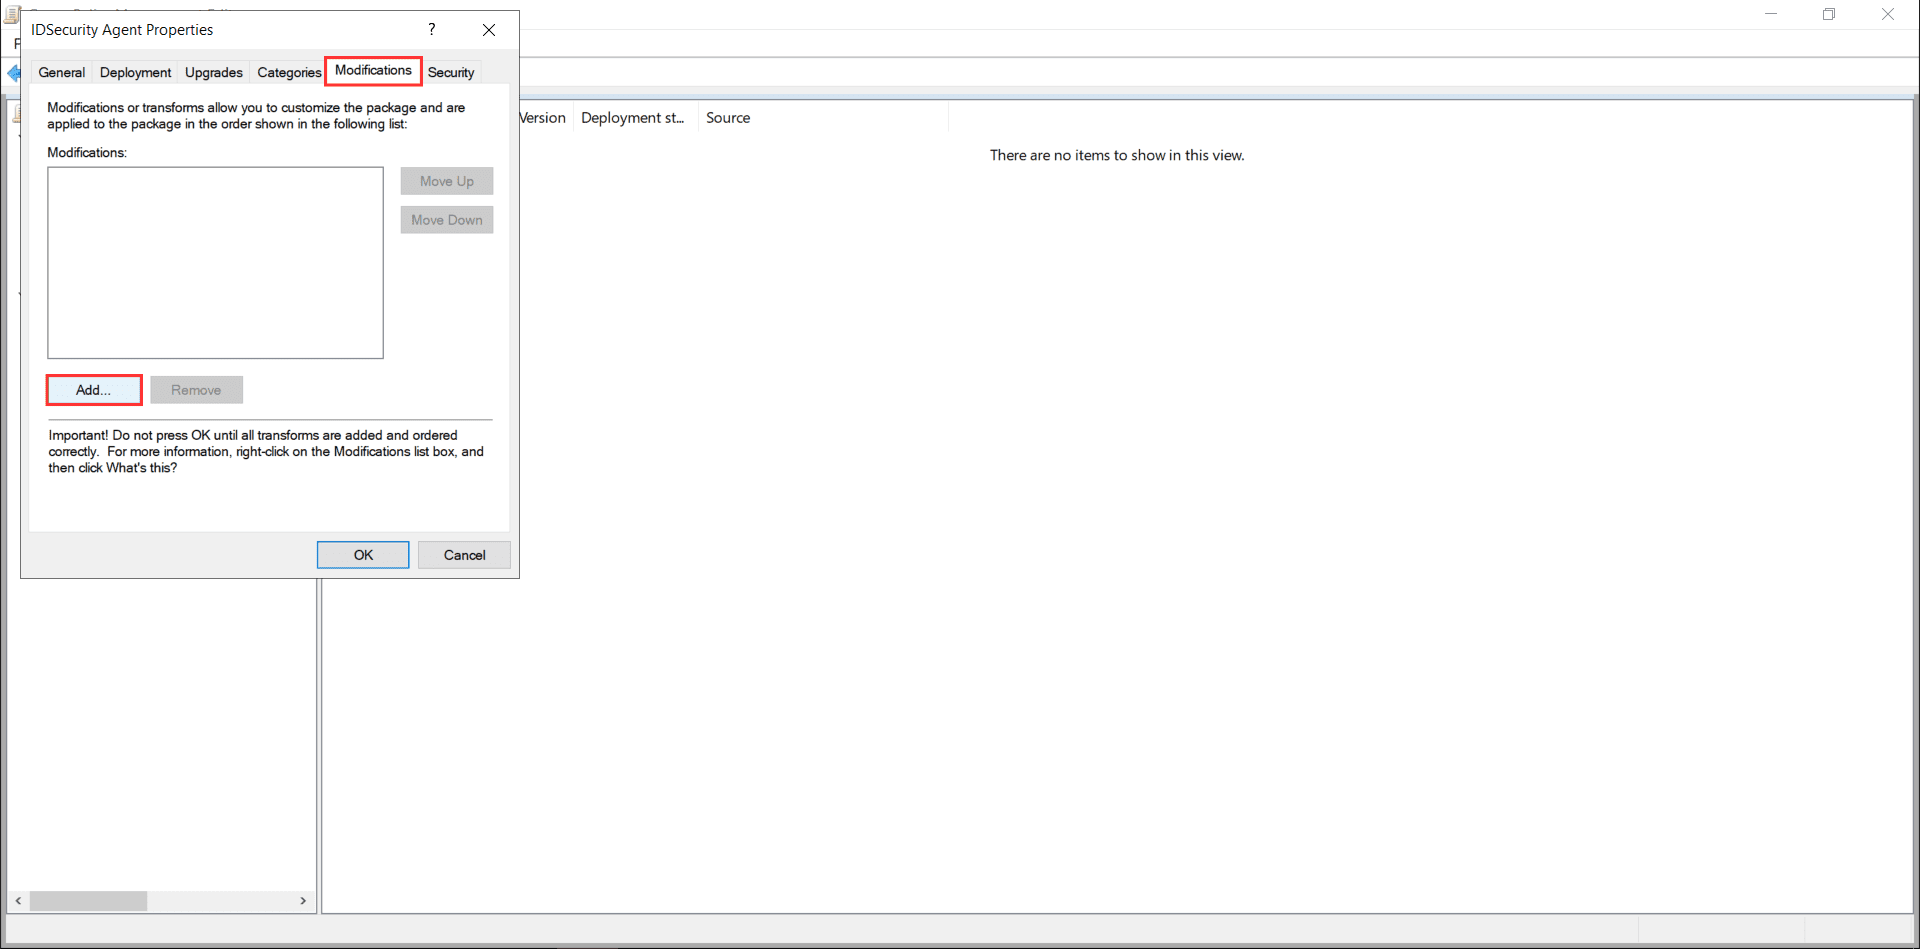
  9. In the IDSecurity Agent Properties window, select the Modifications tab and click Add...
  10. IDSecurity-Agent-installation-via-GPO
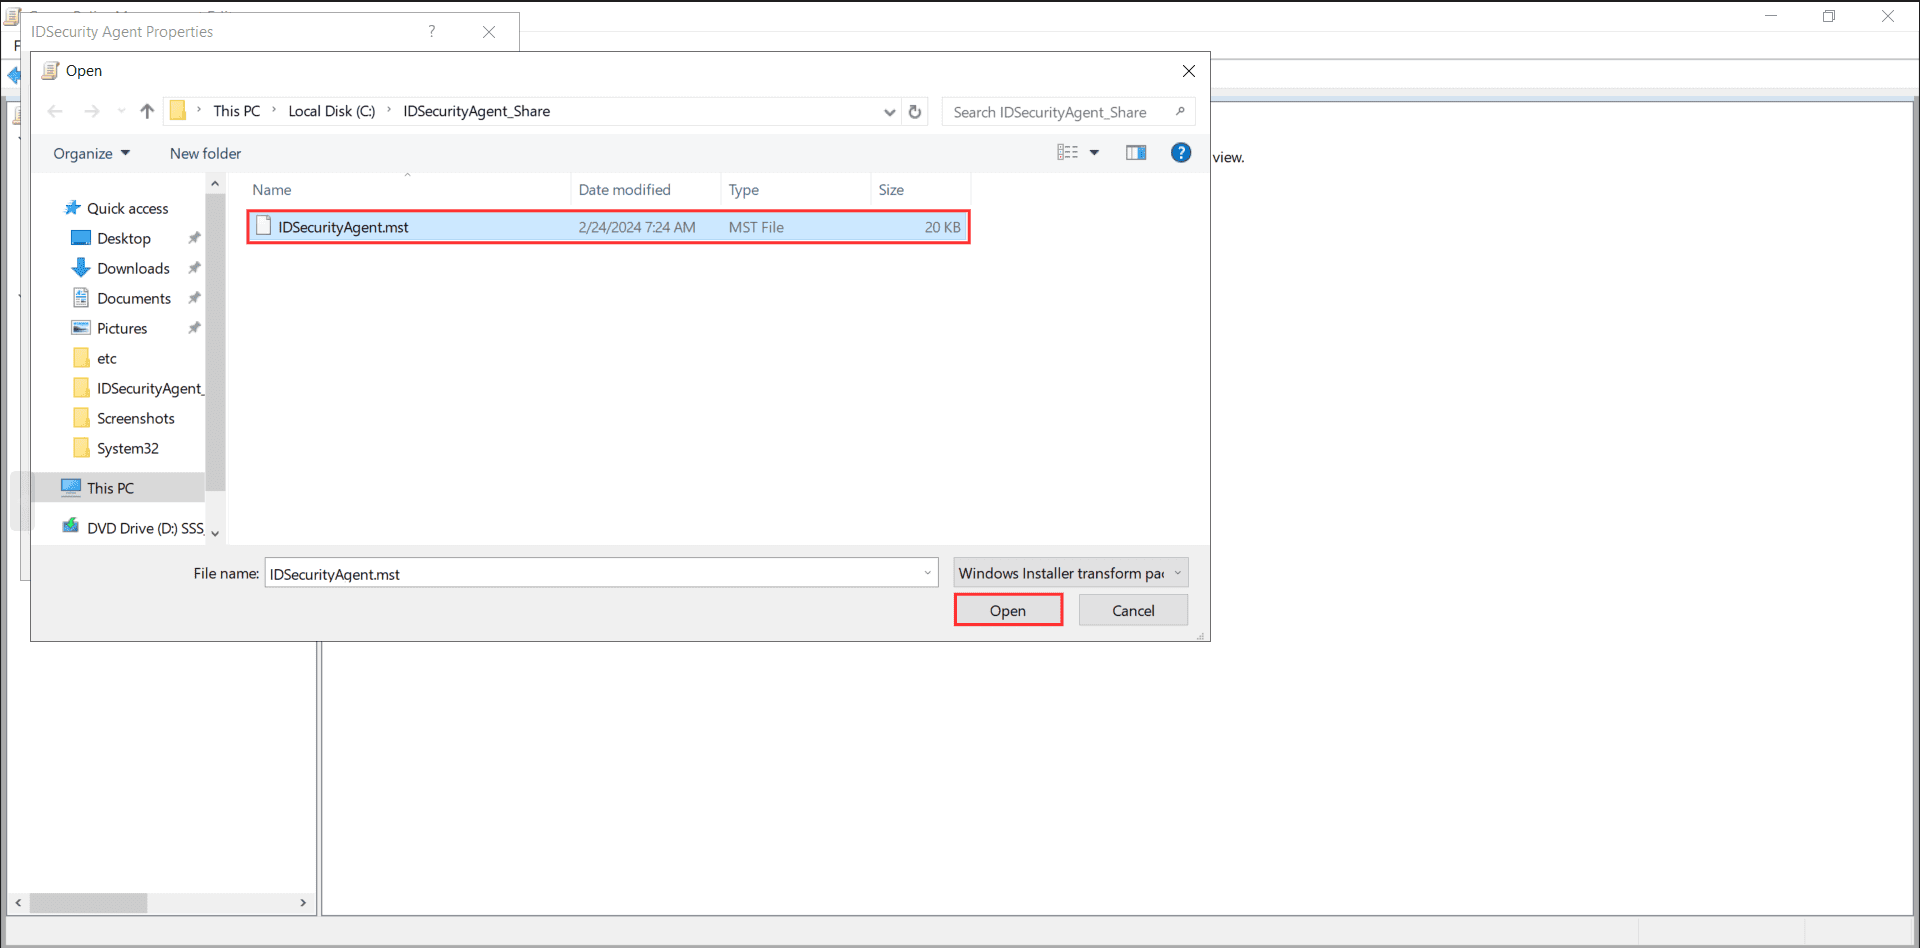
  11. Select the transform file (MST) placed in your network share during step 2 of Create a network share and click Open.
  12. IDSecurity-Agent-installation-via-GPO
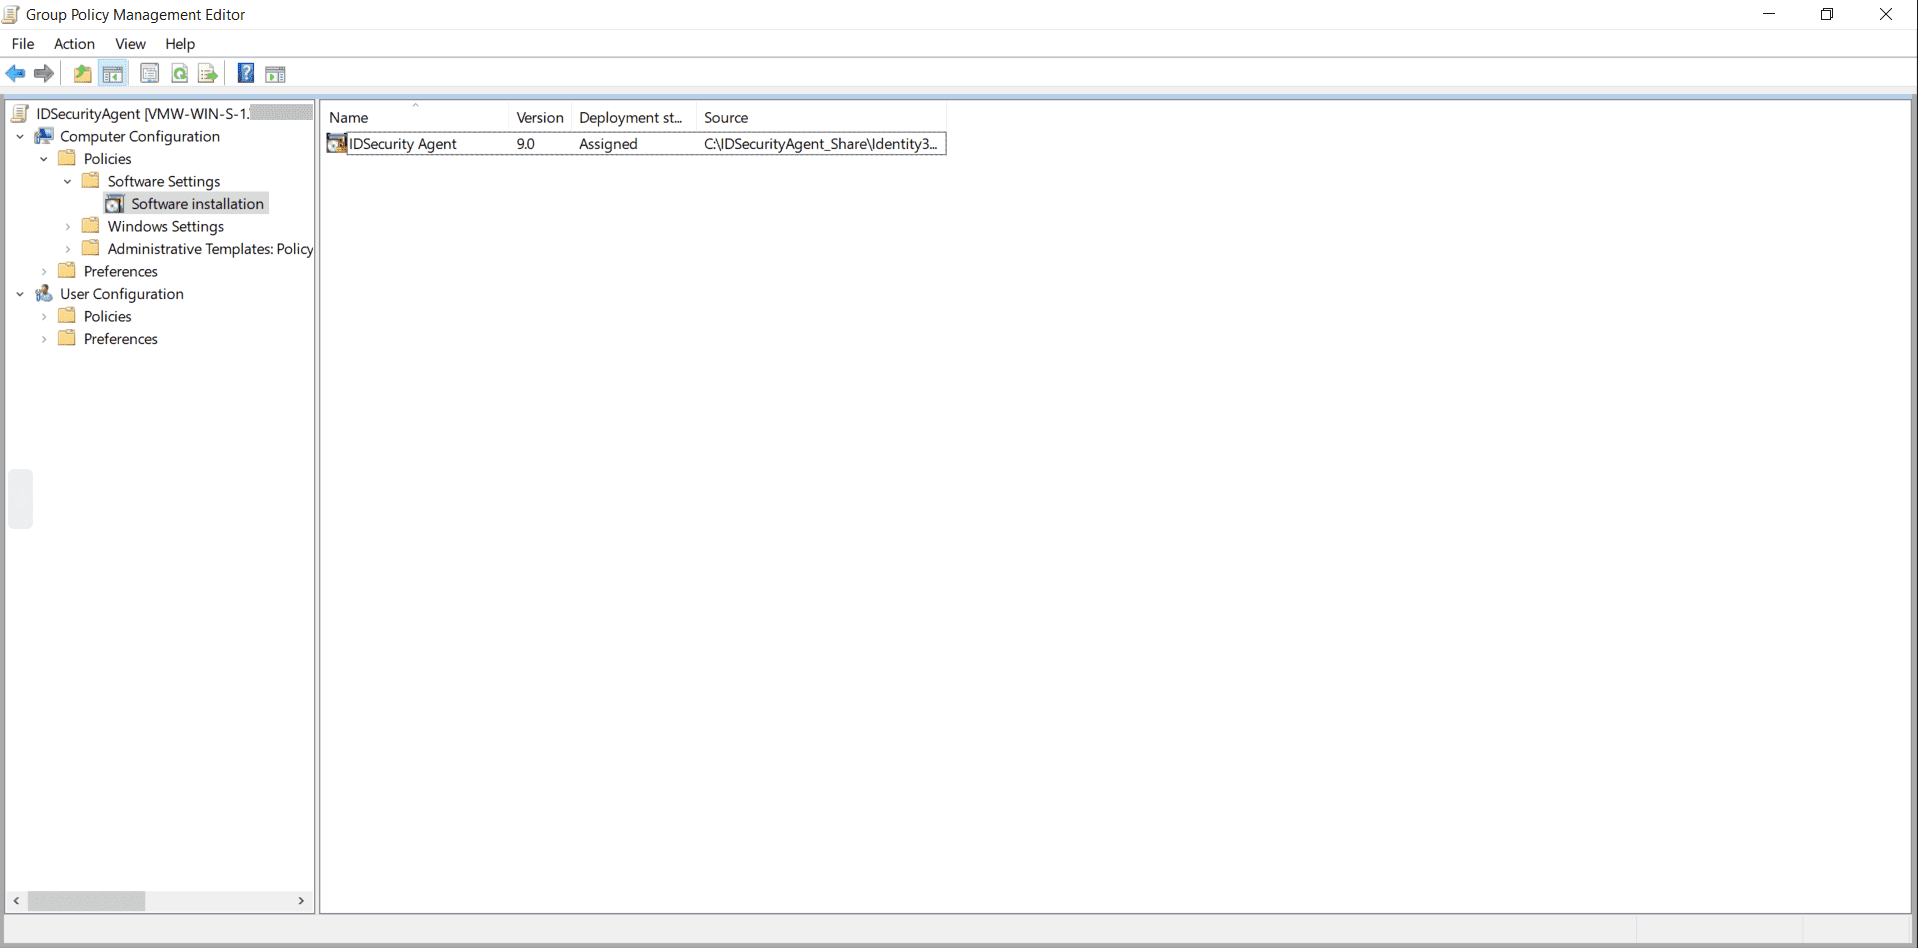
  13. Click OK to complete the software installation process.
  14. IDSecurity-Agent-installation-via-GPO

Testing the agent installation

Verify whether all the computers in the custom computer group have the software installed. The software installation will take effect only after rebooting the client machines. To test whether the installation was successful:

  1. In the Command Prompt of your client machines, type gpresult /v.
  2. Ensure that the GPO you configured appears under the subheading Applied Group Policy Objects.

Customizing the IDSecurity Agent

The customizations.json file is used to customize the IDSecurity Agent's default parameters. Before proceeding with the installation, ensure you prepare a customizations.json file similar to the provided sample below. This file should contain the necessary parameters that require modification. Place this file in the same network path created in Step 2: Create a network share.

Note: If customization is not required, the MSI will automatically utilize the default parameters.

If you have not customized the file as mentioned in the previous step, you can still make adjustments later by editing the file located at C:\Program Files\ManageEngine\Identity360 Cloud IDSecurity Agent\conf\customizations.json

Note: Please refrain from making any modifications to any files aside from customizations.json found in the installation folder, as these files are integral to the functioning of the IDSecurity Agent. Any changes to these files may disrupt functionality of both the agent and the system.

Sample customizations.json file:


{
"LogPath": "C:\\Program Files\\ManageEngine\\Identity360 Cloud IDSecurity Agent\\logs",
"LogLevel": "NORMAL",
"LogRotationMaxSize": "50",
"LogArchivePath": "C:\\Program Files\\ManageEngine\\Identity360 Cloud IDSecurity Agent\\logs\\archive",
"Title": "IDSecurity Agent",
"WebclientFaviconPath": "C:\\Program Files\\ManageEngine\\Identity360 Cloud IDSecurity Agent\\resources\\favicon.ico"
}
		

The table below contains the list of default values and descriptions for all parameters.

Parameter Name Default Value Description
LogPath C:\Program Files\ManageEngine\Identity360 Cloud IDSecurity Agent\logs

The log file is stored here.

Caution: Modifying the value is advised only if there is a valid reason to do so. If the value is altered, ensure that the folder permissions include write permissions for the Users group and the SYSTEM account.

LogLevel NORMAL The default value is set to NORMAL, providing comprehensive information essential for regular operation. If the value is changed to DEBUG, the log will incorporate detailed troubleshooting information crucial for the support team. Exercise caution, as setting the value to DEBUG will generate extra log entries, potentially causing a rapid increase in the log file's size.
LogRotationMaxSize 50 This parameter determines the maximum size of the log file. Upon reaching the specified limit, with a minimum of 10MB and a maximum of 50MB, a new log file is generated, and the previous log file is archived to the path specified in LogArchivePath.
LogArchivePath C:\Program Files\ManageEngine\Identity360 Cloud IDSecurity Agent\logs\archive This refers to the file path where log files are archived once they reach the specified LogRotationMaxSize limit.
Title IDSecurity Agent Title of the MFA prompt.
WebclientFaviconPath C:\Program Files\ManageEngine\Identity360 Cloud IDSecurity Agent\resources\favicon.ico Icon of the MFA prompt.

Updating the Installation Key

In case the current installation of the IDSecurity Agent is compromised, regenerate a new Installation Key from the Identity360 admin portal by navigating to Applications > Multi-factor Authentication > Install IDSecurity Agent > Step 2 > Regenerate. Copy the command along with the newly generated key and follow these steps to update the Installation Key.

  1. Create a new transform file (MST) as shown in step 3 of Prepare the installer files.
  2. Replace the old MST file with the newly created one in the network share.

Copyright © 2024, ZOHO Corp. All Rights Reserved.