Discover Certificates in your Network
You can automatically discover all the certificates available in your network using Key Manager Plus, irrespective of the CA. You can discover the certificates anytime as needed or periodically based on scheduled tasks. The discovery options are quite flexible - you can discover certificates from a single server or multiple servers, and from multiple ports, at one go. Key Manager Plus also allows users to rediscover the expired and about-to-expire certificates from the 'Certificate Expiry' widget in the Dashboard.
- Configuring Discovery Settings
- SSL Discovery Methods Available in Key Manager Plus
- Discover SSL Certificates on Demand.
- Discover SSL Certificates Automatically through Schedules.
- Discover Certificates Mapped to User Accounts in Active Directory.
- Manage Certificates from MS Certificate Store and Local CA.
- Discover SSL Certificates from SMTP Servers.
- Discover SSL Certificates Deployed to Load Balancers.
- Discover SSL Certificates from a Shared Directory Path.
- Discover SSL Certificates using KMP Agents.
- Discover SSL Certificates Hosted on AWS (ACM & IAM).
- Rediscover SSL Certificates.
- Centralized Certificate Repository.
- Export Private Key / Keystore File.
- Update Servers with Latest Certificate Versions.
1. Configuring Discovery Settings
Note: Discovery settings are aplicable from build 7010 and above only.
Key Manager Plus automatically discovers SSL certificates using default discovery settings. However, users can customize these settings to optimize efficiency and performance based on their specific requirements. To manually configure SSL discovery settings, follow these steps:
- Navigate to the Discovery tab and select SSL.
- Click on Discovery Settings to access the configuration options.
- Adjust the following parameters as needed:
- Click Save to apply the changes.
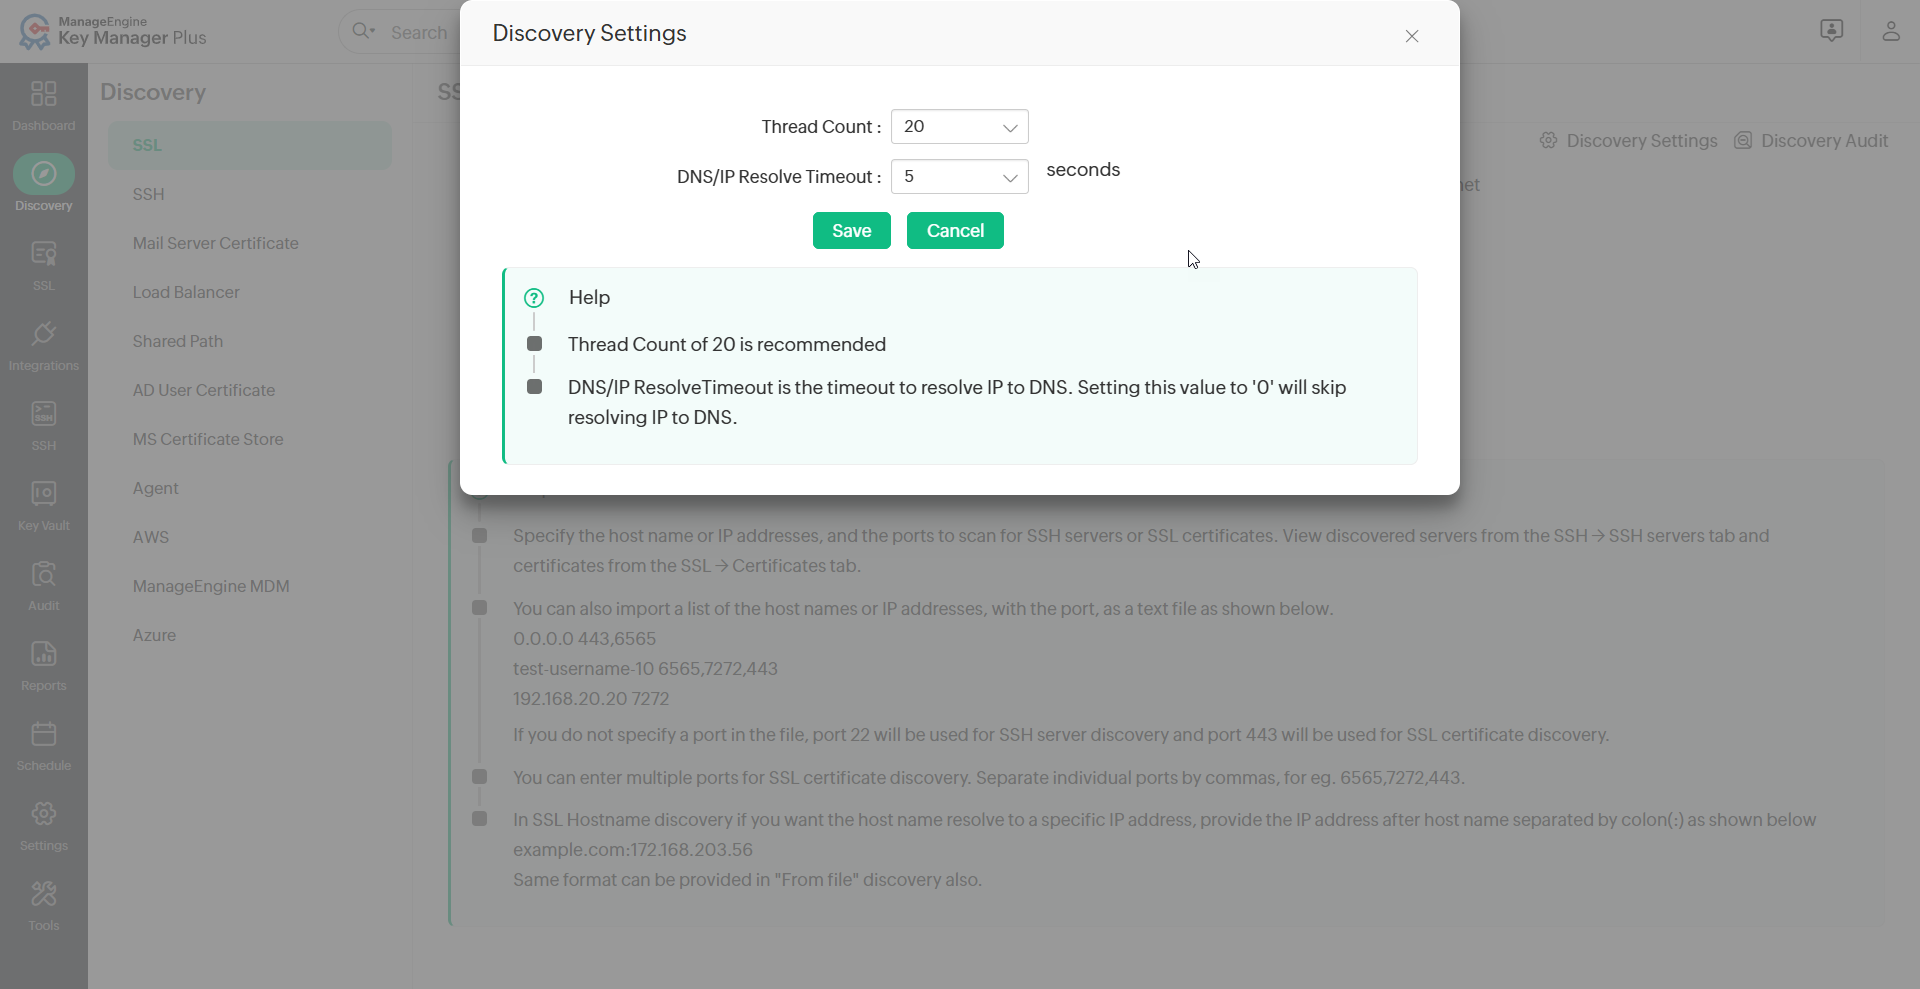
If you have set the thread count above 20, you may experience performance issues when Key Manager Plus executes large operations alongside the SSL discovery. In such cases, we recommend increasing the application memory for Key Manager Plus. To do so, please follow the below steps:
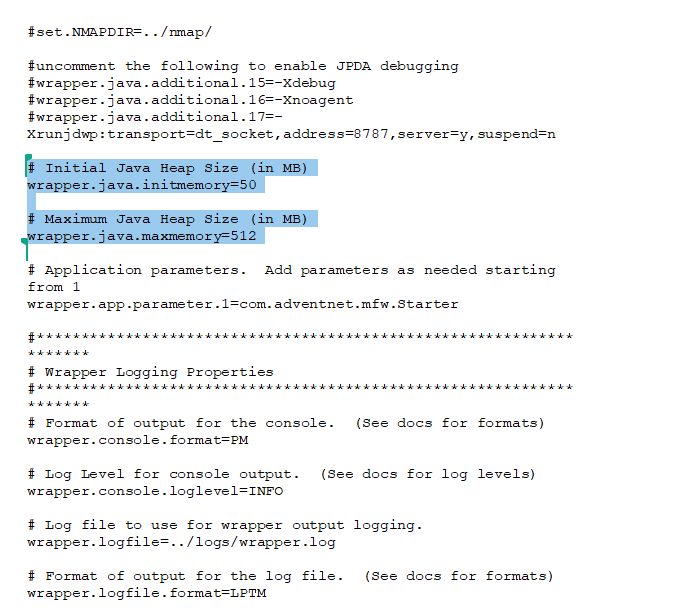
- Navigate to the <Key-Manager-Plus-Installation-Directory>/conf folder and open the wrapper.conf file.
- Increase the allocated memory by editing the default values of initmemory and maxmemory as shown below:
# Initial Java Heap Size (in MB)
wrapper.java.initmemory=1024
#Maximum Java Heap Size (in MB)
wrapper.java.maxmemory=1024 - Save the wrapper.conf and restart the Key Manager Plus application.
Customizing these settings allows users to optimize SSL discovery based on network conditions and performance requirements.
2. SSL Discovery Methods Available in Key Manager Plus
2.1 Discover SSL Certificates on Demand
To discover the certificates manually:
- Go to the Discovery tab in the GUI.
- Click the SSL tab.
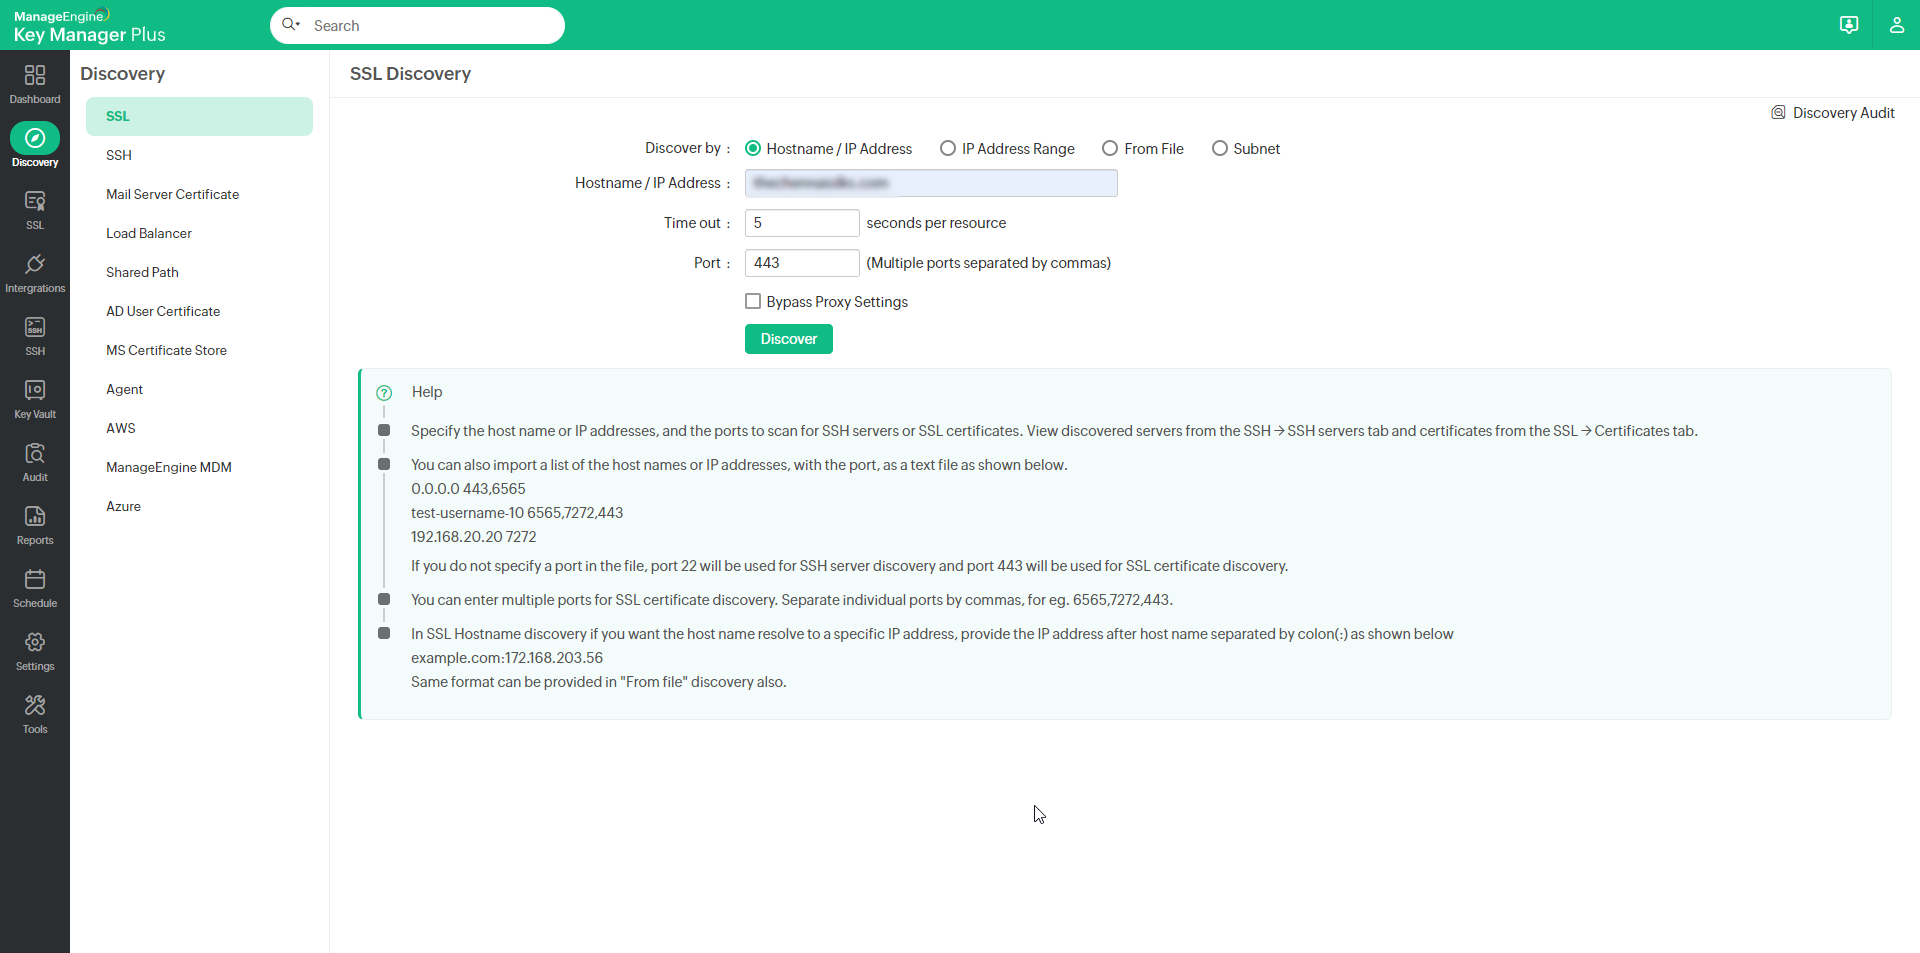
- Select an option for the type of discovery.
- Hostname/IP address — Enter the name or IP address of the server from which the SSL certificates are to be discovered.
- IP address range — Specify an IP range and discover all the SSL certificates available in the servers falling under the range.
- From file — If you have a list of the servers in which certificates are available in your network saved as a text file, it can be loaded directly and all these certificates can be discovered.
- Subnet — You can also choose to discover resources from specific subnet works within an IP range using this option.
- In SSL Hostname discovery, if you want the host name to resolve to a specific IP address, provide the IP address after host name separated by colon (:) as shown below example.com:168.203.56. Same format can be provided in "From file" discovery as well.
Note: The file to be imported must be a text file containing the hostname or IP addresses of individual servers, entered on separate lines. Enter the ports to scan on each server separated by a space, entered on separate lines as illustrated below:
0.0.0.0 6565
test-username-10 443
192.168.20.20 7272
If you do not specify any port, SSL certificates using the default port 443 will be discovered.
- For bulk discovery using IP address range and Subnet options, there is an Exclude IP Address field that allows you to exclude specific resources from being discovered. Specify the IP addresses of the resources that need to be excluded one below another.
- Specify values for the Time out and the Port options.
- Time out: Refers to the number of seconds the application tries to discover the certificates (each). The default value is 5 seconds.
- Port: It refers to the port on the end terminal used for SSH communication. Port 443 is used by default for SSL certificates.
Notes:
- You can specify multiple ports for the discovery of SSL certificates in a single discovery instance, separated by commas.
- During SSL discovery or when manually adding certificates to Key Manager Plus repository, you can choose to exclude specific certificates by providing their details (common name and serial number) in the Settings >> SSL >> Excluded Certificates tab.
- Select the Bypass Proxy Settings checkbox to bypass proxy server settings if you have enabled them under Admin Settings. If this option is selected, Key Manager Plus will bypass the proxy server and directly perform online certificate discovery. The option to bypass the proxy server is available for SSL certificate discovery using Hostname/IP Address, IP Address Range, From File, and Subnet modes. In addition, you can bypass proxy server during scheduled certificate discovery as well.
Click Discover. When you click the Discover button, you will be redirected to the Discovery Audit page where the status of the current discovery instance is updated.
2.2 Discover SSL Certificates Automatically through Schedules
SSL Certificate discovery can also be scheduled to occur at periodic intervals.
- Click the Schedule tab in the GUI.
- Click the Add Schedule button.
- In the Add Schedule window, enter a Name for the schedule and select the Schedule Type as SSL Discovery.
- Specify the Start and End IP addresses and the Port on the end terminal to check for SSL certificates.
- Select the Recurrence Type — hourly, daily, weekly, monthly, or once only. Set the Starting Time, Date or Day corresponding to the option chosen.
- Enter the email addresses of the users to be notified. Navigate to Settings >> General Settings >> Mail Server to configure the mail server settings.
- Click the Save button.
You will get a message confirming addition of a new schedule.
The result of the schedule execution will get updated in the Schedule audit and the Discovery audit tabs.
2.3 Discover Certificates Mapped to User Accounts in Active Directory
Key Manager Plus helps you discover and manage the certificates mapped to user accounts in Active Directory.
To perform AD user certificate discovery,
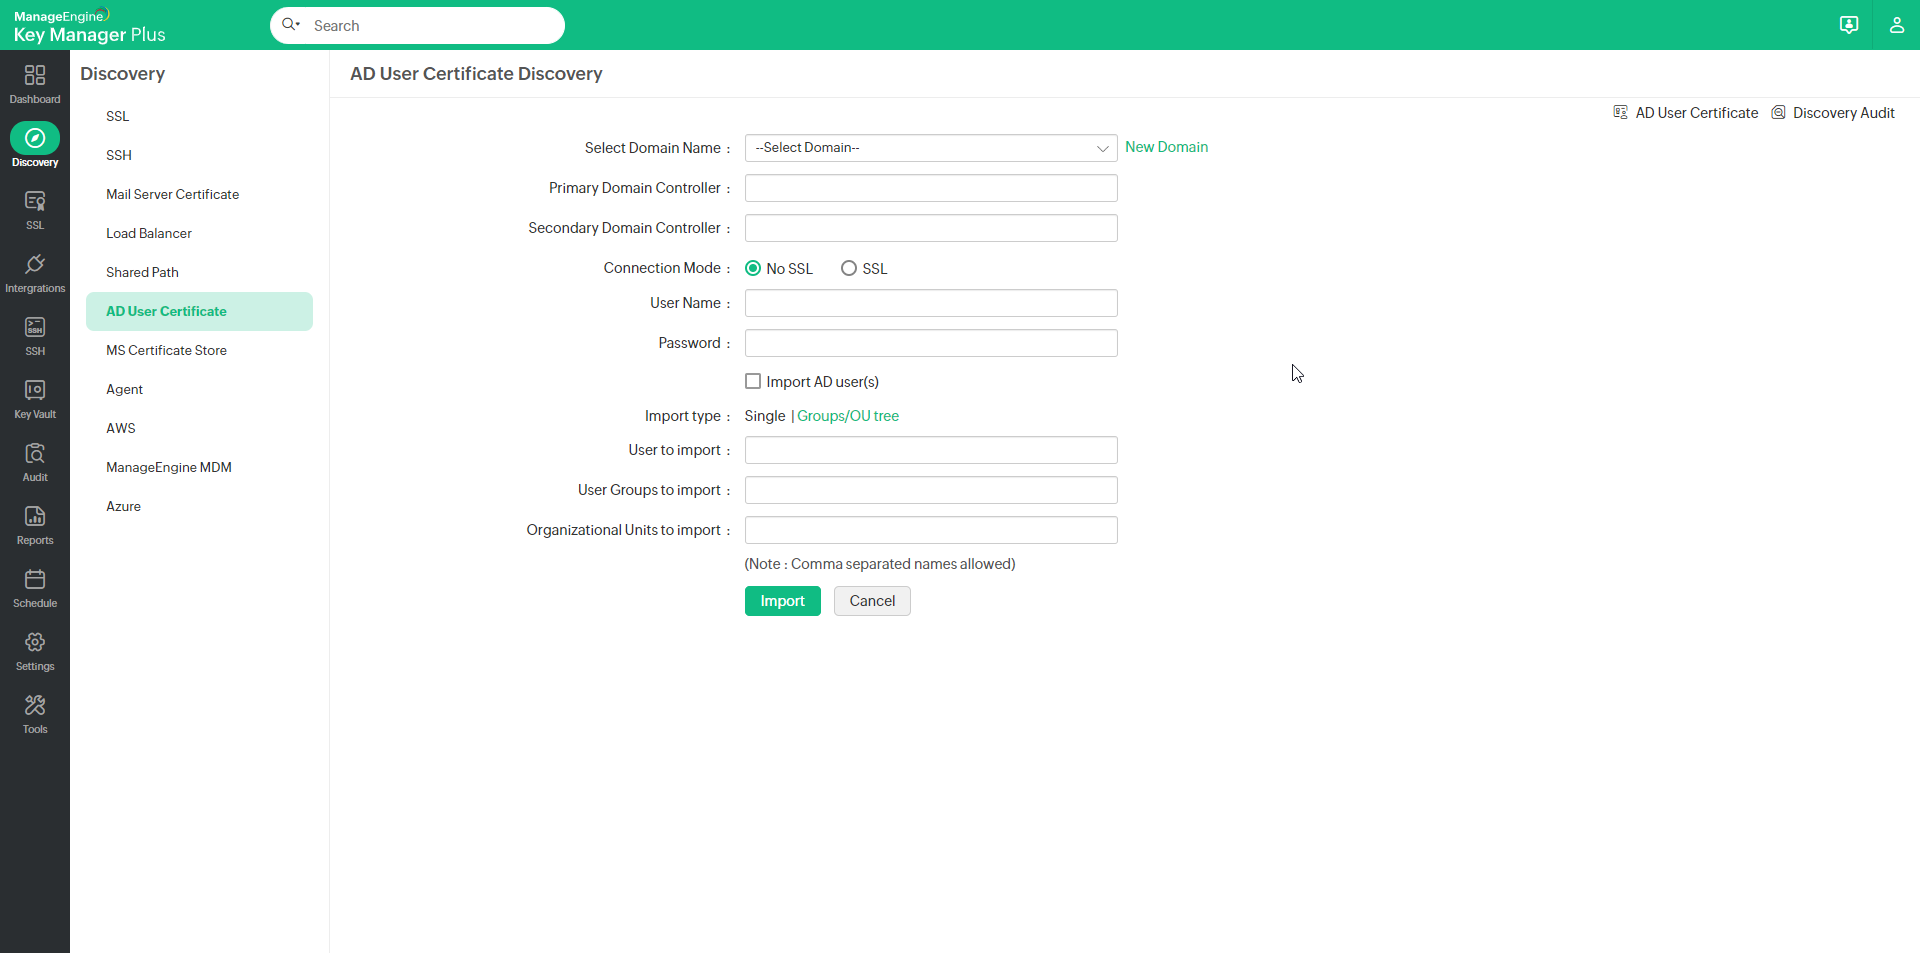
- Navigate to Discovery >> AD User Certificate.
- Select the required Domain Name, which forms part of the AD from the drop-down.
- Specify the DNS name of the domain controller. This domain controller will be the Primary Domain Controller.
- In case, the Primary Domain Controller is down, Secondary Domain Controllers can be used. If you have Secondary Domain Controllers, specify their DNS names in comma separated form. One of the available secondary domain controllers will be used. When you use SSL mode, make sure the DNS name specified here matches the CN (common name) specified in the SSL certificate for the domain controller.
- Enter a valid user credential (User Name and Password) of an user account within the particular domain. Then enter the users / user groups / OUs in which you want to perform the certificate discovery and click Import. To perform certificate discovery for groups/OUs as a whole, choose Groups/OU tree import type and select the required groups from the drop down list.
- Key Manager Plus also provides an option to import AD users while performing the certificate discovery. Enable the check box Import AD users to import those AD user accounts into Key Manager Plus for which the certificate discovery is done.
- The discovered certificates automatically get added to the certificate repository of Key Manager Plus.
2.4 Manage Certificates from MS Certificate Store and Local CA
Key Manager Plus helps you request, acquire, discover, consolidate, track, and manage certificates from the MS Certificate Store and those issued by Local certificate authority. To begin managing certificates from the MS Certificate Store and Local Certificate Authority, start the Key Manager Plus service using your domain administrator account. If you are using a domain service account to run Key Manager Plus, ensure you have configured the account in your local admin group beforehand.
To import certificates from the Microsoft Certificate Store and certificates issued by Local CA,
- Navigate to Discovery >> MS Certificate Store.
- To discover and import certificates issued by Microsoft CA alone, select the Certificate Store option from the drop-down.
- To discover all the certificates from the MS certificates store, choose Certificate Store as the Type. You can discover certificates from the Certificate Store in three ways:
- Using Server Name - Enter the name of the Server where you require Key Manager Plus to scan for certificates
- Using IP Address Range - Enter the Start and End IP addresses to scan the IP range specified
- From File - Click Browse and import a text file with a list of hostnames/IP addresses/agents. To achieve this, upload a text file (in the .txt format) with the hostnames, IP addresses or agents to be scanned.
Ensure that the hostnames/IP addresses are listed line-by-line as shown below:
242.209.75.62
webserver-099
For agents, prepend the term 'Agent:' before the hostnames/IP addresses
Agent:webserver-099
- Select the checkbox to Use Key Manager Plus service account credentials for authentication, or you can specify the other details such as the Name of the Windows domain controller machine and domain admin credentials.
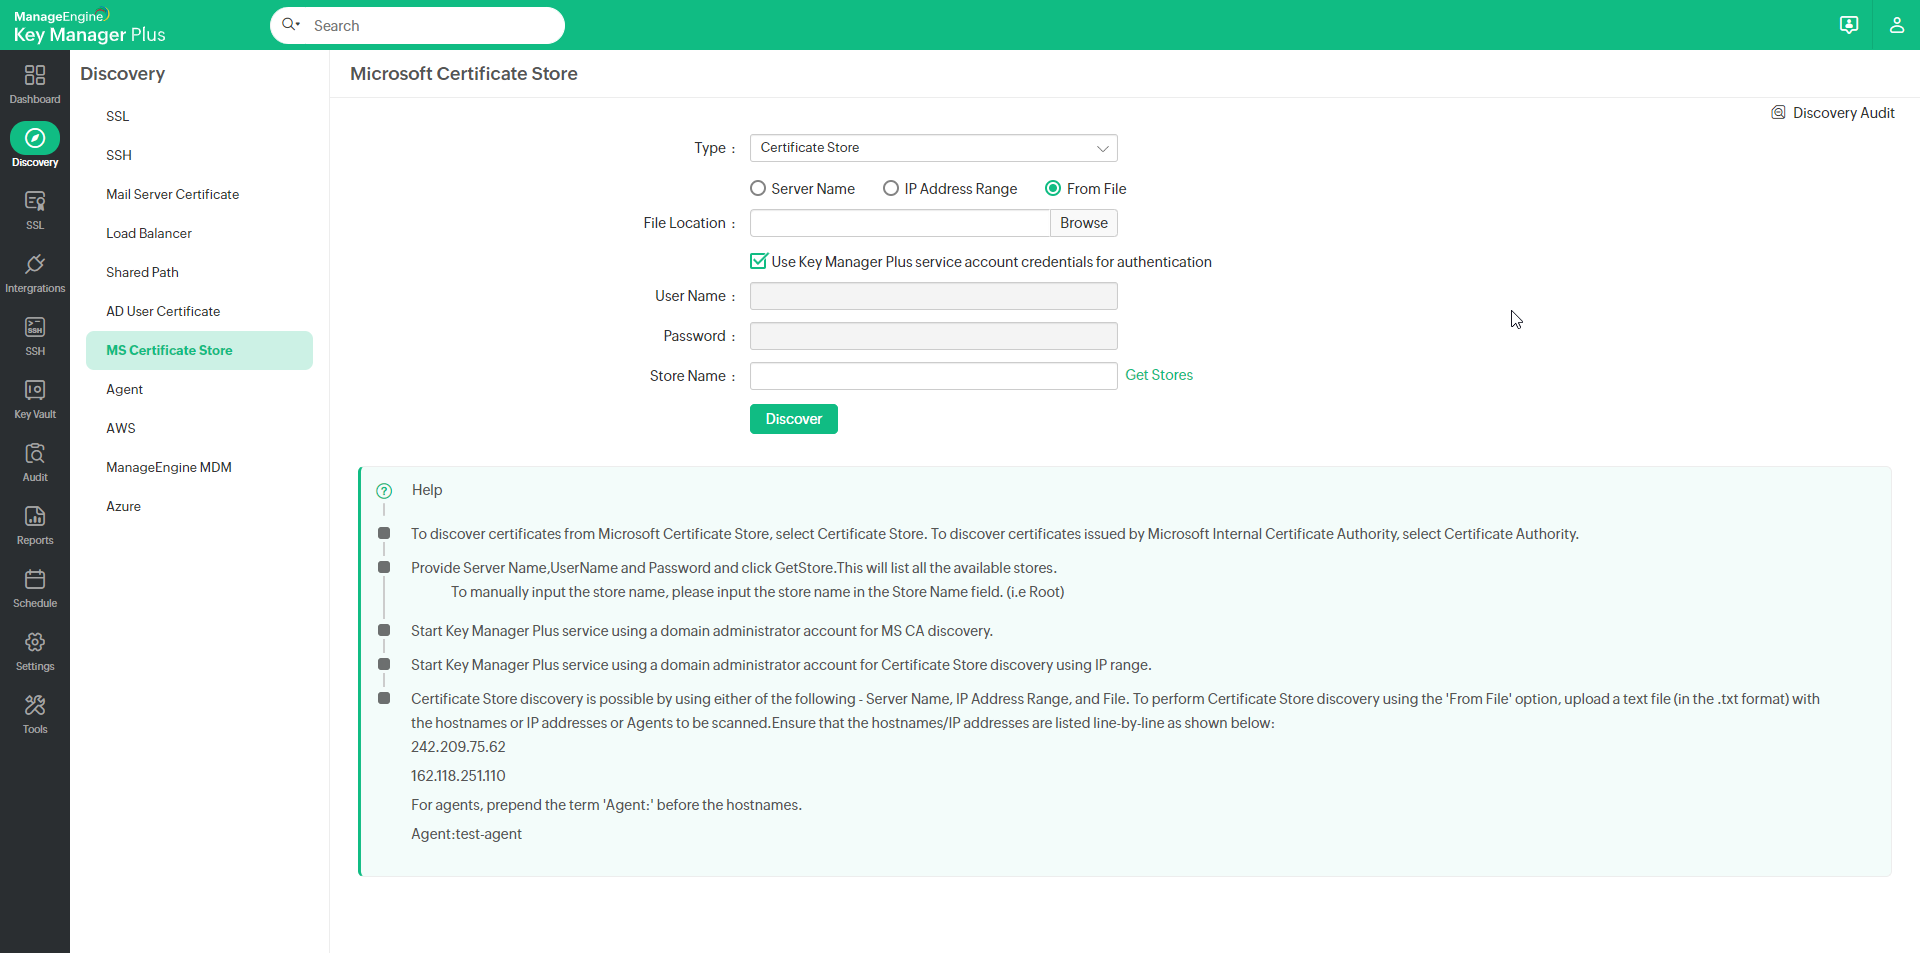
- If you choose to Use Key Manager Plus service account credentials for authentication, you can select IP Address Range to mention the Start IP and End IP to discover the certificates.
- Specify the certificate Store Name from which the certificates are to be discovered and imported. The following format is to be used while specifying the certificate store name:\\server_name\store_name
- e.g., server_name\Root (To discover certificates from trusted root certification authorities)
- e.g., server_name\My (To discover personal certificates)
- Click Discover.
- You can view the discovered certificates in SSL >> Certificates Tab.
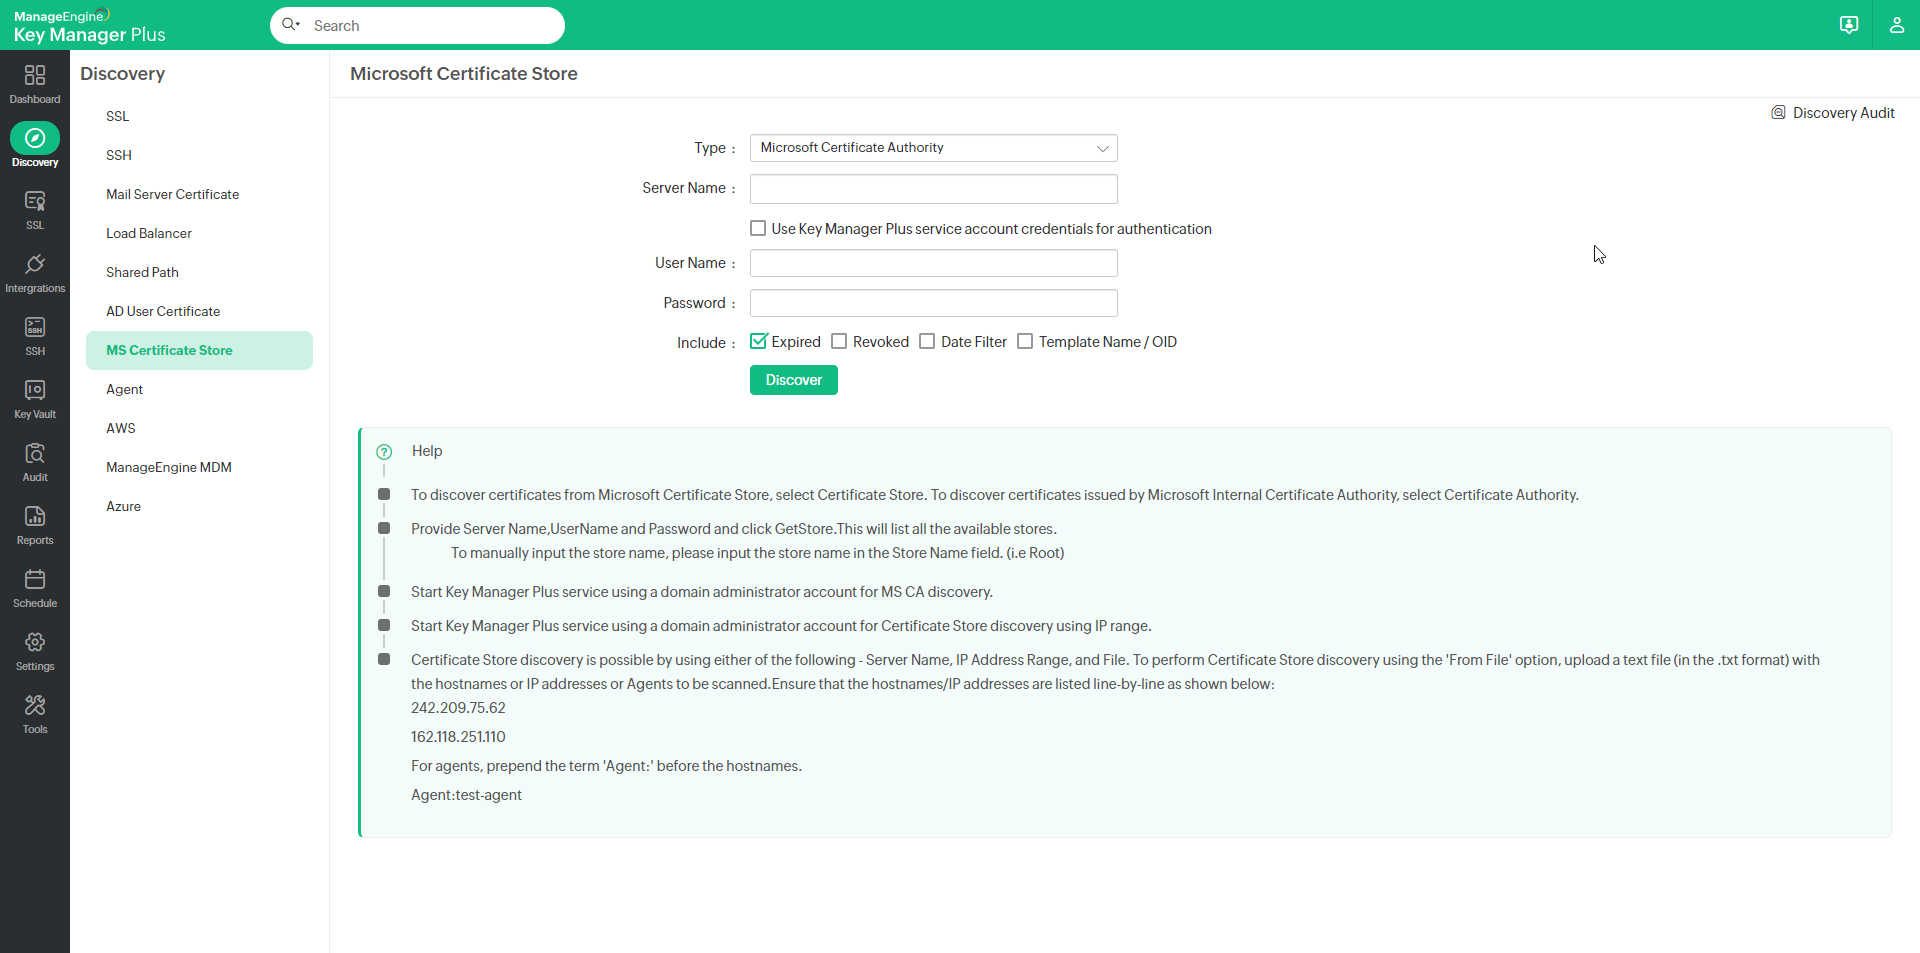
- To discover certificates issued by a particular MSCA, select Type as Microsoft Certificate Authority from the drop-down, enter the Server Name and required credentials, and enter an MSCA name in the Microsoft Certificate Authority text box. Please note that this text box will be visible only if your Key Manager Plus server is installed on a Windows Server machine.
- During the discovery, you can choose to include expired and revoked certificates by selecting the respective check boxes. Select Date Filter and enter a date range to filter the discovered certificates as per the given range. Select the Template Name / OID option to choose certificate templates. You can add up to five certificate templates for each discovery operation. This option is available during the scheduled discovery of certificates issued by a particular MSCA as well.
2.5 Discover SSL Certificates from SMTP Servers
You can discover SSL certificates used by mail servers present in your network and consolidate them in Key Manager Plus' centralized certificate repository. To perform mail server certificate discovery,
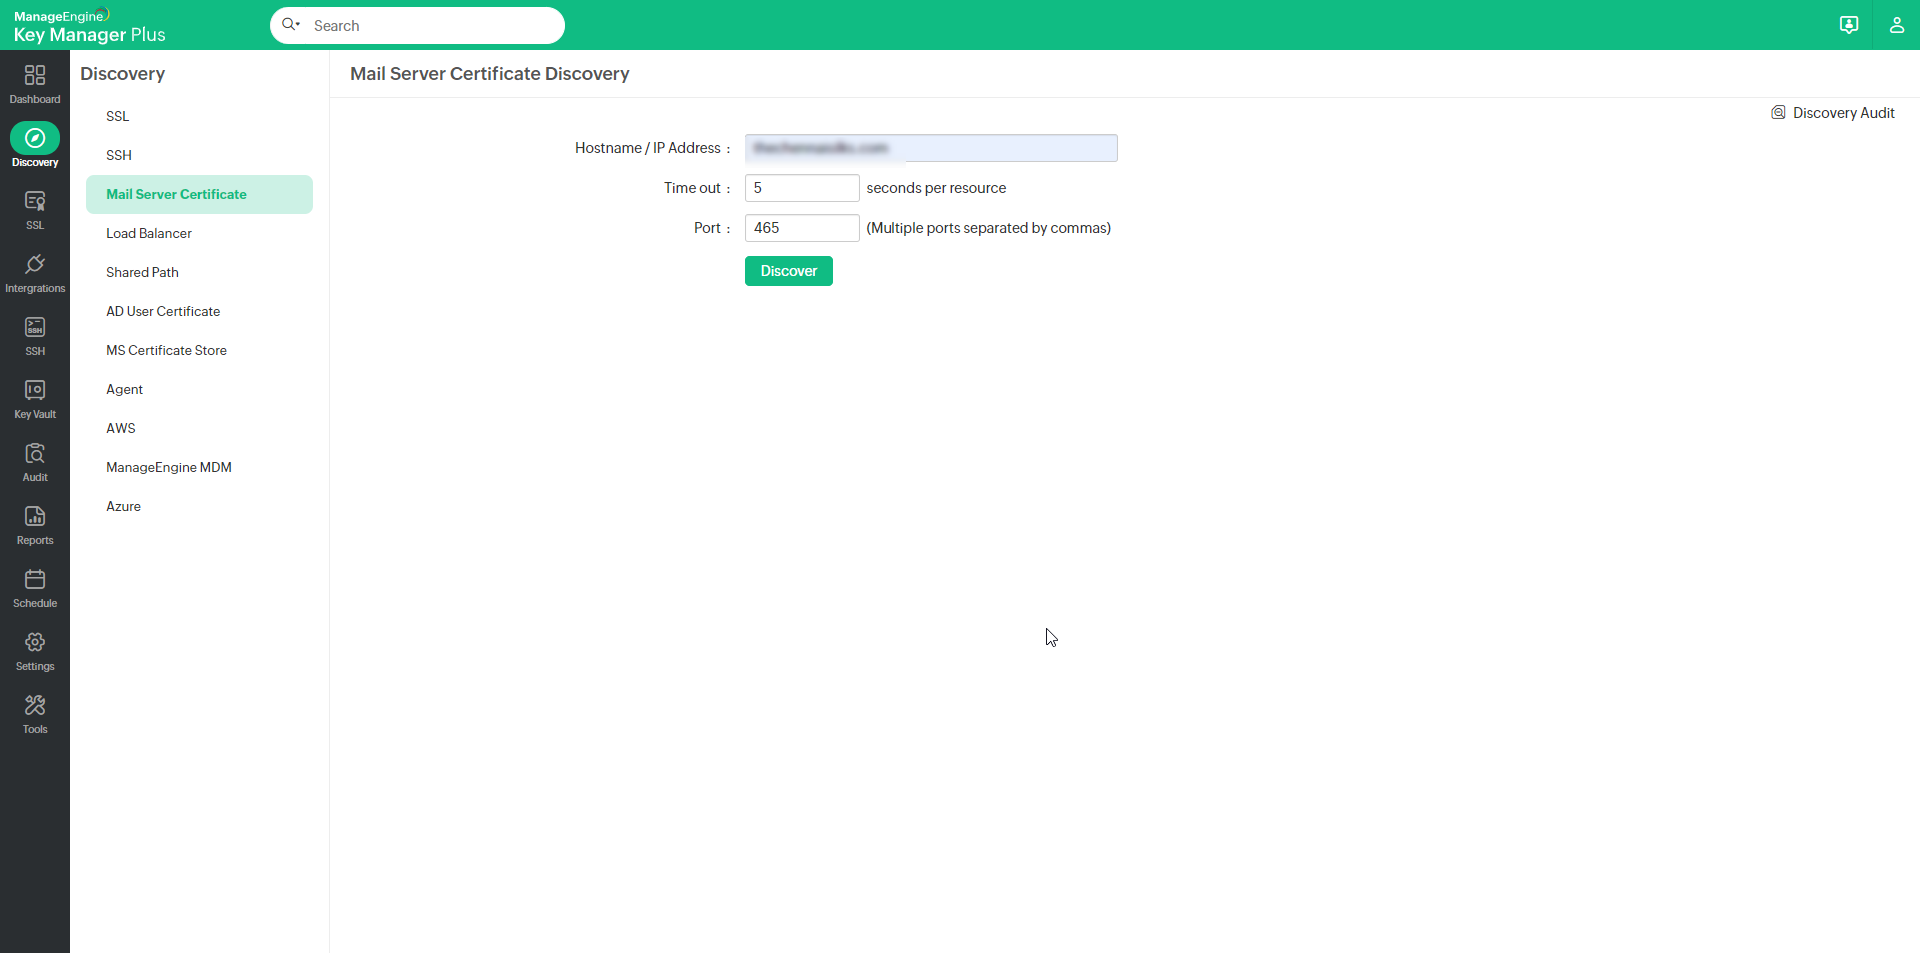
- Navigate to Discovery >> Mail Server Certificate.
- Provide the Host Name or IP Address from which the certificate is to be discovered and specify the Port number. You can specify multiple port values by separating them with commas.
- Click Discover.
On successful discovery, the certificates are fetched from the specified resources and added to Key Manager Plus' repository.
2.6 Discover SSL Certificates from Load Balancers
Key Manager Plus also allows you to discover SSL certificates deployed to load balancers within your network and consolidate them in its secure, centralized repository. Key Manager Plus currently supports certificate discovery from Linux-based load balancers only (i.e., Nginx, F5, Citrix etc.,) and the process is tunneled via SSH. To perform load balancer certificate discovery,
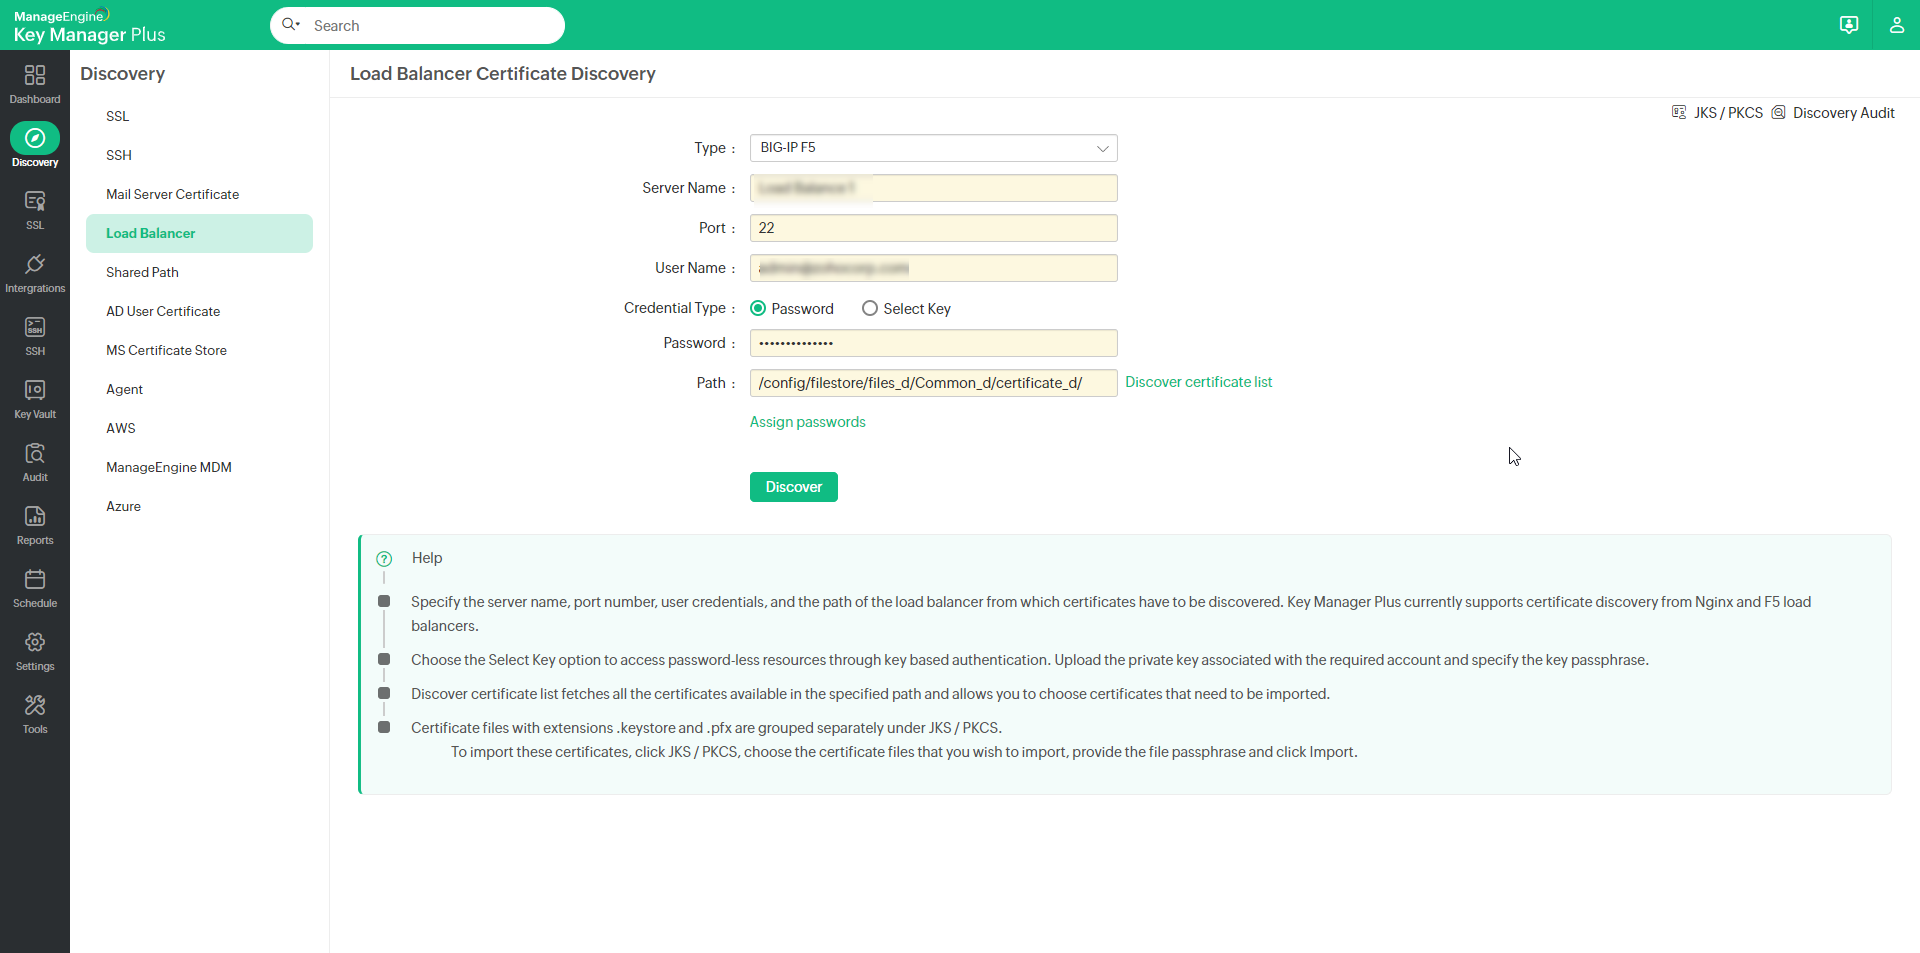
- Navigate to Discovery >> Load Balancer.
- Select a load balancer type from the Type drop-down. Key Manager Plus supports four types of Load Balancer discovery: General, BIG-IP F5, Citrix, and FortiGate Firewall.
- If you have selected the Load Balancer Type as General, BIG-IP F5 or Citrix:
- Specify the Server Name, Port, User Name, and Password.
- Specify the Path in the server from which certificates have to be discovered.
- You can opt for key-based authentication for password-less resources by choosing the Select Key option. Upload the private key associated with the required user account and specify the key passphrase.
- Click Discover certificate list option to fetch all the certificates available in the specified path. This helps you to choose the certificates that you wish to discover and import.
- Upon clicking the Discover button, the certificates are successfully discovered and imported into Key Manager Plus' centralized certificate repository.
Note: During the Citrix REST API-based load balancer discovery, the user credentials you provide must have sufficient permissions to read files and for REST API access. Therefore, to ensure success of the discovery, it is recommended that you supply the credentials of an account which has the superadmin role.
- If the above method fails for Citrix load balancer, follow the below steps to discover the certificates from the citrix load balancers:
Note: You can perform Citrix type discovery in two ways: using CLI commands and using REST API. By default KMP uses CLI commands for discovery and fetching certificates.
- Click Manage Credentials to add or delete a credential.
- In the pop-up that appears, click to Add and mention the Credential Name, Server IP, Citrix Username and Citrix Password.
- Click Test Login to test the credential and click Save Credentials.
- To delete a credential, select a credential you want to delete and click Delete, and in the pop-up that appears, click Ok.
- Select a Citrix Credential from the dropdown, enter the Path, and Discover again.
- If the above method too fails, follow the same procedure again with checkbox Use REST API (By default KMP uses CLI commands for discovery and fetching certificates)enabled.
- During Citrix load balancer discovery using REST API, you can choose to bypass your proxy server settings by selecting the Bypass Proxy Settings checkbox. This option is allows you to bypass the proxy server you have enabled under Admin Settings directly perform Citrix load balancer discovery through the internet.
- Please note that you can choose to bypass proxy server settings for Citrix load balancer discovery only if you select the Use REST API (By default KMP uses CLI commands for discovery and fetching certificates) option. The bypass proxy server option is also available during scheduled Citrix load balancer discovery.
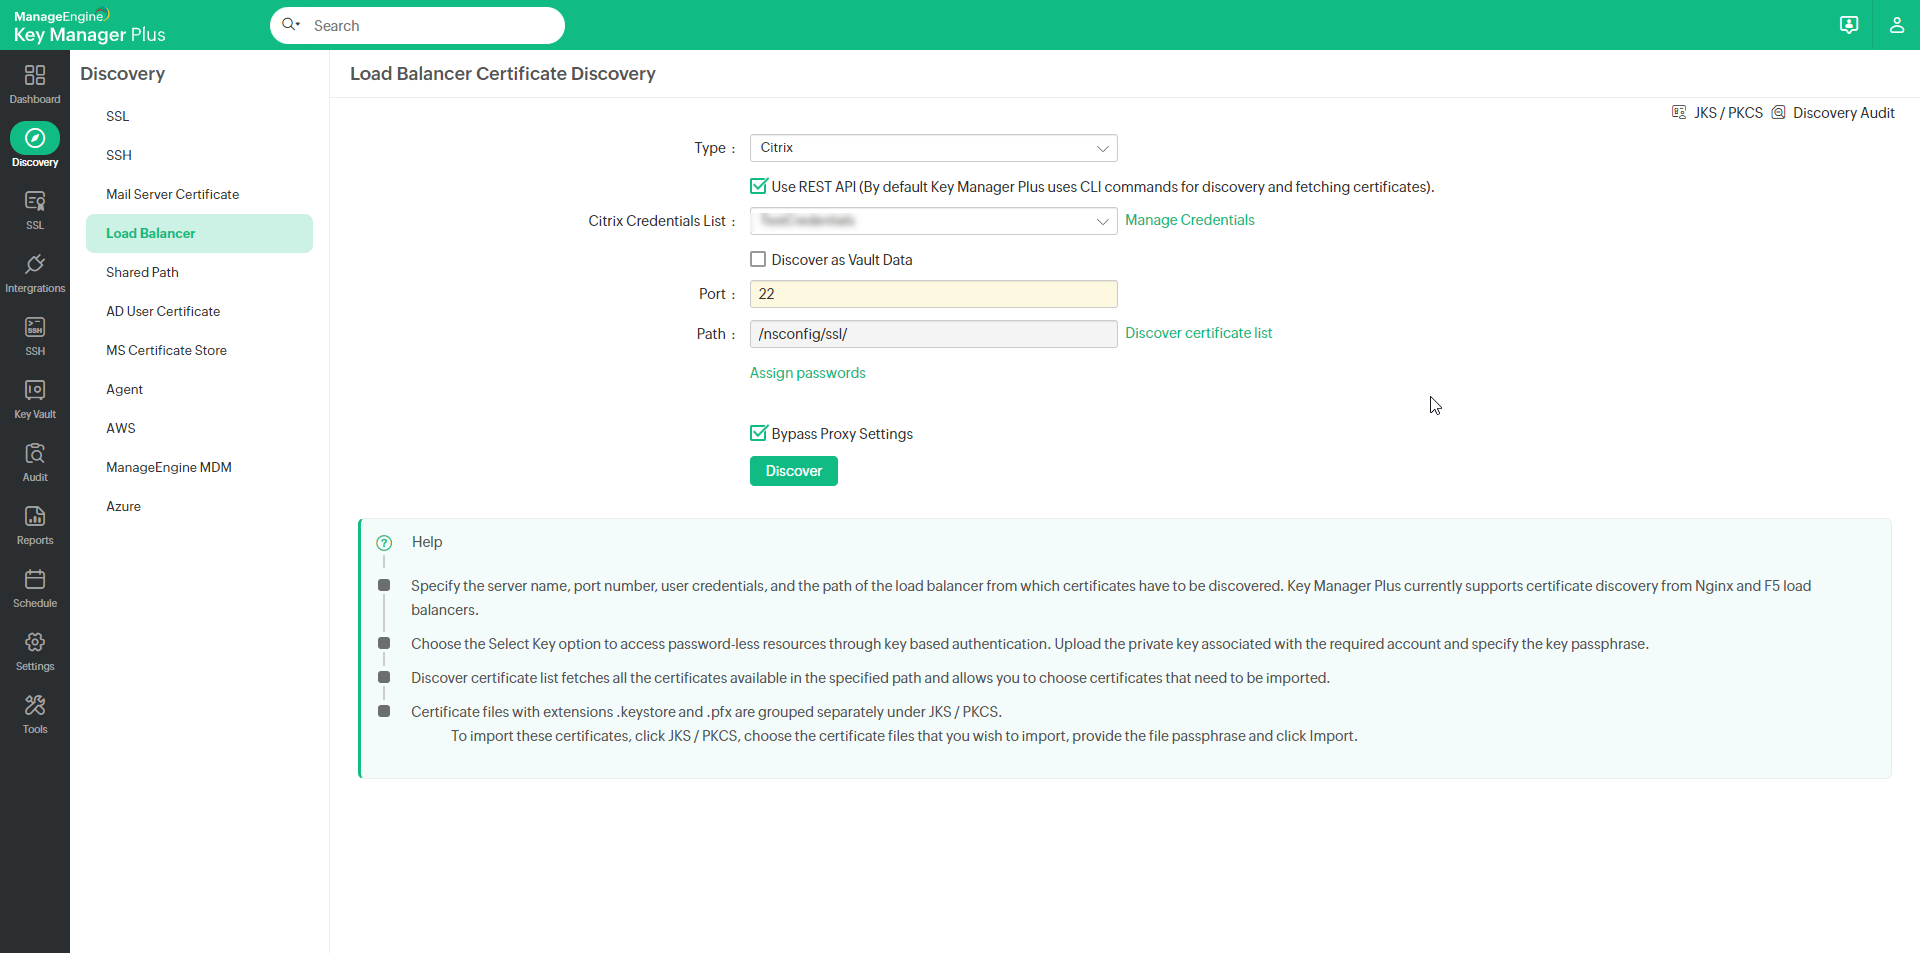
- The certificates will be successfully discovered in any of the above three methods and will be imported into Key Manager Plus' centralized certificate repository. You can view them from the SSL >> Certificates tab.
- Click Manage Credentials to add or delete a credential.
- To discover certificates deployed to the FortiGate Firewalls within your network follow the below steps:
- Select FortiGate Firewall from the Type drop-down.
- Select a FortiGate Credential from the FortiGate Credentials List drop-down.
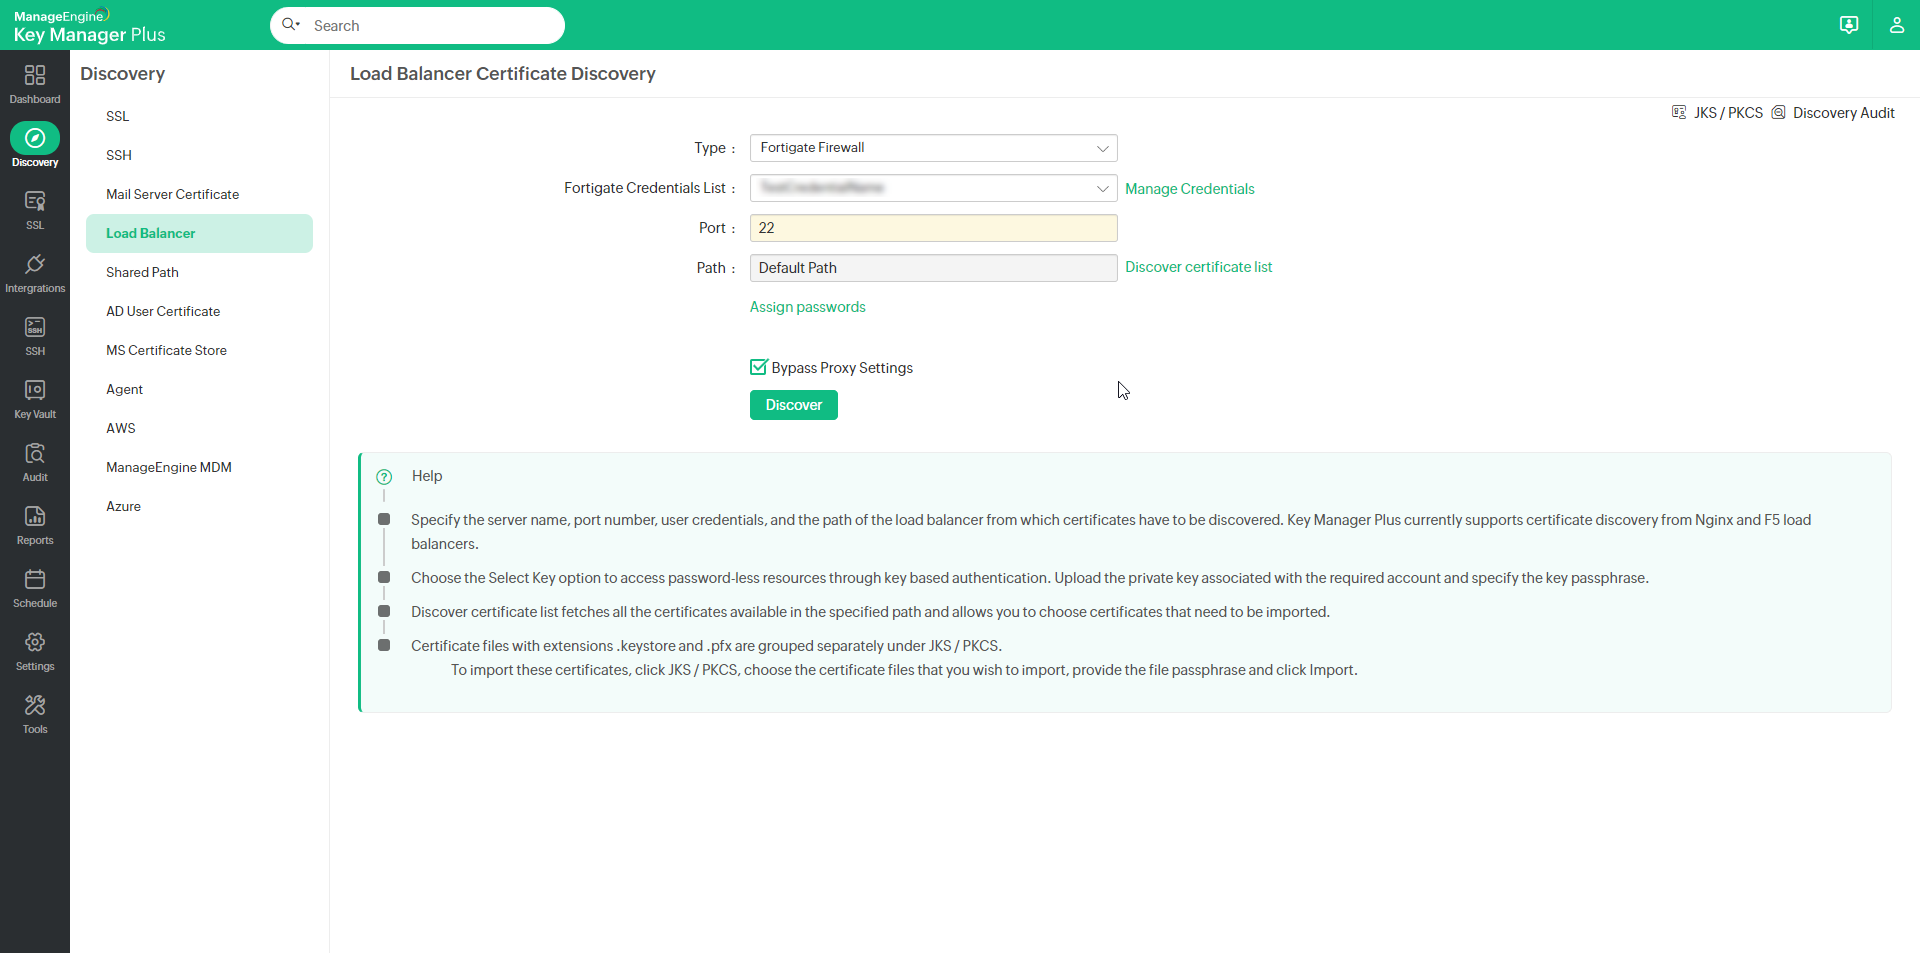
- Click Manage Credentialsto add or delete a credential. In the pop-up that appears:
- To add a credential, click Add and enter the Credential Name, Server IP, and API Key.
- Click Save Credentials to add a new FortiGate Firewall credential.
- To delete a credential, select a credential that you want to delete and click Delete.
- In the pop-up that appears, click Ok to delete the selected credential.
- Specify the Port number. By default, the port number will be 22.
- Enter the Path, and click the Discover Certificate List. From the list that opens, select the required certificates to be added to the centralized certificate repository of Key Manager Plus.
- In addition, you can bypass your proxy server settings by enabling the Bypass Proxy Settings checkbox. This option allows you to bypass the proxy server that you have enabled under Admin Settings directly, to perform the FortiGate Firewall discovery through the internet.
- Upon clicking the Discover button, the certificates will be successfully discovered and imported into the centralized certificate repository of Key Manager Plus.
Certificate files discovered with extensions .keystore and .pfx require their passphrases to be provided to import the certificates into Key Manager Plus. These types of certificate files are grouped separately under the JKS/PKCS section (located in the top-right corner of the window).
Manual Import of Certificates from JKS/PKCS Files into Key Manager Plus Repository:
To import the certificates, select JKS/PKCS, and in the window that appears, choose the certificate file from which you wish to import the certificates and click Import from the top menu. In the popup that appears, provide the certificate file's passphrase and click Import. The selected file will be verified with the provided password, and the relevant certificates will be successfully imported and added to Key Manager Plus' certificate repository.
Automatic Import of Certificates from JKS/PKCS Files into Key Manager Plus Repository:
To automate the import of certificates from the JKS/PKCS files after the discovery process, follow these steps:
- Click Assign Passwords from the Load Balancer Certificate Discovery page.
- In the popup that opens, click Add to input the passwords of the JKS/PKCS files.
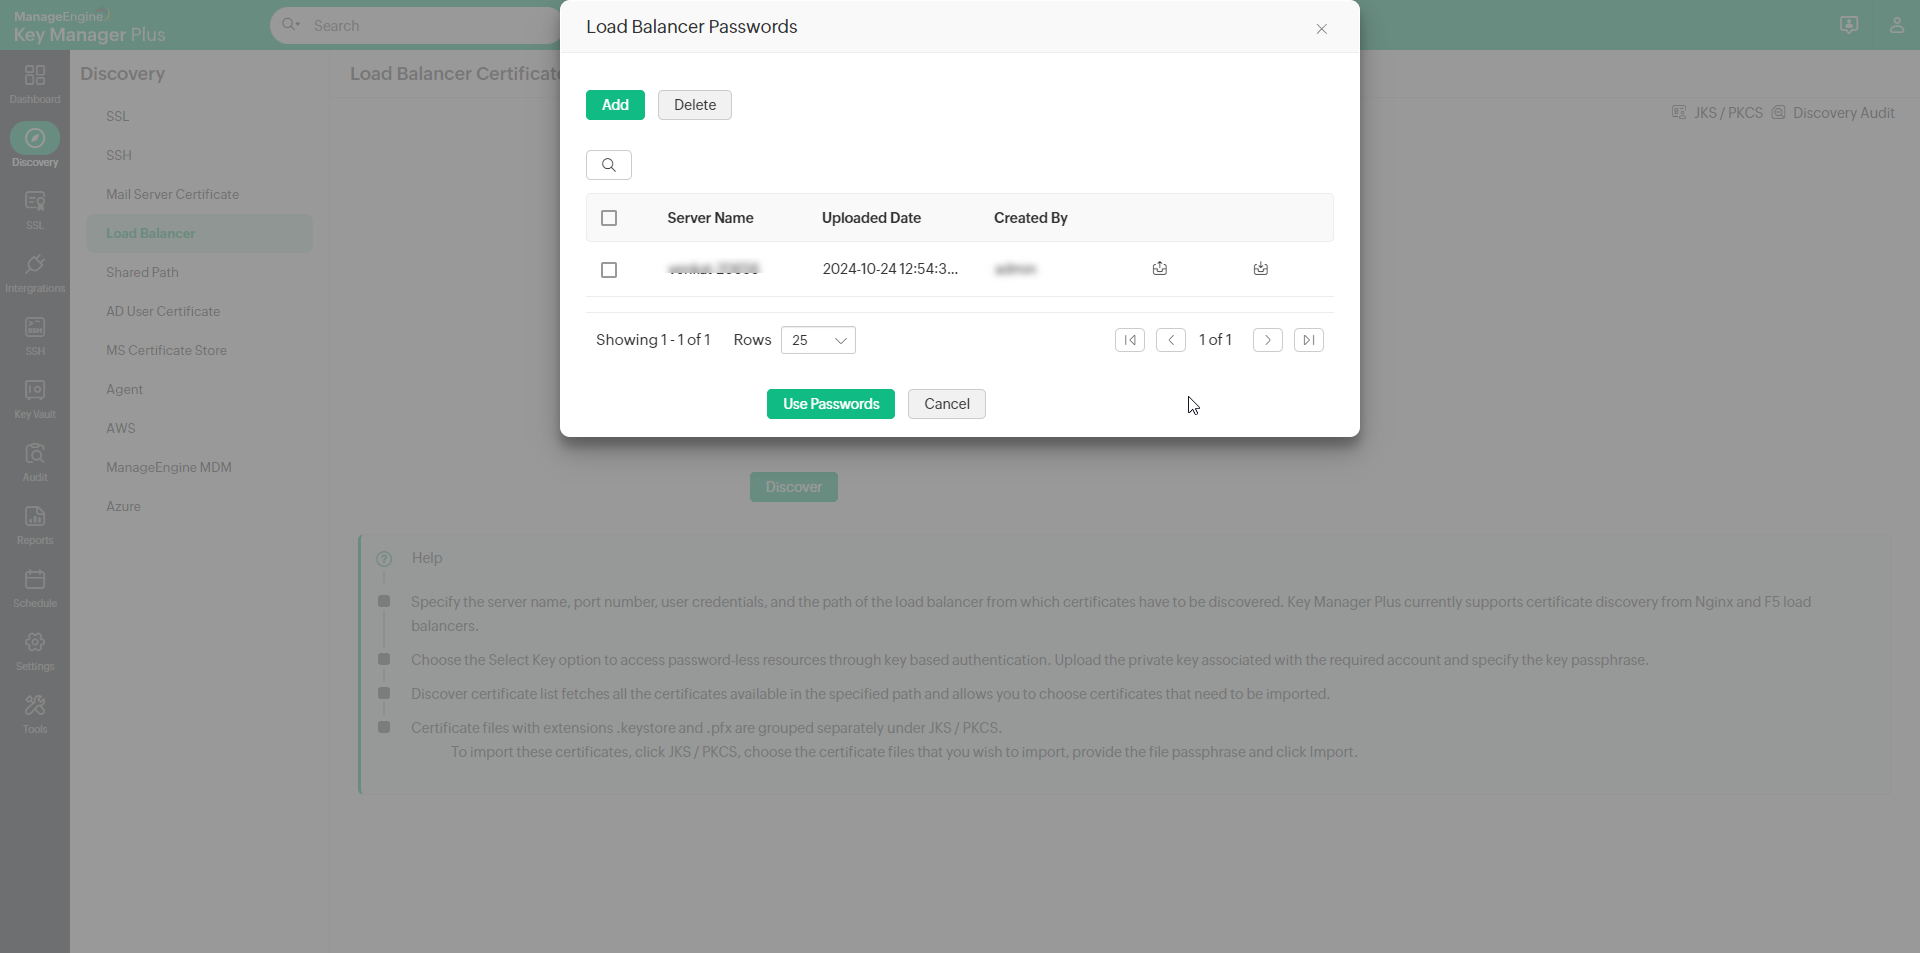
- In the new popup that appears, enter the Server Name and upload a file containing the available JKS/PKCS filenames and passwords.
If there are multiple filenames and passwords, enter the corresponding passwords on consecutive lines in a comma-separated format (e.g., test.keystore, P@ss#123).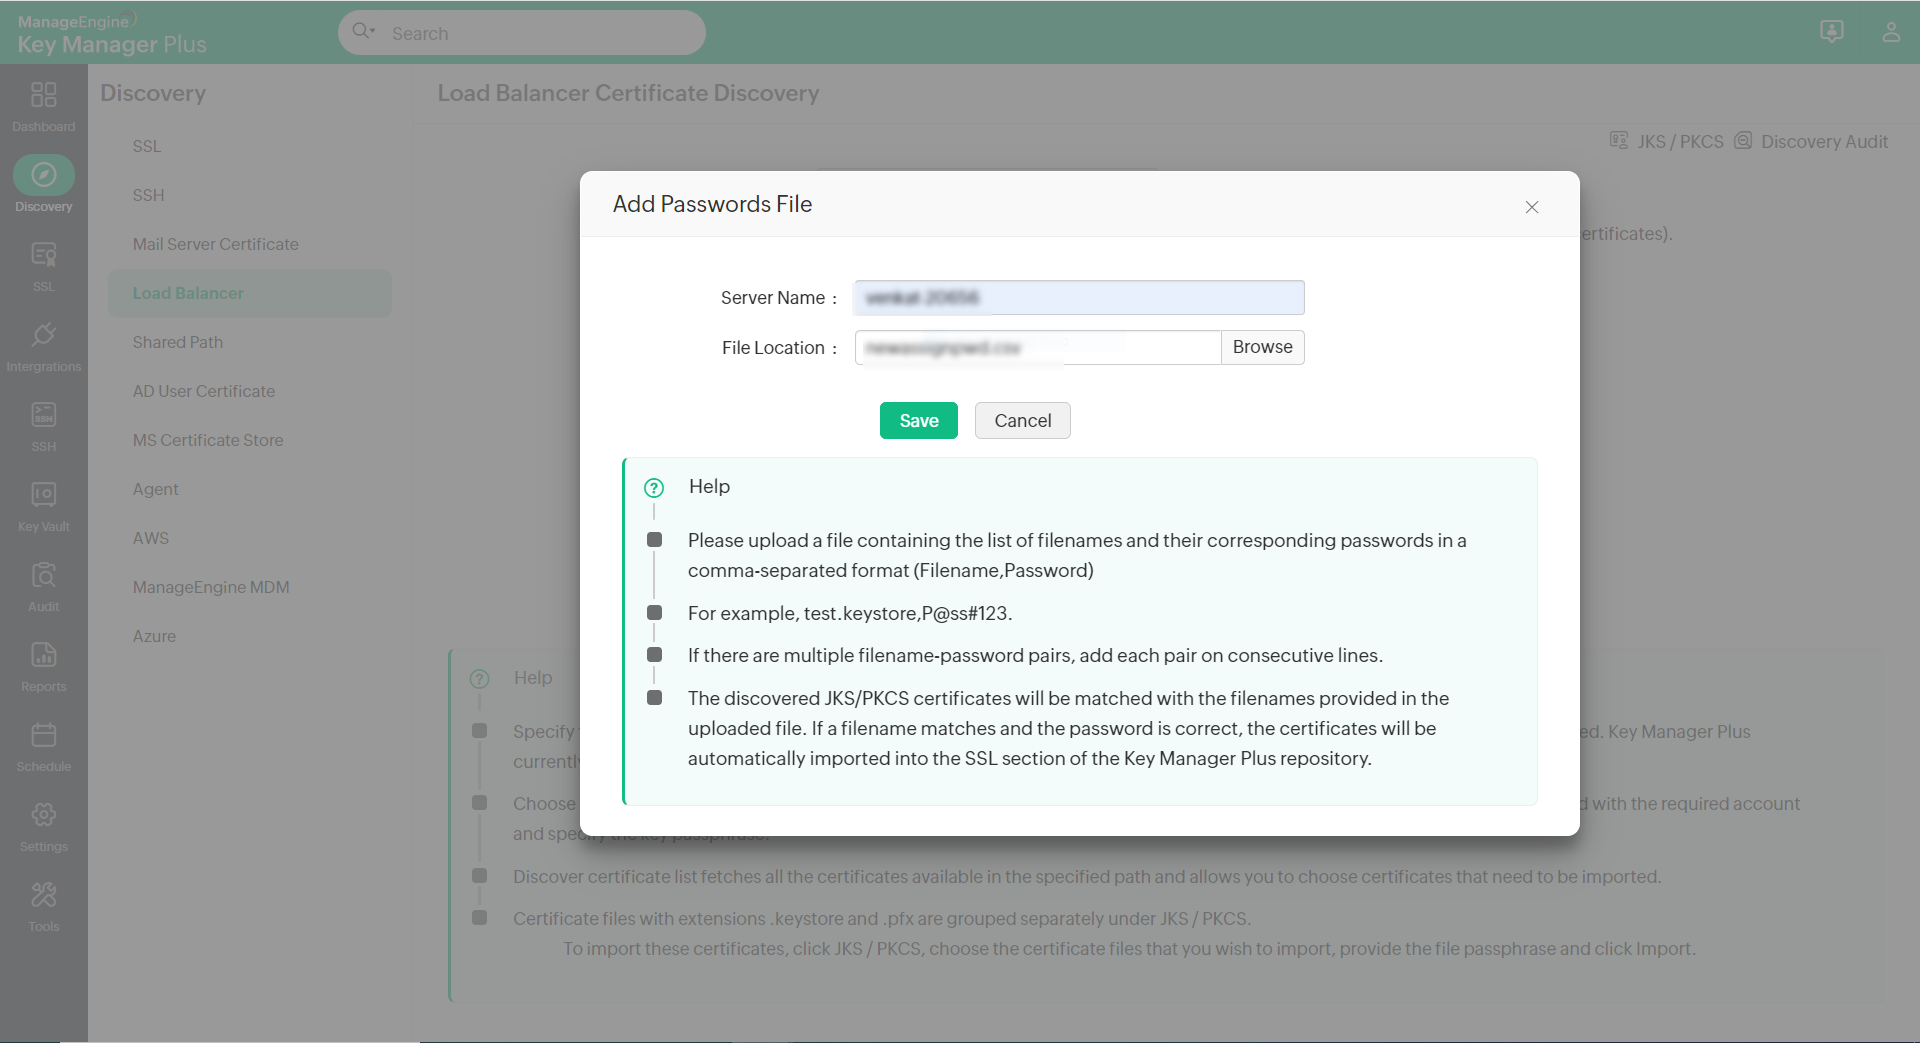
- Click Save Credentials to store the list of JKS/PKCS file passwords.
How does this Assign Passwords Work during the Discovery Process?
For example, in a certificate discovery process for Citrix, fill in the respective fields as mentioned above for the certificate discovery and click Assign Passwords. In the pop-up that opens, select the file with the JKS/PKCS filenames and passwords relevant to the Citrix load balancer's server and click Use Passwords. Upon certificate discovery from the Citrix load balancer, the discovered JKS/PKCS files will be matched with the file names provided in the uploaded file. If the file name matches, it will verify the password, and the respective certificates will be automatically imported into the SSL section of the Key Manager Plus repository.
2.7 Discover SSL Certificates from a Shared Directory Path
Key Manager Plus allows you to discover SSL certificates that are saved in a shared directory path within your network and consolidate them in its secure, centralized repository. Using this option, you can discover all the certificate files saved in a particular folder and then, either add all the certificates to the repository or choose the ones you want to import. During the discovery process, Key Manager Plus will scan only the folder specified in the path and nowhere else in the target machine.
Follow the below steps to discover and import SSL certificates from a shared directory path:
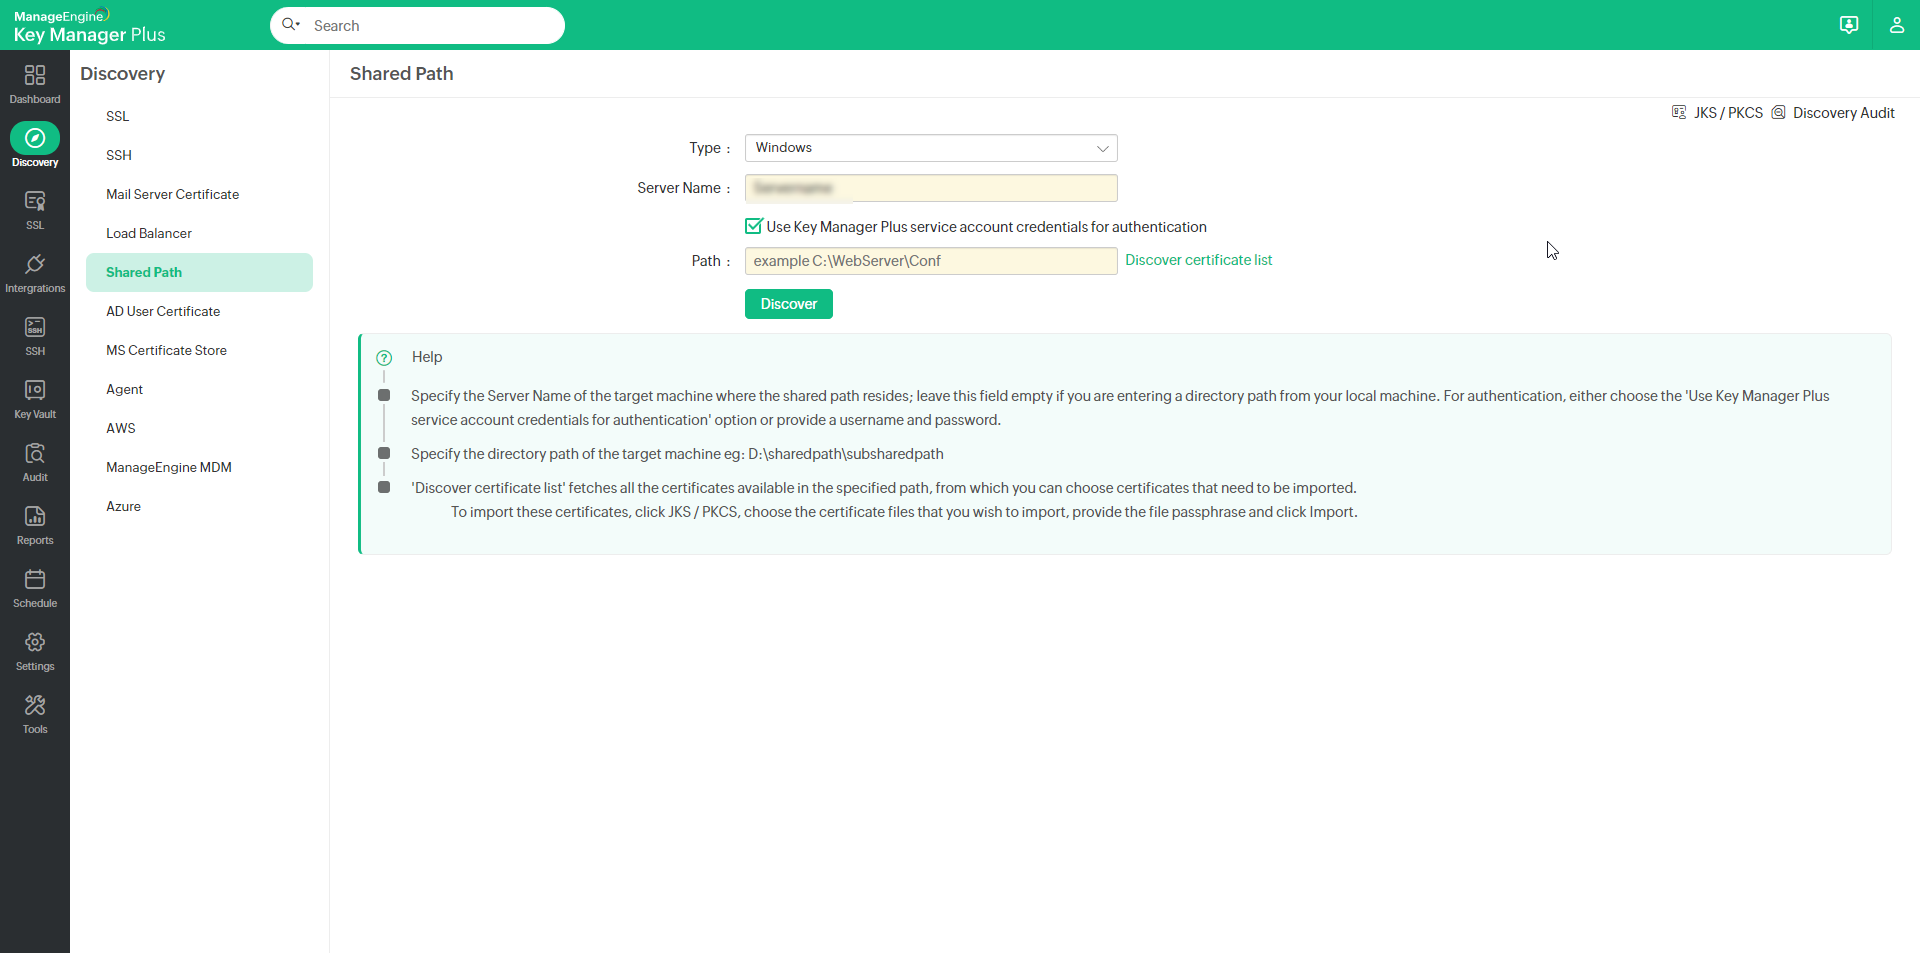
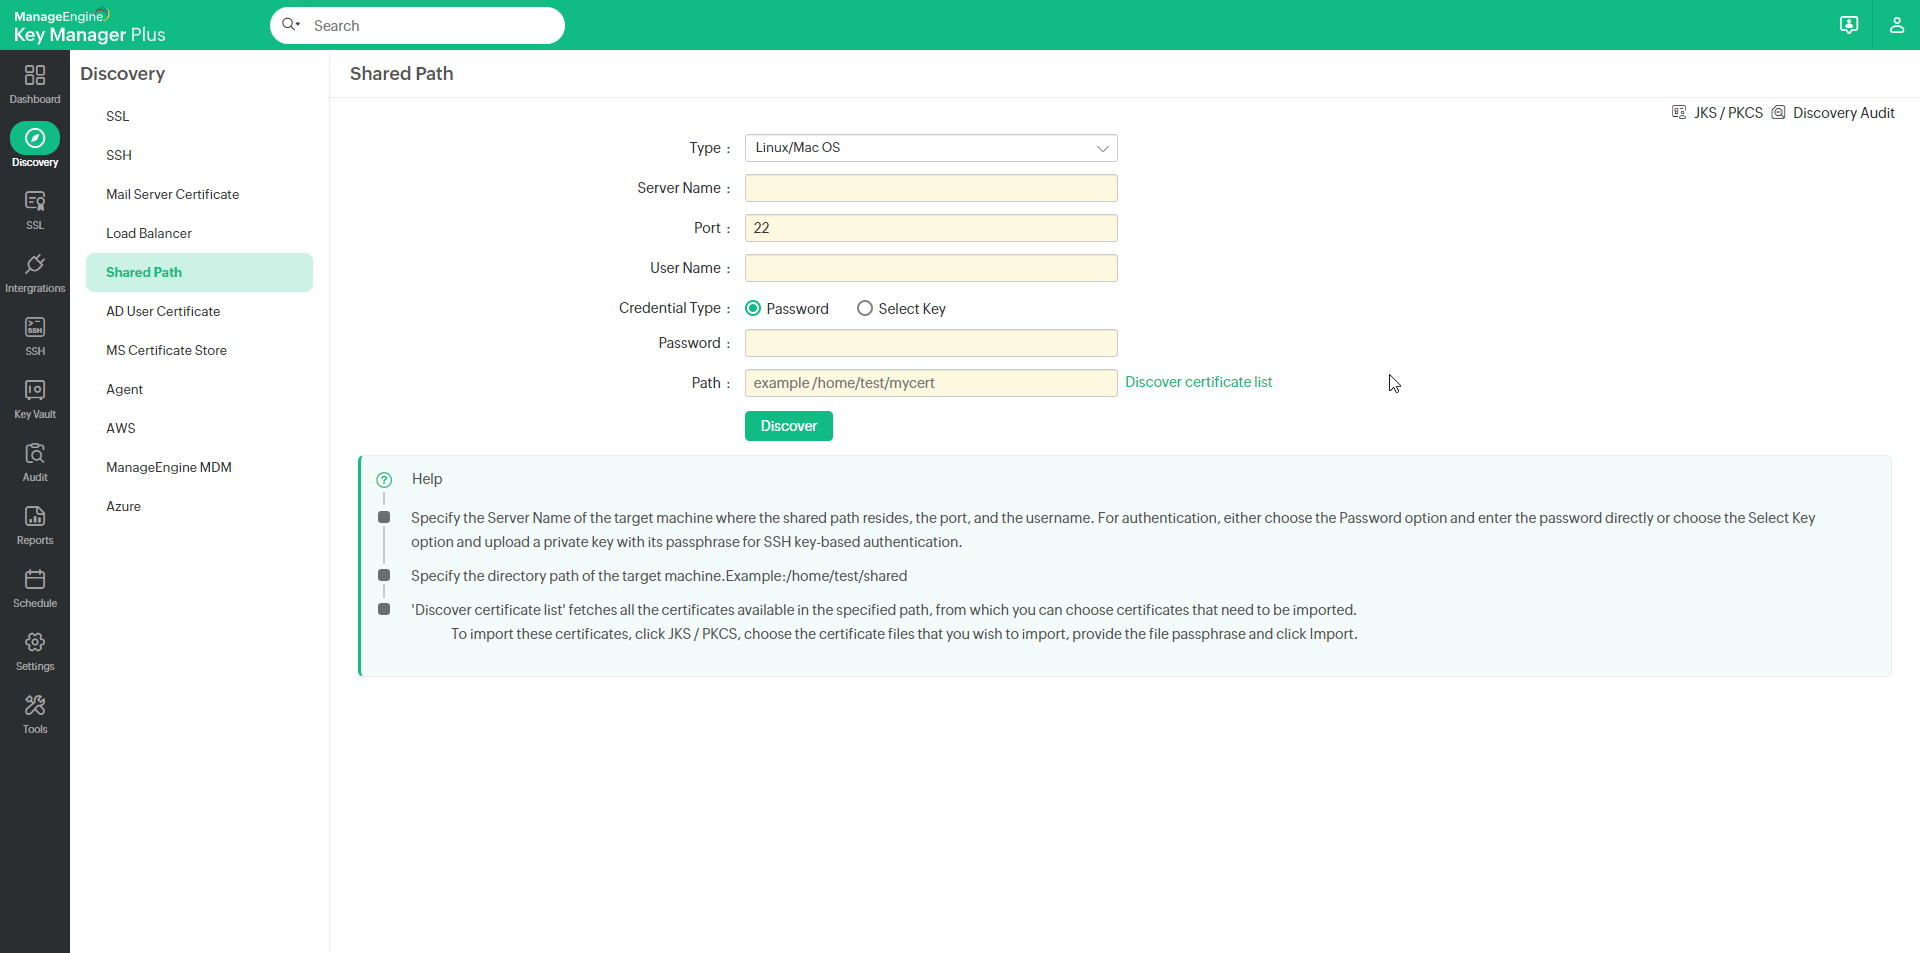
- Navigate to Discovery >> Shared Path. Choose Windows or Linux/Mac OS from the Type drop-down.
- For Windows:
- Enter the Server Name of the target machine where the shared path resides; leave this field empty if you are entering a directory path from your local machine.
- Select the checkbox to Use Key Manager Plus service account credentials for authentication or provide a username and password.
- Specify the directory path of the target machine. Example: D:\sharedpath\subsharedpath.
- For Linux/Mac OS:
- Enter the Server Name of the target machine where the shared path resides, the port, and the username.
- For authentication, either choose the Password option and enter the password directly or choose the Select Key option and upload a private key with its passphrase for SSH key-based authentication.
- Specify the directory path of the target machine. Example: \home\test\shared.
- Click the Discover certificate list option to fetch all the certificates available in the specified path. From this list, choose certificates that you require and click Discover. If you don't choose any specific files, all certificate files found in the shared path will be imported.
- Certificate files with extensions .keystore and .pfx are grouped separately under the JKS / PKCS option in the top right corner. To import these certificates, click JKS / PKCS, choose the certificate files that you wish to import, provide the file passphrase, and click Import.
To check the status of the discovery, click the Discovery Audit tab.
Note: Certificate files that are over 30 KB in size will not be imported during this discovery operation.
2.8 Discover SSL Certificates using KMP Agents
Key Manager Plus provides IT administrators the option to discover SSL certificates deployed across their network through agents. This functionality enables them to download and deploy Key Manager Plus agents to target systems, discover, and import certificates from those systems into a centralized certificate repository directly from the Key Manager Plus web interface. The connection between the Key Manager Plus server and the server(s) in which the agent is deployed is over HTTPS and is completely secure. Currently, Key Manager Plus agents are available only for Windows servers.
Performing certificate discovery through agents is helpful in the following scenarios:
- When the administrative credentials of the target server(s)—required to perform the discovery operation—are not available in the Key Manager Plus server.
- When certificates have to be discovered from servers that Key Manager Plus doesn't have direct access to—for instance, servers in demilitarized zone (DMZ). In such cases, the agent is usually installed in an intermediate jump server that has the permission to access the remote servers and pass on the required information to the Key Manager Plus server.
Steps to perform SSL certificate discovery through Key Manager Plus agent:
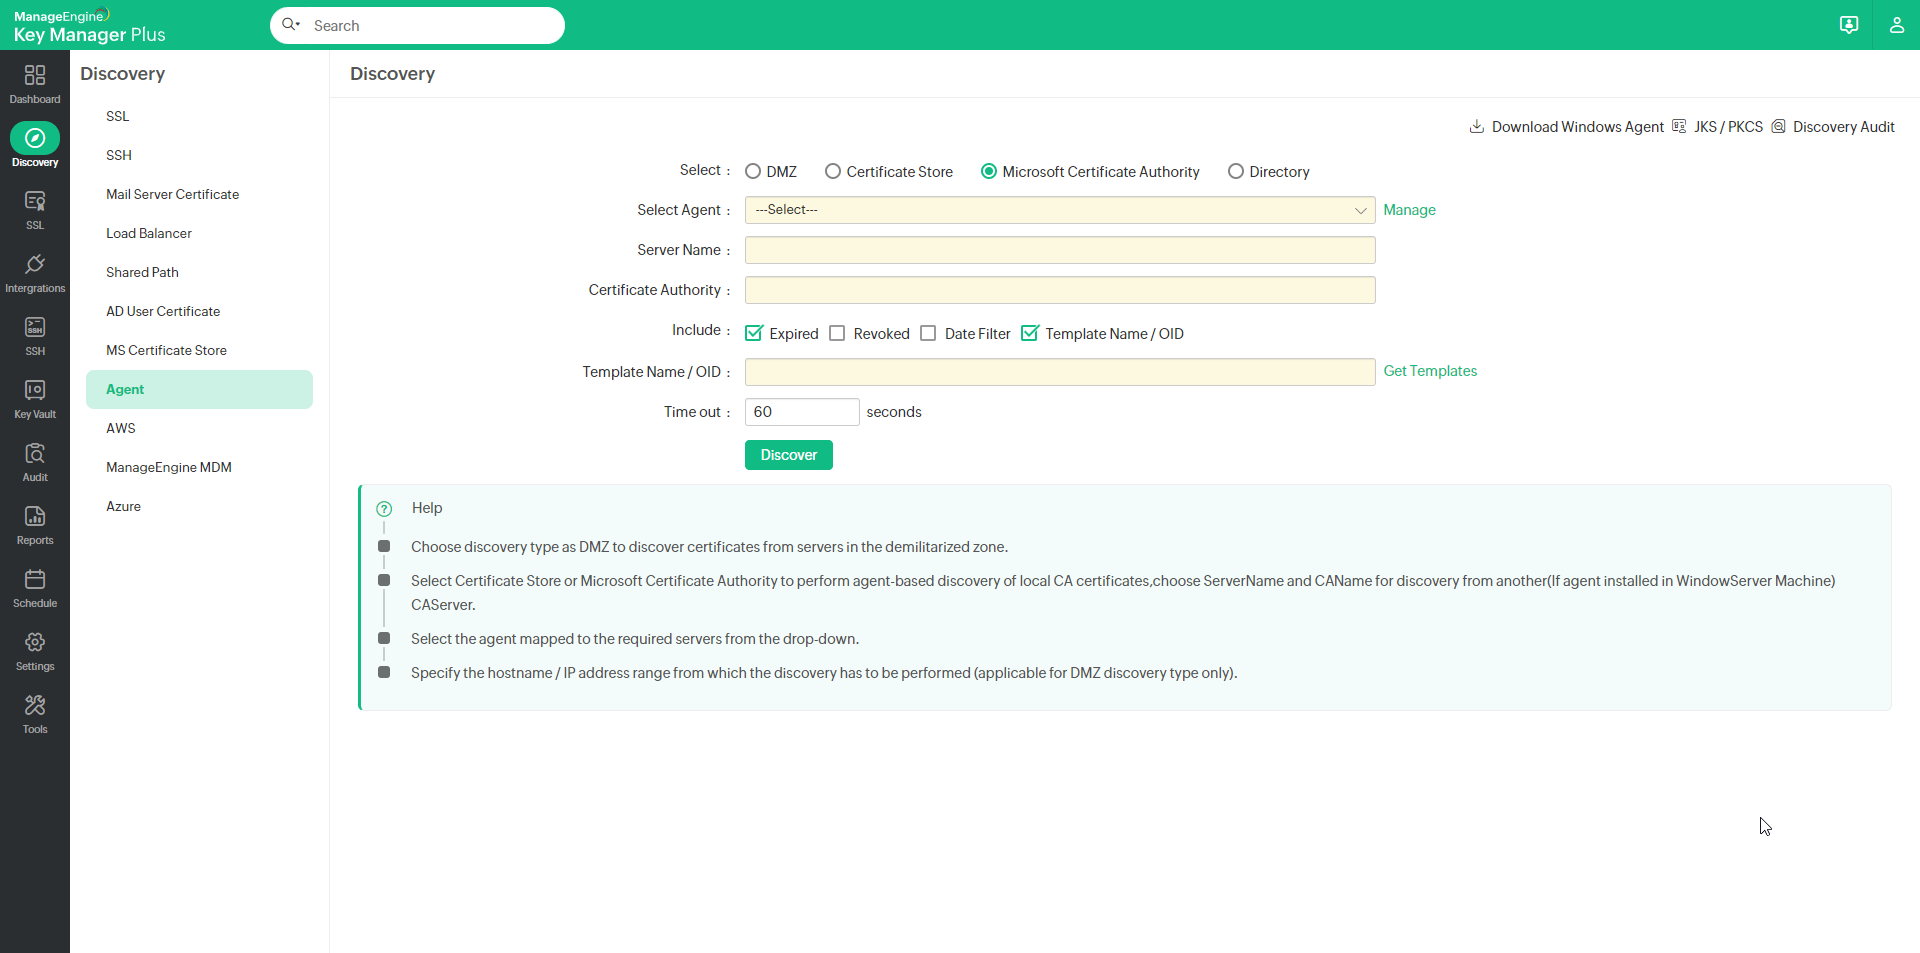
- Navigate to Discovery >> Agent.
- Choose the discovery type from where you want to perform the discovery—DMZ, Certificate Store or Microsoft Certificate Authority
- Select the required agent from the drop down to perform the operation. If the agent is busy, wait and try again after sometime.
- Provide the required details based on the selected discovery type.
- For Microsoft CA discovery, you can choose to exclude expired / revoked certificates or perform discovery based on issue date or certificate template using the filters provided. Select the Template Name / OID option to choose certificate templates. This option is available during scheduled discovery of certificates issued by Microsoft Certificate Authority as well.
Note:
Server Name and Certificate Authority fields are applicable for Microsoft Certificate Authority only from build 6680 onwards.
From build 6680 onwards, Key Manager Plus agent can be installed on any server, provided the server has access to connect to the Microsoft CA server. Enter the Microsoft CA server name in the Server Name field. - Click Discover.
The certificates are discovered from the servers in which the agent is installed and imported into Key Manager Plus' certificate repository.
a. Discover SSL Certificates from a Directory Path in a Remote Machine
Key Manager Plus allows you to discover SSL certificates that are saved in a directory path in a remote machine that is not directly accessible by the Key Manager Plus server—this is achieved through the Key Manager Plus agent. Once the certificates are discovered, you can consolidate them into Key Manager Plus's centralized repository. Using this option, you can discover all the certificate files saved in a particular folder and either add all the certificates to the repository or select only the ones you require. During the discovery process, the Key Manager Plus agent will scan only the folder specified in the path and nowhere else in the target machine.
Follow the below steps to discover and import SSL certificates from a directory path in remote machine:
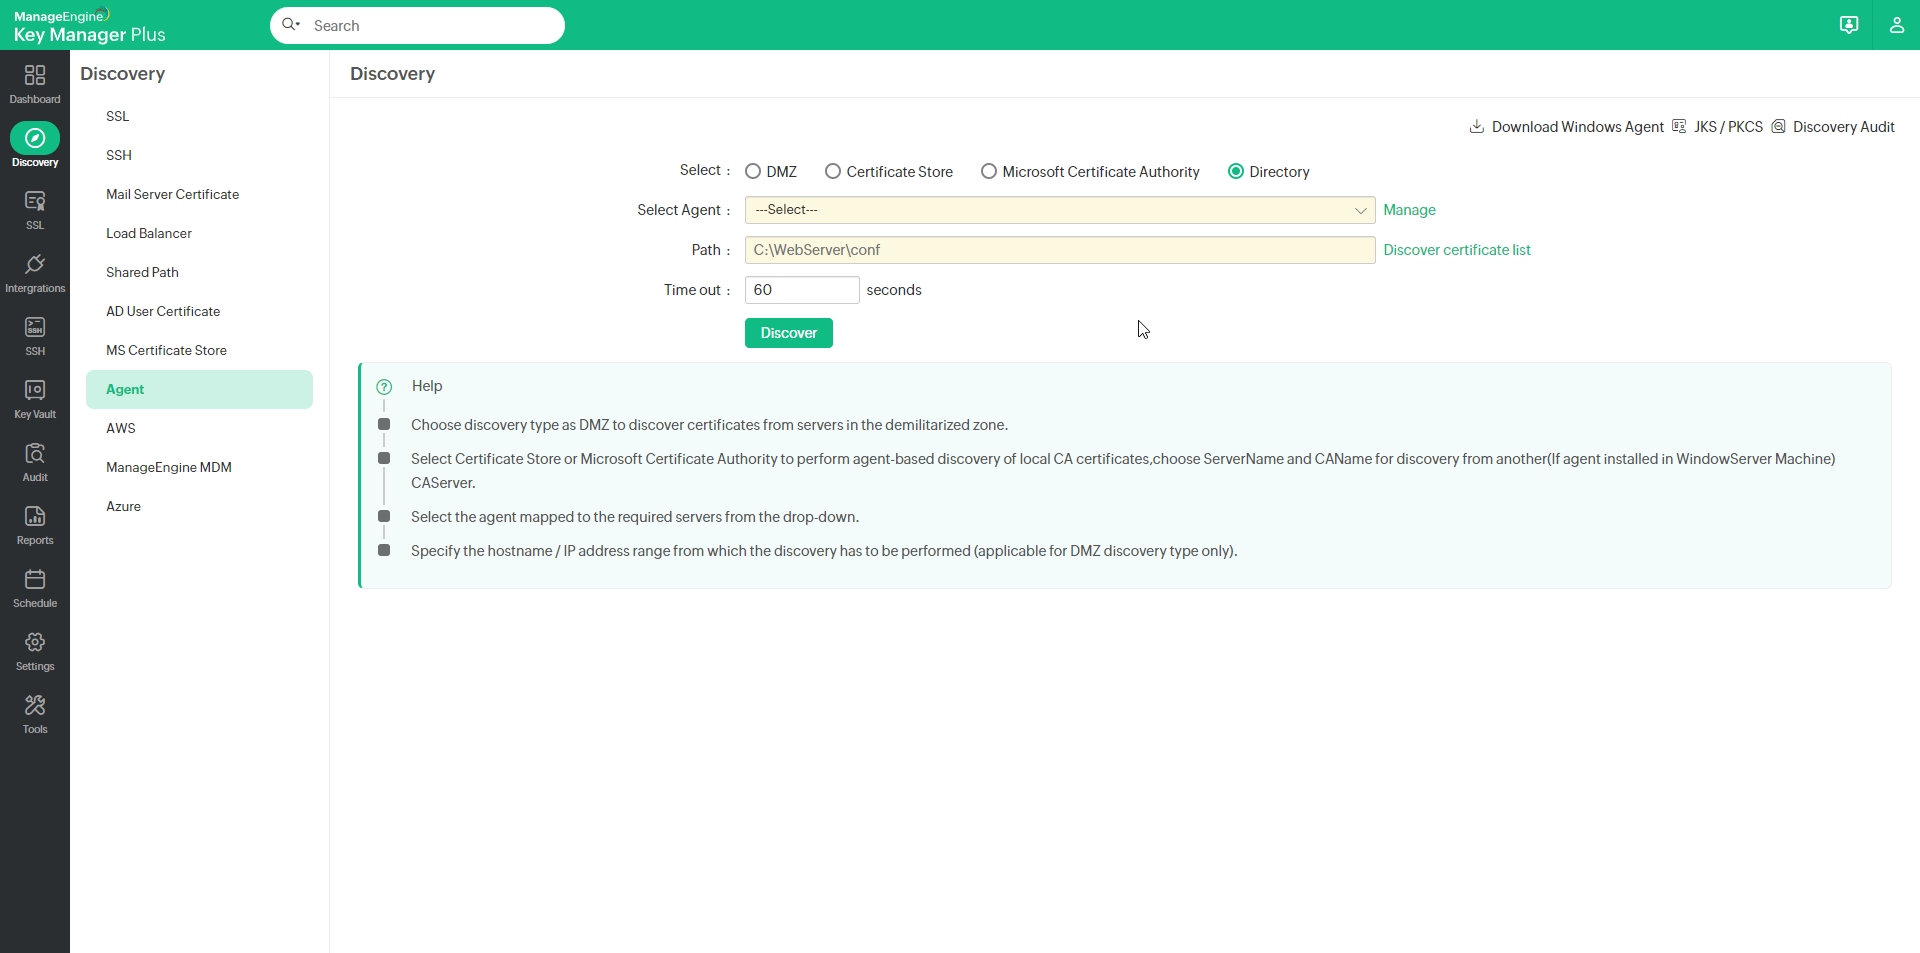
- Navigate to Discovery >> Agent and choose Directory as the type of discovery.
- Select an agent from the drop-down menu.
- Specify the directory path of the target machine, eg: D:\sharedpath\subsharedpath.
- Click the Discover certificate list option to fetch all the certificates available in the specified path.
- From this list, choose certificates that you require and click Discover.
- Enter a time out interval in seconds.
- Certificate files with extensions .keystore and .pfx are grouped separately under the JKS / PKCS option in the top right corner. To import these certificates, click JKS / PKCS, choose the certificate files that you wish to import, provide the file passphrase, and click Import.
To check the status of discovery, click the Discovery Audit tab.
Notes:
2.9 Discover SSL Certificates Hosted on AWS (ACM & IAM)
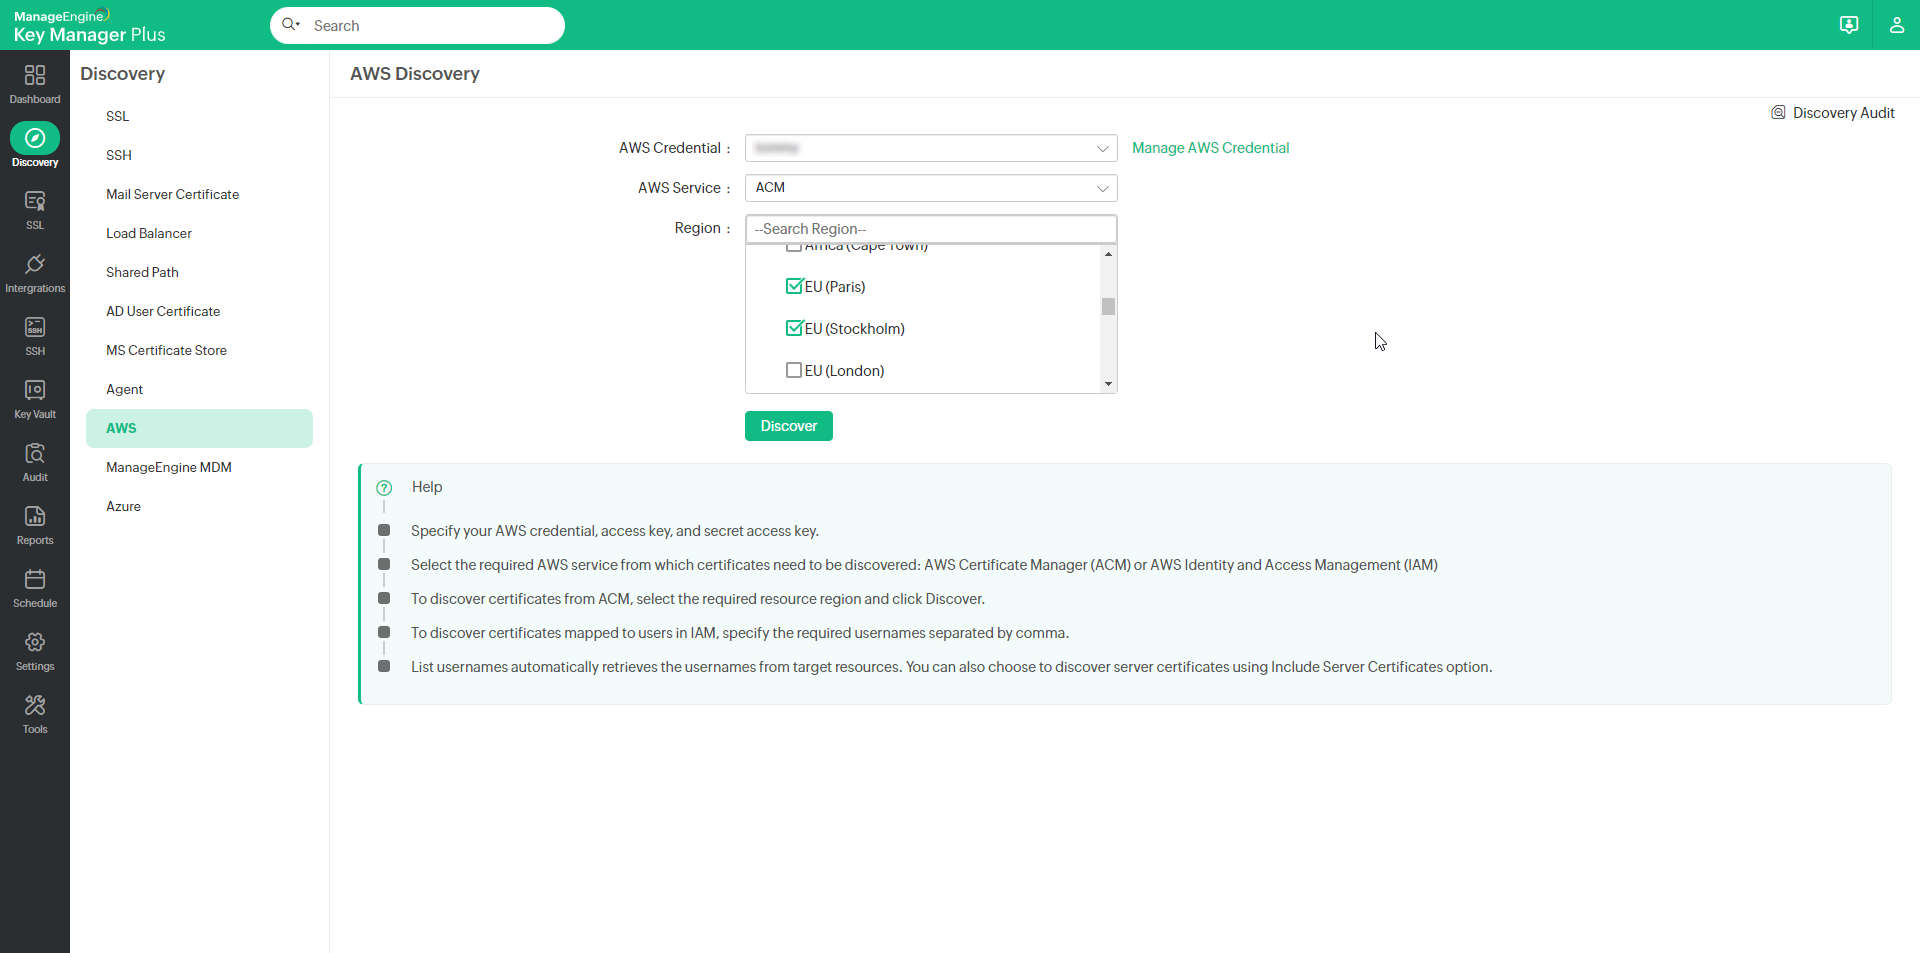
Key Manager Plus enables you to discover, import, and configure expiry notifications for SSL certificates hosted in the following Amazon Web Services: AWS Certificate Manager (ACM) and AWS Identity and Access Management (IAM).
Follow the steps below to discover and import SSL certificates from ACM / IAM into Key Manager Plus.
Step 1: Configure AWS credentials in Key Manager Plus
To add your AWS credentials in Key Manager Plus,
- Navigate to Discovery >> AWS >> Manage AWS Credential and click Add.
- In the Create AWS Credentials window that opens, provide the Credential Name, Access Key and Secret Key.
- Use the Test Login option and check if the login is successful. You will be notified if the login is successful
- Then click Save. The credentials are successfully saved in Key Manager Plus.
Step 2: Discovery and Import
- Switch to Discovery >> AWS tab.
- Choose the appropriate AWS Credentials from among the ones configured in Key Manager Plus or provide your Access Key and Secret Key.
- Choose the required AWS Service from which certificates need to be imported: ACM or IAM.
- To import certificates from ACM, select ACM under AWS service and choose the service Region.
- Click Discover.
- Certificates are discovered from resources in the selected region and imported into Key Manager Plus.
- To import certificates from IAM, specify the required AWS User Name(s) or use the List AWS UserNames option to retrieve the usernames. Choose the required usernames and click Discover.
- You can also choose to import server certificates for the corresponding AWS users by checking the Include Server Certificate option.
User certificates are imported into Key Manager Plus.
3. Rediscover SSL Certificates
From KMP build 6000 onwards, Key Manager Plus allows you to rediscover SSL certificates from the same source using the server details entered during the previous discovery operation. Follow the below steps to perform certificate rediscovery:
- Navigate to the SSL tab.
- Select the required certificates and click More >> Re Discover.
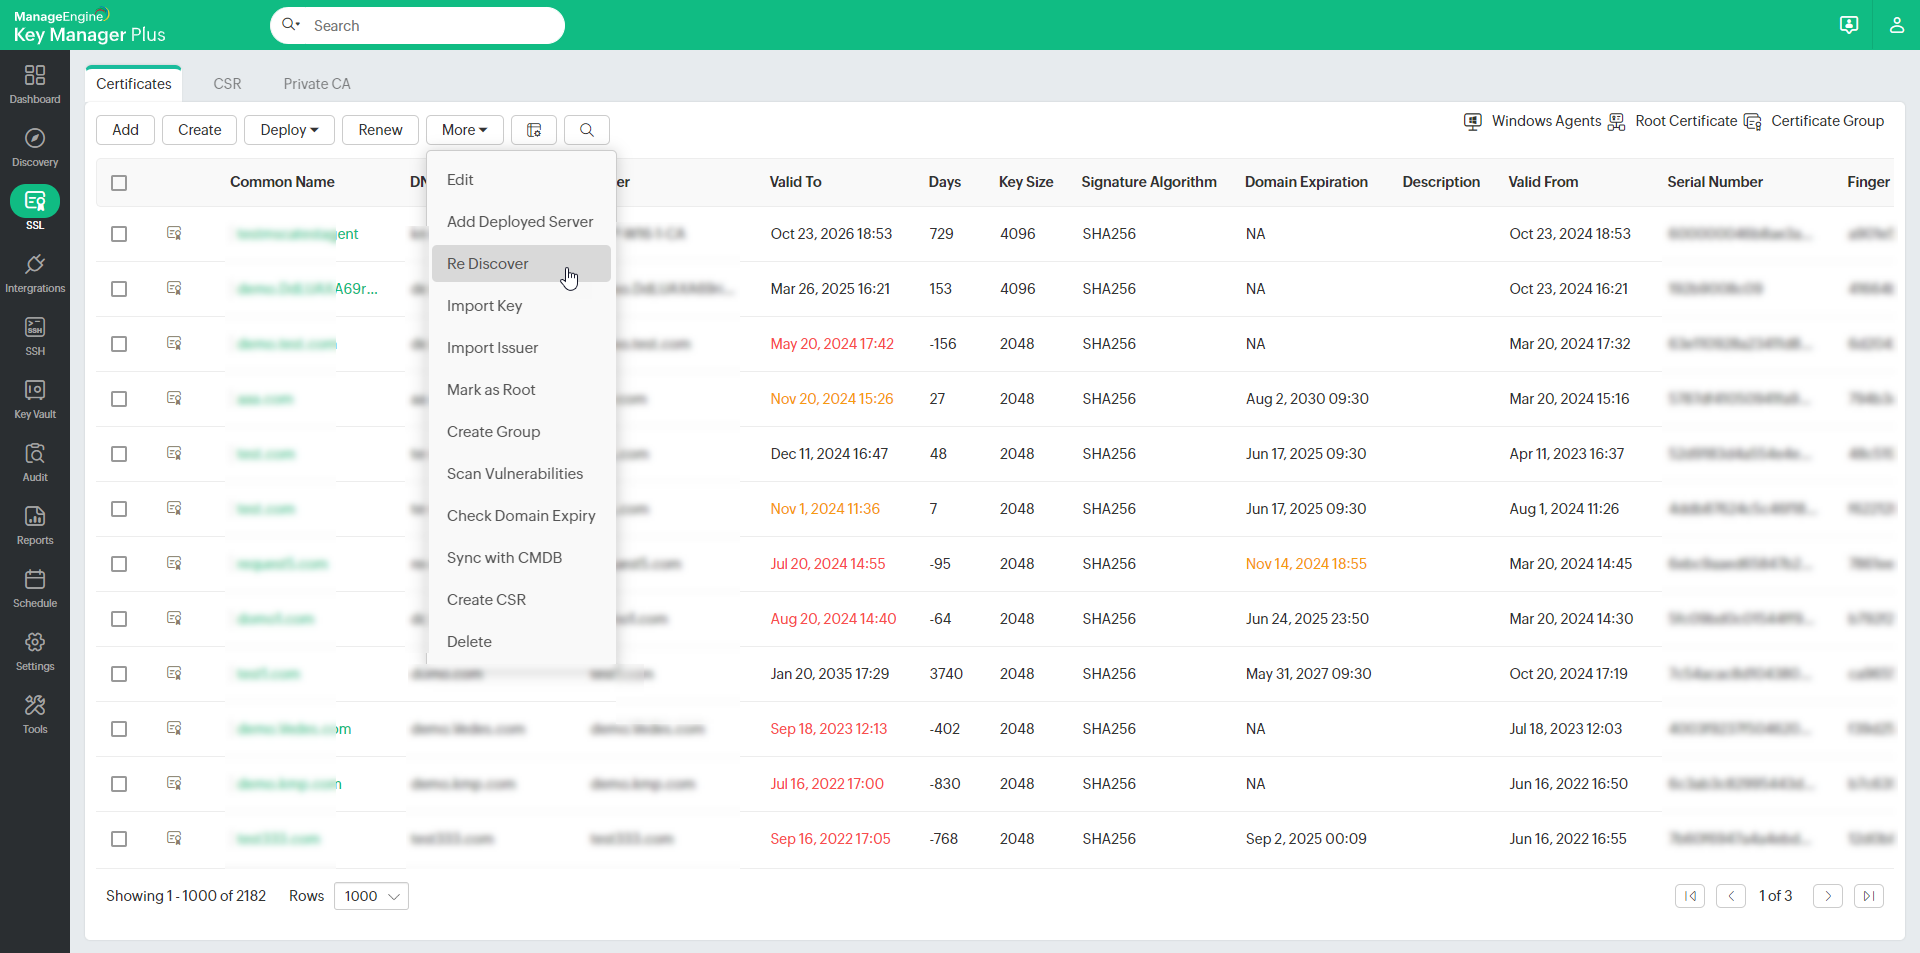
The rediscovery operation begins immediately. You can track the discovery status in the Discovery Audit page. Please note that for agent-based discovery to work properly, upgrade Key Manager Plus Agent to version 6000 before commencing the discovery operation.
4. Centralized Certificate Repository
All the discovered SSL certificates, those that are discovered manually as well as those discovered through scheduled discovery operations are automatically added to the centralized repository of Key Manager Plus. You can view these certificates from the SSL >> Certificates tab in the user interface.
4.1 Search SSL Certificates
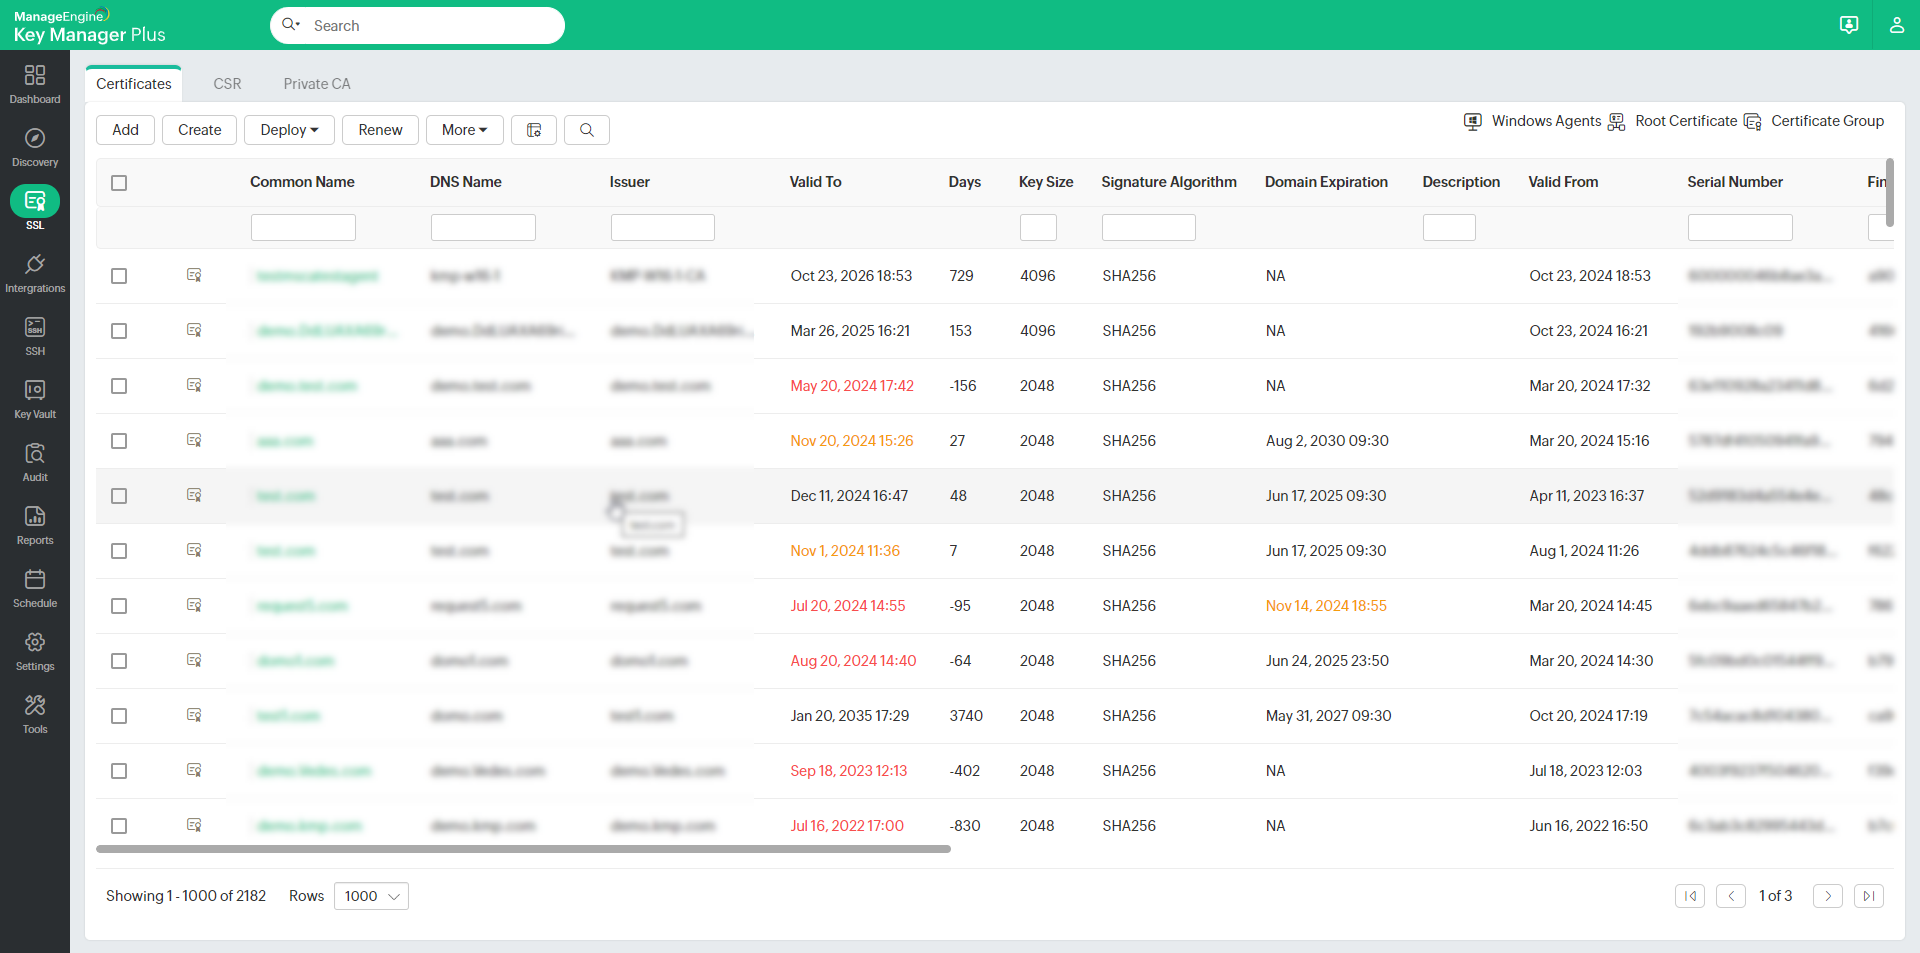
KMP allows you to search certificates using Common Name, DNS Name, Issuer, Key Size, Signature Algorithm, Description, additional fields, etc.
- Navigate to SSL >> Certificates.
- Click the search icon present on the right corner of the table header and mention the search phrase(s) in the text box(es) that appears.
5. Export Private Key / Keystore File
Key Manager Plus allows you to identify and export the private keys / Keystore files of SSL certificates stored in the certificate repository. You can also export certificates in other formats such as PKCS12/PFX or PEM format. Click the Keystore icon ( ![]() ) enabled beside the certificates for which the private keys are managed using Key Manager Plus.
) enabled beside the certificates for which the private keys are managed using Key Manager Plus.
To export the private key or the certificate file:
- Navigate to SSL >> Certificates.
- Click the Keystore icon (
 ) beside the certificate for which you need to export the private key.
 - From the dropdown, choose from the following options as per your requirement:
- Export Keystore / JKS: The Keystore file of the selected certificate will be downloaded.
- Export PKCS12/PFX: The selected certificate will be downloaded in the PFX format.
- Export PEM: The selected certificate will be downloaded in the PEM (Privacy Enhanced Mail) format.
- Export Private Key: The private key of the selected certificate will be downloaded.
- The corresponding certificate is downloaded in the selected format.
6. Update Servers with Latest Certificate Versions
In case of wildcard certificates or single SSL certificate deployed to multiple servers, it is necessary to keep track of servers in which the certificate is deployed and also check if the latest certificate version is in use. Key Manager Plus helps you ensure this.
- Navigate to SSL >> Certificates tab and click multiple servers icon (
 ) corresponding to the required certificate.
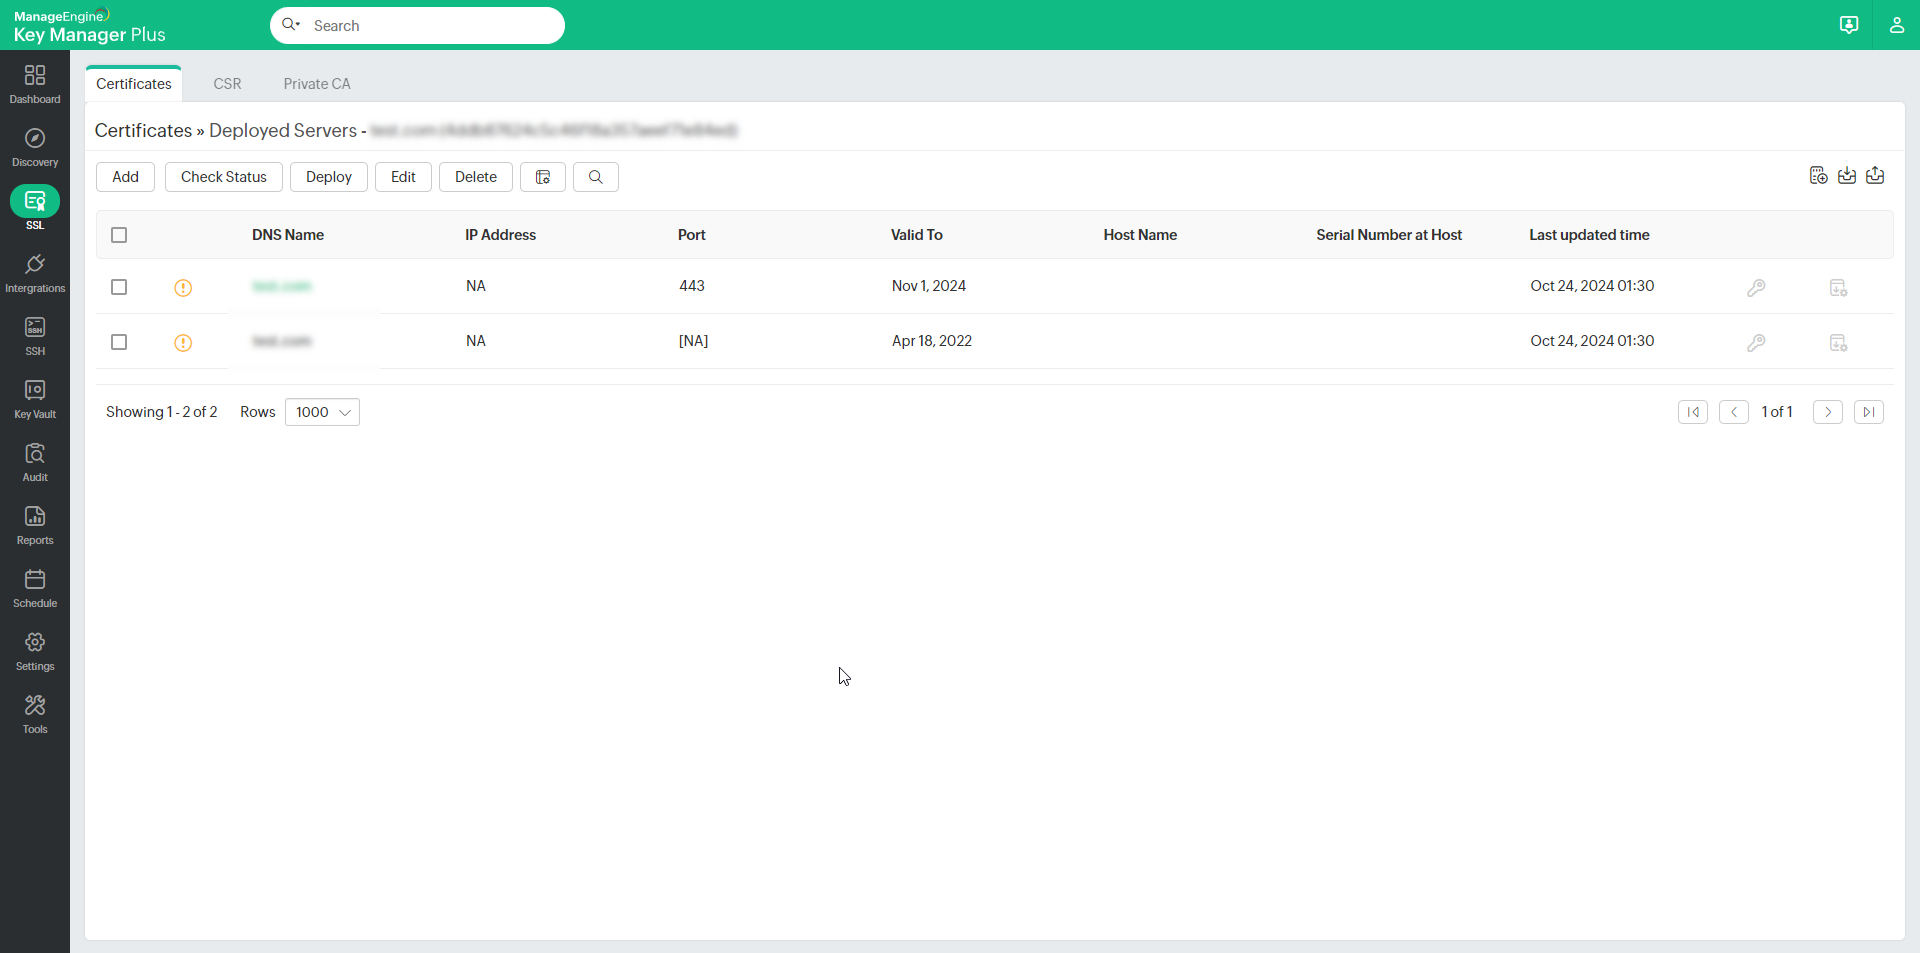
 - A window opens listing the servers in which the certificate is deployed along with other information such as IP address, port and certificate validity.
- If any of the servers listed has an older / expired version of the certificate, update it with the latest version immediately. Select the server and then click Deploy. Refer to the detailed deployment procedure here.
- Click Add to add a new server.
- In the pop-up that appears, mention the DNS Name, IP Address and Port.
- Click Save.
- Click edit icon corresponding to the required server to modify the server details and click Save.
- Select a certificate and click Check Status to check the sync status of the certificate. To know more about Certificate sync status, click here.
Also, you can edit details pertaining to a particular certificate or delete irrelevant certificates by selecting the certificate and clicking the More dropdown.