What are security groups in Virtual Private Cloud?
A security group is like a virtual firewall. It works much like a traditional firewall does.
It consists of a set of rules that can be used to monitor and filter an instance's incoming and outgoing traffic in a Virtual Private Cloud (VPC) instance. Filtering is done on the basis of protocols and ports.
An instance can be assigned with a maximum of five security groups. Unlike network access control lists (ACLs), which operate at the subnet level, security groups operate at the instance level. Therefore, it's not necessary to assign the same set of security groups to every instance in a subnet. Every instance is allowed to have a different set of security groups.
On top of this, security groups can be assigned to multiple instances.
Features of AWS security group
- Security groups are permissive. You cannot have a rule to deny access.
- They are stateful. Irrespective of the inbound rules, if you send a request from your instance, the response traffic for that request will be automatically allowed. For VPC security groups, the responses to allowed inbound traffic can leave the instance irrespective of outbound rules.
- By default, they allow all outbound traffic.
- Every VPC includes a default security group.
Default security groups
Every VPC includes a default security group. If you do not specify a security group while launching an instance, the default security group will be assigned to it. However, at anytime, you can define a new security group using the Amazon EC2 console.
However, at anytime, you can define a new security group using the Amazon EC2 console.
The default security group comes with the following built-in rules:
- The inbound traffic coming from instances associated with the default security group will be allowed. All outbound traffic originating from the instance is allowed. Nevertheless, you can modify the default security group’s rules.
- The default security group cannot be deleted. If you attempt to delete it, the following error will be displayed:
Client.CannotDelete: the specified group: "sg-51320848" name: "default" cannot be deleted by a user.
What are security group rules?
Every security group consists of a set of rules. The security group examines all of its rules before allowing any traffic to enter or leave the instance. The rules that are used to control the inbound traffic are independent of the rules that are used to control the outbound traffic.
When a new security group is created, initially all inbound traffic is restricted and outbound traffic is allowed. Therefore, you need to add rules to the group to permit incoming traffic and to apply restrictions on the outbound traffic.
There is a limit, known as VPC quotas, on the number of rules that can be created for a security group. A security group can have a maximum of 120 rules. Out of the 120 rules, 60 rules are inbound rules and 60 rules are outbound rules. The limit of 120 rules is imposed separately for IPv4 and IPv6 rules. This means a security group can have 60 inbound rules and 60 outbound rules for IPv4 traffic and 60 inbound rules and 60 outbound rules for IPv6 traffic.
Since an instance can have multiple security groups associated with it, all the rules from each security group associated with the instance are combined together to form a single set of rules. This set of rules is used to determine whether the traffic should be denied or allowed into the instance.
For every security rule that you add to the security group, you need to specify the values for the following six fields:
- Type: Indicates the protocol type. Select the required protocol, say HTTP or SSH, from the drop-down list. Custom protocols are also included in the list.
- Protocol: This is usually covered by Type. So this field will be greyed out. However, if you had created a custom rule, you can state a protocol, like TCP or UDP for example
- Port Range: This value will be filled automatically depending upon the default port or port range of the protocol you chose. You can also use custom ports if you'd like.
- ICMP Type and Code: Here again it indicates a protocol type. Select the appropriate type, say Echo requests (ping requests), with the code you want to allow, say code 0: network unreahable. This ensures that the other ICMP traffics are blocked out.
- Source (inbound rules) or Destination (outbound rules): You can specify a particular IP Address, an AWS security group, or a subnet.
Note: If you specify 0.0.0.0/0 as the IP Address, anyone will be able to access the instance.
| Source/Destination | Convention to be followed |
|---|---|
| IPv4 Address | /32 prefix length used. For example: 203.0.112.1/32. |
| IPv6 Address | /128 prefix length used. For example: 2001:db8:4567:1a00::123/128. |
| Range of IPv4 Addresses | For example: 203.0.112.0/24. |
| Range of IPv6 Addresses | For example: 2001:db8:4343:1a00::/64 |
| Prefix List ID | For example: pl-1212abc1212abc121 |
| Prefix List ID | Current security group, different security group in the same VPC, different security group in a VPC peering connection |
Description: You can include a description for the rule. The convention for this is the same as the one for security group description.
It's also important to note that only rules to allow traffic can be defined in the security group. Rules to deny traffic cannot be defined.
How to create a security group using the AWS Management Console?
Every new instance comes with a default security group. However, Amazon VPC also provides you with the option to create your own security groups.
Step 1:
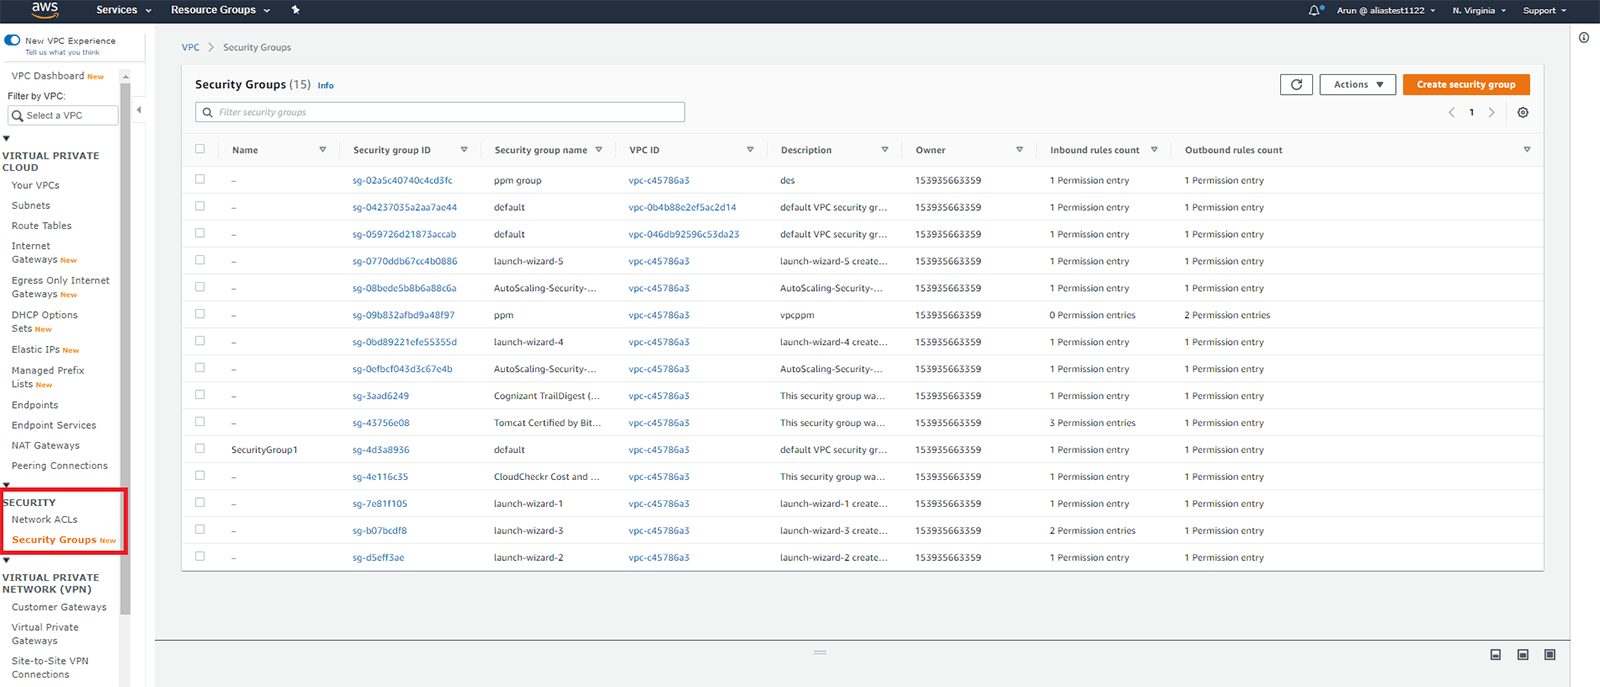
Click on Security Groups under SECURITY on the navigation pane after opening the Amazon VPC console (a list of security groups will be displayed if you've already created some).
Step 2:
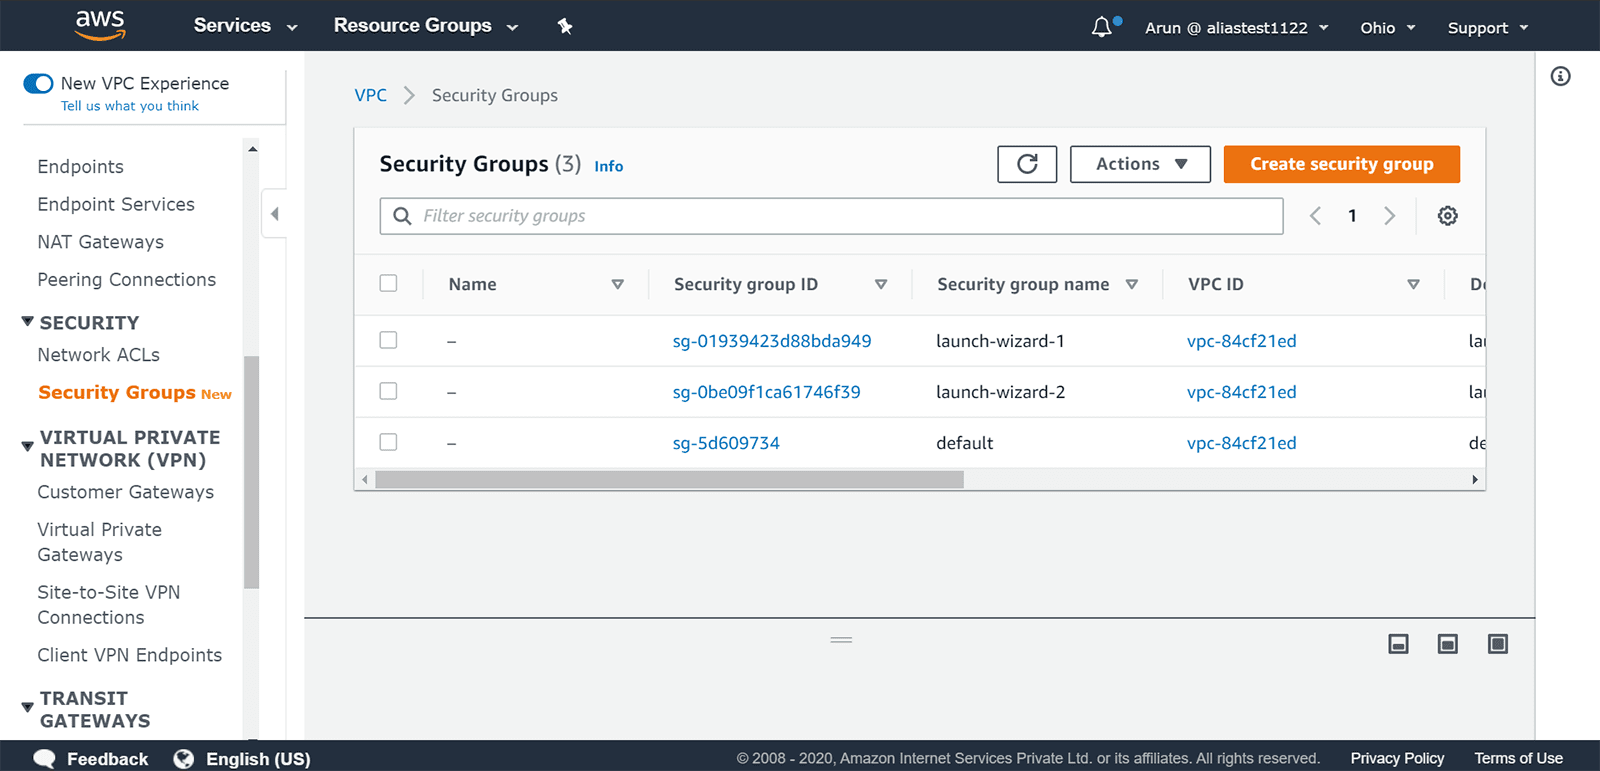
Click the Create security group button at the top right-hand corner of the screen.
Step 3:
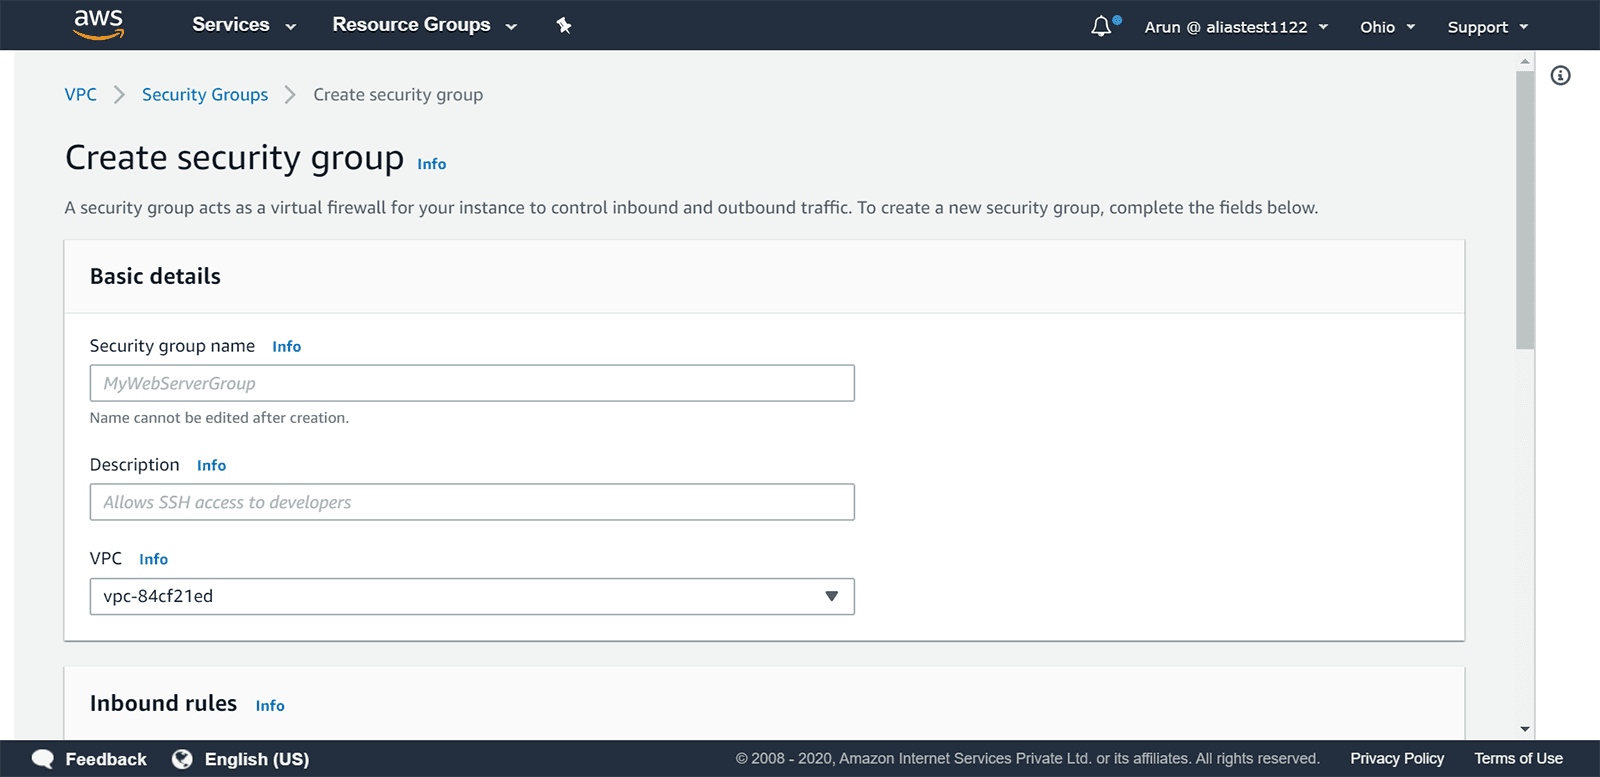
You will have to provide a name for your security group as well as a description. Then select the appropriate VPC ID.
Step 4:
You can either add security group rules now or after creating the security group.
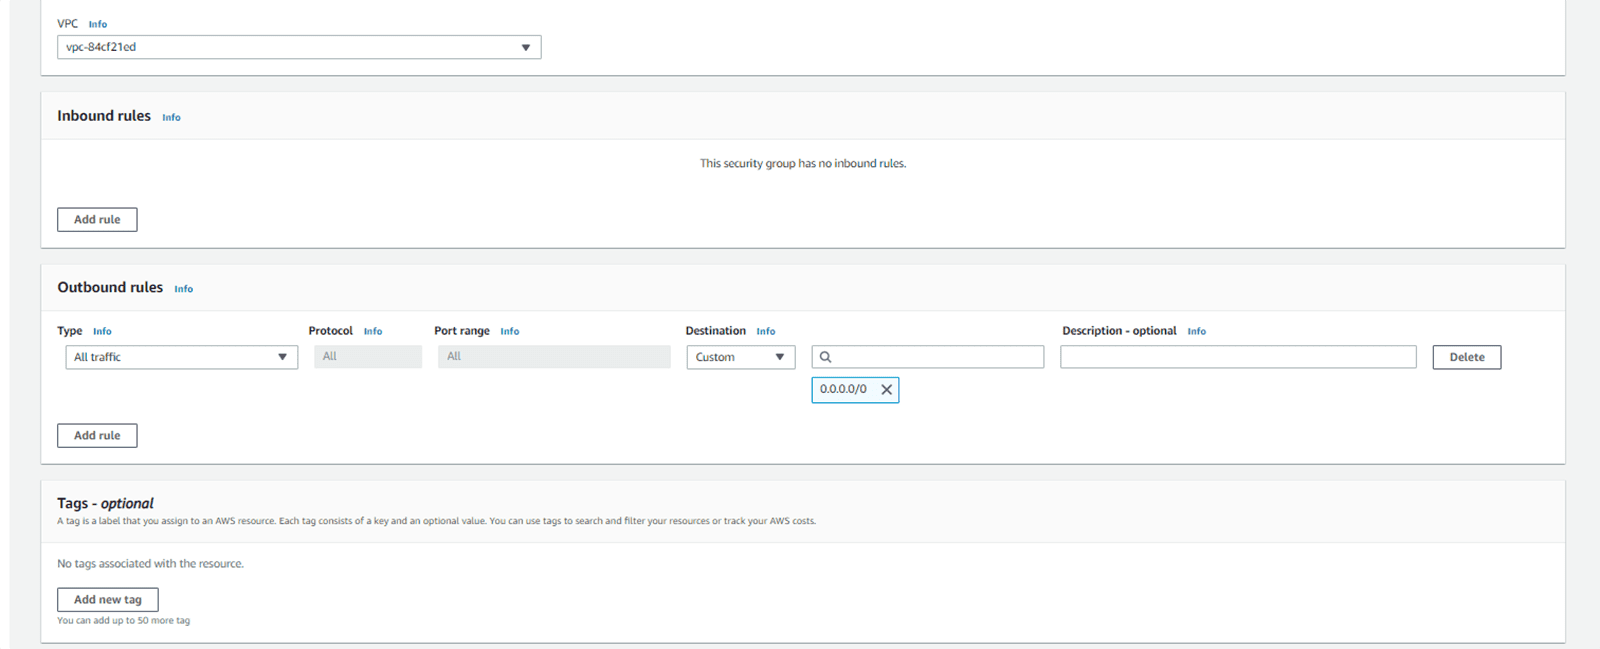
Step 5:
Click the Create security group button at the bottom-right corner of the screen.

Step 6:
A security group will be created successfully.

You can also create a security group by employing the command line.
Conventions for naming and providing a description for a security group
When you create a security group, you will be asked to enter a name and a description for the security group. You need to keep the below points in mind for naming a security group:
The name and the descriptions only have a maximum of 255 characters each.
Names and descriptions can only contain the following characters:
Uppercase or lowercase letters
The numbers 0-9
Special characters: ._-:/()#,@[]+=&;{}!$*.
sg- denotes a default security group. Therefore, it cannot be used for naming security groups created by the user.
Inside any given VPC, every security group should have a unique name.
How to change the security groups associated with an instance?
Changing the security groups assigned to an instance using the Amazon VPC Console:
Step 1:
Click Running Instances after opening the Amazon VPC Console.
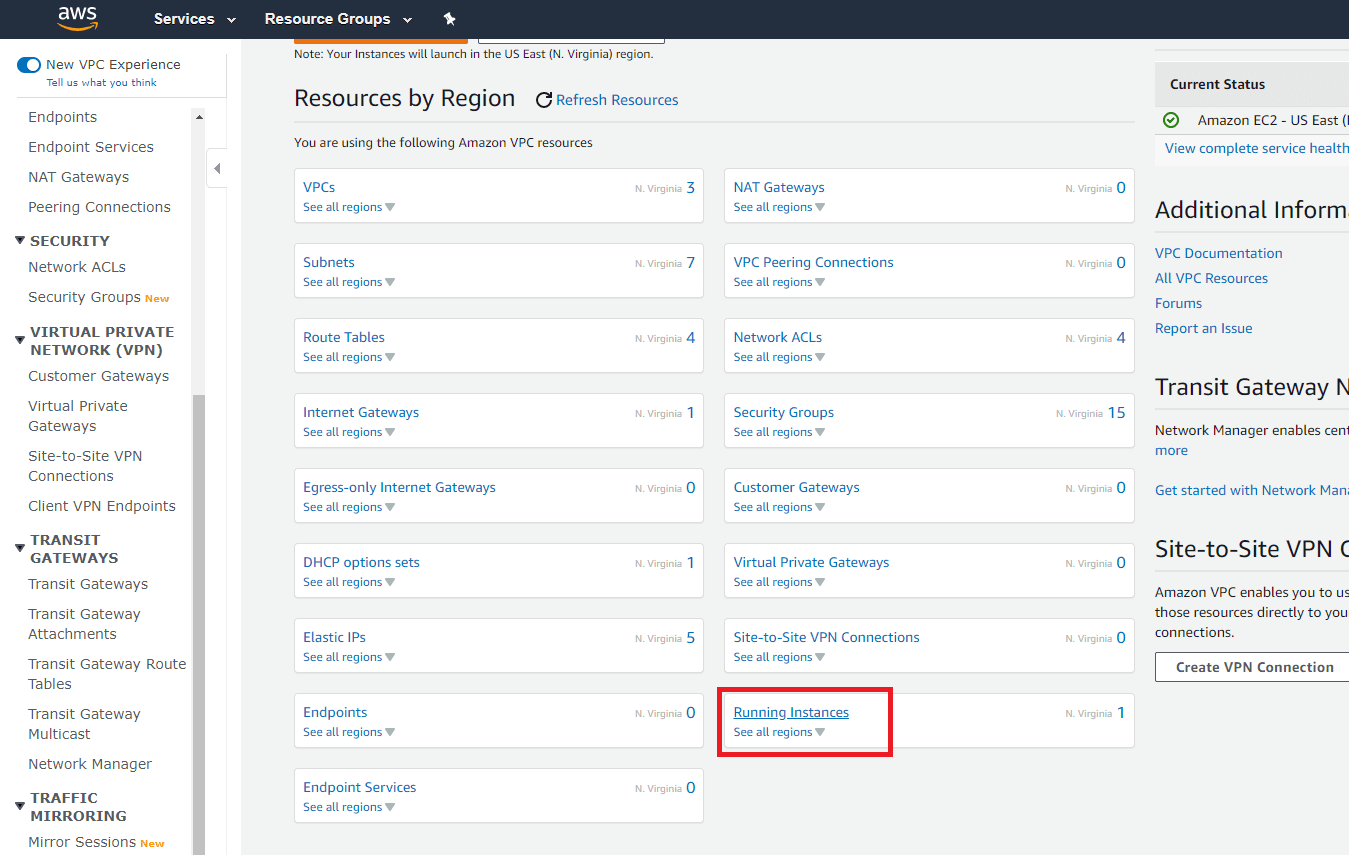
Step 2:
Then click Actions > Networking > Change Security Groups.
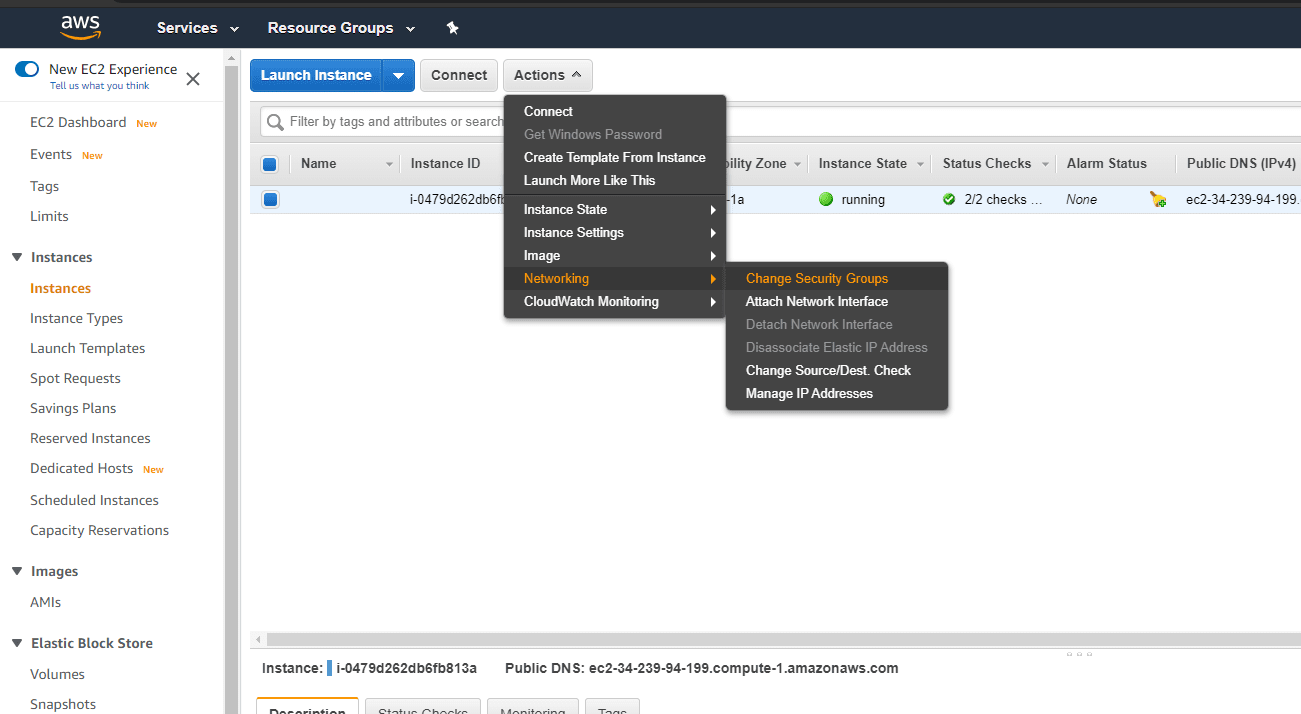
Step 3:
A Change Security Groups dialog box will be displayed. In that dialog box, select the security groups you want to assign to the instance, and click Assign Security Groups.
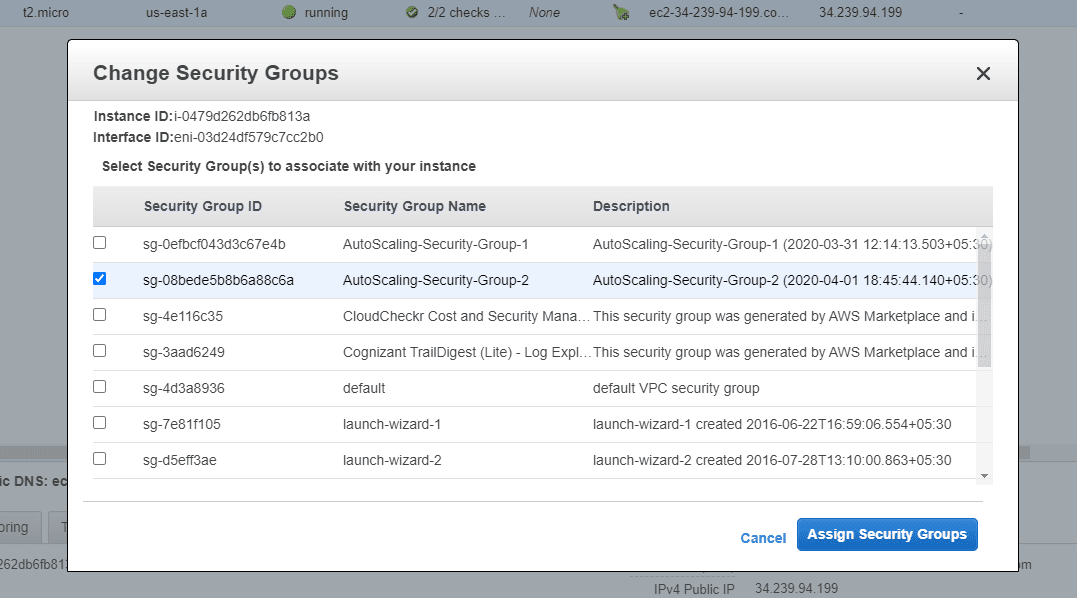
The security groups associated with an instance can be changed either when the instance is in the active state or in the stopped state. You can also use the command line to change the security groups of an instance.
How to delete a security group from a VPC?
A default security group cannot be deleted. However, a security group created by a user can be deleted if the security group does not have any active or inactive instances assigned to it. If the security group you want to delete has an instance assigned to it, you can reassign the instance to a different security group, and then delete it.
Deleting a security group using the Amazon VPC Console:
You can delete multiple security groups at the same time using the VPC Console.
Step 1:
Click Security Groups under Security on the navigation pane after opening the Amazon VPC Console.
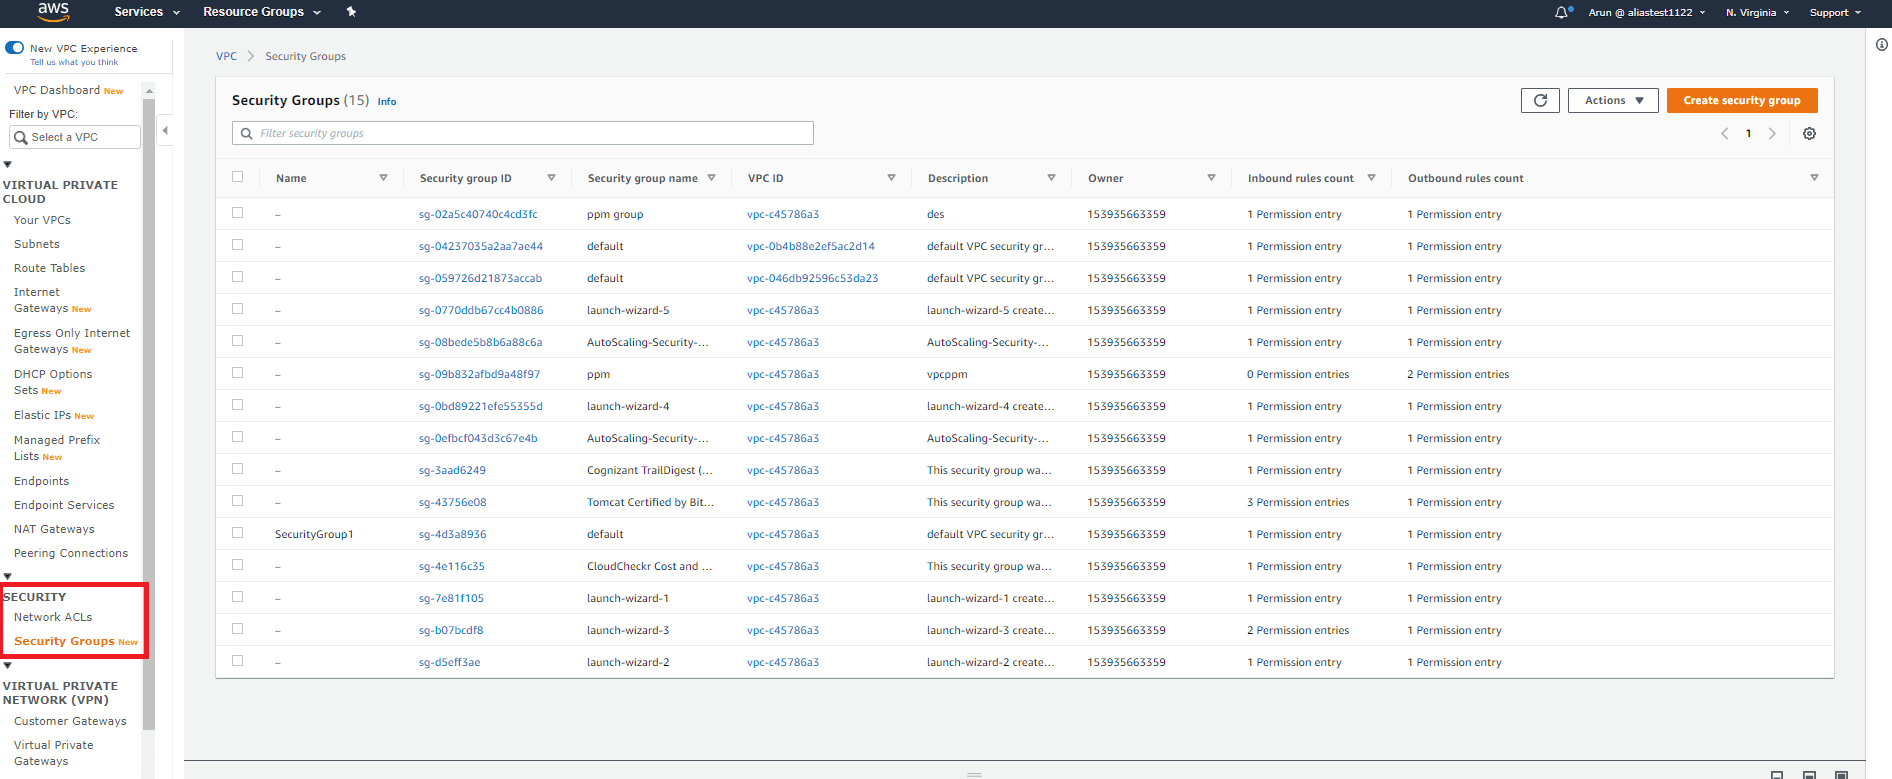
Step 2:
A list of security groups will be displayed. Select the ones you want to delete.
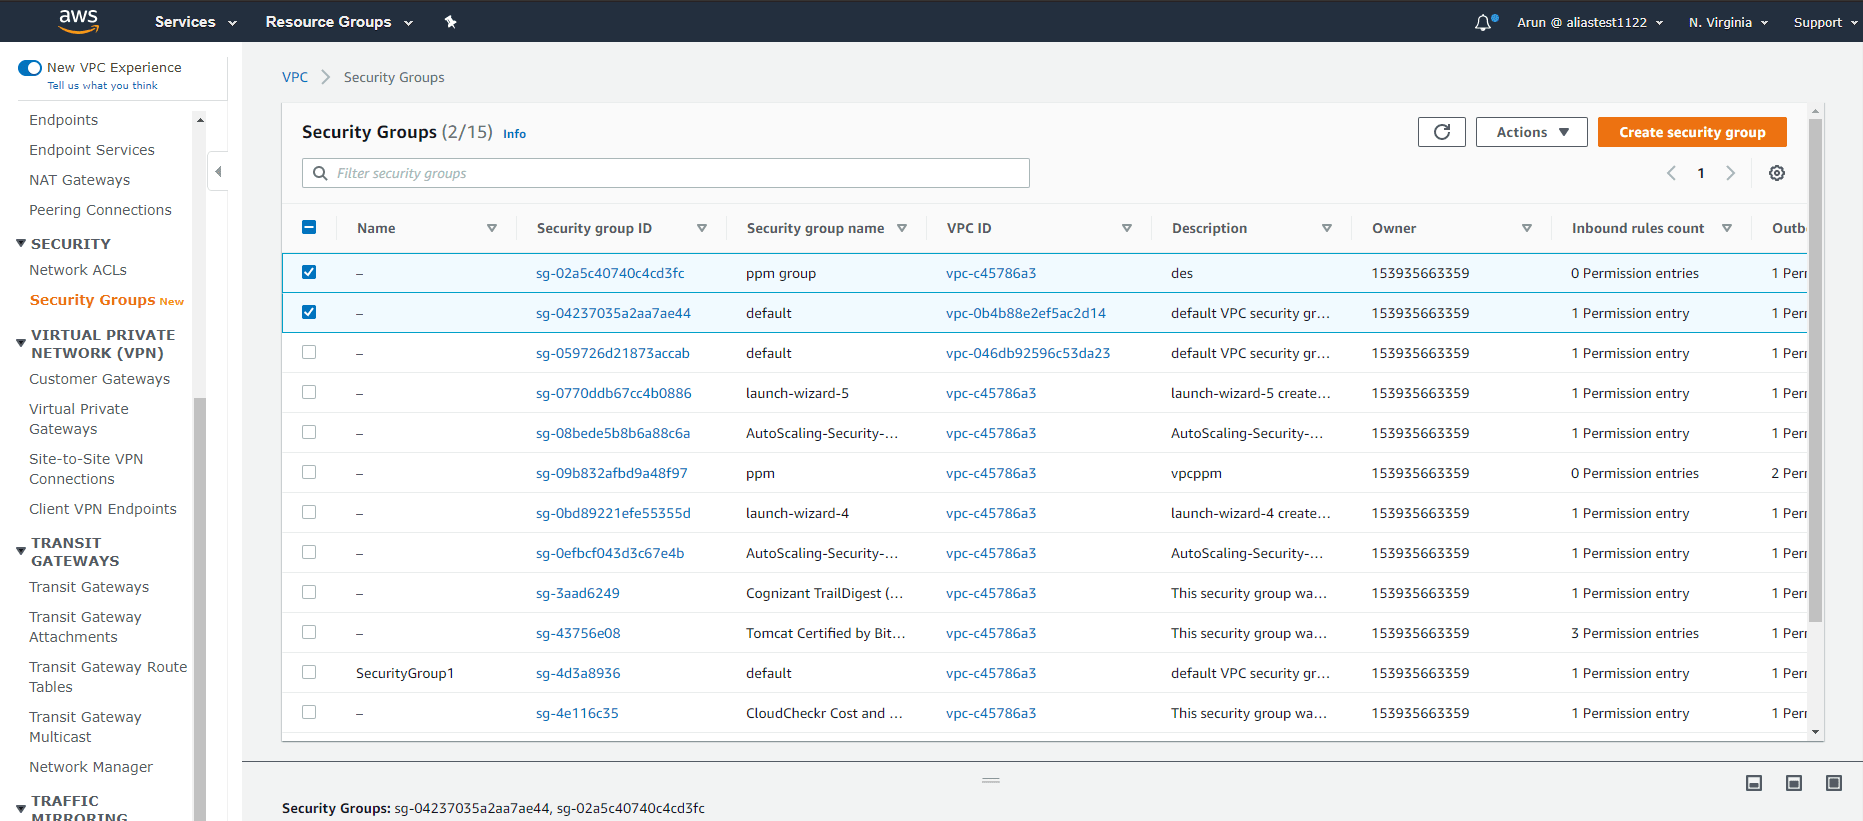
Step 3:
Click Actions and then Delete security group.
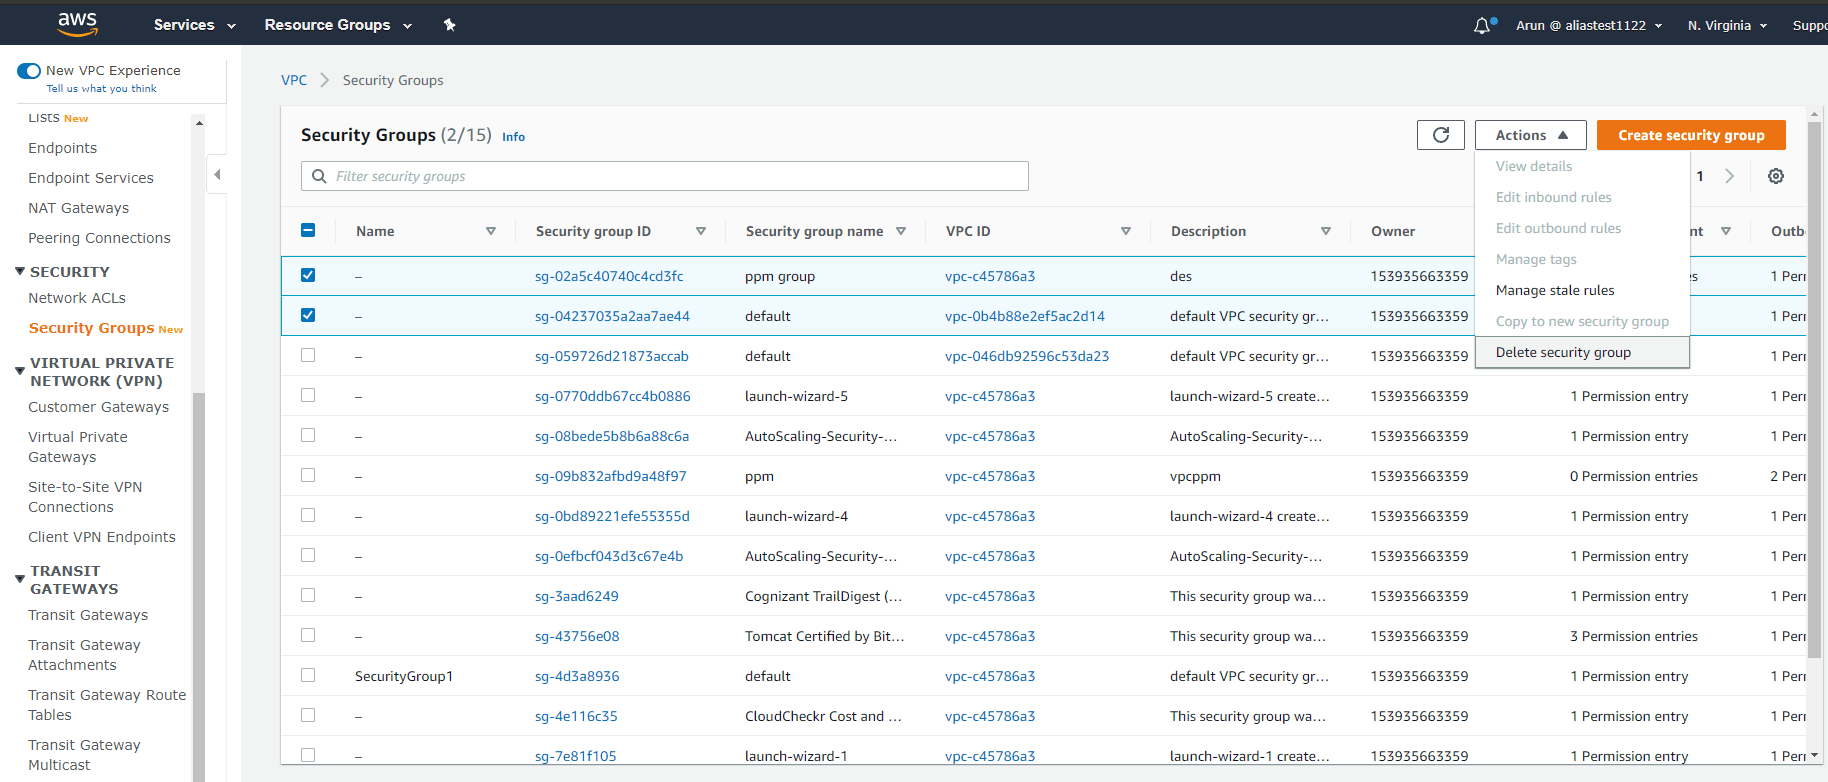
Step 4:
Click Delete in the dialog box that's displayed.

You can also delete a security group by employing the command line or the API. However, you can delete only one security group at a time this way. Creation, deletion or modification of a security group are actions that require high surveillance. This is because a security group is more likely to be the target of cyberattacks due to its higher permissions. With Log360, you can get real-time insights into configuration changes, creation and deletion of security groups, unauthorized and revoked security group ingress and egress, network gateway changes, and network access control list (ACL) changes in the form of alerts and reports. To learn more, walk through the product yourself or sign up for a free personalized demo.

AWS security group reports from Log360
How to view the list of all security groups?
To view the list of all security groups along with their information:
Step 1:
Click Security Groups under Security on the navigation pane after opening the Amazon VPC Console.
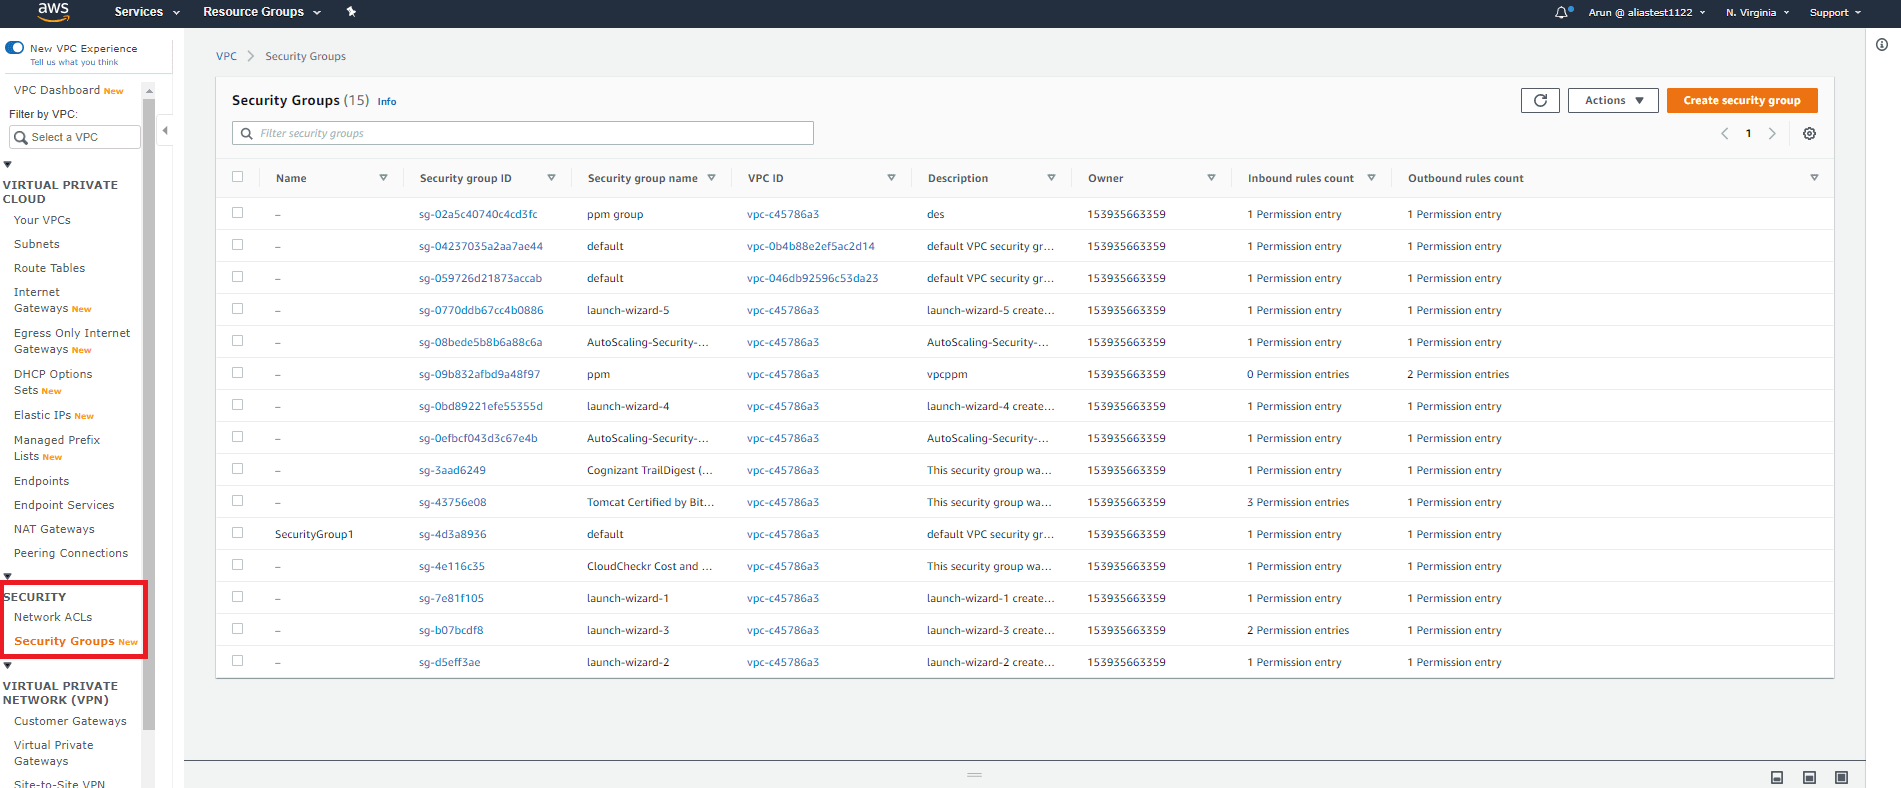
Step 2:
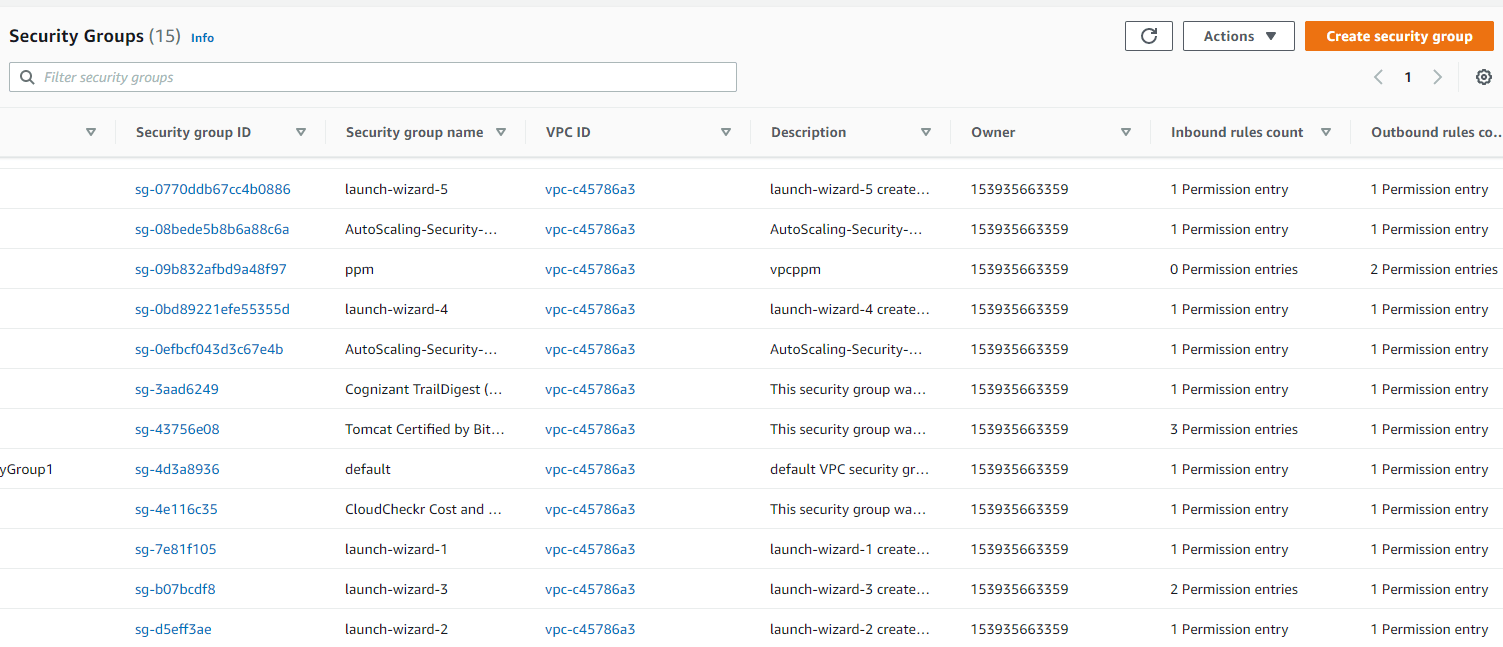
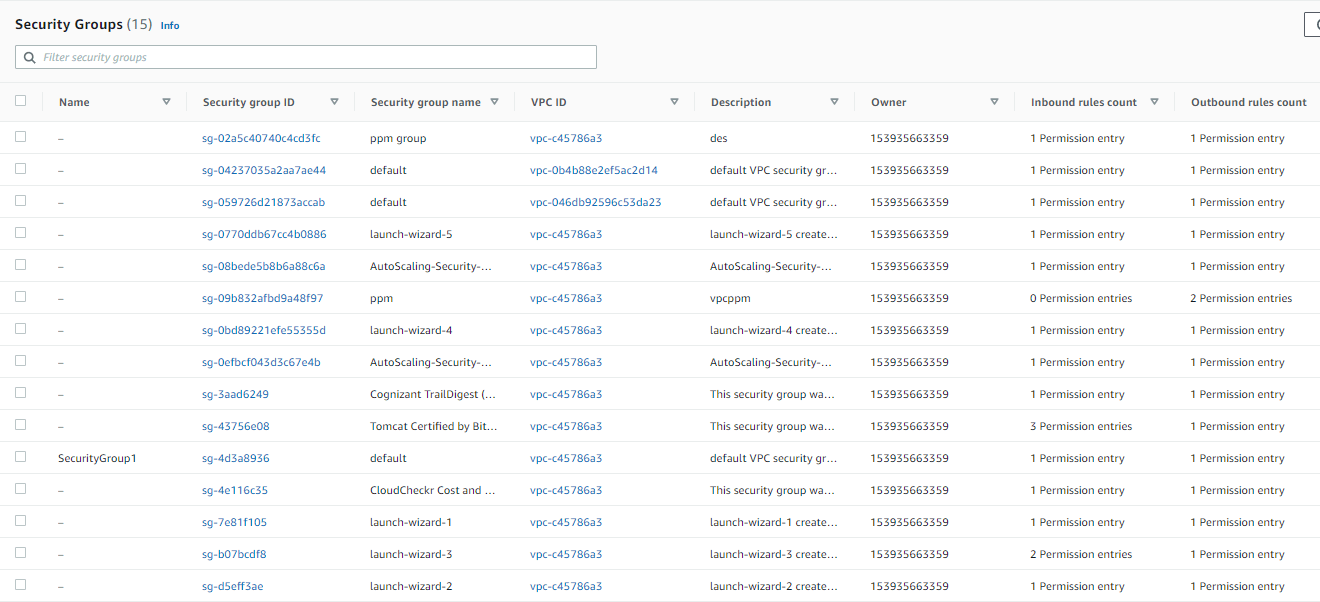
A list of all security groups will be displayed. It includes information such as security group ID, group name, VPC, and group description.
Step 3:
You can also view the inbound and outbound rules of any security group.
How to create a copy of a security group?
You can create a new security group by copying or duplicating an existing one. The copied security group will consist of the same security group rules as that of the original security group. Furthermore, it will be created in the same VPC as the original one if not specified otherwise.
Creating a copy of the security group using the VPC Console:
Step 1:
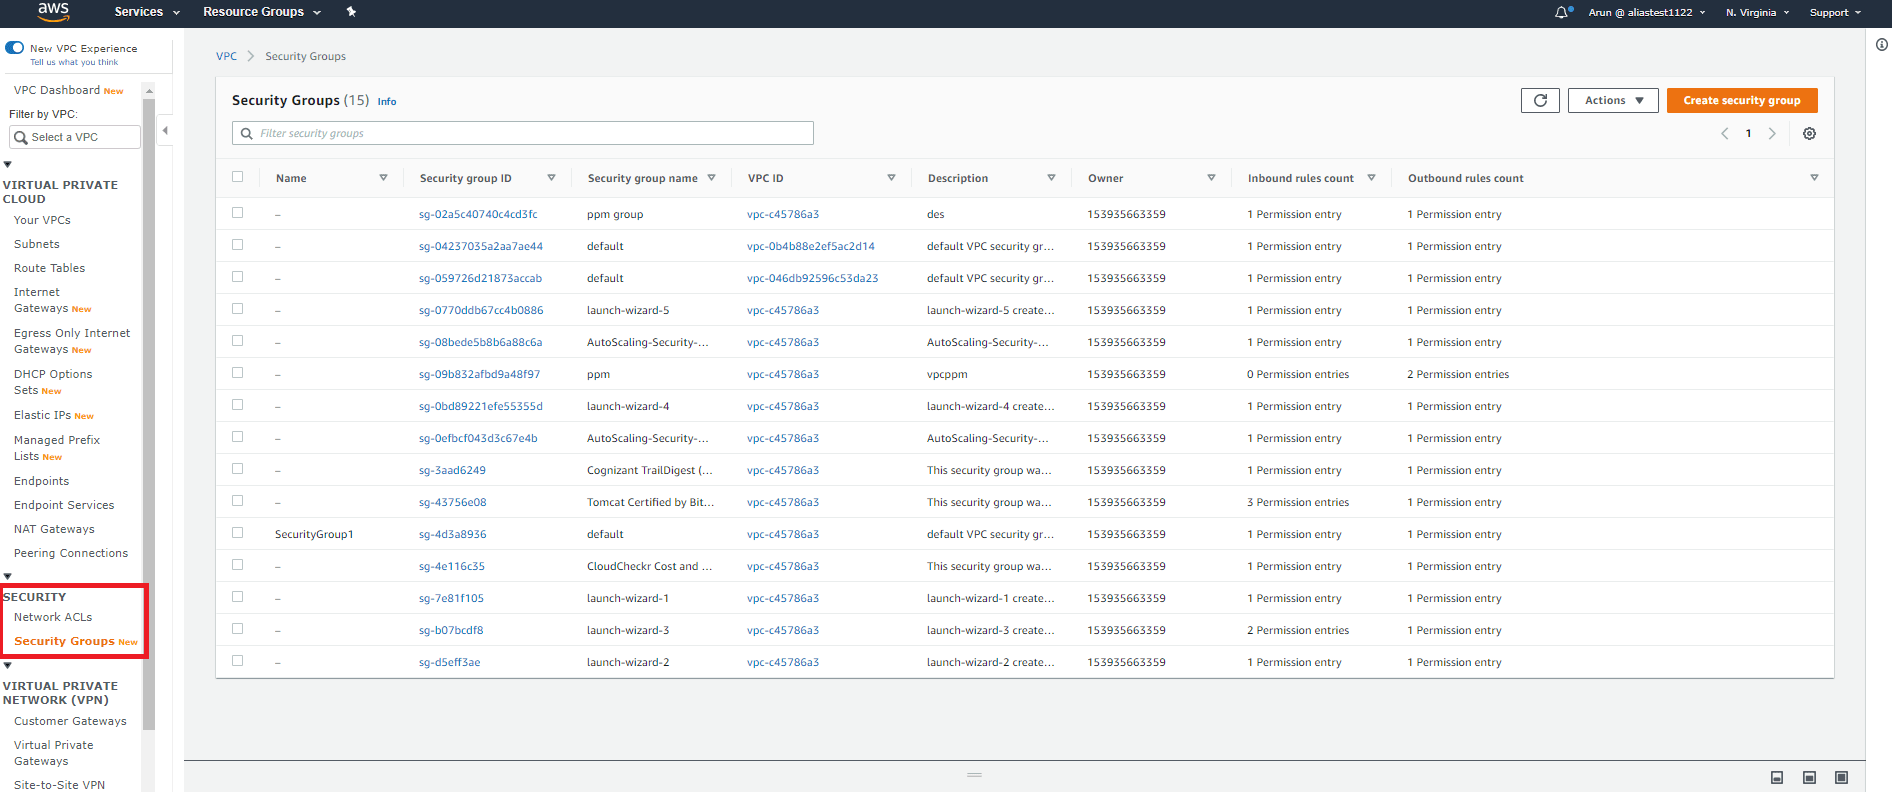
Click Security Groups under Security on the navigation pane after opening the Amazon VPC Console.
Step 2:
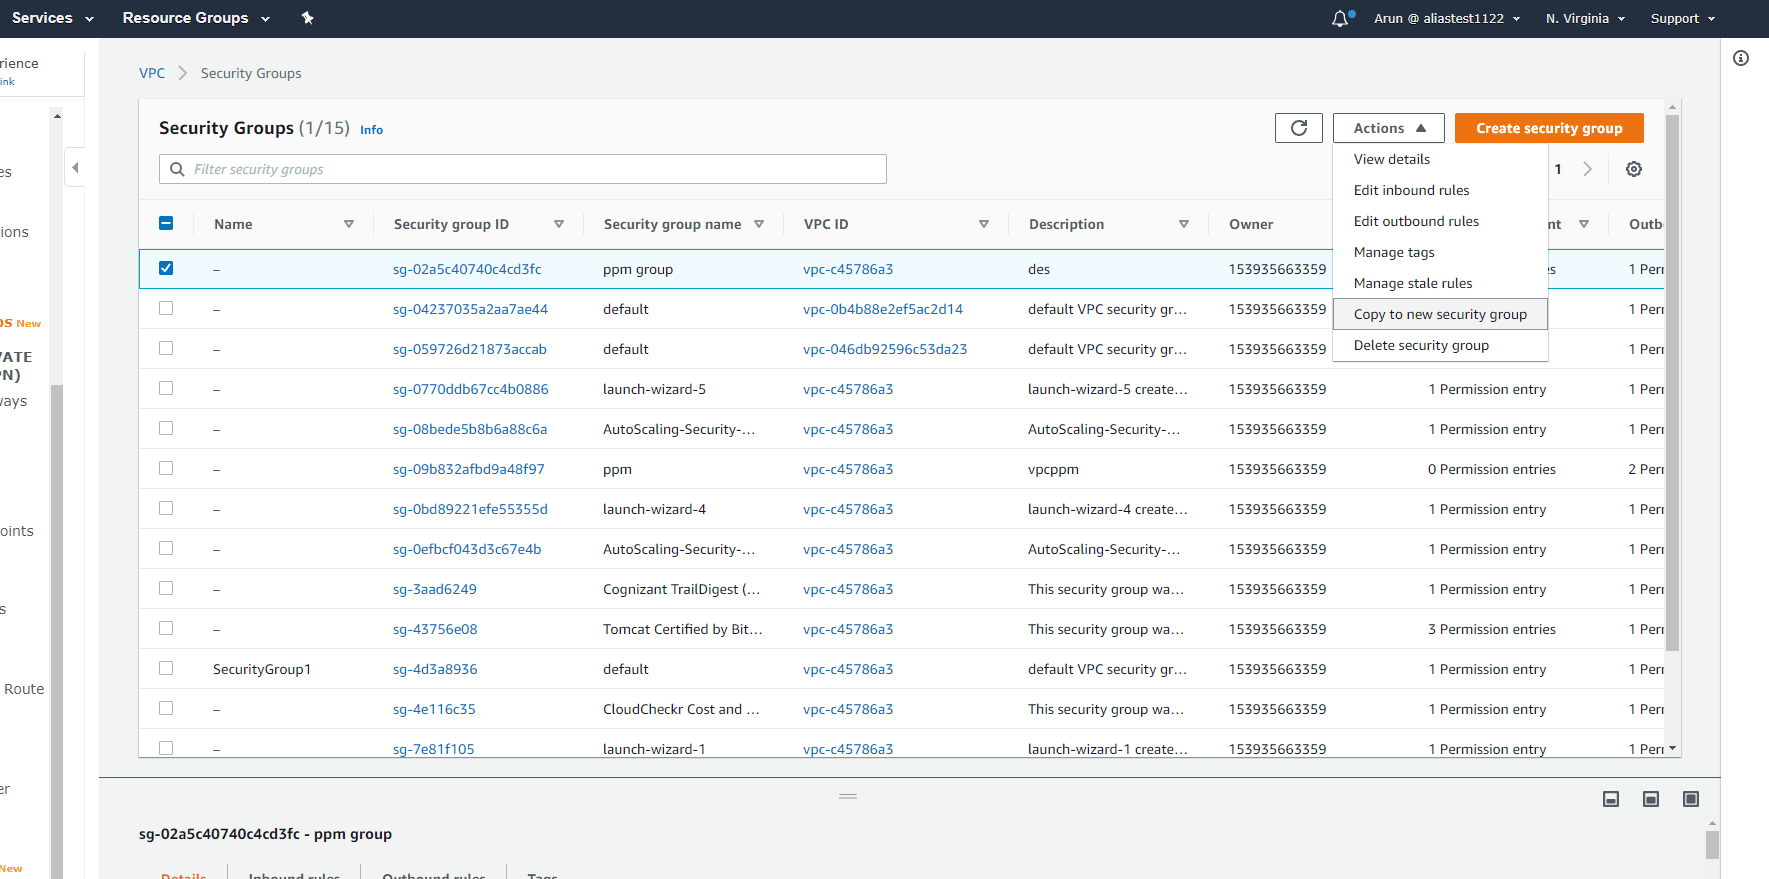
Choose the security group you want to copy, and then click xActions > Copy to new security group.
Step 3:
Provide all the necessary details, and click Create security group.
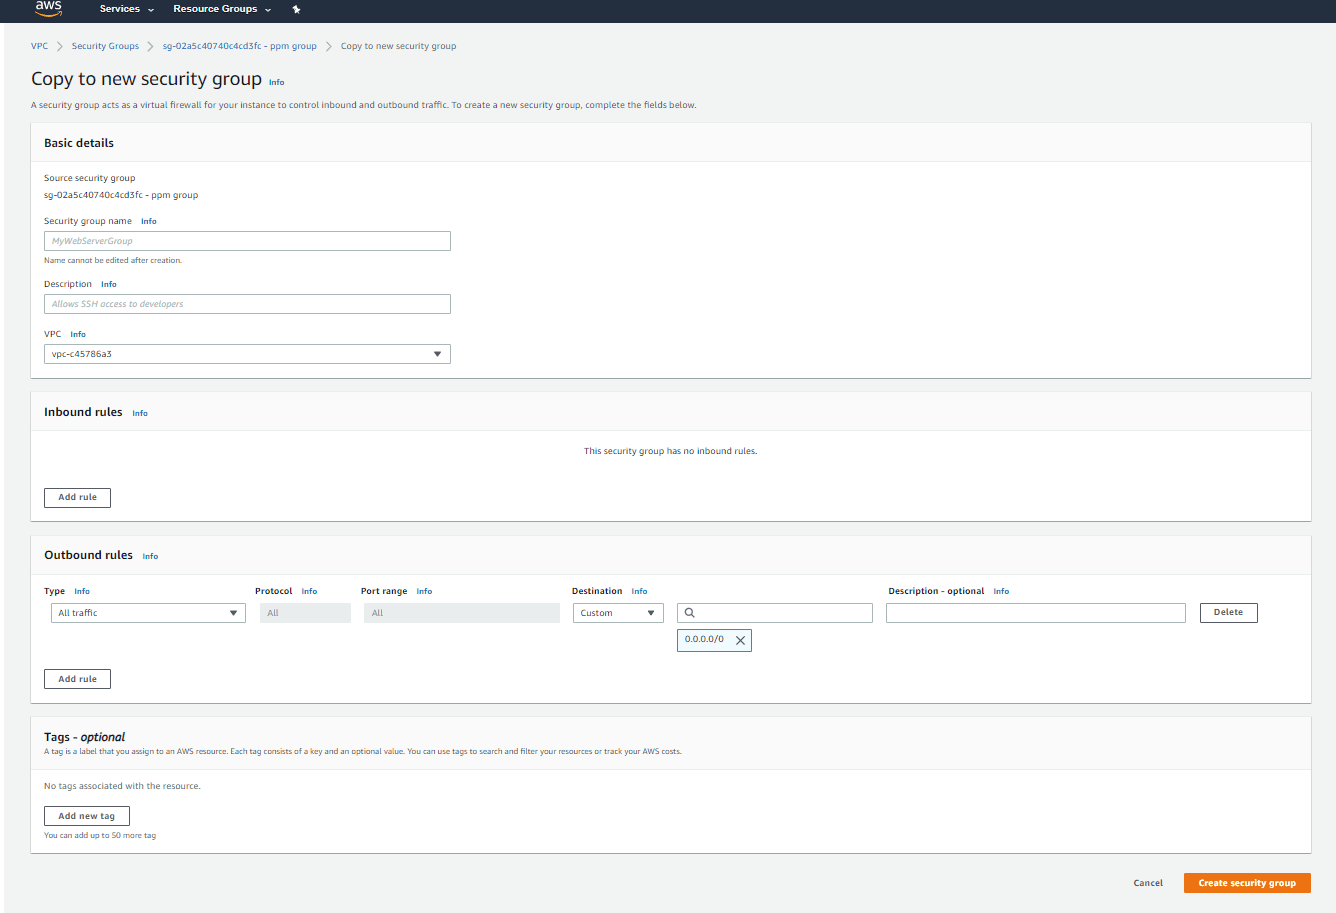
The VPC and the rules of the copied security group can be changed while copying. The new security group will have a unique ID. A security group cannot be copied from one region to another.
Adding a rule to the security group using VPC Console
Any addition or modification of the rules of a security group will be applied to all instances linked to that particular security group.
By default, a new security group by default consists of a single outbound rule that permits all outbound traffic. In order to permit only certain outbound traffic to leave your instance, you can remove this rule and add specific outbound rules that restrict the traffic. The below steps will guide you to add and modify rules in a security group.
Step 1:
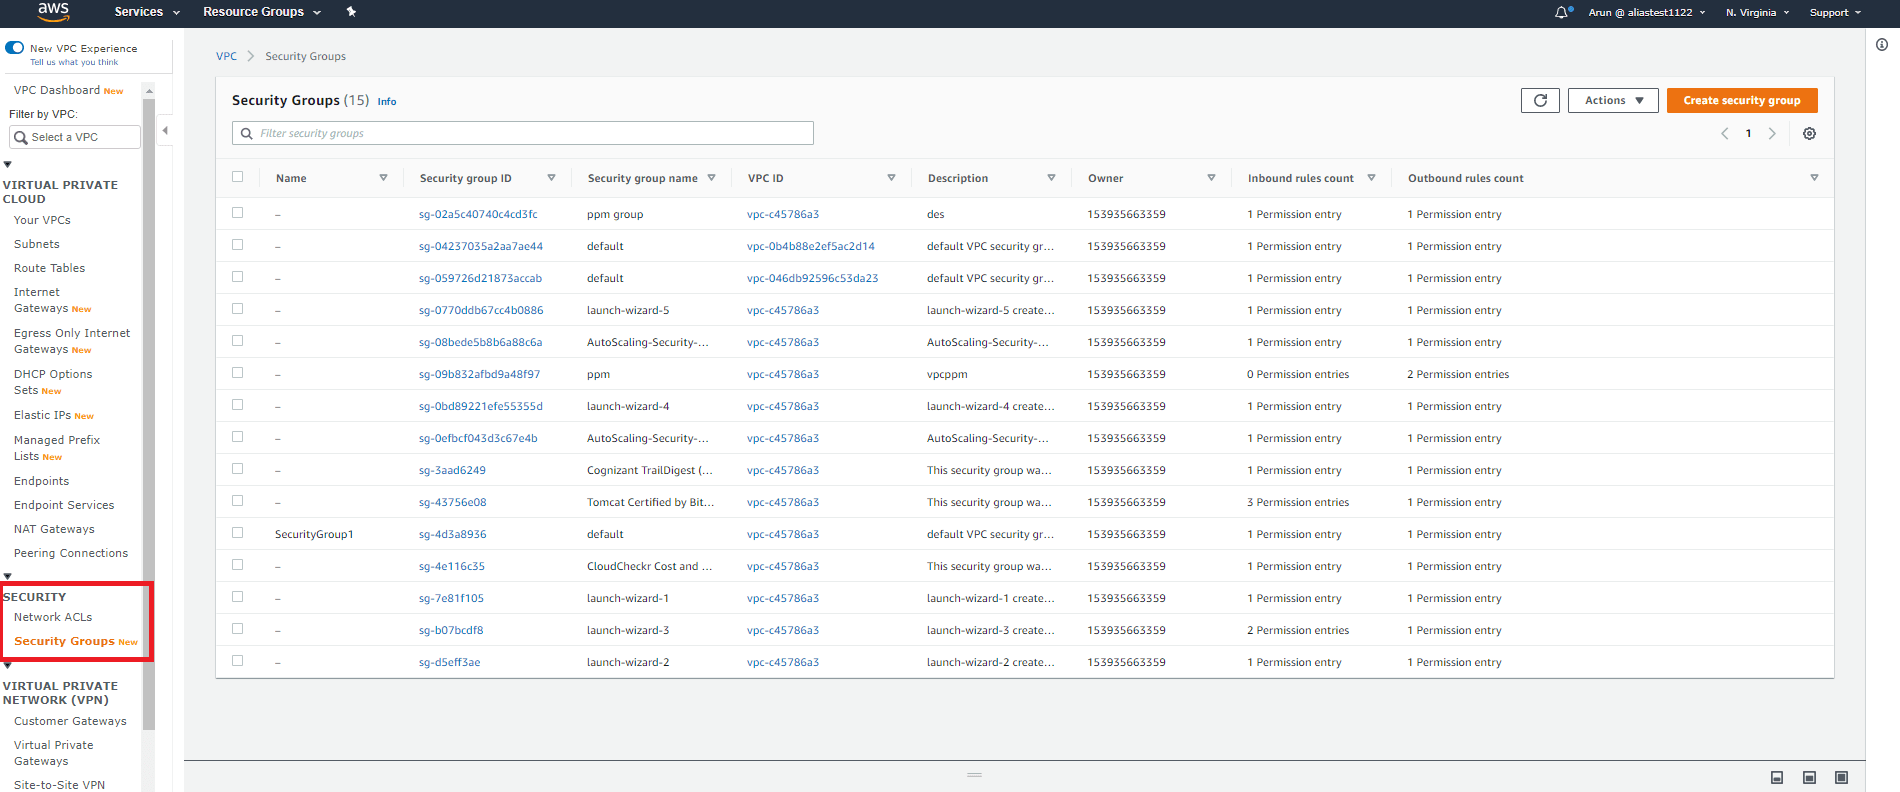
Click Security Groups under Security on the navigation pane after opening the Amazon VPC Console. Click Security Groups under Security on the navigation pane after opening the Amazon VPC Console.
Step 2:
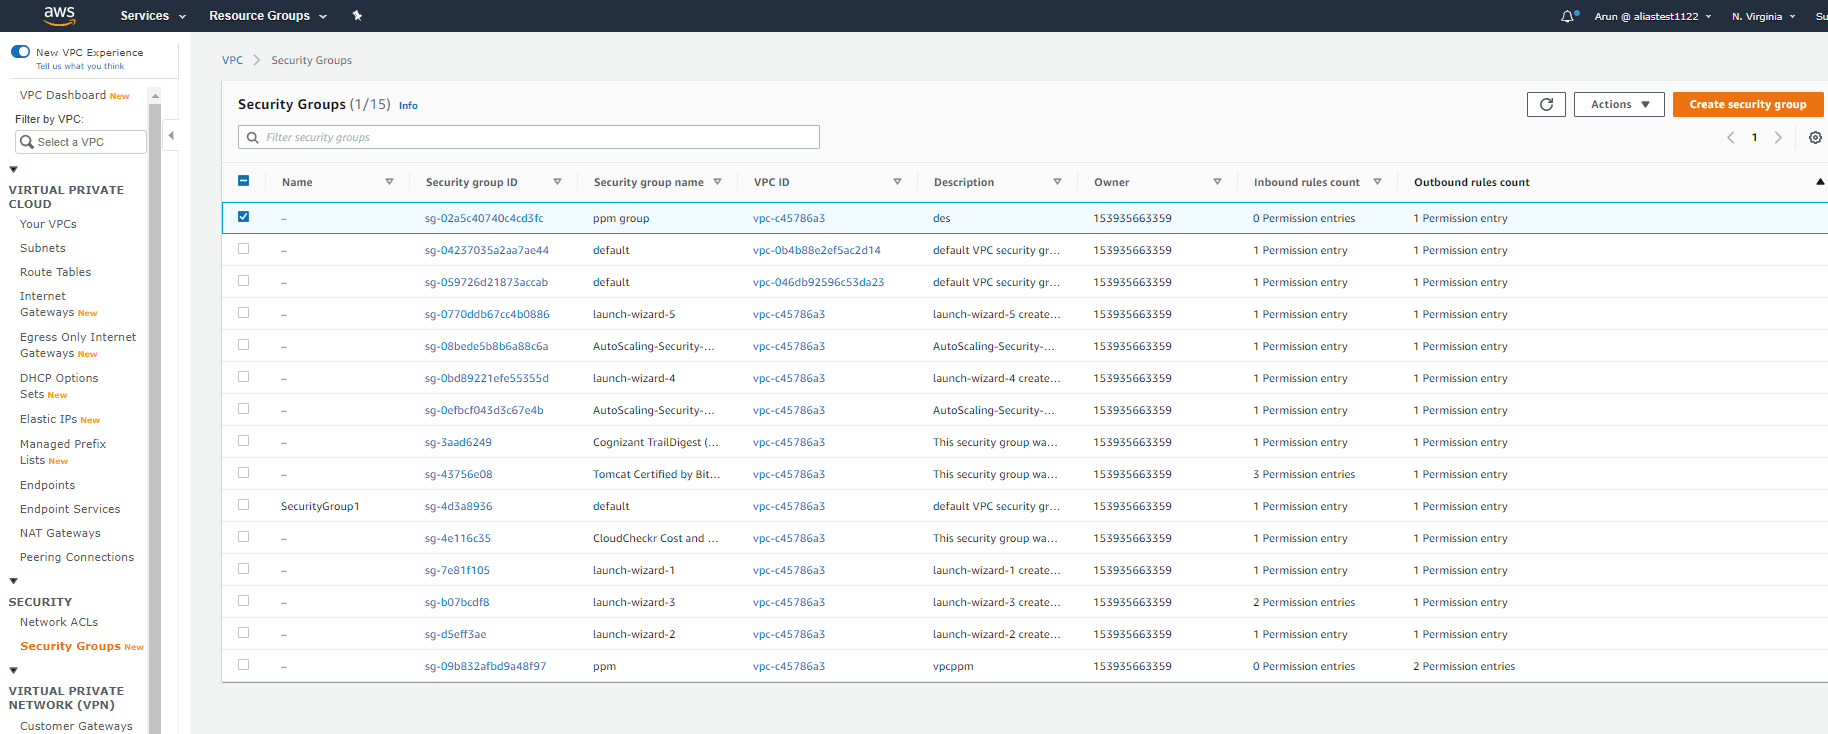
A list of security groups will be displayed. Select the security group you want to modify.
Step 3:
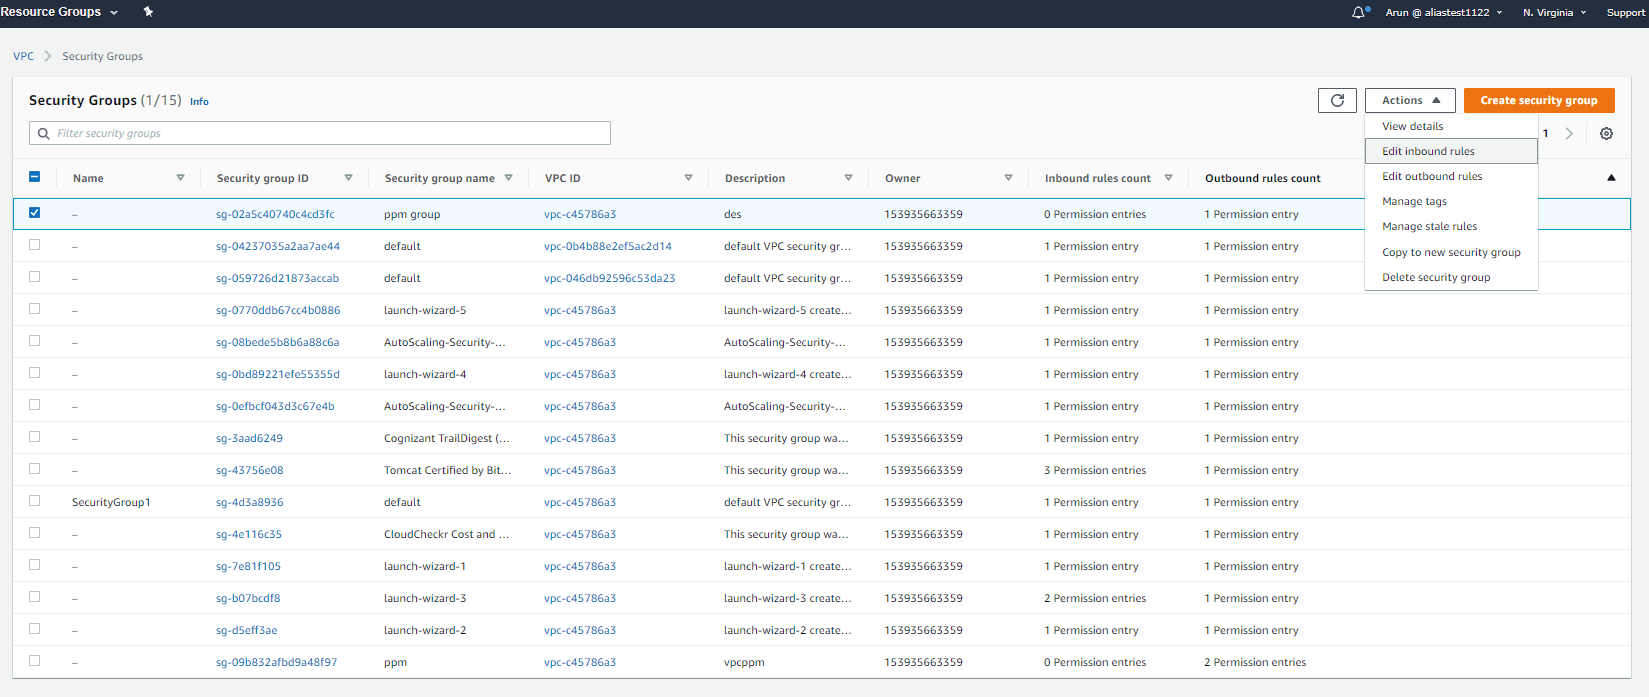
Click Actions > Edit inbound rules or Edit outbound rules.
Step 4:
Click Add rule.

Step 5:
Specify the values for the following fields:
- Type: This consists of a drop-down list from which you can select any common protocol like SSH or HTTP.
- Protocol: This is usually covered under Type. However, if you created a custom rule, you can choose a protocol, for example TCP or UDP.
- Port Range: This value will be filled automatically depending on the default port or port range of the protocol you chose. You can use custom ports if you'd like.
- Source: You can specify a particular IP address, AWS security group, or subnet. If you specify 0.0.0.0/0, anyone will be able to access the instance.
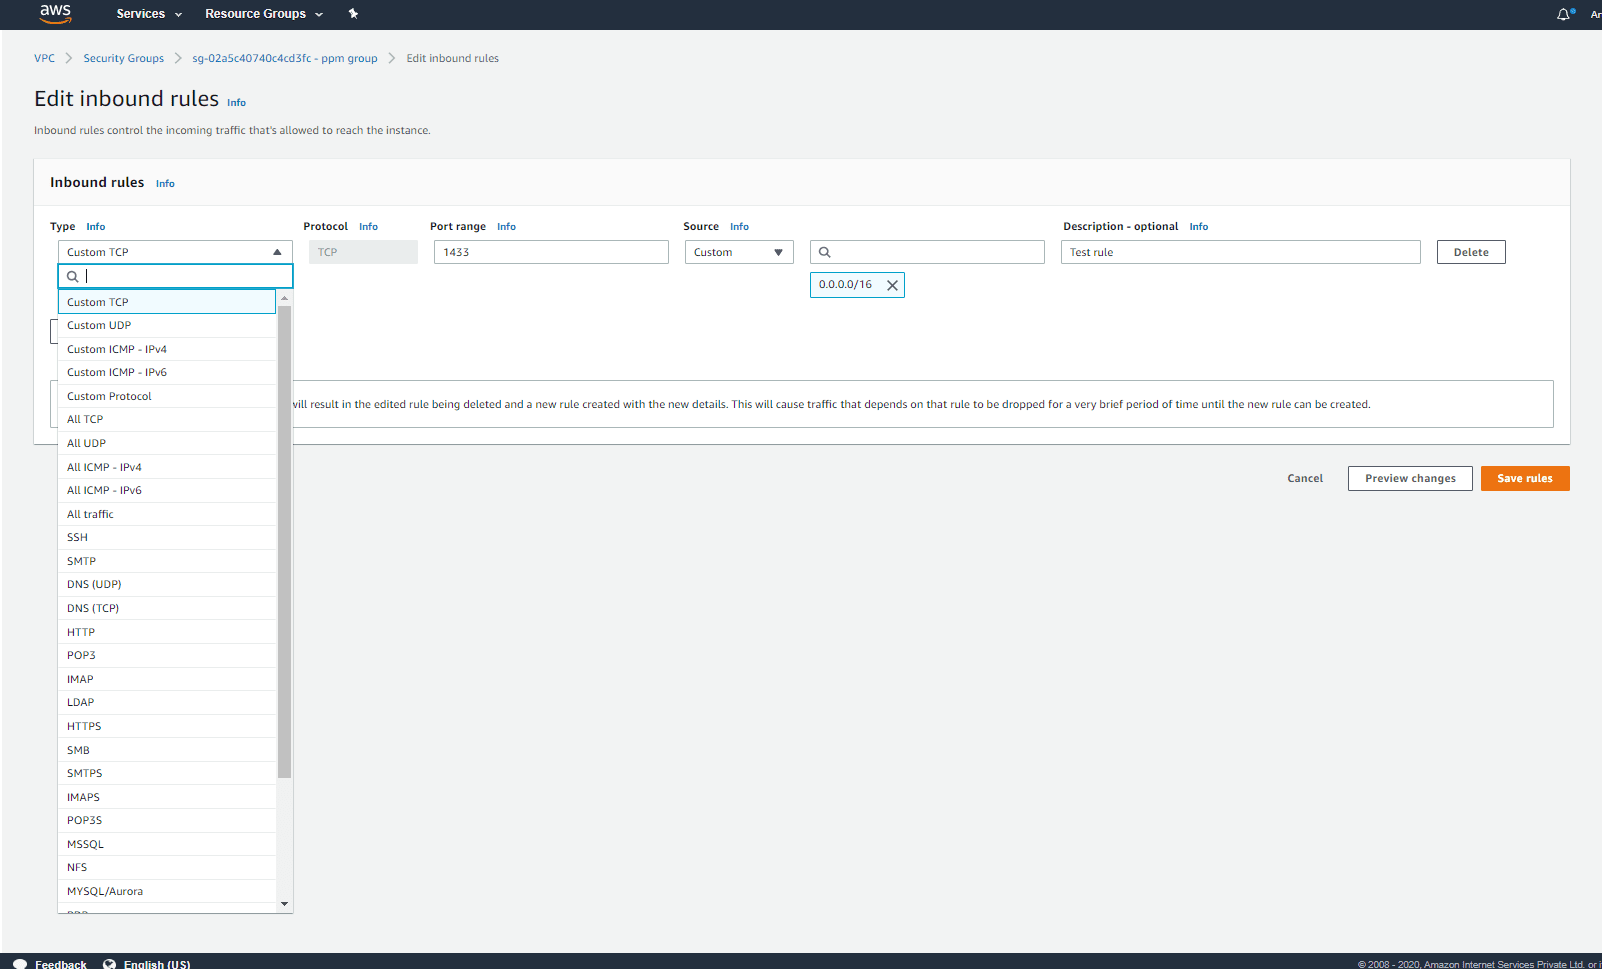
Step 6:
Click Save rules after entering all the details. The rule will be added to the security group.

Deleting a rule in the security group using the VPC Console
Step 1:
Click Security Groups under Security on the navigation pane after opening the Amazon VPC Console.
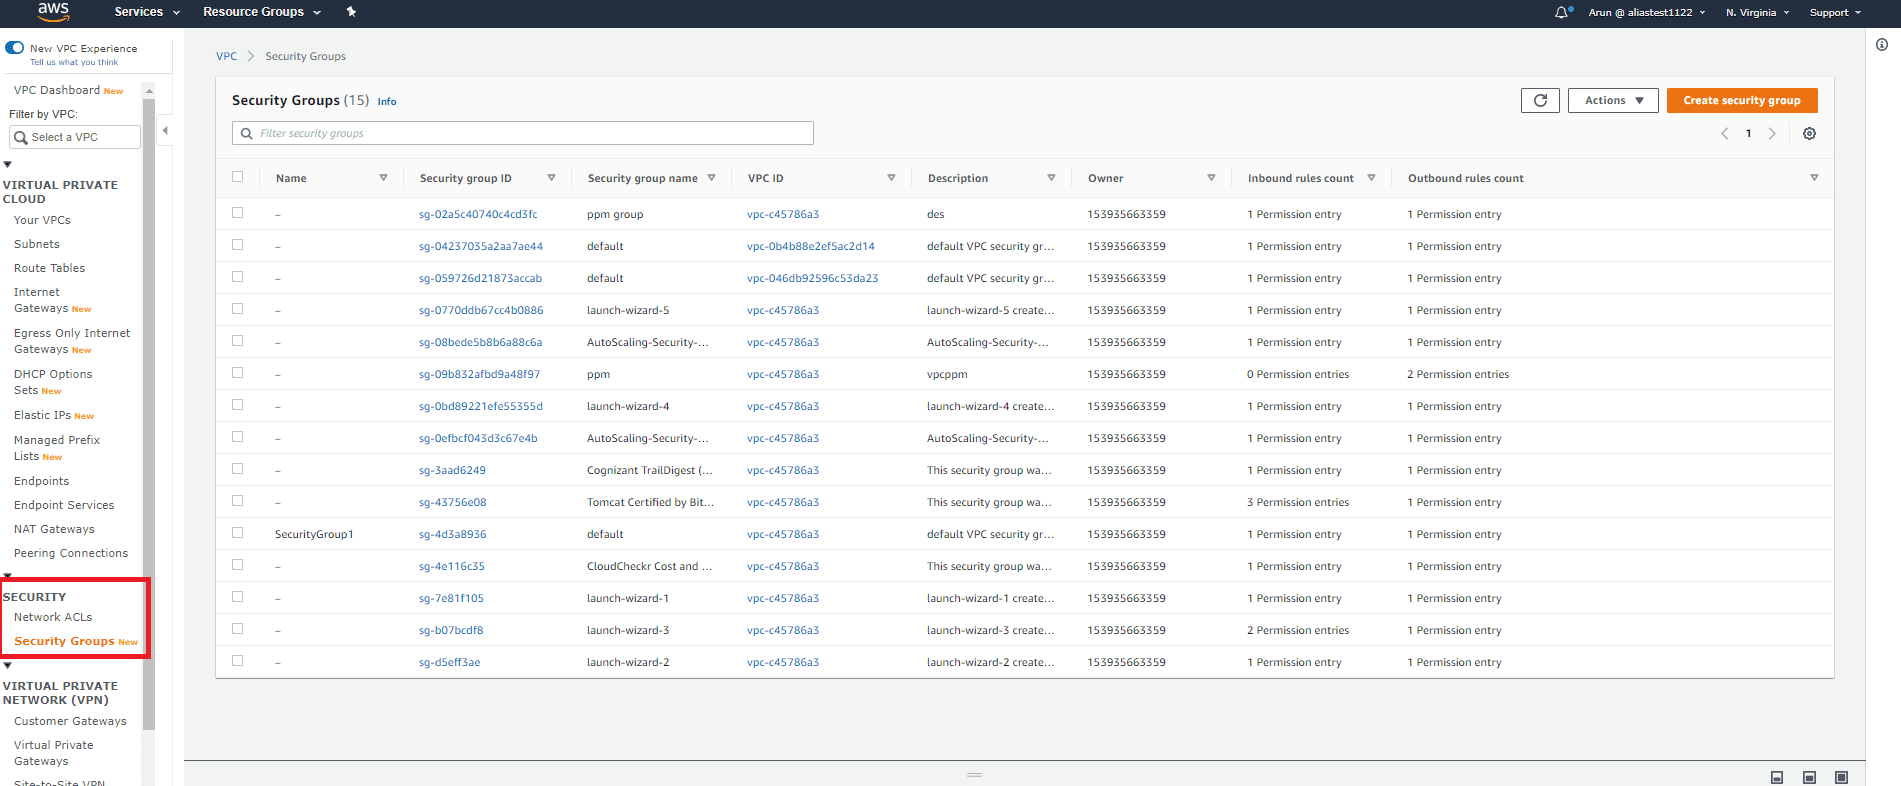
Step 2:
A list of security groups will be displayed. Select the security group you want to modify.
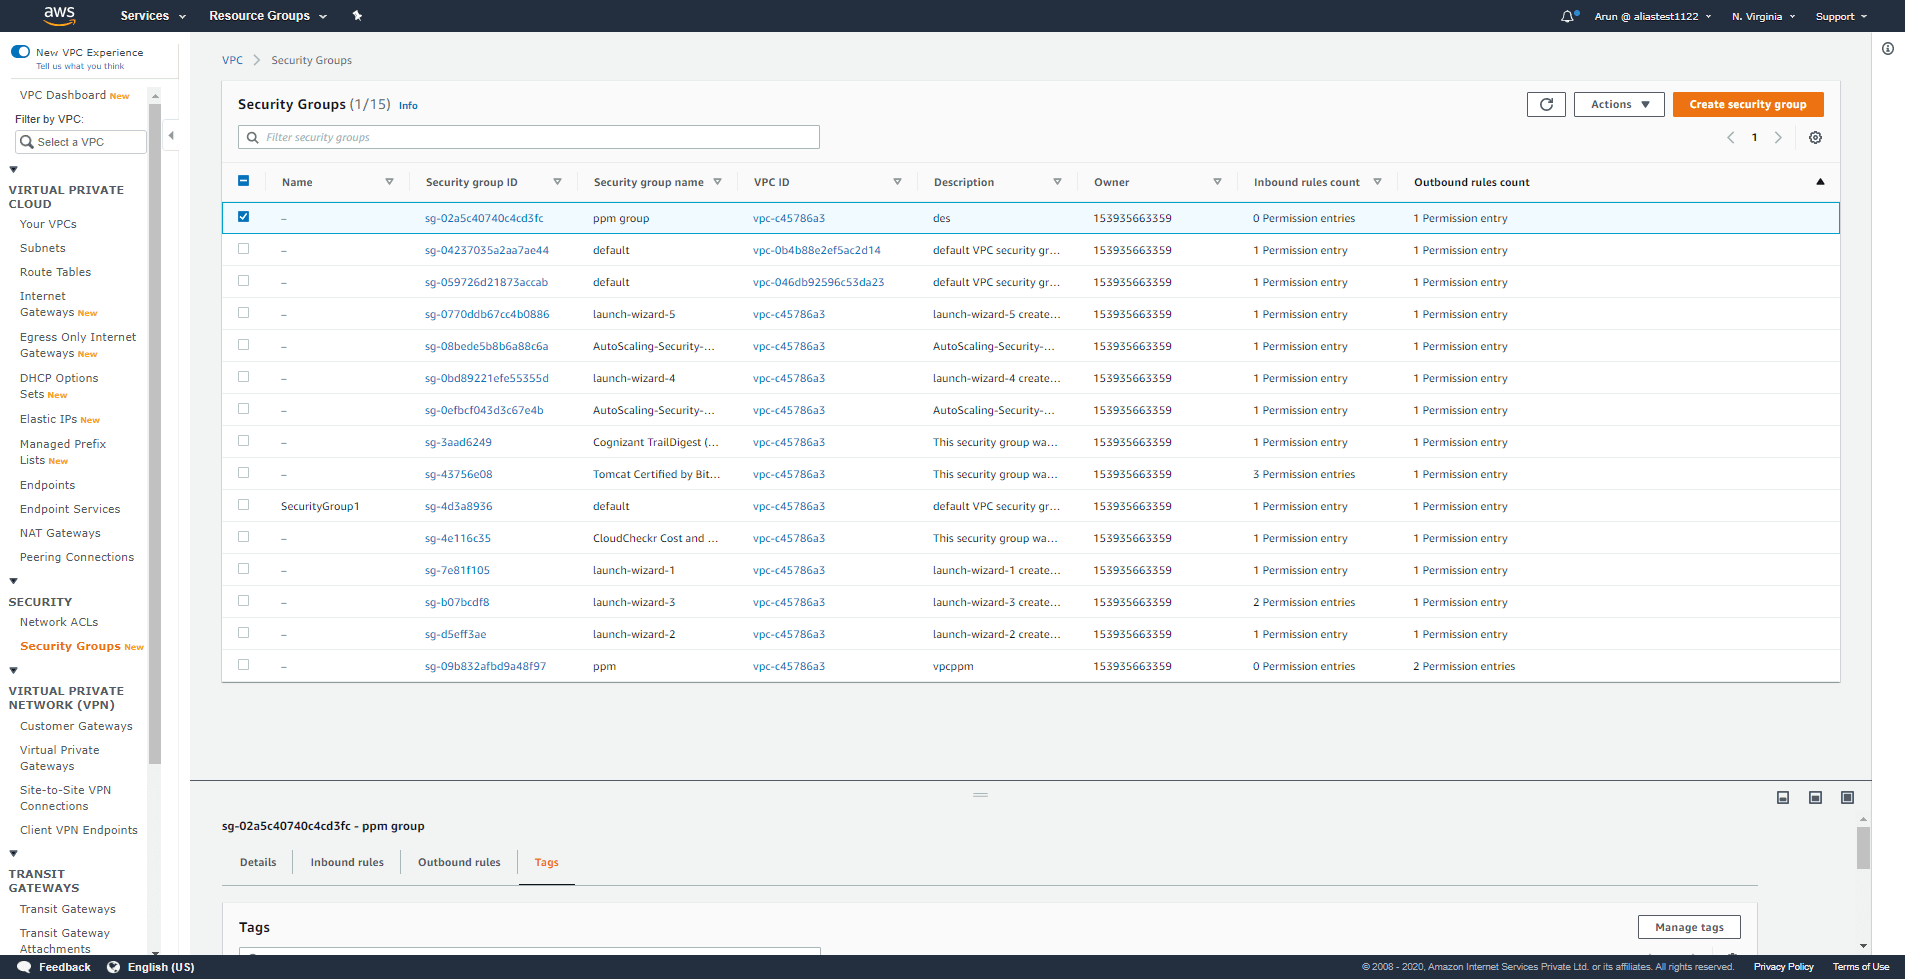
Step 3:
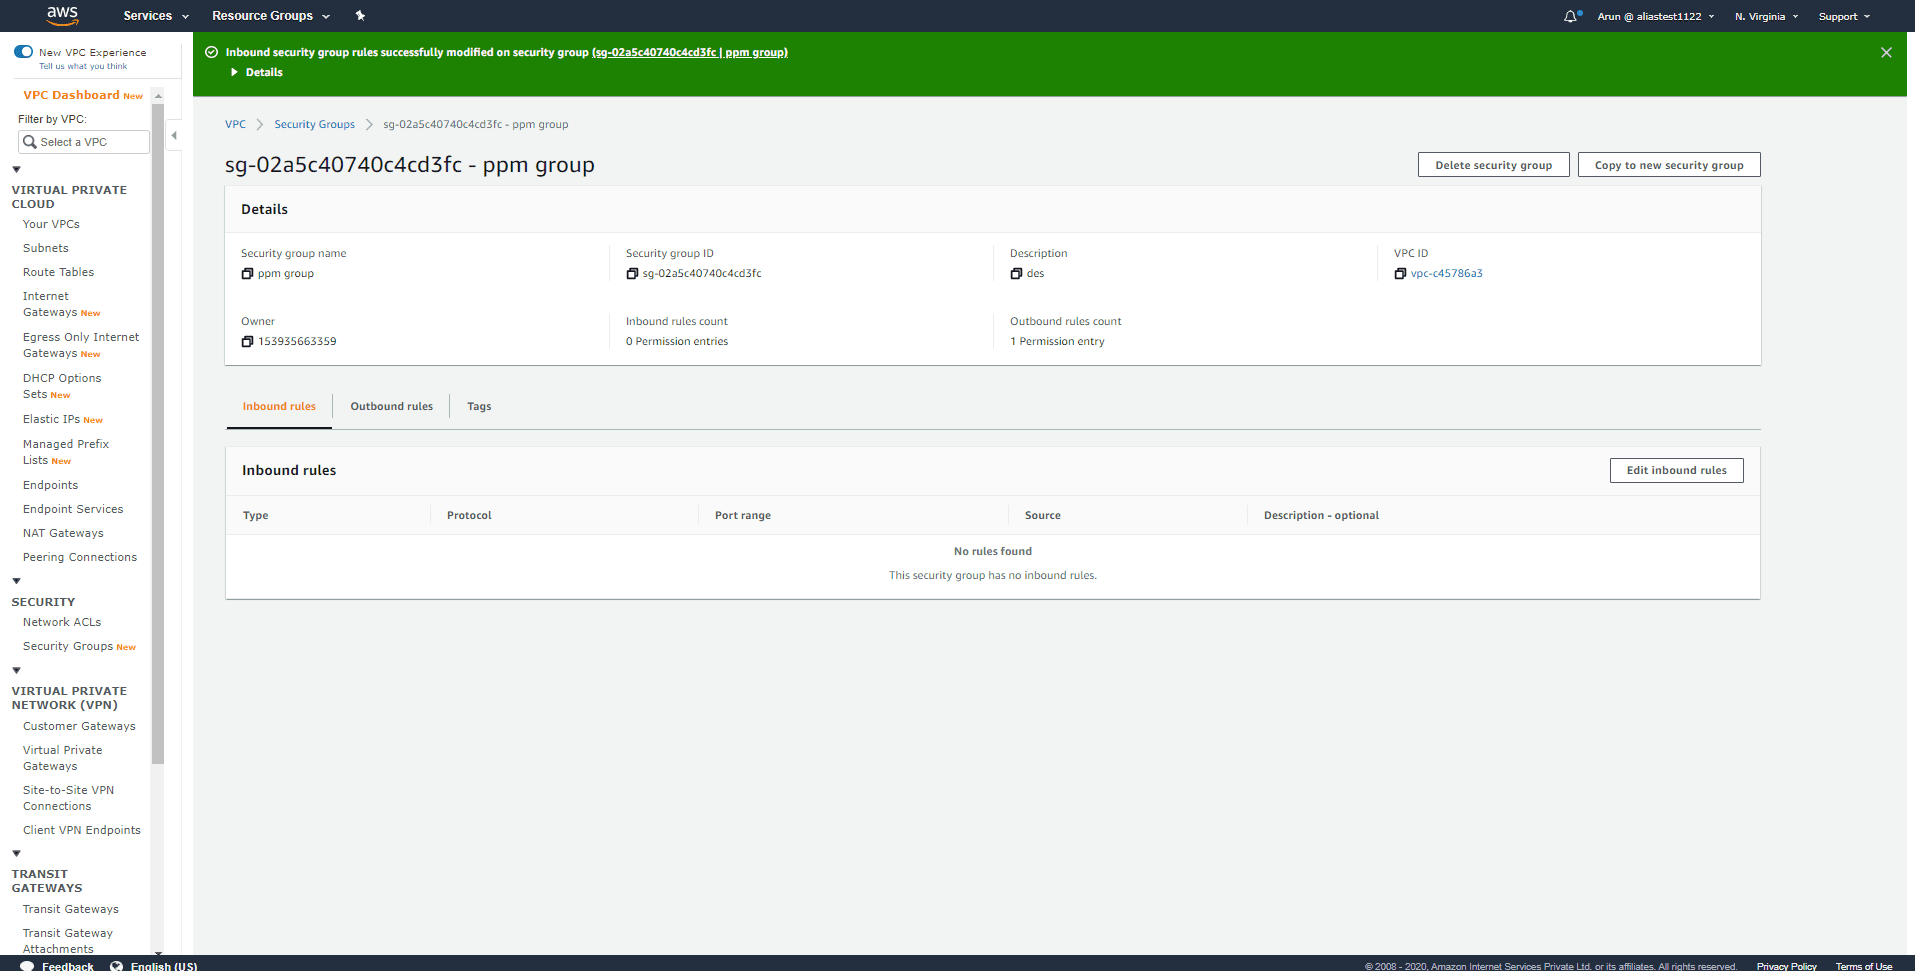
Click Actions and Edit inbound rules or Edit outbound rules.
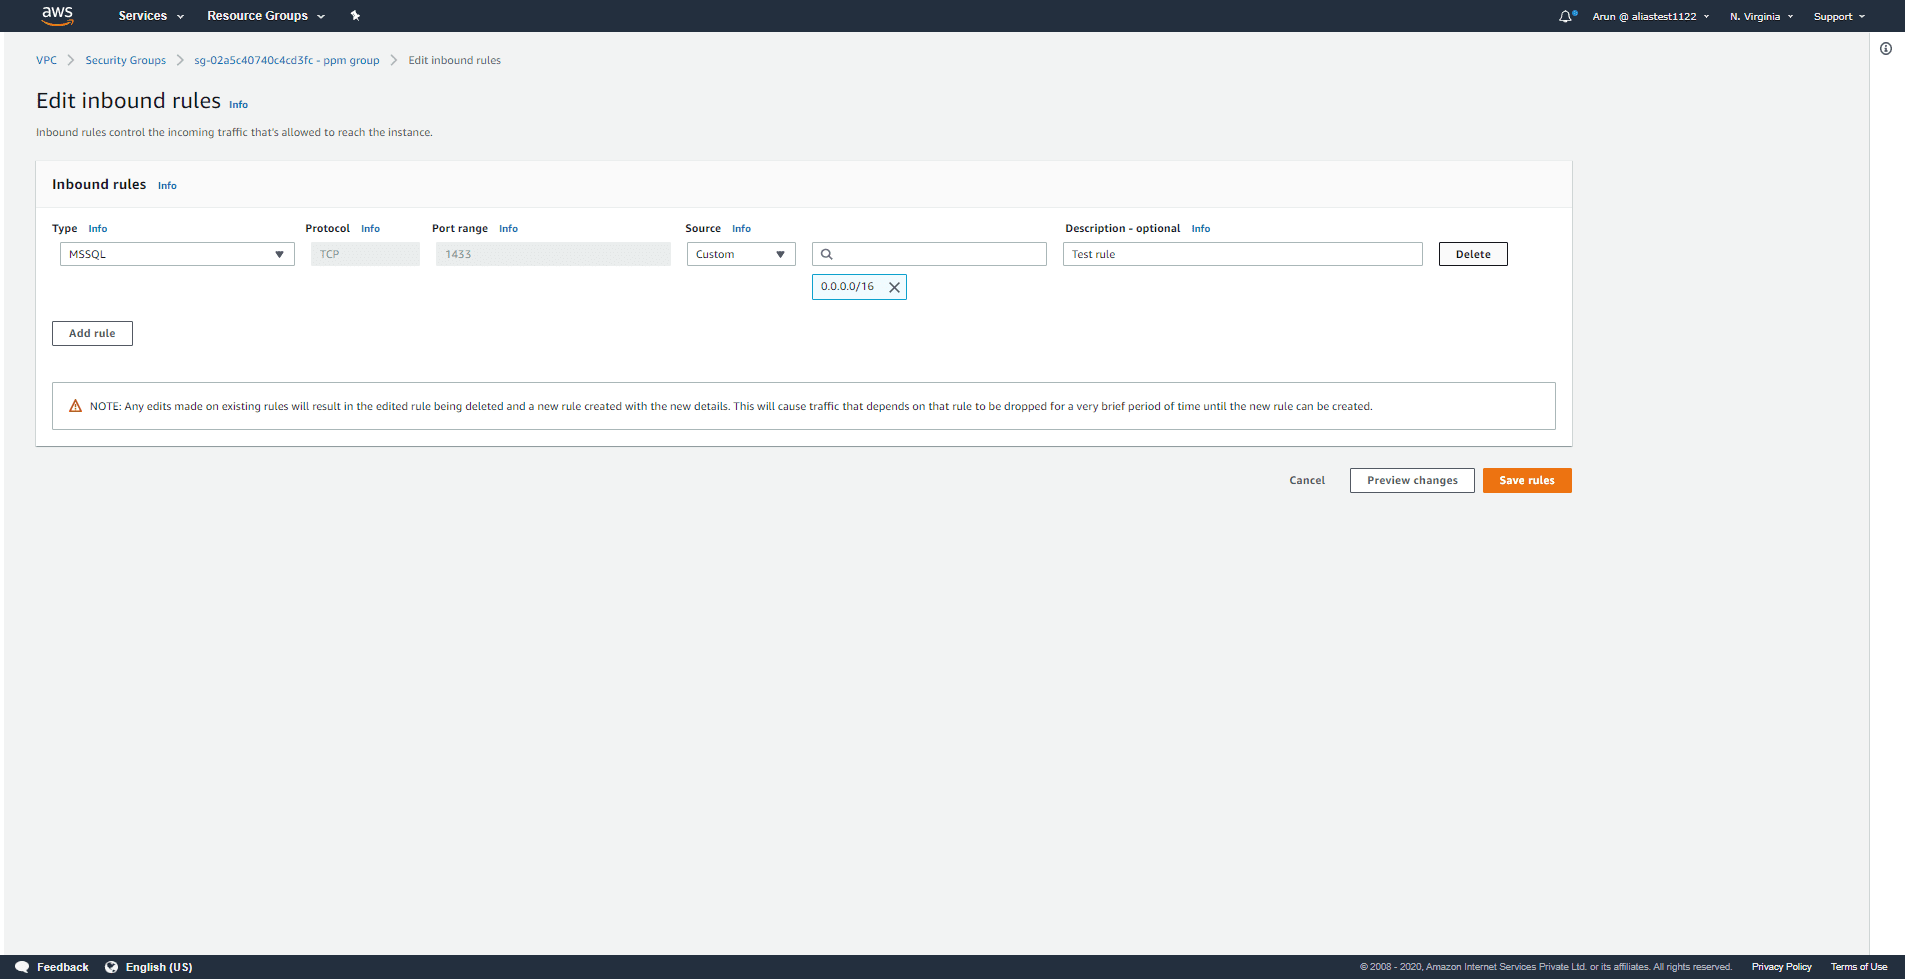
Step 4:
Click Delete on the right end of the rule you want to delete.
Step 5:
The rule will be removed, and you can click Save rules.
Modifying a rule in the security group using the VPC Console
Step 1:
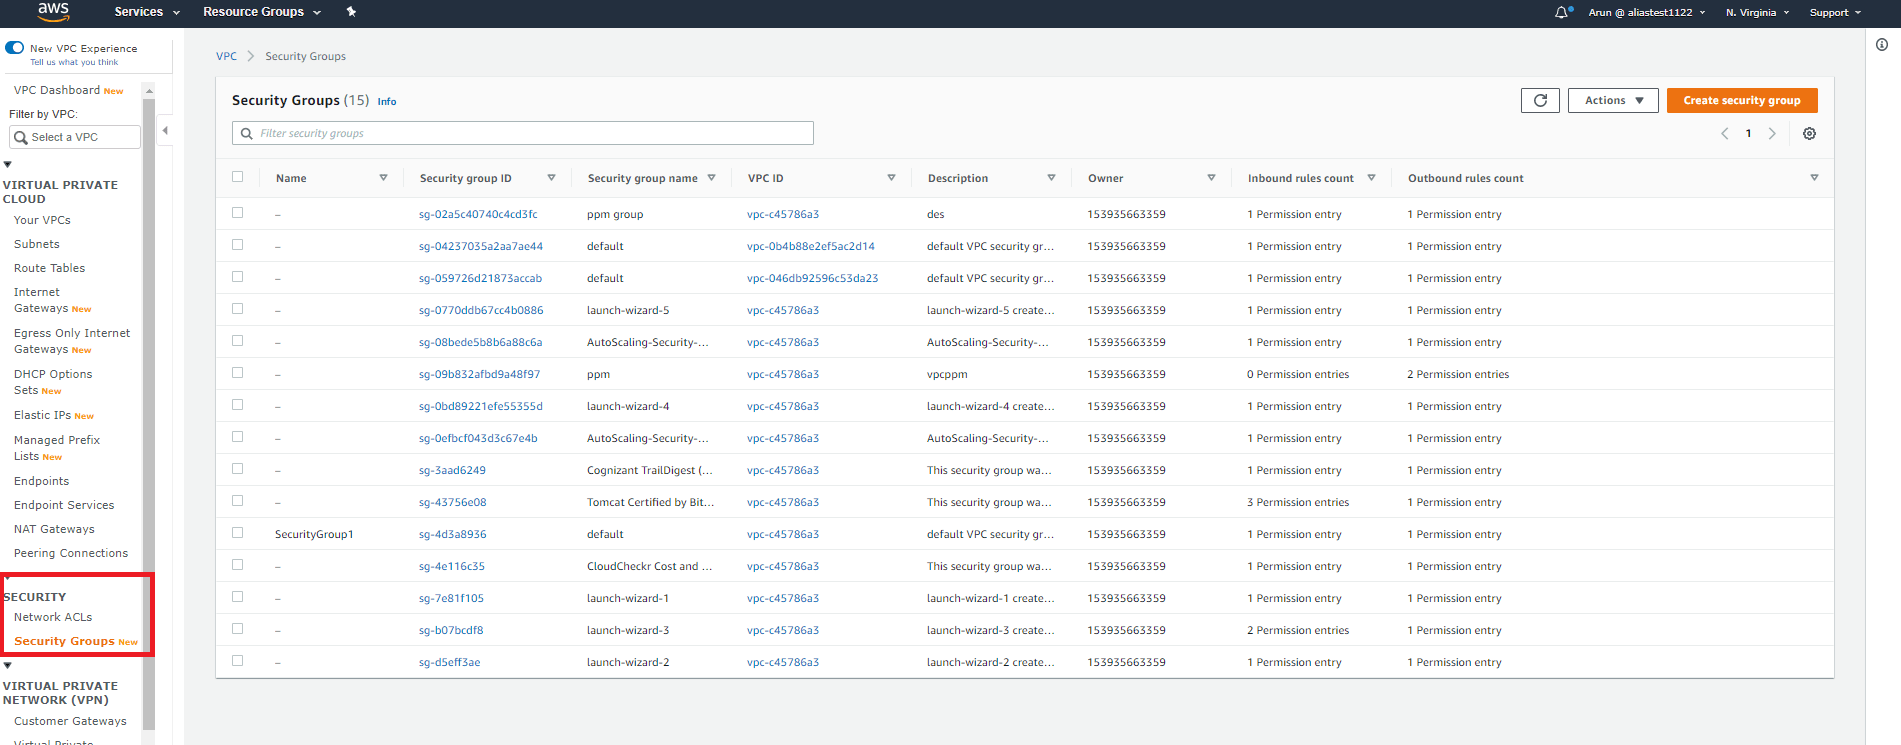
Click Security Groups under Security on the navigation pane after opening the Amazon VPC Console.
Step 2:
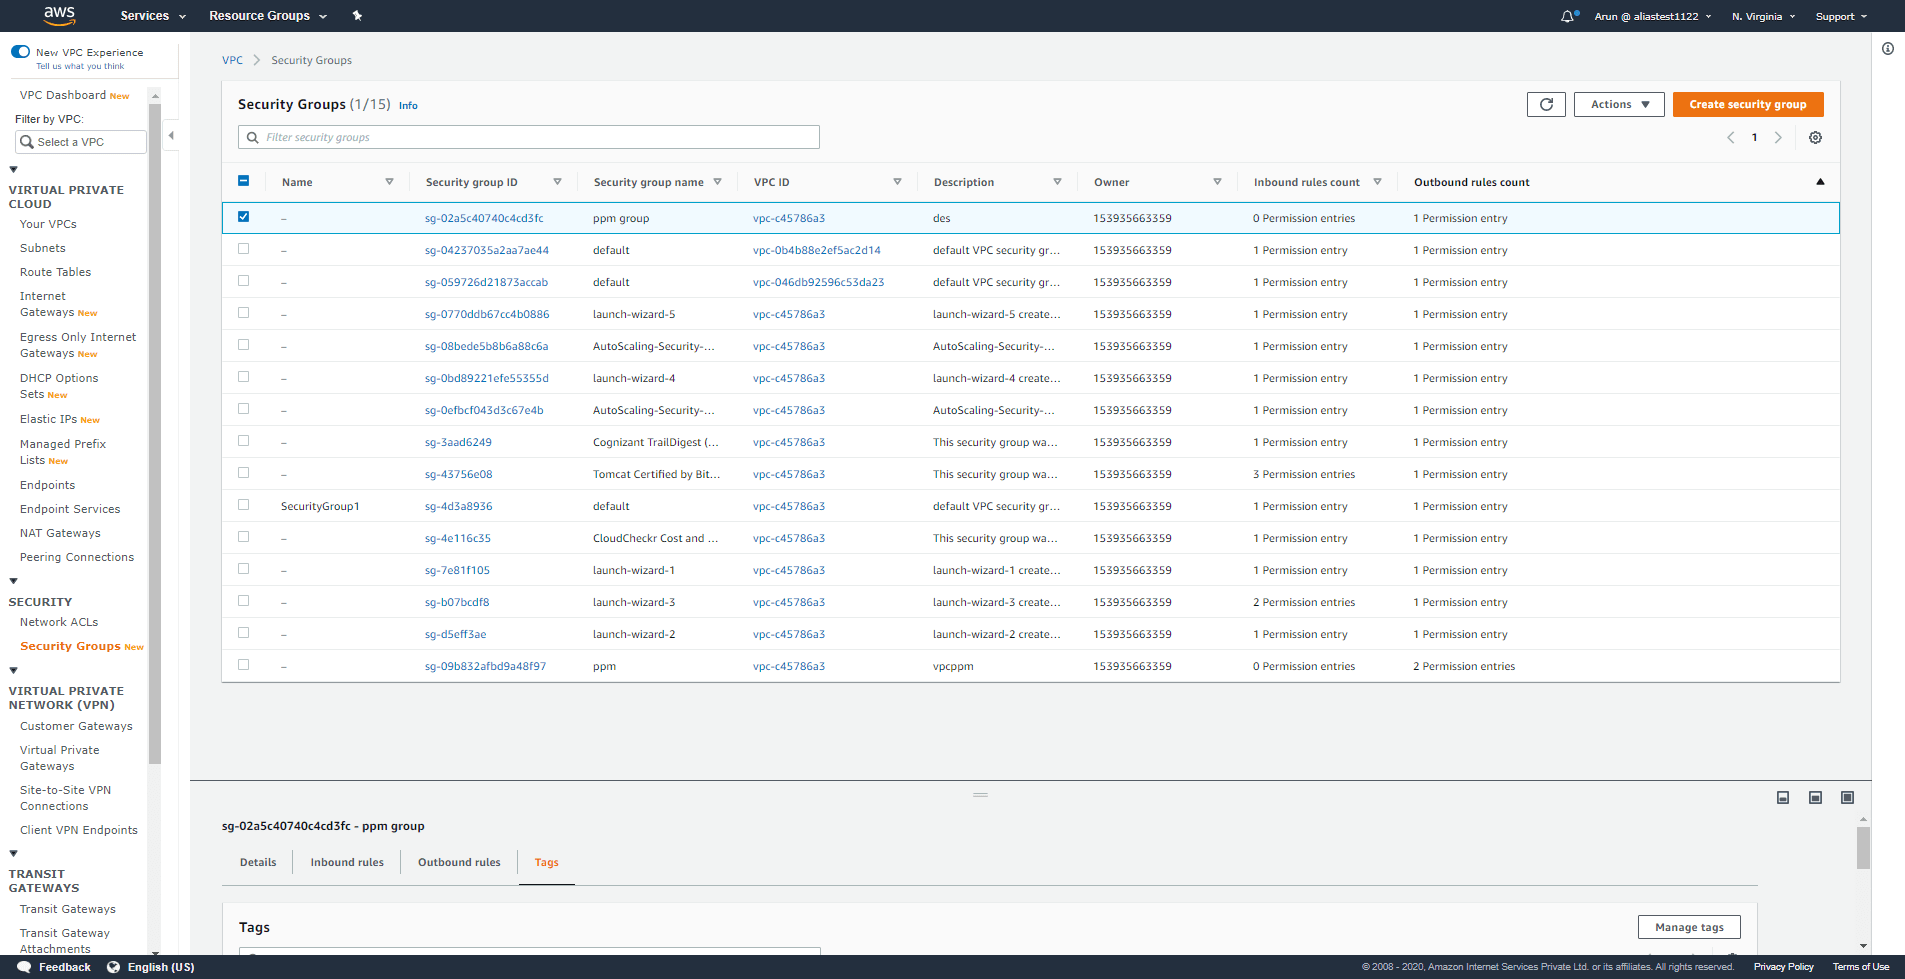
A list of security groups will be displayed. Select the security group you want to modify.
Step 3:
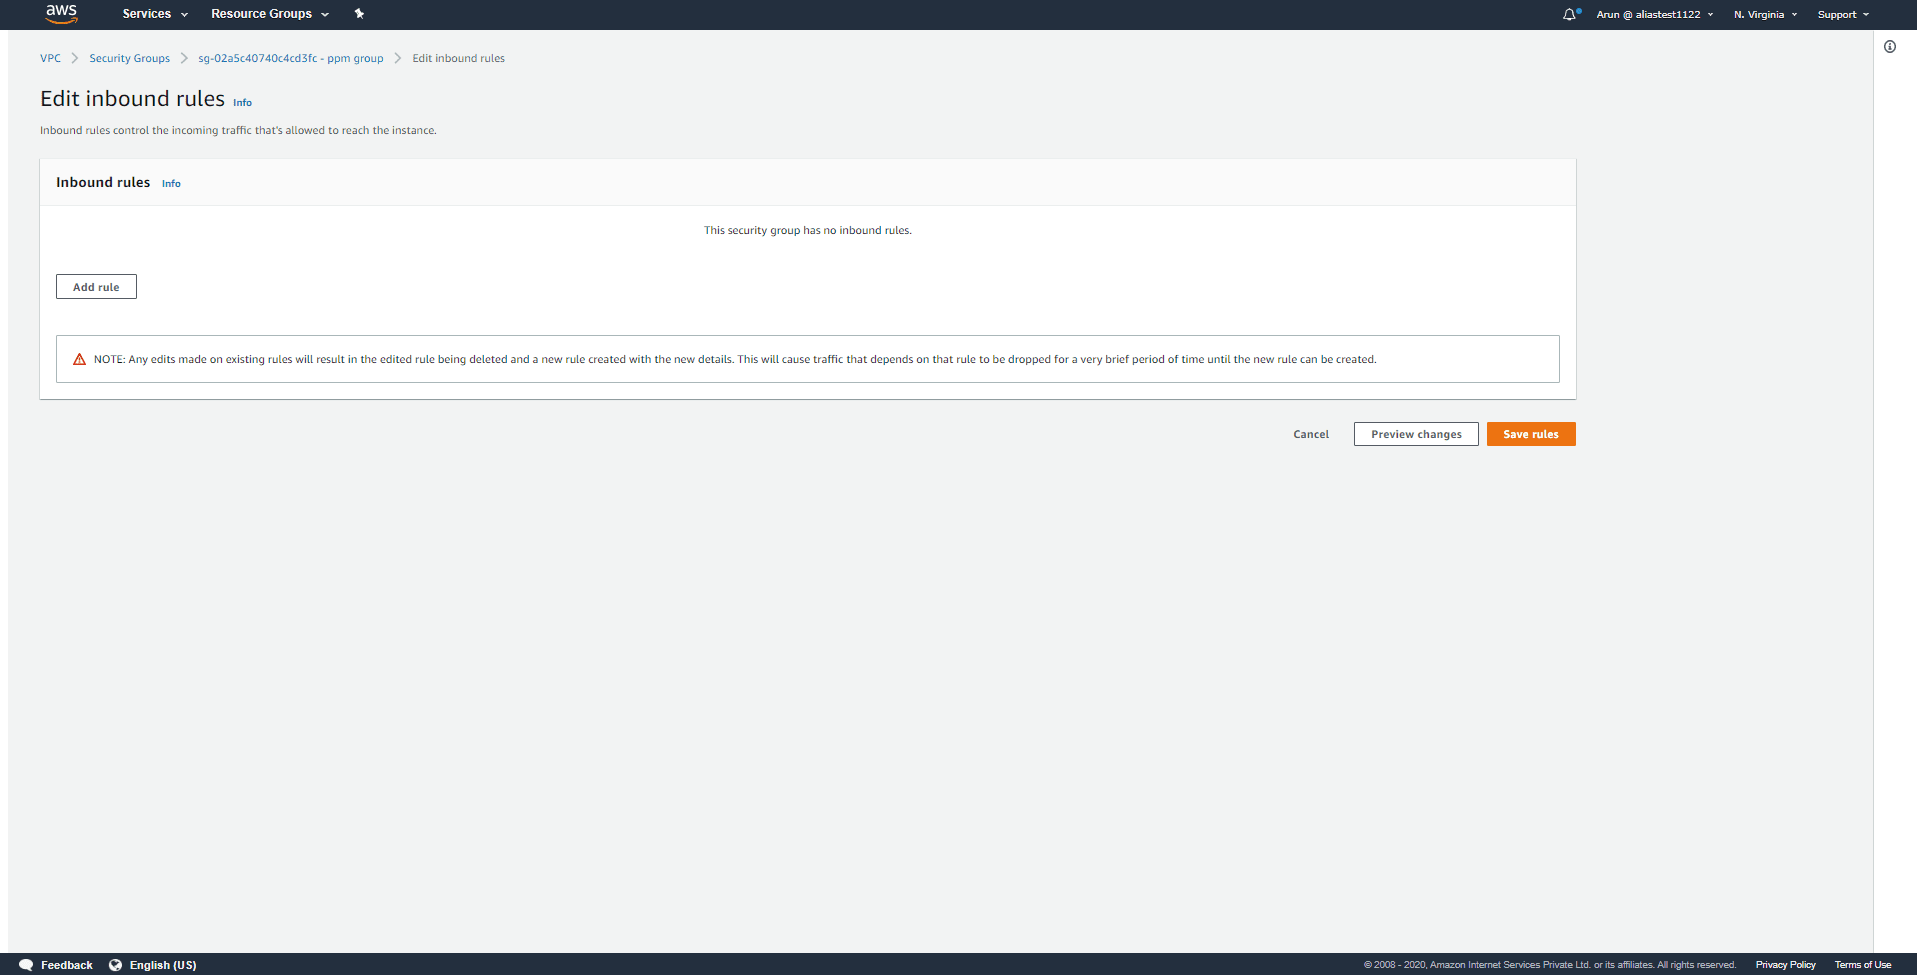
Click Actions and Edit inbound rules or Edit outbound rules.
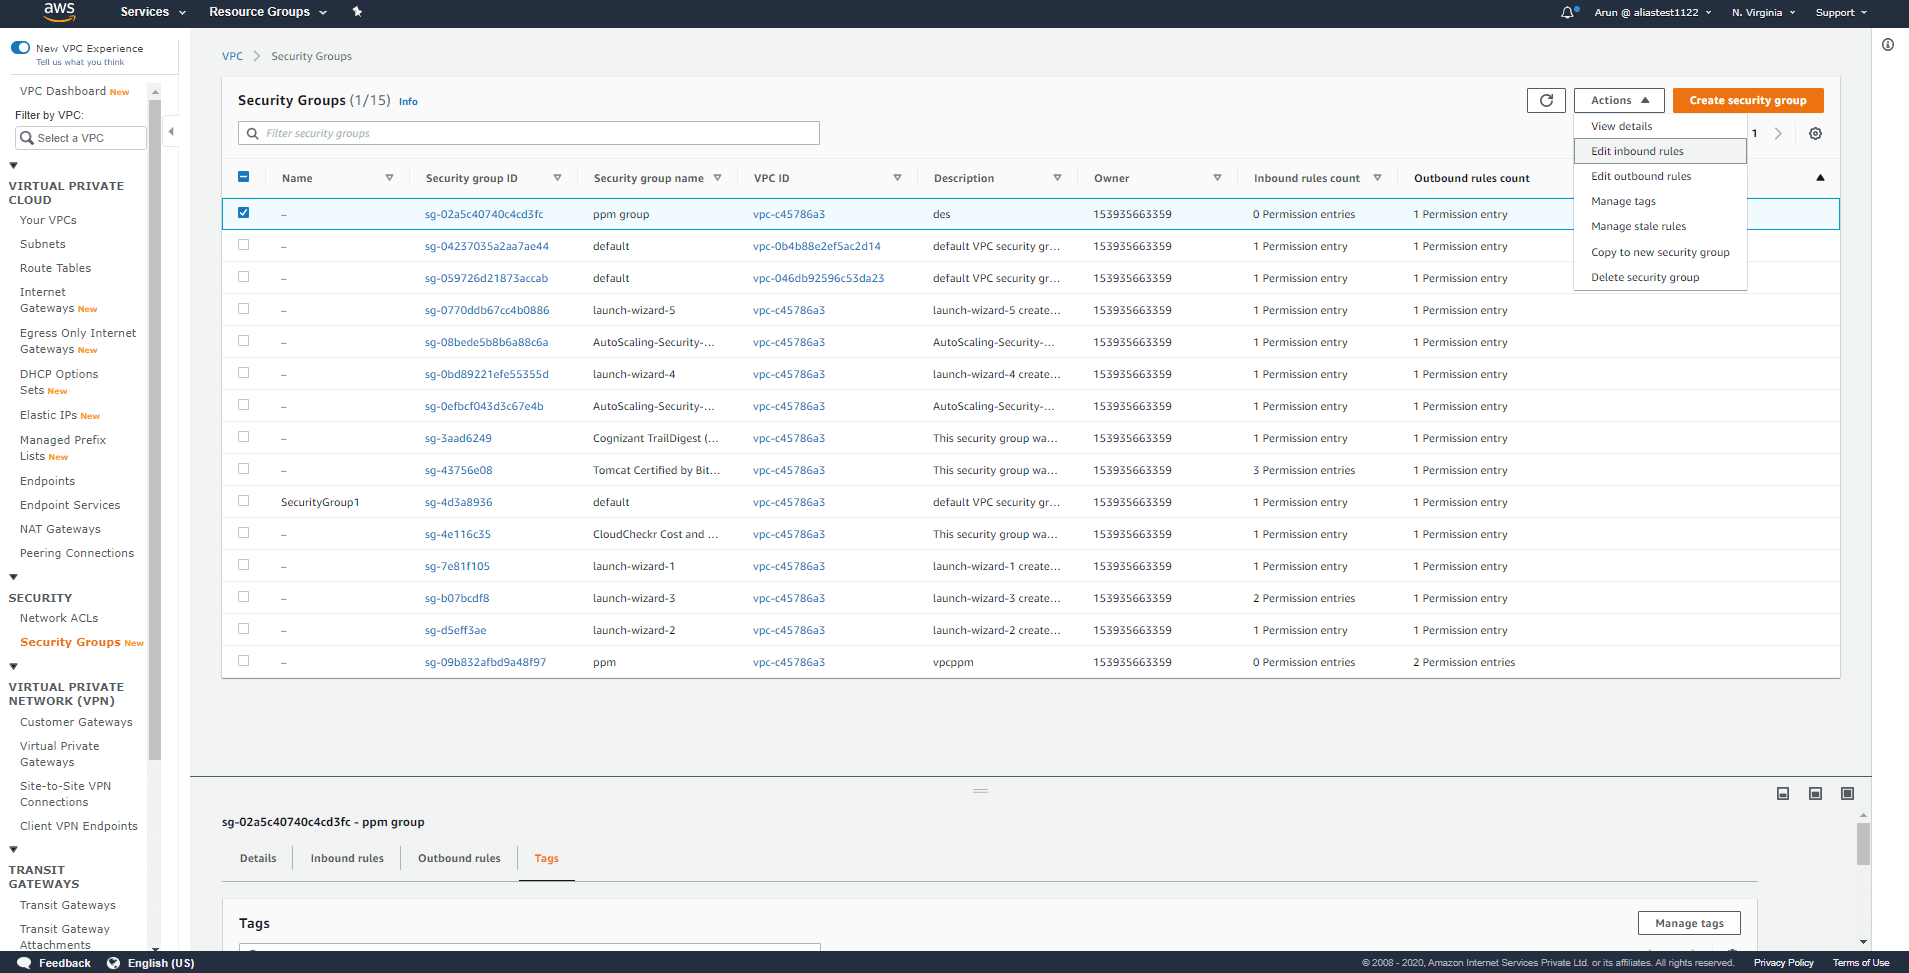
Step 4:
Update the rule and then click Save rules.
You cannot modify a rule that already exists using Amazon EC2 API or the command line. You need to delete the existing rule and create a new rule.
A default security group cannot be deleted, but its rules can be modified. The procedure for modifying the rules is the same as above.
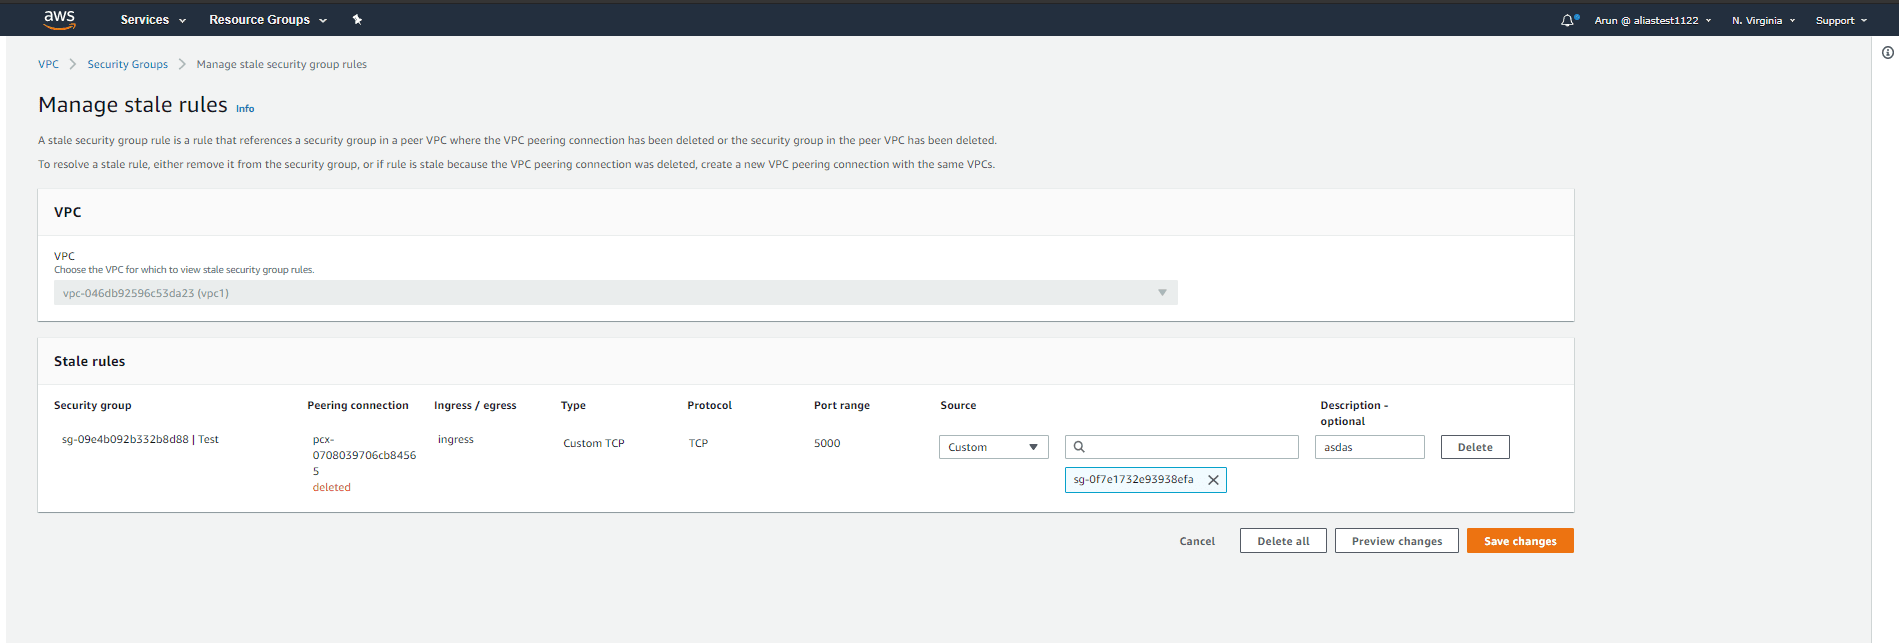
Stale security groups - Deleting or modifying a stale rule in a security group using the VPC Console:
When a security group rule is referencing another security group in a peer VPC, if the referenced security group is deleted or if the peer connection has been deleted, the security group rule becomes obsolete. Such rules are known as stale security group rules. They will not be deleted automatically and have to be deleted manually.
Step 1:
Click Security Groups under Security on the navigation pane after opening the Amazon VPC Console.
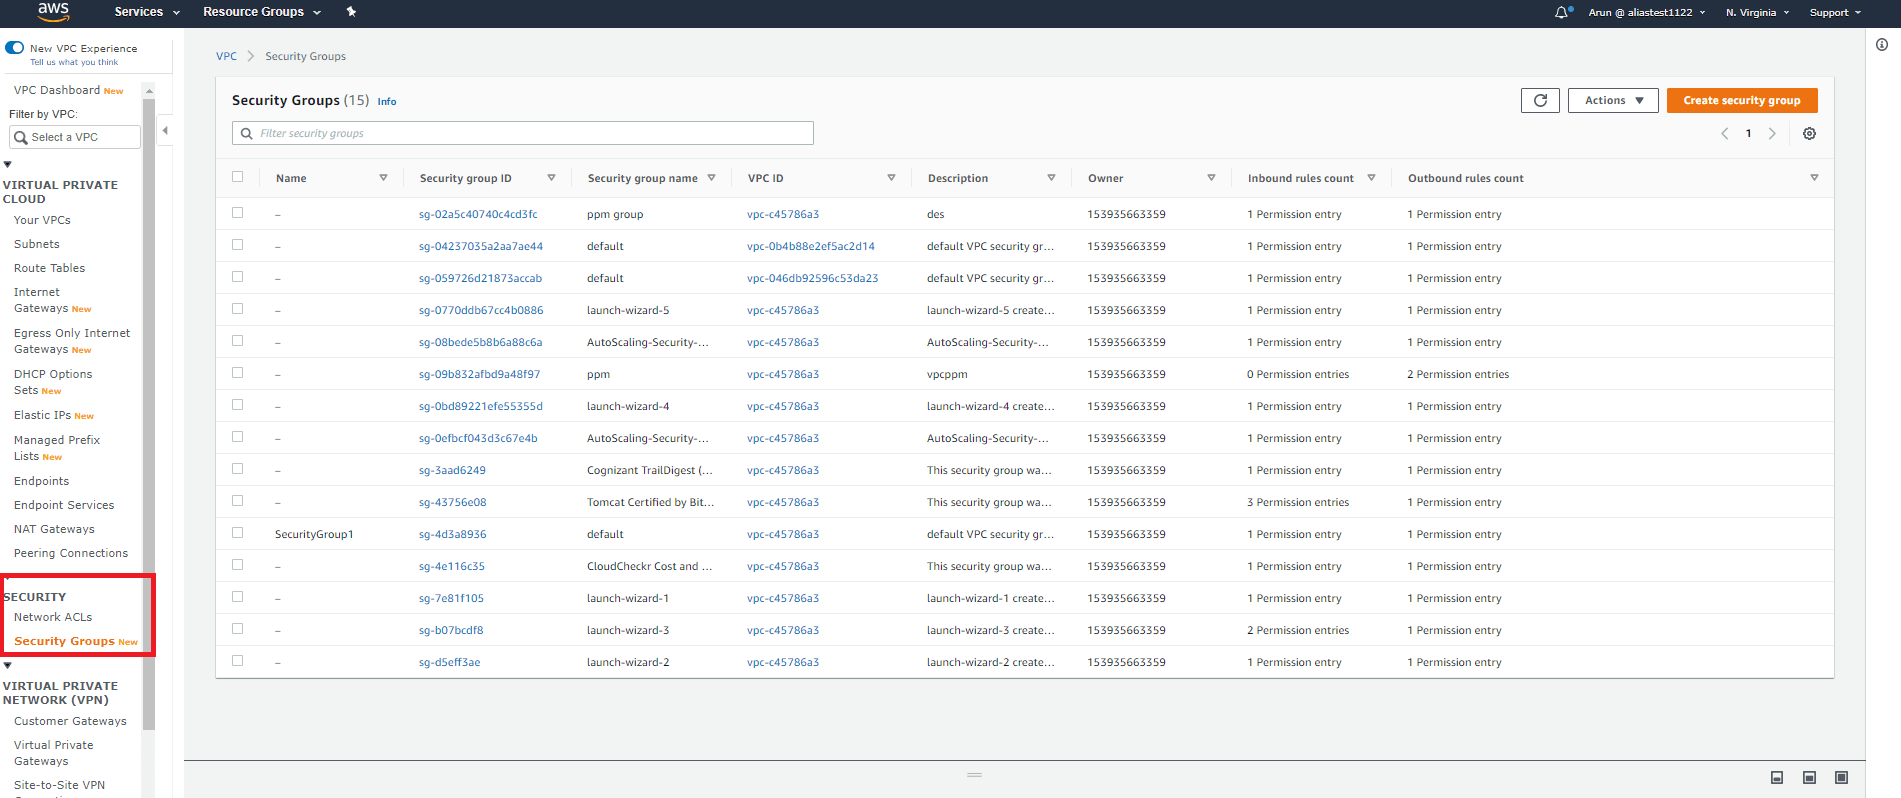
Step 2:
There will be a notification icon at the top of the screen stating that you have new stale security group rules. Click Manage state rules.
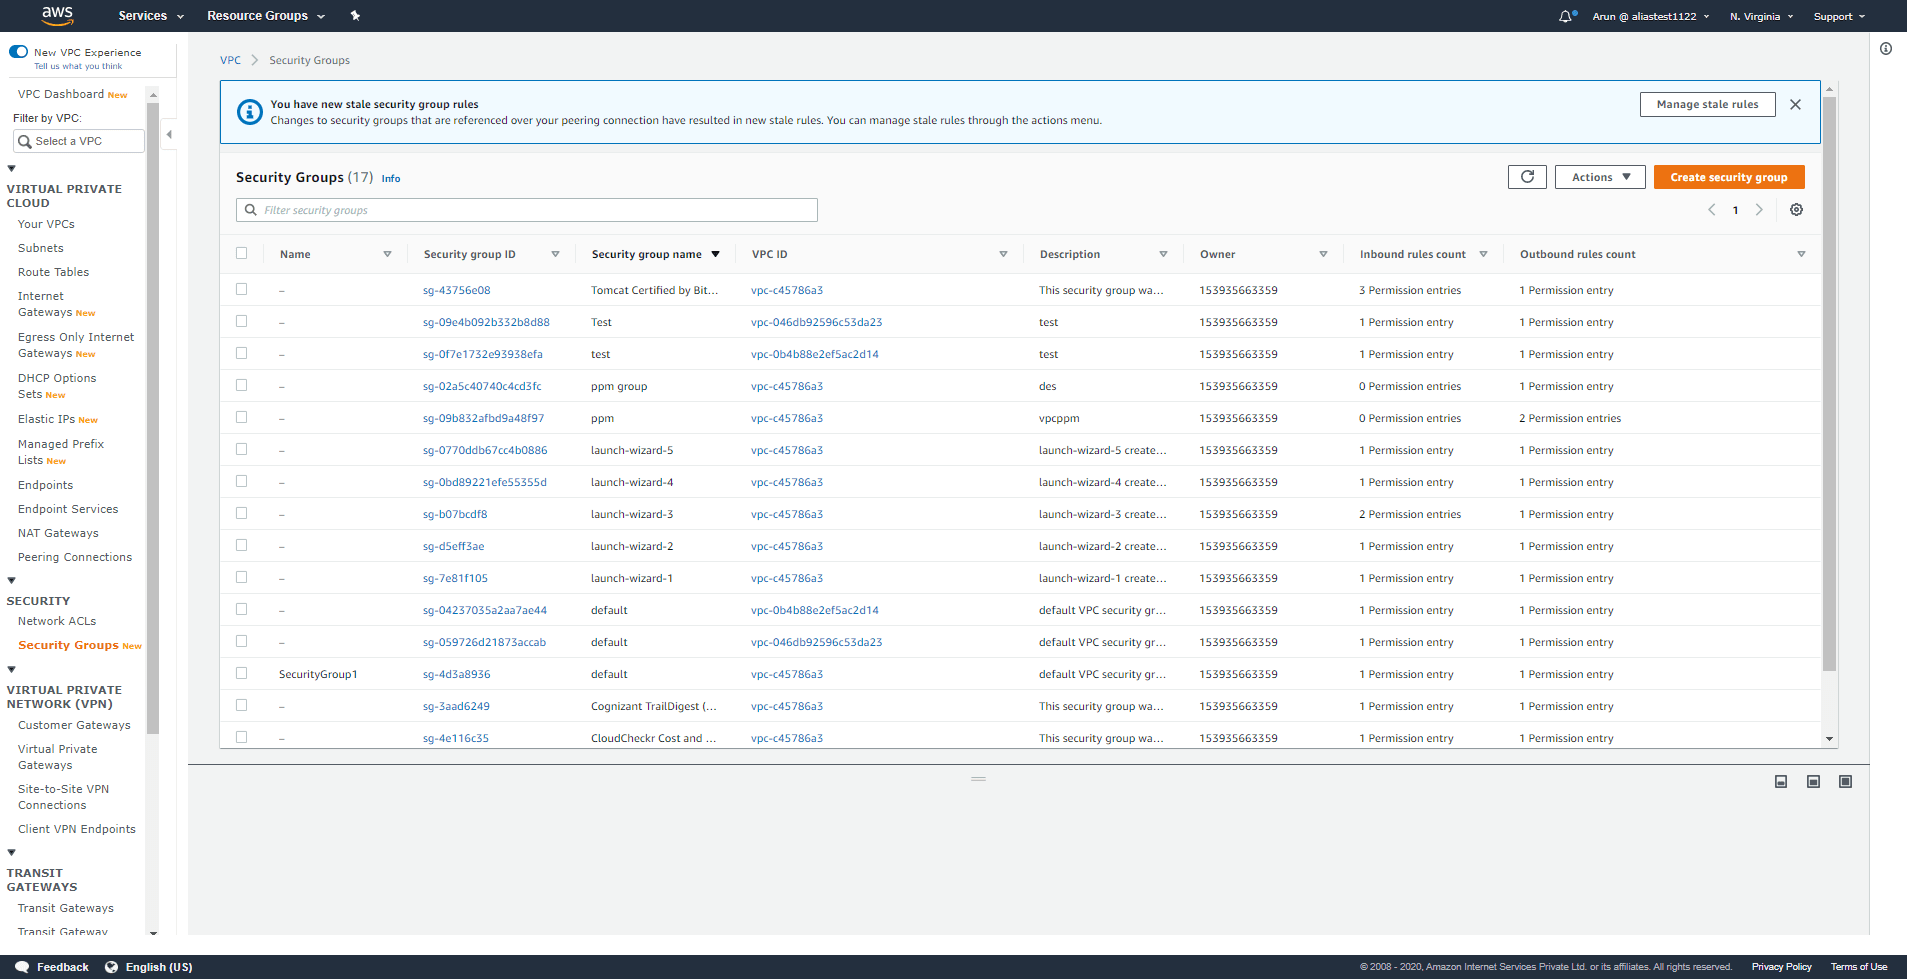
Step 3:
The stale rule can be deleted or modified by clicking Edit.
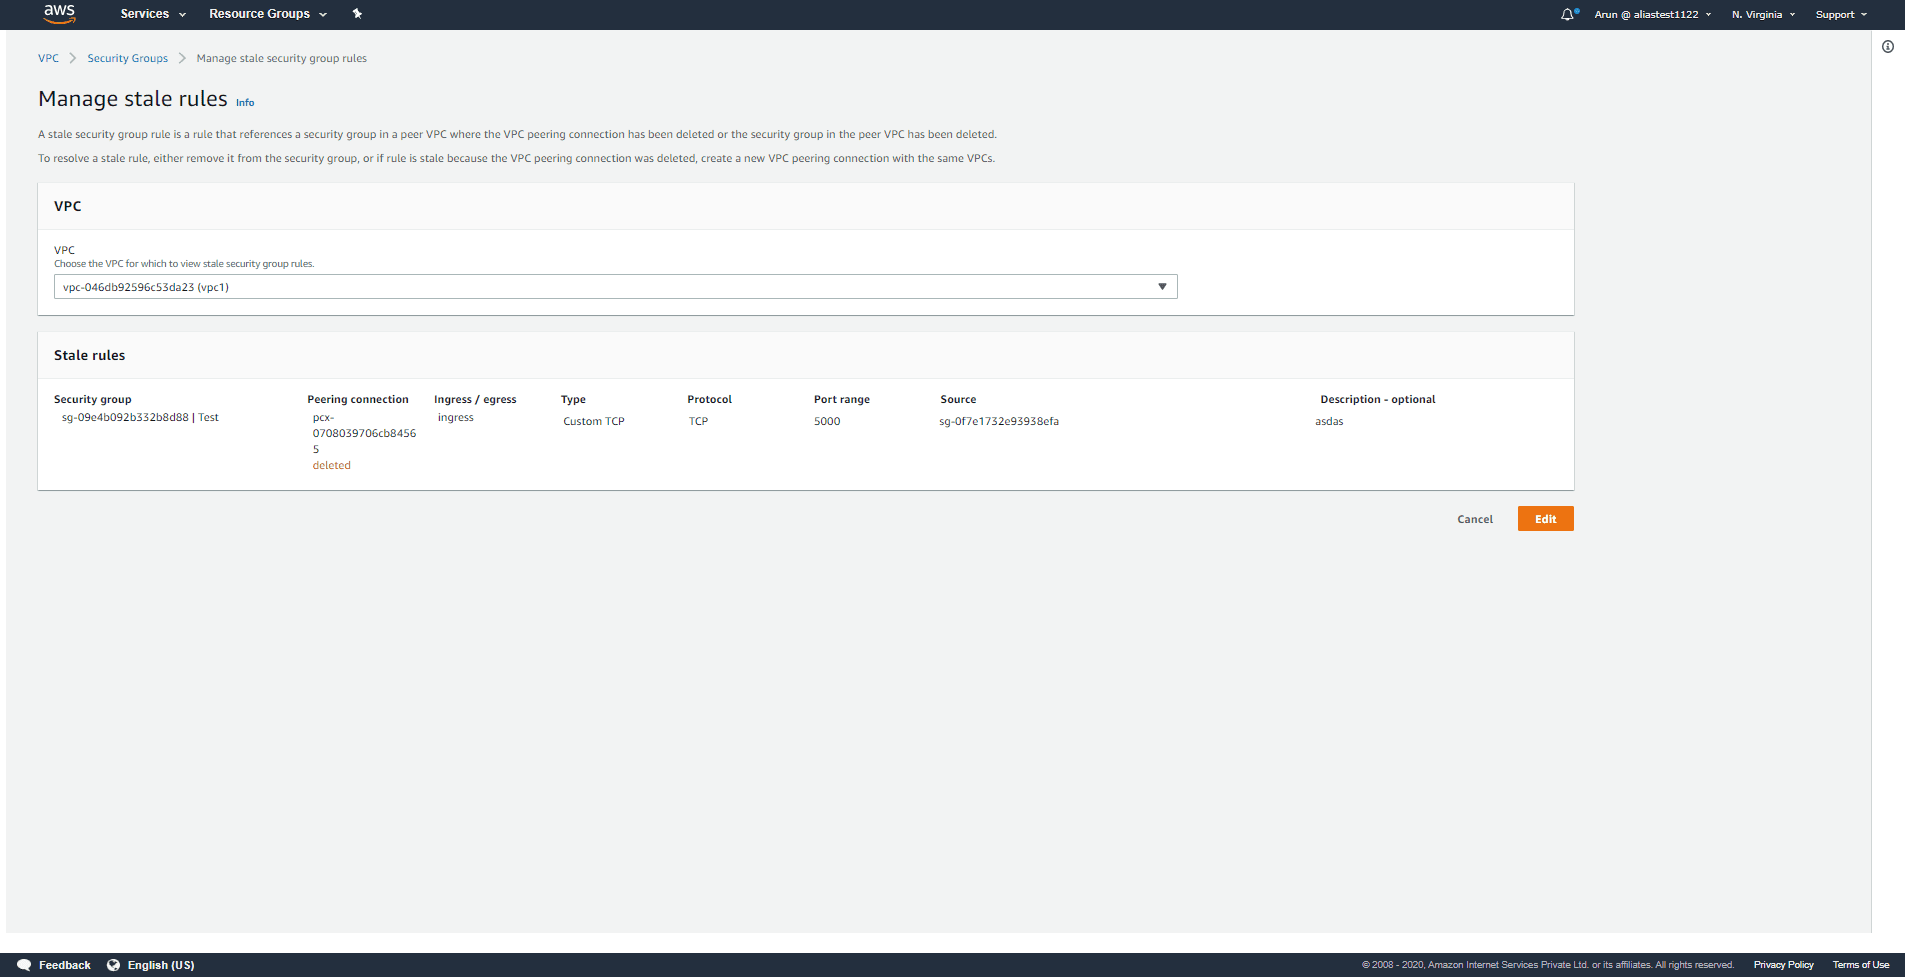
Step 4:
You can make changes to the stale rule. Click Save changes after modifying the stale rule.
Step 5:
If you want to delete the rule, click Delete. Click Delete all to delete all the stale rules.
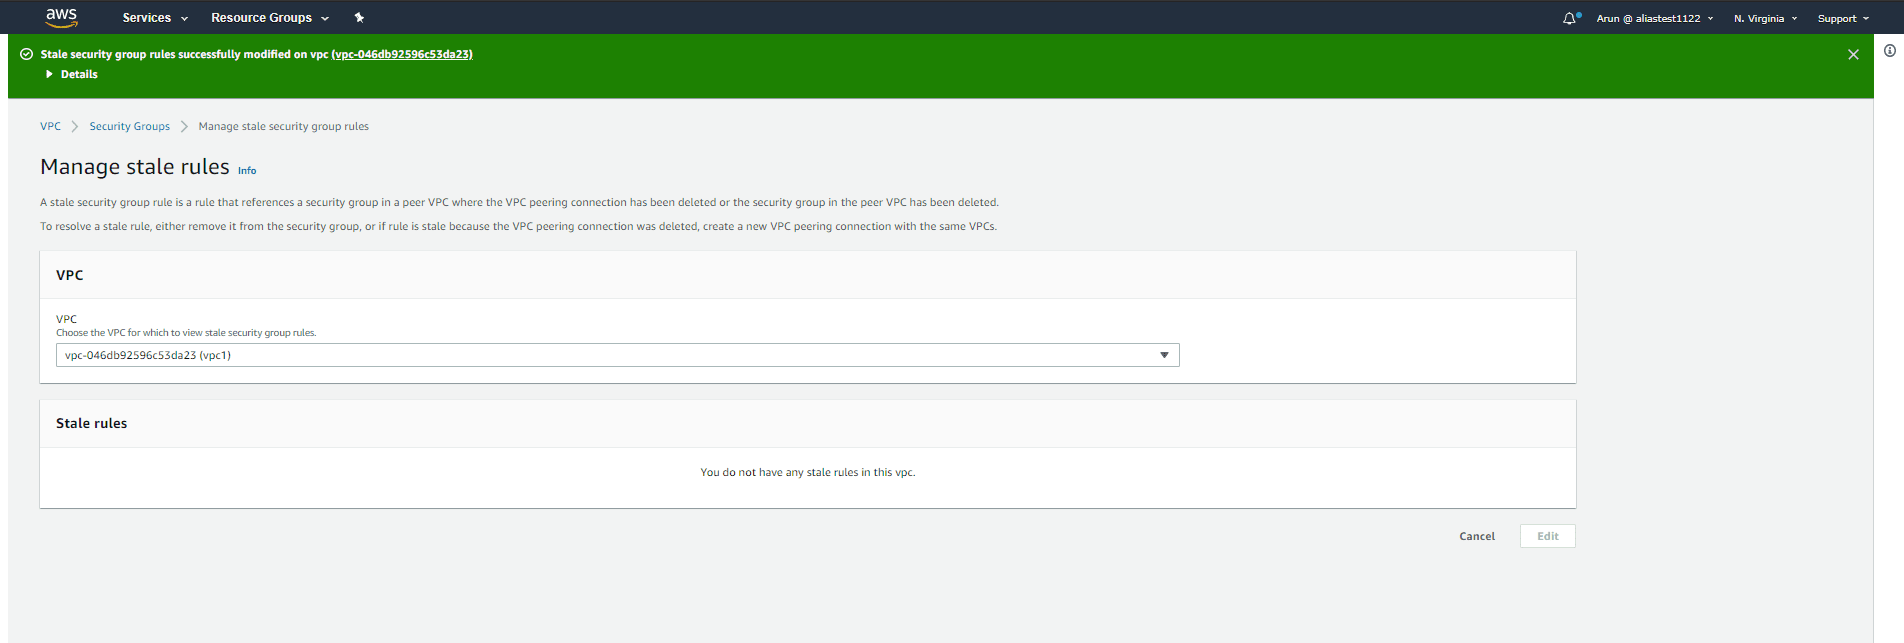
If another peer connection is established between the same VPCs after deletion of the original peer connection, the security group rules will no longer be stale. ManageEngine Log360 is a comprehensive SIEM and cloud monitoring tool that identifies and mitigate threats automatically and efficiently. With real-time alerting and out-of-the-box reporting, this solution helps secure your cloud platform from threat actors. You can also learn more about ManageEngine Log360 on your own through a free, fully functional 30-day trial, or schedule a free personalized demo with one of our solution experts to receive answers to your product related questions.


