Installing SNMP Agent on Windows System
SNMP, or Simple Network Management Protocol, is a crucial component for network management, allowing OpManager to effectively monitor and manage network devices. An SNMP Agent is a very small file that is installed on a network device. The agent collects and sends its operational data to an SNMP manager, for easy network monitoring and management. This help document will guide you through the process of installing OpManager's SNMP Agent on a Windows system.
(Adapted from Windows help)
Prerequisites:
The following information is needed before installing the Simple Network Management Protocol (SNMP) service on your computer:
- Community names in your network.
- Trap destinations for each community.
- IP addresses and computer names for SNMP management hosts.
To install SNMP on Windows XP, 2000, and 2003, follow the steps given below:
You must be logged on as an administrator or a member of the Administrators group to complete this procedure. If your computer is connected to a network, network policy settings may also prevent you from completing this procedure.
- Click Start, point to Settings, click Control Panel, double-click Add or Remove Programs, and then click Add/Remove Windows Components.
- In Components, click Management and Monitoring Tools (but do not select or clear its check box), and then click Details.
- Select the Simple Network Management Protocol check box, and click OK.
- Click Next.
- Insert the respective CD or specify the complete path of the location at which the files stored.
- SNMP starts automatically after installation.
This completes the installation process. This also implements the Host Resources MIB automatically. To configure SNMP agents respond to SNMP requests, refer to Configuring SNMP agents.
To install SNMP in Windows NT, follow the steps given below:
- Right-click the Network Neighborhood icon on the Desktop.
- Click Properties.
- Click Services.
- Click Add. The Select Network Service dialog box appears.
- In the Network Service list, click SNMP Service, and then click OK.
- Insert the respective CD or specify the complete path of the location at which the files stored and click Continue.
- After the necessary files are copied to your computer, the Microsoft SNMP Properties dialog box appears.
This completes the installation process. This also implements the Host Resources MIB automatically. To configure SNMP agents respond to SNMP requests, refer to Configuring SNMP agents.

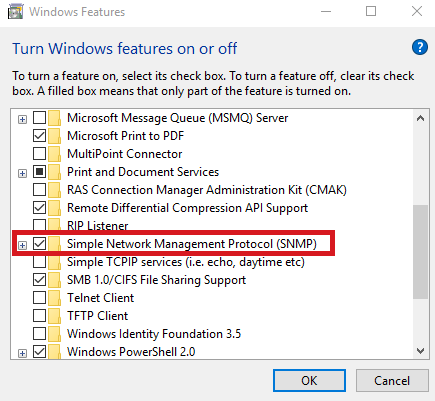
1. Go to Control Panel > Programs > Programs and Features > Turn Windows Features on or off.
2. Choose 'Simple Network Management Protocol (SNMP)' from the list.
3. Click OK.
4. Restart the SNMP Service.
Alternately, if you can’t find the SNMP service by following the above instructions;
- Go to the Start menu
- Click on Settings ->Apps-> Apps and features
- Click on Optional features
- Look for Simple Network Management Protocol (SNMP) and install it.
Windows 2012 Server - Install the SNMP service
- Open Server Manager
- Click on the short cut on the taskbar, or from the Start Menu, and open Control Panel
- Click on Administrative Tools
- Click on Server Manager, and in the top right corner select Manage
- Click on Add Roles and Features, and click Next
- Keep clicking Next to finish installing SNMP service in Windows 2012 server.
In Features,
- Check the box for SNMP Service
- Click Add Features
- Click Next, and click Install
- When installation is complete hit Close.
