Importing Users from Microsoft Entra ID
Integrate Microsoft Entra ID with PAM360 to seamlessly import users and user groups, allowing them to log in using their Microsoft Entra ID credentials across both Windows and Linux platforms. This integration preserves the user details and group structures from Microsoft Entra ID exactly as they are.
Caution
Users without multi-factor authentication (MFA) enabled in the Microsoft Entra ID portal can only be imported into PAM360.
Following are detailed steps to register PAM360 in the Azure portal and import users into PAM360:
- Registering PAM360 in the Microsoft Entra ID Portal
- Steps to Import Users from Microsoft Entra ID
- Troubleshooting Tips
1. Registering PAM360 in the Microsoft Entra ID Portal
To integrate PAM360 with Microsoft Entra ID and import users, PAM360 should first be added as a native client application in your Microsoft Entra ID portal. Follow the steps given below to register PAM360 as an application:
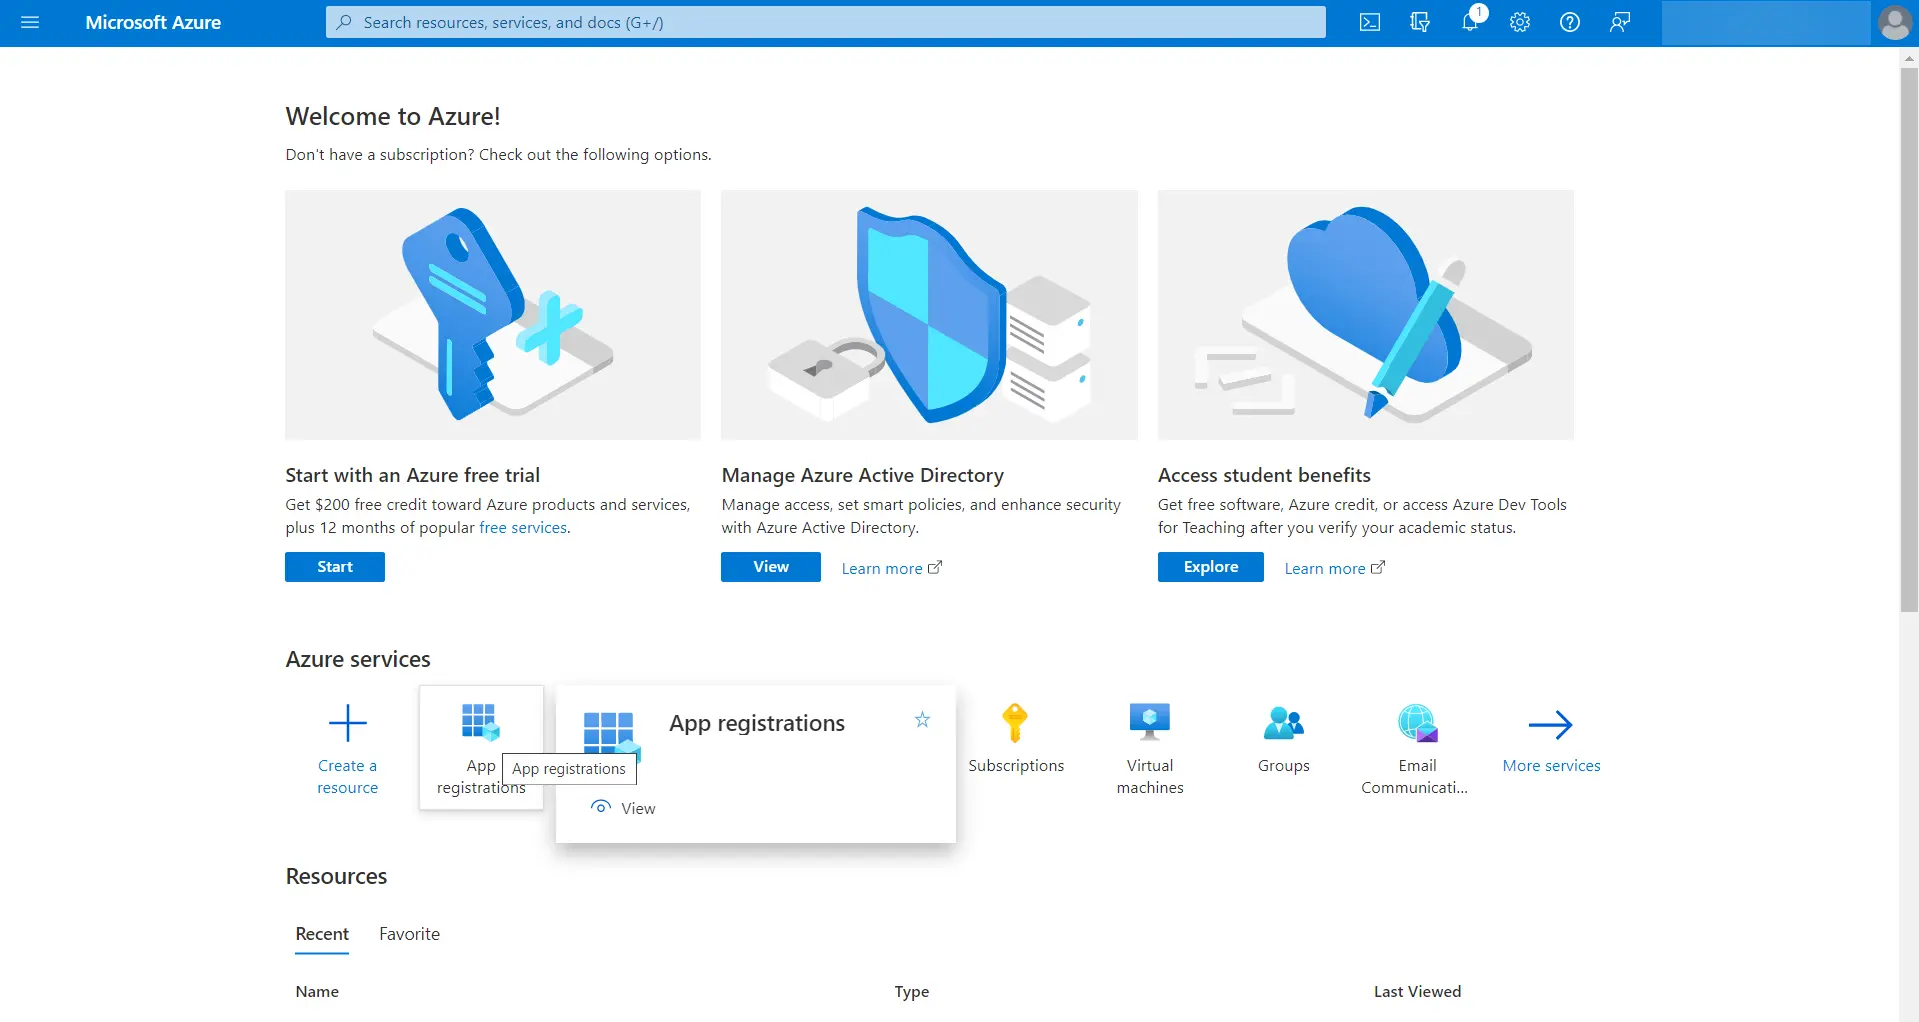
- Log in to your Microsoft Azure portal and click App registrations from the Microsoft Azure home page.
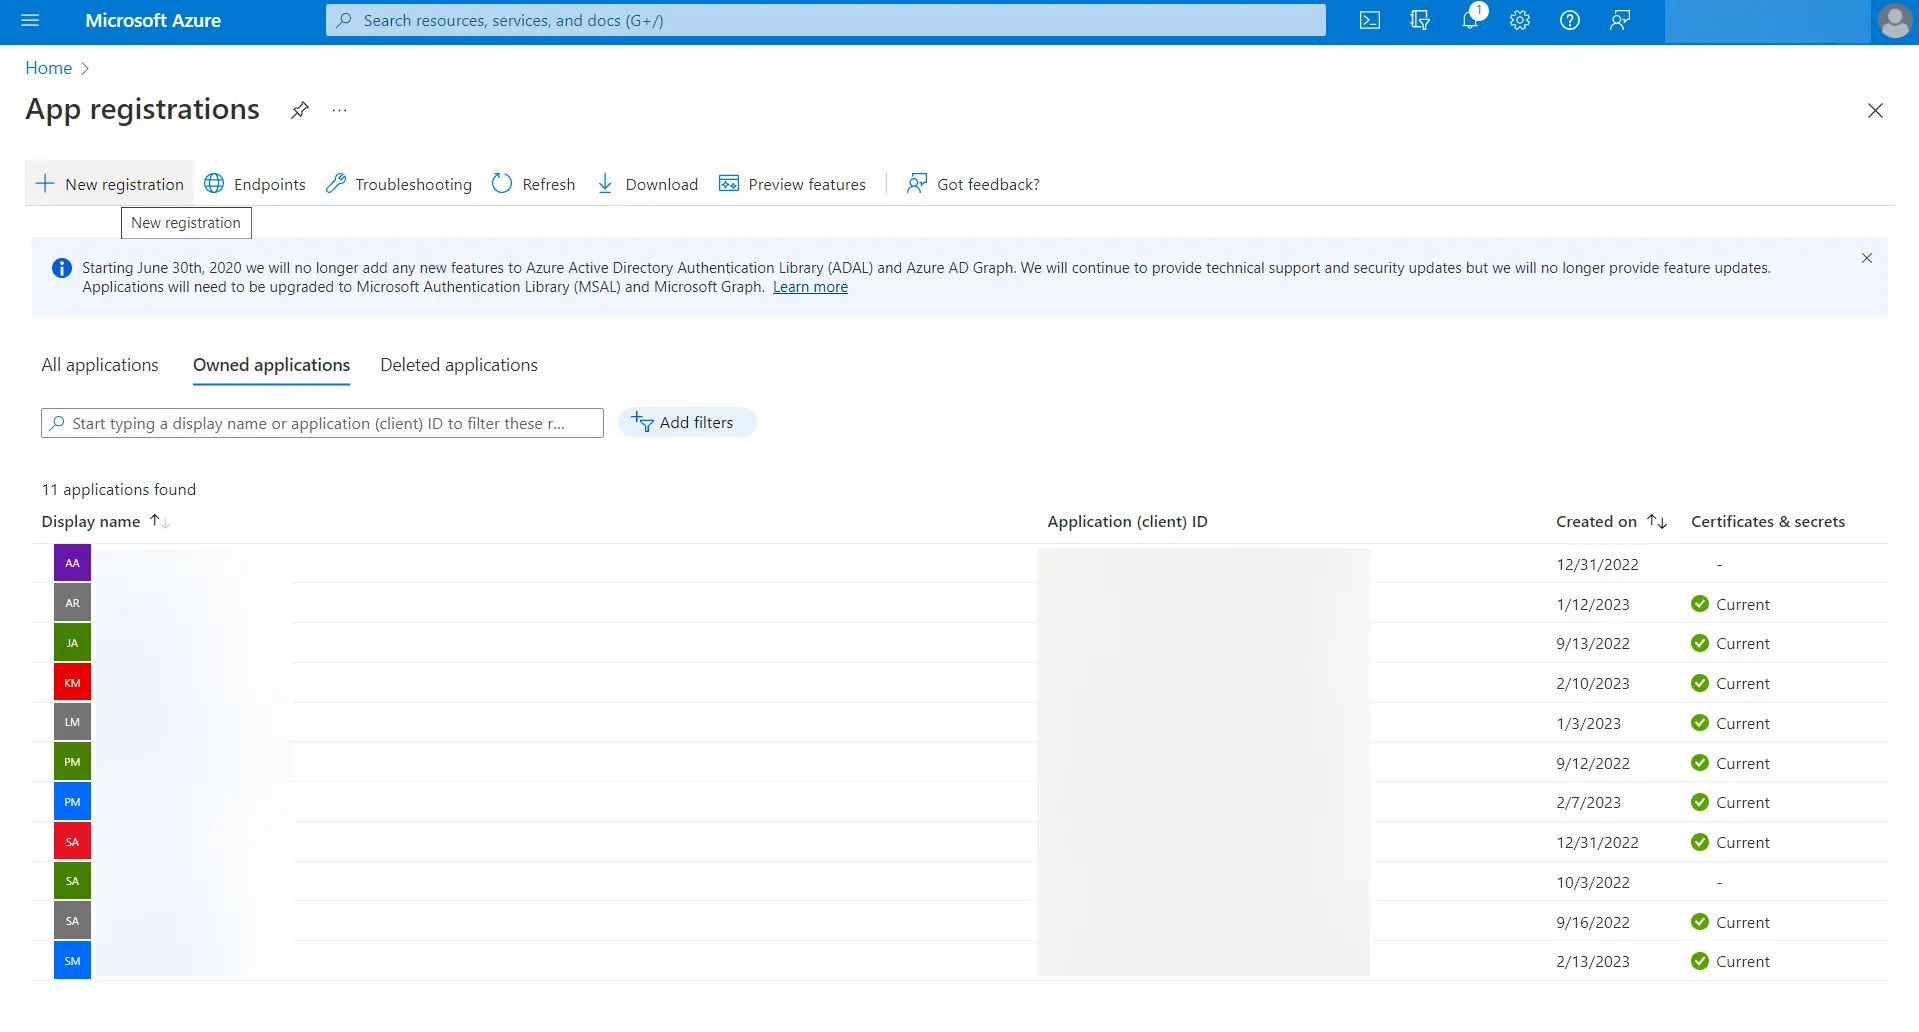
- Click + New registration from the top bar.
- In the Register an application page, enter the following attributes:
- Enter the Name as PAM360 or any name of your choice.
- Choose Supported account types - Accounts in this organizational directory only - Single tenant.
- Enter the Redirect URI of the PAM360 application.
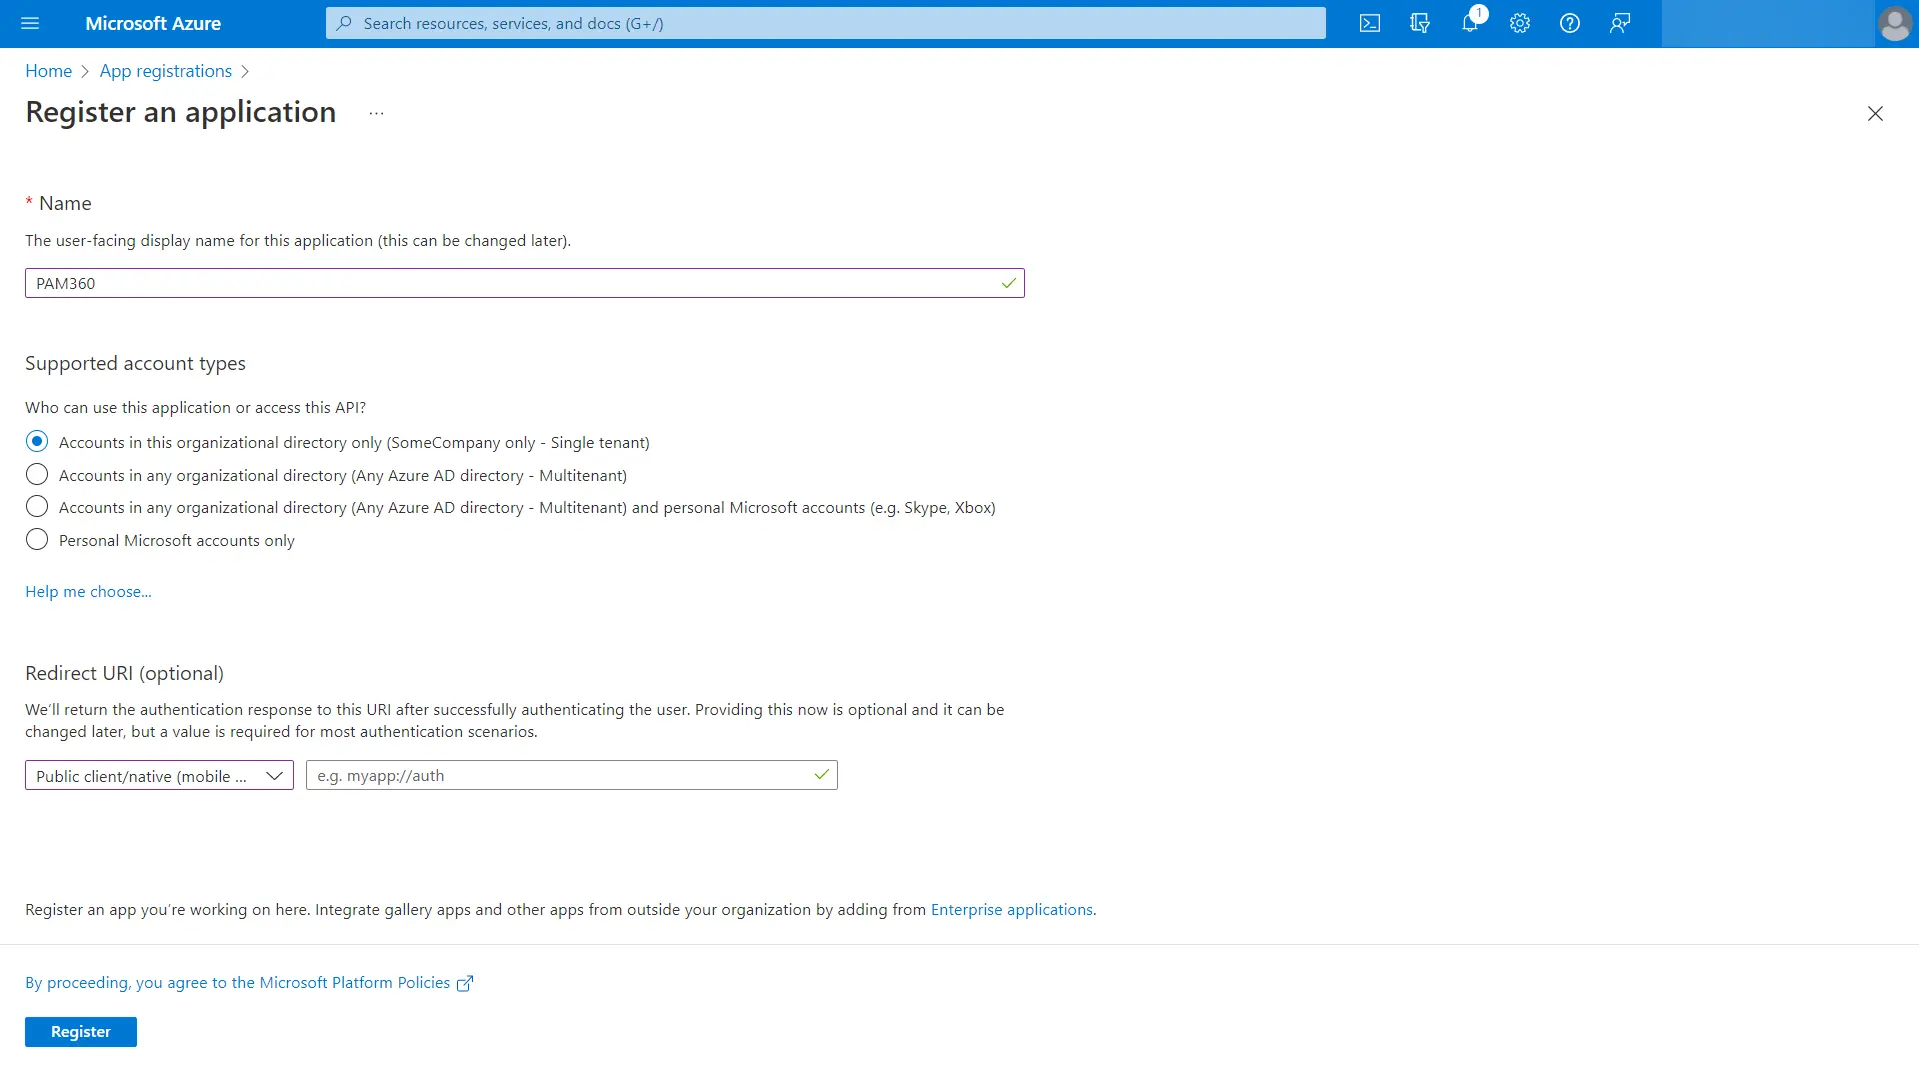
- Click Register. PAM360 will be added as an application in the Microsoft Entra ID portal and you will be taken to the page with the details of the newly registered PAM360 application.
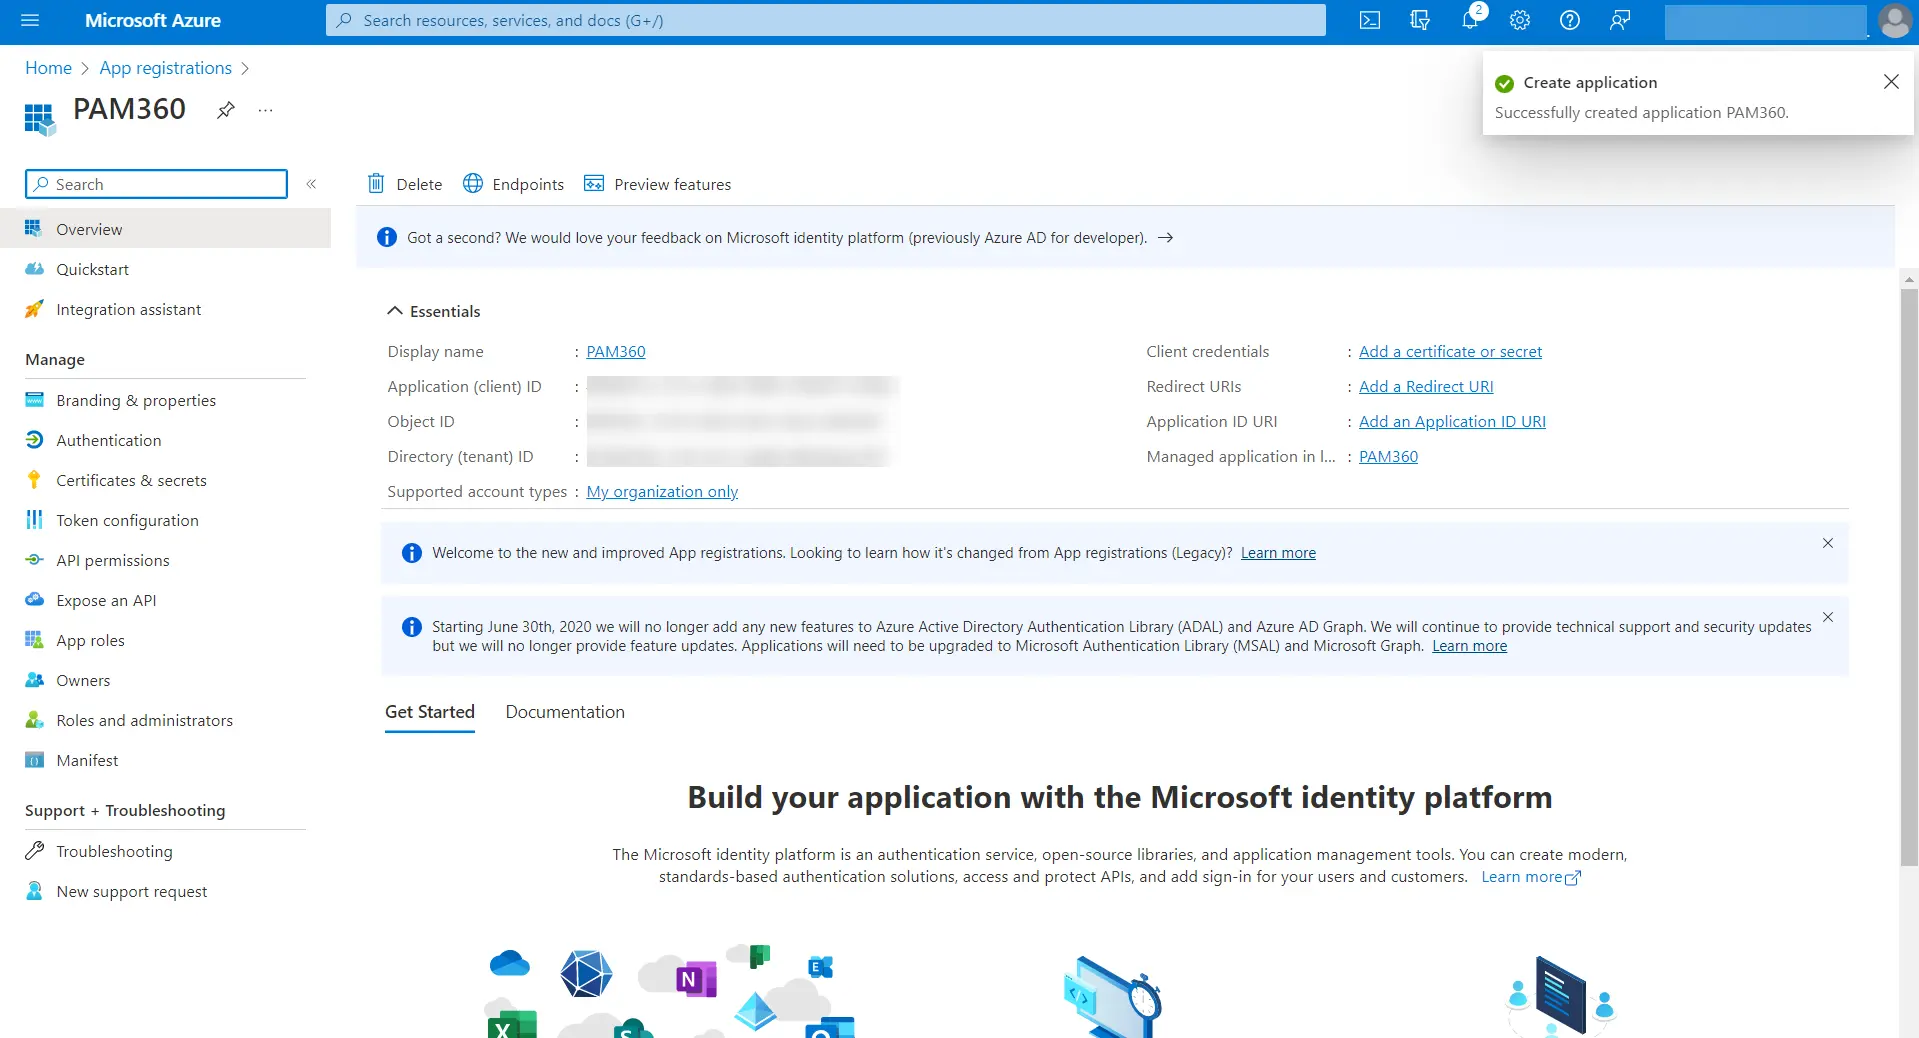
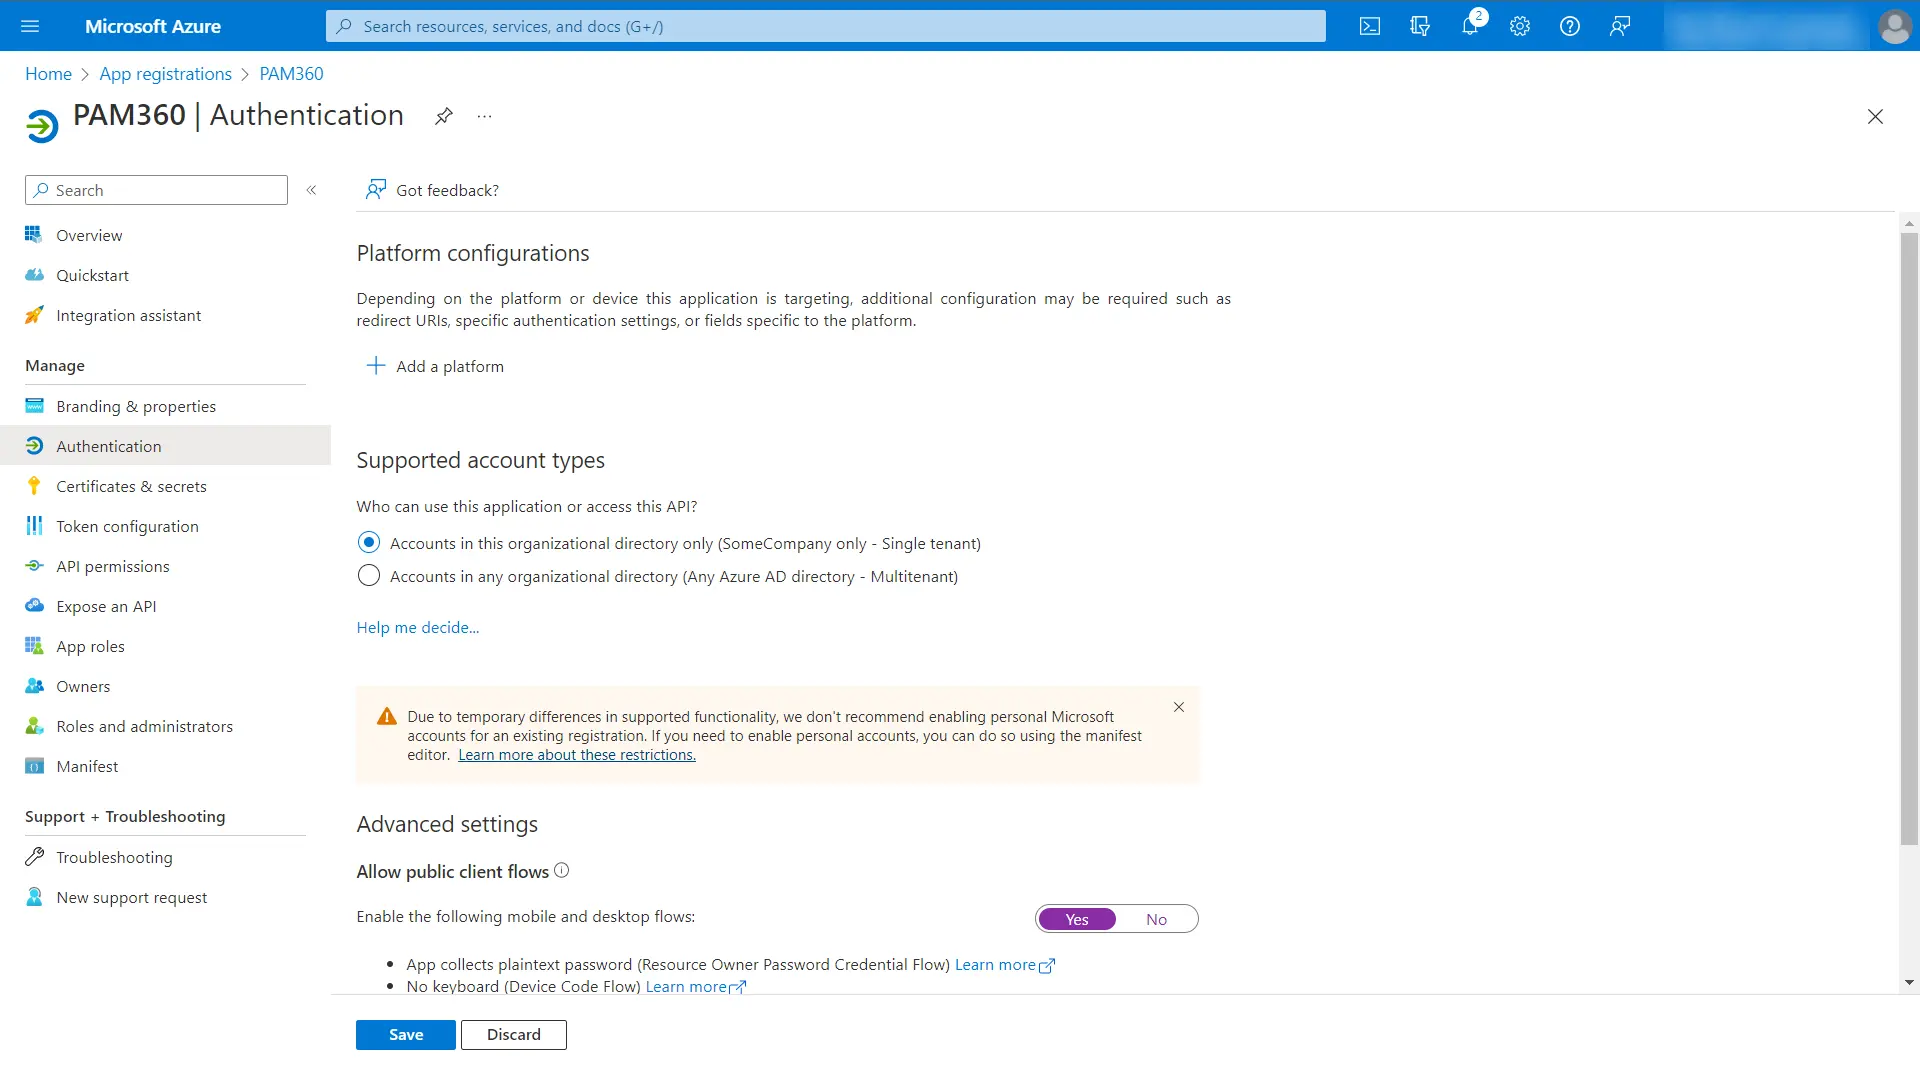
- Click Authentication under Manage in the left pane. In the Authentication page, under Advanced settings, enable Allow public client flows by clicking Yes.
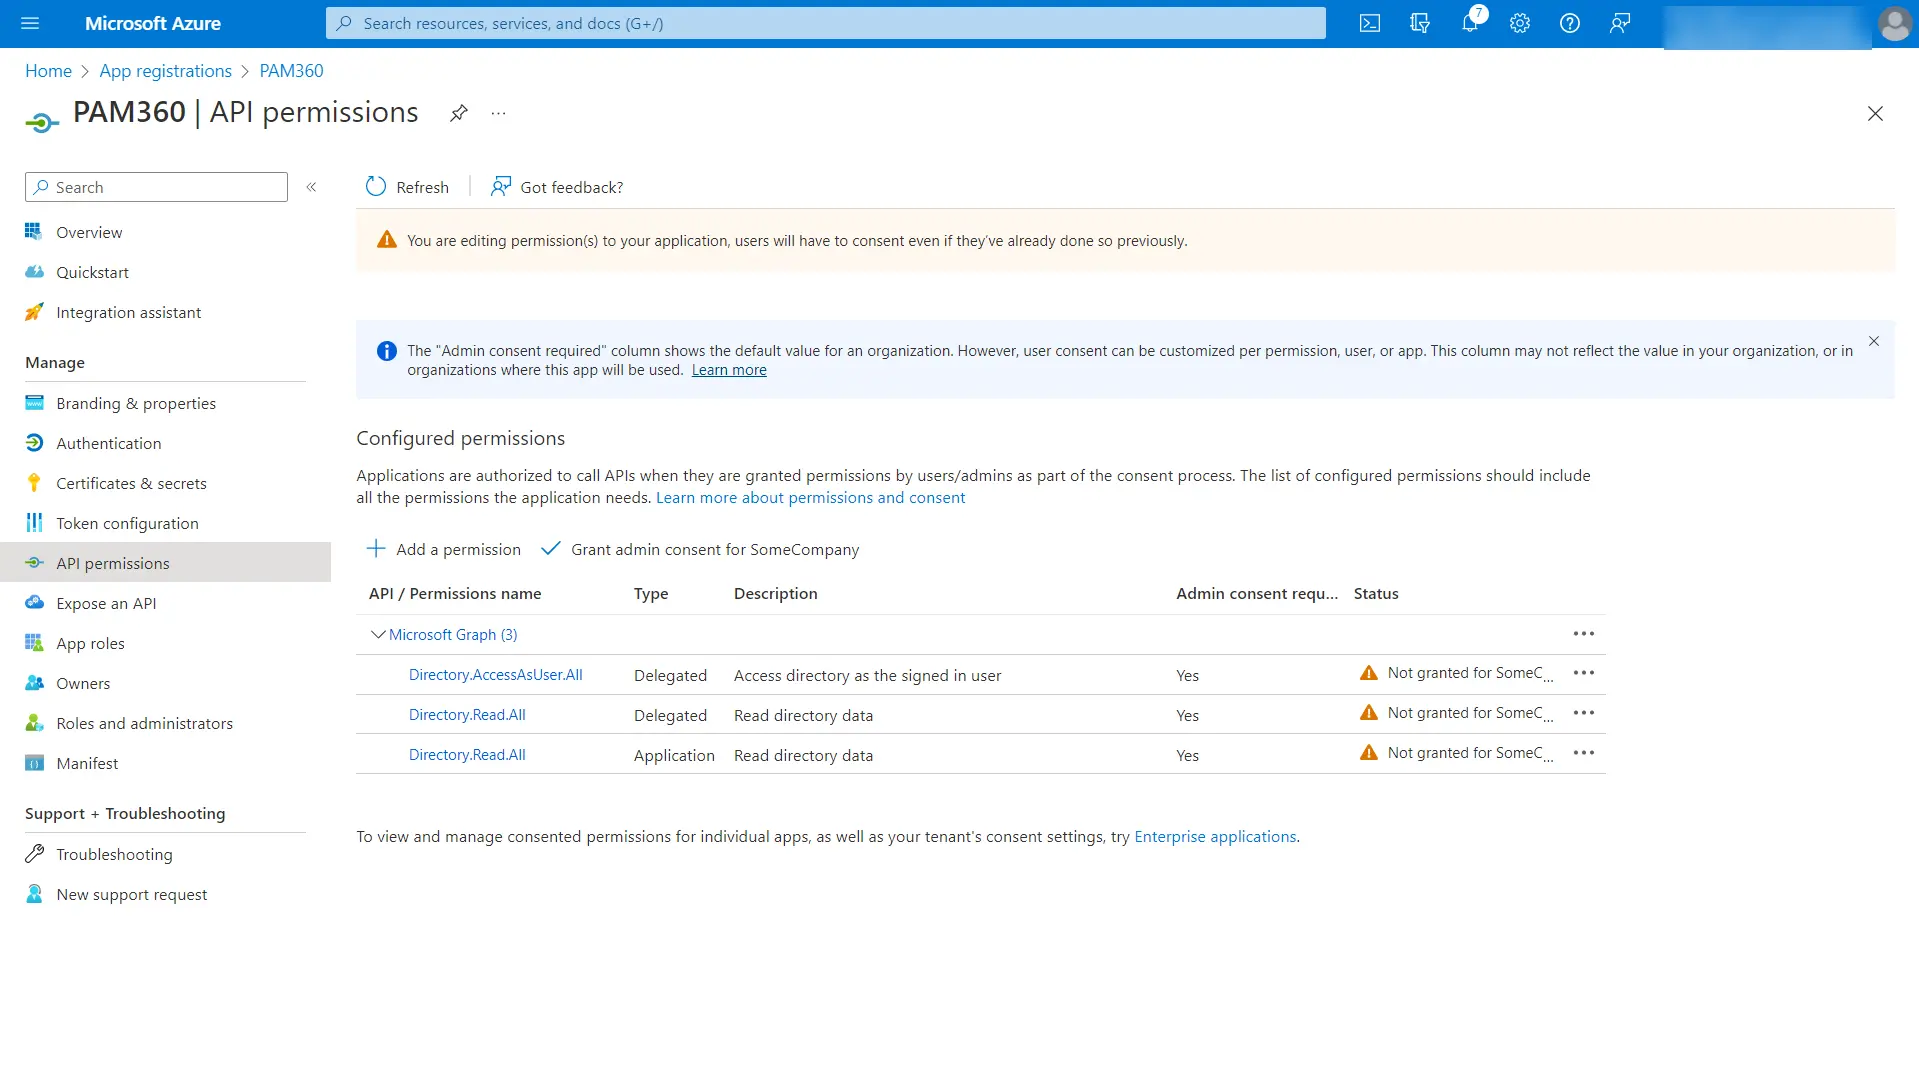
- Click API permissions under Manage in the left pane. In the API Permissions page, click +Add a permission.
- In the Request API Permissions page, choose Microsoft Graph.
- Click Delegated Permissions and search for "read" in the Select Permissions search bar to populate relevant permissions. Select the option Directory.Read.All and click Add Permissions.
- Click Application Permissions and search for "read" in the Select Permissions search bar to populate relevant permissions. Select the option Directory.Read.All and click Add Permissions.
- Click Delegated Permissions and search for "access" in the Select Permissions search bar to populate relevant permissions. Select the option Directory.AccessAsUser.All and click Add Permissions.
- In the Request API Permissions page, choose Microsoft Graph.
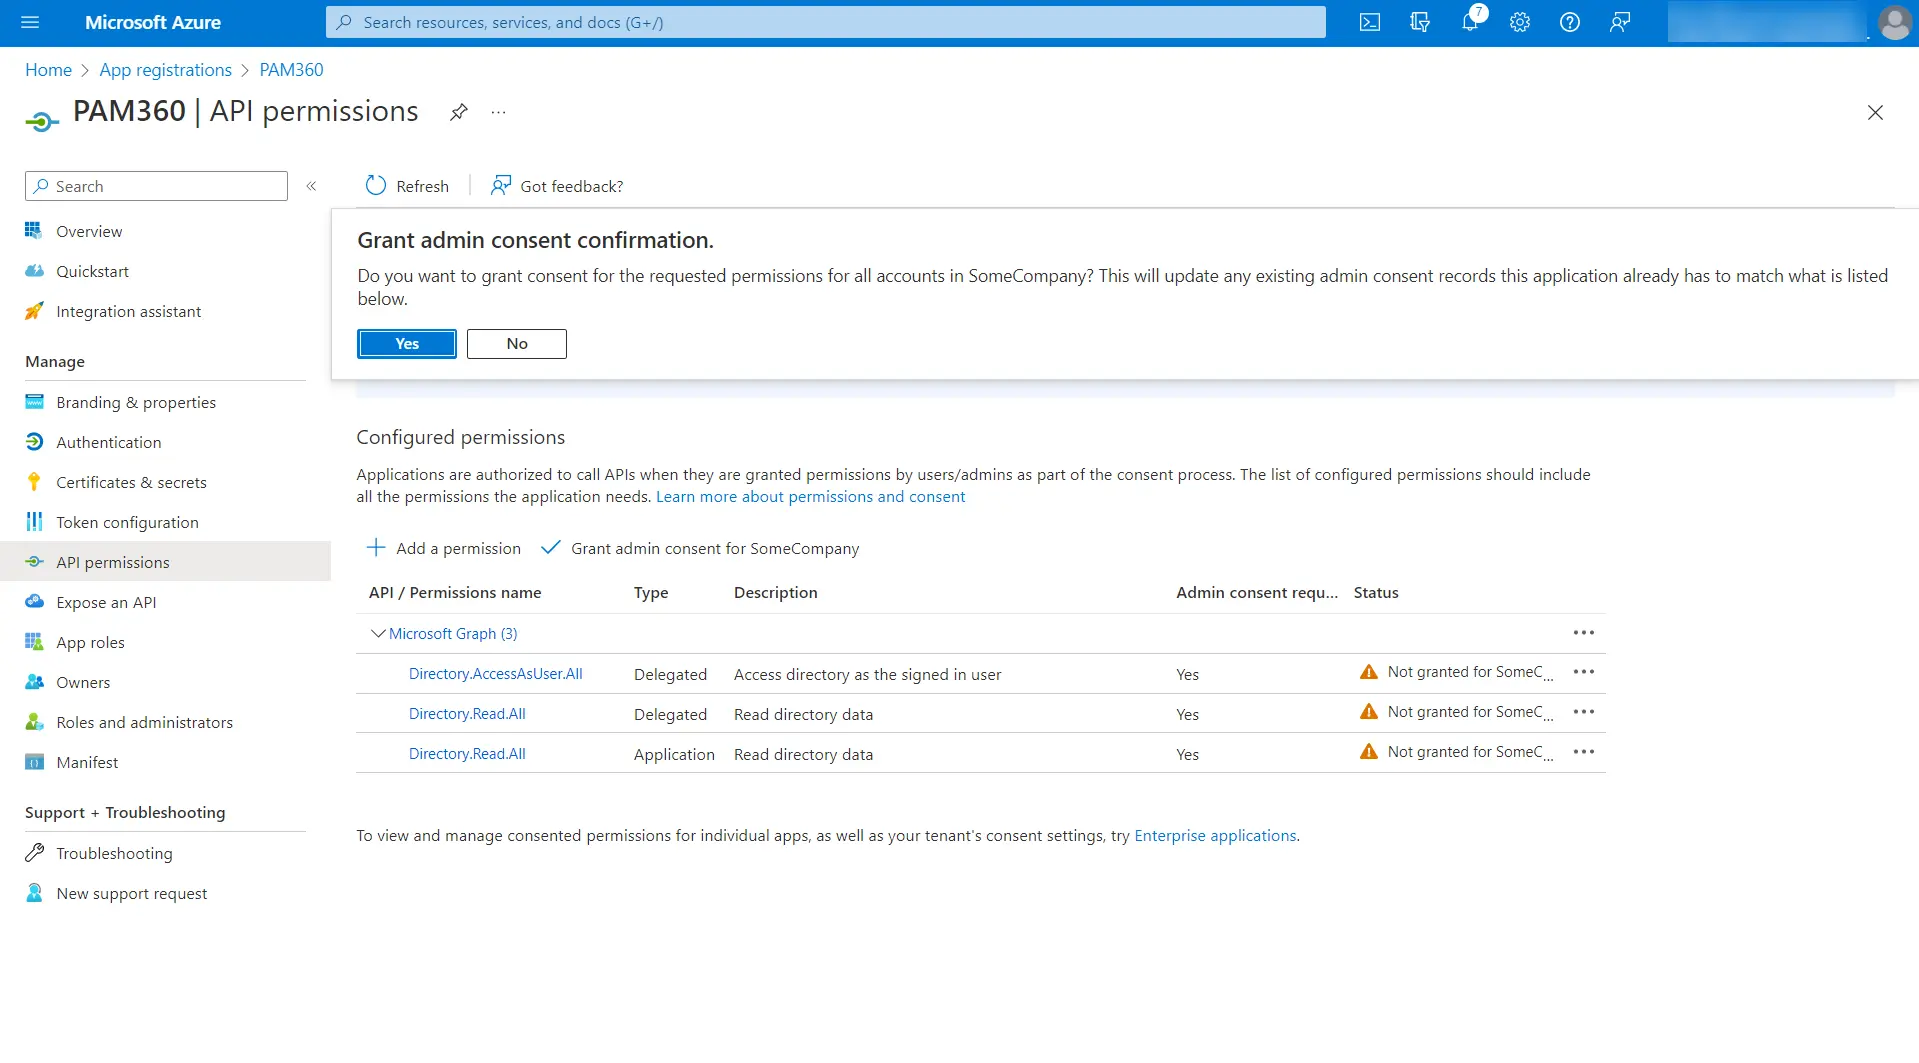
- Now, click the Grant admin consent button under Grant Consent.
- In the pop-up that opens, click Yes to grant consent for the requested permissions.
Once you have registered PAM360 with appropriate permissions, go to PAM360's web interface and start importing users using the steps detailed below.
2. Steps to Import Users from Microsoft Entra ID
- Log in to PAM360 and navigate to Admin >> Authentication >> Microsoft Entra ID.
Additional Detail
You can also import users by navigating to Users >> Add Users >> Import from Microsoft Entra ID. However, Microsoft Entra ID Authentication can only be enabled from Admin >> Authentication >> Microsoft Entra ID.
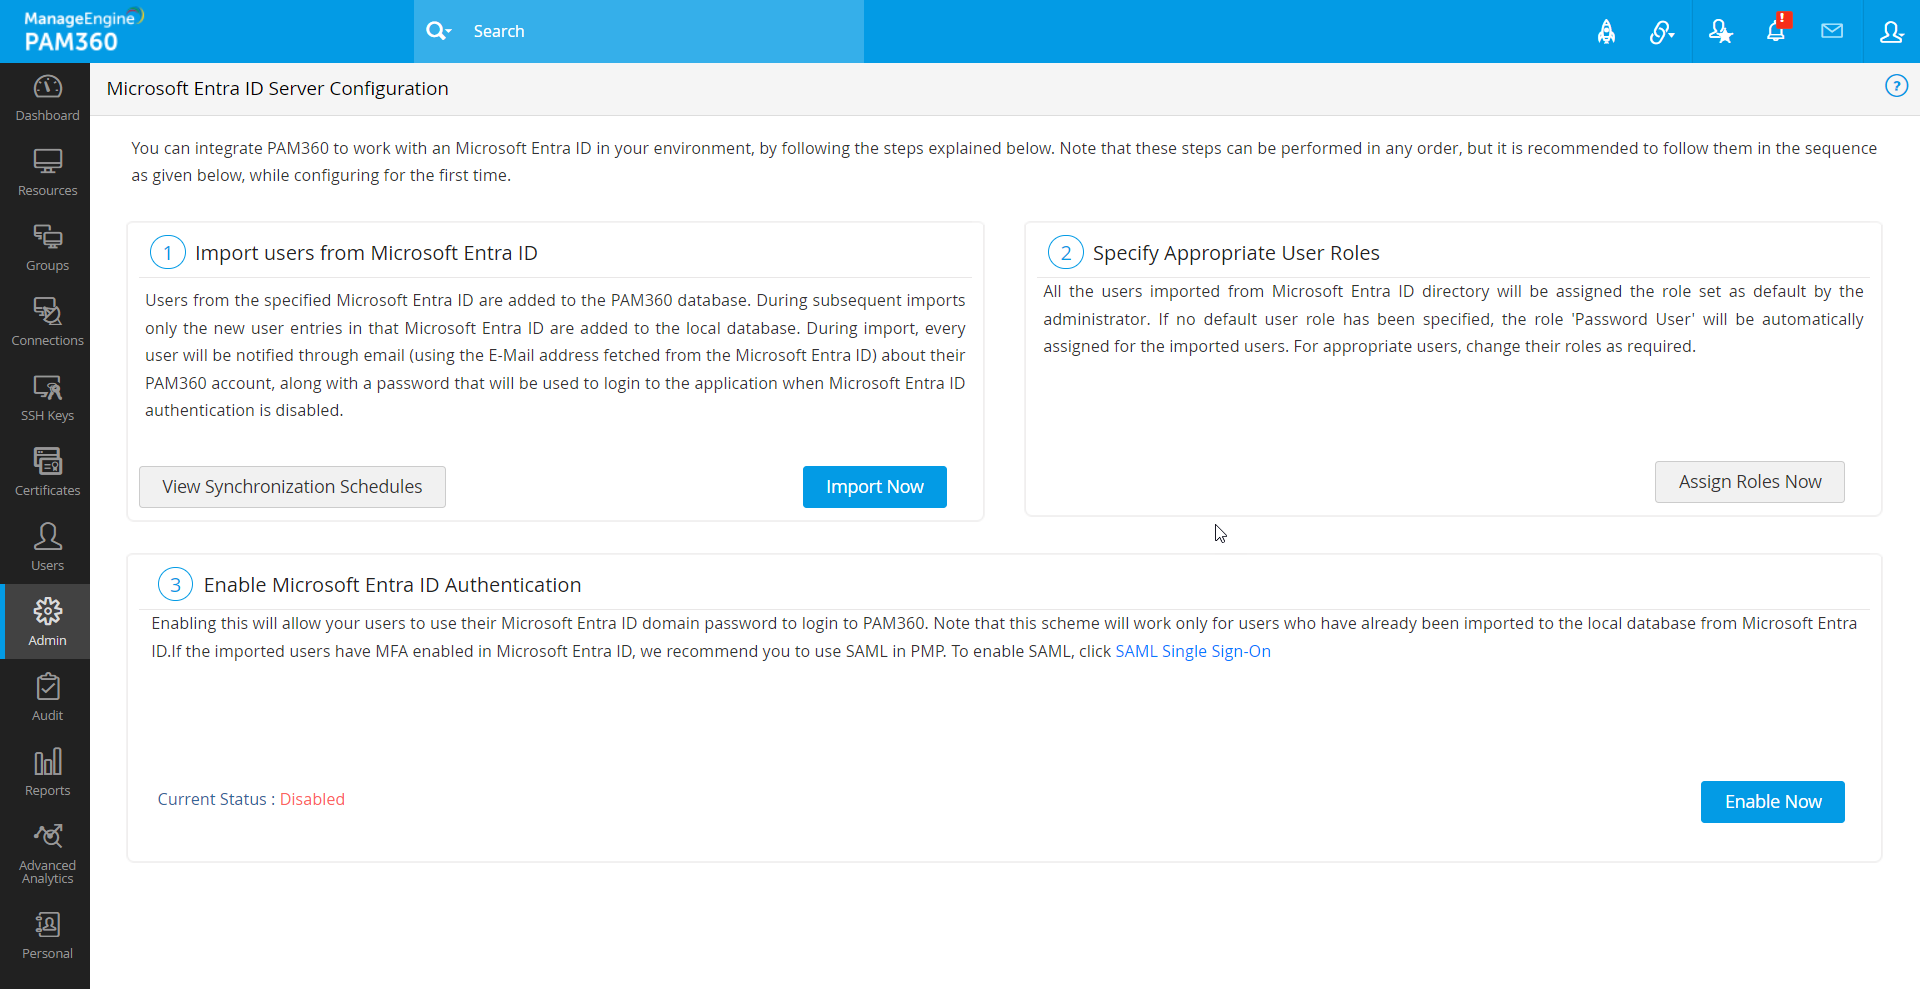
- On the Microsoft Entra ID Server Configuration page, perform the following sequence of steps:
- Import users from Microsoft Entra ID
- Specify appropriate user roles
- Enable Microsoft Entra ID authentication
2.1 Importing Users from Microsoft Entra ID
- Navigate to Users >> Add User >> Import From Microsoft Entra ID or Admin >> Authentication >> Microsoft Entra ID >> Import Now.
- In the pop-up that opens, perform the following actions:
- Click New Domain to add the Microsoft Entra ID domain from which users and user groups will be imported.
- Select Authentication mode as App-Only Access Token as User Access Token is no longer applicable from build 6000 onwards.
Caution
For the existing users, the User Access Token method will continue to work (without further imports or synchronization) until Microsoft deprecates its API services.
- Select Supply Credentials as Specify Client ID and Client Secret Manually if you do not have the Microsoft Entra ID credentials stored as a resource in PAM360.
- Enter the Tenant ID and Client Secret in the respective fields.
- Enter the CLIENT ID generated on the Microsoft Entra ID server while registering PAM360 as a native client application in the Azure portal.
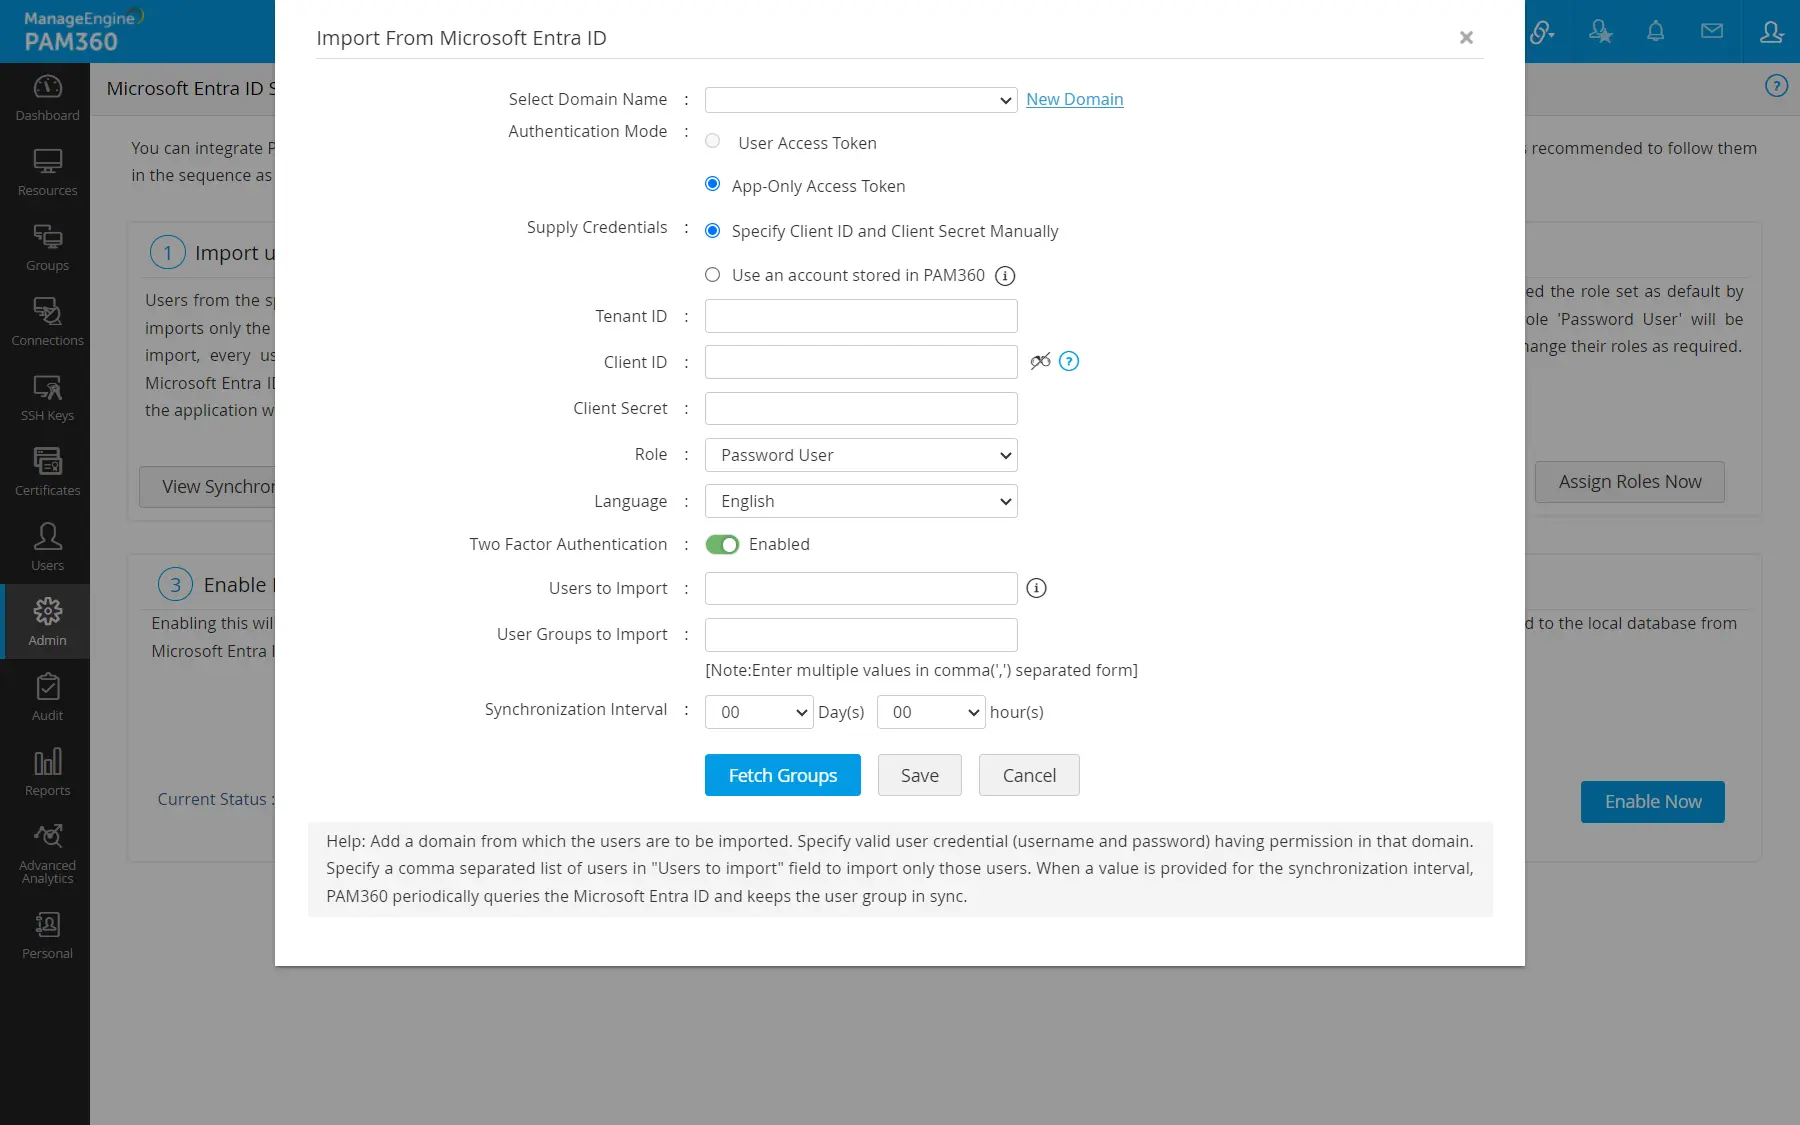
- Select Supply Credentials as Use an account stored in PAM360 if you have stored the Microsoft Entra ID credentials as a resource in PAM360.
- Choose the appropriate resource from the Resource Name drop-down field.
- Choose the appropriate account from the Account Name drop-down field.
- Users imported from Microsoft Entra ID will be automatically assigned the default role. To change this, select the desired role from the Role drop-down field. The selected role will be applied to all the users imported from the provided domain of the Microsoft Entra ID
Caution
The configurations applied during the initial import will be retained in subsequent schedules unless modified.
- Set the language for the users to be imported by choosing the desired language from the Language drop-down field.
- By default, Two-Factor Authentication (TFA) is enabled for the users imported from the Microsoft Entra ID. Toggle off the switch button beside the Two-Factor Authentication field to disable TFA for the users to be imported from Microsoft Entra ID.
Caution
- The role, language, and TFA fields are applicable only from PAM360 build 6700 and above.
- If TFA is disabled on the Two-Factor Authentication Settings page, users imported from Microsoft Entra ID during this period will have TFA disabled by default.
- To import specific users or user groups from Microsoft Entra ID, enter the required user name(s) in the comma-separated form in the Users to Import field or enter the required group name(s) in User Groups to Import field.
- Add a synchronization schedule to keep the PAM360 user database in sync with Microsoft Entra ID. In the Synchronization Interval field, enter the time interval at which PAM360 should query Microsoft Entra ID to maintain synchronization with the user database.
Additional Detail
The imports configured with the synchronization interval will be added as a schedule on the Microsoft Entra ID Synchronization Schedules page.
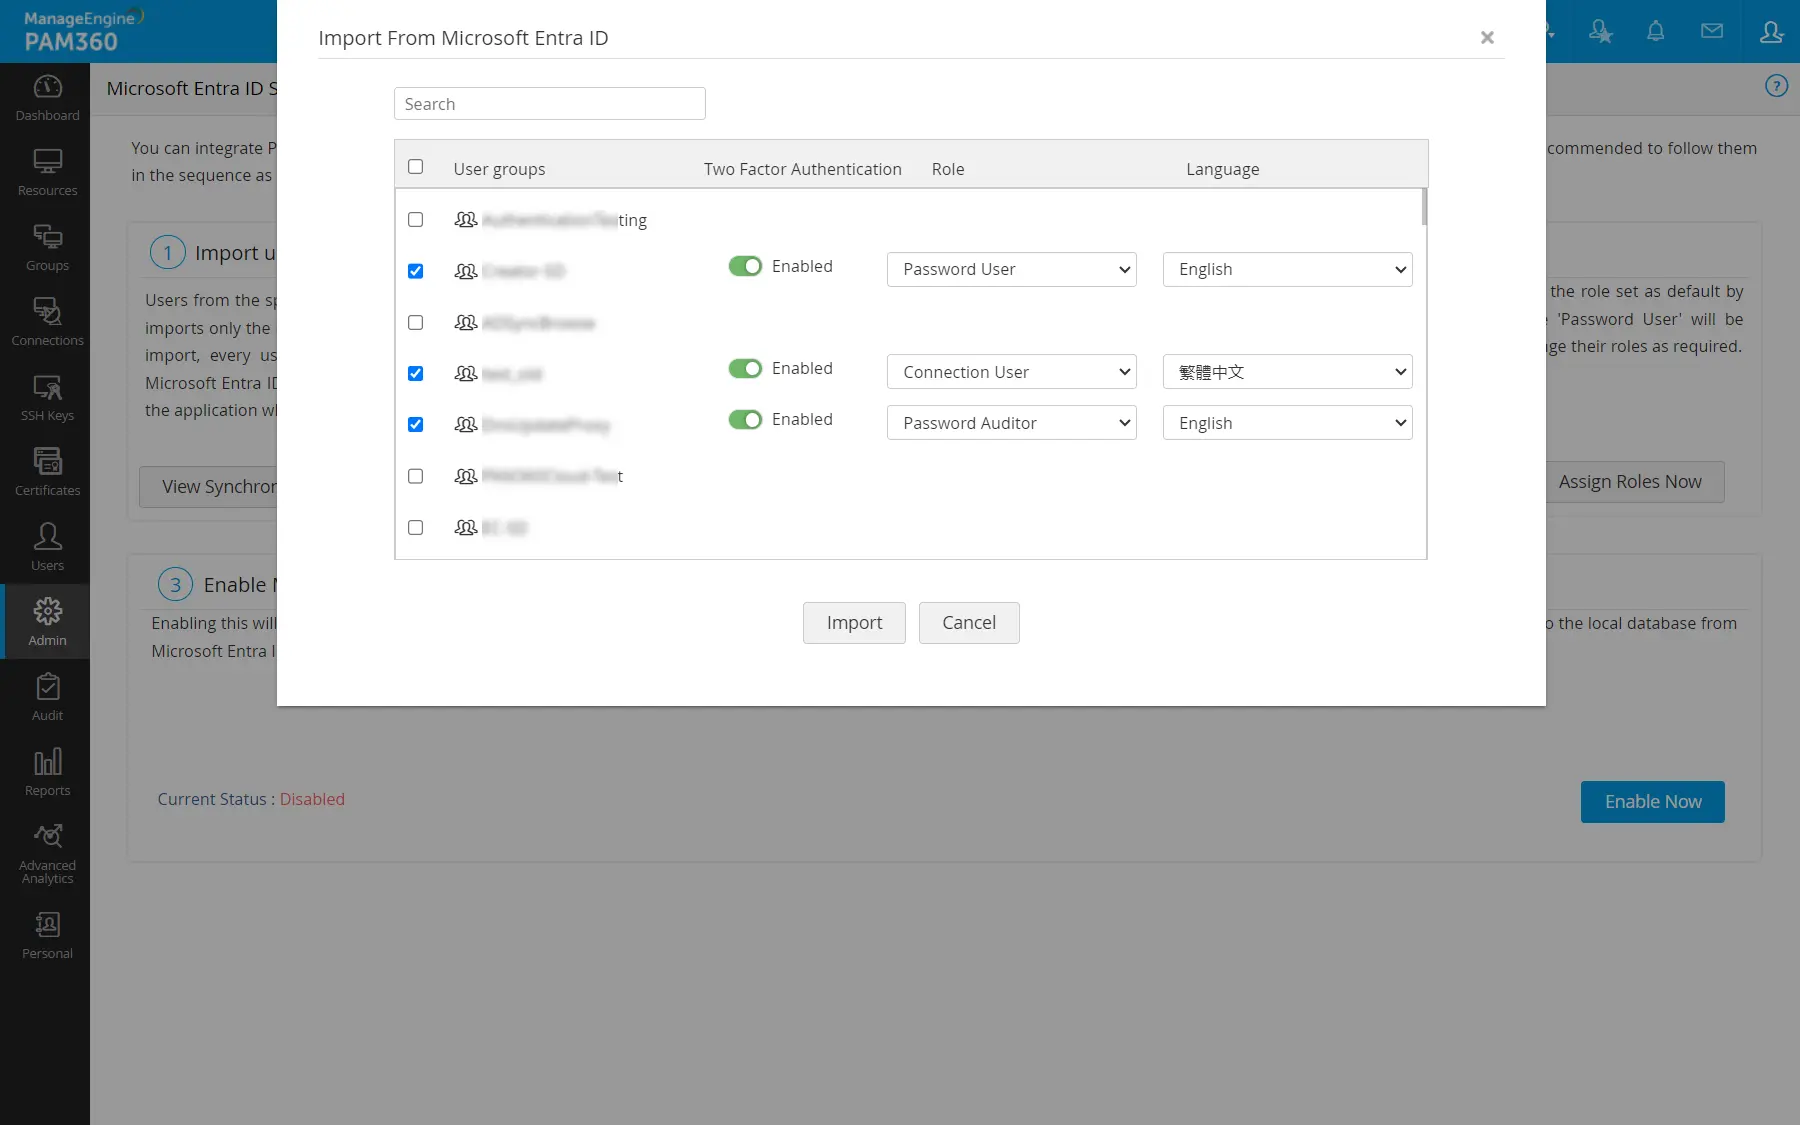
- If you do not know the specific users or user groups that you want to import from Microsoft Entra ID, click Fetch Groups. PAM360 will list all the user groups in your Microsoft Entra ID domain. Use the checkboxes to select the required groups.
- After selecting the user group(s), assign the user role and language, configure TFA for the selected user group(s), and then click Import to onboard the selected user group(s) into PAM360.
- If you have specified user(s) or user group(s) to import, skip the previous step and click Save to import the specified users or user groups from Microsoft Entra ID into PAM360.
- Once the import is complete, an import summary will be displayed indicating the number of users successfully imported and any that failed. Click Close to specify user roles for the users imported from Microsoft Entra ID.
2.2 Specifying Appropriate User Roles
By default, all users imported from Microsoft Entra ID are assigned the Password User role unless otherwise specified during the import process. To change specific roles to particular users upon the import process:
- Navigate to Admin >> Authentication >> Microsoft Entra ID and click Assign Roles Now.
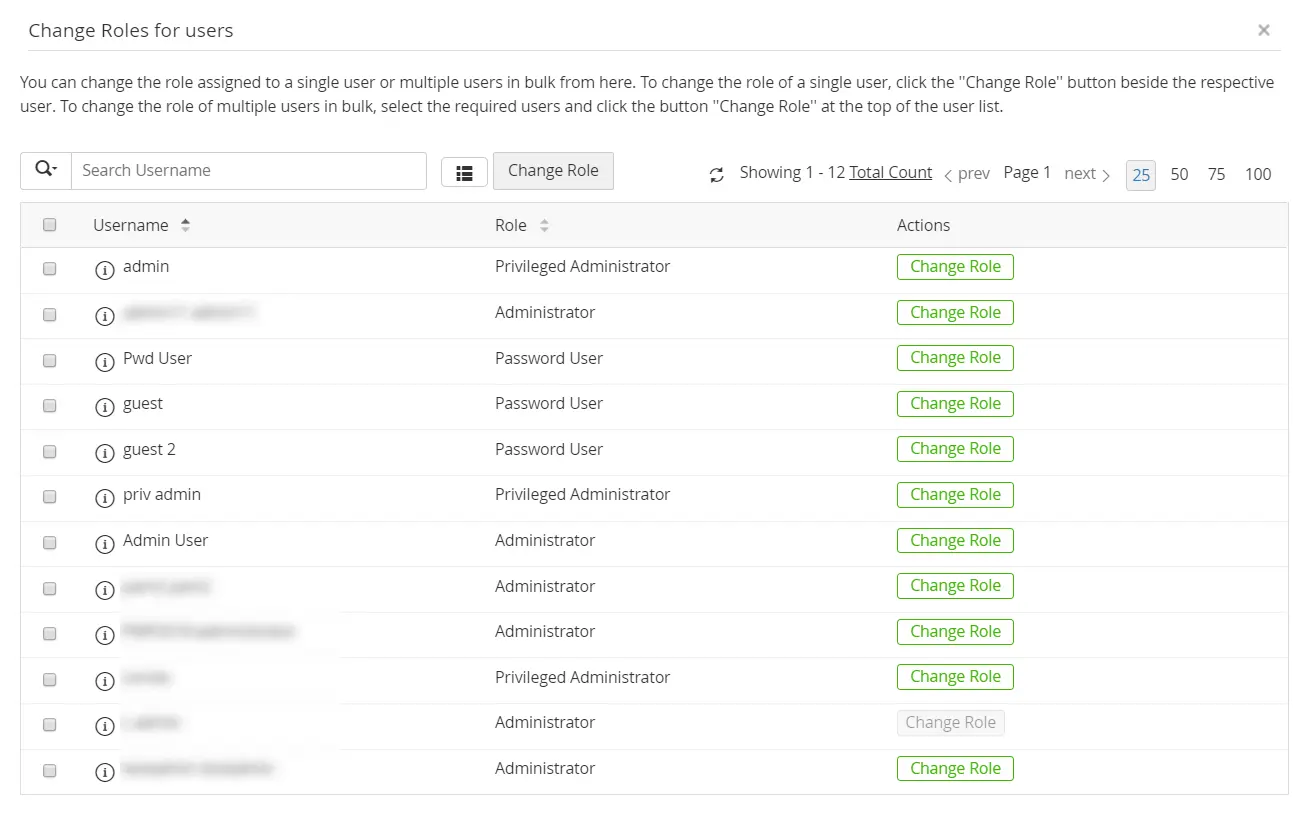
- In the Change Roles for Users window, all the users imported from Microsoft Entra ID will be listed.
- Click the ChangeRole button beside the users for whom you wish to change the role.
- Choose an appropriate role from the drop-down menu.
- To change user roles in bulk, select the users using the checkboxes, click the Change Role button at the top, and choose an appropriate role from the drop-down menu. The changes will be saved as and when the roles are assigned.
Caution
Assign the Administrator role to at least one user from the list of imported users from Microsoft Entra ID. This is essential, as administrator privileges are necessary for managing users and performing critical system operations within PAM360.
2.3 Enabling Microsoft Entra ID Authentication
The third step is to enable Microsoft Entra ID authentication. Enabling this will allow your users to log in to PAM360 using their Microsoft Entra ID domain password. Note that this feature will work only for users who have already been imported to the local database from Microsoft Entra ID. Before enabling Microsoft Entra ID authentication, ensure that AD authentication is disabled.
- Navigate to Admin >> Authentication >> Microsoft Entra ID and click Enable Now under Enable Microsoft Entra ID Authentication as shown in this image.
- Once Microsoft Entra ID authentication is enabled, you can disable local authentication under Admin >> Customization >> General Settings >> User Management. Click here to learn more about that.
2.4 Managing Microsoft Entra ID Synchronization Schedules
Navigate to Admin >> Authentication >> Microsoft Entra ID >> View Synchronization Schedules. In the window that opens,
- Click the Edit/Delete icon beside the respective Microsoft Entra ID domain to edit or delete it.
- To edit or delete an existing synchronization schedule, click the Edit/Delete icon beside the respective Microsoft Entra ID schedule.
- To instantly import users from an existing schedule, click the Import Now icon beside the respective Microsoft Entra ID schedule.
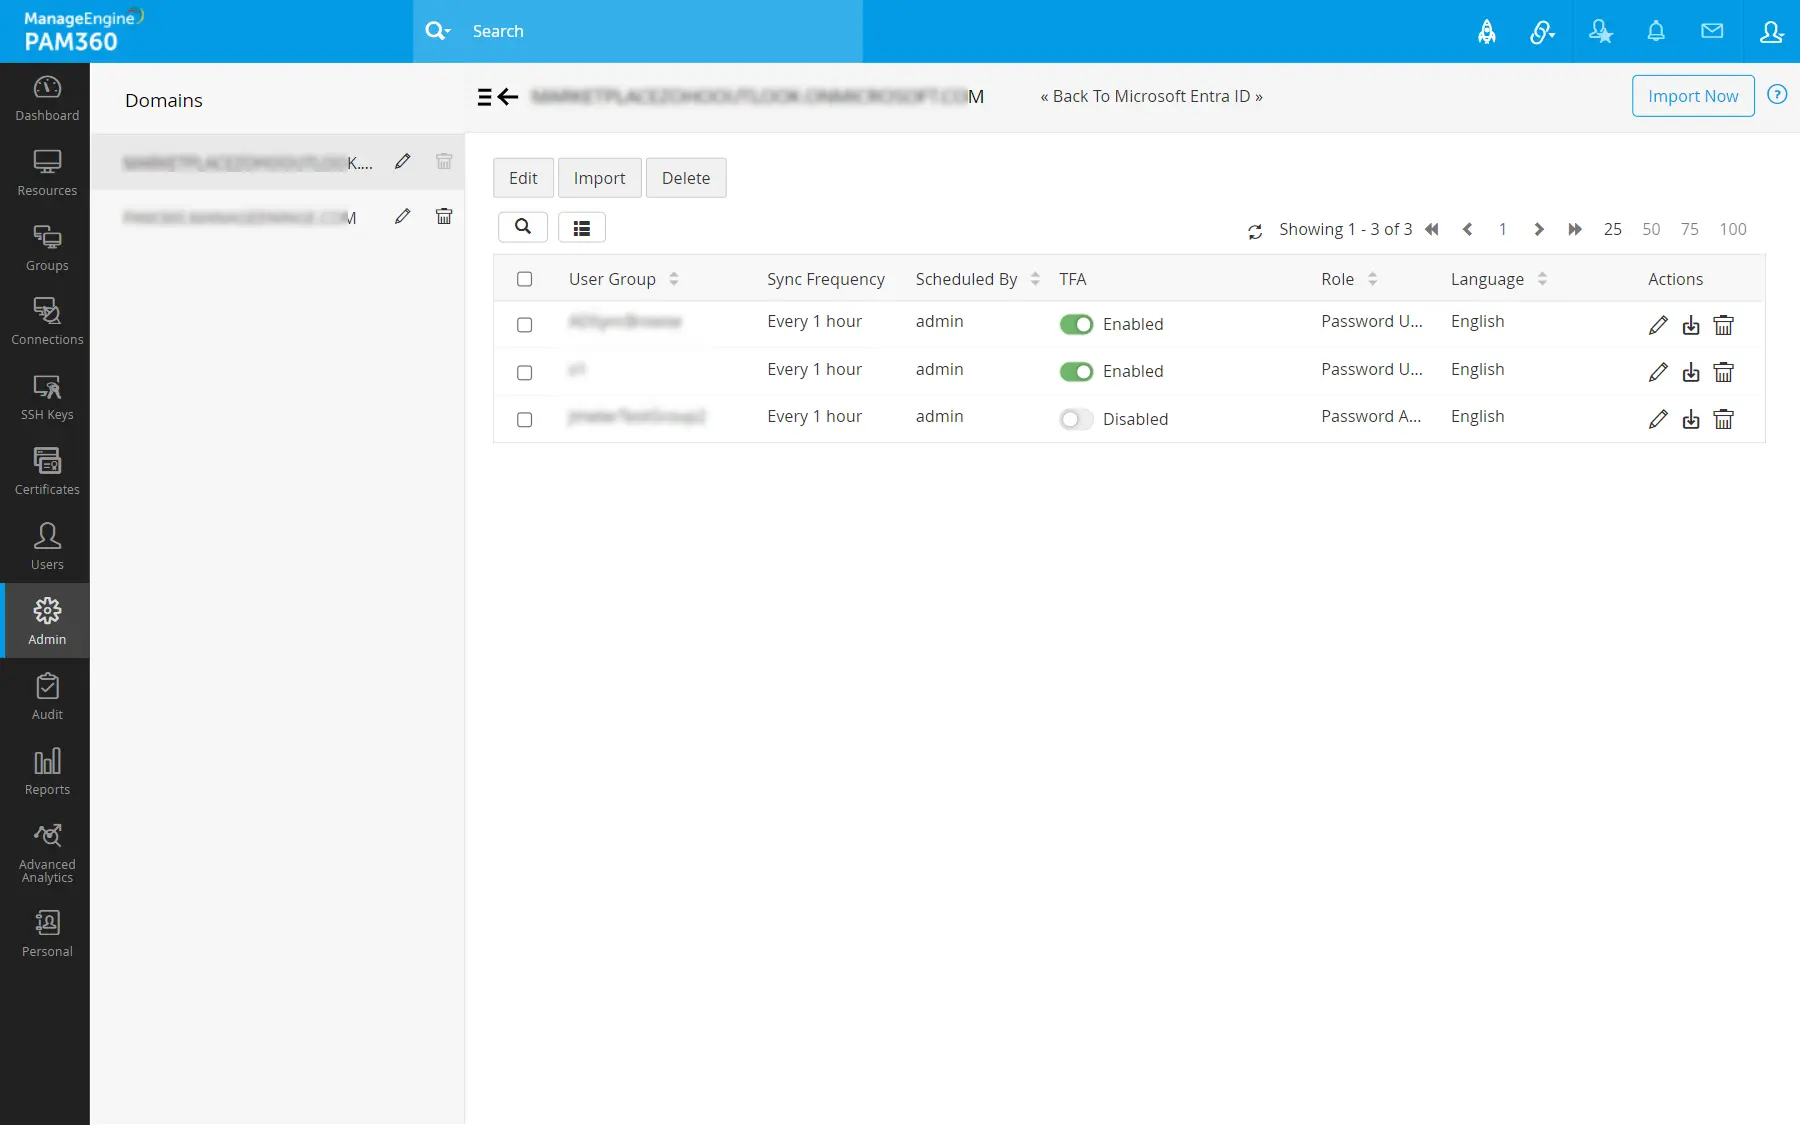
- Additionally, You can perform these operations in bulk by selecting the desired schedules and clicking the Edit/Import/Delete button at the top pane.
3. Troubleshooting Tips
Microsoft Entra ID authentication in PAM360 may fail under the following conditions:
- Conditional Access is enabled for users in the Microsoft Entra ID portal: This setting blocks the transmission of the authentication token to PAM360, resulting in authentication failure.
Solution: To resolve this, disable Conditional Access at both the application and user levels in the Microsoft Entra ID portal before enabling Microsoft Entra ID authentication in PAM360. - Multi-Factor Authentication (MFA) is enabled in the Microsoft Entra ID portal: MFA can prevent successful authentication.
Solution: To bypass this, disable MFA in the Microsoft Entra ID portal.
Alternatively, instead of Conditional Access and MFA, you can enable SAML Single Sign-On (SSO) in the Microsoft Entra ID portal. Click here to learn how to set up SAML authentication.