Secondary Server Model using Microsoft SQL Server
In mission-critical environments, uninterrupted access to passwords is essential. PAM360 offers a secondary server model to ensure this. When configuring a secondary server (High Availability or HA) setup using Microsoft SQL Server (MS SQL), database replication between the primary and secondary MS SQL databases must be set up. This can be accomplished directly from PAM360 or through the SQL Server Management Studio. This document provides a detailed guide to configuring MS SQL Server replication between the primary and secondary databases using PAM360.
Additional Detail
For configuring replication using SQL Server Management Studio, please refer to this help document.
By the end of this document, you will have a thorough understanding of the following key aspects related to configuring a secondary server in a Microsoft SQL Server-based PAM360 environment:
- How Does the Secondary Server Model Works?
- Secondary Server Architecture in PAM360
- Network Scenarios for Secondary Server
- Setting up Secondary Server with Replication using PAM360
- Verifying the Secondary Server Setup
1. How Does the Secondary Server Model Work?
In PAM360, the secondary server model ensures redundancy of both servers and database instances. Key characteristics of the model include:
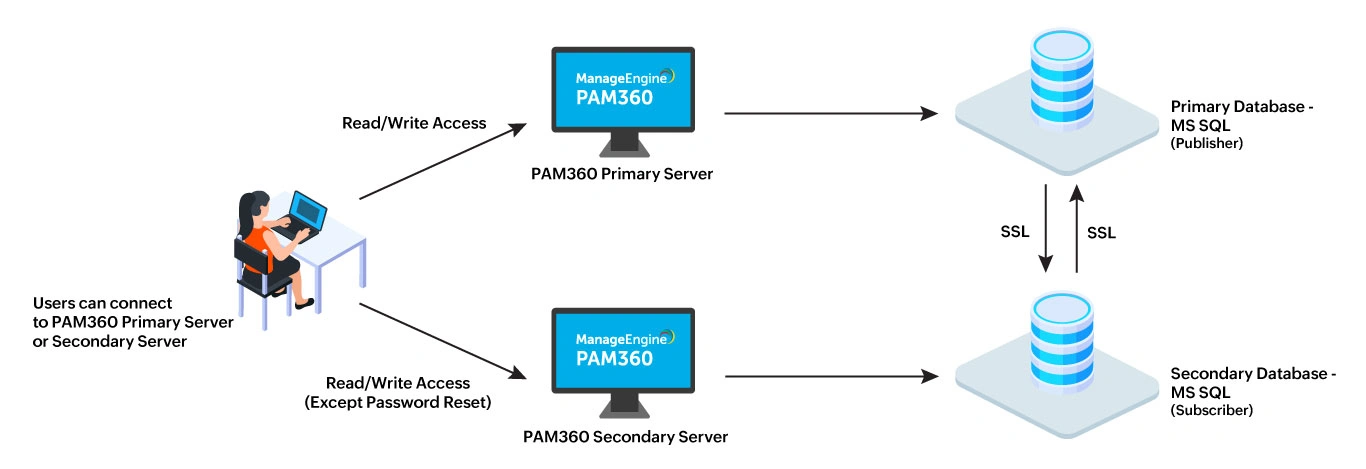
- Primary and Secondary Instances: The primary instance handles read/write access for all users. The secondary instance remains synchronized with the primary instance.
- Data Synchronization: Data between the primary and secondary databases is continuously synchronized via SQL Server's data replication over a secure, encrypted channel.
- Failover: When the primary server becomes unavailable, the secondary server automatically provides read/write access to users (except for password reset functionality) until the primary server is back online. Once the primary server is restored, any changes made to the secondary database during the downtime are automatically synchronized with the primary database.
2. Secondary Server Architecture in PAM360
The architecture consists of redundant PAM360 servers - one primary server and one secondary server. The secondary server is kept in synchronization with the primary server through SQL Server replication.
3. Network Scenarios for Secondary Servers
The secondary server architecture in PAM360 supports two network scenarios:
| Scenario 1 | |
|---|---|
Primary and Secondary Servers on the Same Network | In this scenario, both the primary and secondary servers are hosted within the same network. If the primary server fails, the secondary server assumes read/write responsibility, except for password resets. |
Example | Both servers are deployed in the same location. If the primary server goes down, users can still retrieve passwords and perform relevant operations from the secondary server within the same network. Once the primary server becomes active, the data in both the servers' database will be synchronized. |
| Scenario 2 | |
Primary and Secondary Servers on Different Networks | In this scenario, the primary and secondary servers are hosted in different geographical locations, connected via a WAN link. If the WAN link fails, the secondary server can continue to serve users in its network by providing read/write access (except password resets). |
Example | If the primary server is located in location A and the secondary server in location B, and the WAN link between them fails, both servers will operate independently. Users in location B will access the secondary server until the link is restored, after which both servers' database will synchronize. |
3.1 Audit Trail Management
In both scenarios, audit trails are recorded as usual. If users access the secondary server during a primary server failure, actions such as password retrieval, login, and logout will be logged on the secondary server. Once network connectivity is restored, the audit data between the primary and secondary servers is synchronized.
4. Setting up Secondary Server With Replication Using PAM360

4.1 Configuring the Replication Using PAM360
Additional Detail
For configuring replication using SQL Server Management Studio, please refer to this help document.
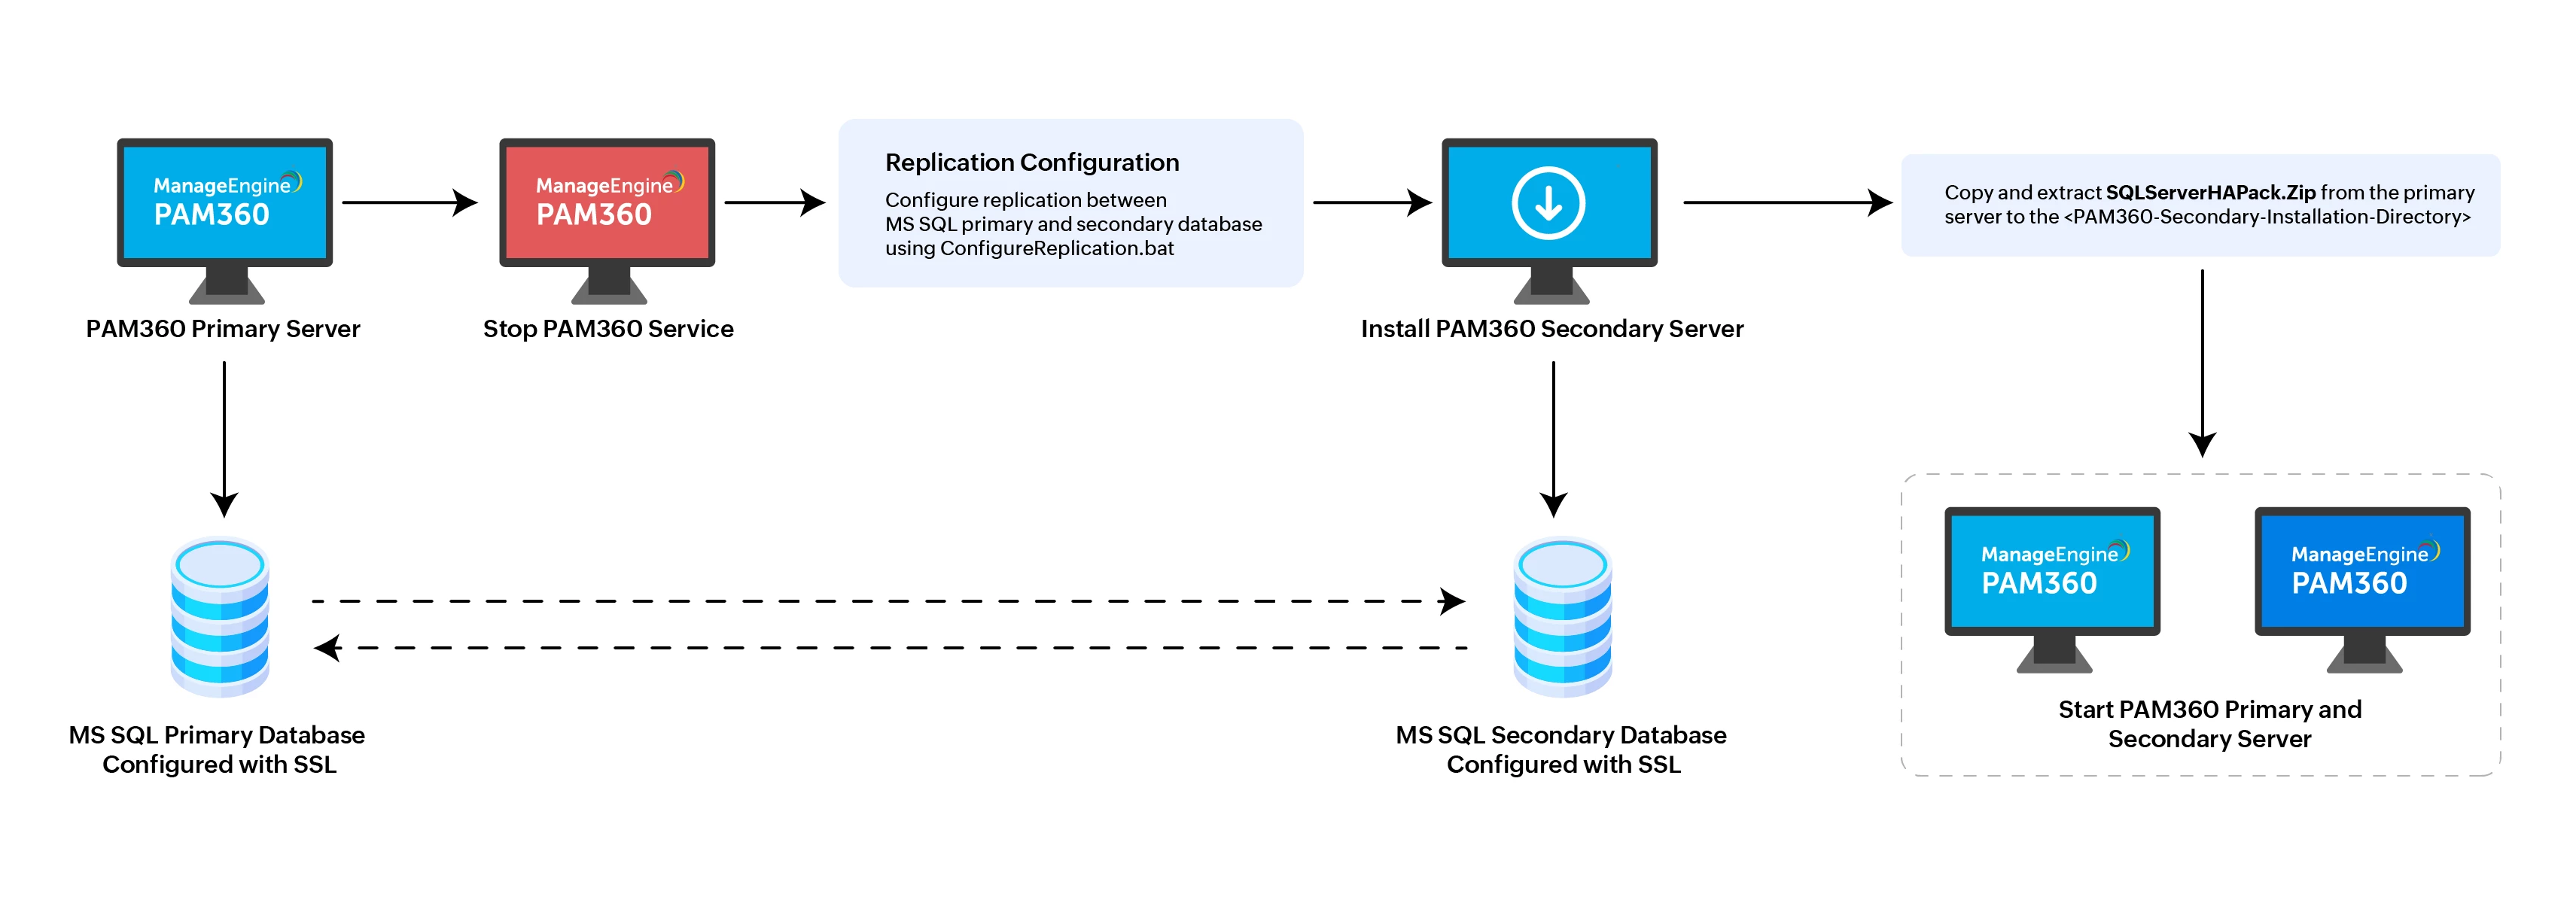
- Stop the PAM360 primary server.
- Next, import the SSL certificate of the MS SQL secondary database into the primary server. If the secondary database is not already configured with SSL, you must set it up using the referenced help document. PAM360 requires SSL to ensure secure communication between the databases. To import the SSL certificate, open the command prompt, navigate to the <PAM360-Primary-Installation-Directory>/bin folder, and execute the following command:
importCert.bat <Absolute-Path-of-the-MS-SQL-Secondary-Database-SSL-Certificate>
- Once the SSL certificate is imported, Open the pam360_key.key file and copy the value of MASTERKEY. You will use this in the next step. If, in case, you have moved this key to a secure location as recommended while integrating the SQL server, keep it ready for use in the next step.
If you are using PAM360 builds before 8000, navigate to the <PAM360-Primary-Installation-Directory>/conf folder and open the masterkey.key file. Copy the SQL Master Key from this file for use in the next step. If, in case, you have moved this key to a secure location as recommended while integrating the SQL server, keep it ready for use in the next step. - Now, navigate to the <PAM360-Primary-Installation-Directory>/bin folder again and execute the replication configuration script ConfigureReplication.bat or sh ConfigureReplication.sh based on your operating system. This command starts a secure replication configuration wizard for the primary and secondary databases.

Additional Detail
From PAM360 build 8000 and above, you can execute ConfigureReplication.bat --files-only (in Windows) or sh ConfigureReplication.sh --files-only (Linux) to create SQLServerHAPack.zip without database replication.
- Under Master Details, provide the following details:
- Master Host Name: Enter the name or IP address of the machine where the MS SQL Server for the primary database is installed.
- Instance Name: Specify the named instance of the SQL Server that PAM360 should use. If an instance name is not provided, PAM360 will attempt to connect to the default instance on port 1433.
Since PAM360 only connects to MS SQL in SSL mode, it is recommended to create a dedicated database instance running on a specific port for PAM360. If you need to specify a port number other than 1433, include it in the Host Name field in the format: <hostname>:<port>. - Login Name and Password: Enter the SQL server authentication credentials to connect to the primary database. This user must have the sysadmin SQL role. Note that PAM360 does not store these credentials; they are only used during the replication configuration process between the primary and secondary databases.
If you are connecting from a Windows machine, you can also use your Windows login credentials. In this case, enter the login name as <domain-name>\<username>. - Master Database: Provide the name of the PAM360 primary database.
- Master Key: Paste the SQL Master Key copied from step 3 earlier.
- Master Host Name: Enter the name or IP address of the machine where the MS SQL Server for the primary database is installed.
- Under Slave Details, provide the following information:
- Slave Host Name: Enter the name or IP address of the machine where the MS SQL Server for the secondary database is installed.
- Instance Name: Specify the named instance of the SQL Server that PAM360 should use. If an instance name is not provided, PAM360 will attempt to connect to the default instance on port 1433.
As with the master database, it is recommended to create a dedicated database instance for PAM360 on a specific port. If using a port other than 1433, include it in the Host Name field in the format: <hostname>:<port>. - Slave Login Name and Password: Enter the SQL server authentication credentials to connect to the secondary database. This user must have the sysadmin SQL role. Note that PAM360 does not store these credentials; they are only used during the replication configuration process between the primary and secondary databases.
If you are connecting from a Windows machine, you can also use your Windows login credentials. In this case, enter the login name as <domain-name>\<username>. - Slave Database: Provide the name of the PAM360 secondary database, which is pam360standby by default. If you selected the Custom option for Encryption Key when configuring ChangeDB.bat for the primary server, you will need to create a new secondary database. Additionally, create a Master Key, Certificate, and Symmetric Key using AES 256 encryption, then specify the slave database name here.
- Slave Host Name: Enter the name or IP address of the machine where the MS SQL Server for the secondary database is installed.
- Click Test and then Configure to begin the replication setup. This process may take 30 minutes or more to complete, depending on the environment.
- Once replication is configured, restart the primary server.
4.2 PAM360 Secondary Server Configuration
- Install the PAM360 application on the secondary server by selecting the Configure this server as High Availability Secondary Server option.
Caution
Do not start the PAM360 service in the secondary server after the installation.
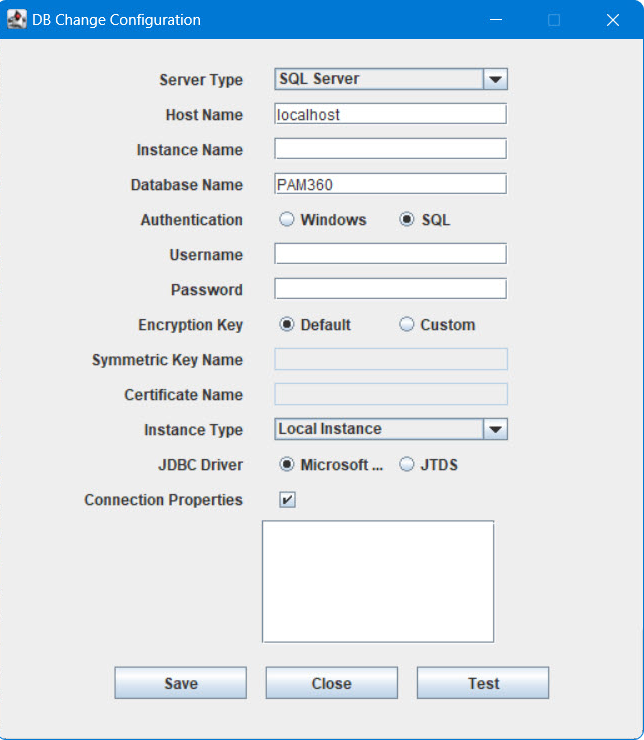
- Now, provide the details about the secondary database SQL server to PAM360 secondary server by editing the file ChangeDB.bat (Windows) or ChangeDB.sh (Linux). To do so, navigate to the <PAM360-Secondary-Installation- Directory>/bin folder and execute the file ChangeDB.bat (Windows) or sh ChangeDB.sh (Linux). In the pop-up that opens, fill in the following values:
- Select the Server Type as SQL Server.
- Host Name: The name or the IP address of the machine, where the MS SQL server for the secondary database is installed.
- Instance Name: Specify the named instance of the SQL server, to be used for PAM360. If the instance name is not specified, PAM360 will try establishing connection with the default instance on port 1433.
Best Practice
Since PAM360 connects to MS SQL only in SSL mode, it is recommended that you create a dedicated database instance running in a specific port for PAM360. If you want to specify a port number other than 1433, you can specify it in the Host Name parameter above as <hostname>:<port>.
- Database Name: Enter the name of the PAM360 secondary database. Make sure this matches exactly with the database name specified during the replication configuration.
- Authentication: The way by which you wish to connect to the SQL server. Choose Windows, if you are connecting to the SQL server from Windows. Make use of the Windows Single Sign On facility, provided the PAM360 service is running with a service account, which has the privilege to connect to the SQL server. Otherwise, select the option SQL.
Best Practice
It is recommended to choose the option Windows, as the Username and Password used for authentication are not stored anywhere.
- Login Name and Password: If you have selected the option SQL in step v, specify the user name and password with which PAM360 can connect to the database.
Additional Details
- The Login Name and Password entered here will be stored in the database_params.conf file in PAM360. So, take care of hardening the host.
- You can use even your Windows login credentials, if you are connecting to the database from Windows. In this case, you need to enter the User Name as <domain-name>\<username>.
- Encryption Key: The key to encrypt your data and store it in the SQL server. You may either leave it Default allowing PAM360 to generate a key. If you have configured the primary database with custom key, you need to choose Custom here in secondary database too.
If you have selected the option Custom, do the following:
- Create Database - For details, refer to https://learn.microsoft.com/en-us/sql/relational-databases/databases/create-a-database?view=sql-server-ver16
- Create Master Key - For details, refer to https://learn.microsoft.com/en-us/sql/relational-databases/security/encryption/create-a-database-master-key?view=sql-server-ver16
- Create Certificate - For details, refer to https://learn.microsoft.com/en-us/sql/relational-databases/security/encryption/create-a-certificate?view=sql-server-ver16
- Create Symmetric Key - For details, refer to https://learn.microsoft.com/en-us/sql/t-sql/statements/create-symmetric-key-transact-sql?view=sql-server-ver16
- Provide the Certificate Name and Symmetric Key Name in the GUI.
- Instance Type: Select Local Instance as your instance type to continue with the DB change configuration.
- JDBC Driver: The driver works seamlessly with the MS SQL server database. Microsoft (Recommended) is the default driver selected in the field and is recommended for most installations because it is compatible with the latest SQL server versions and features. The alternative JDBC driver available for selection is 'jTDS', which supports specific compatibility features.
- Connection Properties: After selecting this checkbox, you will have the option to specify custom connection properties in the following format: "key1=value1;key2=value2".
Additional Detail
The existing server details in the DB migration setup window and properties, such as SSL and encrypt, cannot be added as custom connection properties.
- Finally, click Test to ensure that the connection settings are proper, and then click Save.

- To transfer the PAM360 license, custom icons, and rebranding settings from the primary to the secondary server, copy the SQLServerHAPack.zip file from the primary server and extract it into the <PAM360-Secondary-Installation-Directory>.
- Next, edit the manage_key.conf file in the <PAM360-Secondary-Installation-Directory>/conf folder to specify the location of the encryption key. PAM360 requires the pam360_key.key file to be accessible with its full path during startup. Once the application has successfully started, the key is no longer needed, allowing the device containing the key file to be taken offline.
Caution
From PAM360 build 8000 onwards, it is mandatory to retain the pam360_key.key file in the file path specified in the manage_key.conf file for a seamless operation. PAM360 continuously accesses this file to ensure uninterrupted operation. If the pam360_key.key file is not available in the specified path, the service may not startup or certain features such as database backup will not function.
- Finally, start the secondary server.
5. Verifying the Secondary Server Setup
To verify that the Secondary Server is functioning correctly, navigate to Admin > General > Secondary Server on either the Primary or Secondary server. A status message reading High Availability Status: Alive confirms that the setup is working properly.