

Manual Deployment of patches is preferred when:
Applies to:
The Missing Patches tab provides details of patches of applications/softwares in your network computers that are not installed. To view the list of Missing Patches, follow these steps:
Click on Threats & Patches → Patches → Missing Patches.
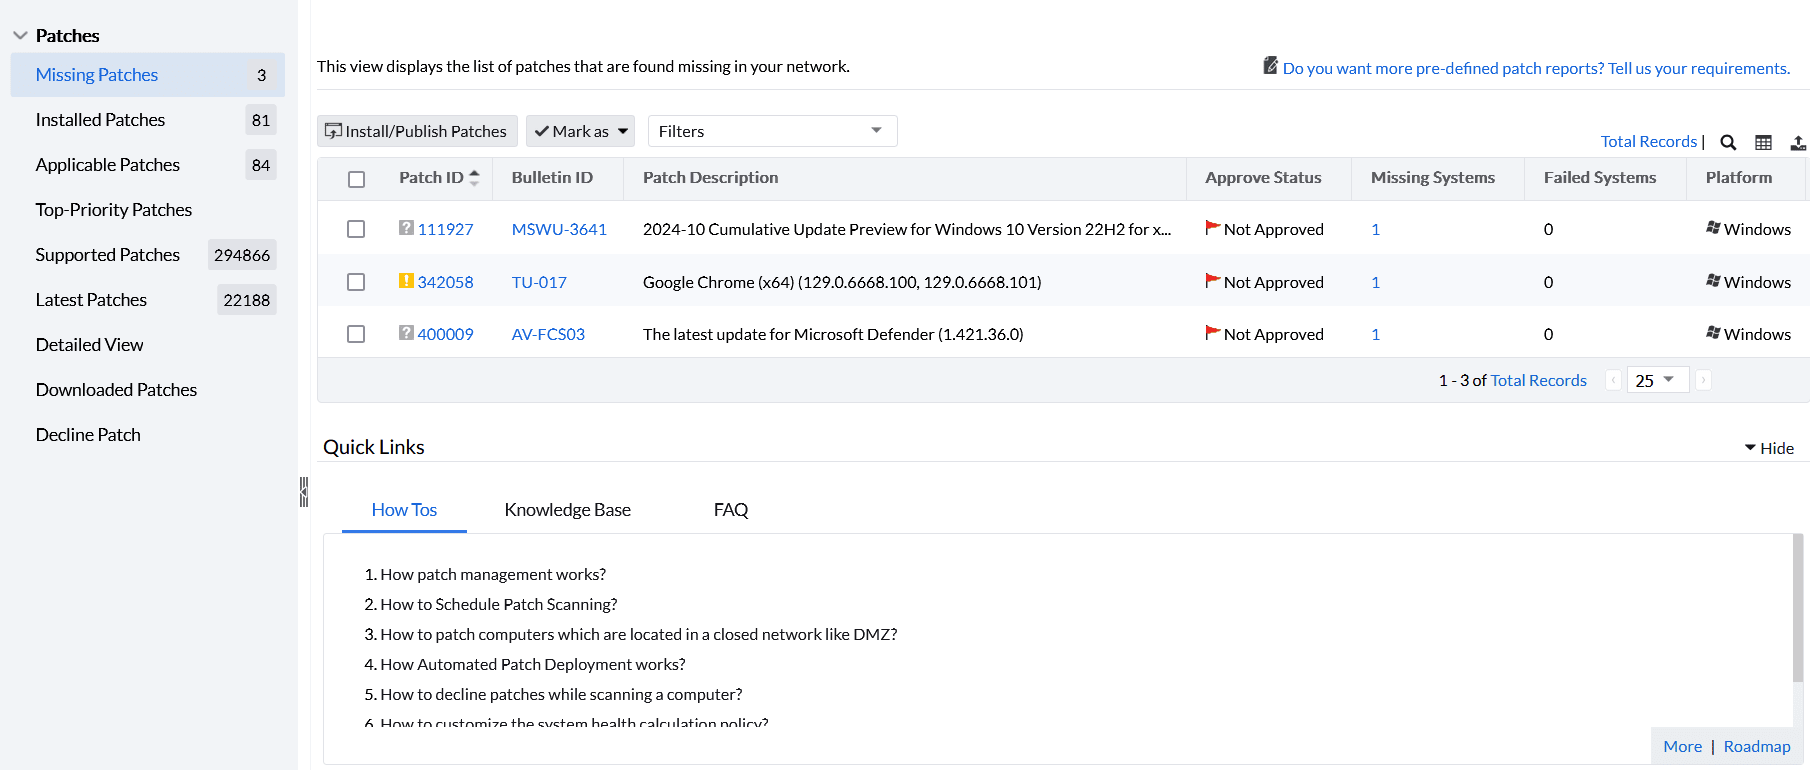
You can view the details of patches missing in your network as shown in the above image. Missing patches are further listed under specific views like patch view, computer view, and detailed view. You can also generate reports by selecting options from predefined filters. You can filter patches by application, service pack, bulletin, patch type, approval status, download time, and release time. Refer to the below images to know how to filter the patches


Note: Certain Linux distributions demand prerequisites; such as Red Hat and SUSE Machines. Only if these prerequisites are fulfilled, the missing patches are listed in these machines.
To patch systems running on these Linux distributions, configure the Red Hat Linux Settings and SUSE Linux Settings appropriately.
You can install patches by selecting the patches to be installed by enabling the checkbox present beside the patch and clicking the Install/Publish Patches button, as shown in the image below.
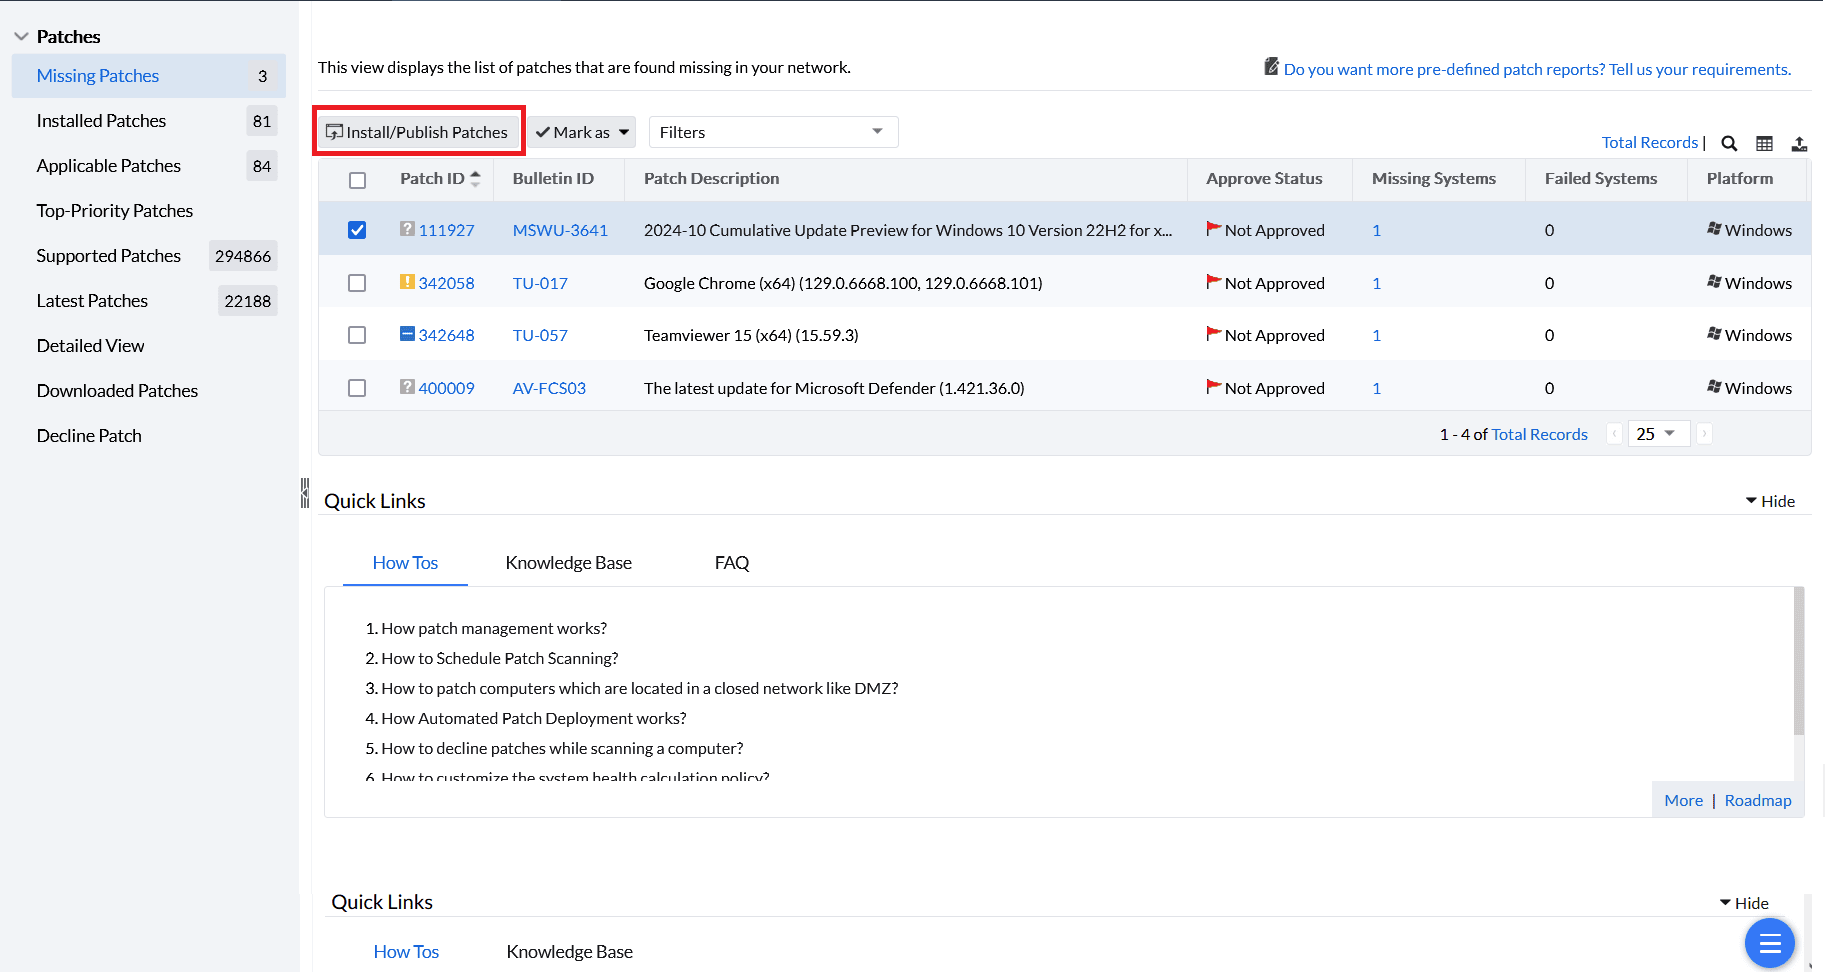
After clicking the Install/Publish Patches button, you will be redirected to the Install/Uninstall Patch window, where you will be configuring the deployment settings.
Note: Missing patches can also be installed by clicking on Threats & Patches ---> Systems ---> By Patches. Here you can see the list of systems listed against the number of patches missing or failed. By clicking on those number of missing patches, you can see the detailed view for what are the patches missing for that individual system. Select the patches and click on Install/Publish Patches button to install the desired patches. Targets will be automatically chosen.
Another way for manual deployment is Threats & Patches ---> Deployment ---> Manual Deployment ---> Install/Uninstall Patch ---> Choose the desired OS. You will be redirected to the Install/Uninstall Patch window, where you need to select the required patches and targets.
The image below shows the Install/Uninstall Patch window.
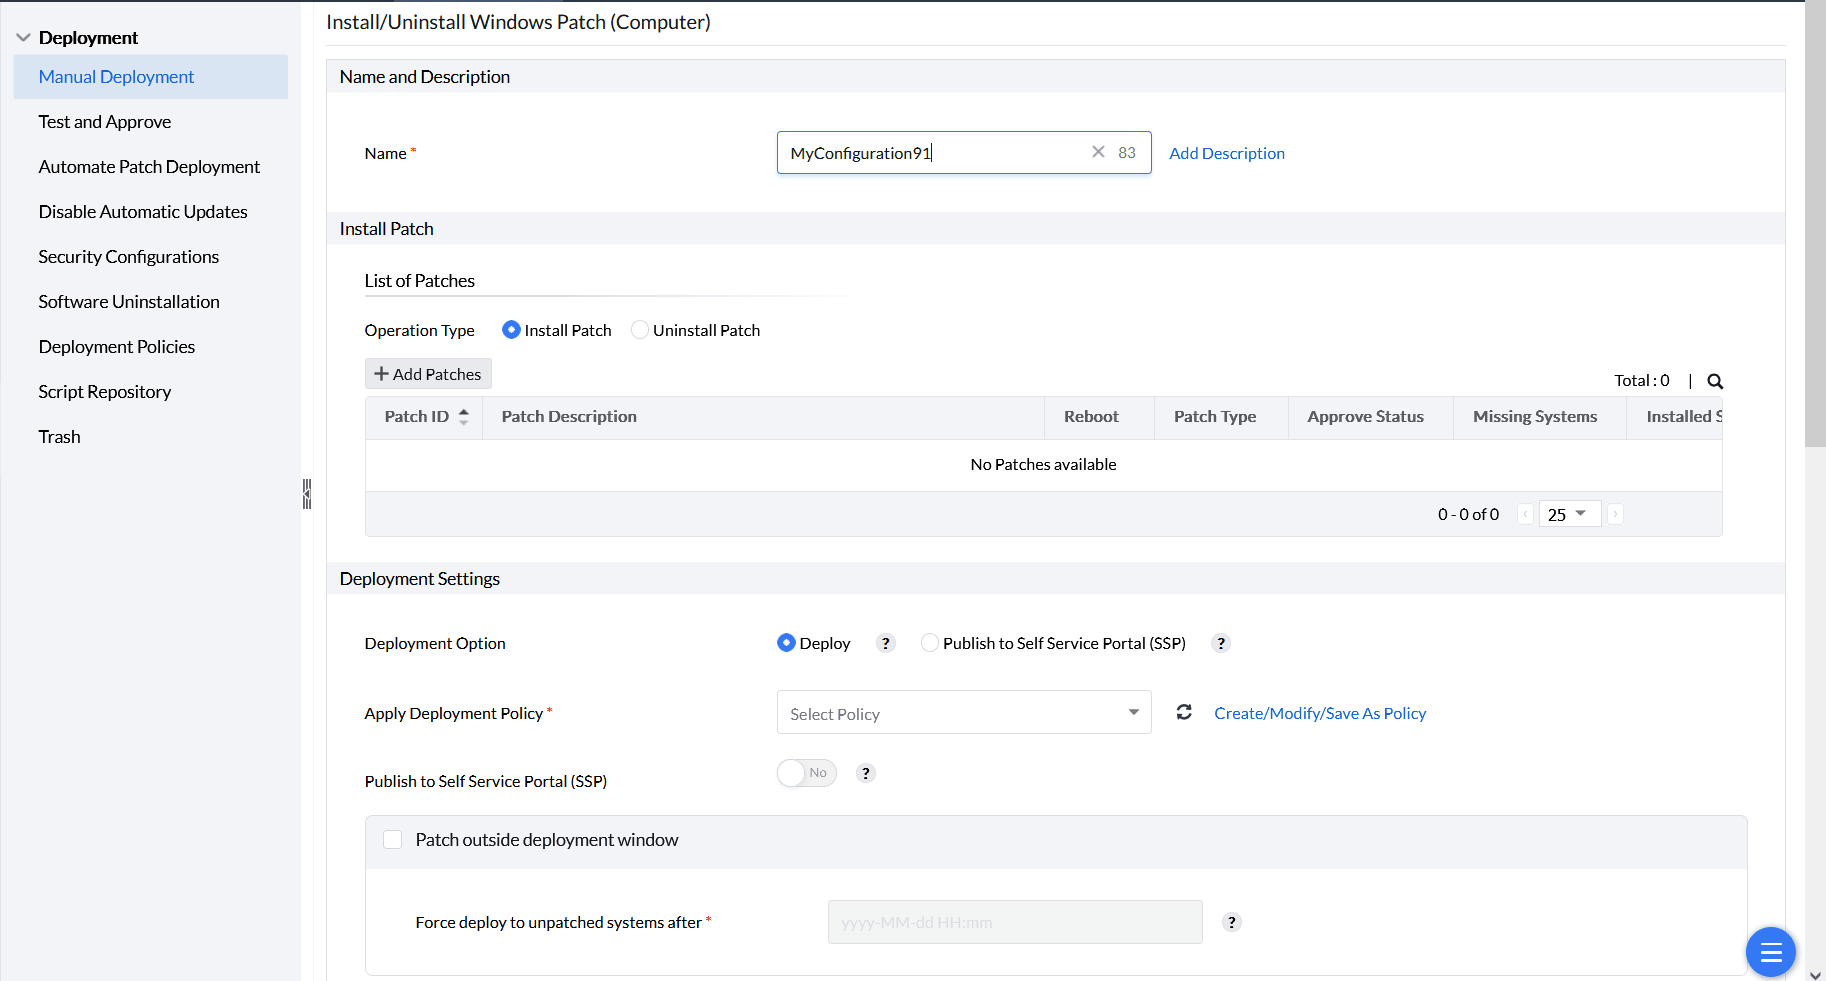
Under the Name and Add Description, give a name and description of your choice, respectively, for the configuration.
Under the Install Patch section, under List of Patches, under the Operation Type, you can choose to either install or uninstall patches. As you want to deploy patches, select Install Patch.
Note: You can choose Uninstall Patch to remove previously installed patches from target systems; this will rollback/recover the older version of the selected Patch. This option is useful when a patch causes compatibility issues or unexpected behavior after deployment. This uninstallation/patch recovery is supported only for patches that include rollback capability.
You can manually select the patches that need to be deployed. Select Add Patches; a new window Add Patches will be opened.

From the Add Patches window,select patches to install by enabling the checkbox beside them. There is an option to view the missing patches or all patches, which can then be filtered based on the application and service pack. After choosing the patches, click on Add

After clicking Add, you can see them listed in the table as shown in the below image.

Note: Missing patches will already be listed in the table if you have clicked the Install/Publish Patches button from the Missing Patches tab. Perform this step if you want to add more patches to your configuration than listed already.
After selecting the patches for deployment, configure the Deployment Settings. It comprises the following sections:
Deployment Option: Choose Deploy or Publish to Self Service Portal (SSP). Selecting Publish to Self Service Portal simplifies the deployment process by allowing administrators to publish patches to the portal, enabling users and server owners to decide if they want to install updates.To learn more about Self Service Portal, refer to this page. Click on Deploy for deploying the selected patches to the target computers.
Apply Deployment Policy: If you select Deploy, choose a deployment policy under Apply Deployment Policy. By analyzing the uptime activities of your endpoints, you can create a custom deployment policy tailored to your enterprise requirements.This will be listed under Self Created. To learn how to customize the policy according to your requirements, refer to this page. Under Created by Others section, you can see the pre-created policies by other users and ManageEngine. You can see those policies in the image below.

Publish to Self Service Portal (SSP): After choosing the deployment policy, select yes or no for Publish to Self Service Portal (SSP). If yes, patches can be scheduled for deployment and pushed to SSP simultaneously, offering flexibility in installation.
Patch outside deployment window: If a user in your Domain continuously skips the patch installation of an application during the deployment window as he/she is working on a critical business task using that application, but you want Domain computers to be up-to-date, enabling the Patch outside deployment window option will be useful. You can set a specific date and time as a grace period, after which force deployment will be initiated for systems that missed patching in the deployment schedule.
Note: Apply Deployment Policy, Publish to Self Service Portal (SSP) and Patch outside deployment window are applicable only if you choose Deploy under Deployment Option. These are not applicable if you had chosen Publish to Self Service Portal (SSP) instead.

After choosing the deployment settings, you can choose to include or exclude target computers of your choice under the Define Target section as shown in the above image. To learn more about Defining Targets, refer to this page.
After defining the targets of your choice, configure the Execution Settings, which is optional.
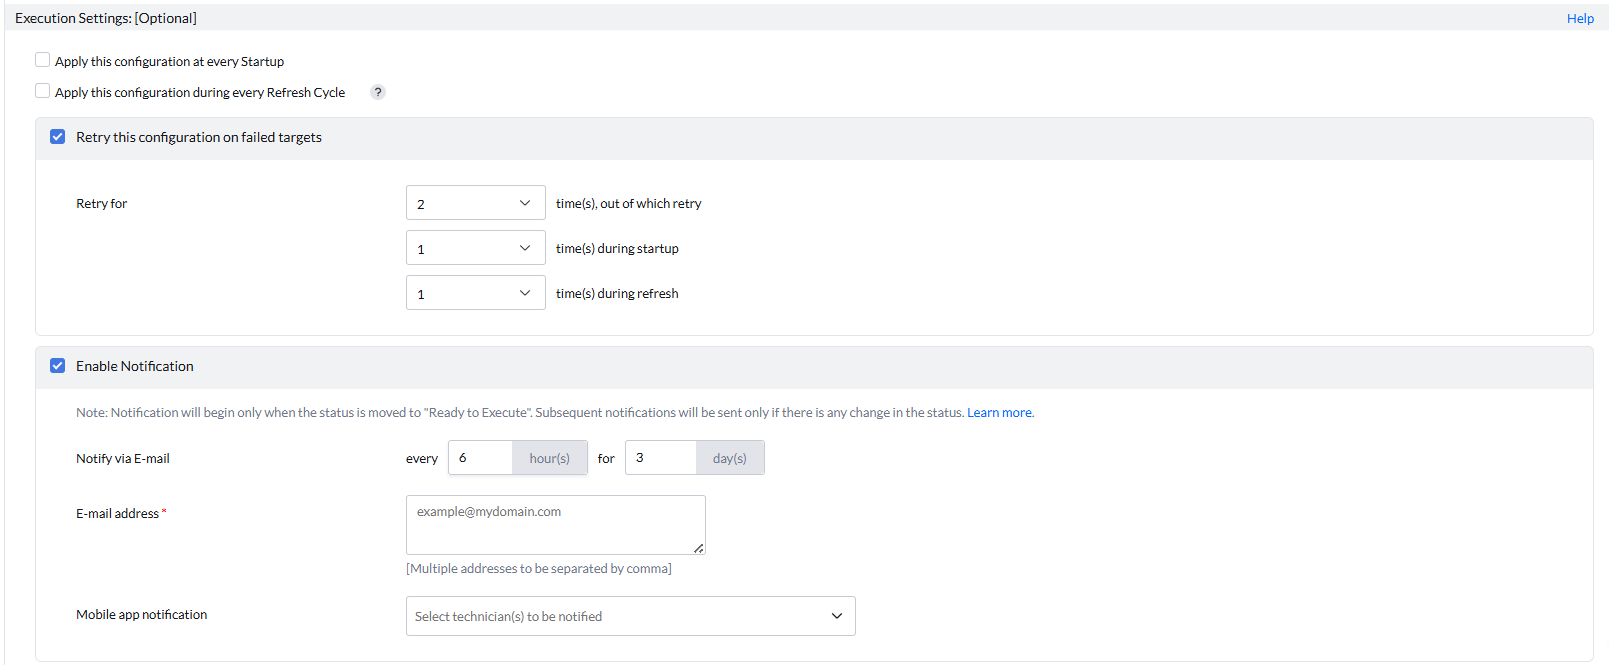
Under execution settings, the following sections are present:
Retry this configuration on failed targets: Often, patching of services/applications such as Java or .NET may fail as that particular service/application is being used by the users in other applications to perform business critical tasks and requires that particular application to be closed for patching to be successful. By enabling the Retry this configuration on failed targets, you can choose the number of times for retrying on failed computers according to your choice either during startup or at refresh cycle. To learn more about this, refer to this page.
Enable Notifications: If you want to configure notifications about this activity, select the Enable Notifications option. To learn more about this, refer to this page.
Scheduler Settings: Under Scheduler Settings, by enabling the option Install After and specifying the date and time, the patches will be installed after the specified date and time. By enabling the option Do not apply this configuration after the time specified below and specifying the date and time, the patches will not be installed after the specified date and time.
By specifying time limits in these sections, you can set a time frame for patch deployment. This is useful for systems where critical business applications need patching only during scheduled downtime; patching at other times may affect productivity. You can ensure that patching of critical applications occurs only within this scheduled downtime window.
Also under the same settings, you have the option to Continue deployment even if some patches cannot be downloaded. Enabling this option is beneficial when most patches have already been downloaded or installed on target machines. Continuing deployment in these cases ensures that the majority of updates are applied, even if a few patches fail. Also, sometimes, network issues or connectivity problems can prevent certain patches from being downloaded. Allowing the deployment to continue despite these failures helps avoid halting the entire process while waiting for the issue to be resolved. And if the failed patches are re-downloaded successfully, they will be installed during the next refresh cycle within the deployment window.

After choosing all configuration settings, if the deployment window is open when configuring the policy and you want immediate patch deployment, select Deploy Immediately. This feature will deploy patches to a maximum of 200 computers immediately, with remaining computers deploying the patches in their subsequent refresh cycle. Select Deploy if you want deployment in their subsequent refresh cycle. If the deployment window is not open when configuring the policy, deployment will occur as per the policy regardless of whether you choose Deploy or Deploy Immediately.
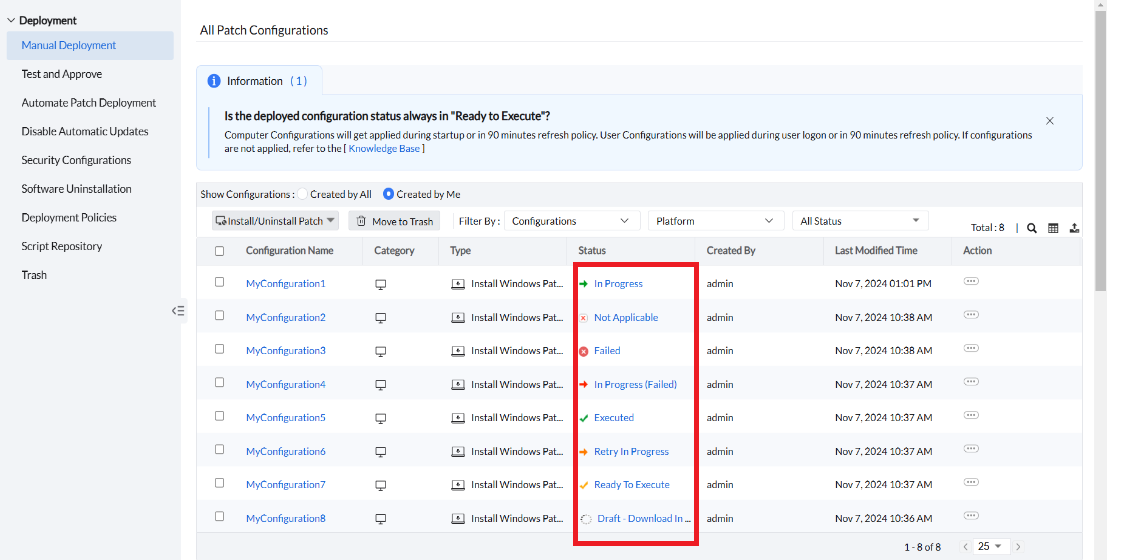
After deploying, you can check the status of the deployment of that particular configuration in the Manual Deployment page. It will be listed under the Status section against that configuration name. Status may be:
Draft: Download In Progress: Displayed when the Server is downloading the patches from the vendor website.
Ready to Execute: Displayed when the server has downloaded the patches from the server.
In Progress: Displayed when the agent is installing the patches to the target computers.
Executed: Displayed when the installation is successful in all target computers.
Retry in Progress: Displayed if you have enabled the Retry Configuration for failed targets option in deployment policy and the deployment has failed at the end of an attempt.
In Progress (Failed): Displayed if you have enabled the Retry Configuration for failed targets option in deployment policy and when the deployment has failed in one of the attempts, and the next attempt for installing the patches to the failed target computers is being carried on by the agent.
Failed: Displayed when the patch deployment has failed at any stage of the patching process in all the attempts. If you have not enabled the Retry Configuration for failed targets option, the status will be displayed as failed if the patching has failed in the single attempt itself.
Not Applicable: Displayed when a policy is deployed to a group of computers, but certain computers within that group do not meet the criteria or conditions for the policy to be applied. This could happen if the policy settings are not relevant to those specific computers, or if there are configuration issues that prevent the policy from being applicable.
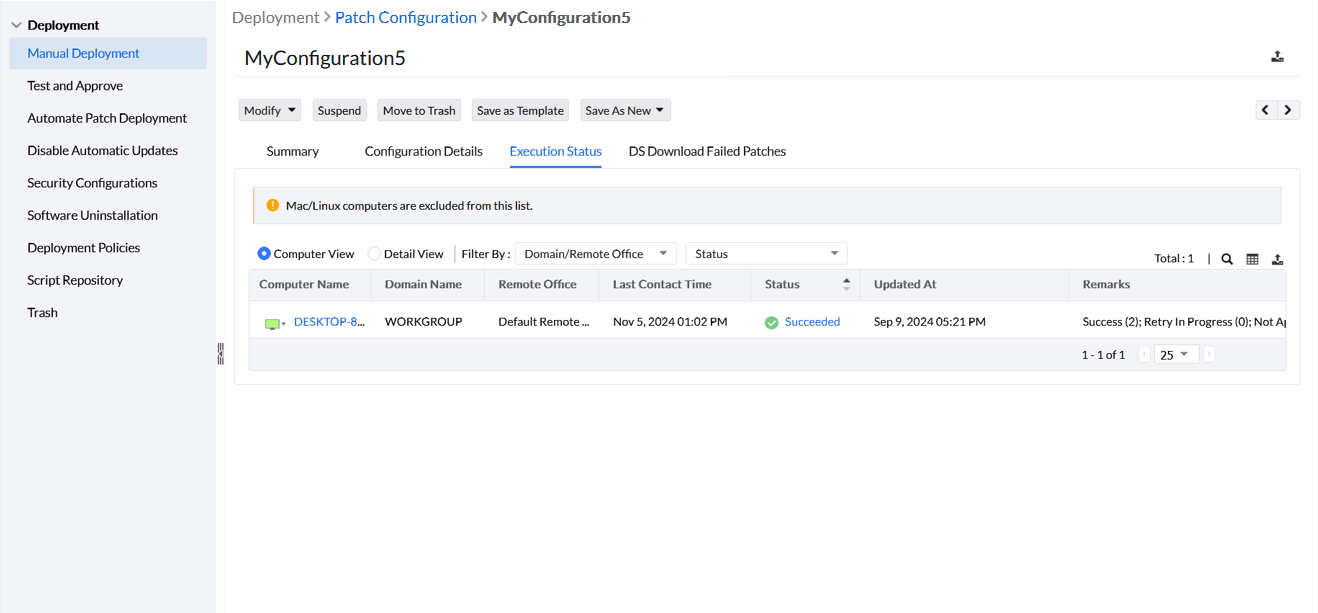
By clicking on that status, you will be redirected to the Execution Status window. Here you can see the status of each endpoint listed individually, and you can also learn the reason for displaying such status under Remarks. If all the patches have been successfully installed in that computer, it will be displayed as Succeeded under status.
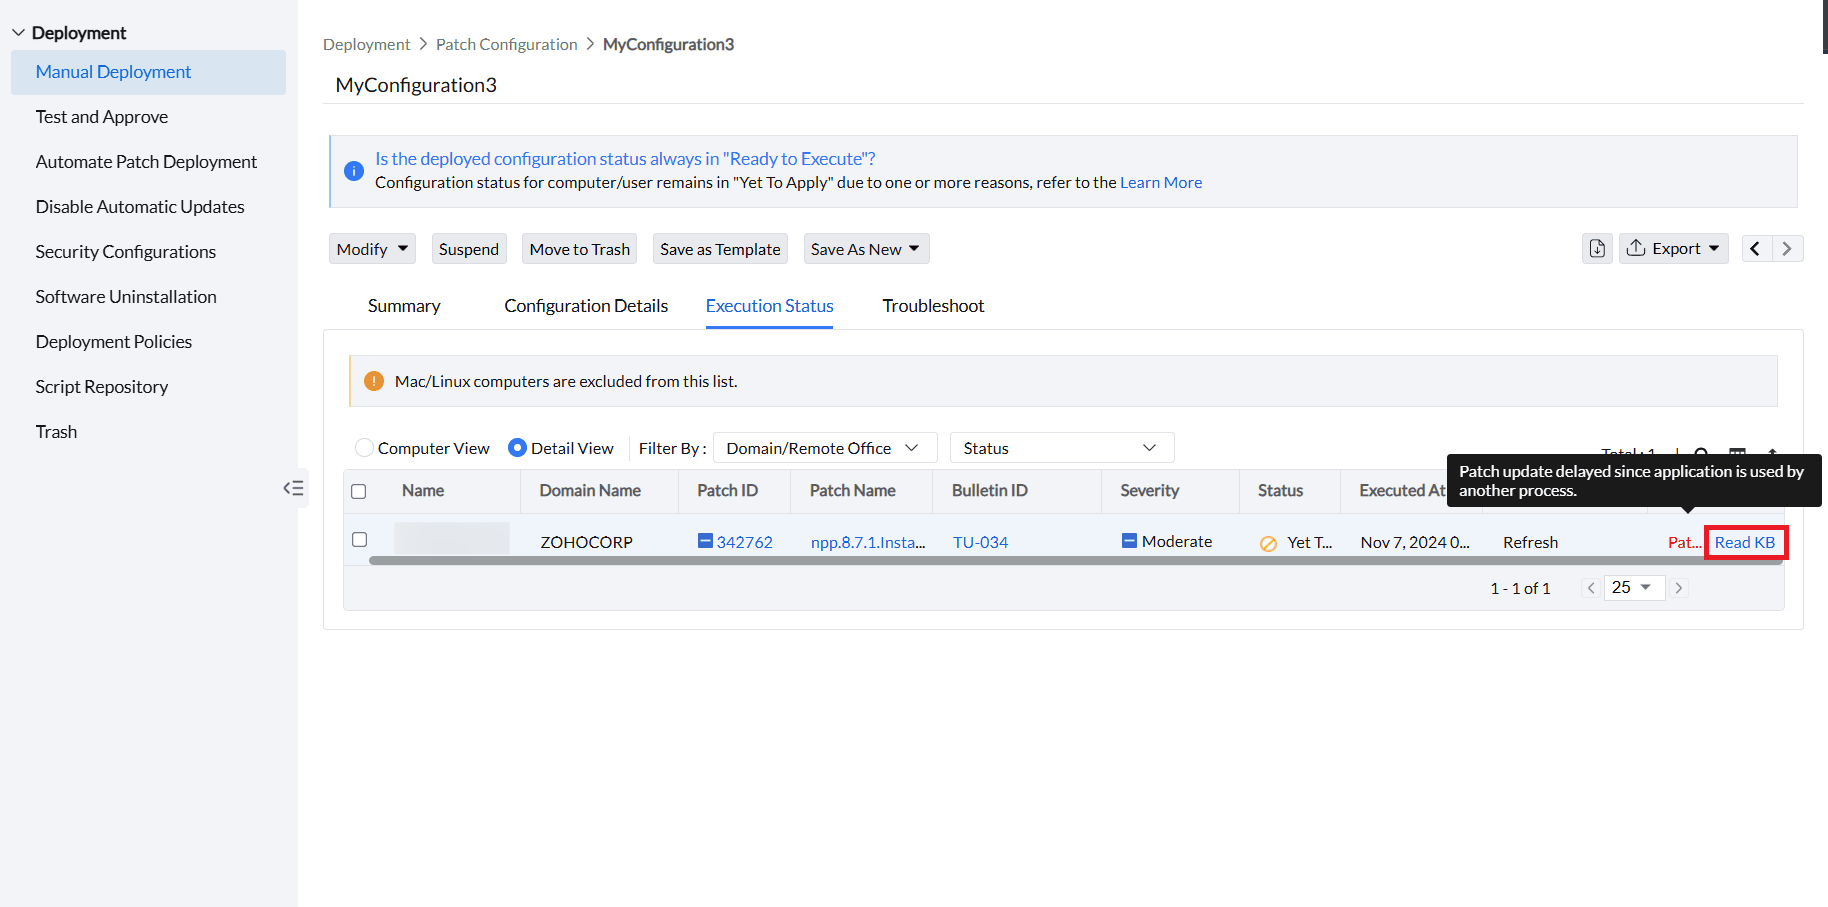
If failed, you can see the reason for the failure by enabling Detail View in the Remarks section. To troubleshoot the failure, click on Read KB option in the Remarks section; you will be redirected to the Knowledge Base. These Knowledge Base articles are specifically tailored to address failures. They will guide you through troubleshooting steps and provide insights to help you resolve the failure effectively. To learn more about troubleshooting, refer to this page.
In scenarios where earlier manual patch deployment tasks have become redundant and new patching policies are followed, users can delete the redundant configurations. Organizations like banks have strict downtime every month dedicated to patching. If patch deployment is not performed in that window, it should be deferred to the next month. If your organization follows scheduled downtime like that, suspending configurations is useful to halt deployments when they exceed the scheduled window or when a deployment is configured incorrectly (such as installing incorrect or untested patches) and needs immediate stopping. You can also resume suspended configurations whenever needed.
Here are the steps to:
Step 1: Go to Deployment > Manual Deployment.
Step 2: Select configurations to be deleted.
Step 3: Click Move to Trash to delete selected configurations.

Note: Once deleted (Move to Trash), the deployment configurations will cease to act:
1.Immediately in systems connected through LAN/remote agents (except in systems with deployment in progress*).
2.As per the replication policy in systems under a distribution server.
* The machines with deployment in progress continue with the deployment, even if configurations are deleted or suspended.
The deleted configurations can be viewed from Deployment > Trash.
In Trash, under Status, you can see the latest status of configurations before deletion.

Step 1:Click Deployment > Trash.
Step 2:Click on the three horizontal dots next to the respective configurations in the Action column.
Step 3:Click Restore from the menu.

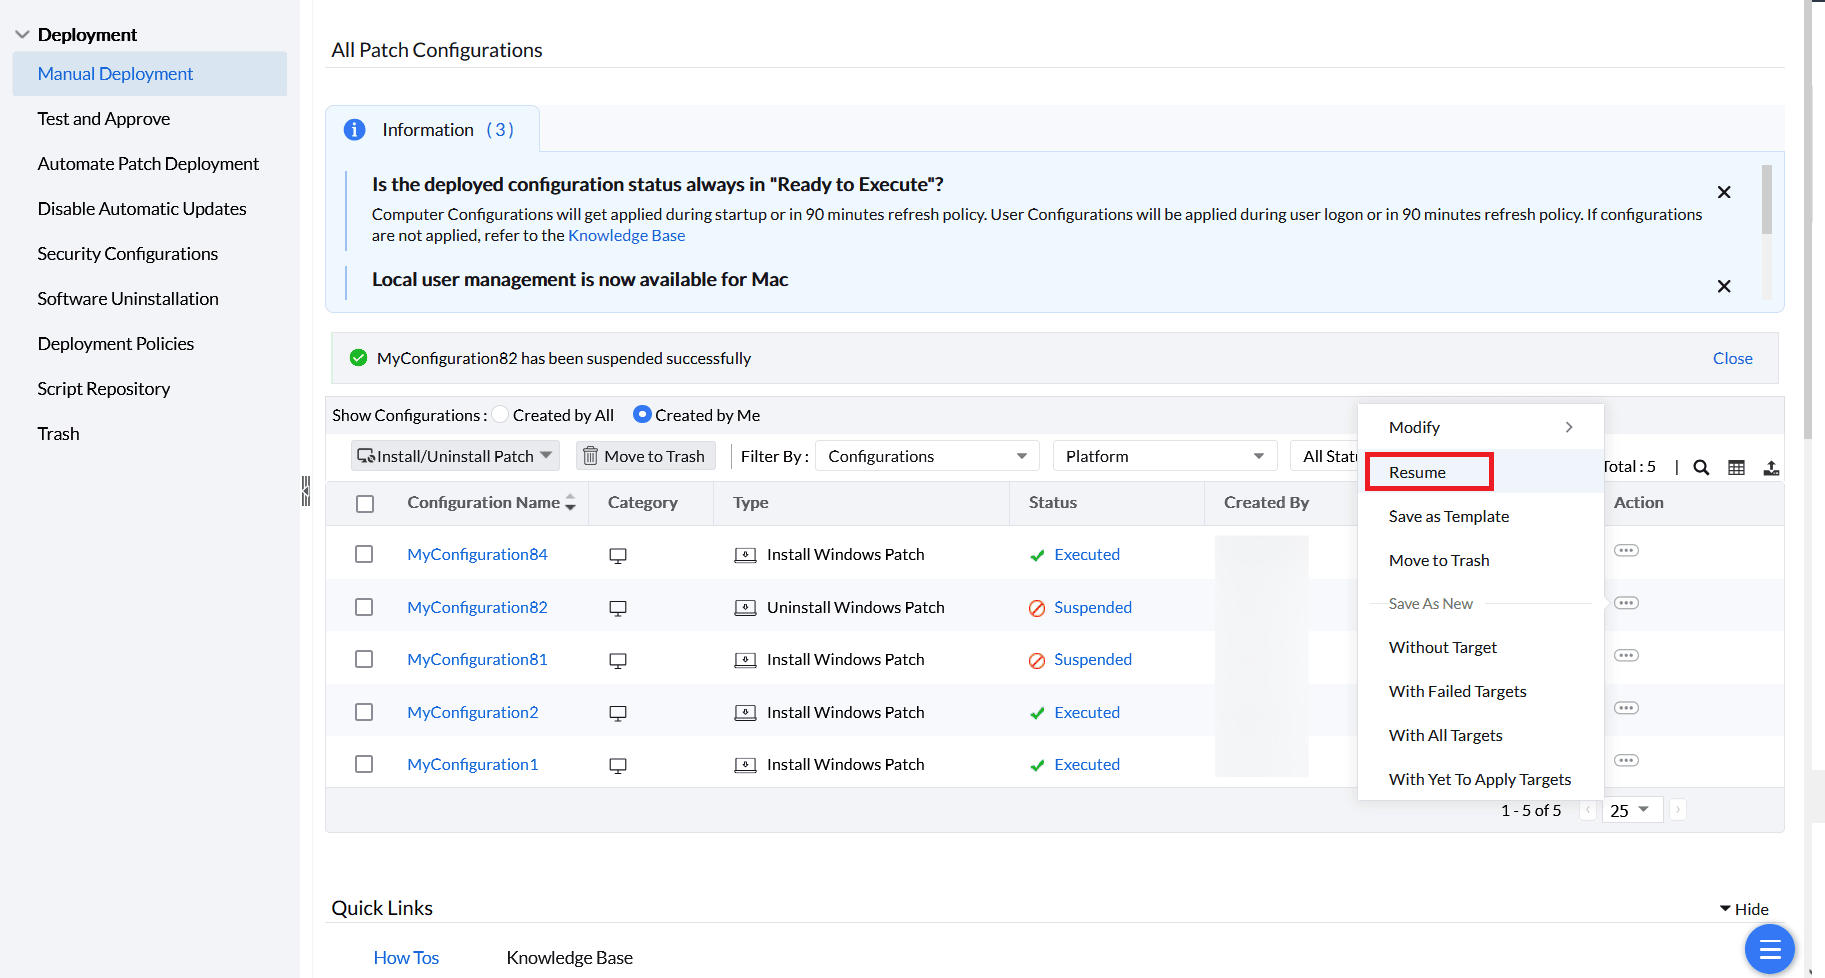
Step 1:Go to Deployment > Manual Deployment.
Step 2:Click the three horizontal dots corresponding to the respective configurations in the Action column.
Step 3:Click Suspend from the menu.
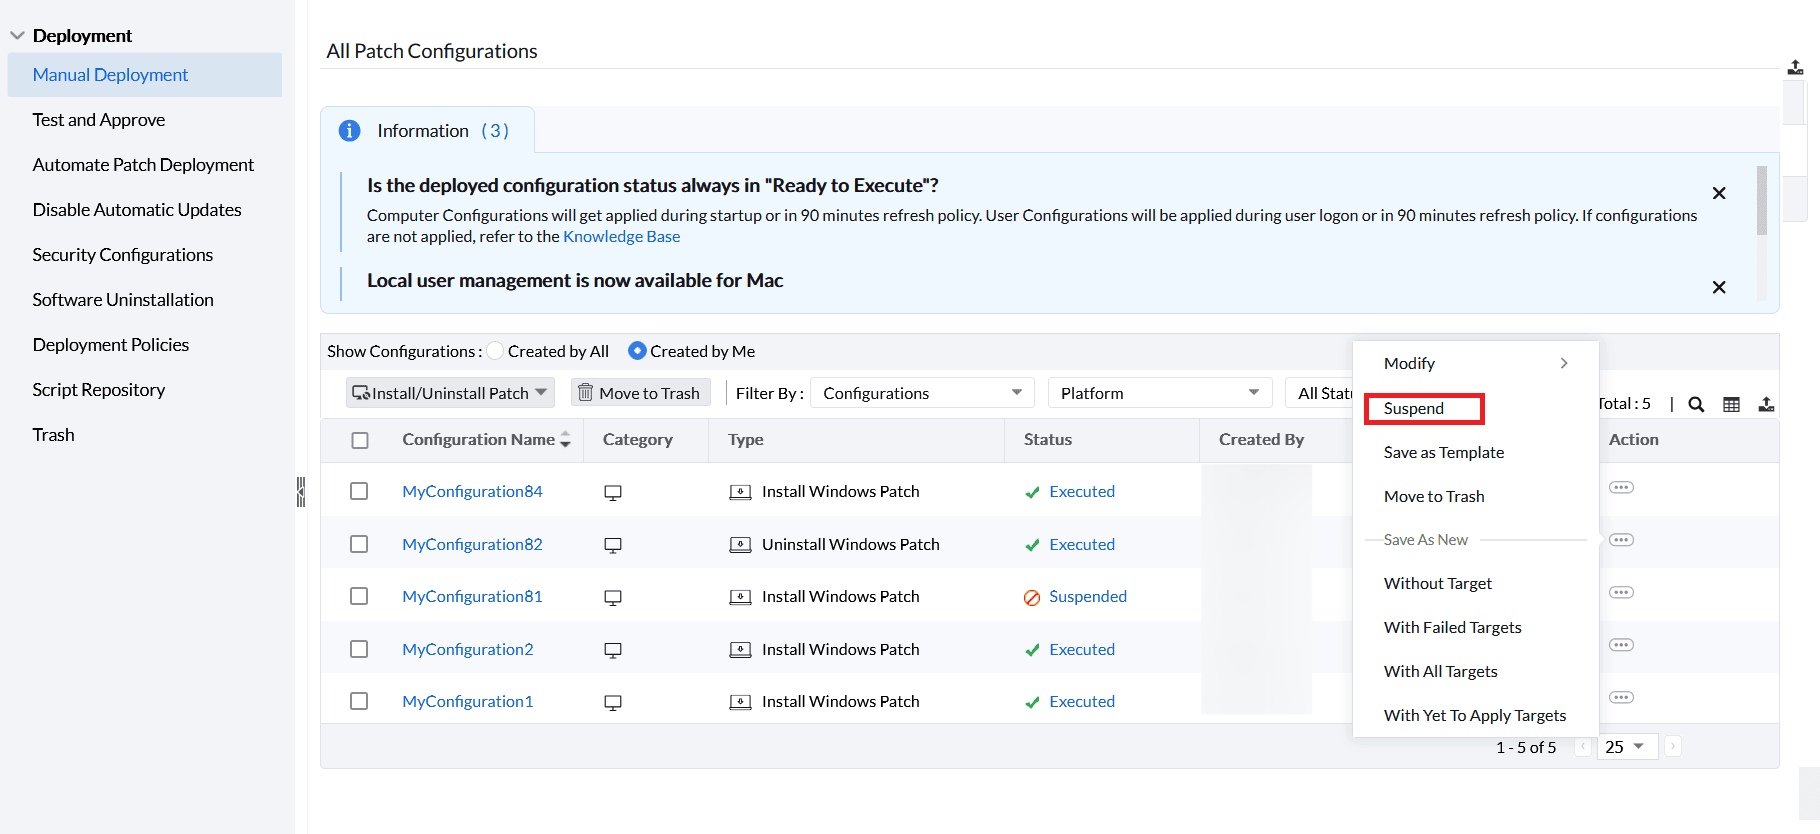
As shown in the below image, suspended configurations can be resumed by following Steps 1 & 2 and clicking Resume.
Note: The Suspend and Move to Trash actions take effect:
1. Immediately in systems connected through LAN/remote agents (except in systems with deployment in progress).
2. As per the replication policy in systems under a distribution server.
By clicking on Suspended, you can also see the last status of configurations before suspension.
If you have any further questions, please refer to our Frequently Asked Questions section for more information.