Azure AD MFA
Note: Azure AD MFA is an Advanced Authenticator available as part of the Professional edition of ADSelfService Plus.
If your organization employs Microsoft Azure Active Directory (AD) and uses Azure AD multi-factor authentication (MFA) to secure sign-ins, you can extend Azure AD MFA's use by configuring it as an authentication method for ADSelfService Plus' MFA feature. This simplifies the configuration process for administrators and provides a familiar authentication experience for end users.
Azure AD MFA can be used for identity verification during:
- AD self-service password reset or account unlock actions.
- Endpoint machine logins for Windows, macOS, and Linux, and Outlook web logins.
- Enterprise application logins through single sign-on.
- ADSelfService Plus portal logins.
Azure AD MFA offers the following authenticators to secure access:
- Microsoft Authenticator app-based push notifications.
- Microsoft Authenticator app-based verification codes.
- Phone call-based verification.
- SMS-based verification.
- OATH hardware tokens using Yubico, DeepNet Security, and more.
How does Azure AD MFA work?

- The user attempts to log in or perform self-service password reset or account unlock.
- The multi-factor authentication page is loaded, and the user initiates Azure AD MFA.
- The ADSelfService Plus server sends a RADIUS request to the Network Policy Server (NPS).
- The NPS extension for Azure MFA contacts the Azure cloud and triggers an MFA request.
- If Microsoft Authenticator push notification or phone call-based verification methods are enabled for Azure AD MFA, the verification request is triggered directly.
- If Microsoft Authenticator verification code, hardware token-based, or SMS-based verification code methods are enabled for Azure AD MFA, the NPS extension returns a RADIUS challenge response to the ADSelfService Plus server and the user is prompted for the verification code.
- Once Azure AD MFA is successful, the NPS extension returns a RADIUS accept response to the ADSelfService Plus server and the user is granted access.
Steps for Azure AD MFA configuration
With pre-existing configuration and user enrollment information in Azure, you can enable Azure AD MFA as an ADSelfService Plus identity verification method using the following steps:
Prerequisites:
- The server configured as the NPS must have the Azure NPS extension installed and configured using these steps.
- A RADIUS client must be configured in the NPS for the ADSelfService Plus server.
- In the NPS, primary authentication must be skipped by selecting the Accept users without validation credentials option under Connection Request Policy > Authentication.
- Make sure the Connection Policy where authentication is skipped applies only for ADSelfService Plus' RADIUS client to avoid unauthenticated access to other RADIUS clients in the same NPS.
- If Azure AD MFA needs to be removed, don't uninstall the Azure NPS extension without disabling Azure AD MFA in ADSelfService Plus.
- End users must be enrolled in Azure AD MFA.
Configuration steps:
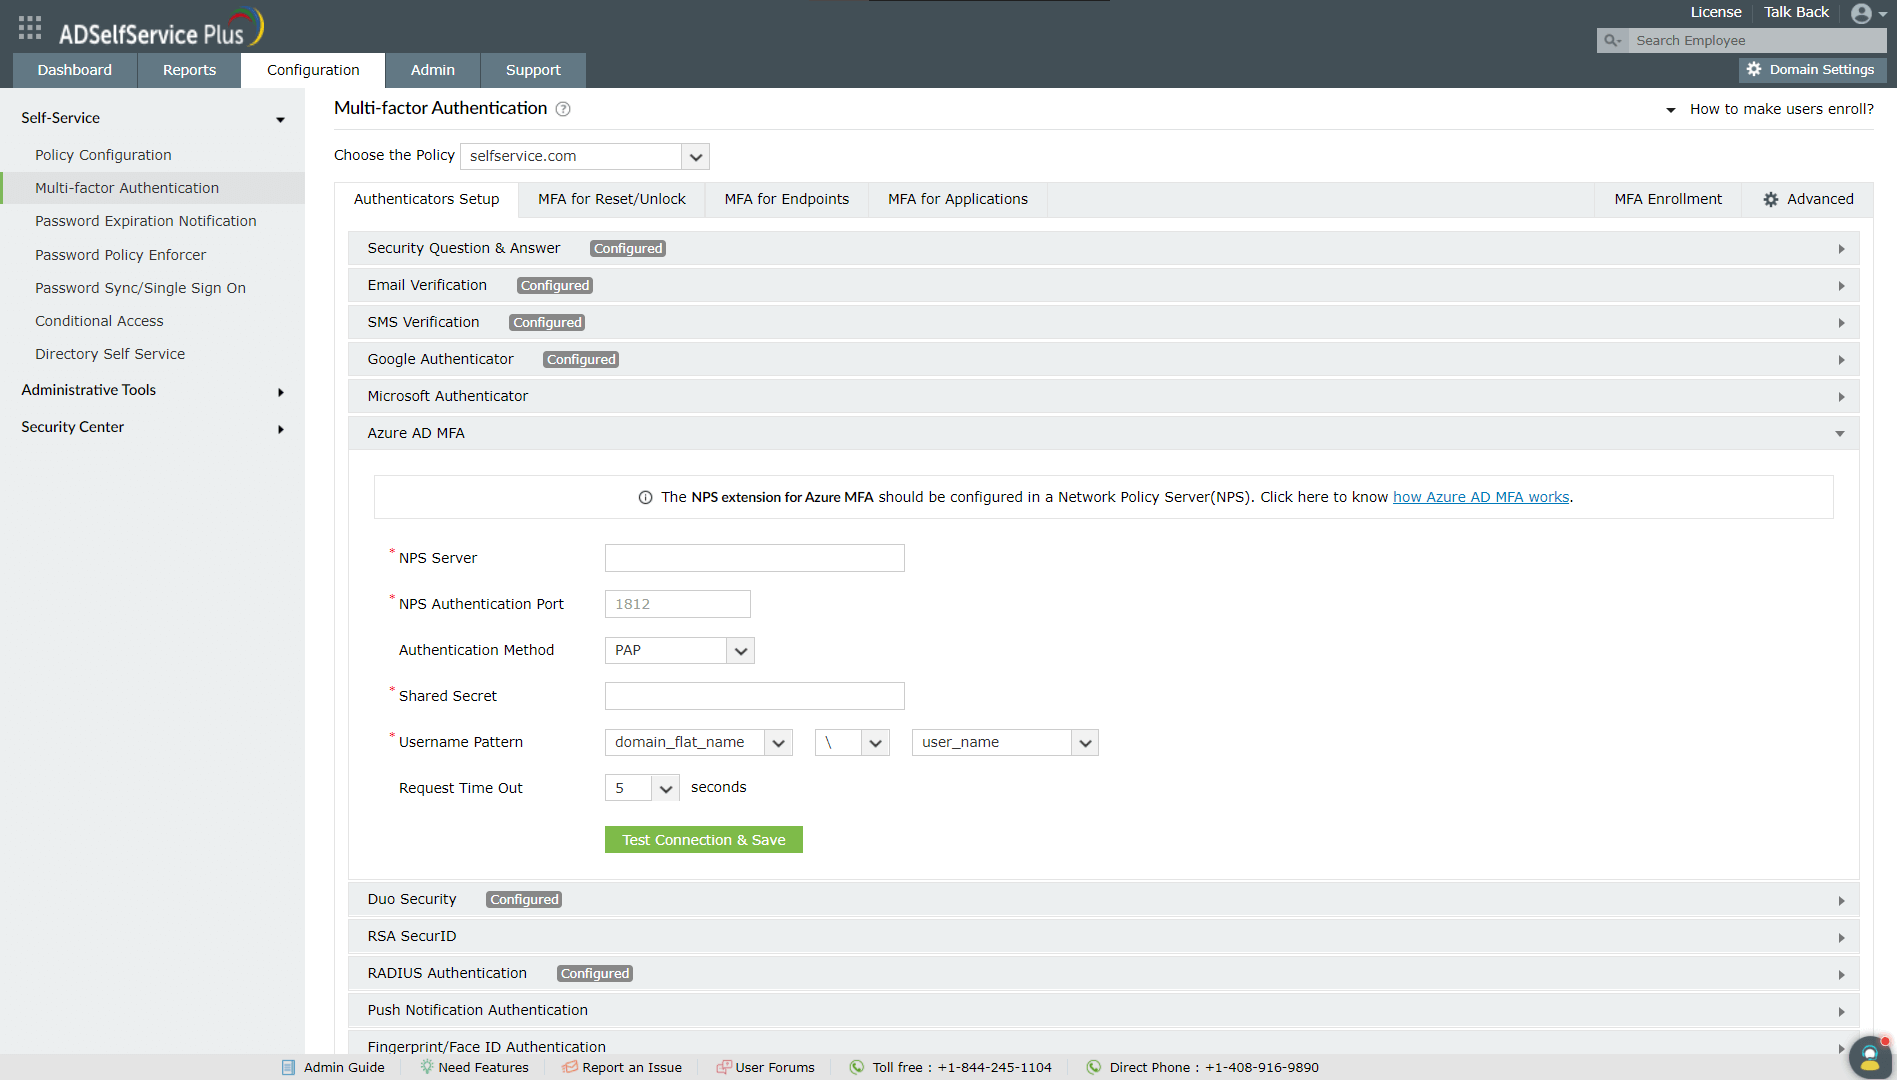
- Navigate to Configuration > Self-Service > Multi-factor Authentication > Authenticators Setup.
- From the Choose the Policy drop-down, select a policy.
Note: ADSelfService Plus allows you to create organizational unit- (OU) and group-based policies. To create a policy, go to Configuration > Self-Service > Policy Configuration > Add New Policy. Click Select OUs/Groups and make the selection based on your requirements. You need to select at least one self-service feature. Finally, click Save Policy.
- Click Azure AD MFA.
- Enter the necessary information in the NPS Server, NPS Authentication Port, Authentication Method, Shared Secret (set while configuring the RADIUS client. Refer to prerequisite 2), Username Pattern, and Request Timeout Settings fields.
- For OATH hardware tokens, SMS-based verification, and Microsoft Authenticator app-based verification code methods, PAP must be selected as the Authentication Method.
- For Microsoft Authenticator app-based push notification and mobile call-based verification methods, it's recommended that the Request Timeout Settings be set to at least 60 seconds.
- Click Test Connection & Save.

To modify the configuration:
- Navigate to Configuration > Self-Service > Multi-factor Authentication > Authenticators Setup.
- Select Azure AD MFA.
- Click Modify and change the information provided wherever necessary.
- If the configuration needs to be removed, click Remove Configuration.
- Click Test Connection & Save.
Don't see what you're looking for?
-
Visit our community
Post your questions in the forum.
-
Request additional resources
Send us your requirements.
-
Need implementation assistance?
Try OnboardPro

