How to configure RSA MFA with ADSelfService Plus
ManageEngine ADSelfService Plus helps protect user accounts from identity theft by empowering IT admins to implement multi-factor authentication (MFA) for endpoints and MFA for Active Directory to prevent unauthorized access, mitigate credential-based attacks, and strengthen security posture against modern cyberthreats.
With MFA enabled, users can authenticate their identity using authentication methods such as RSA SecurID, biometrics, YubiKey, Duo Security and others, in addition to the conventional username and password authentication.
This document describes the steps required to configure RSA multii-factor authentication.
Multi-factor authentication via RSA SecurID
With RSA 2FA and MFA enabled, users will be prompted for RSA SecurID passcodes after their domain credentials are validated. This passcode can be a security code generated by the RSA SecurID mobile app, a hardware token, or a security token received by SMS or email. Users will be granted access to the ADSelfService Plus console only after their passcodes are validated by RSA Authentication Manager.
Configuration
Step 1: Add ADSelfService Plus server as an authentication agent
- Log in to RSA admin console (e.g., https://adssp-rsa.mydomain.com/sc).
- Navigate to Access tab → Authentication Agents.
- Under Authenticate Agents, click Add New.
- Now, add ADSelfService Plus server as an authentication agent.
- Click Save.
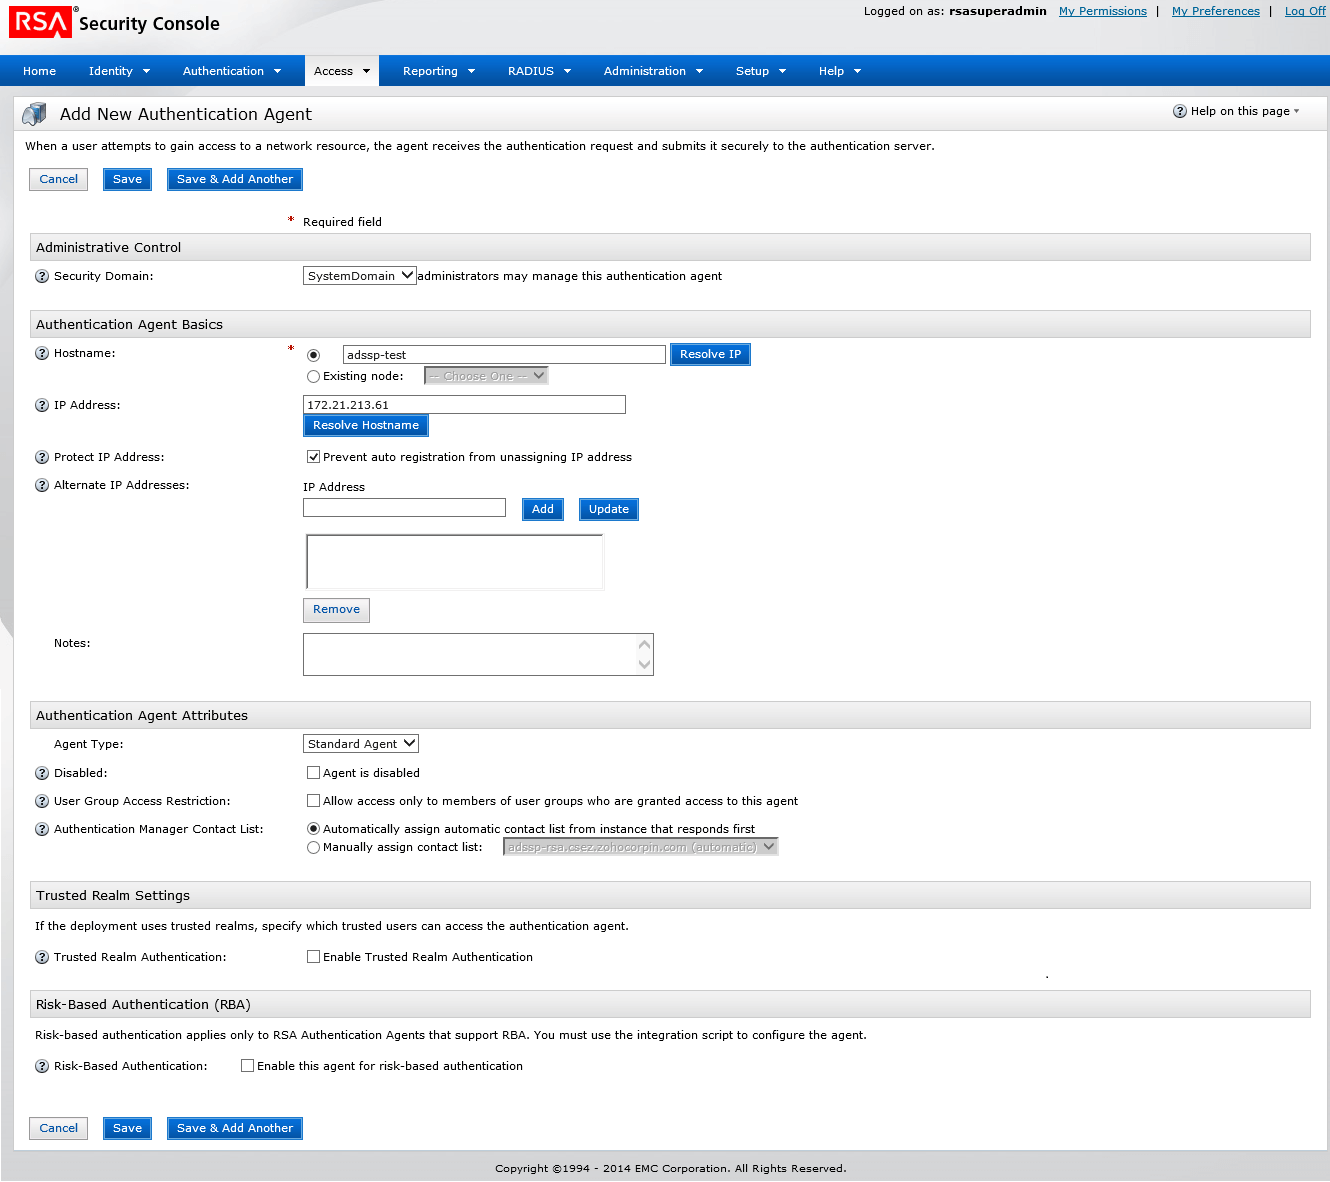
Step 2: Configure ADSelfService Plus for RSA SecurID
- Navigate to Access tab → Authentication Agents → Generate Configuration File.
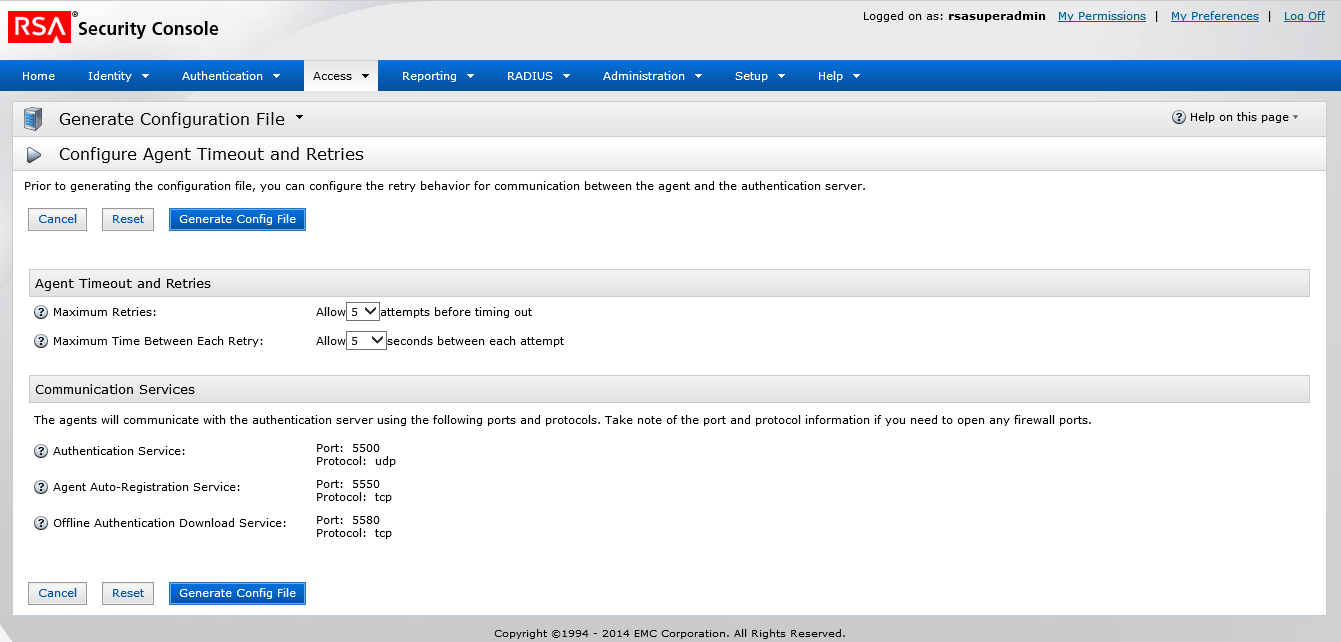
- Download AM_Config.zip (Authentication Manager configuration).
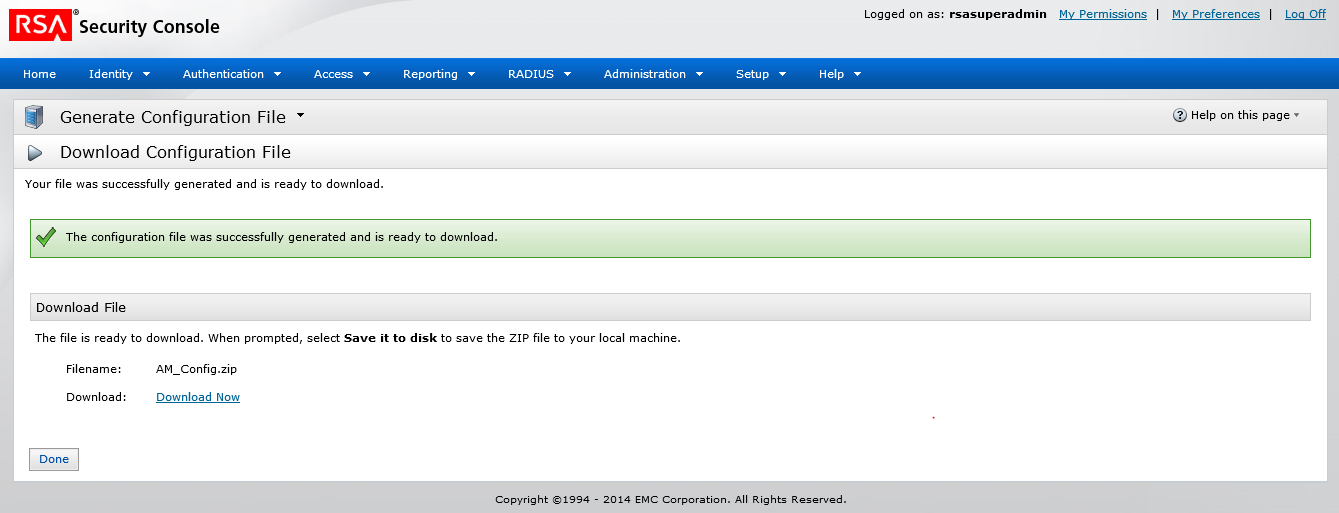
- Extract sdconf.rec file and the RSA SecurID file from the ZIP folder to the <install_dir>/bin folder.
Note: By default, the installation directory will be C:\Program Files\ManageEngine\ADSelfService Plus.
Step 3: Enable RSA SecurID authenticator
- Log in to ADSelfService Plus using administrator credentials.
- Navigate to Configuration → Self-Service → Multi-factor Authentication → Authenticators Setup.
- Select a policy from the Choose the Policy drop-down list.
- Select the RSA SecurID section.

- Click Enable RSA SecurID.
- ADSelfService Plus allows you to create organizational unit (OU) and group-based policies. To create a policy, go to Configuration → Self-Service → Policy Configuration → Add New Policy. Click Select OUs/Groups, and make the selection based on your requirements. You need to select at least one self-service feature. Finally, click Save Policy.
- All ADSelfService Plus users' Active Directory or Lightweight Directory Access Protocol (LDAP) domain usernames must match their RSA username.
Steps to enable multi-factor authentication for ADSelfService Plus' end-user portal login
- Navigate to Configuration → Self-Service → Multi-factor Authentication → MFA for Reset/Unlock.
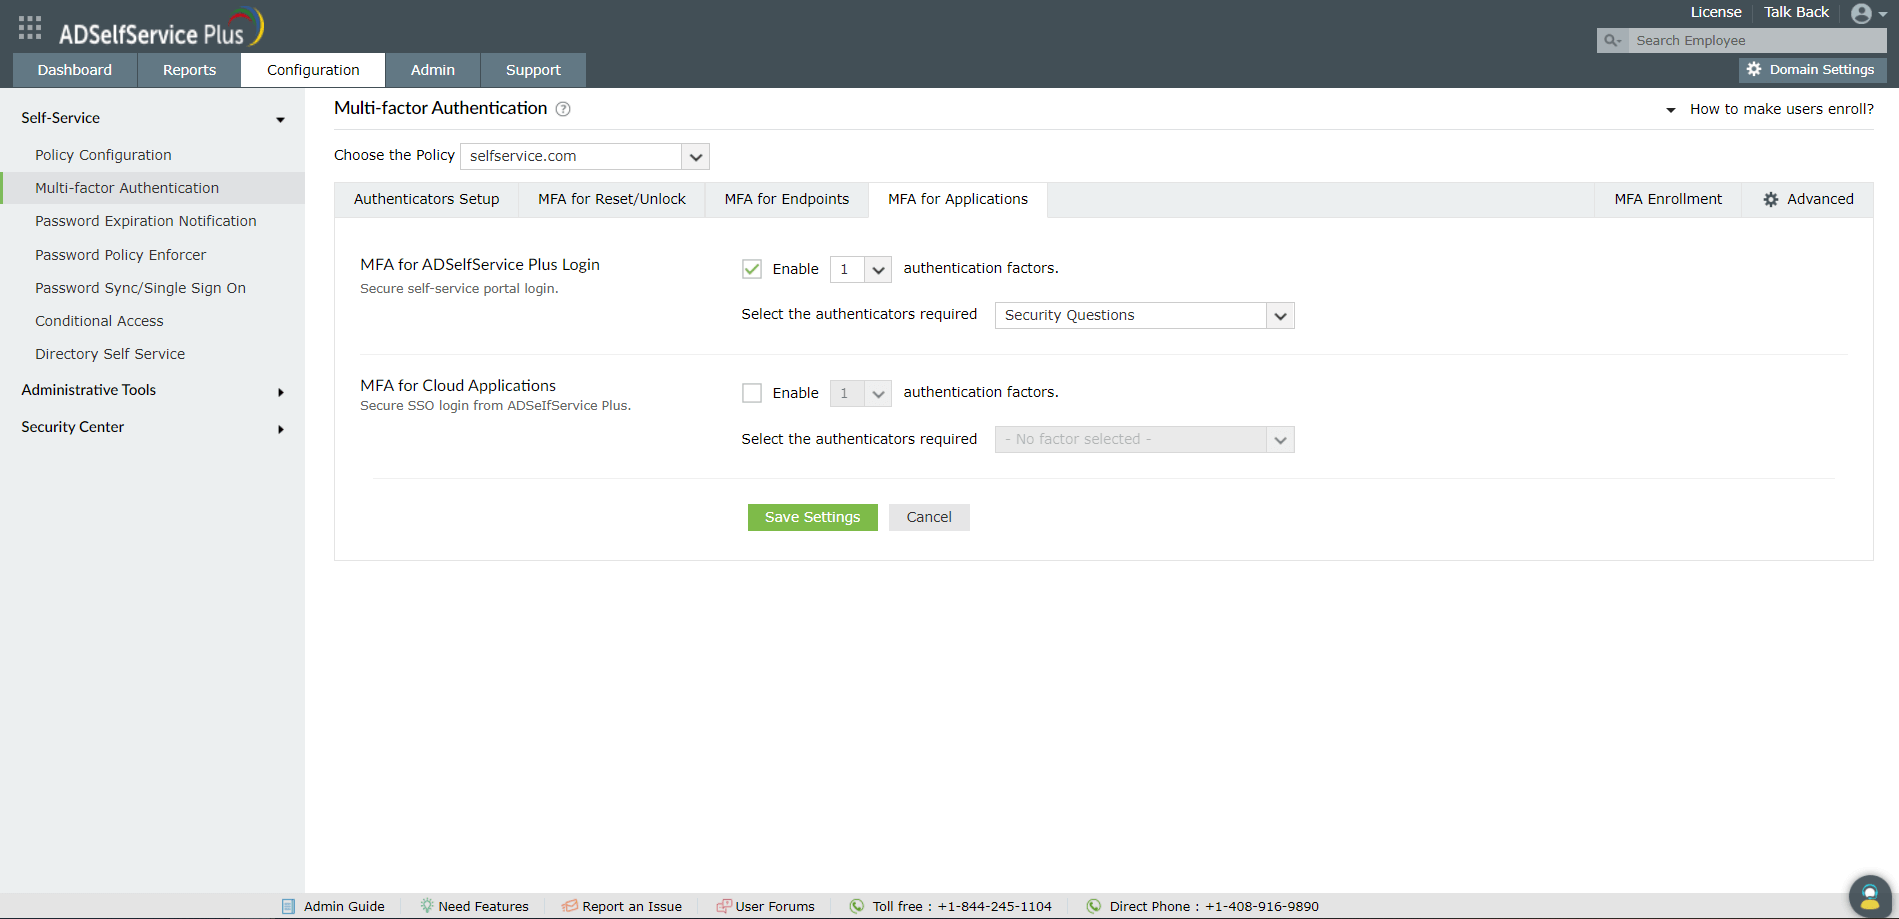
- Choose the Policy from the drop-down.
Note: ADSelfService Plus allows you to create OU- and group-based policies. To create a policy, go to Configuration → Self-Service → Policy Configuration → Add New Policy. Click Select OUs/Groups, and make the selection based on your requirements. You need to select at least one self-service feature. Finally, click Save Policy.
- Use the Enable _ authentication factors option next to MFA for ADSelfService Plus Login,
- Select RSA SecurID and other necessary authenticators from the Select the authenticators required drop-down.
- Click Save Settings.
Once configured, RSA SecurID will be one of the authenticators that verifies a user's identity when they login to ADSelfService Plus.
Steps to enable multi-factor authentication for password reset/account unlock
- Navigate to Configuration → Self-Service → Multi-factor Authentication → MFA for Reset/Unlock.
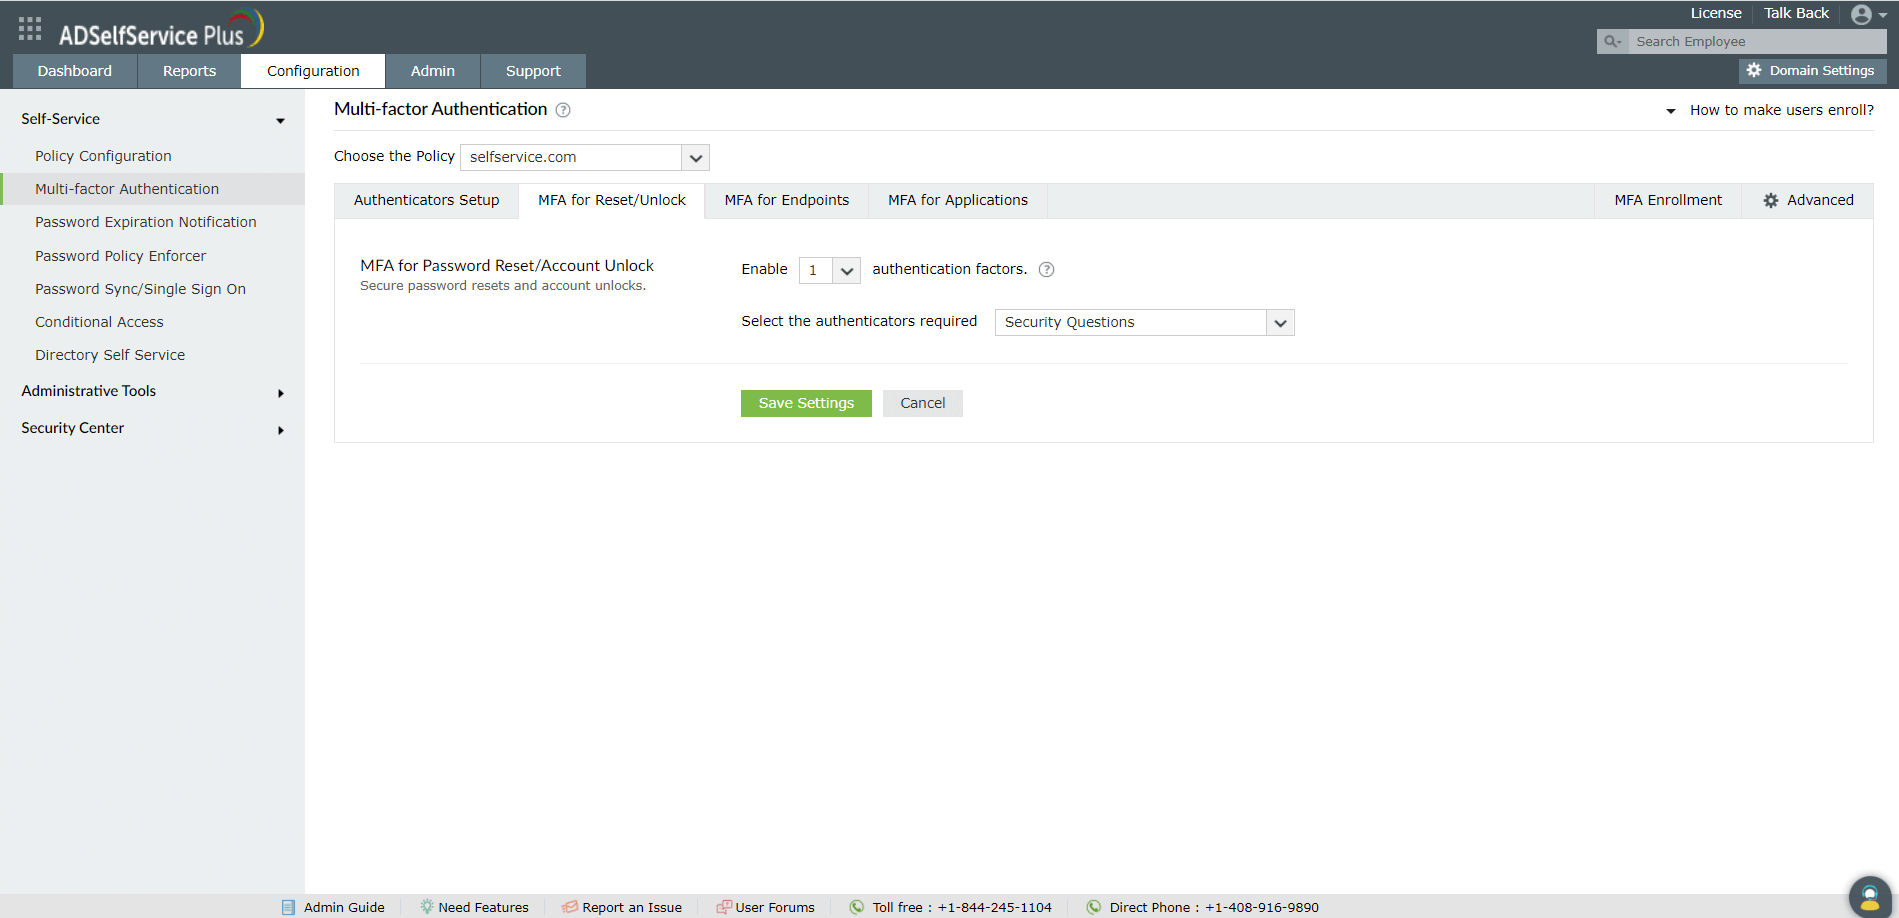
- Choose the Policy from the drop-down.
Note: ADSelfService Plus allows you to create OU- and group-based policies. To create a policy, go to Configuration → Self-Service → Policy Configuration → Add New Policy. Click Select OUs/Groups, and make the selection based on your requirements. You need to select at least one self-service feature. Finally, click Save Policy.
- Enable the Select the authenticators required checkbox
- Use the Enable _ authentication factors option next to MFA for Password Reset/Account Unlock to select the number of authenticators
- Select RSA SecurID and other necessary configured authenticators from the drop-down.
- Click Save Settings.
Once configured, RSA SecurID will be one of the authenticators that verifies a user's identity when they try to reset their password, or unlock their account in ADSelfService Plus.
Steps to enable multi-factor authentication for endpoints
- Navigate to Configuration → Self-Service → Multi-factor Authentication → MFA for Endpoints..
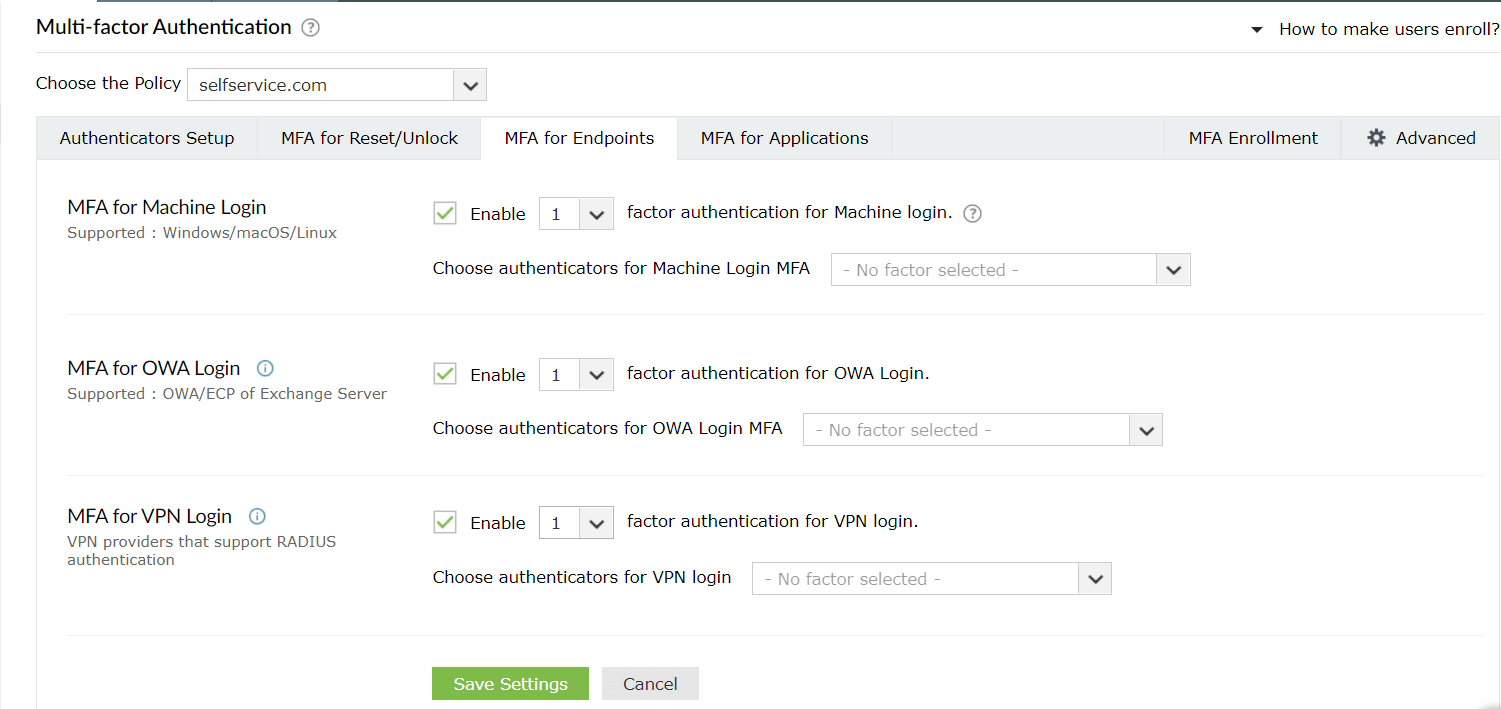
- Choose the Policy from the drop-down.
Note: ADSelfService Plus allows you to create OU- and group-based policies. To create a policy, go to Configuration → Self-Service → Policy Configuration → Add New Policy. Click Select OUs/Groups, and make the selection based on your requirements. You need to select at least one self-service feature. Finally, click Save Policy.
- MFA can be configured so additional factors of authentication are required at the login screens of Windows, macOS, and Linux machines or systems, during VPN or Outlook Web Access (OWA) logins.
- For machine logins:
- Go to MFA for Endpoints.
- Enable the Select the authenticators required checkbox.
- Use the Enable _ authentication factors option next to MFA for Machine Login to select the number of authenticators.
- Select RSA SecurID and other necessary configured authenticators from the drop-down.
- Click Save Settings.
- For OWA logins:
- Select the Enable second factor authentication option next to MFA for OWA Login, and choose RSA SecurID from the drop-down.
- Click Save Settings.
Highlights of ADSelfService Plus
Allow Active Directory users to self-service their password resets and account unlock tasks, freeing them from lengthy help desk calls.
Get seamless one-click access to 100+ cloud applications. With enterprise single sign-on, users can access all their cloud applications using their Active Directory credentials.
Intimate Active Directory users of their impending password and account expiry via email and SMS notifications.
Synchronize Windows Active Directory user passwords and account changes across multiple systems automatically, including Microsoft 365, Google Workspace, IBM iSeries, and more.
Strong passwords resist various hacking threats. Enforce Active Directory users to adhere to compliant passwords by displaying password complexity requirements.
Enable Active Directory users to update their latest information themselves. Quick search features help admins scout for information using search keys like contact numbers.