Certificate Signing Requests
Key Manager Plus enables users to generate Certificate Signing Requests (CSRs) directly within its interface and utilize them to request certificates from any public Certificate Authority. Additionally, Key Manager Plus provides robust management capabilities for CSRs, including import, export, and deletion functionalities. This ensures efficient handling and security of certificate requests throughout the lifecycle.
At the end of this help document you will have learned about generating and managing the CSRs from the Key Manager Plus interface.
1. Generating a CSR from Key Manager Plus
The following steps explain in detail on how to generate a CSR directly from the Key Manager Plus interface:
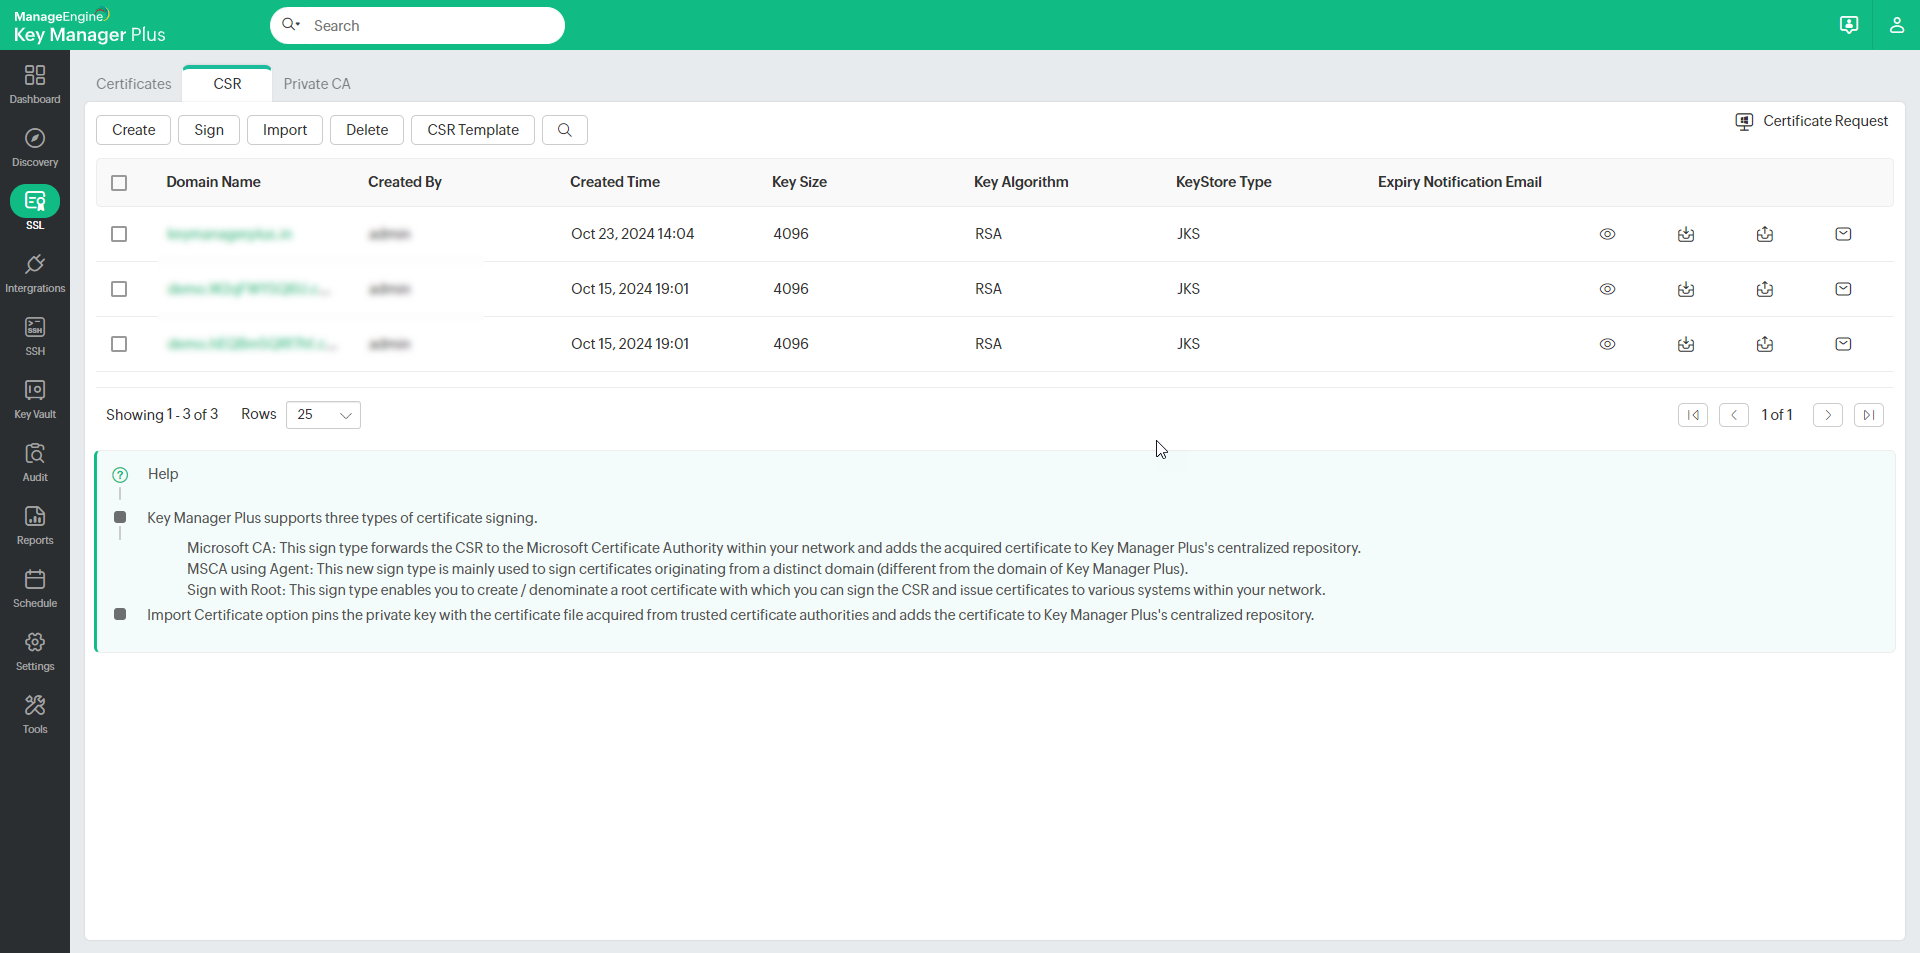
Navigate to SSL >> CSR. Here, you will see all the available CSRs in a list view and their details such as Domain Name, Created By, Created Time, Key Size, Key Algorithm, etc.
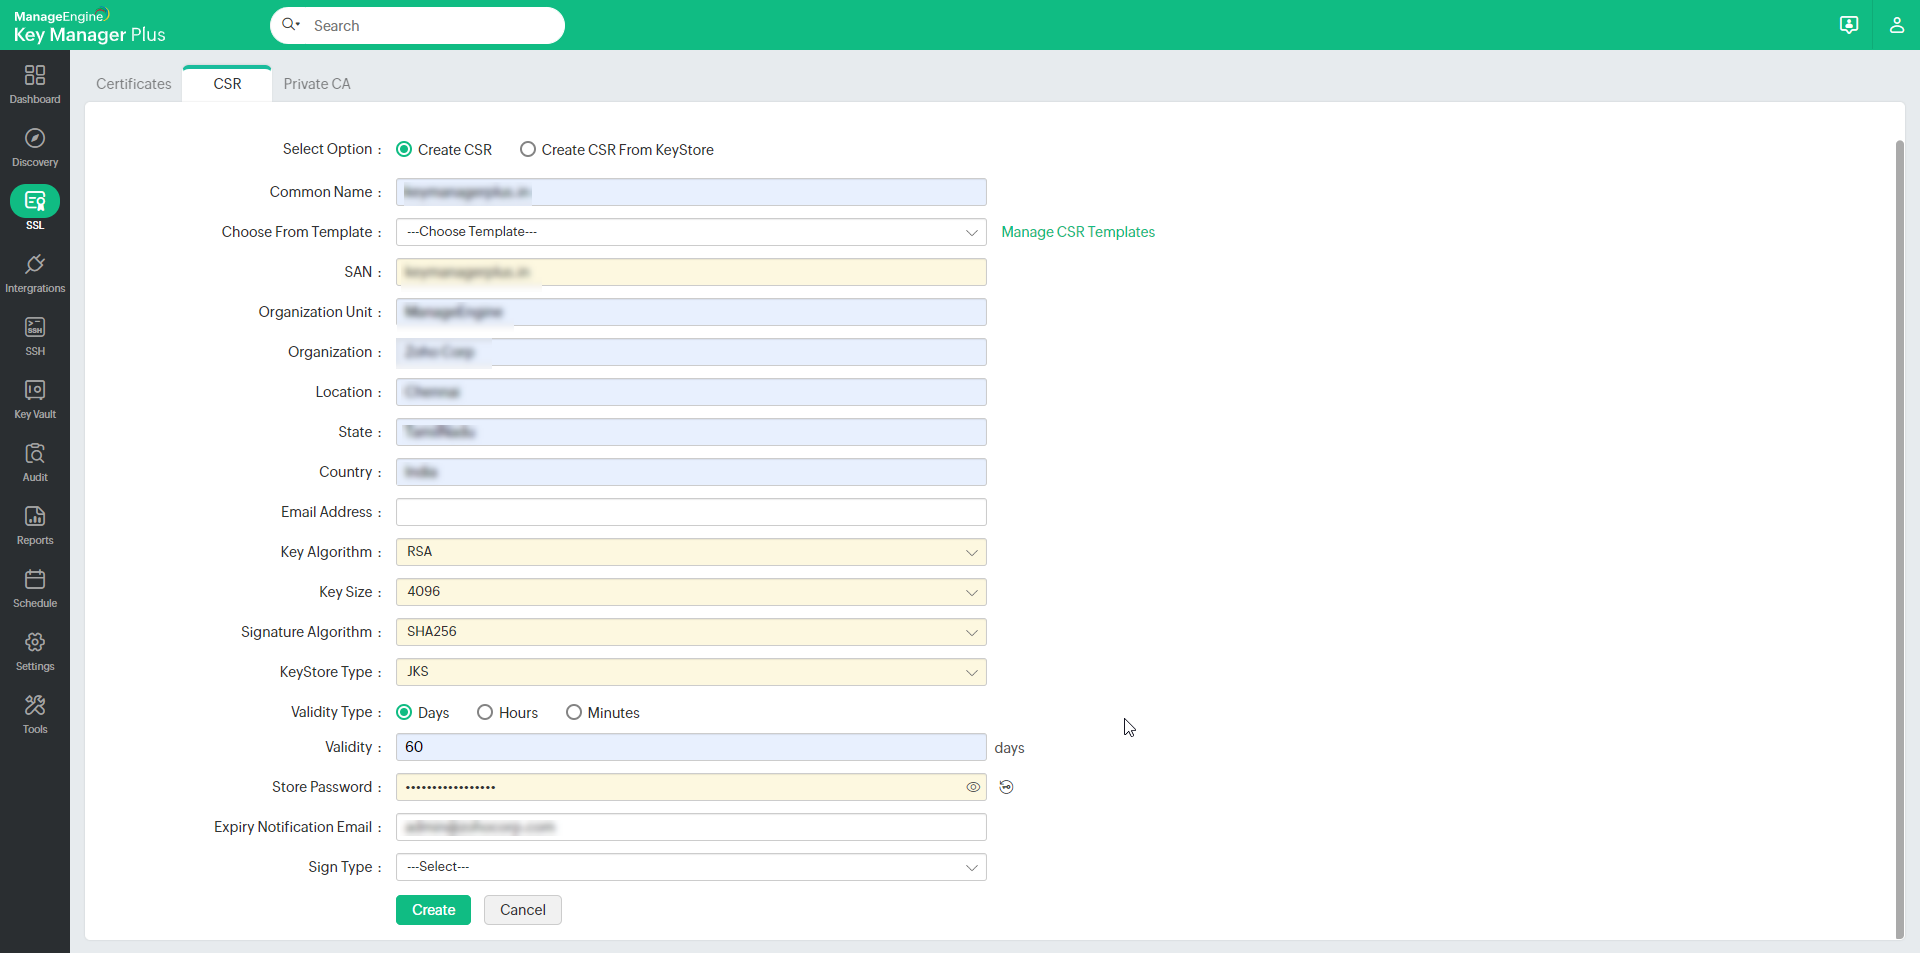
Click Create to generate a new CSR. In the new window that opens, enter the following:
- Choose between Create CSR or Create CSR from KeyStore.
- If you choose to Create CSR from KeyStore, select the KeyStore file, enter the Private Key Password of the selected KeyStore, the Expiry Notification Email and click Create.
- If you choose to Create CSR manually, follow the below steps:
- Specify the required details such as Common Name, SAN, Organization Unit, Organization, Location, State, Country, and Email Address.
Notes:
- You can populate the CSR details using predefined templates available under the Choose From Template option. Click Manage CSR Templates to create or modify CSR templates.
- From build 7070 onwards, you can specify multiple DNS names in the SAN field in a comma-separated format when creating a CSR.
- Select the Key Algorithm, Key Size, Signature Algorithm, and KeyStore Type.
- Choose a Validity Type (Days, Hours, or Minutes) and mention the Validity.
- Enter the Store Password and the Expiry Notification Email address.
- Select the Sign Type and enter the required details.
Notes:
If you are a user with the operator role, tick the checkbox Already approved by the administrator to sign certificates and select the administrators to notify.
Do not select the Sign Type if you opt to sign your CSR later. To know more about signing the CSR later, click here. - Click Create. You will be redirected to a CSR window where the CSR content is displayed.

- Specify the required details such as Common Name, SAN, Organization Unit, Organization, Location, State, Country, and Email Address.
If you are willing to use the KeyStore file from an SSL certificate present in the Key Manager Plus repository, do the steps that follow:
- Navigate to the SSL >> Certificates tab.
- Select the SSL certificate from which the KeyStore is to be used for creating a CSR and select Create CSR under the More option in the top pane.
- In the pop-up that opens, you can add an expiry notification email.
- Now, click Create to create the CSR from the KeyStore which is available in your Key Manager Plus repository.
You have successfully created a CSR and it has been added to the list view. The CSR will be assigned to the user who created it.
Note:
The Administrator can grant access to allow an operator to sign the CSR.
To grant access, navigate to Settings >> SSL >> Operator Settings, select Allow/Deny Certificate Signing Permission for the operator globally, and click Save.
Note:
(Applicable from build 5920 onwards)
Apart from having a wildcard certificate name in the Common Name field, you can add the wildcard name in the SAN field while creating a CSR. With wildcard certificates, one can secure an unlimited number of subdomains for a registered base domain. For example, consider the base-domain zoho.com, a wildcard certificate for *.zoho.com can secure any subdomain.zoho.com. The asterisk (*) is the wildcard that corresponds to any valid subdomain.
2. Managing the CSRs from Key Manager Plus
Key Manager Plus allows you to perform the following operations from the SSL >> CSR tab:
- Show Passphrase - The show passphrase icon corresponding to every CSR allows administrators to view the Keystore passwords of respective CSR files.
- Export/Mail - You can export the CSR content in a file or mail the CSR content to a specified email ID by using the relevant icons beside the required CSR on the CSR page. To export CSR as a Private Key or PKCS8 Key, click the required CSR from the list. In the pop-up window that appears, click the Export icon and choose the desired format.
Note: PKCS8 format is applicable from build 7060 and above.
- Import - Besides generating a CSR from the Key Manager Plus, you can also upload CSRs generated outside the application using the import option and track their statuses from Key Manager Plus. To import a CSR, click Import. In the pop-up that appears:
- Select the import method.
Note: CSR content import method is applicable from build 7060 and above.
- If you have the CSR content in a file, select File Based. Click Browse to Select a CSR file.
- If you have the CSR content, select CSR Content and paste the content.
- Click Browse to Select a key file (the file format should be .pfx, .p12, .pkcs12, .jks, .keystore, or .key).
- Enter the Private Key Password, Expiry Notification Email, and click Import.
- Select the import method.
- Delete - To delete a CSR, select the CSR you wish to delete and click Delete. In the pop-up that appears, click OK. You have now successfully deleted the selected CSR.
- CSR Template - Click CSR Template to add, delete, or manage the templates. The templates generated can be used while generating a new CSR.

- Update Expiry Email - Users can update the expiry notification email of the CSRs by following the steps below:
- Select the CSRs that need to be updated with the new expiry notification emails.
- Click Update Expiry Email from the top menu.
- In the pop-up window that appears, enter the expiry notification email in the field and click Save.
Note: Update Expiry Email is applicable from build 7060 and above.