Configuring Failover in Network Configuration Manager
- How does Failover work?
- What are the prerequisites?
- How to configure failover instance in Network Configuration Manager?
How does Failover work?
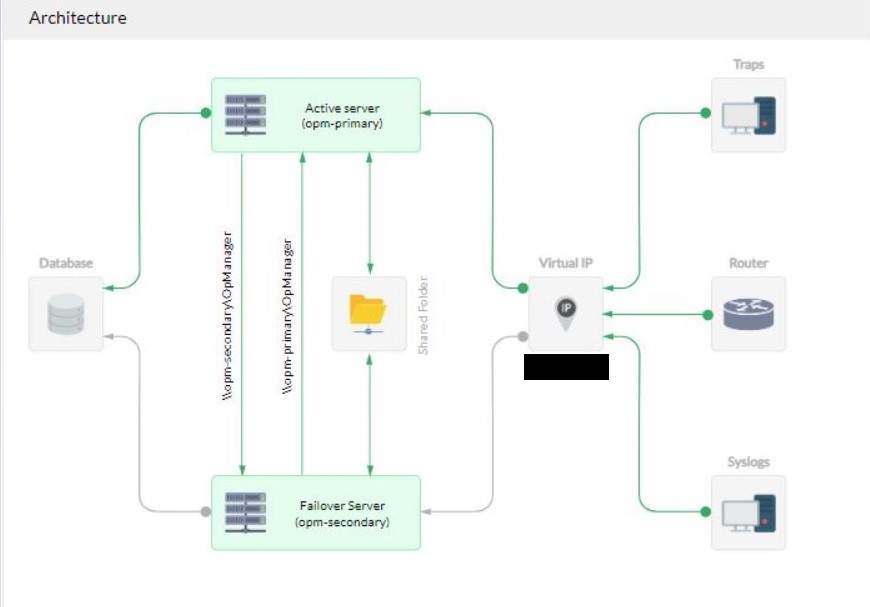
The primary server updates a value called heartbeat in the database. The heartbeat value is a counter that is incremented by the primary server at a specific frequency of time. The secondary server monitors the heartbeat value to check if it is being updated in the specified time interval. When the primary server goes down, it will not be able to update the heartbeat value in the database. If the heartbeat value in the database is not updated for the last 60 seconds, the primary server is considered to have gone down and the secondary monitoring instance takes over. This secondary server will continue monitoring the network as long as it is up. Meanwhile, if the primary server is up (recovered and restarted), it will take the standby mode and let the secondary server continue monitoring.
The information between the primary and secondary instances are synced periodically, thus ensuring that you don't miss critical monitoring data ( such as syslog messages etc., ) when your primary Network Configuration Manager instance goes down.
What are the prerequisites?
- Apply the failover add-on: Apply the Failover - Hot Standby Engine add-on in your primary instance. You can purchase the add-on for Professional Edition from here (Note: Failover is supported in both MSSQL and remote PGSQL setups. To configure failover for remote PGSQL setup, click here.
- Have the database in a separate server: Ensure that the database for your Network Configuration Manager installation is setup in a separate server and not the same server in which the primary or secondary Network Configuration Manager instance is installed (MSSQL or remote PGSQL setup).
- Select a Connection type: The connection types refer to the methods by which users can establish communication with servers in a network environment. Depending on their needs for flexibility, redundancy, or specific configurations, they can choose between three connection types. Click here for more information.
- Hardware and software requirements
- The same version of Network Configuration Manager should be installed in both servers.
- Both primary and secondary Network Configuration Manager services should have the same port and protocol ( http / https ).
- Both primary and secondary servers should have the same time and time zone.
- Both primary and secondary servers should have the same hardware configurations.
- Network requirements
- Both primary and secondary servers should have a static IP address.
- The primary server and secondary server should be able to resolve each other's host name and IP address.
- Both the servers should have high connectivity and bandwidth.
- The primary, secondary and the server in which the shared folder is created should all be in the same domain.
- The Syslogs, SNMP traps and Flows are forwarded to the virtual IP address.
How to configure failover instance in Network Configuration Manager?
In your primary instance, go to Settings -> General Settings -> Failover Details and enter the following details:
- Connection Type: Users have the flexibility to choose between different connection types: Virtual IP, Virtual hostname, or none. The primary and secondary servers can either reside on the same subnet or different subnets.
Virtual IP: A Virtual IP (VIP) address is an IP address shared by both primary and secondary servers on the same subnet. When one server goes down, the other server takes over the VIP address and responds to requests sent to the VIP. The VIP and both servers must be part of the same subnet.
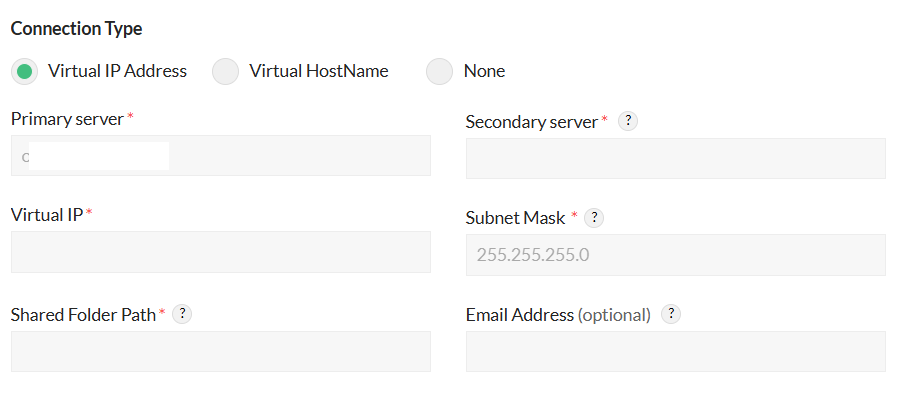
- The VIP option is available only when both primary and secondary servers are on the same subnet.
- If the servers are in different subnets, you must use a virtual hostname instead of a VIP.
- Subnet mask: The subnet mask is used to bind the Virtual IP to the appropriate network interface. By default, it is set to 255.255.255.0. Please update this value to match your server’s subnet configuration.
Virtual hostname: A Virtual hostname is shared by both the primary and secondary servers. Only the active server responds to requests sent to the virtual hostname. This setup allows you to configure failover servers either on a single subnet or across two different subnets.
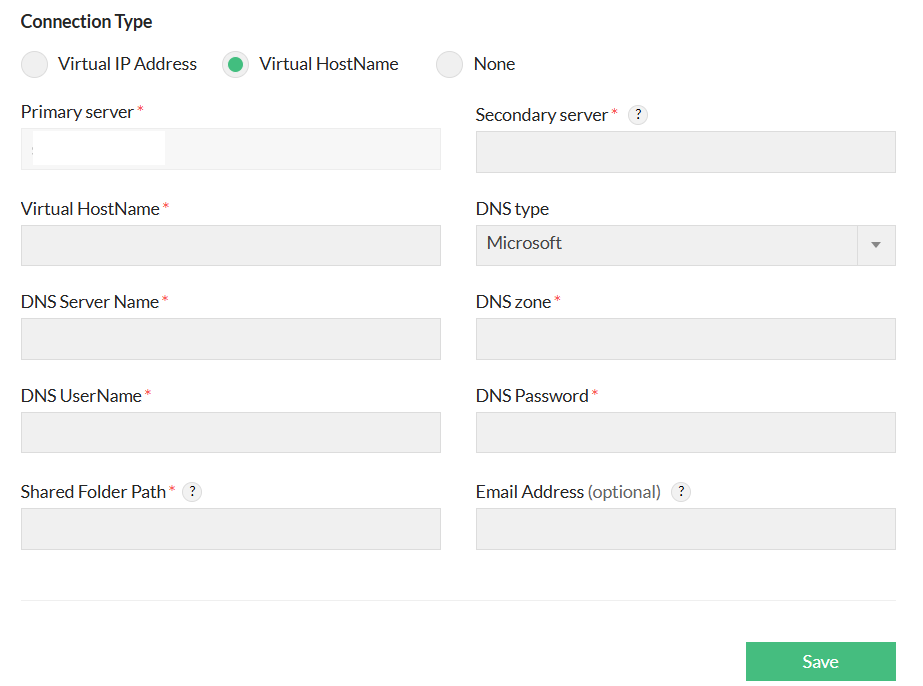
- DNS Type: For virtual hostname configuration, you need to choose one of the supported DNS types by OpManager, i.e., either Microsoft or BIND DNS Servers.
- Microsoft: A DNS server type
- User name/Password: Credentials for the Microsoft DNS server
Note: For Microsoft DNS, make sure the required RSAT packages are installed on the Primary & Secondary servers.
- RSAT can be installed on a Windows client machine. For Windows 10 and above, you can install it via the Optional Features option.
- Go to Settings -> Apps -> Optional features -> Add a feature.
- Search for "RSAT" and install the necessary tools such as RSAT: DNS Server Tools.
Bind: The DNS Server type (Applicable for Linux)
- TSIG: When interacting with BIND DNS, transaction signatures (TSIG) are required instead of administrator credentials. Configure your BIND DNS name server in the DNS zone to use the TSIG key when configuring failover. The key must use the HMAC_SHA256 message authentication code with a key size between 1 and 512 bytes. Use the dnssec-keygen utility from your BIND installation to generate a new key. If you haven't used TSIG with BIND DNS before, update the BIND configuration file to allow DNS updates signed by the new TSIG.
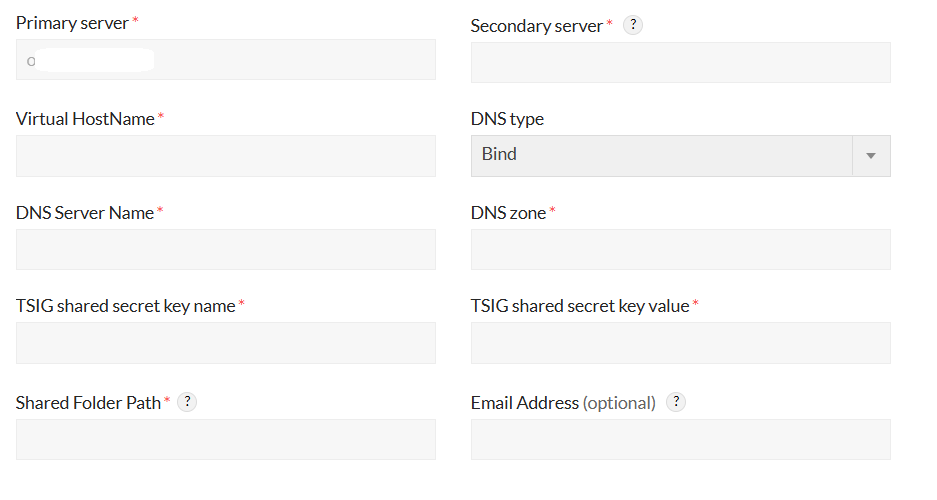
- TSIG Shared Secret Key Name: The name given to the key in the configuration file.
- TSIG Shared Key Value: The value from the .private file generated when creating the TSIG secret. Use the string after Key: in this file.
- DNS Zone: A DNS zone is where you store name information for the domains you manage. You can divide your network into multiple subordinate DNS zones for better management, organization, or performance. Both the Primary and Secondary DNS servers must be managed within the same DNS zone, even if it spans multiple subnets.
Note: When a failover uses a virtual hostname, issues may arise where the failover does not appear to work due to caching problems. The client DNS cache may take up to one minute to redirect traffic to the active server.
However, since browser DNS caches often do not respect the DNS Time to Live (TTL) value, the retention time can vary between browsers, ranging from 60 seconds to 24 hours. To ensure successful redirection to the new active server, it may be necessary to flush the browser's DNS cache.None: In scenarios where neither Virtual IP nor Virtual hostname is preferred or required, users have the option to establish connections using individual IP addresses and hostnames of the Primary and Secondary servers.
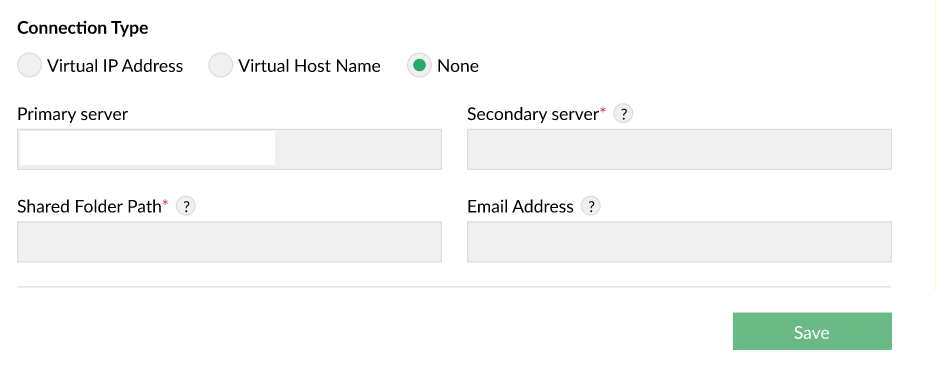
However, consider the following if you are choosing the None option:
- Identifying the Active Server: Users must independently determine the active server to access the client application.
- Redirection of Traffic: End devices need to be configured to redirect traffic to the Primary server when it is active; when the Primary server fails, traffic must be redirected to the Secondary server.
- Secondary Server IP: The IP address or host name of your secondary server.
Shared folder path: The path to the empty shared folder created in a separate server.
- For Windows: This is generally of the form \\<Server_Name_or_IP>\<Share_Name>.
- For Linux: This is generally of the form <Server_Name_or_IP>:/Desired/Path
Note: Ensure that the empty folder is shared with both primary and secondary servers. Learn how to share the folder with primary and secondary servers in Windows and Linux.- Email address (optional): Receive notifications on failover self-monitoring alerts, data synchronization alerts, and secondary server takeover alerts. You can specify the email recipients to whom the notifications must be sent. You can specify multiple recipients by separating each email address with a comma.
Save the details and perform the following steps in the primary and secondary servers:
In Windows:
In the primary server:
- Stop Network Configuration Manager service.
- Share the <NetworkConfigurationManagerHome> folder with the secondary server. Learn how.
- Open command prompt / terminal with administrator priviliges, navigate to <NetworkConfigurationManagerHome> \bin and execute the following command:
Clone_primary_server.bat - Start the Network Configuration Manager service.
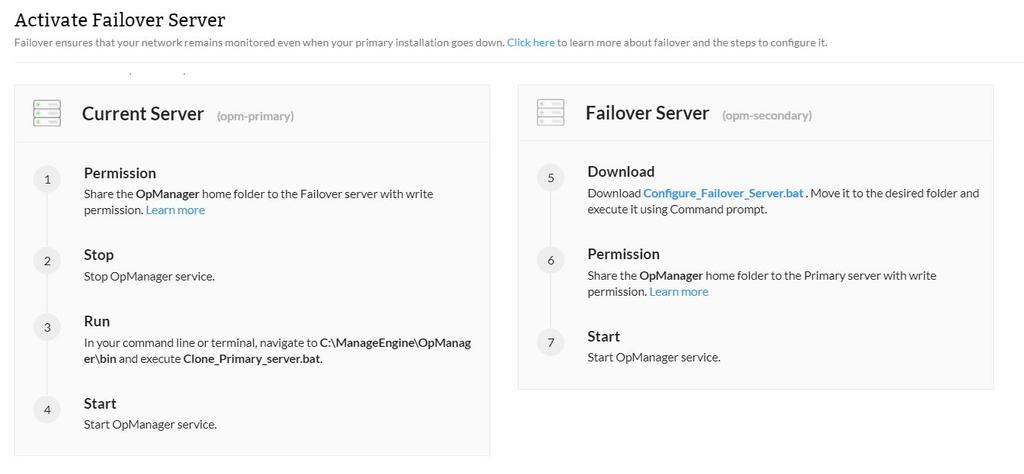
In the secondary server:
- Download the Configure_failover_server.bat file and move it to the folder where you wish to have your secondary instance configured. (Ex: C:\Program Files\ManageEngine)
- Open Command prompt as administrator, navigate to the <Location> and execute Configure_Failover_Server.bat.
- Share the <NetworkConfigurationManagerHome> folder to the primary server. Learn how.
- Start the secondary Network Configuration Manager instance.
In Linux(From version 12.8.401):
In the primary server:
- Stop Network Configuration Manager service.
- Configure SSH authentication to the secondary server. Learn how.
- In your command line or terminal, navigate to <NetworkConfigurationManagerHome> \bin and execute the following command:
Clone_primary_server.sh - Start the Network Configuration Manager service.
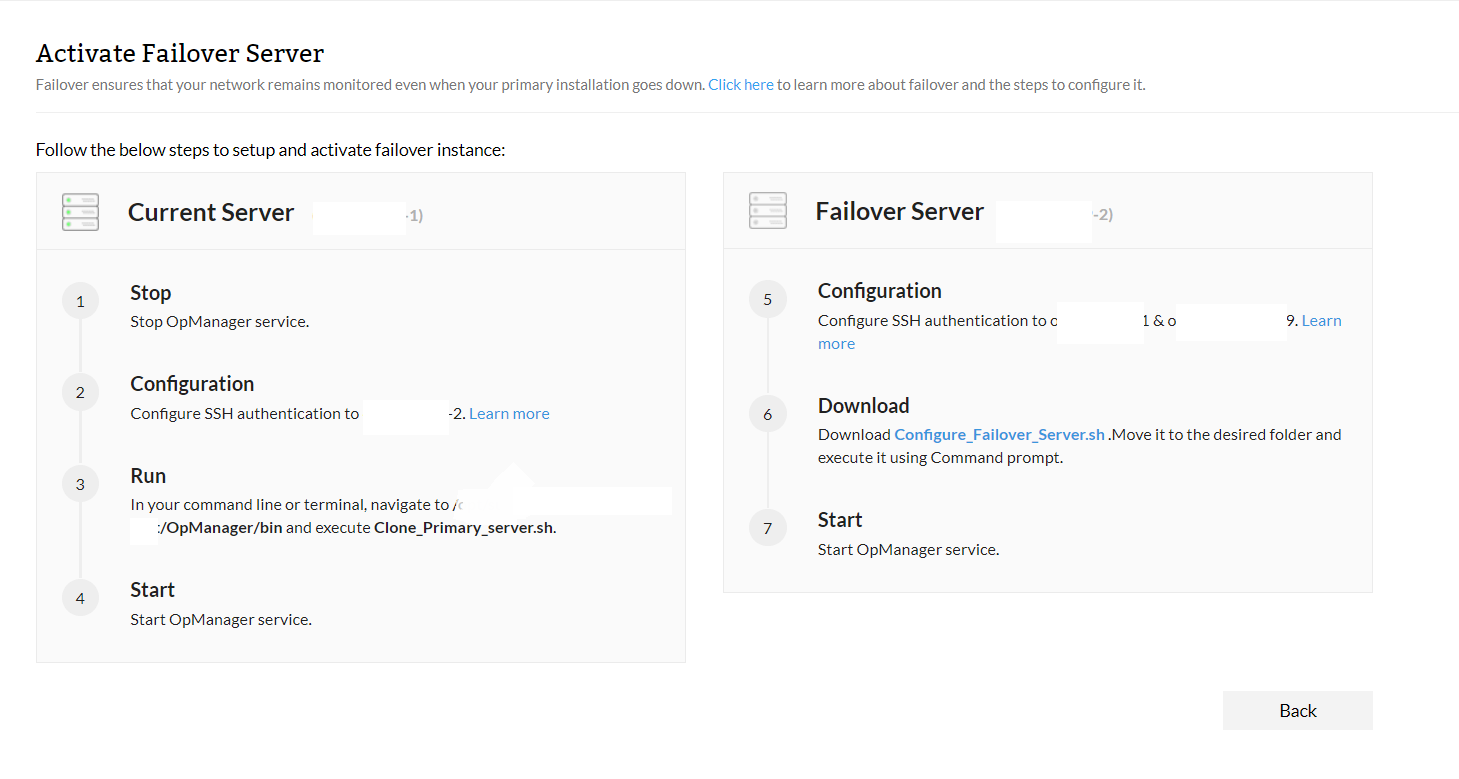
In the secondary server:
- Download the Configure_failover_server.sh file and move it to the desired folder, and execute it via command prompt.
- Configure SSH authentication to the primary server and Shared folder server. Learn more.
- Start the secondary Network Configuration Manager service.
Note:
- The option to configure Virtual IP is available from version 12.5.140 and above, and the option to configure Virtual hostname and None were introduced from version 12.8.401.
- From version 12.8.401, users can configure failover in Network Configuration Manager Linux installations.
- Network Configuration Manager does not provide any kind of database failover support. It only provides application level failover support.
- Always start the secondary instance after the primary instance is completely started.
- The approximate time taken for the secondary server to completely takeover the primary will be 3-4 minutes. There may be a minor loss of data in few SNMP traps, syslogs or flow received during that period.
- If a Virtual IP address is configured, the Syslogs, SNMP Traps, Flow should be forwarded to the virtual IP address.
Upgarding the failover setup: While upgrading your Network Configuration Manager service, it is enough to apply the PPM for the primary setup. The secondary server will be updated automatically.
Encrypted File transfer
In Virtual IP Based Failover, the configuration files in primary and secondary setup will be synced periodically. From version 127189, Encrypted File transfer between Primary and Secondary server will be supported. Please contact our support team to enable it.
Thank you for your feedback!