Configuring SNMP Agents
SNMP, or Simple Network Management Protocol, is a crucial component for network management, allowing OpManager to effectively monitor and manage network devices. An SNMP Agent is a very small file that is installed on a network device. The agent collects and sends its operational data to an SNMP manager, for easy network monitoring and management. This help document will guide you through the process of configuring SNMP Agent on a Windows system.
For details about installing SNMP agents in Windows systems, refer to this help document on Installing SNMP Agent on Windows Systems.
To configure SNMP agent in Windows XP and 2000 systems, follow the steps given below:

- Click Start, point to Settings, click Control Panel.
- Under Administrative Tools, click Services.
- In the Details tab, right-click SNMP Service and select Properties.
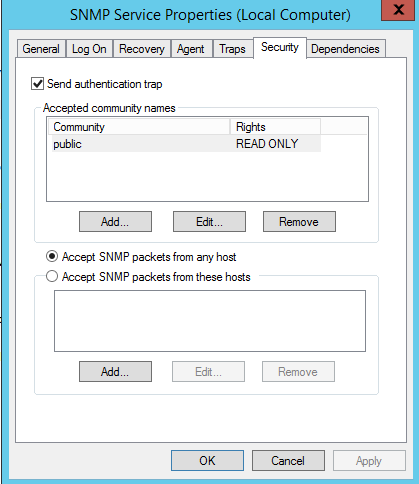
- In the Security tab, select Send authentication trap if you want a trap message to be sent whenever authentication fails.
- Under Accepted community names, click Add.
- Under Community Rights, select a permission level for this host to process SNMP requests from the selected community.
- In Community Name, type a case-sensitive community name, and then click Add.
- Specify whether or not to accept SNMP packets from a host:
- To accept SNMP requests from any host on the network, regardless of identity, click Accept SNMP packets from any host.
- To limit acceptance of SNMP packets, click Accept SNMP packets from these hosts, click Add, type the appropriate host name, IP or IPX address, and then click Add again.
- Click Apply to apply the changes.
To configure SNMP traps, follow the steps given below:
- Click Start, point to Settings, click Control Panel.
- Under Administrative Tools, click Services.
- In the details pane, right-click SNMP Service and select Properties.
- In the Traps tab, under Community name, type the case-sensitive community name to which this computer will send trap messages, and then click Add to list.
- Under Trap destinations, click Add.
- In the Host name, IP or IPX address field, type host name or its IP address of the server (OpManager server) to send the trap, and click Add .
- Repeat steps 5 through 7 until you have added all the communities and trap destinations you want.
- Click OK to apply the changes.
To configure SNMP agent in Windows NT systems, follow the steps given below:
- Click Start, point to Settings, click Control Panel.
- Under Administrative Tools, click Services.
- In the details pane, right-click SNMP Service and select Properties.
- In the Security tab, select Send authentication trap if you want a trap message to be sent whenever authentication fails.
- Under Accepted Community Names, click Add.
- In the Community Names box, type the community name to authenticate the SNMP requests.
- To move the name to the Accepted Community Names list, click Add.
- Repeat steps 6 and 7 for any additional community name.
- To specify whether to accept SNMP packets from any host, or from only specified hosts, click one of two options:
- Accept SNMP Packets From Any Host, if no SNMP packets are to be rejected on the basis of source computer ID.
- Only Accept SNMP Packets From These Hosts, if SNMP packets are to be accepted only from the computers listed. To designate specific hosts, click Add, type the names or addresses of the hosts from which you will accept requests in the IP Host or IPX Address box, and then click Add.
- Repeat step 11 for any additional hosts.
- In the Agent tab, specify the appropriate information (such as comments about the user, location, and services).
- Click OK to apply the changes.
Further, the SNMP Agent running Windows NT does not respond to Host Resource Data, by default. To include this support, you should have Windows NT Service Pack 6 & above. Verify this and then follow the steps given below:
Note: Windows NT 4.0 Server does NOT come with a Host Resource MIB.
If you are running Windows NT Service Pack 6a, and have a Windows 2000 Server:
Step 1. Copy the %SystemRoot%\System32\hostmib.dll file from the Windows 2000 Server to the %SystemRoot%\System32 folder on your Windows NT 4.0 Server.
Step 2. From cmd-prompt > Run regedit or Regedt32 and Add the following keys and values:
Key: HKEY_LOCAL_MACHINE\SOFTWARE\Microsoft\HostMIB\CurrentVersion
Value Name: Pathname
Type: REG_SZ
< div>
Data: C:\WinNT\system32\hostmib.dll
On Linux versions 8 and above, the latest version of SNMP will already be available. You need to just make the following changes in snmpd.conf file:
