OpManager allows you to create subgroups within a group. Subgroups make bulk configuration and filtering of devices much more easier. You can create multiple subgroups and associate it with a parent group.
For eg:
Consider two device groups - "Routers of model A" and "Routers of model B" in an organization. They can be collectively grouped under a parent group called "Routers".
Similarly two device groups - "Central Servers" and "Production servers" can be created and placed under a parent group called "Servers".
The two parent groups - "Routers" and "Servers" can be placed under a group "Network devices in India", which now becomes the parent group.
In Reports/Widgets, when "Network devices in India" group is selected, OpManager provides a detailed report of all the devices under the subgroups present under the parent group - "Network devices in India".
Similarly the subgroup feature can be used in any module where grouping is supported.
Steps to create a group
- Click on Settings → Configuration → Groups and click on the "Add" button or go to Inventory → Groups → Add Group.
- Provide a suitable group name and description and click on Next.
- Select the type of elements you want to add to this group.
- Select the method to group the elements. You can group elements either 'Manually' or by 'Criteria'.
- If you selected the 'Manually' option - Select the group members from the available list and click on 'Next'.
- If you selected the 'By criteria' option - Select any one of the property available from the dropdown box, select a condition and provide a suitable value resolving the property and condition and click on '+' icon.
- Add multiple criteria if needed, along with the logical operation you need to perform based on the criteria. Click on Next.
- From the available members listed, select the members you want the group's health to depend on. If no members are chosen, then the health status of the group will depend on all the available members by default.
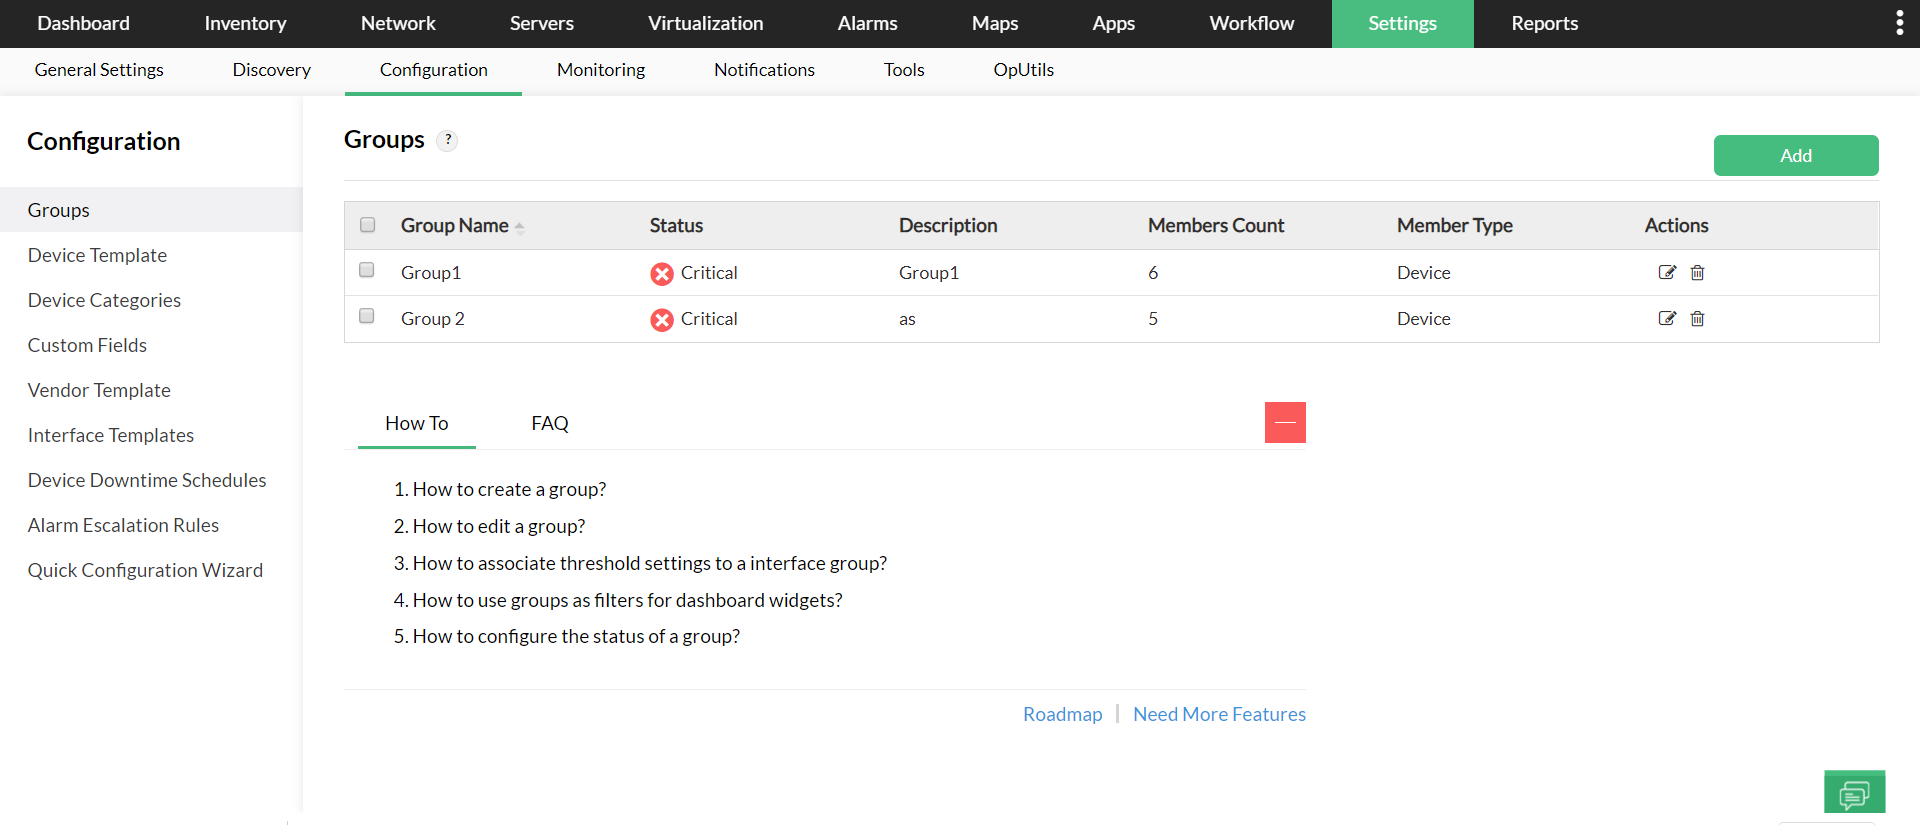
- Click on Settings → Configuration → Groups and click on the 'Edit' icon under 'Actions'. You can also edit Groups from Inventory → Groups → and click on the 'Edit' icon under 'Actions'
- Edit the description if needed and click on 'Next'.
- The group type and method of creation of the group cannot be edited.
- If the 'Manually' option was selected - Edit the group members from the available list and click on 'Next'.
- If the 'By criteria' option was selected - The existing criteria can be deleted and new criteria can be added if required. Click on 'Next'.
- From the available members listed, edit the members you want the group's health to depend on.
To create a subgroup, follow the below steps:
- Go to Settings-> Configuration-> Groups
- Create a new Group. Enter the group name and click Next.
- In the Select From dropdown, select Groups.
- Select Manually to select the devices, or By Criteria to set criteria and the logical operation that should be performed based on the criteria.
- The selected groups, or the groups that fit the specified criteria will be added in this subgroup.
- Select the required members for the Health Status and click Save to save the subgroup.
Groups can be created based on custom fields. Create a group with 'By Criteria' method and select the 'custom fields' properties from the drop down box. Select the suitable condition required and provide a custom field value associated to devices/interfaces.
Users can automatically group devices based on shared custom field values using OpManager's Smart Grouping feature. With Smart Grouping, you can streamline your network management by categorizing devices according to specific custom fields, such as Model, SerialNumber, Department, etc..
Leveraging advanced algorithms, OpManager will prompt users to create a new group when it identifies that multiple devices or interfaces share similar custom field attributes.

In this pop-up, if users confirm by clicking "yes," the group will be created, and the relevant devices will be added seamlessly.
For example, if multiple devices are tagged with the same location or the building name in their custom fields, OpManager will offer to create a group for them, enhancing visibility and control over your network infrastructure.
Smart grouping also allows users to automatically create groups when discovering devices via
CSV discovery. To do this,
- Create a separate column in the CSV file, labeled GroupName.
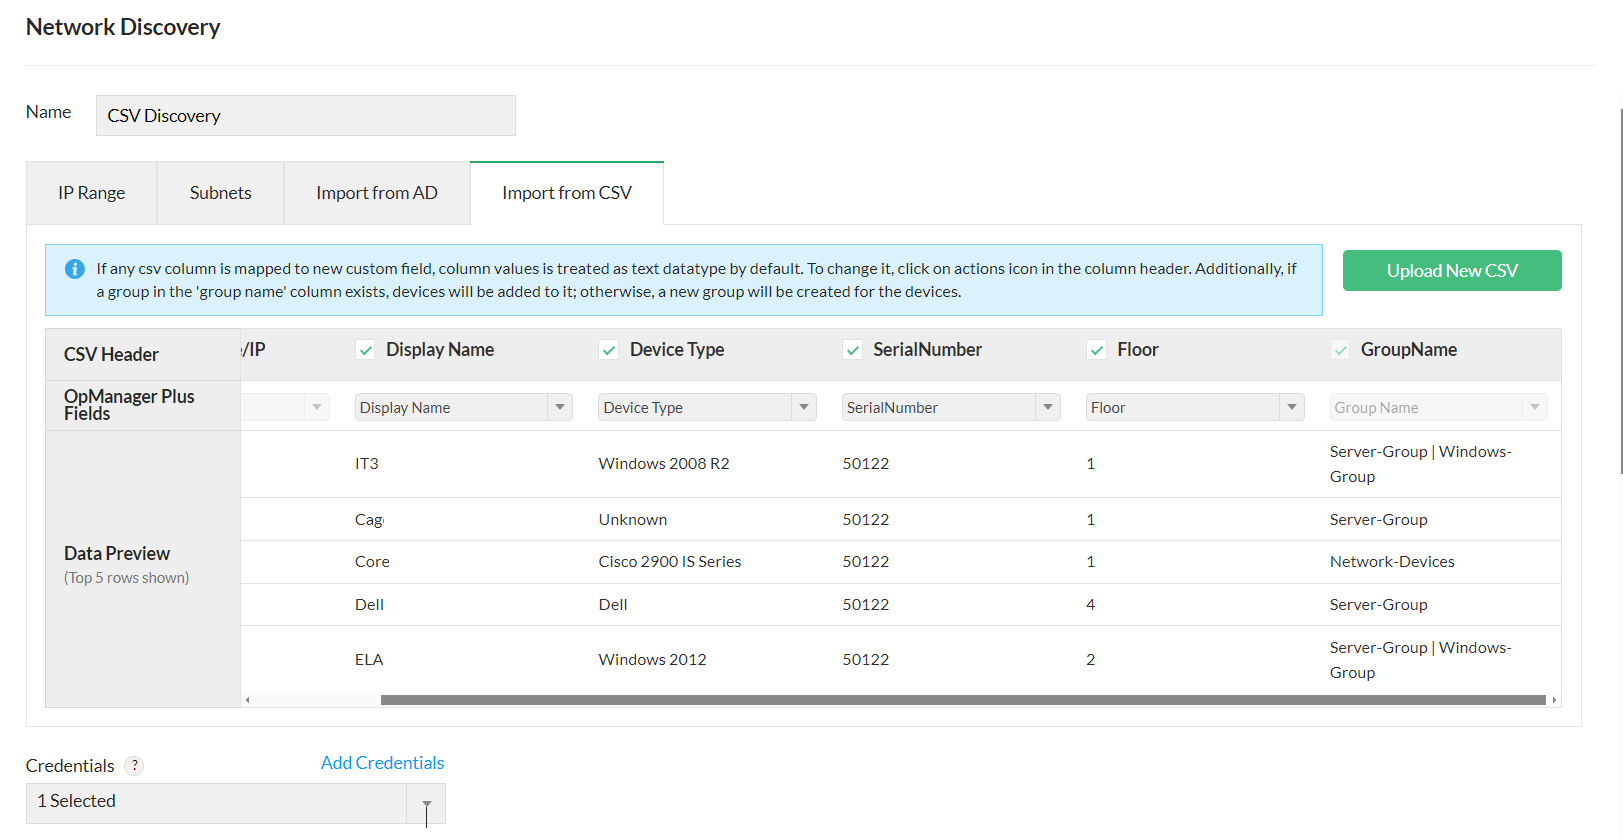
- If the group name entered is present in OpManager and was created manually, the devices will be automatically added to the corresponding group.
- If the group doesn't exist in OpManager, a new group will be automatically created with names specified in the CSV file, and the corresponding devices will be added to that group.
Note:
- Note that this feature is available from version 128398
- Devices will not be added to groups created via the 'By Criteria' option.
- Ensure that the Custom field column in the CSV file is already present in OpManager. If not, it is mandatory to create the respective custom field in OpManager before initiating CSV discovery.
Interface Groups :
- Click on Settings → Configuration → Interface Templates. Under the Interface groups tab, click on a group name and configure the threshold settings. Click on 'Save and Apply'.
- The configured threshold values will be applied to all interfaces in a group irrespective of type.
Interface Types :
- Click on Settings → Configuration → Interface Templates. Under interface types, click on a interface type name and configure the threshold values. Click on 'Save and Apply'.
- In the new tab displayed, click on "Select groups to apply" option and click on 'Save'.
- The threshold will be applied only to interfaces of the selected type.
While creating a group, you can configure the health status of the group. The health status of the group will depend on the members selected. If no member is selected, by default the health status will depend on all available group members.
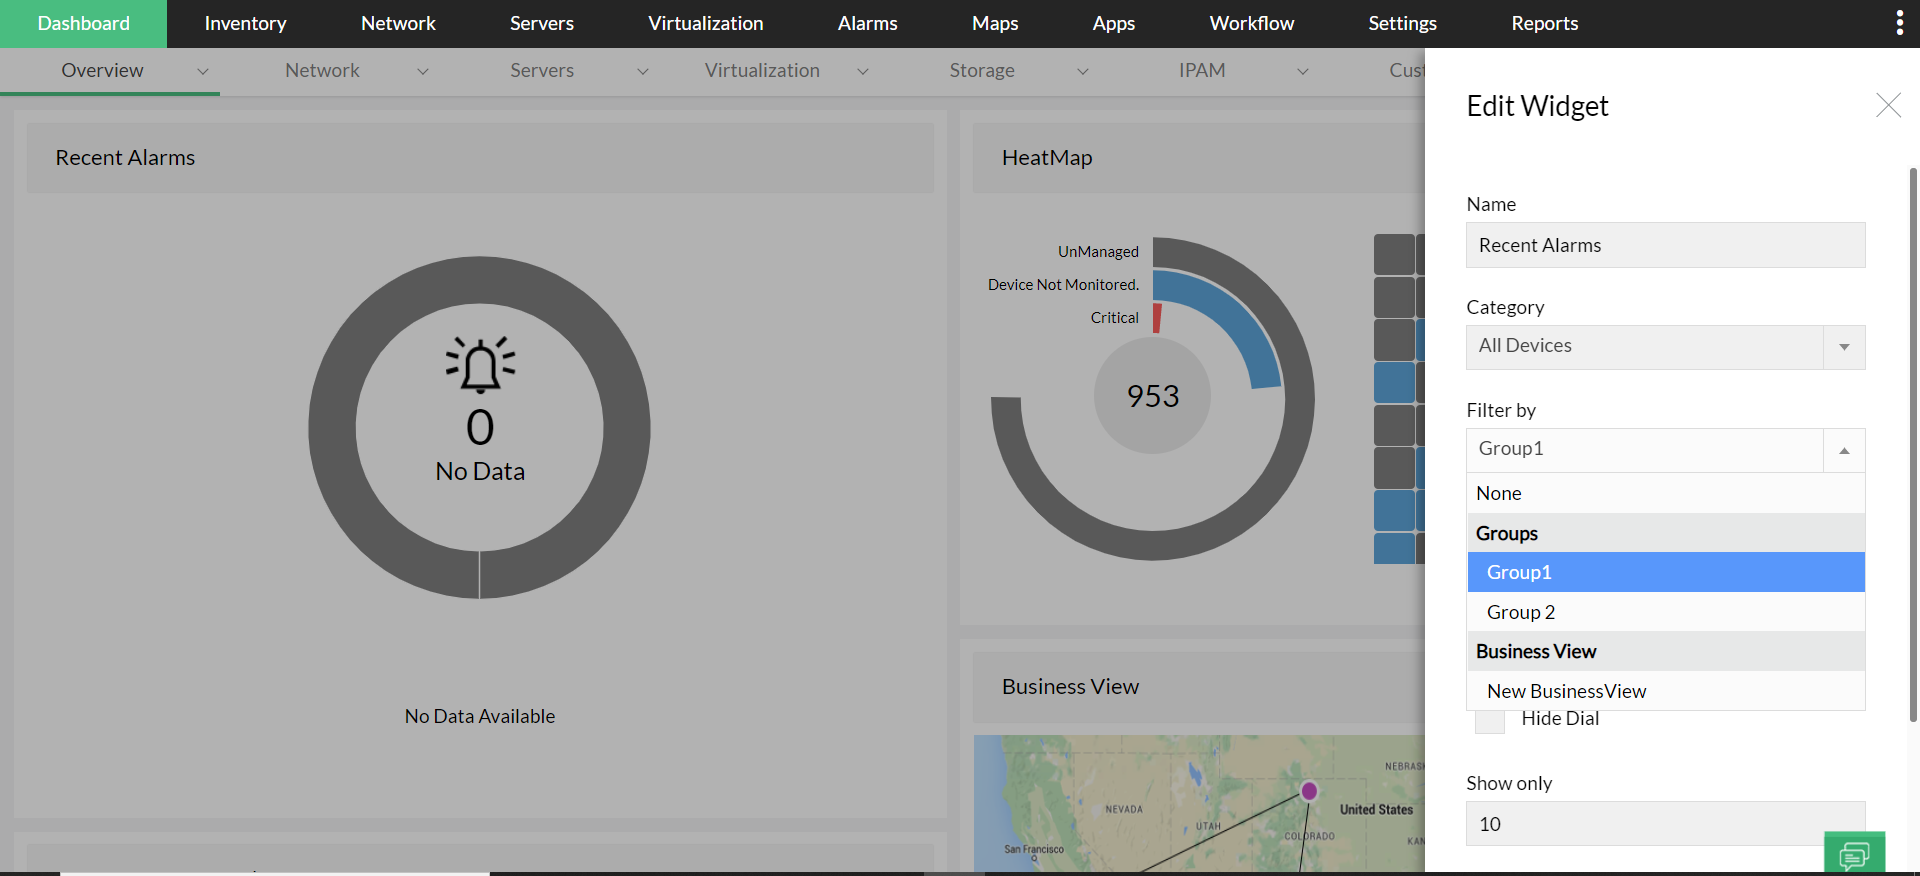
Groups can also be used as a filter in the dashboard. You can customize the widgets to display only specific data or devices based on your requirement using Groups.
Steps to use Groups in dashboard:
- In the Dashboard, click on the 'Edit' icon in any widget.
- In the 'Edit' widget menu, select groups under the 'filter by' drop menu and click on 'Save'.
You can also view the availability data in the 'all groups' widget in the dashboard of OpManager.
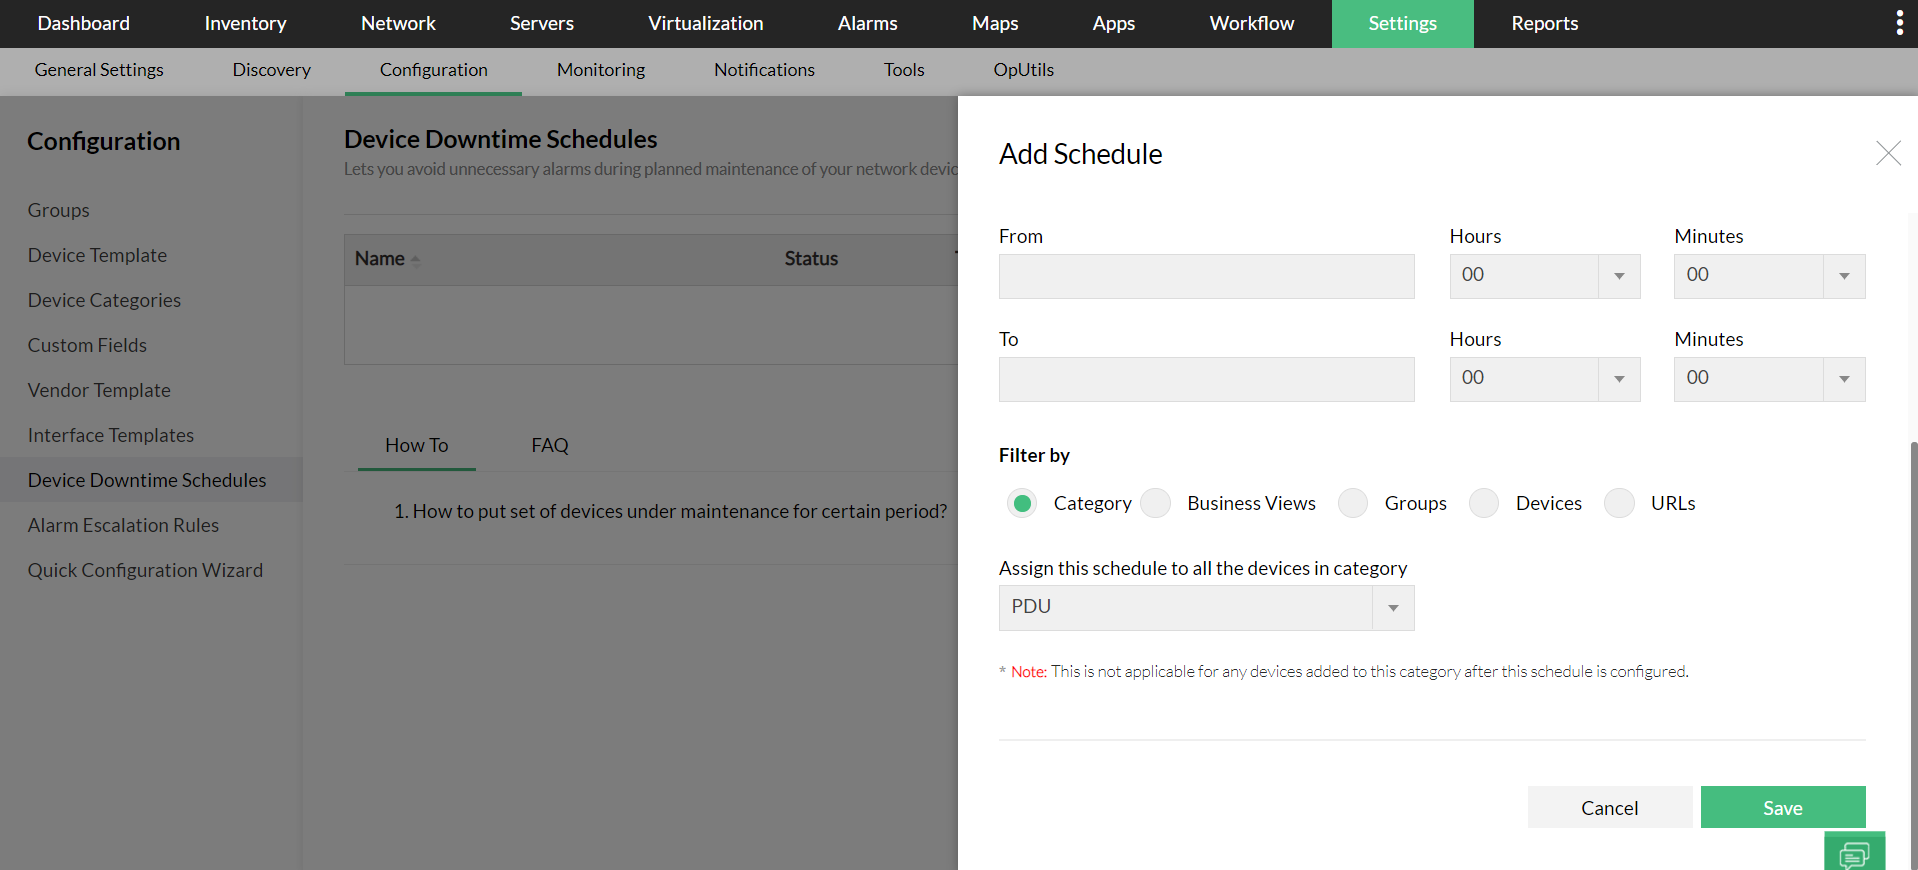
IT admins can now configure device downtime schedule for 'Groups' to prevent OpManager from polling those devices during maintenance for availability.
- Visit Settings -> Configuration -> Device Downtime Schedules.
- Click on 'Add Schedule'.
- Choose filter by 'Groups' after filling the relevant fields.
From version 128451, an option to sync Logical Groups created in the Central server to all Probe servers is provided in the UI. When creating or updating a group, you can choose to sync it from the Central server to all Probe servers. Once synced, this option cannot be reverted.< br/> This following section details the key functionalities and behaviour of group synchronization between the Central server and Probe servers
- If you haven't enabled group sync but attempt to assign a group to a user in the Central server, the associated groups will be automatically synced to all Probe servers.
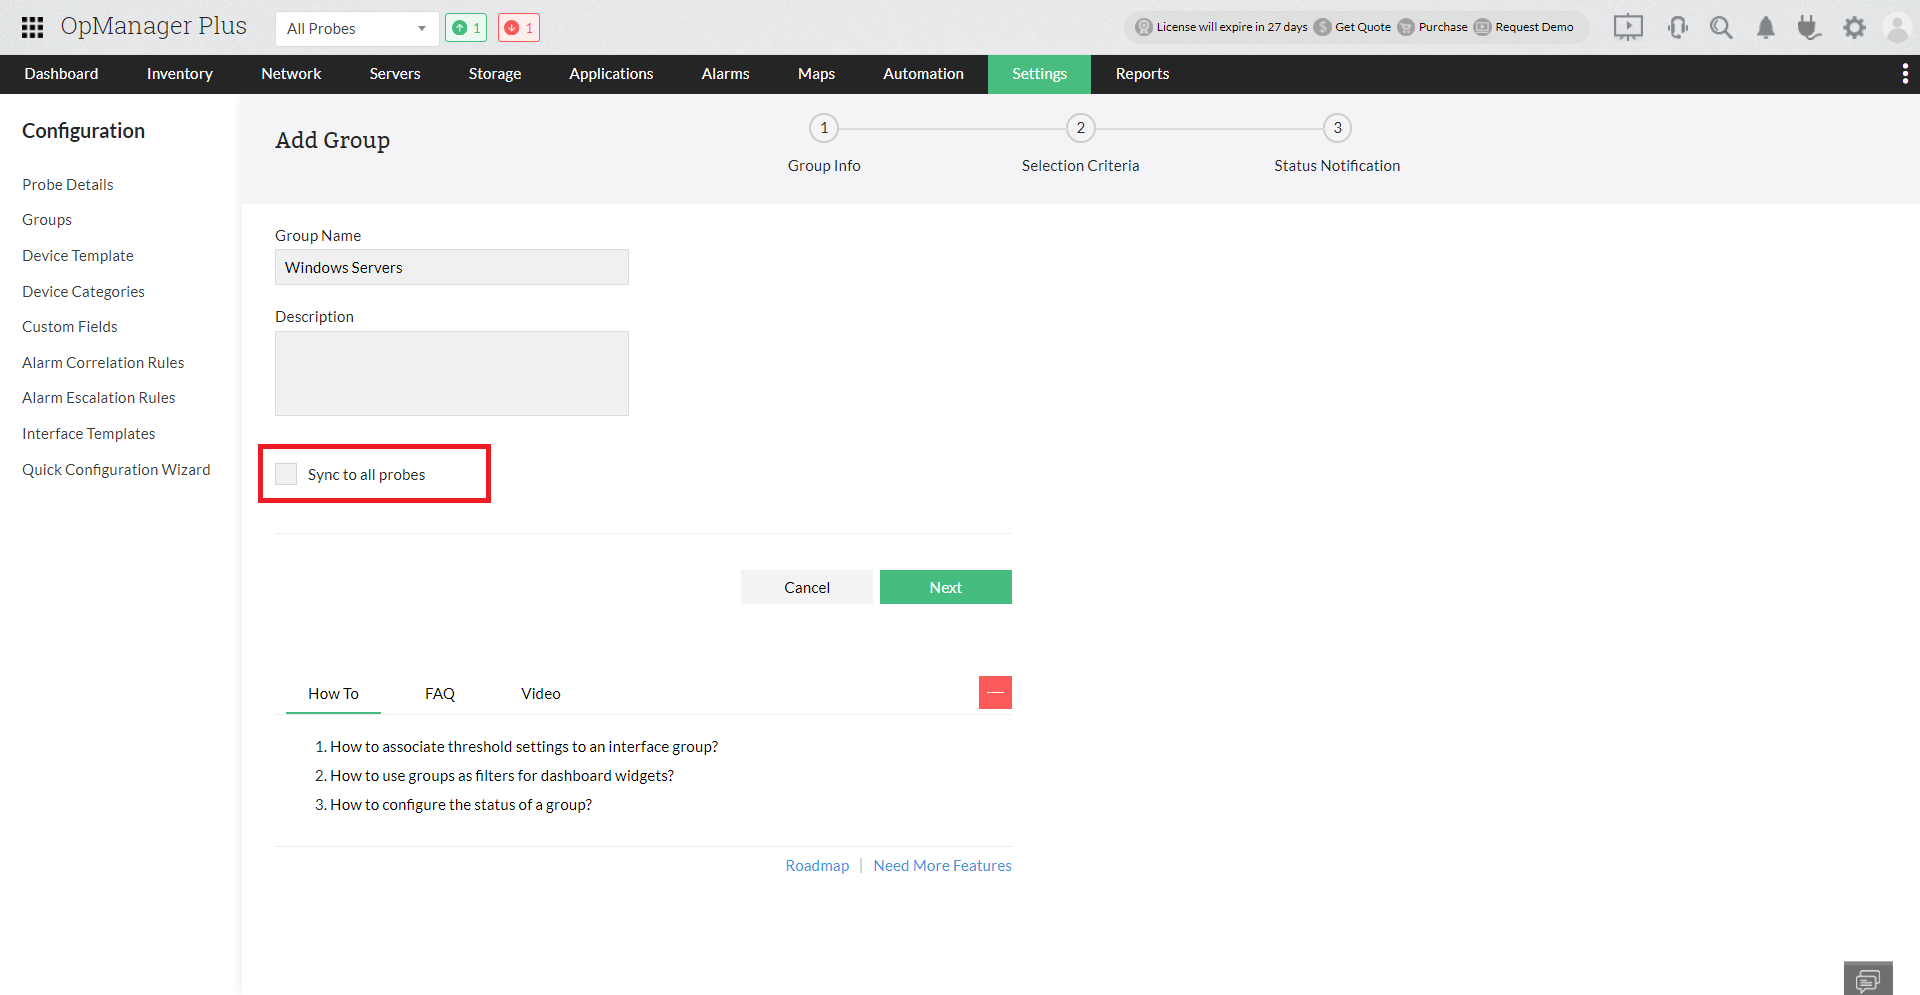
- Groups of groups can also be synced. Before syncing a parent group, all its subgroups will be synced to the Probe servers if they haven't been synced already.
- Synced groups will be marked with a "C" icon in the UI, similar to how it is in user management. While synced groups can be accessed in the Probe, options to edit, delete, or update the display name will be restricted.
- Synced groups can be linked to downtime schedules, reports, and widgets at the Probe level. If a group is deleted from the Central server, the synced group on the Probe server will revert to a normal group, allowing for modifications specific to that Probe.
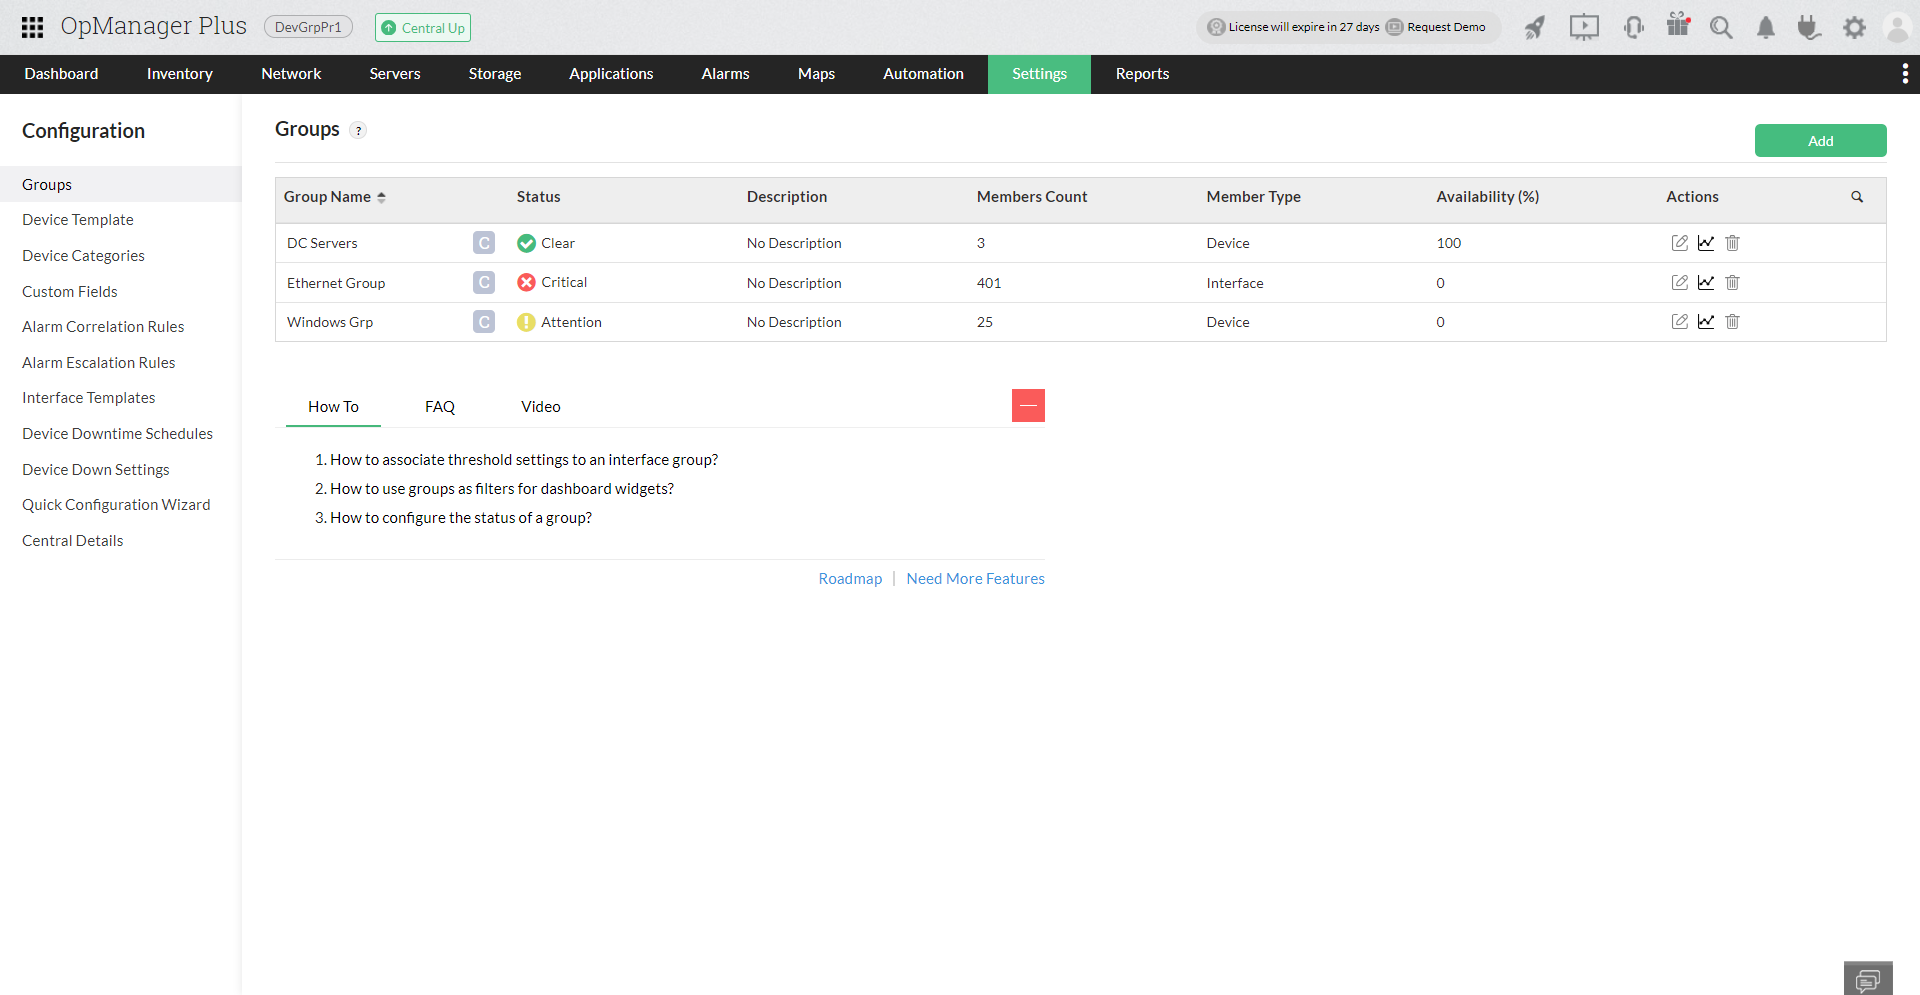
- Group sync will be performed for new Probe installations as well. Groups with zero devices or criteria filters will be created in the new Probes. Upon device discovery, these groups will be automatically updated in both the Central and Probe servers.
From version 128608, during the creation or update of a Logical Group, users can now choose to map the group to specific probes through a sync prompt.
How it works?
- Configure and click Save during group creation or update.

- A prompt will appear asking if you want to sync the groups to specific probes.
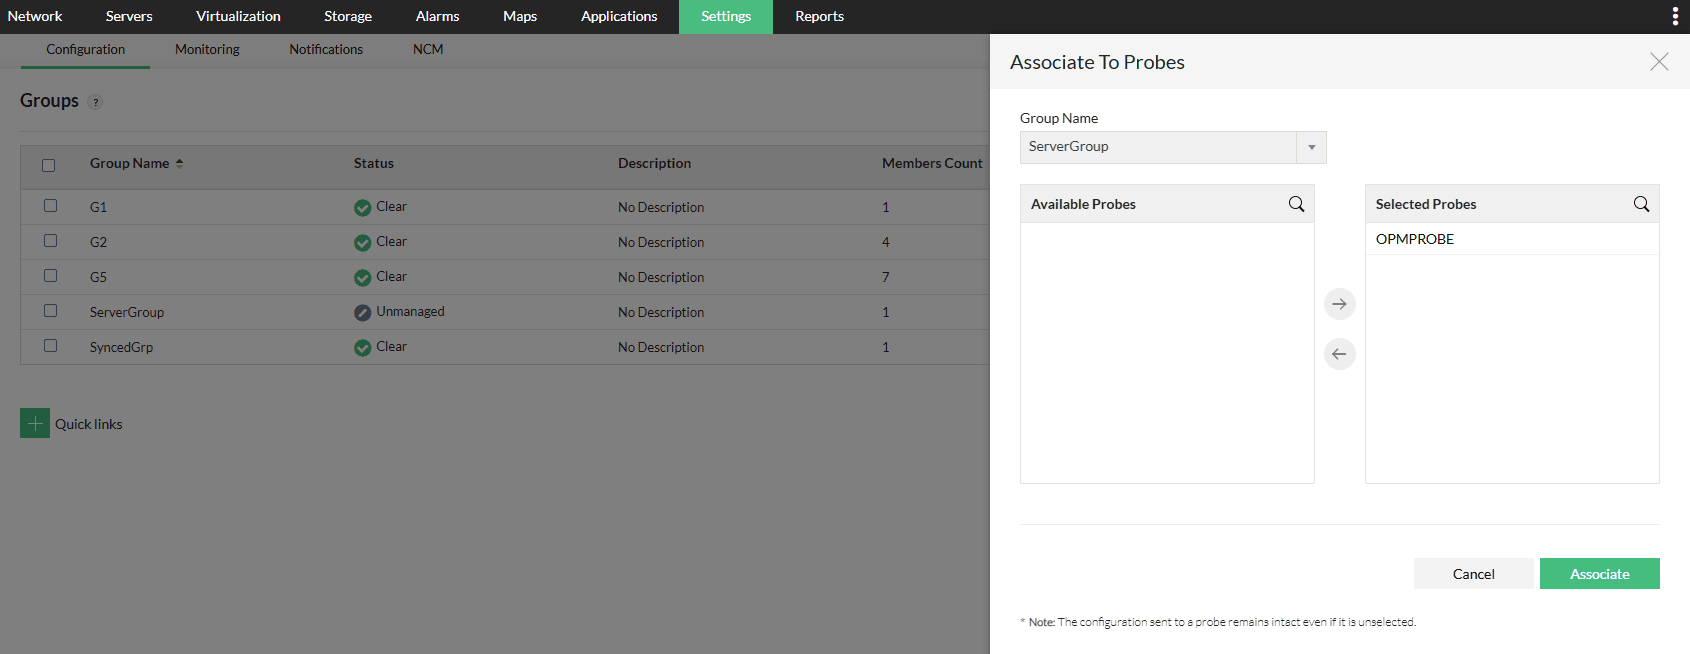
- Select the desired Probes and proceed to sync the configuration.
- Alternatively, you can skip syncing and push the group later using the Associate option.

NOTE:
- Newly added probes do not automatically receive groups synced via Specific Probe Sync.
- To associate them, use the Associate page after the probe is installed and connected.
- Groups marked as “Sync All” or associated with users will not appear for reassociation—they are already auto-synced.


