Remember the last time your manager requested an update on the status and specifics of the 10 laptops required for new hires? Without thorough documentation, tracking details (such as the vendor, delivery status, and cost), and other relevant factors can become quite challenging. This is where purchase orders prove invaluable. Especially if you can generate and manage purchase orders directly from your IT service and asset management system, it can significantly enhance transparency and reduce discrepancies.
In this article, we’ll walk you through the essential steps to create a purchase order (PO) in ServiceDesk Plus to meet your organization’s IT purchasing needs.
A PO is an official document that signifies a buyer's intent to purchase IT and non-IT assets from a vendor or supplier. A PO describes in detail the specifics of a transaction, from item descriptions to payment terms. Generally, a PO includes the following information.
| PO number | A unique identifier for the PO, which helps in tracking and record-keeping. |
|---|---|
| Date | The date when the PO was created. |
| Supplier information | The supplier’s name, address, and contact details. |
| Buyer information | The buyer’s company name, address, and contact details. |
| Itemized list of products/services | A detailed description of each item or service requested. These could be workstations, software licenses, MSP services, etc. |
| Quantities | The number of items required. |
| Prices | Unit prices and the total cost (including taxes, if any). |
| Delivery dates | Expected delivery dates for the goods or services. |
| Payment terms | The agreed terms for payment, such as 90 days. |
| Cost center | The cost center incurring the expense of the PO. |
Beyond its foundational role in facilitating purchasing, the PO holds significant implications in IT service management (ITSM), particularly with IT asset management (ITAM). Integrating the purchase management process with ITAM enhances the visibility of assets from the moment of purchase. Additionally, an integrated purchase module with accurate POs enables IT service desk administrators to adjust their SLAs based on the delivery timelines of various assets. It also streamlines workflows, enhances budgeting and forecasting accuracy, and optimizes IT investment decisions.
The purchasing process begins with a purchase request and concludes once the requested item has been purchased and delivered to the requester. Below is an illustration of the purchase workflow (Fig. 1) from ServiceDesk Plus. Creating a PO is an integral part of purchase management. Before initiating the creation of a PO, consider factors such as existing IT asset inventory levels and operational requirements. Subsequently, confirm the availability of a sufficient IT budget for the intended purchase to prevent any instances of overspending by your organization.
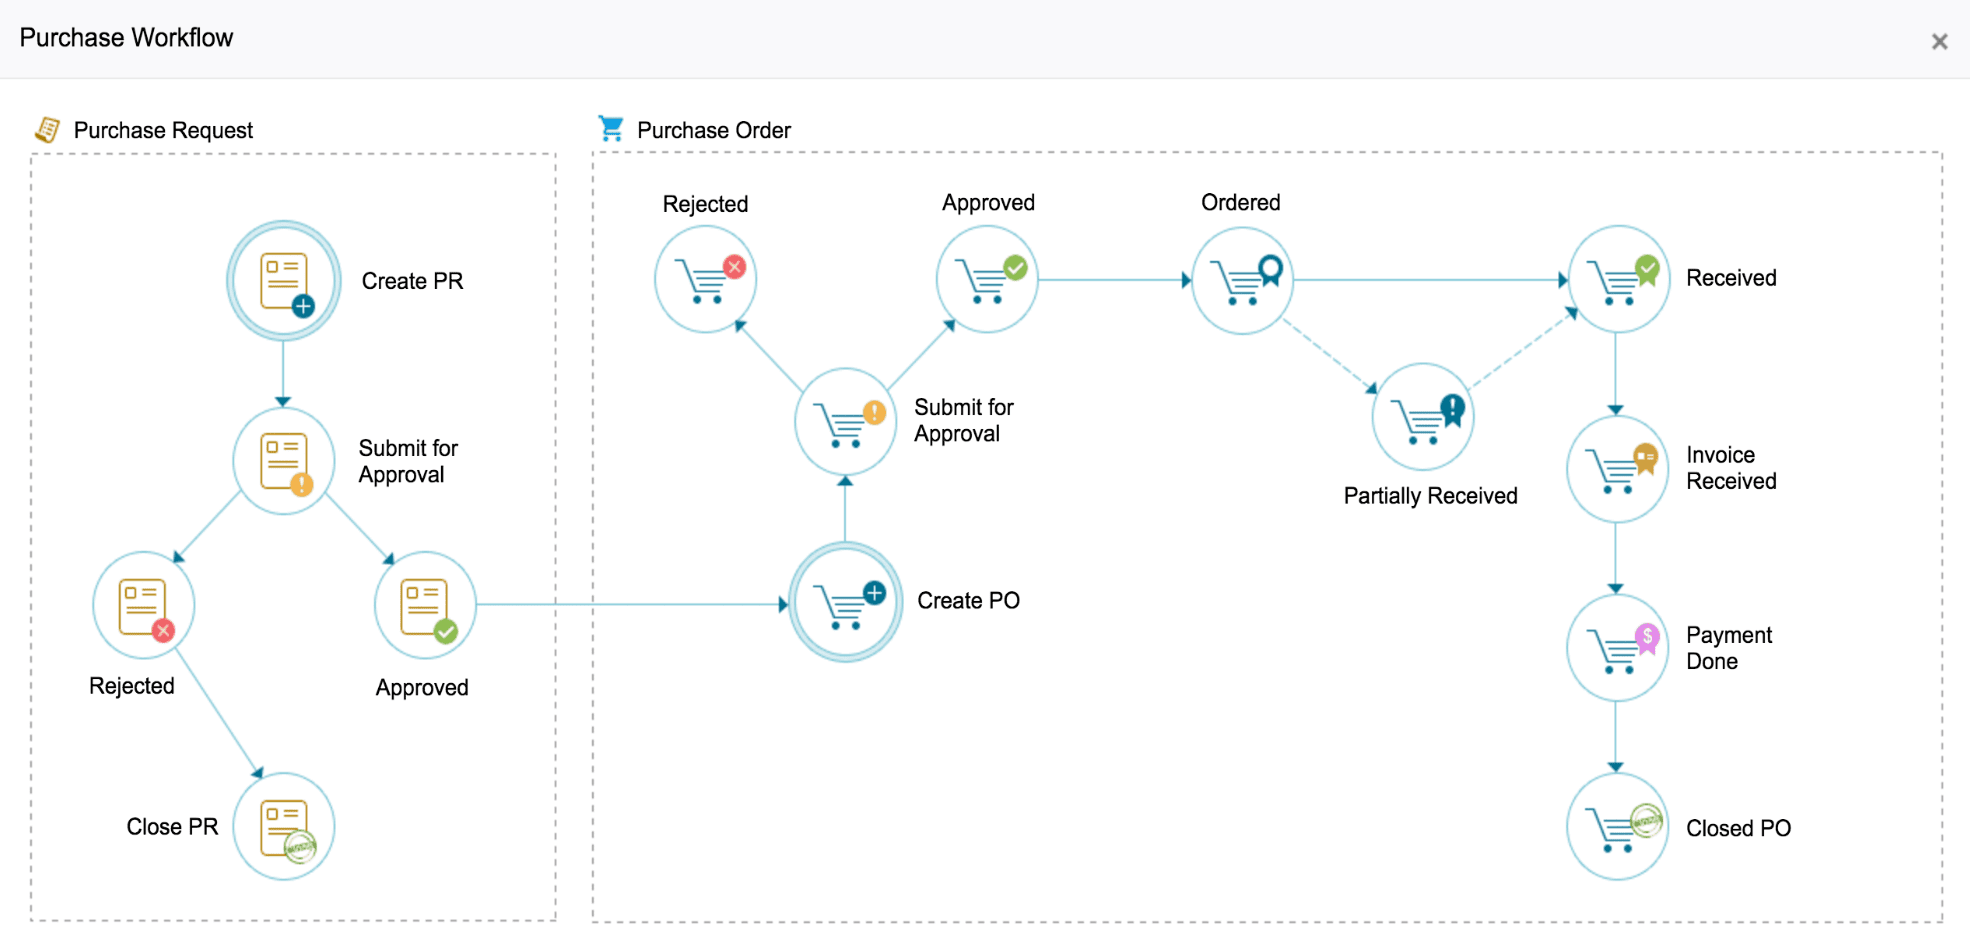
Figure 1: Purchase workflow in ServiceDesk Plus.
- Understanding your requirements lays the groundwork for a well-executed PO. Start by identifying the IT assets and services needed.
- Next, create a new PO by specifying all the required details or by using a PO template that captures all the necessary information, such as vendor details, item descriptions, quantities, prices, delivery schedules, and terms. Using PO templates streamlines the process, enabling efficient creation and tracking of POs.
- Before finalizing the PO, carefully review item descriptions, quantities, prices, and other details for accuracy. Then, obtain approval following your organization’s processes to authorize the purchase.
Having these POs in place enables you to keep records for future reference. Beyond auditing and reporting purposes, these records allow you to monitor spending, delivery statuses, and vendor performance effectively.
At Zylker Inc., a large-scale onboarding of 100 new hires begins with an onboarding request detailing the essential IT assets, services, and materials required, including laptops, software licenses, and office supplies. This request is submitted as a service request ticket in ServiceDesk Plus.
Upon receiving the request, the admin identifies that 20 laptops are unavailable. To address this, the admin decides to create a PO for the vendor, ensuring a smooth and efficient acquisition of resources to facilitate the onboarding process. Now, let's see how Zylker creates and generates the PO using ServiceDesk Plus.
The purchase process in ServiceDesk Plus streamlines the procurement of necessary products and services. It seamlessly integrates with the asset management system, enabling you to set up and store vendor details, including their products and price quotes. This information aids in vendor selection by allowing price comparisons when generating a PO.
Let's take a quick look at the step-by-step process.
Step 1: ServiceDesk Plus enables technicians to swiftly generate accurate POs by utilizing PO templates (Fig. 2). These templates capture essential details, including vendor information, item descriptions, quantities, and costs.
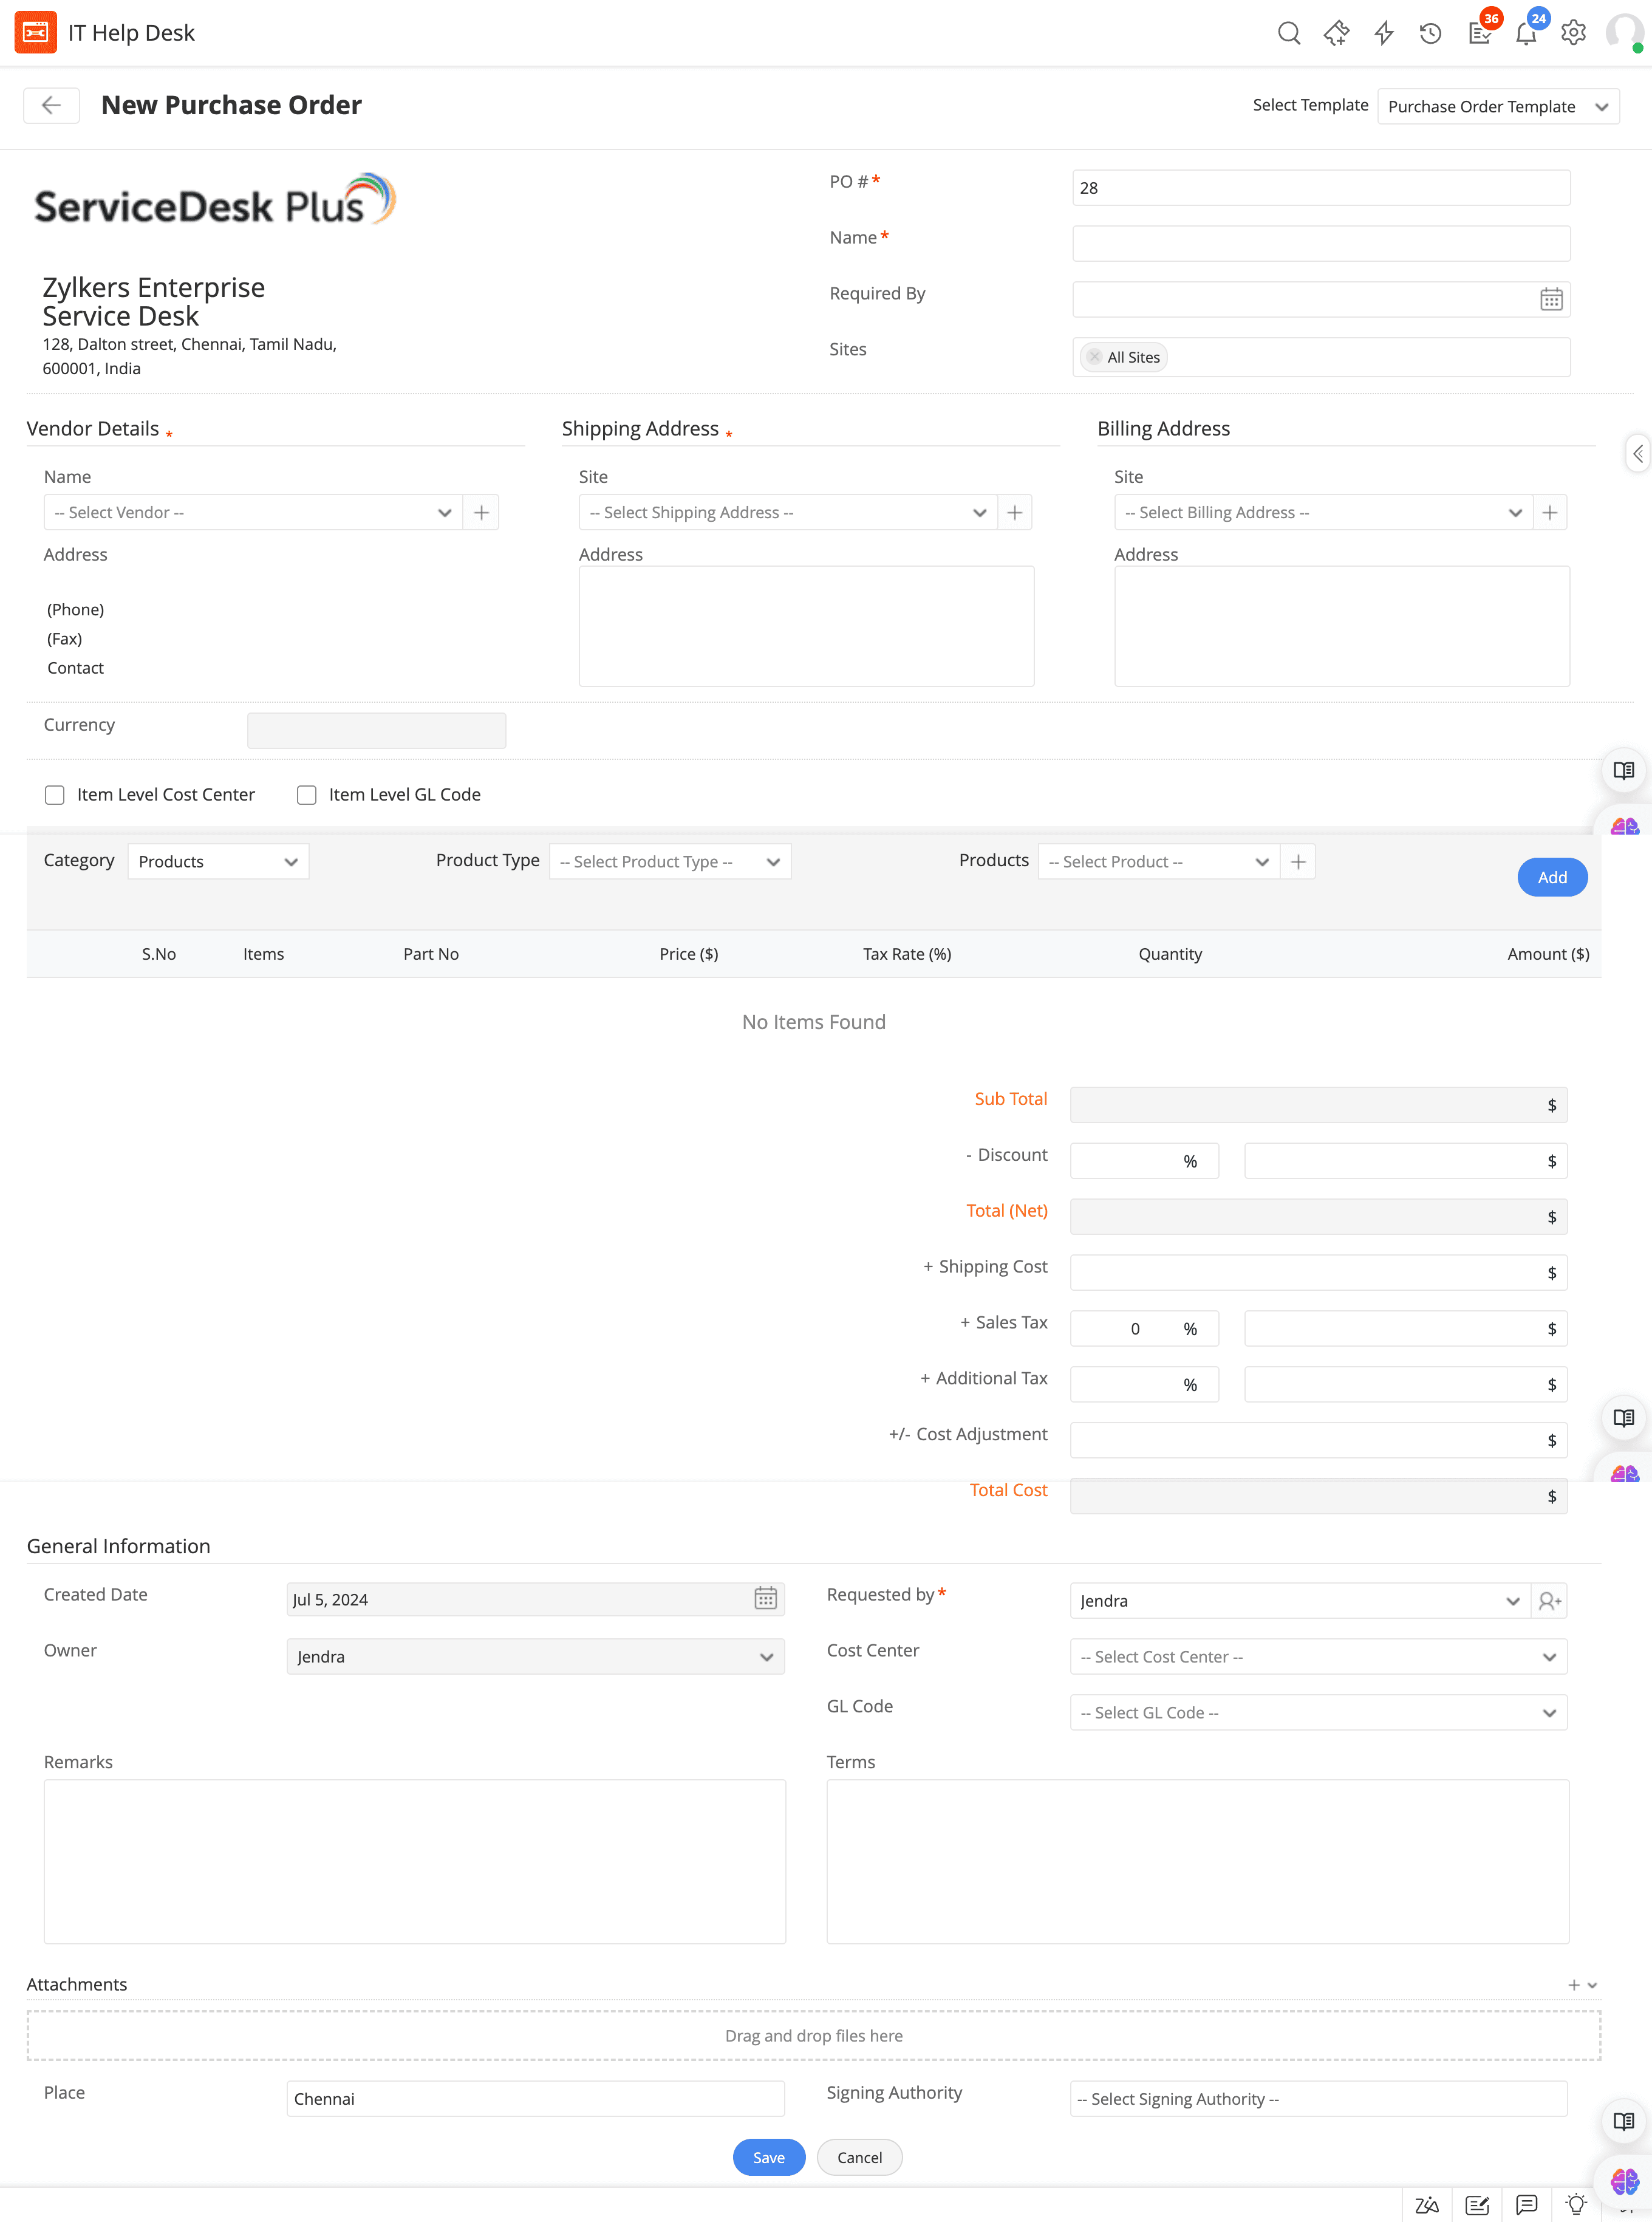
Figure 2: The PO template in ServiceDesk Plus.
These templates allow technicians to quickly log POs (Fig. 3) without having to start from scratch each time. By leveraging these pre-built templates, you can streamline your purchasing process and maintain consistent, accurate records.
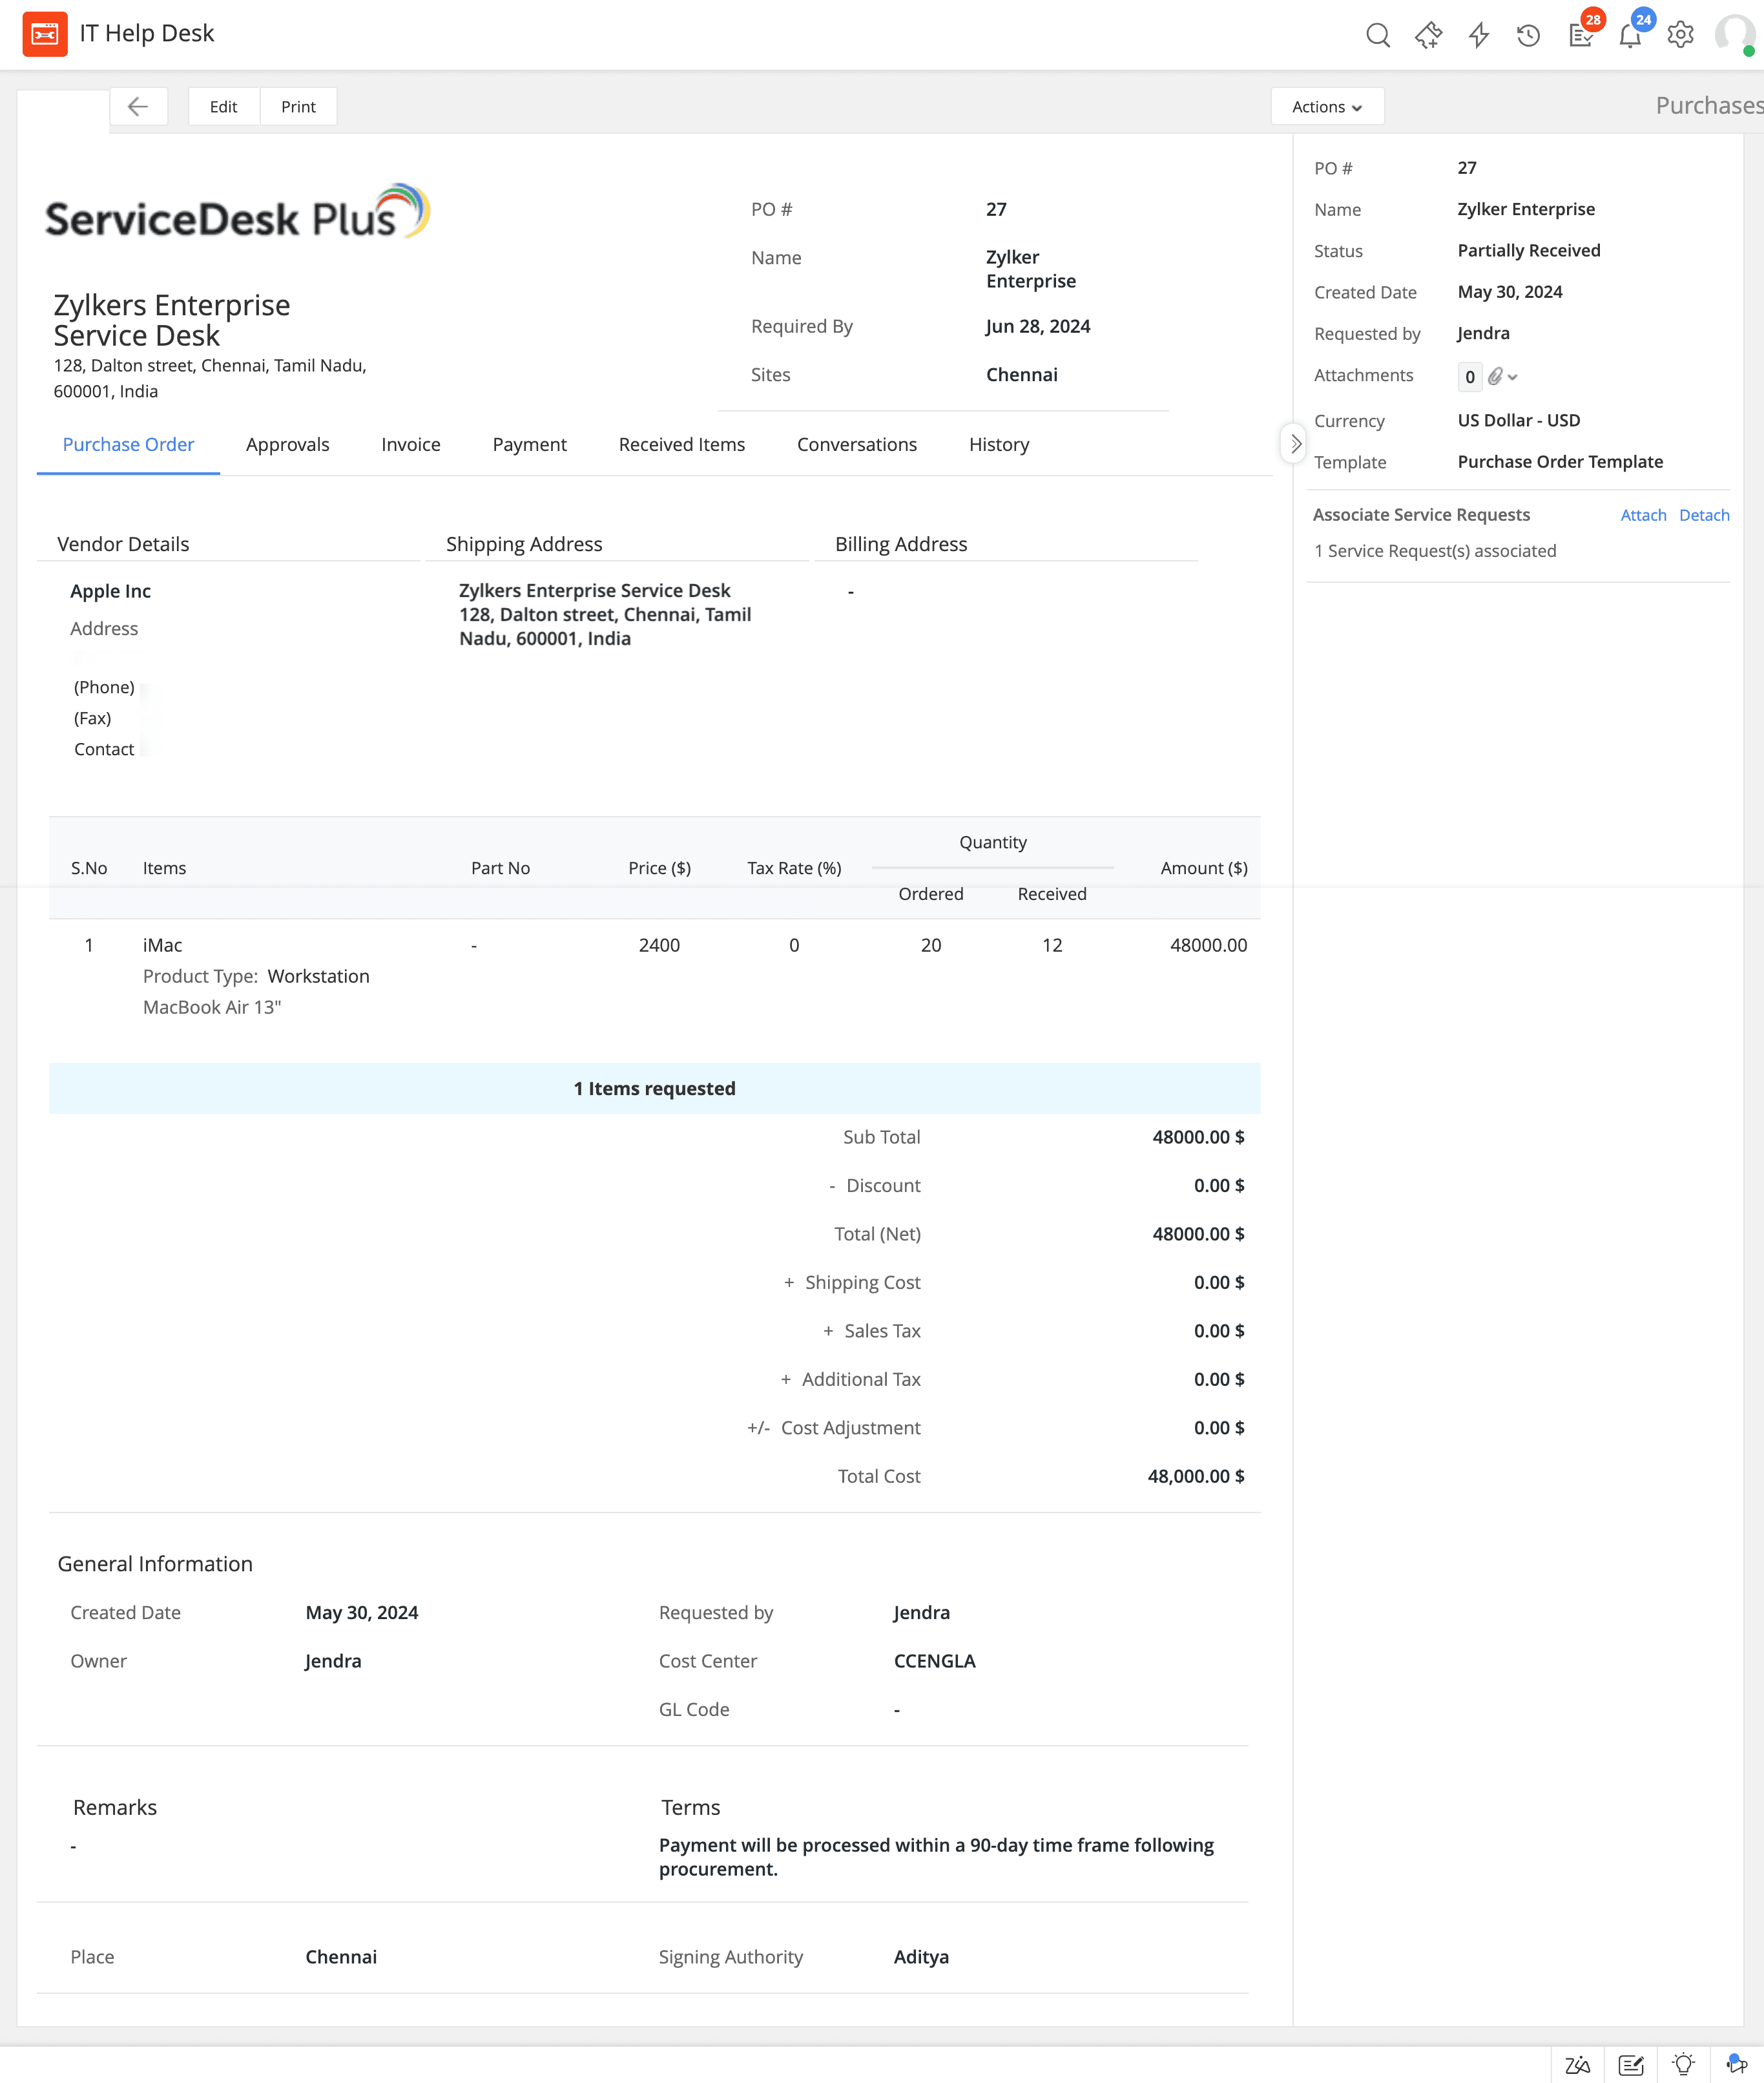
Figure 3: Generating a PO using a template in ServiceDesk Plus.
Step 2: The PO undergoes a structured multi-stage approval process (Fig. 4), ensuring that the right personnel are involved at each step. An automatic approval notification is sent to the approvers upon the creation of the PO.
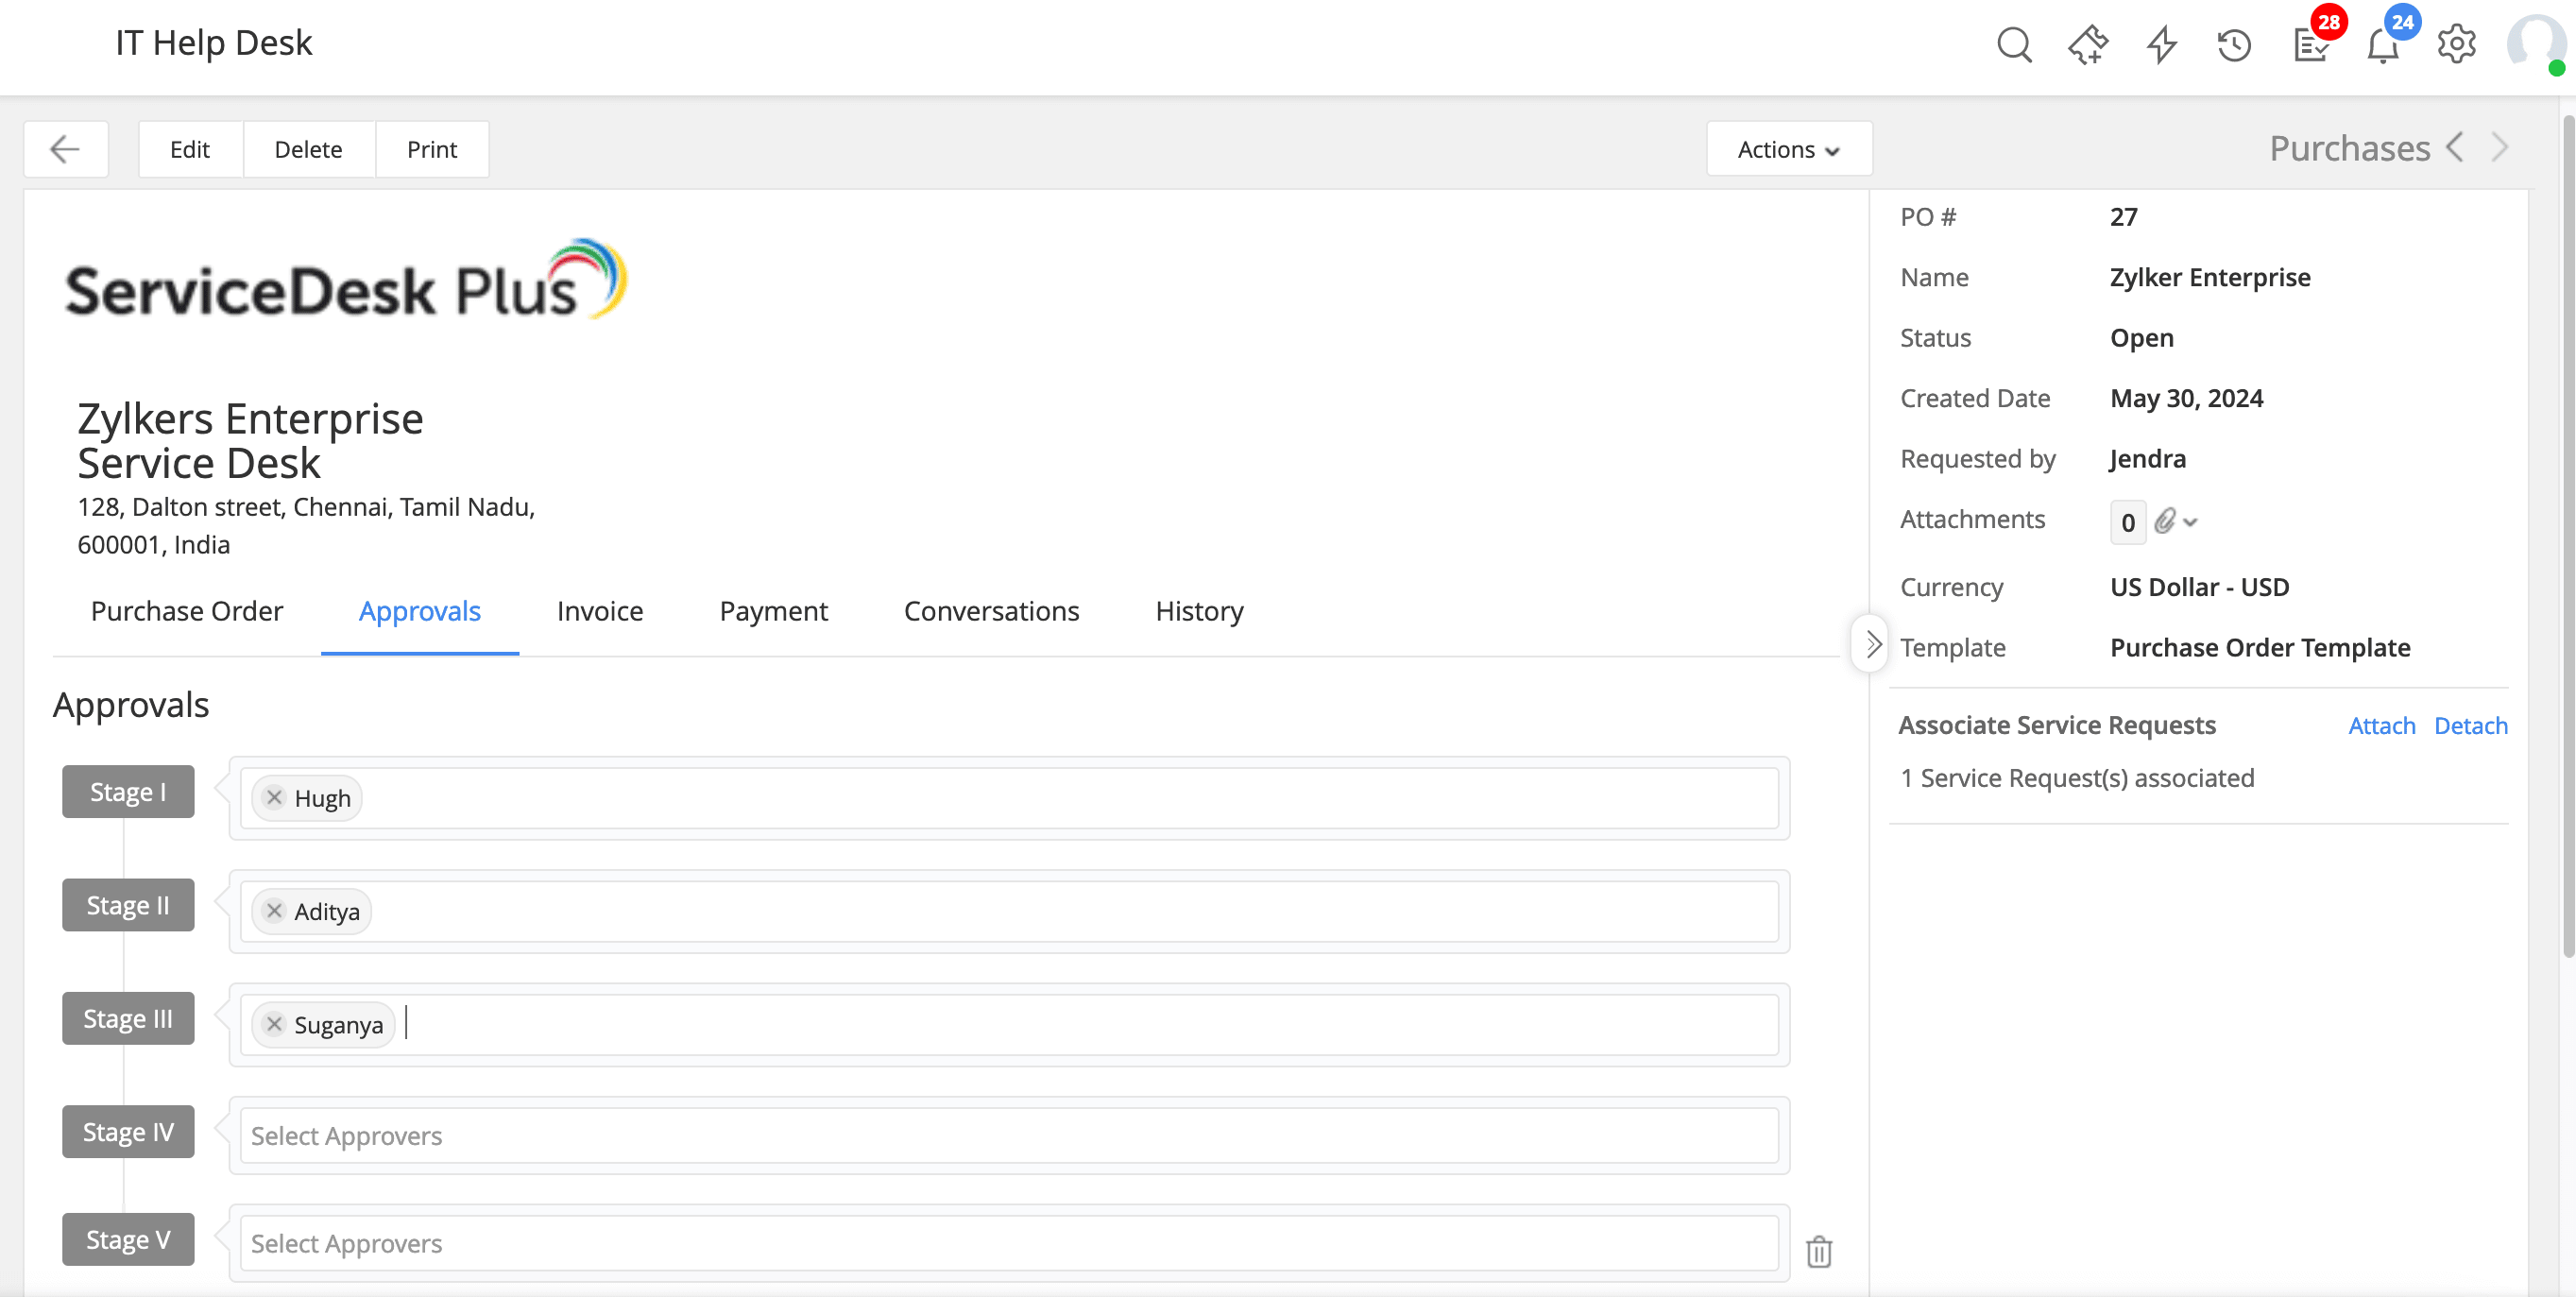
Figure 4: Multi-stage approval process.
Step 3: Once the PO is approved, the technician can link the PO to the service request ticket (Fig. 5). This association makes it easier for the purchasing teams and the service delivery teams to collaborate better, leading to enhanced service experiences.
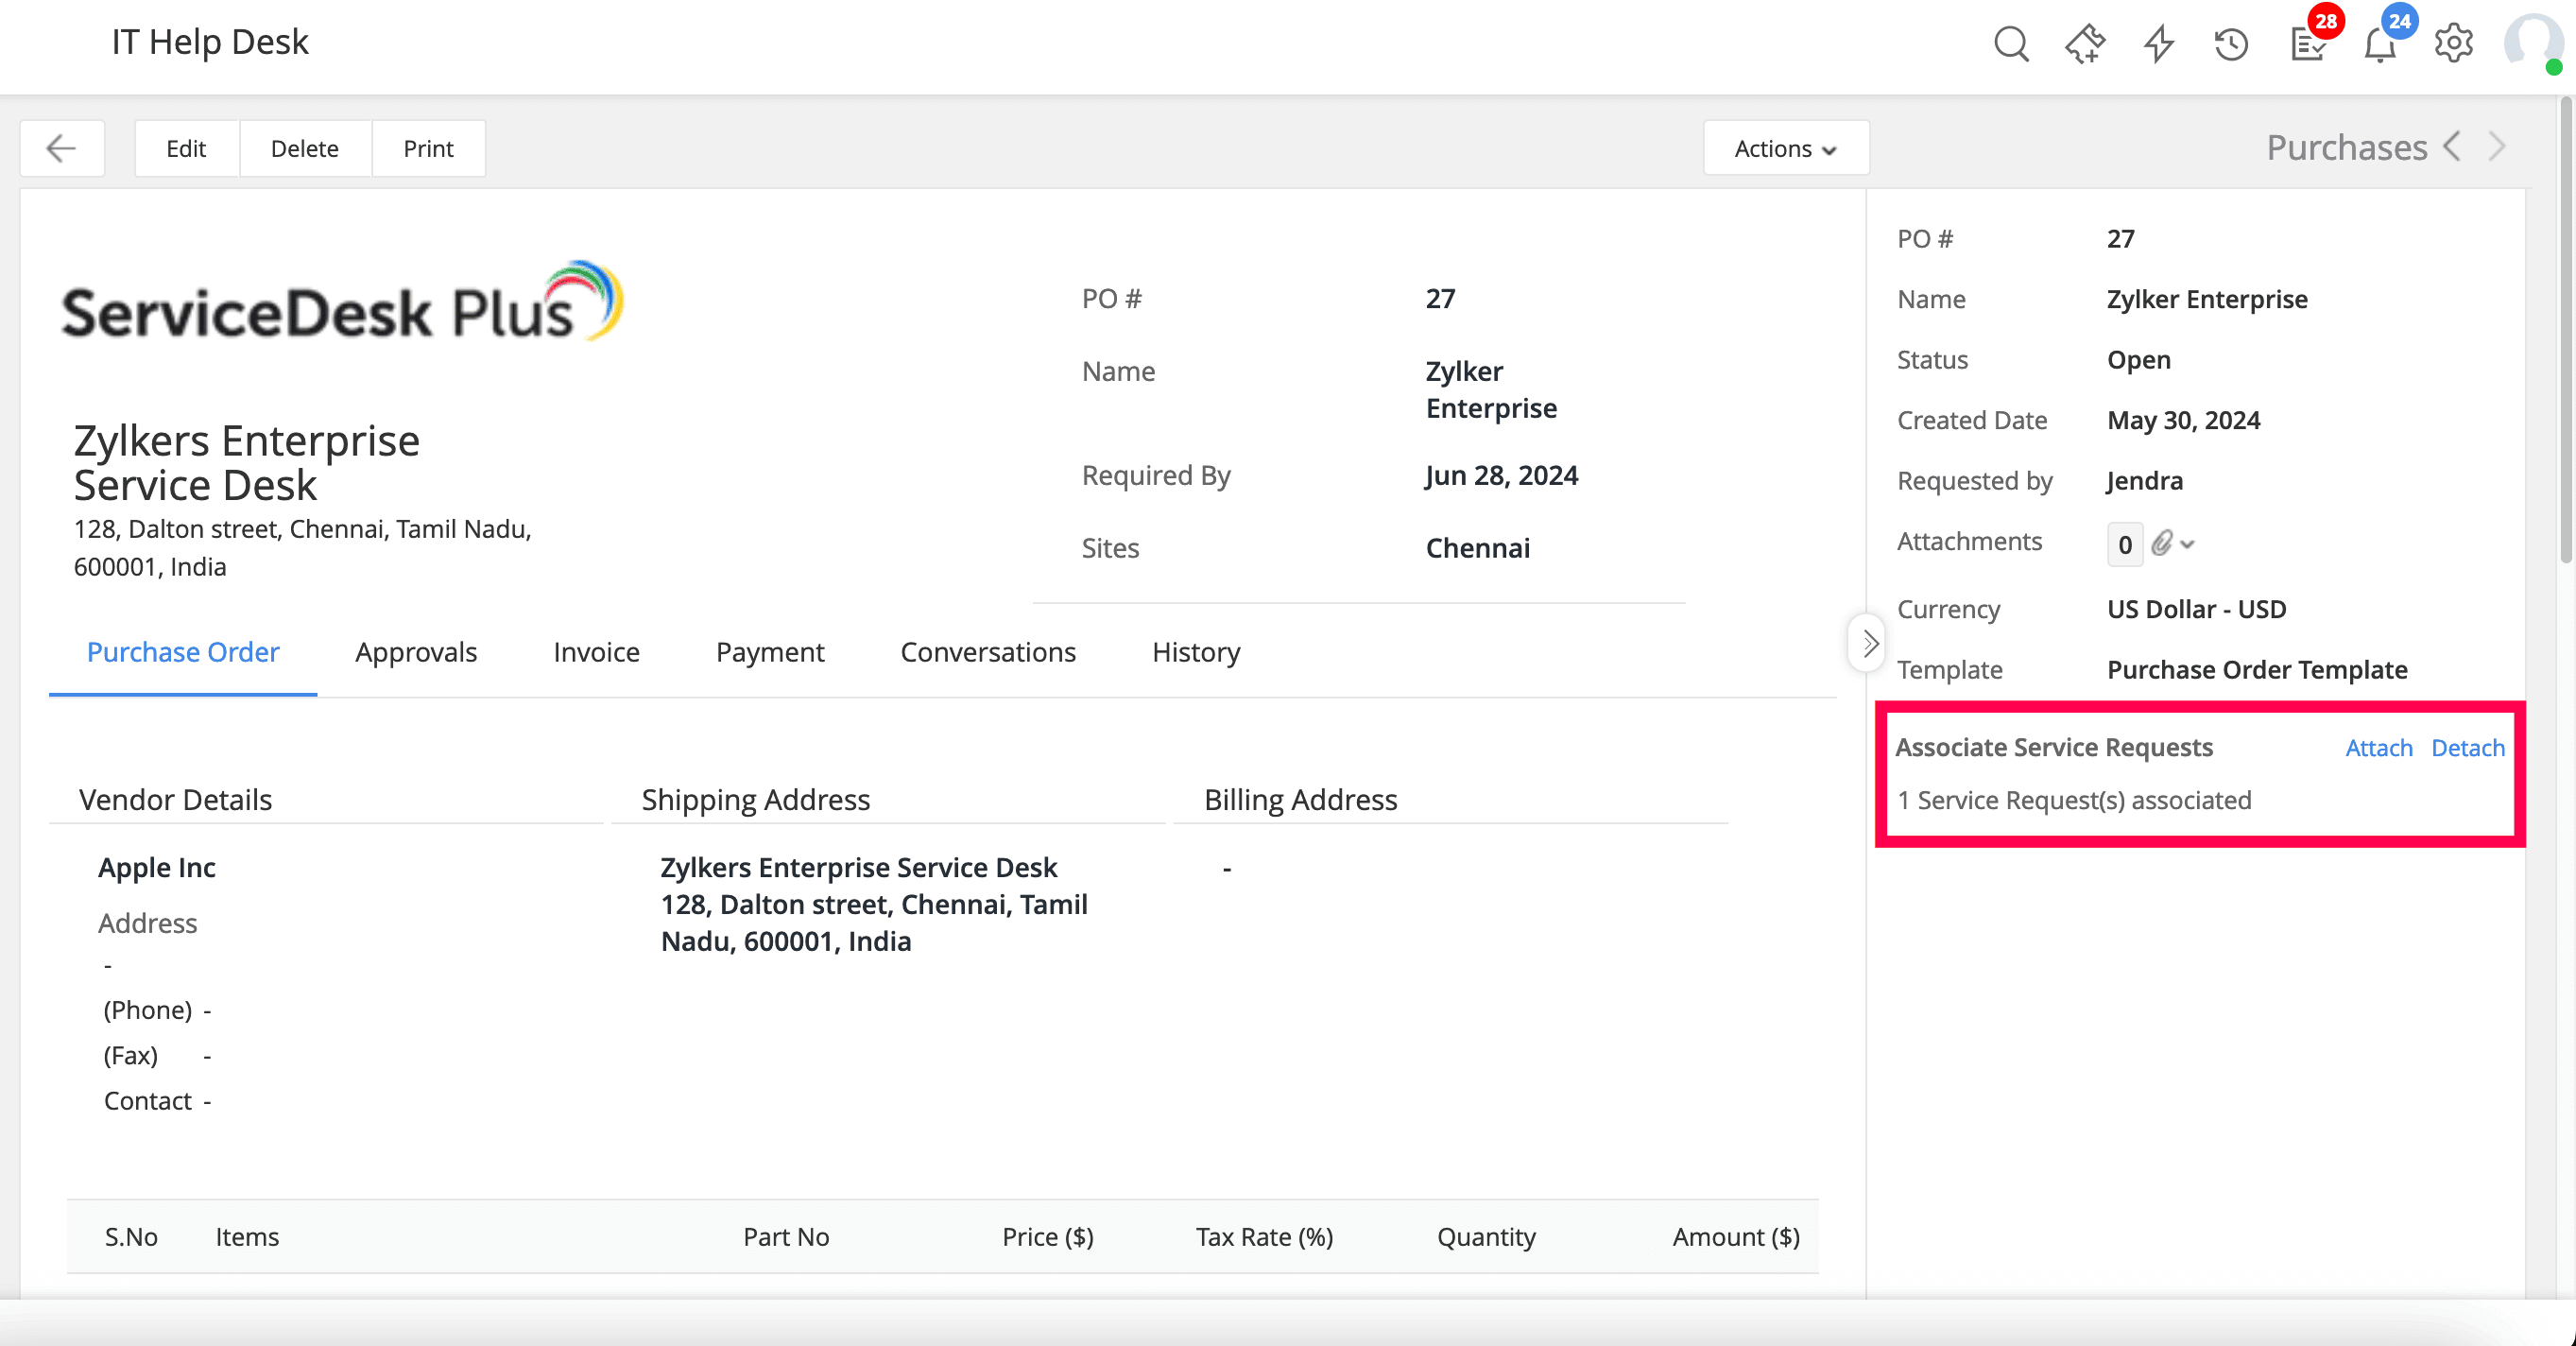
Figure 5: Linking the PO to the service request.
Step 4: The PO is then sent to the vendor via the email option (Fig. 6) available within ServiceDesk Plus. Then the vendor processes the order and sends the invoice.
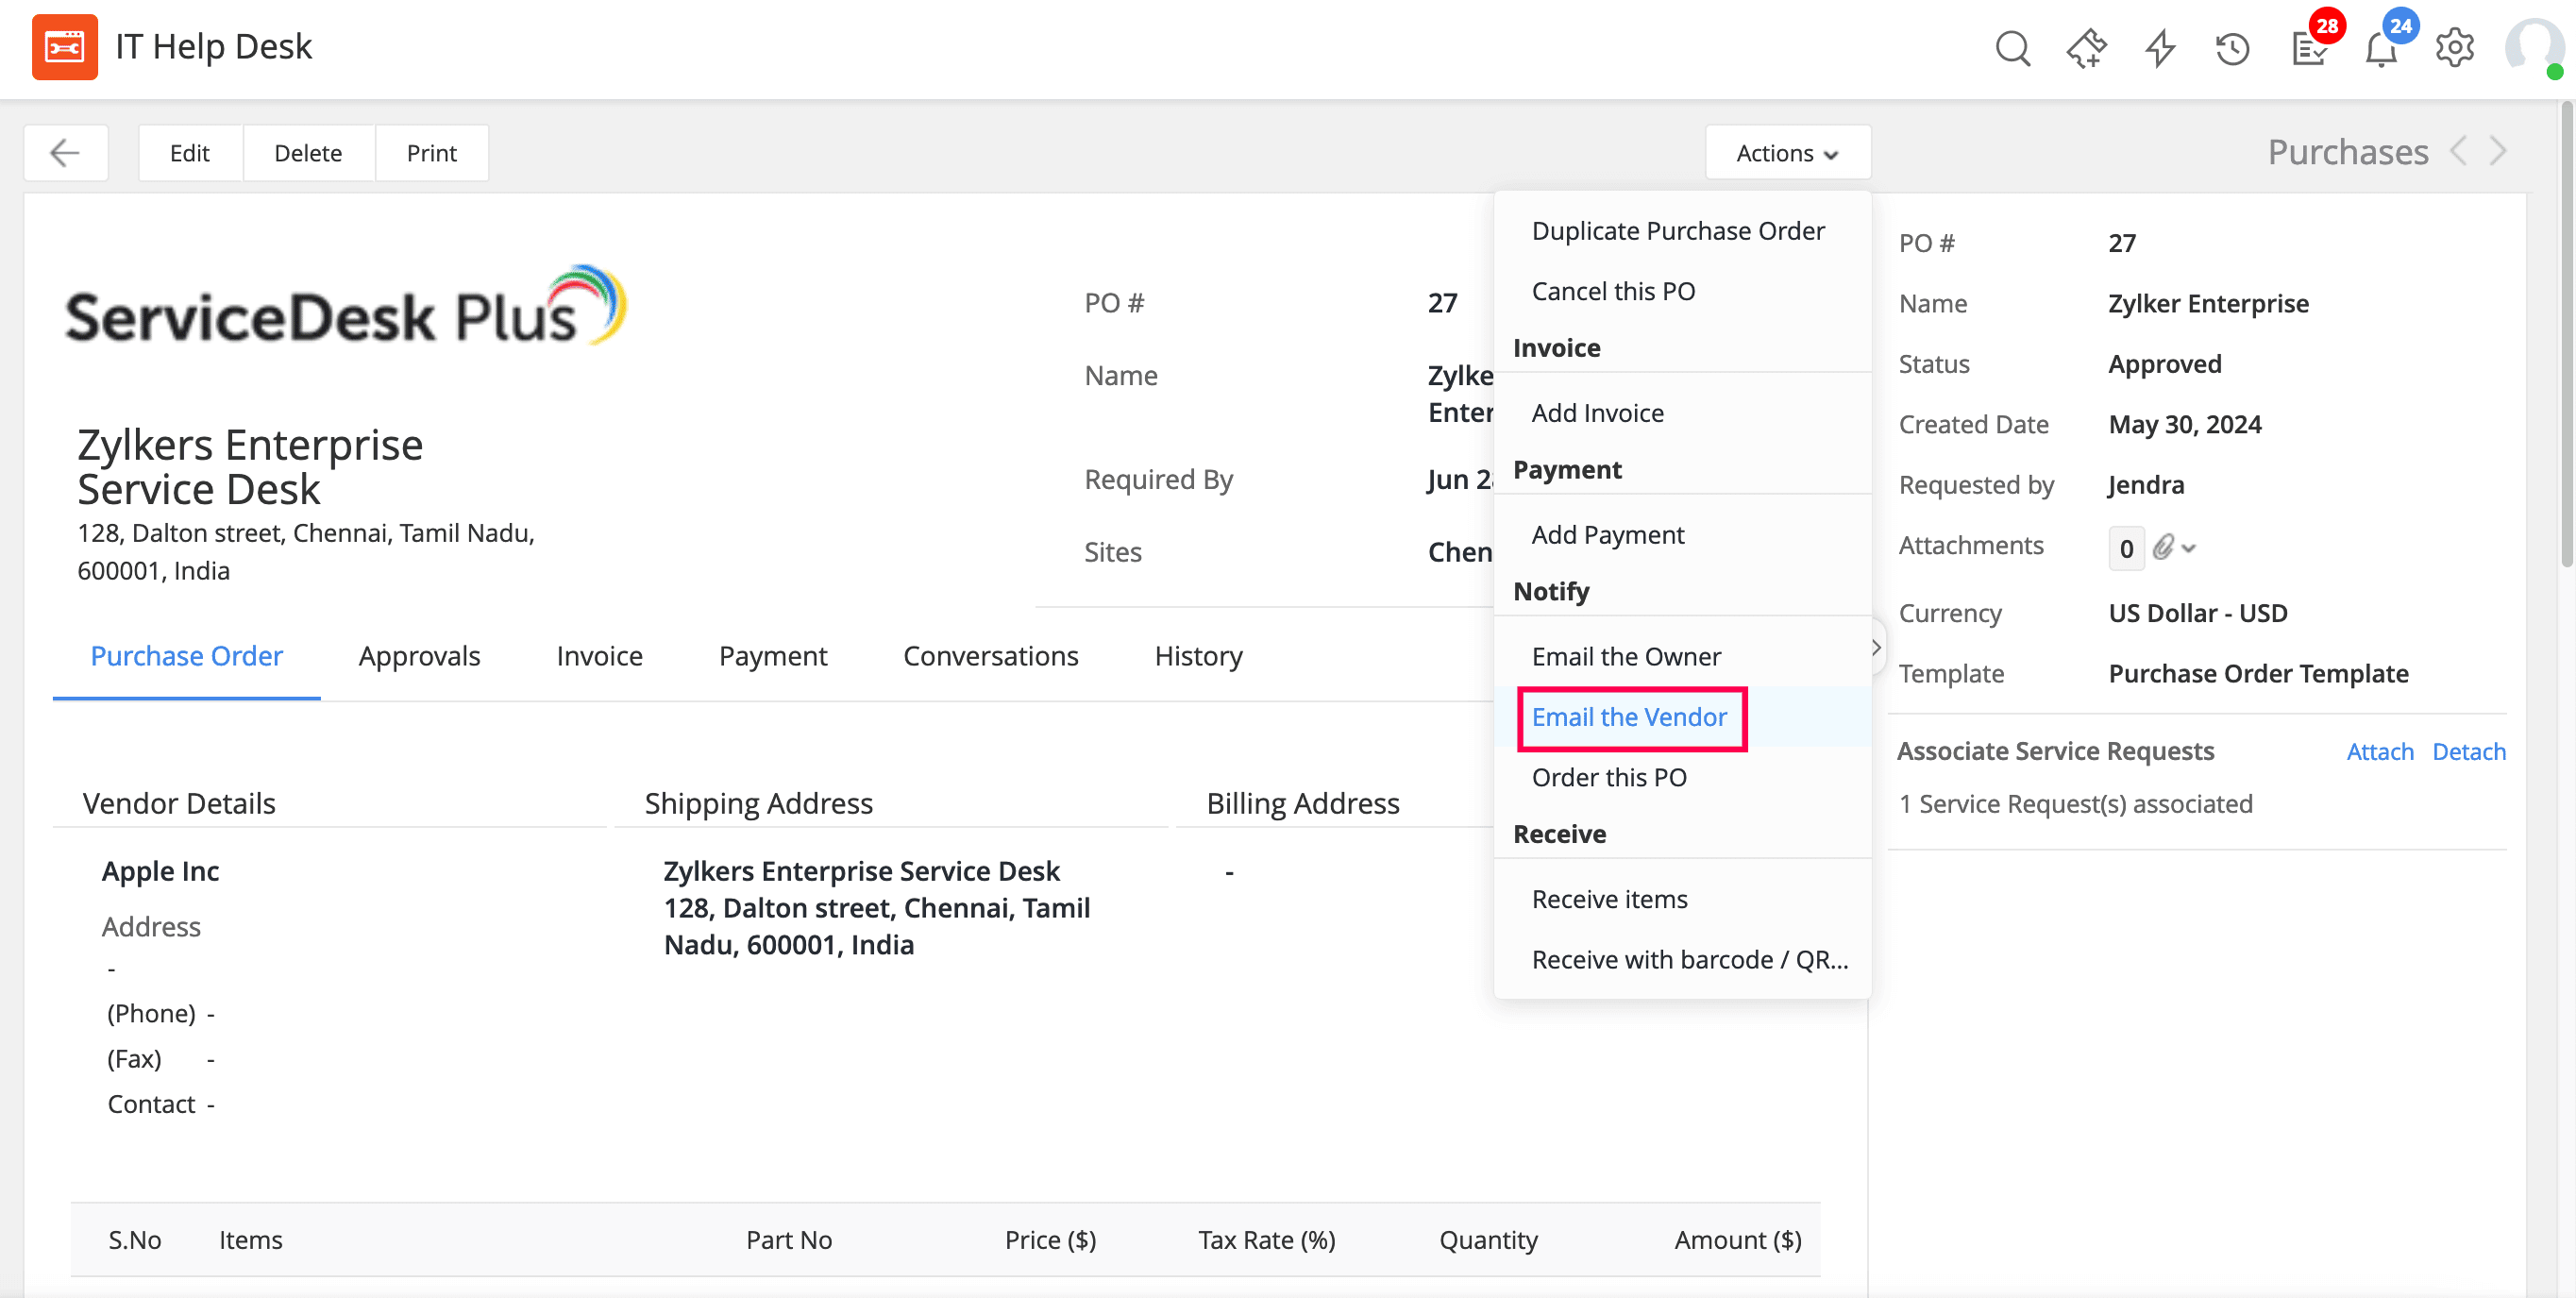
Figure 6: Sending the PO via email to the vendor.
Step 5: Now, the invoice received is verified and appended to the approved PO (Fig. 7).
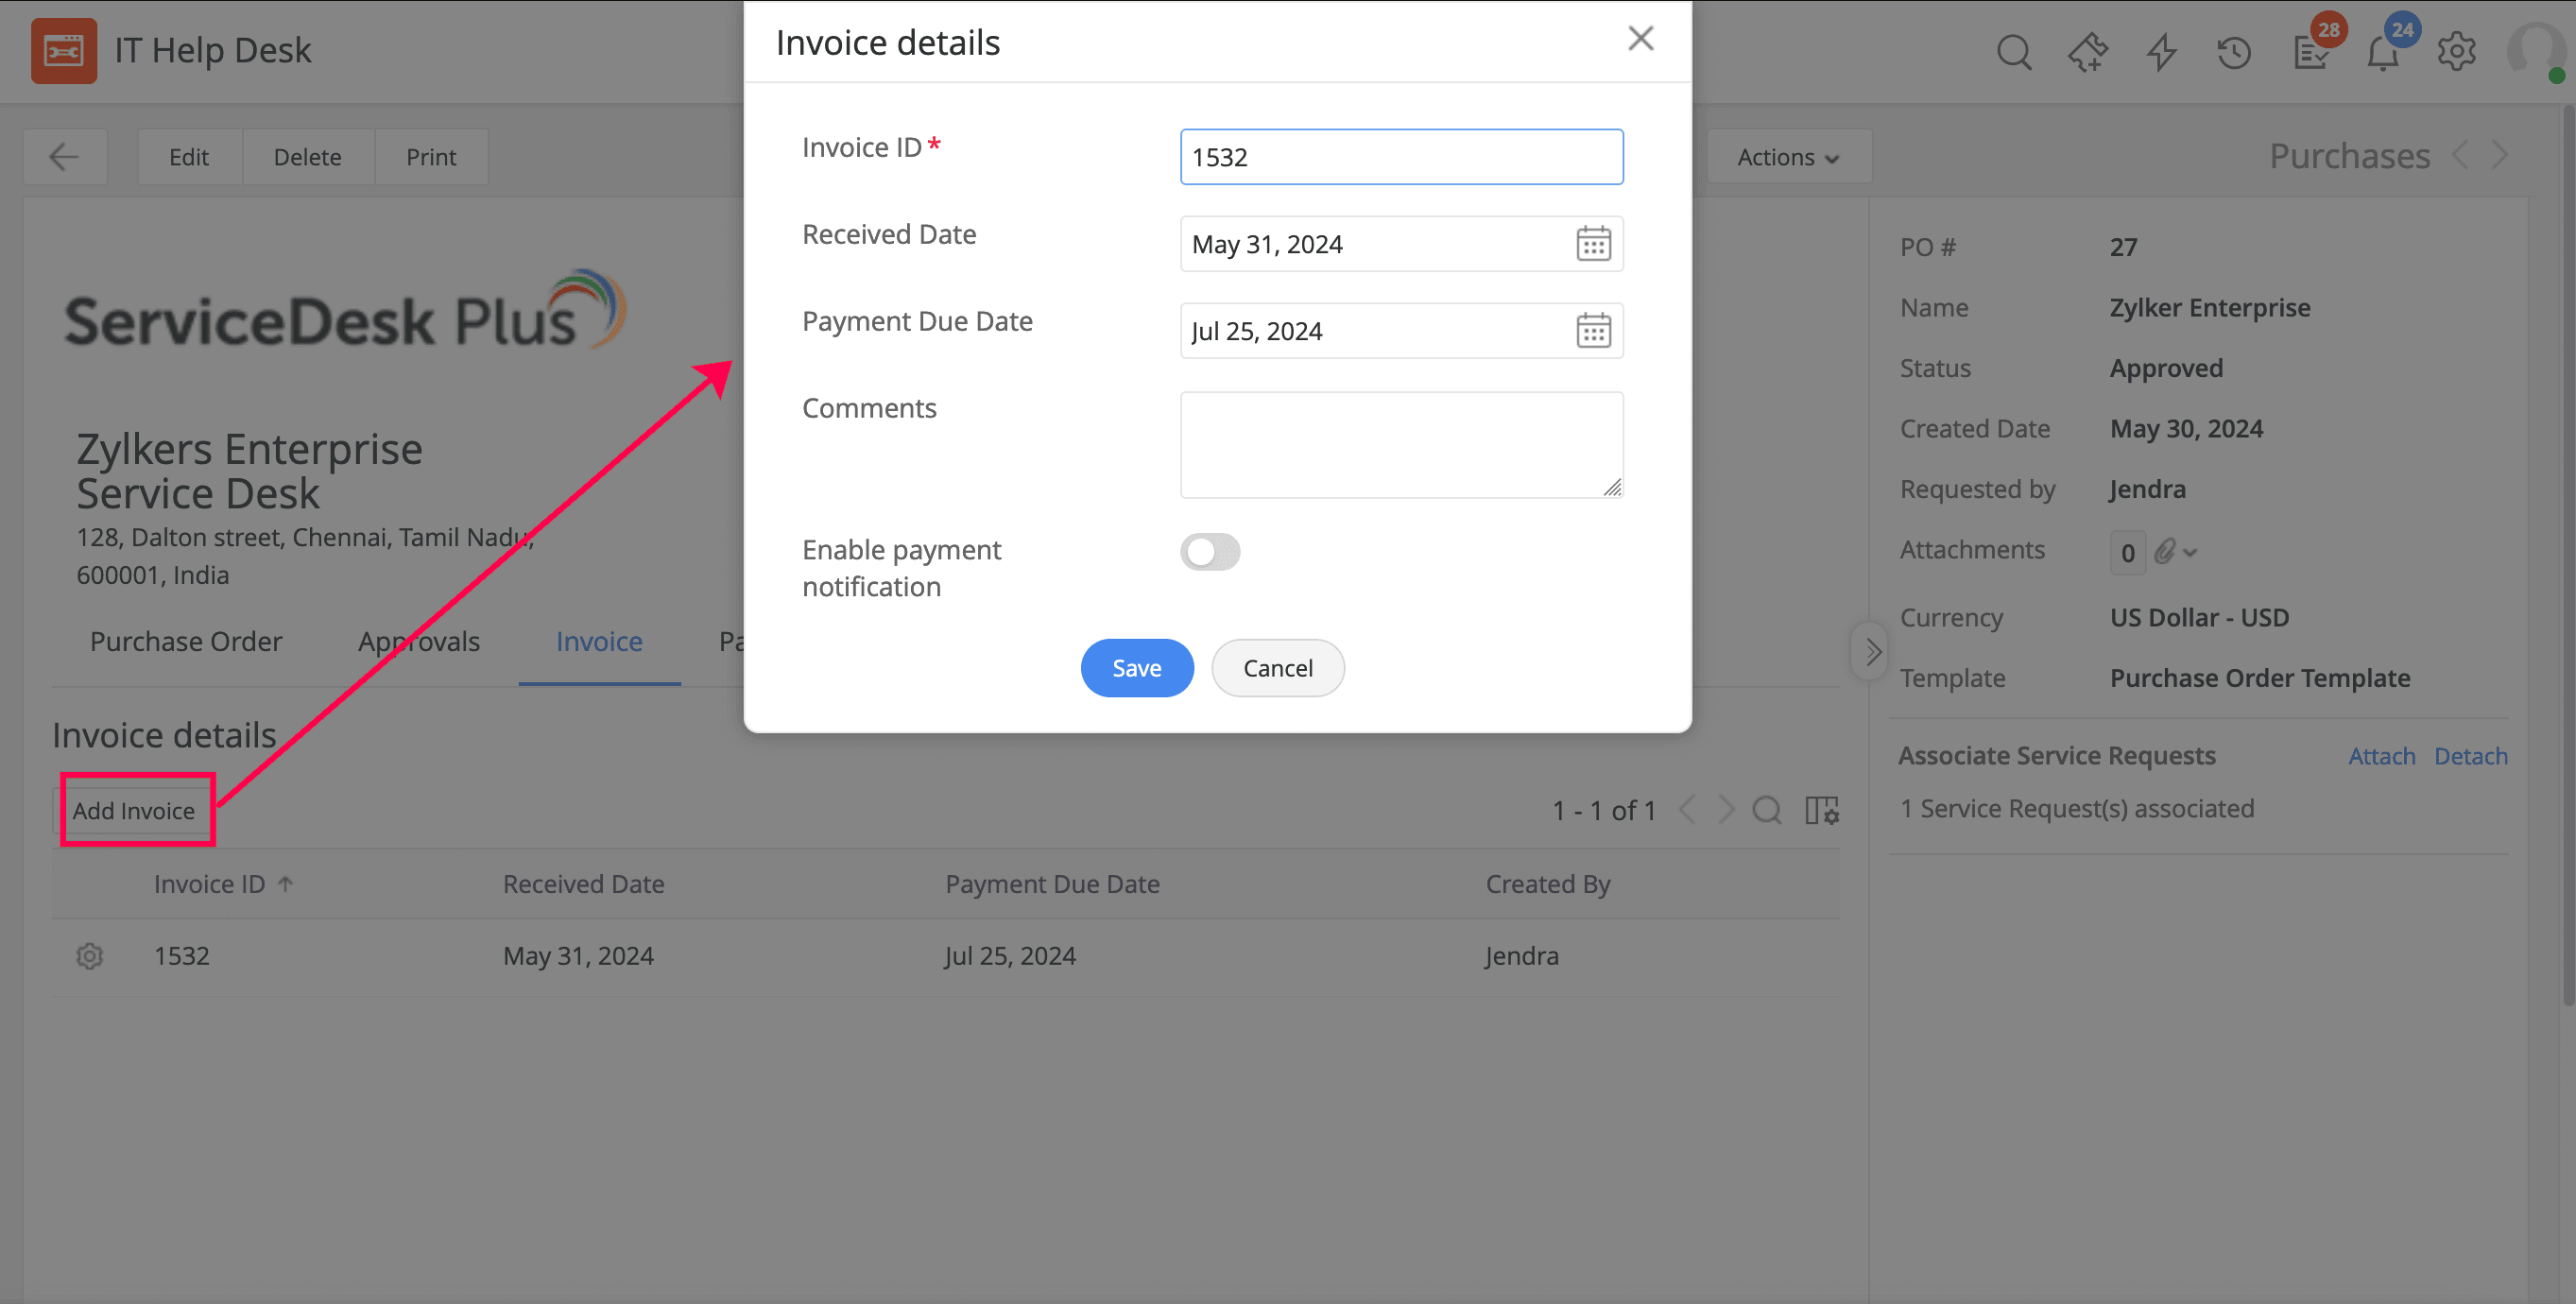
Figure 7: Recording invoice details within the PO.
You can also add the payment details and enable payment notifications (Fig. 8) to inform a designated list of technicians and set alerts to remind them of the upcoming vendor payment.
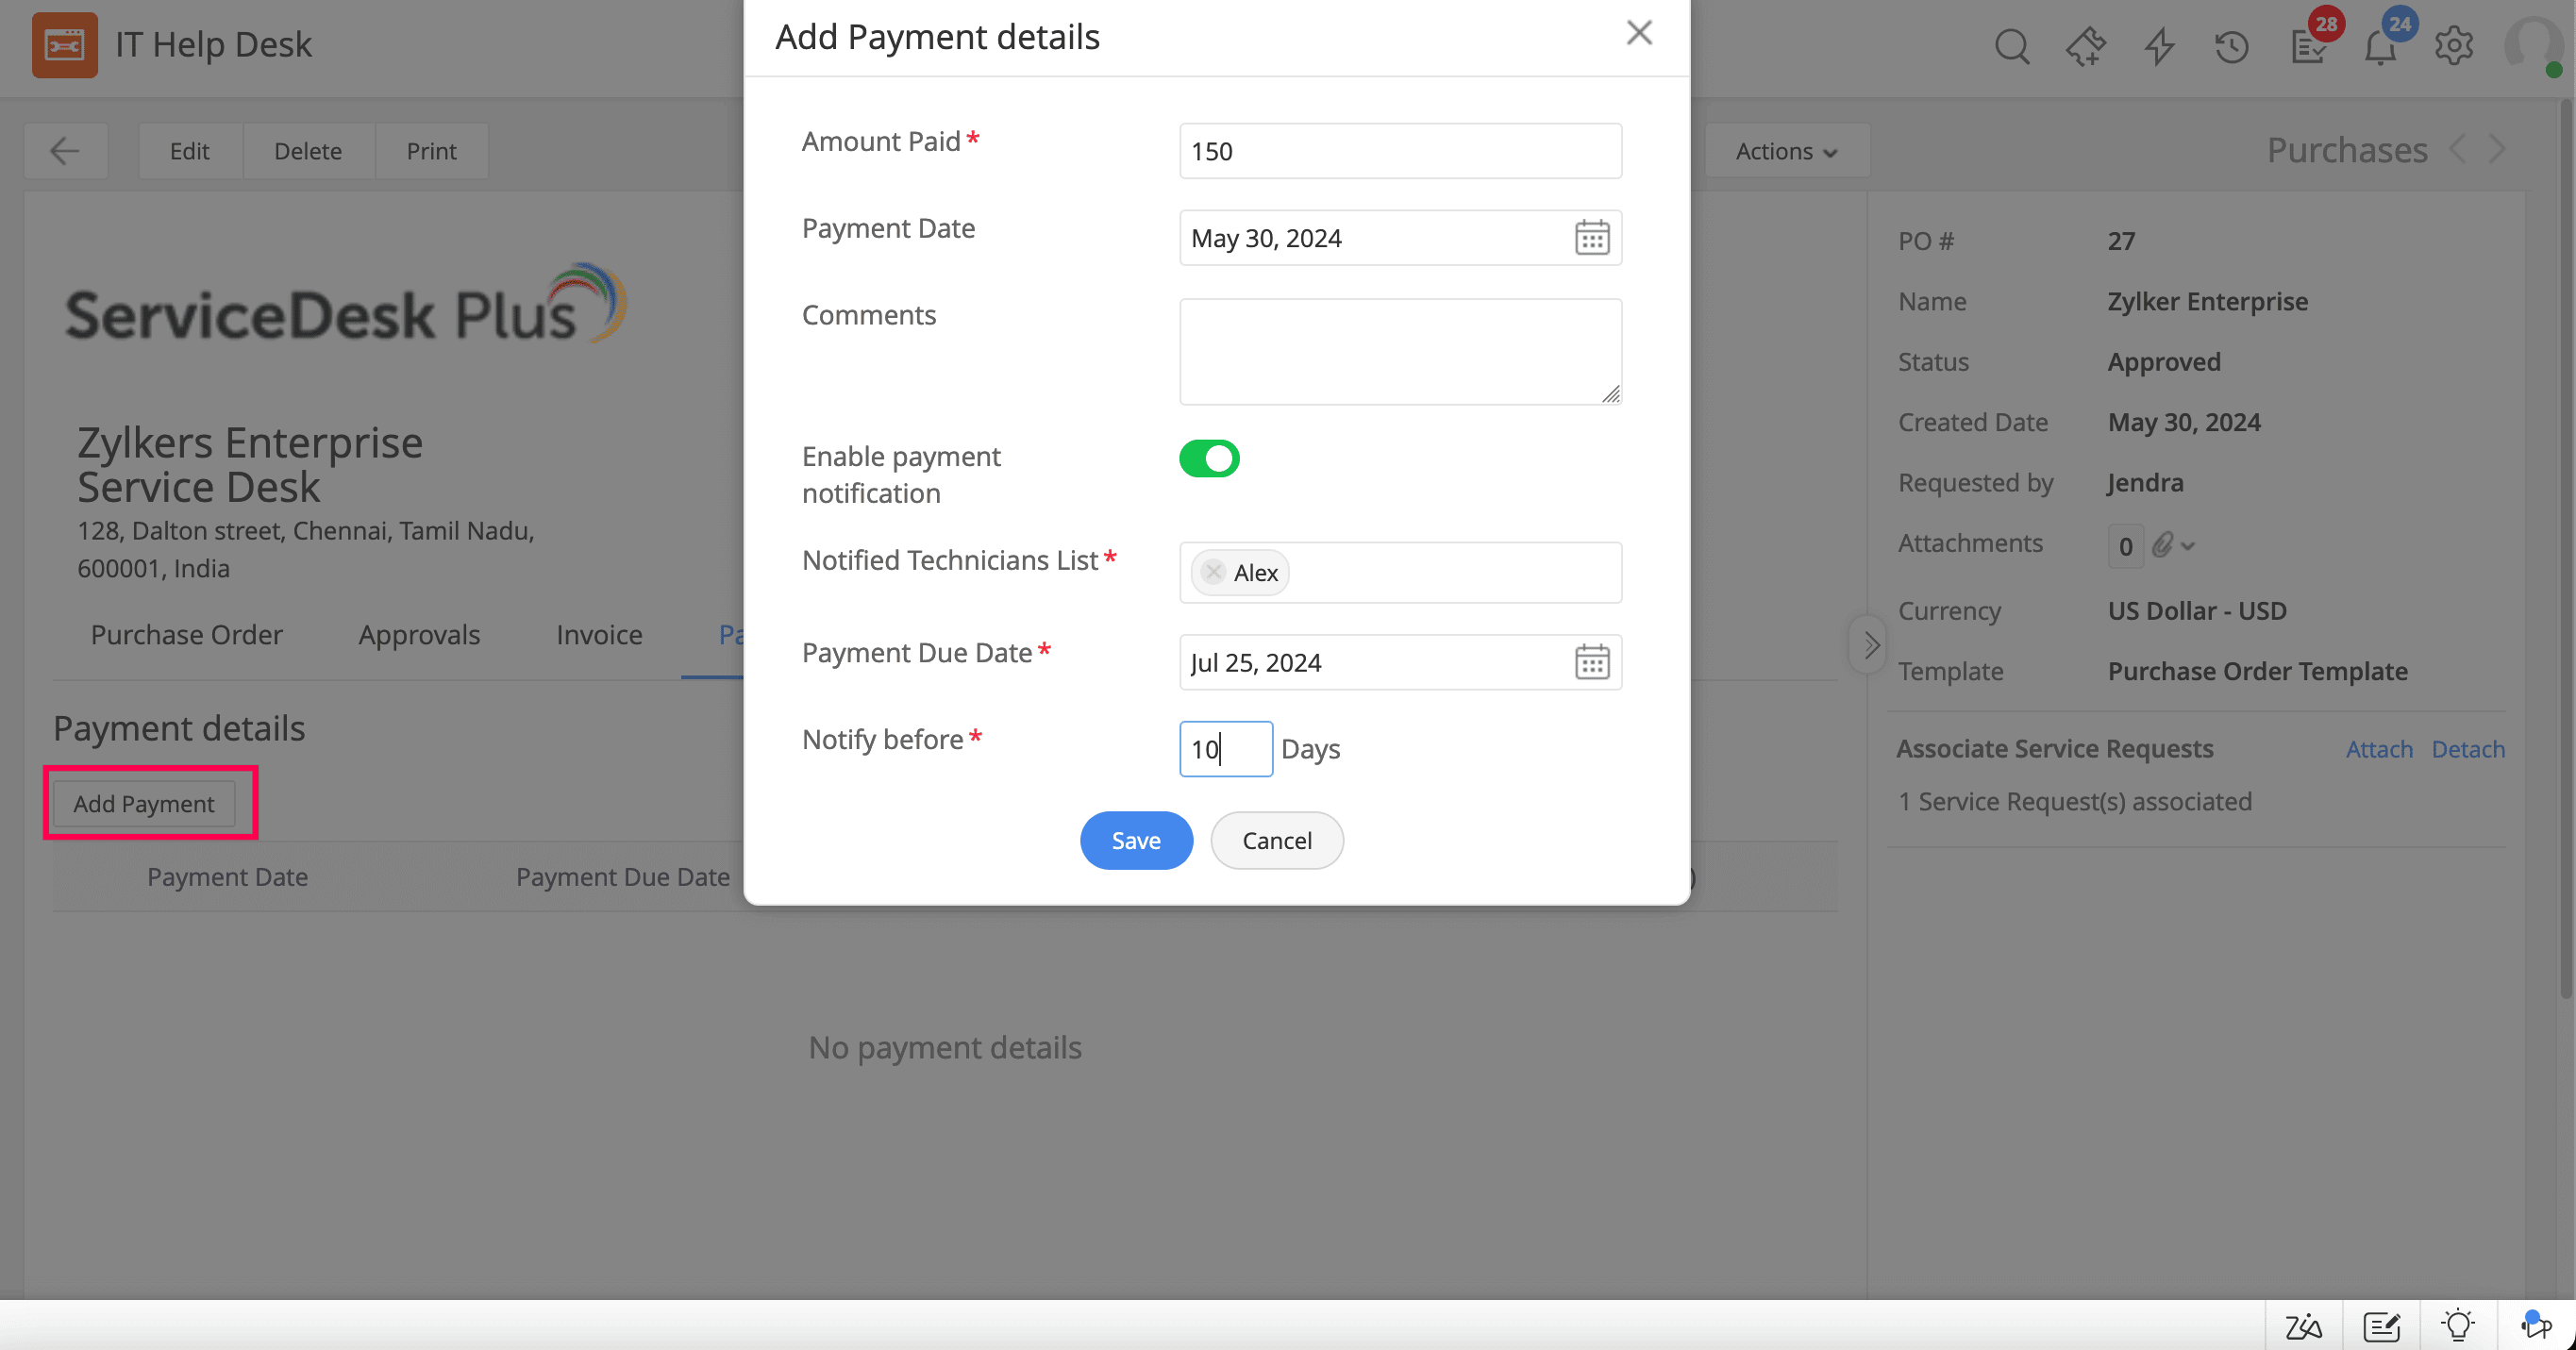
Figure 8: Adding payment details and setting a payment reminder.
Step 6: The vendor might dispatch the items either fully or partially, providing a receipt in either scenario. ServiceDesk Plus lets you adjust the status of the PO accordingly. For instance, when items are received partially, the PO status is updated to Partially Received (Fig. 9); and upon receiving all items, the status changes to Items Received.
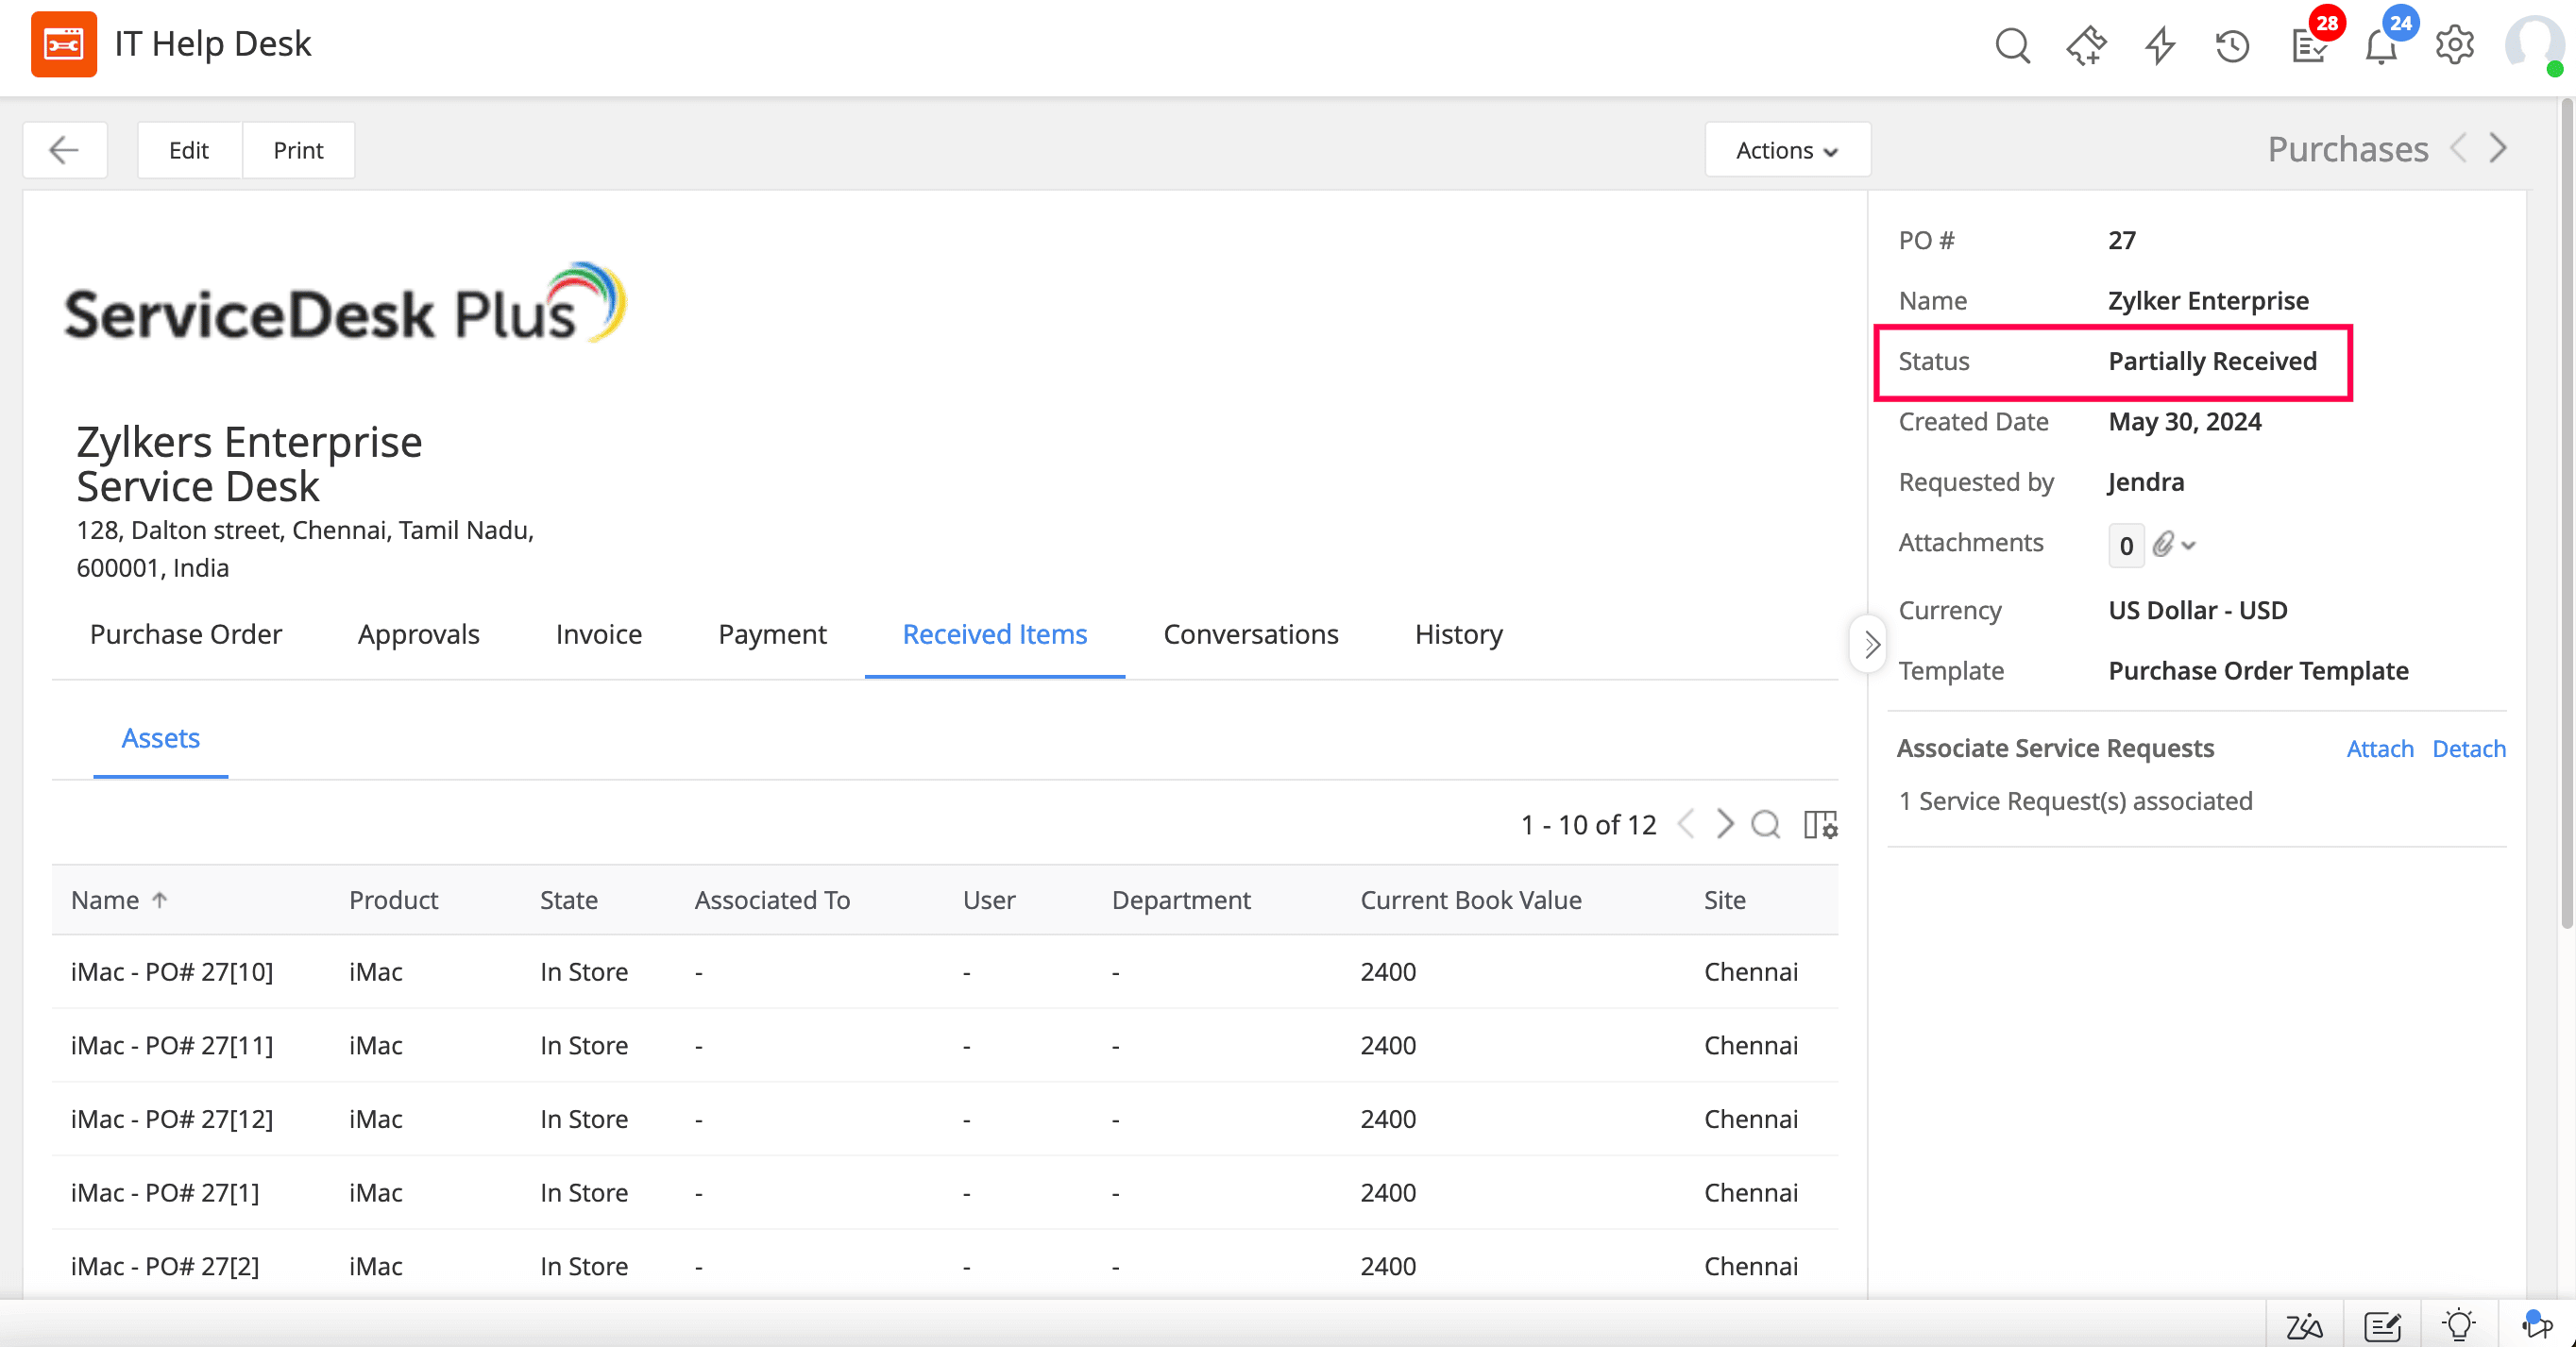
Figure 9: Status of partially-received items.
ServiceDesk Plus allows you to receive items using a barcode or QR code (Fig. 10). All products received from the PO will be automatically added as assets or consumables. These assets or consumables will be linked to the specific PO. You can conveniently monitor goods, services, and other received items directly within the PO.
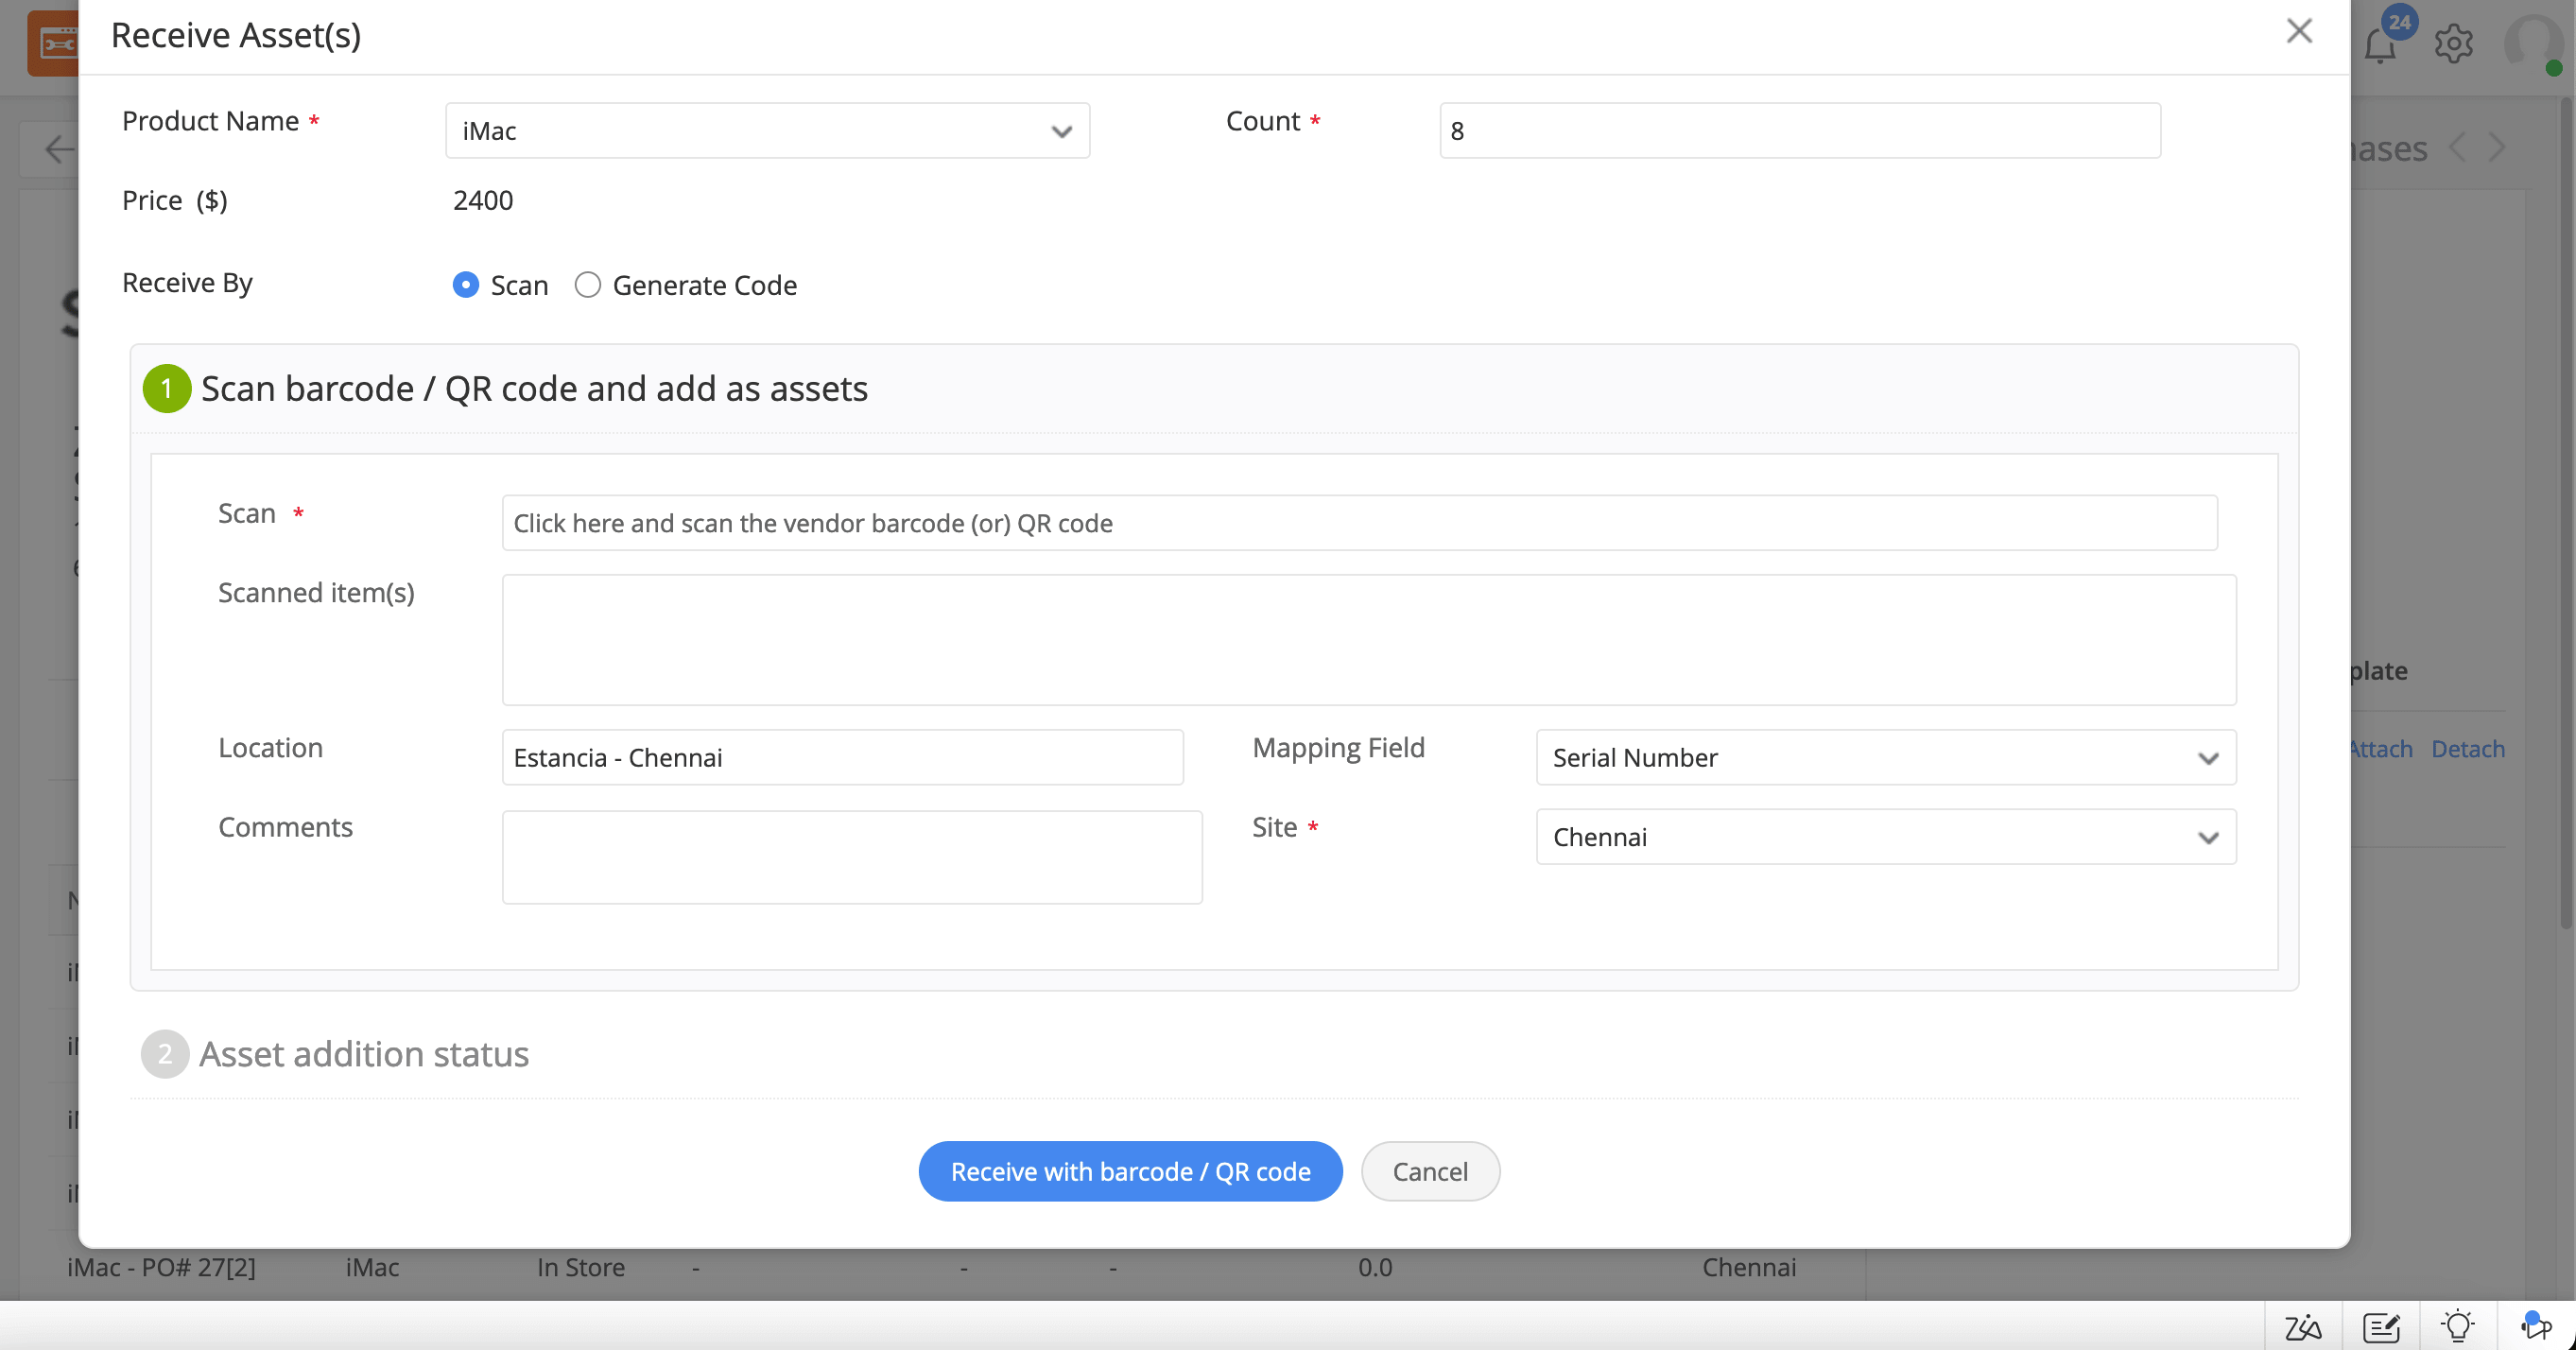
Figure 10: Receiving the items with a barcode or QR code.
Additionally, ServiceDesk Plus enables you to generate reports based on PO vendors, ordered date, required date, and status. You can also create and schedule query reports (Fig. 11) for POs based on site, vendor, order items, and approvers.
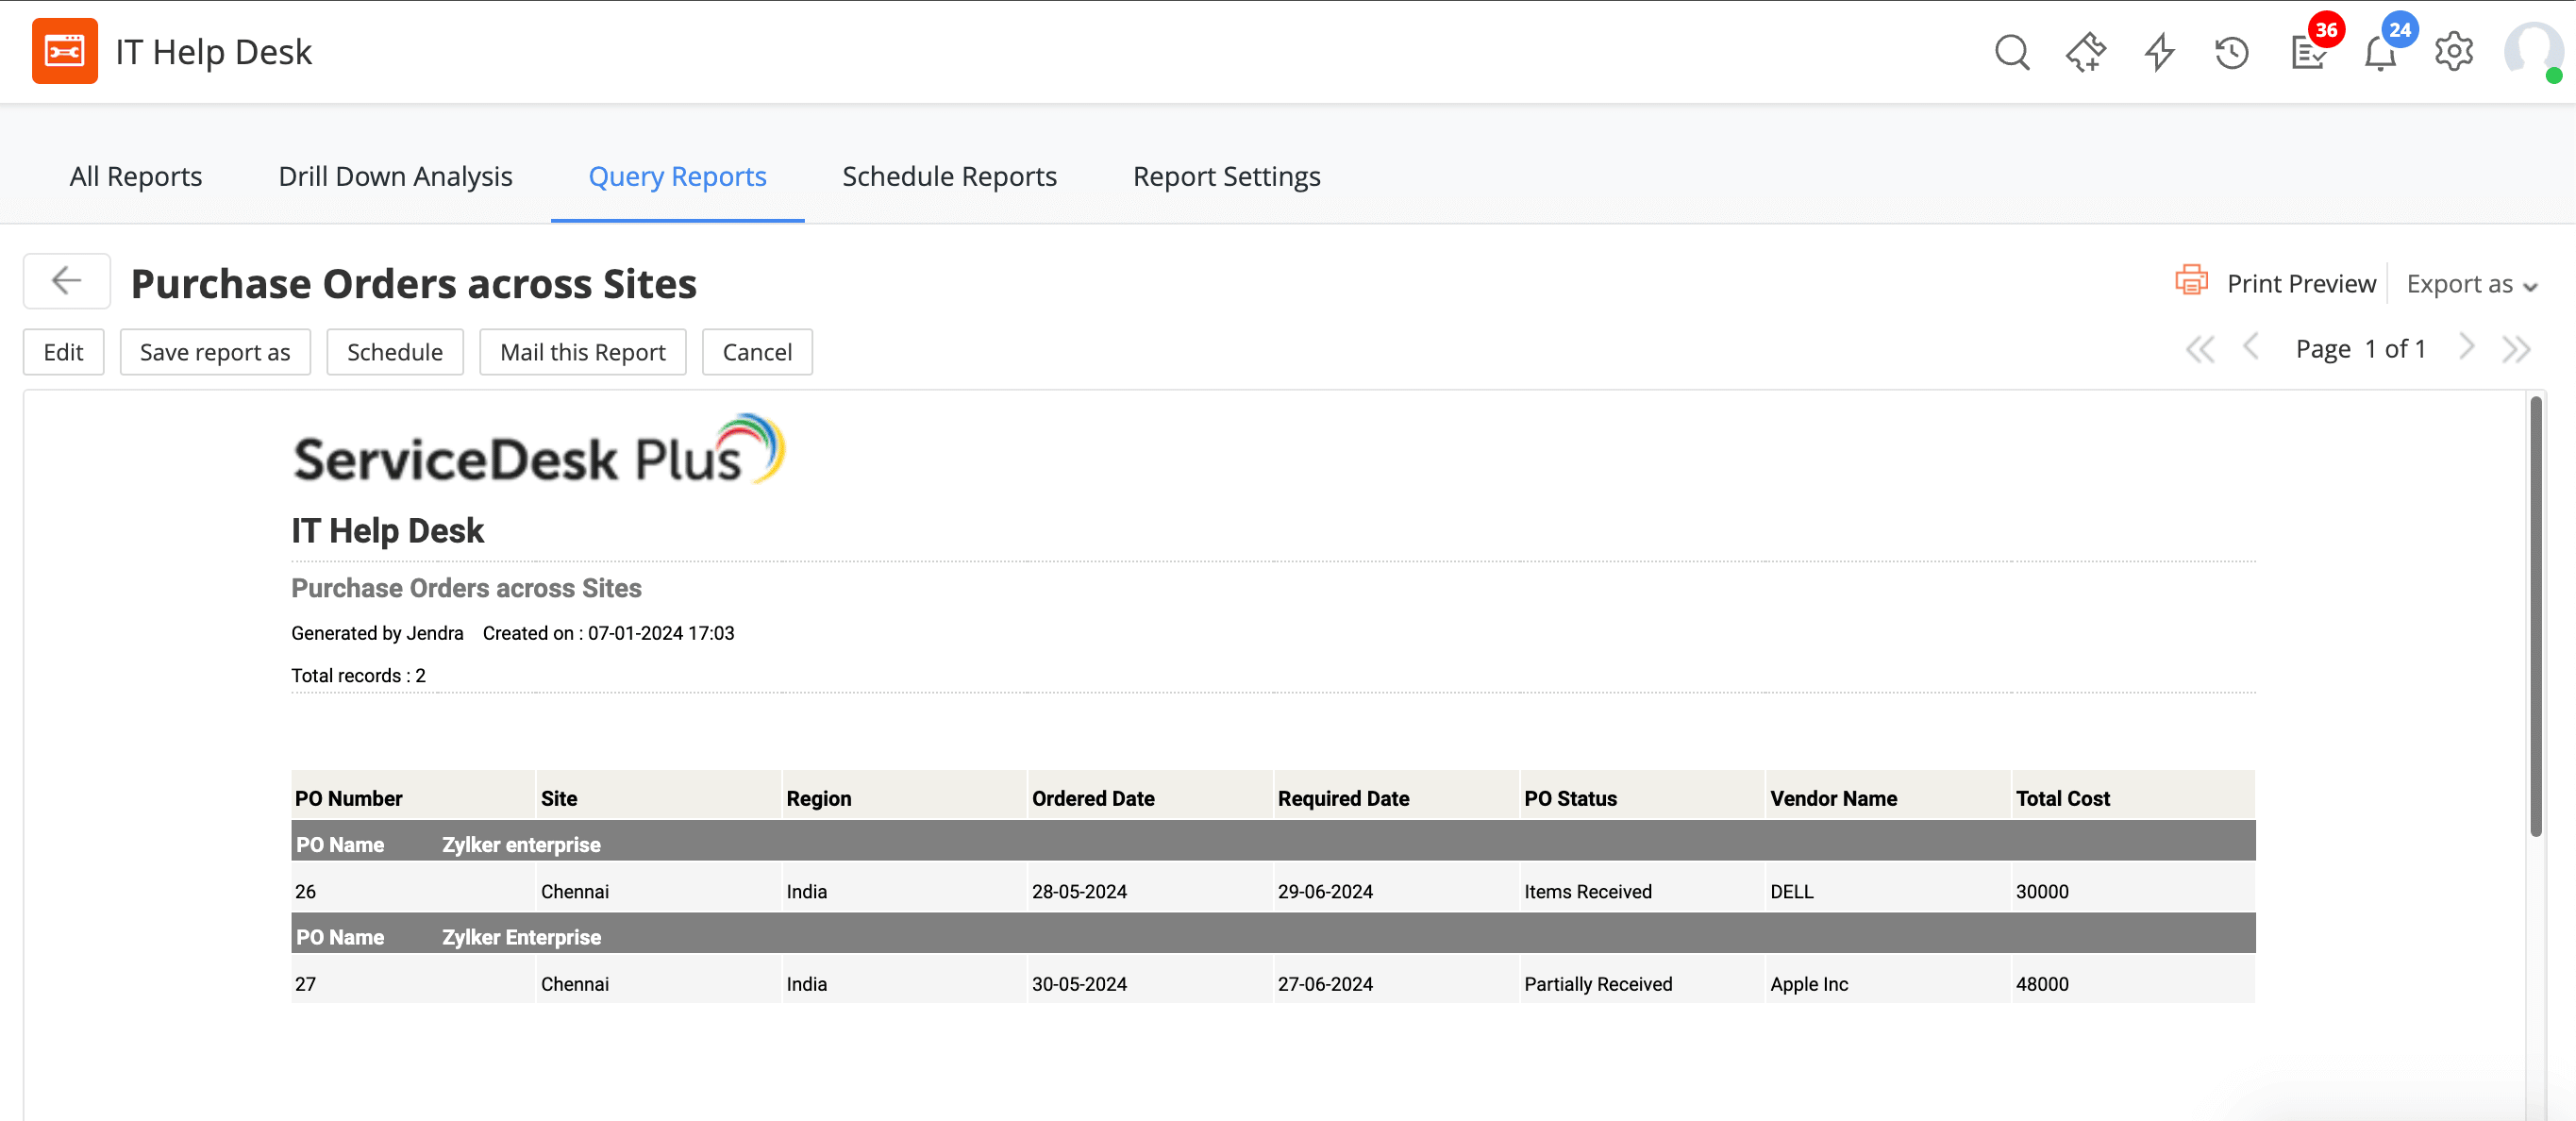
Figure 11. Query report for POs.
Detailed purchase orders provide a comprehensive view of IT asset acquisition history and all purchasing activities, aiding in effective preparation for IT audits and enhancing reporting capabilities. From monitoring spending patterns to optimizing supplier relationships, accurate POs and management processes help businesses adhere to IT budgets and enhance financial reporting.
Start your 30-day, free trial today to experience streamlined PO management and financial oversight with ServiceDesk Plus.


