The primary goal of any service desk is to restore normal business operations at the earliest possible, and with minimum business impact. Consequently, managing the incoming tickets is fundamental to implementing an efficient incident management process in your organization.
A typical incident resolution process follows these steps:

However, this doesn't always work this way. There are multiple hurdles at every step.
In the next few topics, we will look at all possible hurdles that you could face while managing a service desk and how you can use ServiceDesk Plus to overcome them.
Overdue Tickets

Often, the overall productivity and efficiency of the service desk falls because of multiple overdue tickets. This could happen because of incorrect SLA assignment, SLA-violations, and lack of timely reminders and notifications of the violations.
Defining a good SLA is often the starting point of establishing an open communication channel between the service desk and its customers. SLAs or service level agreements help in making clear the expectations between the customers and the service providers. SLA adherence can be ensured in many ways, such as setting up reminders, escalation points, and OLAs or operational level agreements.
In simple terms, an OLA is an internal SLA. They are agreements made with an organization's internal teams, whose service delivery is essential to achieving the committed, organizational level SLA. In ServiceDesk Plus, you can create 5 OLAs for an SLA. And, under one OLA you can up to 5 support groups. The OLA timer for the configured group starts immediately after the ticket is placed in the group.
Now let's see how you can use prevent overdue tickets by making the best use of SLAs, along with OLAs.
In ServiceDesk Plus, you can define SLAs, incident SLAs and service request SLAs. You can define detailed SLAs with escalation points, violation emails, and specific SLA actions, such as assigning the ticket to a specific technician or group. Based on the Impact or Urgency of the ticket, you can automatically assign its priority, which can in turn be used to assign the SLA. In addition, multiple SLA widgets, which populate data, are available on the dashboard for the technician to take timely action.
We will delve into each of these in detail. We'll see how you can configure SLAs and OLAs, how to automatically set up priority when the customer provides urgency and impact, and finally how to track SLAs through dashboard widgets.
Configure SLAs
There are two types of SLAs in ServiceDesk Plus, Incident SLAs and Service Request SLAs.
SLAs for incidents can be assigned based on the criteria of the incoming requests. For example, if the priority of the incoming request is High, a High SLA can be assigned to the request. Requests with a high SLA have shorter response, resolution, and escalation times. Often, the customer may not be in a position to assign the correct priority. In such cases, Priority Matrix will be immensely useful. We'll discuss the priority matrix in the next section.
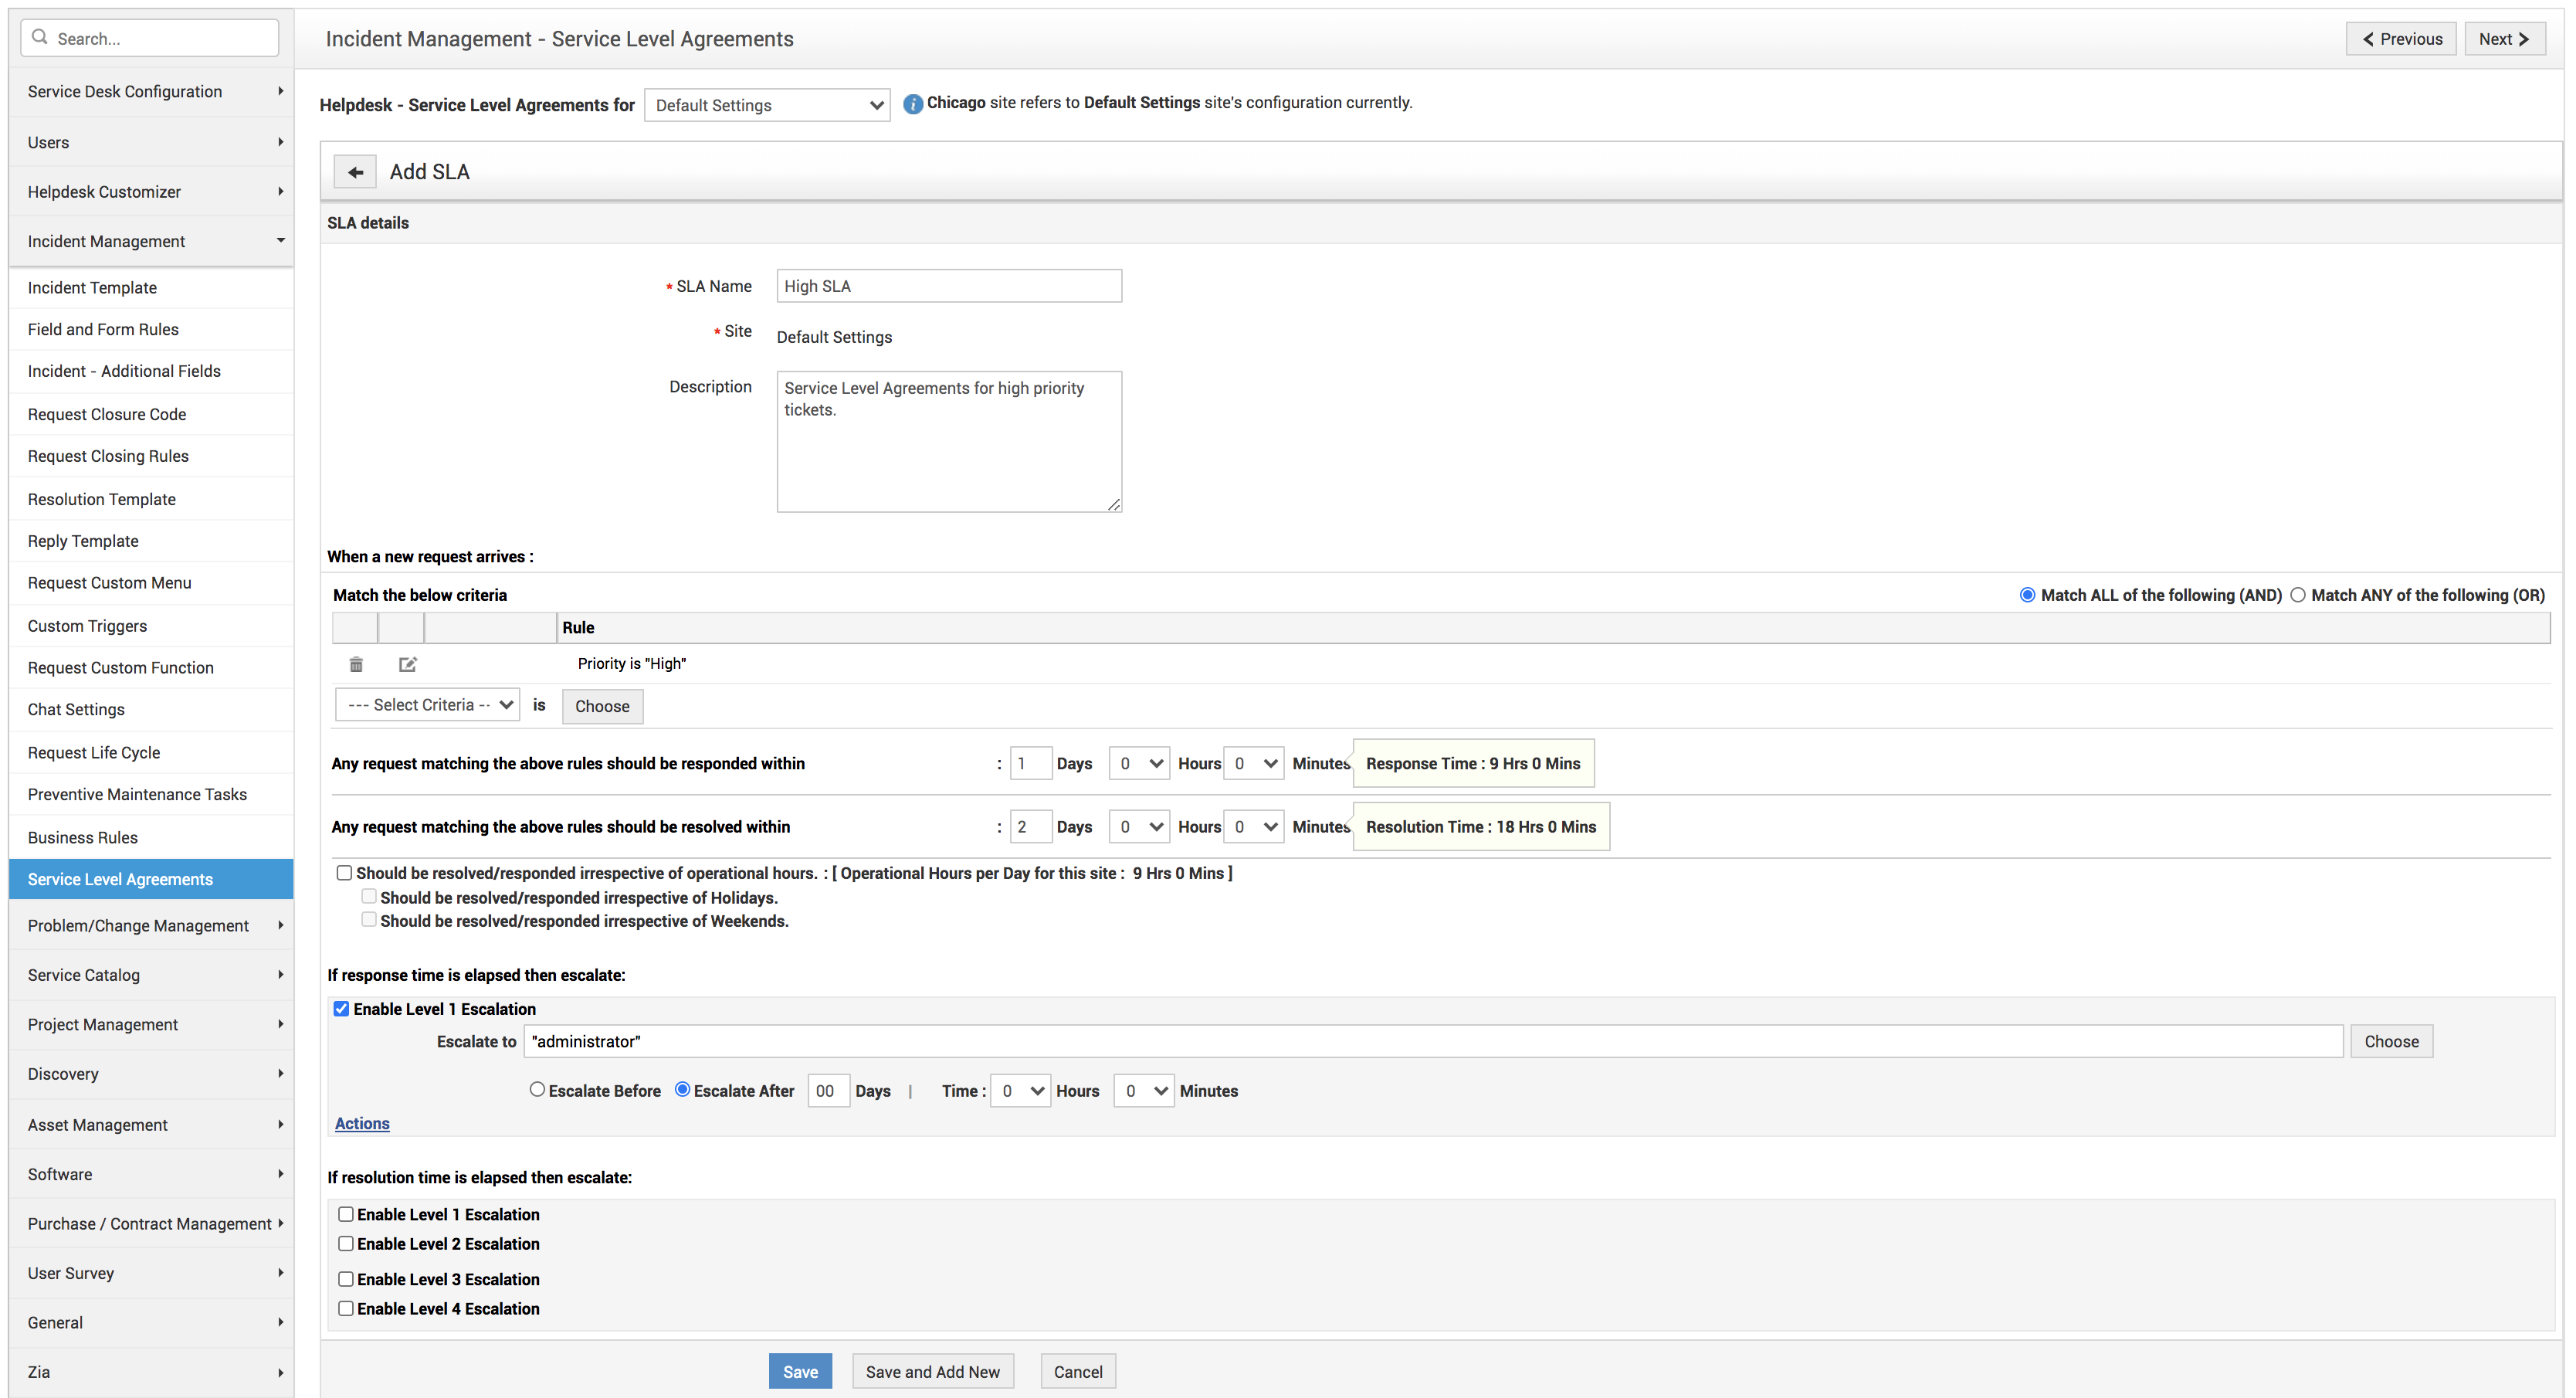
To configure an incident SLA, go to Admin>>Incident Management>>Service Level Agreements.
Click Add New SLA.
On the displayed form, provide all the necessary details.
Choose the criteria from the drop-down for the SLA to be assigned.
Choose how soon a High SLA must be responded to and resolved.
Also, choose to whom the escalation mails must be sent, if the ticket is not responded to resolved within the specified time.
There are up to 4 levels of escalation that can be sent, depending on how close the SLA-violation point is.
SLA Actions
When a violation occurs, say the response or resolution time has breached, you can configure an escalation mail to be sent and also automate the following actions:
- Place the ticket in group
- Assign a technician
- Set up the priority of the ticket
- Set up the level of the ticket

Service Request SLAs are essentially the same as incident SLAs, but are not assigned based on any criteria
Go to Admin>>Service Catalog>>Service Level Agreements
On the displayed form, provide all the necessary details and the response and resolution time configurations.
Here too, you can configure the following actions when the response or resolution times are violated:
- Place the ticket in group
- Assign a technician
- Set up the priority of the ticket
- Set up the level of the ticket
The Incident SLAs are assigned by template, whereas Service Request SLAs can be selected by the requester. These service request SLAs are usually displayed on the top of service request form for the requester to choose from. Depending on the requester's choice, the SLA is assigned for the request. You can also assign multiple SLAs for Service Requests.
Configuring service request SLAs is the same as incident SLAs, but without being based on criteria.
Track SLA-Violations
One of the ways to reduce overdue tickets is to keep tracking the ticket status and also how close they are to the SLA mark.
Configure Notifications
Notification Rules help you track every aspect of the ticket status, from a ticket being logged to when its SLA is updated. For each of these changes, you can configure email/SMS notifications. Therefore, configuring notifications can also help you prevent overdue tickets
Notifications can be configured in two ways, Notification Rules and Custom Notifications
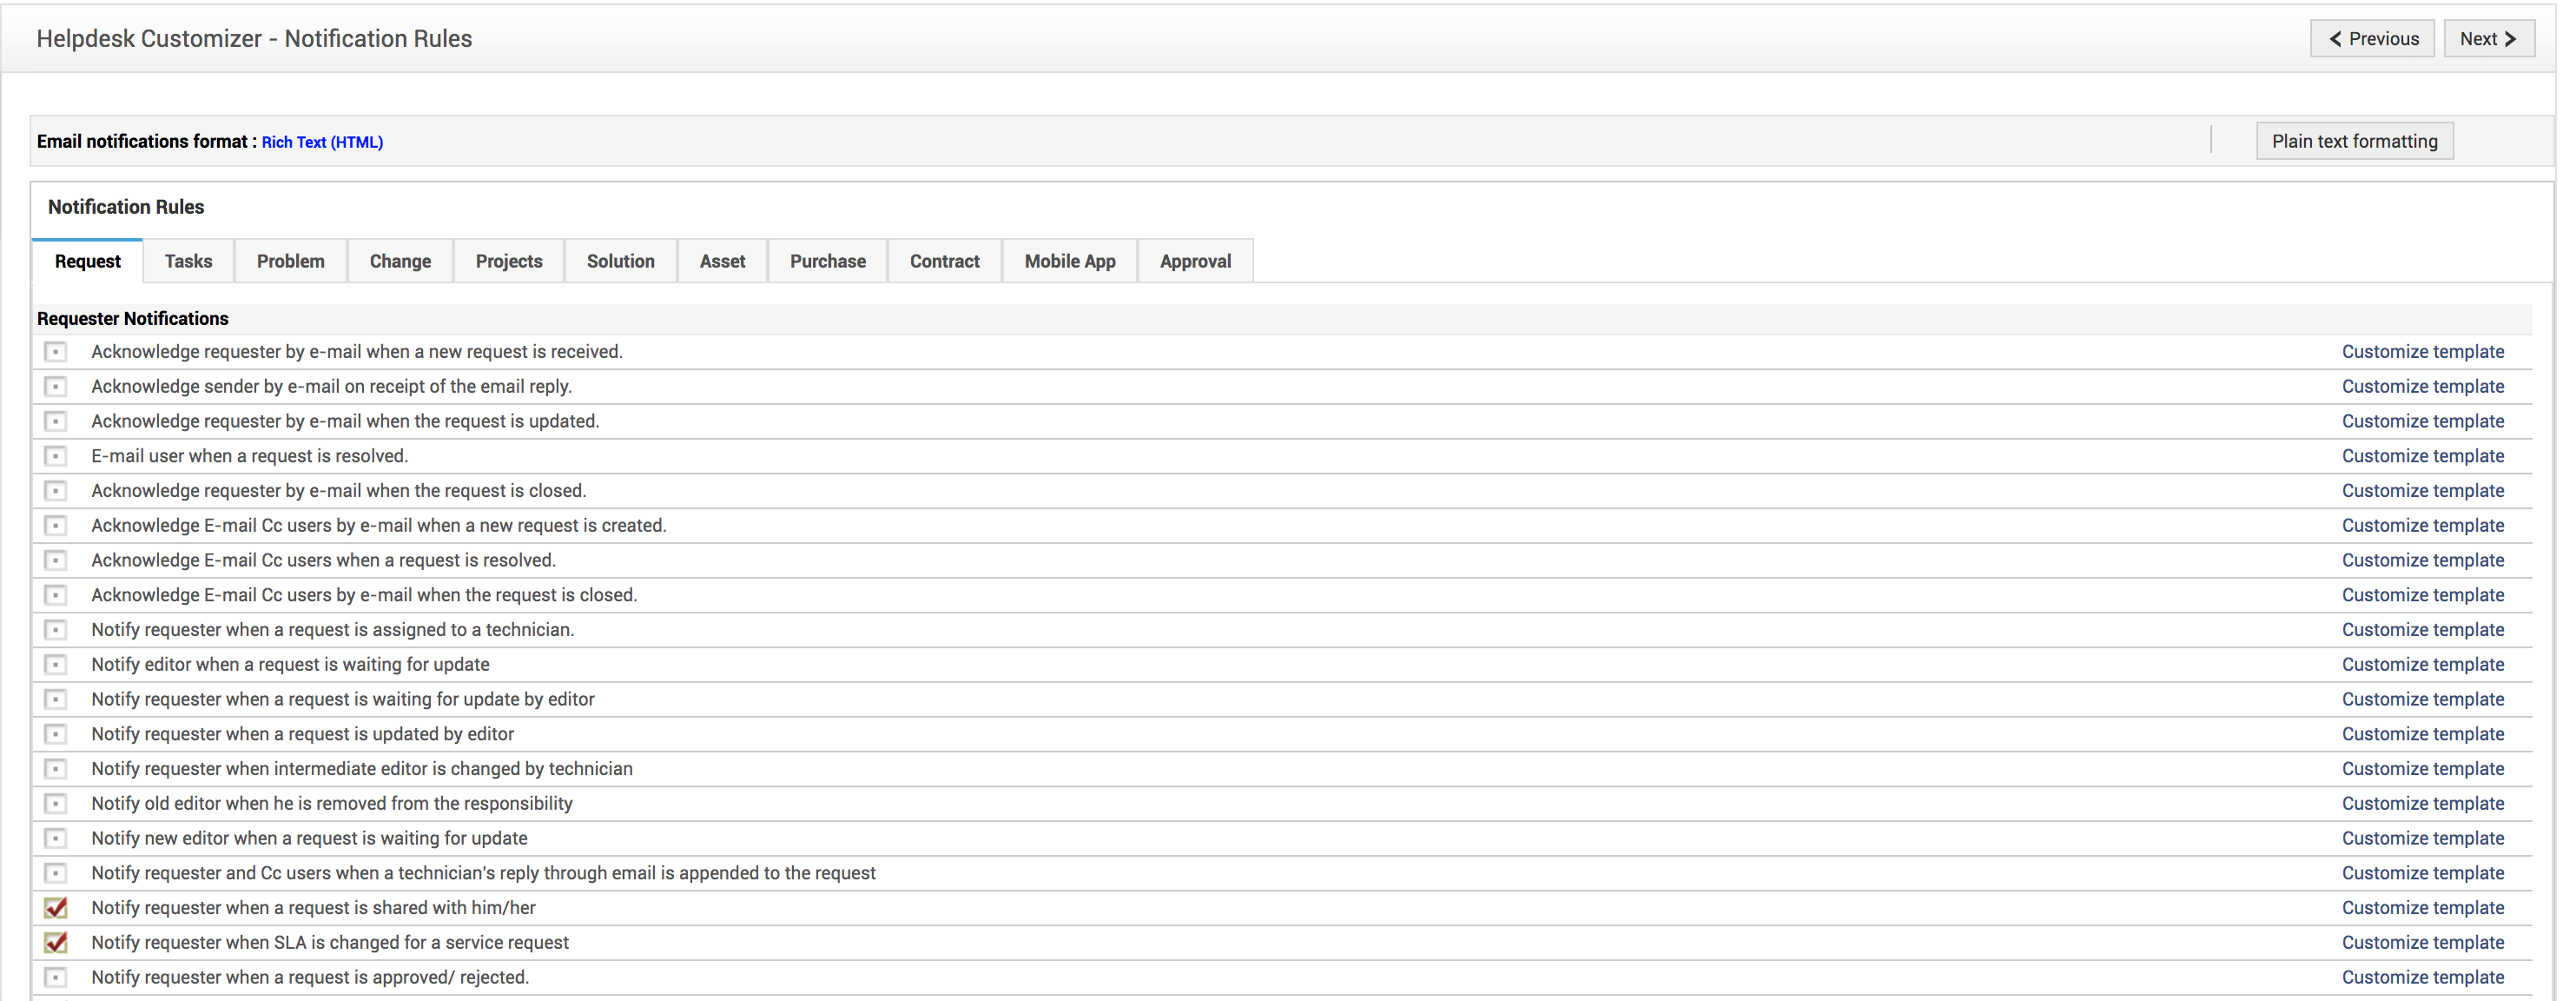
Go to Admin>>Helpdesk Customizer>>Notification Rules
On this page, you can select the notifications to be sent and also customize the corresponding templates, as shown.
Custom Notifications
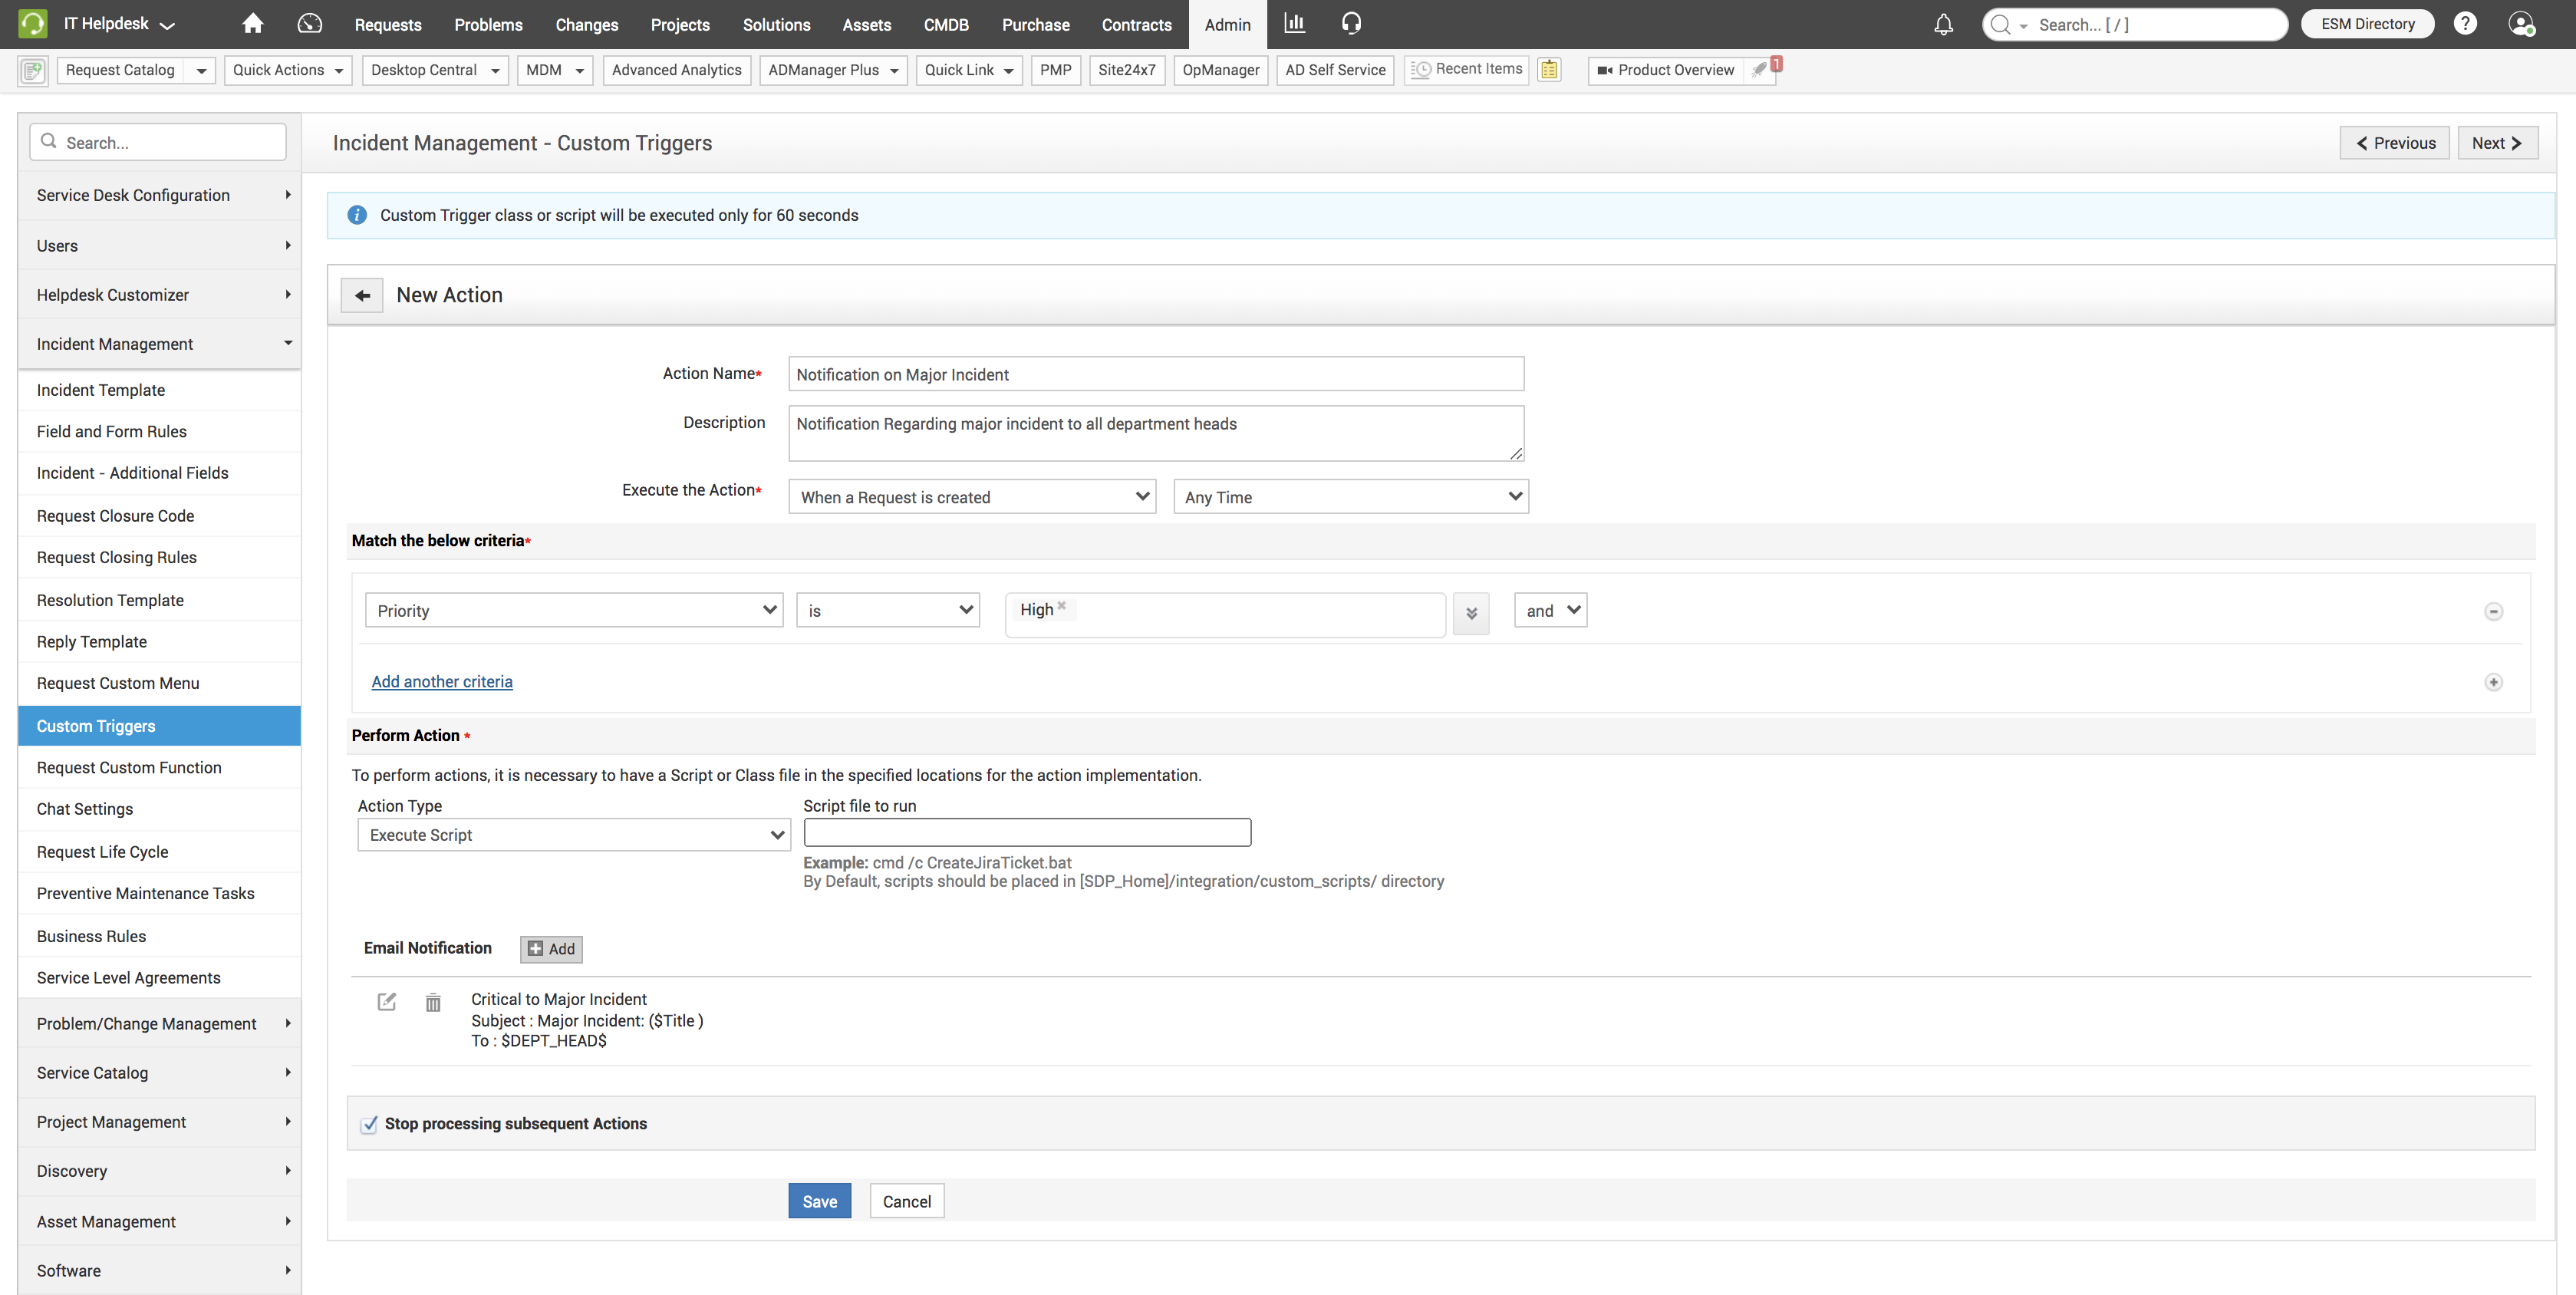
These notifications sent from the application to various stakeholders when an incoming ticket fulfills certain criteria. In this case, you can configure a notification to be sent out to all department heads when a major incident occurs and a ticket with priortity "high" is created
Go to Admin>>Incident Management>>Custom Triggers>>New Action
Fill out all the required details, as shown in the following table:
| Field | Explanation | Sample |
|---|---|---|
| Action | Name of the intended action. | Notification for all high priority tickets Notification to all department heads |
| Description | A detailed description of when this notification or action will be triggered. | This action will be triggered when the incoming ticket is created with the priority marked as high. The action will involve creating and assigning specific tasks to the technicians in the support group. |
| Execute the Action | Choose when this action will be executed; when the ticket is created, edited, or created and edited, approved, rejected, etc. Also whether this trigger will work within or outside operational hours. | Choose when ticket is created; Anytime. |
| Match the below criteria | Choose both the criteria and the fulfilling condition. | Choose priority is high. |
| Execute Script | Choose the script, if available, to execute the required action. | |
| Email Notification | Click Add to configure a new email template or select from the list of templates already available. |
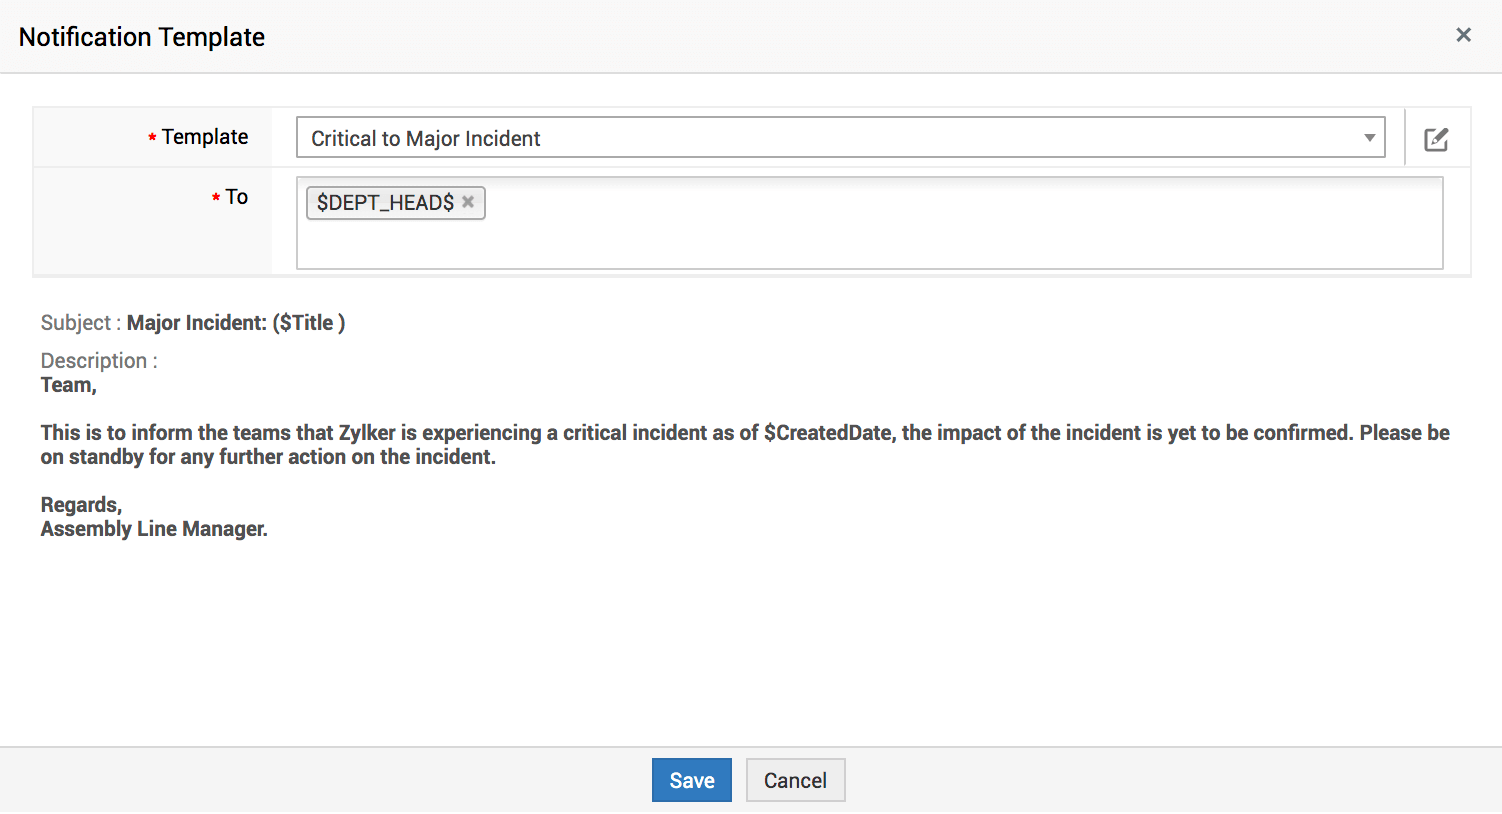
After you click Add, a pop-up to send out the notification is displayed.
Select the required template or configure a new template and click Save.
Priority Matrix
Priority is one of the crucial criteria used to assign the SLA for an incoming ticket. Usually, requesters may not be able to select the correct priority of a ticket. Priority is a function of urgency and impact. So, when users select urgency and impact, the priority is automatically assigned based on how the admin configures the priority matrix
To configure the priority matrix, go to Admin>>Helpdesk Customizer>>Priority Matrix

Dashboard Widgets
Another way to track SLA-violations is to look at the SLA widgets on the dashboard. There are about three dashboard widgets that populate data about the requests' SLA.
With the SLA Violations widget, you can track SLA violations by Priority, Group, Technician, Level, and Category.

SLA Violated widget provides the number of requests that have already violated SLA. You can click the request count to open all the SLA-violated requests.

Requests approaching SLA violation provides the number of requests that will breach their SLA in the next 60, 120, and 180 minutes. Again, to open the requests, the request count under each category.


