1. "No response received from workstation. Probably the workstation might be switched off or does not exist"
Troubleshooting Remote Control Issue
Cause:
- The target workstation might be switched off while performing the scan operation.
- Application is running in a non-English OS computer.
Solution:
a. The target workstation might be switched off while performing the scan operation.
- Check if the target workstation is switched ON and can be pinged from DOS prompt in ServiceDesk Plus/Asset Explorer Server.
- Sometimes if the firewall is enabled, normal ping does not work.
- Ensure normal ping is successful.
Next you will have to open the firewall for ICMP echo.
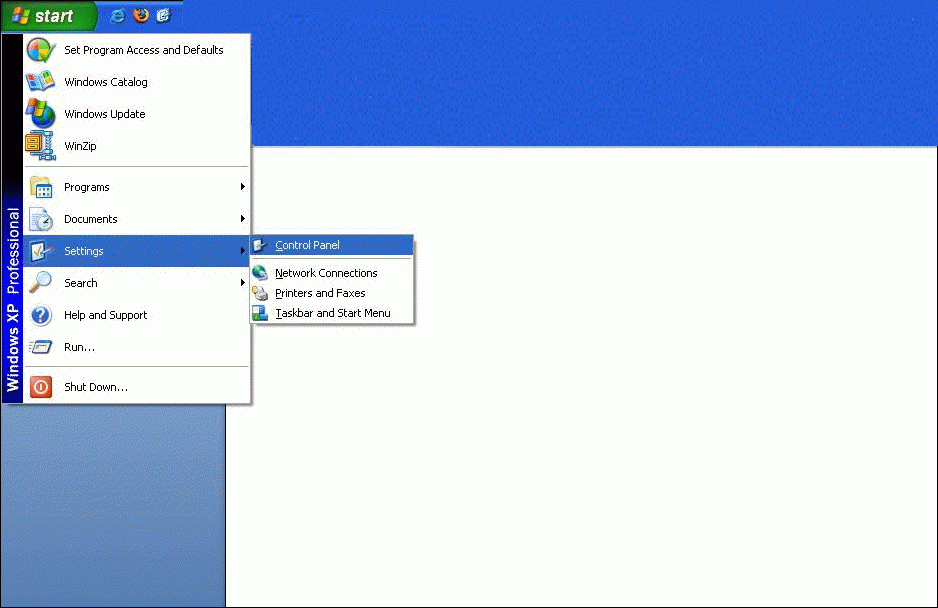
- Click Start -> Settings -> Control Panel.
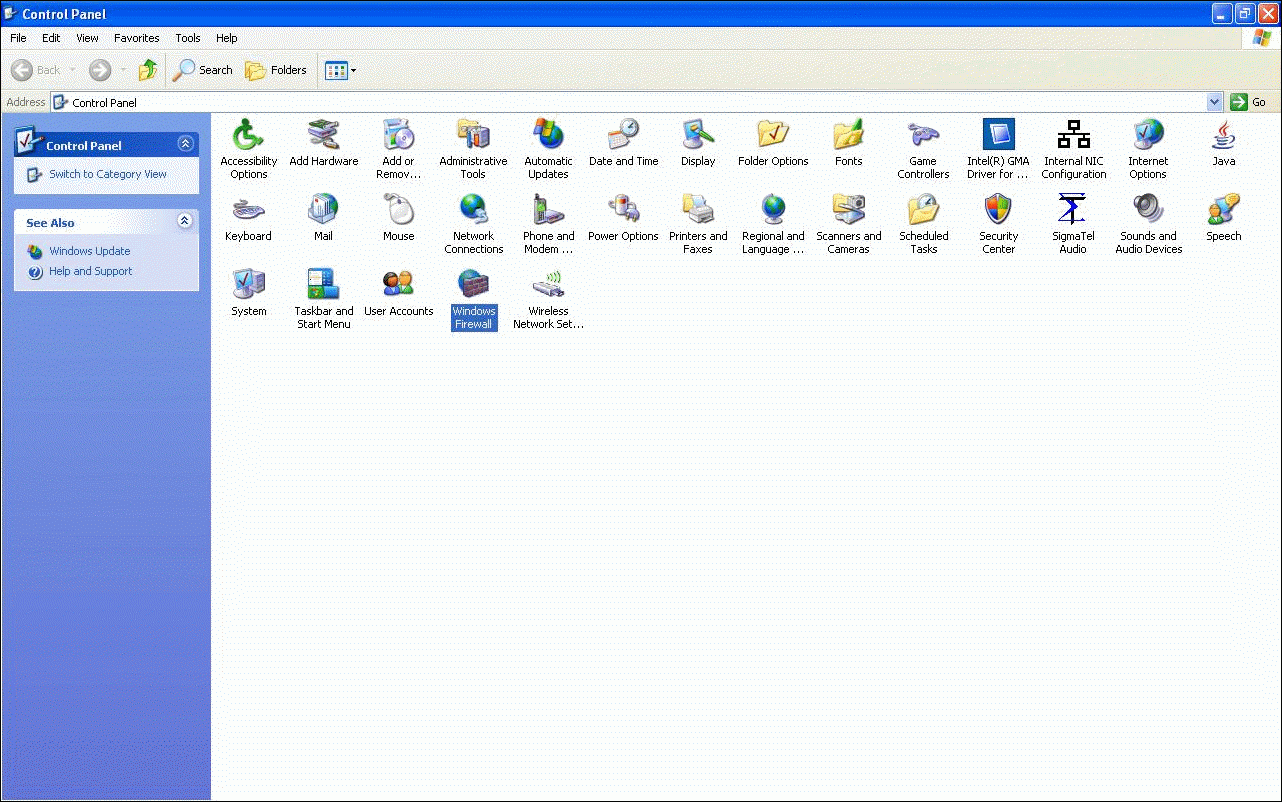
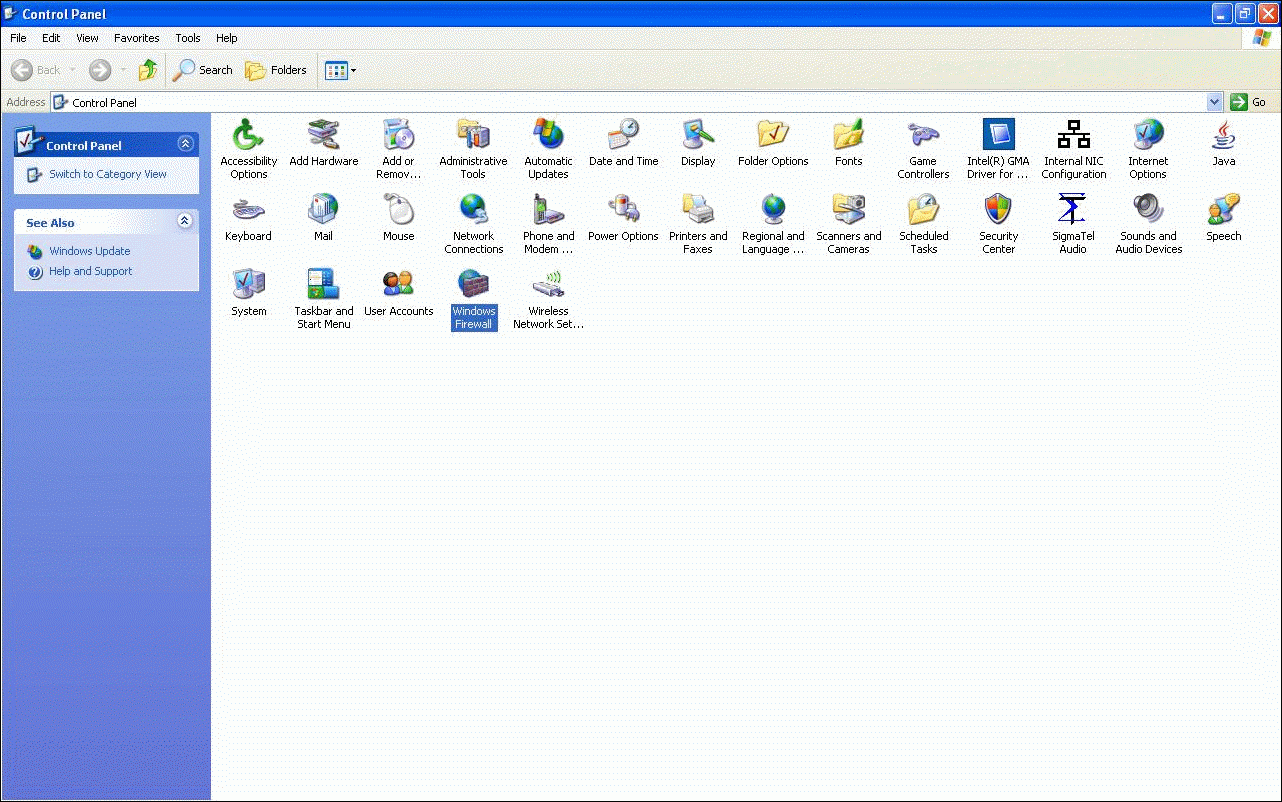
- From the Control Panel window, select Windows Firewall.
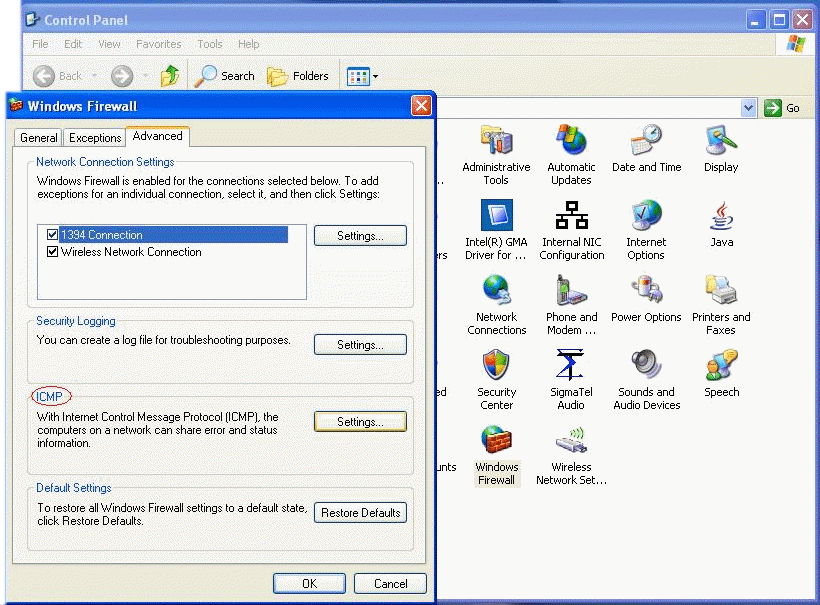
- Select Advance tab -> Settings under ICMP.
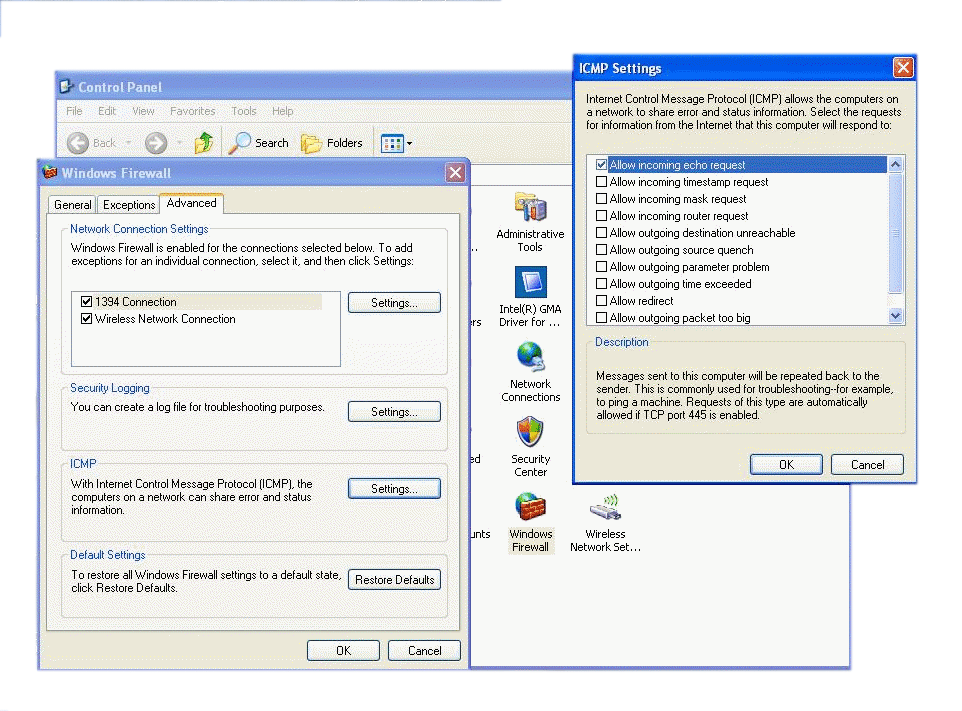
- Enable the option "Allow incoming echo request".
b. Application is running in a non-English OS computer.
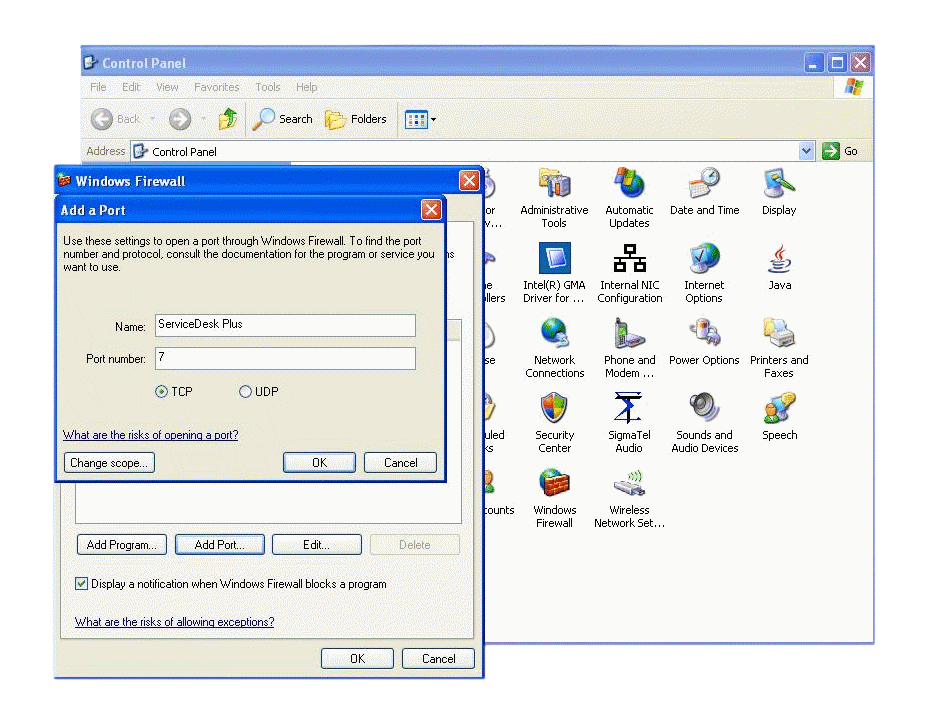
If the server is running in a Non-English OS, open TCP port 7 Exception in Firewall of the target workstation.
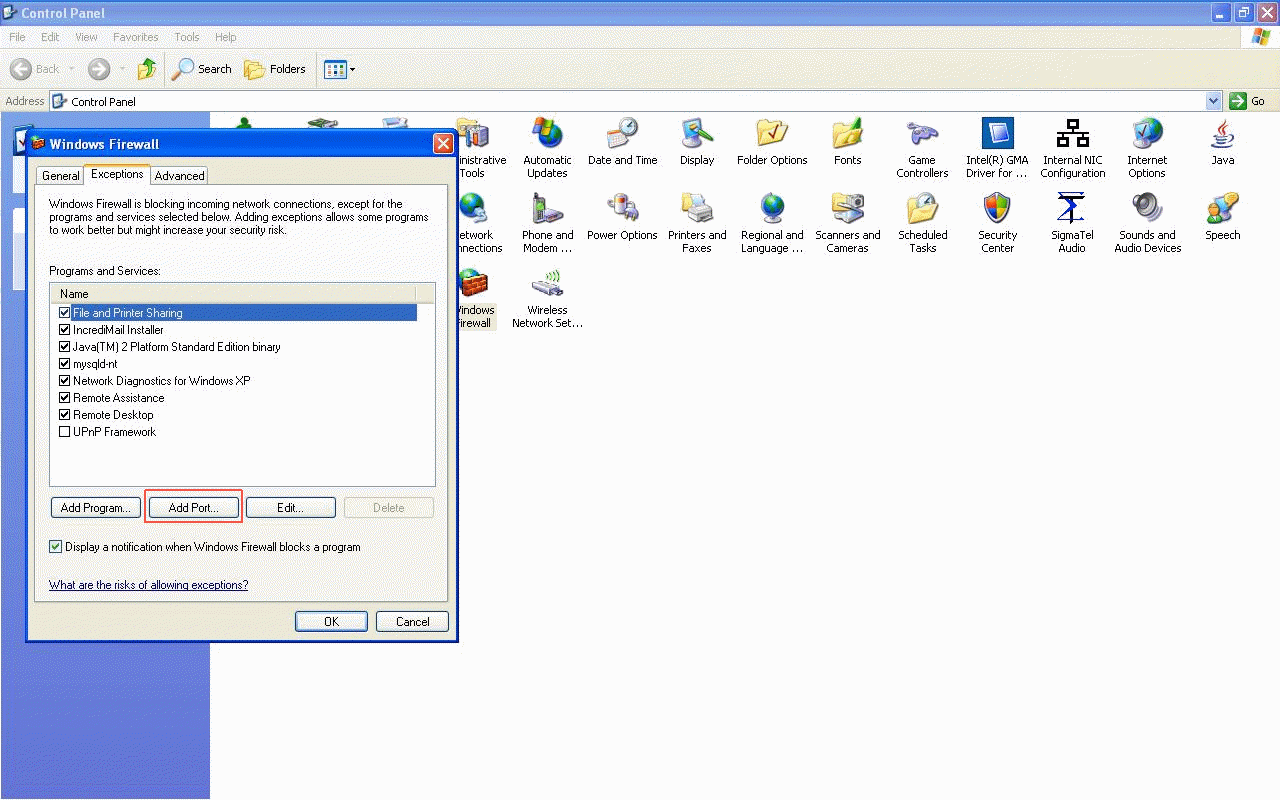
- Go to Control Panel -> Windows Firewall -> select Exceptions Tab.
- Click the Add Port button.
- Enter a name for Reference, Port 7 and enable TCP.
- Click Ok.
2. "Access denied for the user or the remote DCOM option might be disabled in the workstation"
Cause:
This error message occurs when a Windows workstation fails while scanning. This can be due to the following reasons,
- The login name and password provided for scanning might be invalid in the workstation.
- Remote DCOM option might be disabled in the remote workstation.
Solution:
Step 1:
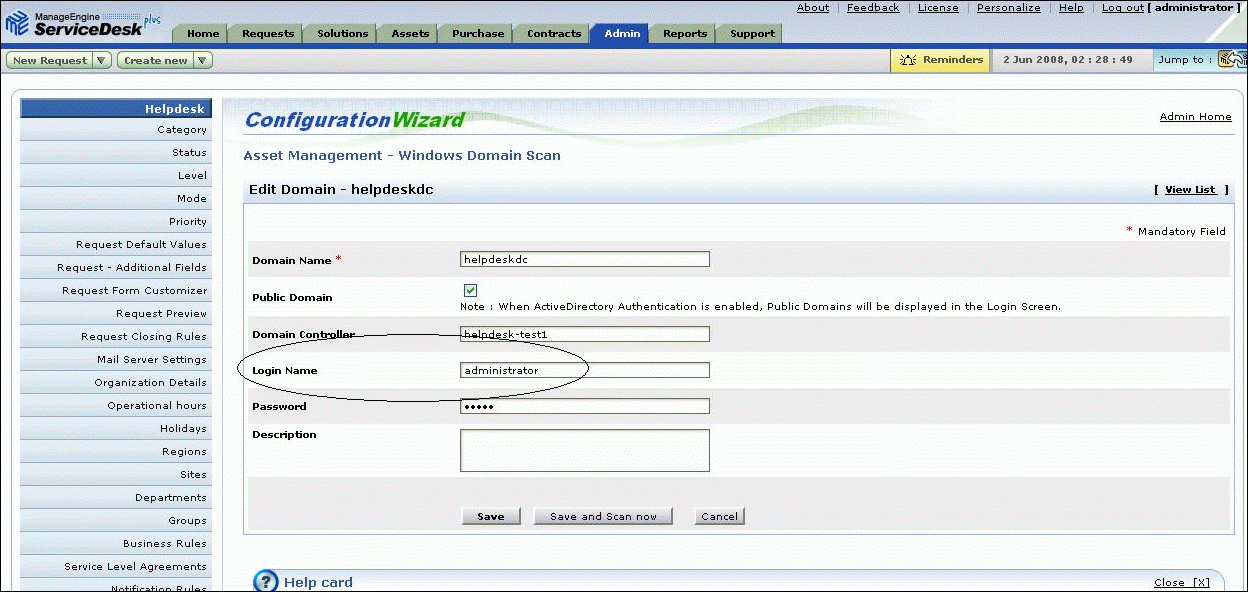
For Windows workstations "Windows Domain Scan" mode is more efficient than "Network Scan" mode. Configure the proper login credentials for the Domain/Workgroup. Check if the login credentials are provided in correct format.
For login credentials ensure that you haven't entered the Domain Name along with the Username (i.e. Do not Enter as Domain Name\\Username). It is sufficient if you enter only the Username in the provided text-field.
Step 2:
Ensure that the login information provided are correct and has administrator privileges in the target computers. To check the validity of the login information, you can execute the following commands in the command prompt of
the server:
net use \\
\C$ /u:
"
"
net use \\
\ADMIN$ /u:
"
"
NOTE: Replace the relevant value within
<>. Supply password within the quotes.
If the above commands succeed and scanning fails, then the problem might be in the DCOM Configurations.
Step 3:
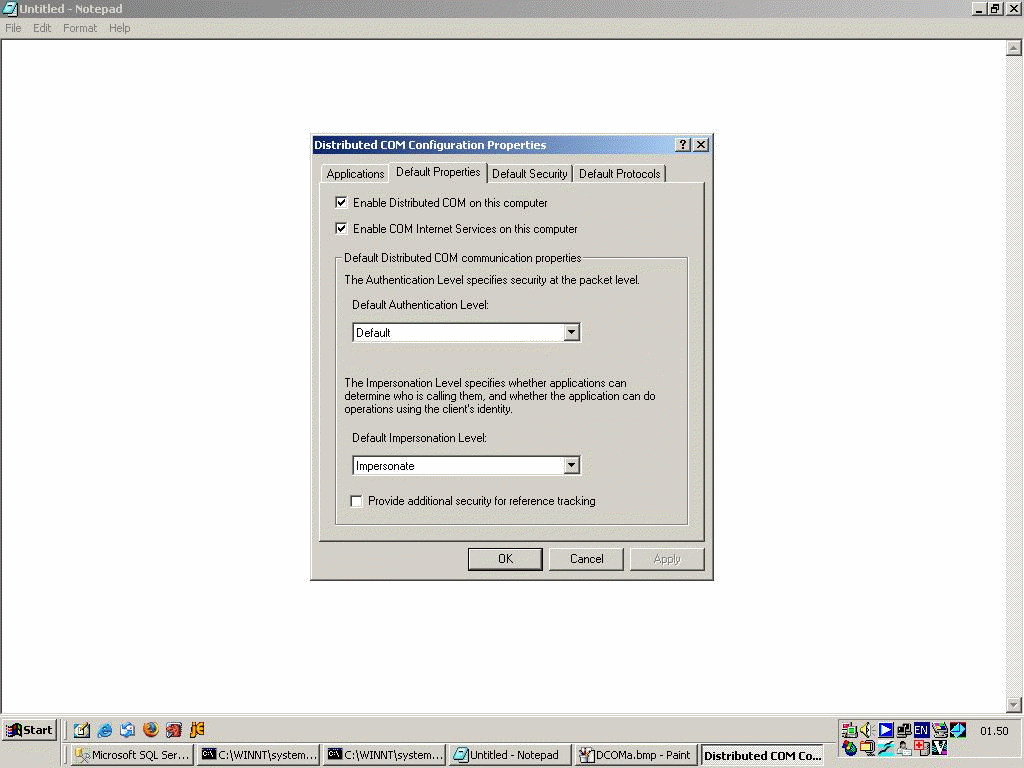
Ensure Remote DCOM is enabled on the target workstations. To Enable DCOM in Windows 2000 Computers,
- Select Start > Run
- Type DCOMCNFG in the text field
- Click Ok.
- Select Default Properties tab
- Check the box "Enable Distributed COM on this machine".
- Press OK
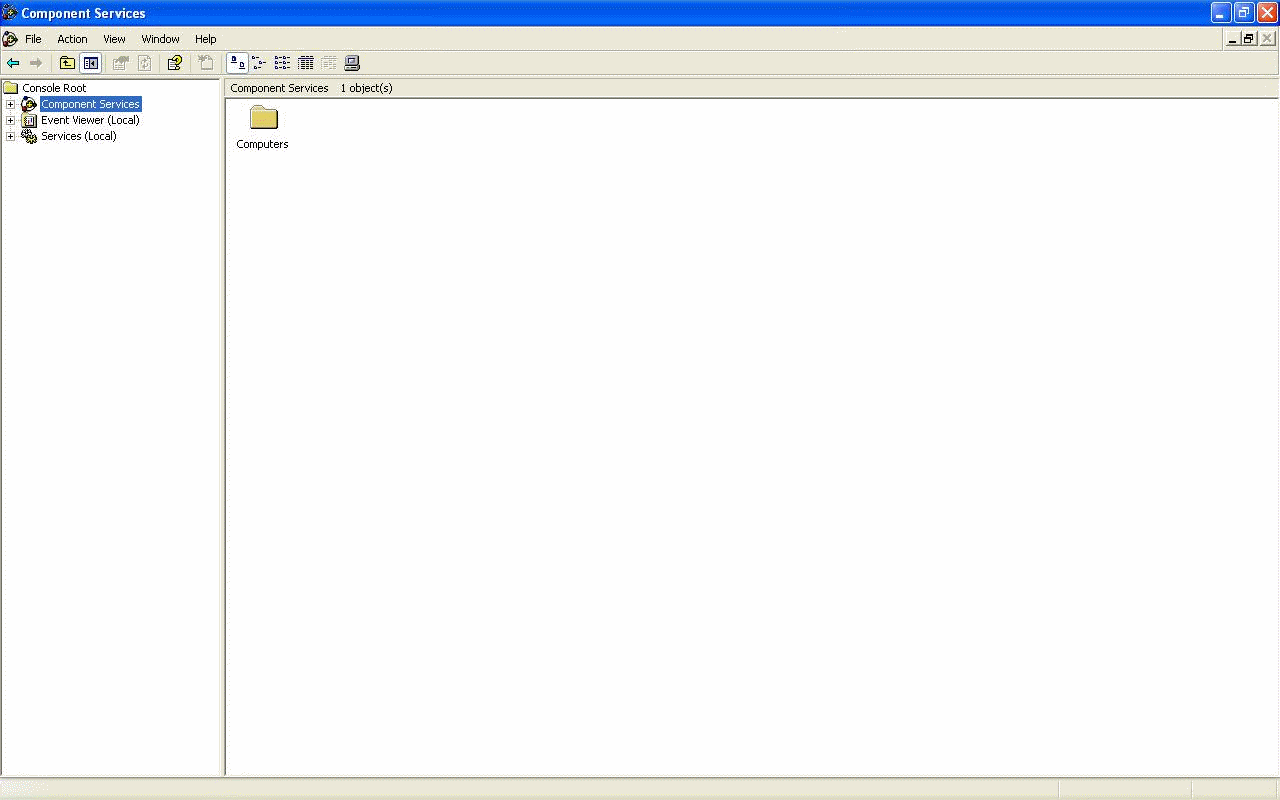
To Enable DCOM in Windows XP Computers,
- Select Start > Run
- Type DCOMCNFG in the text field
- Click OK.
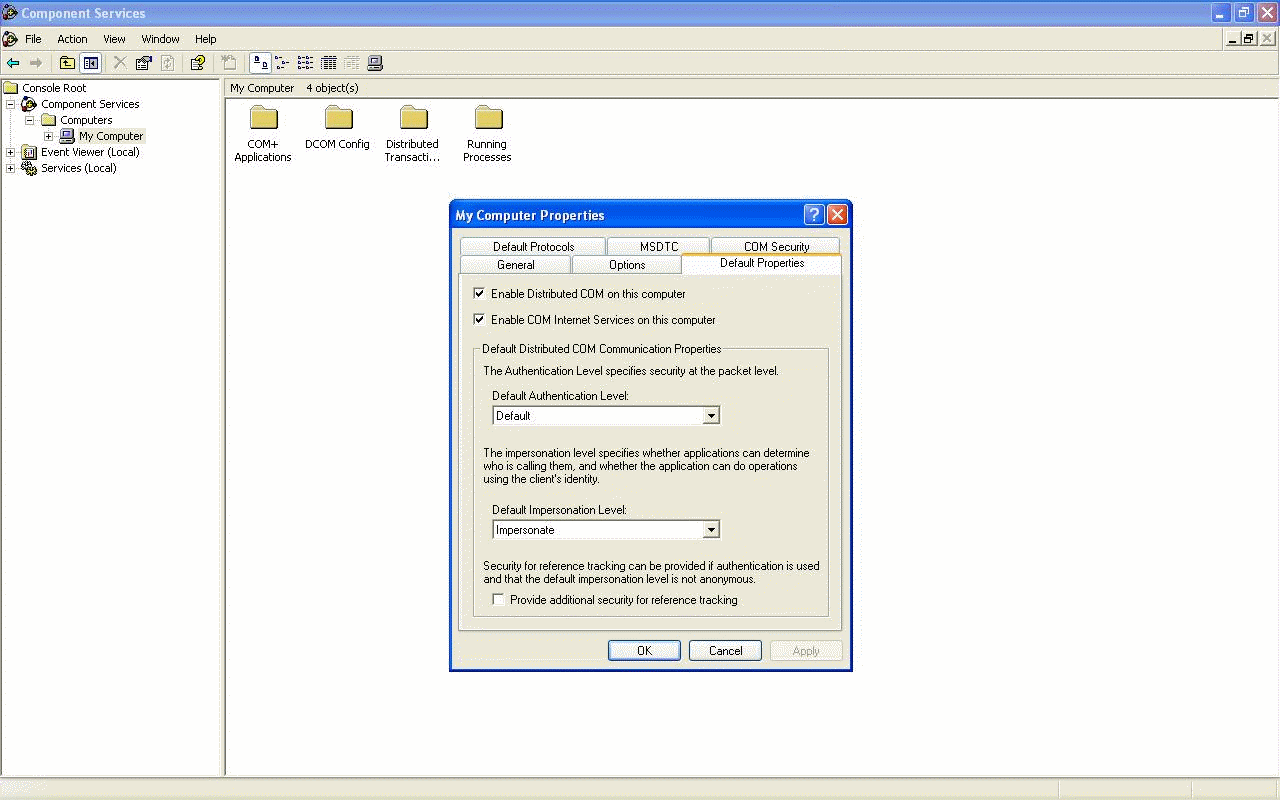
- Right Click on Component Services > Computers > My Computer.
- Click Properties.
- Select Default Properties tab in the frame that pops
- Check the box "Enable Distributed COM in this machine."
- Press Ok.
Now try scanning the workstation after Enabling Remote DCOM.
Step 4
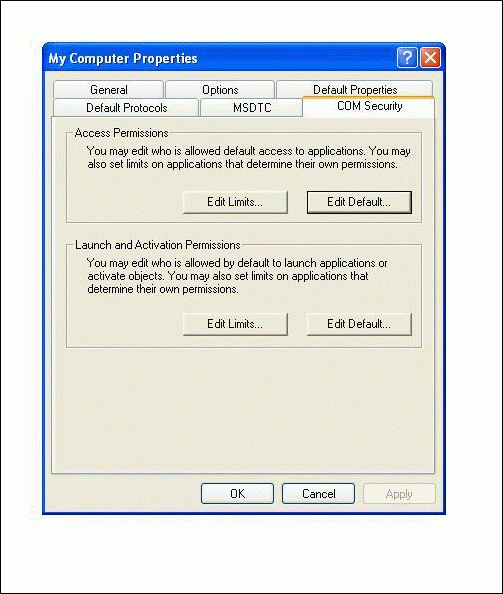
If scanning fails on enabling remote DCOM, give more DCOM permissions and try scanning the workstation.
- Start -> Run -> DCOMCNFG
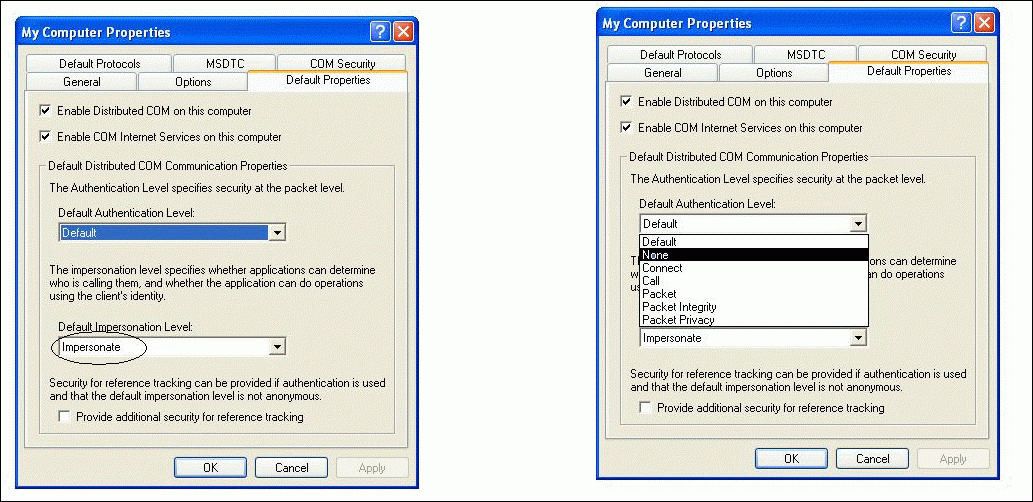
- Choose the DEFAULT PROPERTIES tab
- Check the check-box Enable Remote DCOM on this computer
- Set the Default Authentication Level as DEFAULT. NONE also can be set.
- Set the Default Impersonation Level as IMPERSONATE.
- Now select the DEFAULT SECURITY tab.
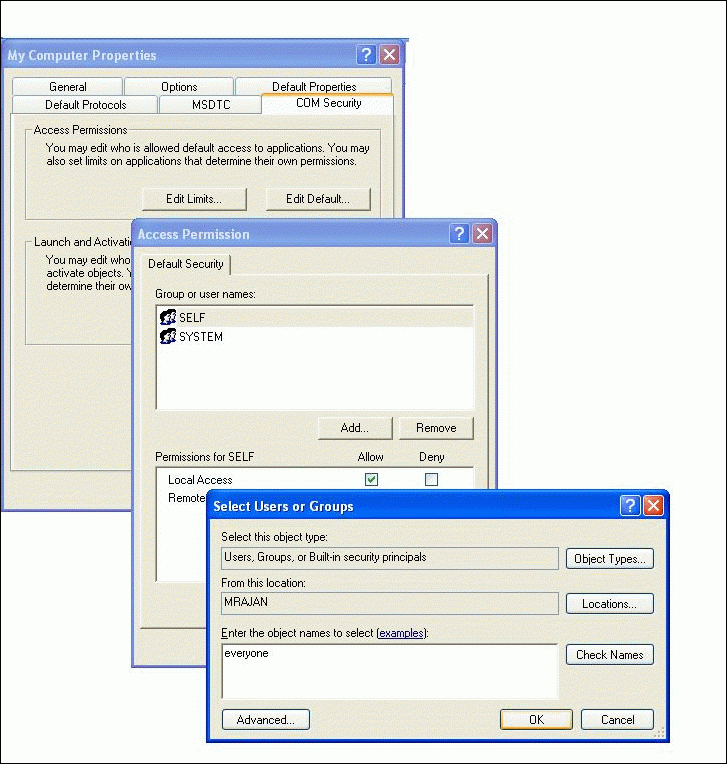
- Click the Edit Default button under Default Access Permission.
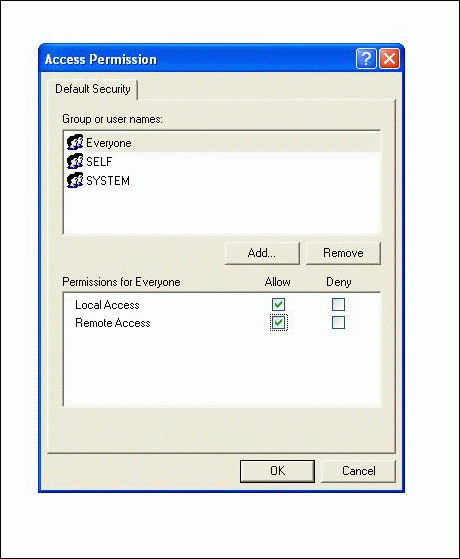
- In the Frame that pops, click the ADD button and add "Everyone" with Allow Access permission.
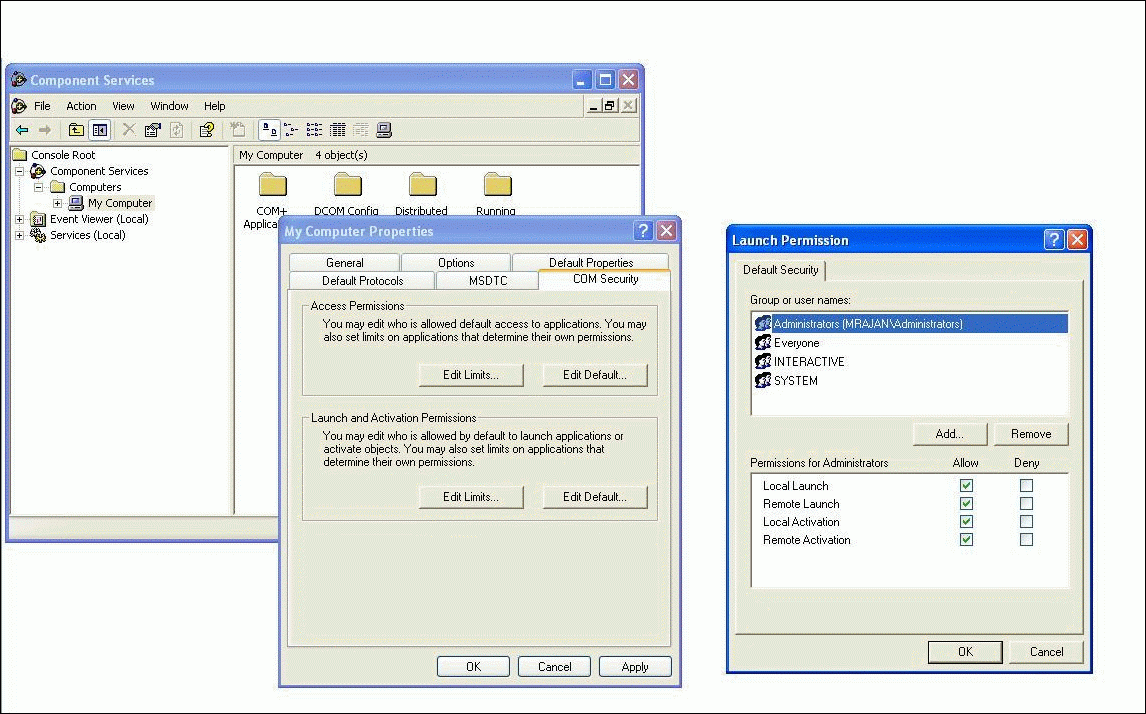
- Similarly, under the Default Launch Permission add "Everyone" with Allow Launch permission.
- Click OK and now try scanning the workstation.
NOTE: Sometimes DCOM Settings will be effective after restarting the server.
Step 5:
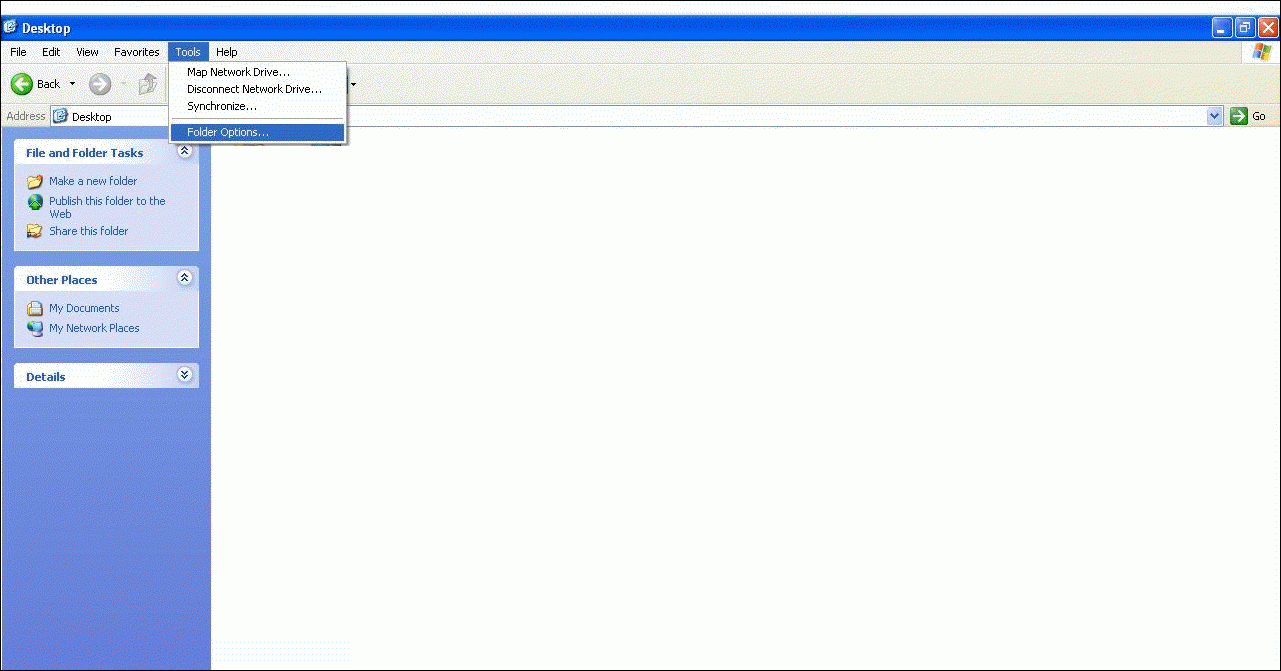
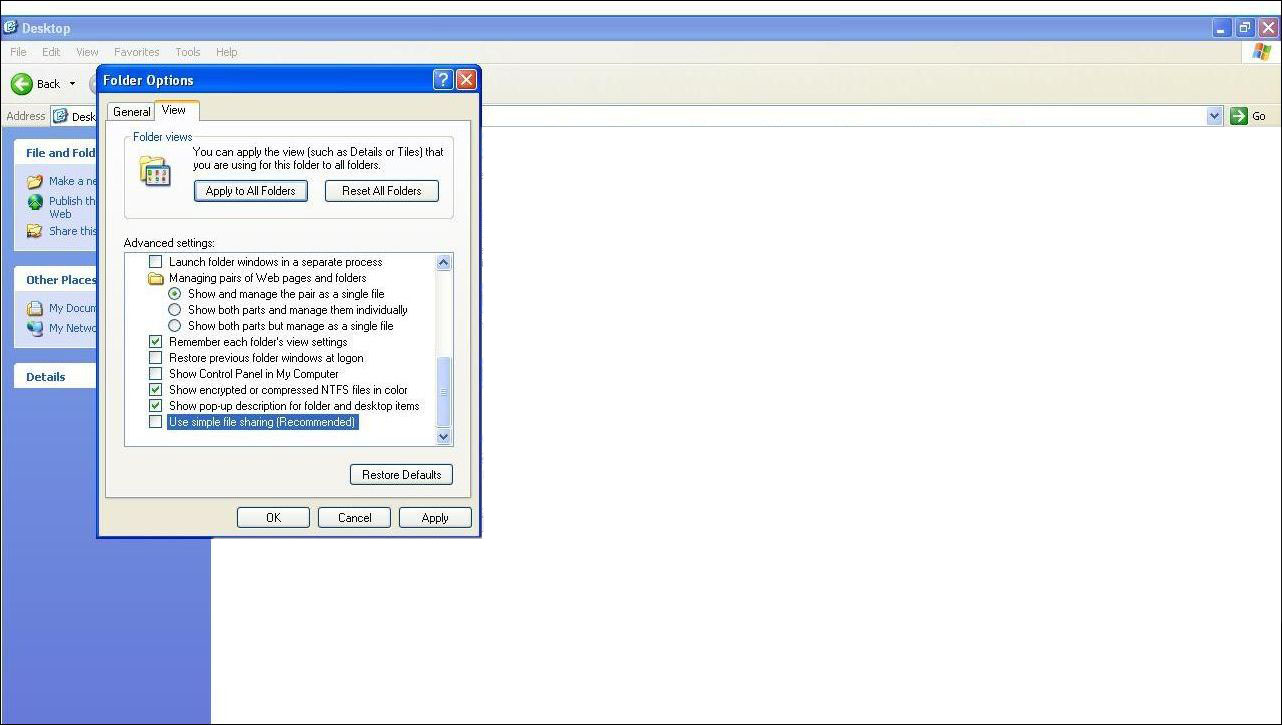
In certain cases, the problem might be due to enabling "Simple File Sharing". To disable "Simple File Sharing":
- In any of the Windows Folders Click "Tools" > "Folder Options".
- In the Folder Options window, go to "View" tab.
- Un-check "Use simple file sharing".
- Click OK to save changes.
Step 6:
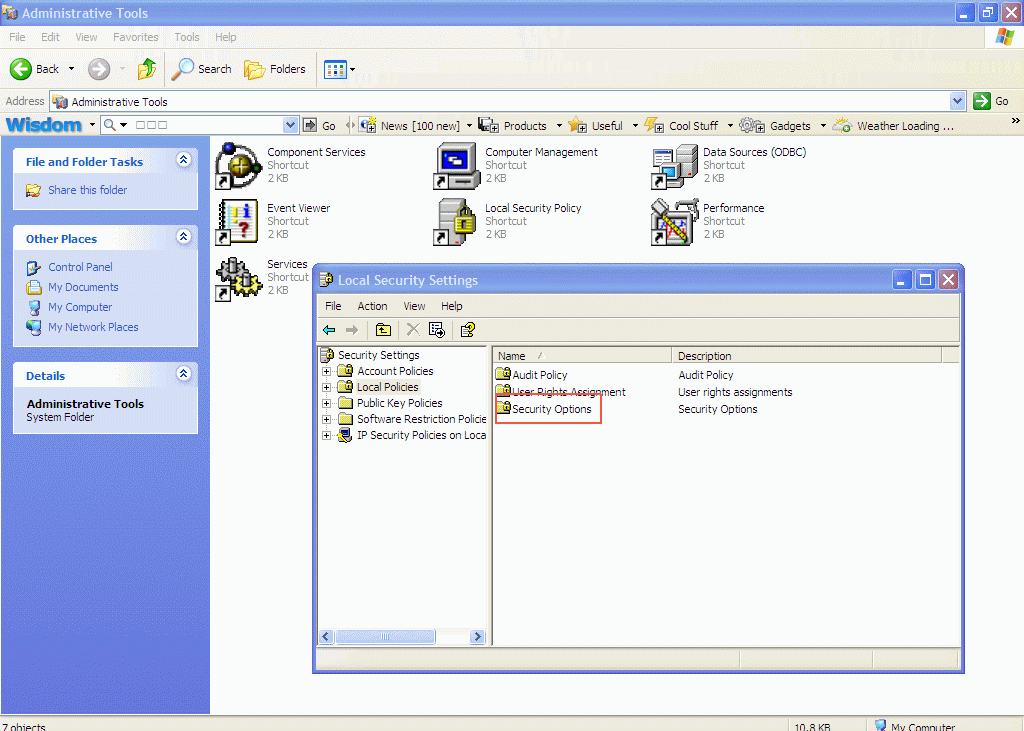
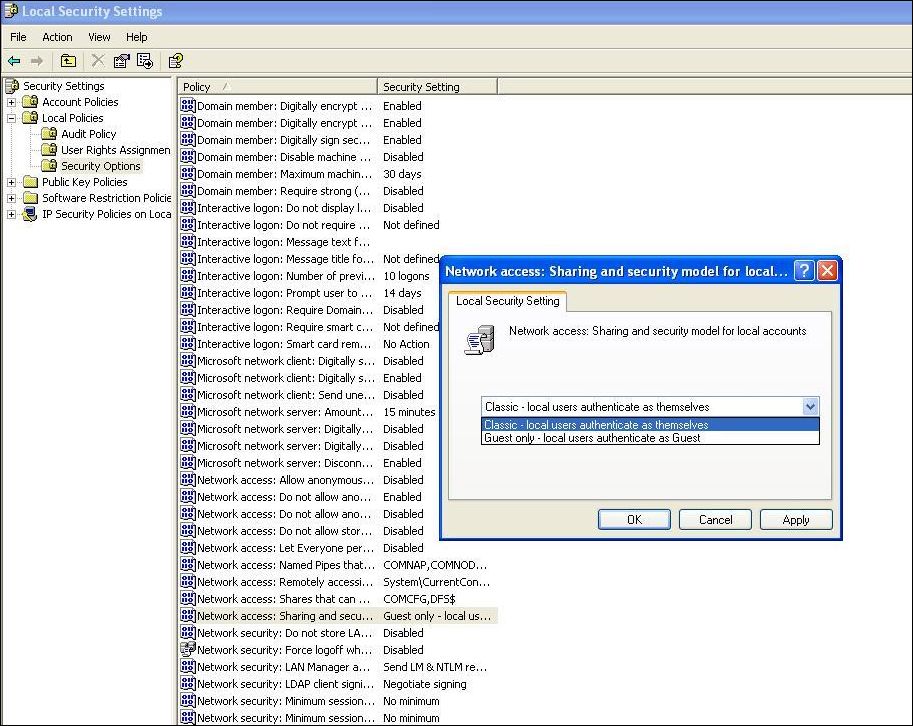
If the target workstations are Windows XP try modifying the Network Access Security Model.
- Go to Control Panel -> Administrative Tools -> Local Security Policy -> Local policies -> Security options.
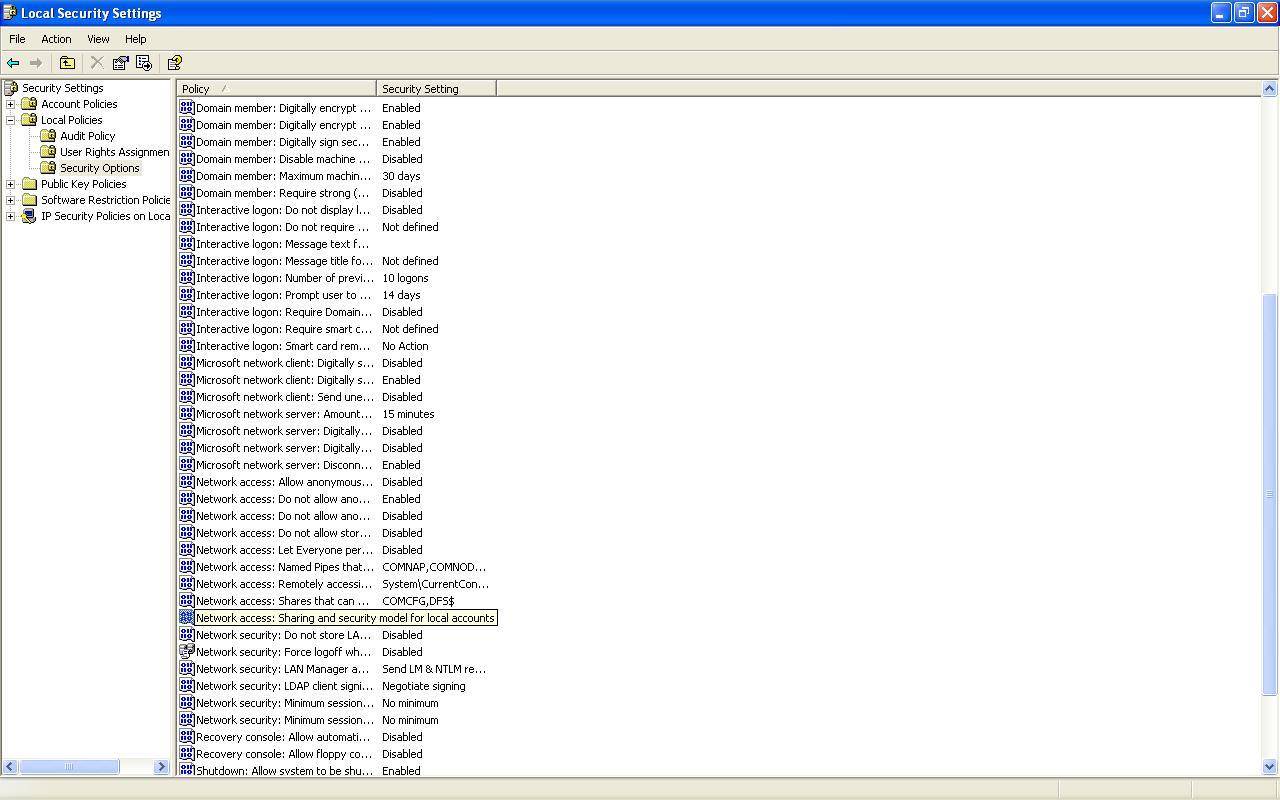
- Right Click "Network Access: Sharing and security model for local accounts" and then select Properties.
- Choose the option "Classic - local users authenticate as themselves" and apply.
- Restart and scan the workstation.
3. "User does not have the access privileges to perform this operation"
Cause:
Such error messages are shown, if the User ID provided for scanning does not have sufficient access privileges to perform the scanning operation. Probably, this user does not belong to the administrator group of the workstation.
Solution:
Either move the user to the Administrator Group or scan with an administrator (preferably a Domain Administrator) account.
Alternatively, You may also provide WMI Admin rights for the user in the target workstation as follows:
- In the target Windows Workstation, Click Start -> Run -> Type "wmimgmt.msc" and Press Enter
- Right Click on "WMI Control (LOCAL)" that is shown in the Right side Frame and Select Properties
- In the "WMI Control Properties" window that pops up, click the "Security" tab
- Select the "Root" node; Click the "Security" button at the right bottom corner.
- Add the User (configured for Domain Scan) and allow All Security Permissions.
4. "RPC Error"
Cause:
This message is shown when a firewall is configured on the remote computer. Such exceptions mostly occur in Windows XP (SP-2), when the default Windows Firewall is enabled.
1. Configuring Windows Firewall
a. Disable the default Firewall in the workstation. To disable the Firewall in Windows XP (SP2)
- Select Start->Run
- Type Firewall.cpl
- Click OK.
- In the General tab, click Off.
- Click OK.
b. If Firewall cannot be disabled, launch Remote Administration feature for administrators in the remote computer and then scan the workstation. The following command when executed in the target computer can enable this feature:
netsh firewall set service RemoteAdmin
After scanning the computer, if required, the Remote Administration feature can also be disabled. The following command disables this feature:
netsh firewall set service RemoteAdmin disable
c. Instead of executing the command in each and every machine, you can configure the above commands through Policy Editor globally as follows:
- From Start -> Run -> gpedit.msc (to open Group policy editor)
- Computer Configuration folder.
- Open the Administrative Templates folder.
- Open the Network folder.
- Open the Network Connections folder.
- Open the Windows Firewall folder.
- If the computer is in the domain, then open the Domain Profile folder; otherwise open the Standard Profile folder.
- Click Windows Firewall: Allow remote administration exception. On the Action menu, select Properties.
- Click Enable, and then click OK.
2. Configuring 3rd Party Firewall/Security Software
If any 3rd party Firewall/Security Software is running in the target workstation then,
- Edit the System Registry to restrict random port to specific ports.
- Open the configured WMI ports in the Firewall/Security software
STEP 1: Script to restrict WMI Ports:
As mentioned above one random port will be chosen by the OS within 2000-6000 for WMI requests.
- Download the file "wmi_port_setup.txt"
- Copy the file as "wmi_port_setup.vbs" in the target workstation.
- Execute the script using Cscript from command prompt as follows:
- DIR_OF_SCRIPT_FILE> CSCRIPT wmi_port_setup.vbs
- Restart the Workstation (recommended)
STEP 2: Open ports in the 3rd Party Firewall/Security Software:
Open the Ports: TCP 135, TCP 445, TCP 5000, TCP 5001, TCP 5002 in the firewall
3. WAN/VPN Connection with NAT Box
If the Server workstation and the target Workstation is connected through a WAN/VPN with a NAT box between them, follow the below procedure:
STEP 1: Configure Firewall
Configure firewall (if any) between the Server and target workstation. To configure the firewall, kindly refer the procedures mentioned above.
STEP 2: Scan the workstation using FQDN
Scan the target workstation using its FQDN (as identified in its own LAN). Modify the DNS/Host file of the Server so that the target workstation is reachable by its FQDN.
5. "One of the WMI components is not registered properly"
Cause:
This message is shown if WMI is not available in the remote windows workstation.
This occurs in Windows 9x, Windows NT and Windows ME. Such error codes might also occur in higher versions of Windows if the WMI Components are not registered properly.
Solution:
- Install WMI core in the remote workstation. This can be downloaded from the Microsoft web site.
- If the problem is due to WMI Components registration, do register the WMI dlls, executing the following command at command prompt: winmgmt /RegServer
FOR DCOM ERROR:
=================
You can use the scan_setup.vbs script file to enable the WMI in windows machines.
You can find the scan_setup.vbs script file under (Click on Assets Module -> Troubleshoot ). Execute this script file in the WMI disabled workstation so that it can be enable. You can also use it as a logon script in you Active
Directory in order to execute the script in all the machines.
6. "Connection to RPC server in the workstation failed"
Vista Scanning
ServiceDesk Plus and Asset Explorer will Scan Vista workstation if it is a part of the domain. If the vista workstation is in the workgroup, then it will require some configuration settings. You need to disable User Account
Control - UAC in Control Panel.
Alternatively, you can also disable UAC by using one of the following methods:
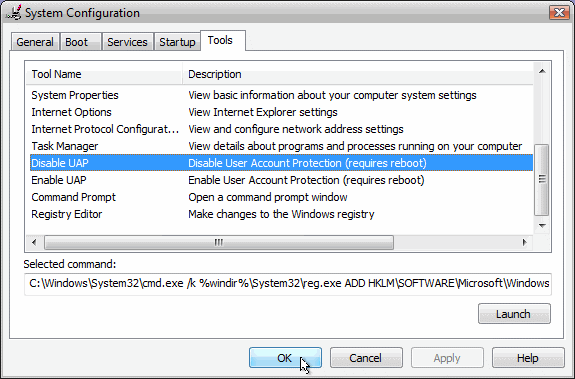
Method #1 - Using MSCONFIG
- Launch MSCONFIG by from the Run menu.
- Click on the Tools tab. Scroll down till you find "Disable UAC" . Click on that line.
- Press the Launch button.
- A CMD window will open. When the command is done, you can close the window.
- Close MSCONFIG. You need to reboot the computer for changes to apply.
Note that you can re-enable UAC by selecting the "Enable UAC" line and then clicking on the Launch button.
Method #2 - Using Regedit
- Open Registry Editor.
- In Registry Editor, navigate to the following registry key.
- Locate the following value (DWORD): EnableLUA and give it a value of 0.
NOTE: Before making any changes to your registry you should always make sure you have a valid backup. In cases where you're supposed to delete or modify key values from the registry, it is possible to first export that
key or value(s) to a .REG file before performing the changes.
- Close Registry Editor. You need to reboot the computer for changes to apply.
In order to re-enable UAC just change the above value to 1.
Method #3 - Using Group Policy
This can be done via Local Group Policy or via Active Directory-based GPO, which is much more suited for large networks where one would like to disable UAC for many computers at once.
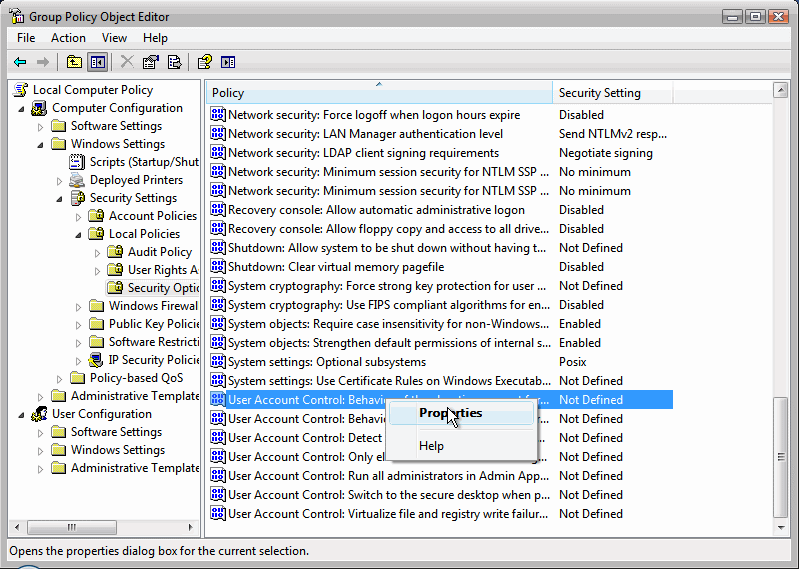
If you're using Local Group Policy then you need to open the Group Policy Editor (Start > Run > gpedit.msc) from your Vista computer.
If you're using AD-based GPO, open Group Policy Management Console (Start > Run > gpmc.msc) from a Vista computer that is a member of the domain.
In the GPMC window, browse to the required GPO that is linked to the OU or domain where the Vista computers are located, then edit it.
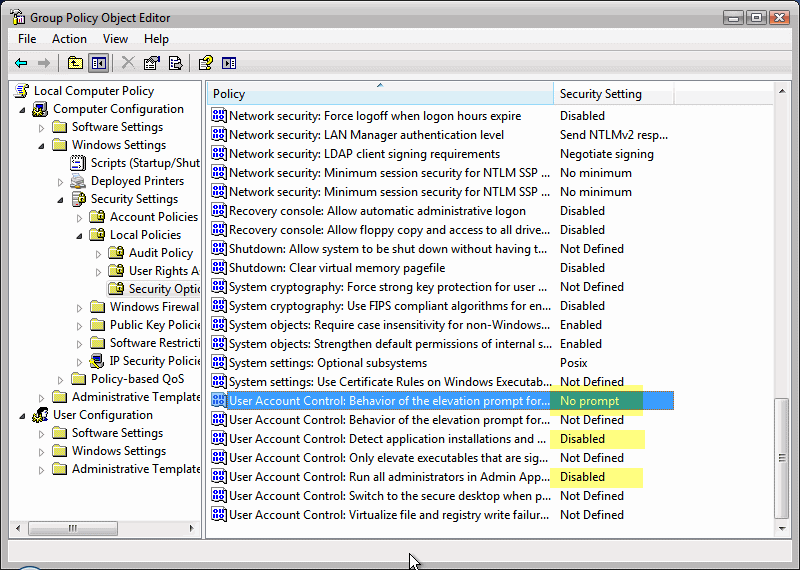
In the Group Policy Editor window, browse to Computer Configuration > Windows Settings > Security Settings > Local Policies > Security Options.
In the right pane scroll to find the User Access Control policies at the bottom of the window. You need to configure the policies.
Reboot your computers.
Method #4 - Using Control Panel
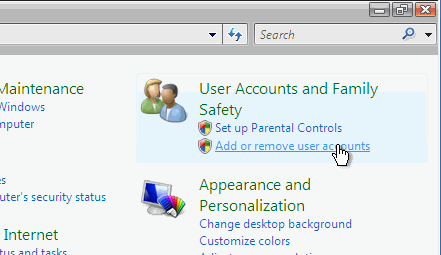
- Open Control Panel.
- Under User Account and Family settings click on the "Add or remove user account".
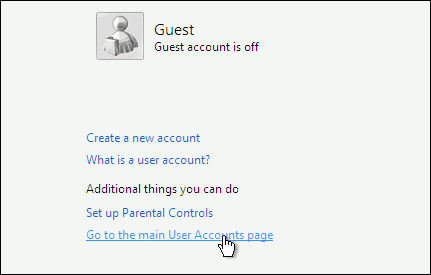
- Click on one of the user accounts, for example you can use the Guest account.
- Under the user account click on the "Go to the main User Account page" link.
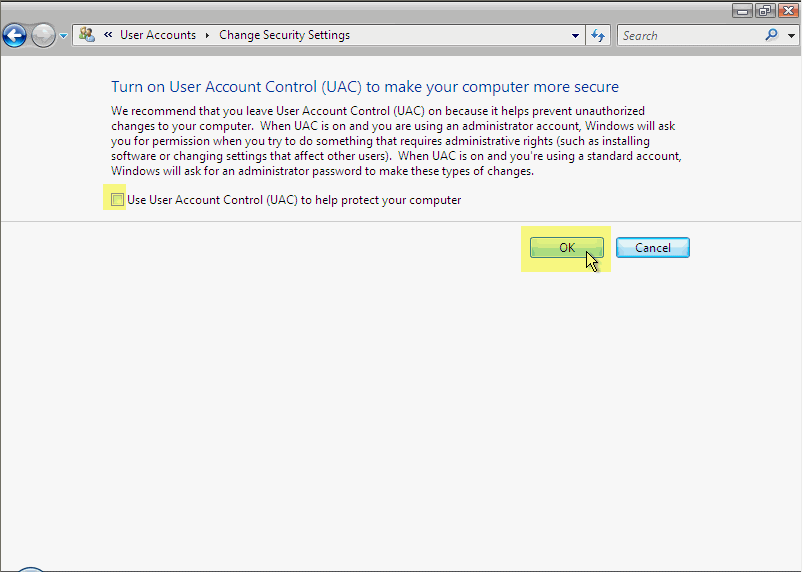
- Under "Make changes to your user account" click on the "Change security settings" link.
- In the "Turn on User Account Control (UAC) to make your computer more secure" click to un-select the "Use User Account Control (UAC) to help protect your computer". Click on the Ok button
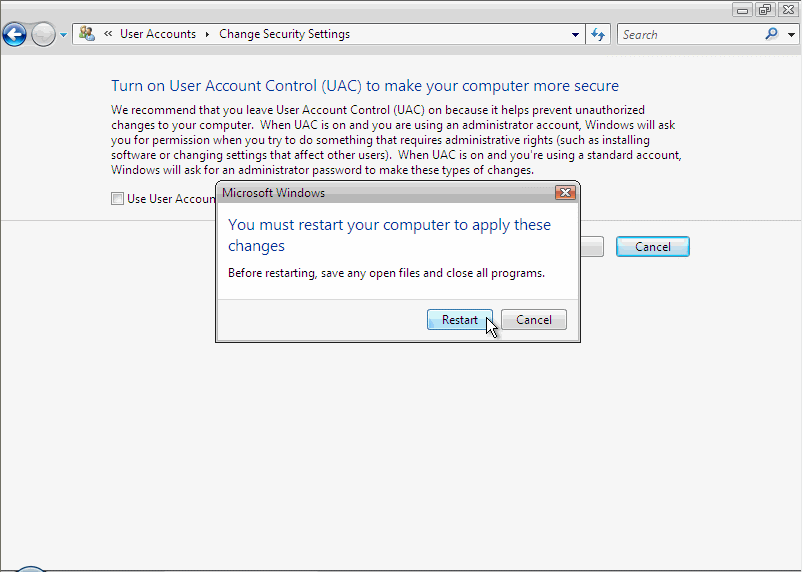
- You will be prompted to reboot your computer. Do so when ready.
- In order to re-enable UAC just select the above checkbox and reboot.
