Configuring a mail server with OAuth
What is OAuth authentication?
OAuth or Open Authorization is an open standard for token-based authentication and authorization that enables secure access to resources without sharing user credentials (such as passwords). It allows applications like DDI Central to grant limited access to a user’s information on another platform without exposing the user’s credentials.
Why do you need OAuth authentication for your mail server settings?
Configuring mail server settings with OAuth offers several key benefits that enhance security, user experience, and manageability:
- Enhanced security: OAuth eliminates the need to store or transmit passwords directly to the mail server. Instead, it uses access tokens, which are more secure, can be limited in scope, and have defined expiration times, reducing the risk of unauthorized access or password compromise.
- Improved user experience: OAuth enables Single Sign-On (SSO), allowing users to authenticate once with their identity provider (e.g., Azure AD or Google) and access multiple applications, including email, without logging in again. This reduces login friction and improves productivity.
- Compliance and policy control: OAuth allows administrators to set policies and permissions at the identity provider level. This means organizations can enforce access controls, multi-factor authentication, and conditional access policies more easily, ensuring compliance with security standards.
- Token-based access control: OAuth’s token system enables fine-grained access control. Administrators can define access scopes for specific resources or actions, which can be customized according to roles and responsibilities. This is especially useful when access needs to be limited for specific tasks.
- Automatic session management: OAuth supports token refreshes for long-lived sessions, which helps manage user access seamlessly without re-authentication. When a user’s access needs to be terminated, administrators can revoke tokens without resetting passwords, which is ideal for managing user sessions.
- Compatibility with modern apps: OAuth is widely supported in modern email clients and applications, particularly for cloud services. By configuring OAuth, organizations can leverage identity providers like Microsoft 365 or Google Workspace, ensuring compatibility with modern, mobile, and remote work requirements.
Configuring mail servers with OAuth ultimately provides a more secure and streamlined approach to authentication, making it easier to manage access across various applications and improving the security posture of the organization’s email infrastructure.
OAuth for DDI Central mail services
DDI Central creates an authorization flow URL request with the necessary details for the authorization provider (Microsoft Azure or Google) of your choice. Once the request is validated, the authorization provider prompts the user to approve the DDI Central’s access request. Upon user approval, DDI Central receives an access token, which can then be used for API requests.Requirements: Use the Redirect URL to obtain the client ID, client secret, authentication URL, access token URL, and scope from the authorization provider.
Currently, DDI Central support sending email through Microsoft and Google Authenticator servers, all you have to do is to add an OAuth provider of your choice for secure authentication in SMTP server settings.
Follow the detailed instructions below on generating access tokens from these providers.
Configuring OAuth with Microsoft Azure
Follow the below steps to configure OAuth with Microsoft
In Azure services, go to App registrations.
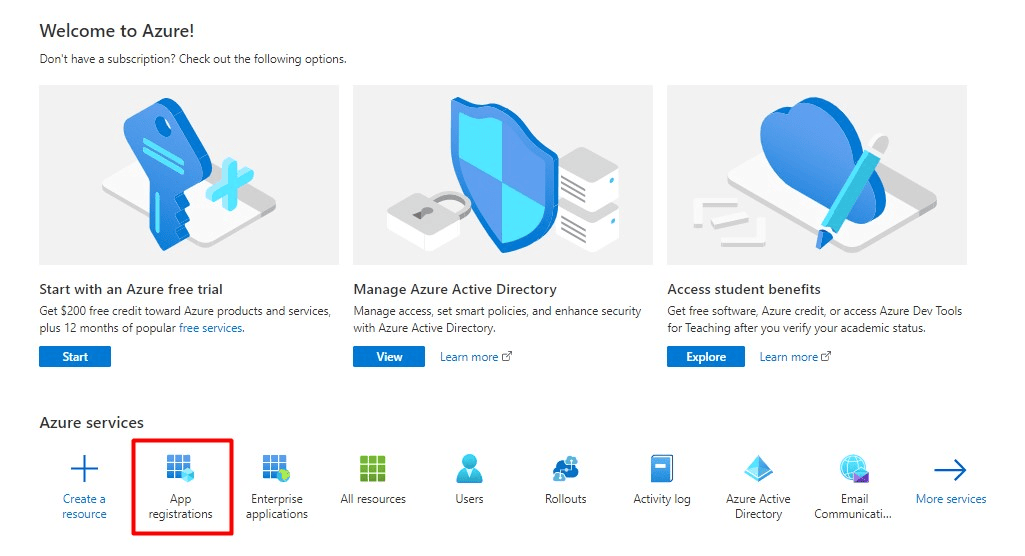
Click New registration.

Follow the below steps to register an application
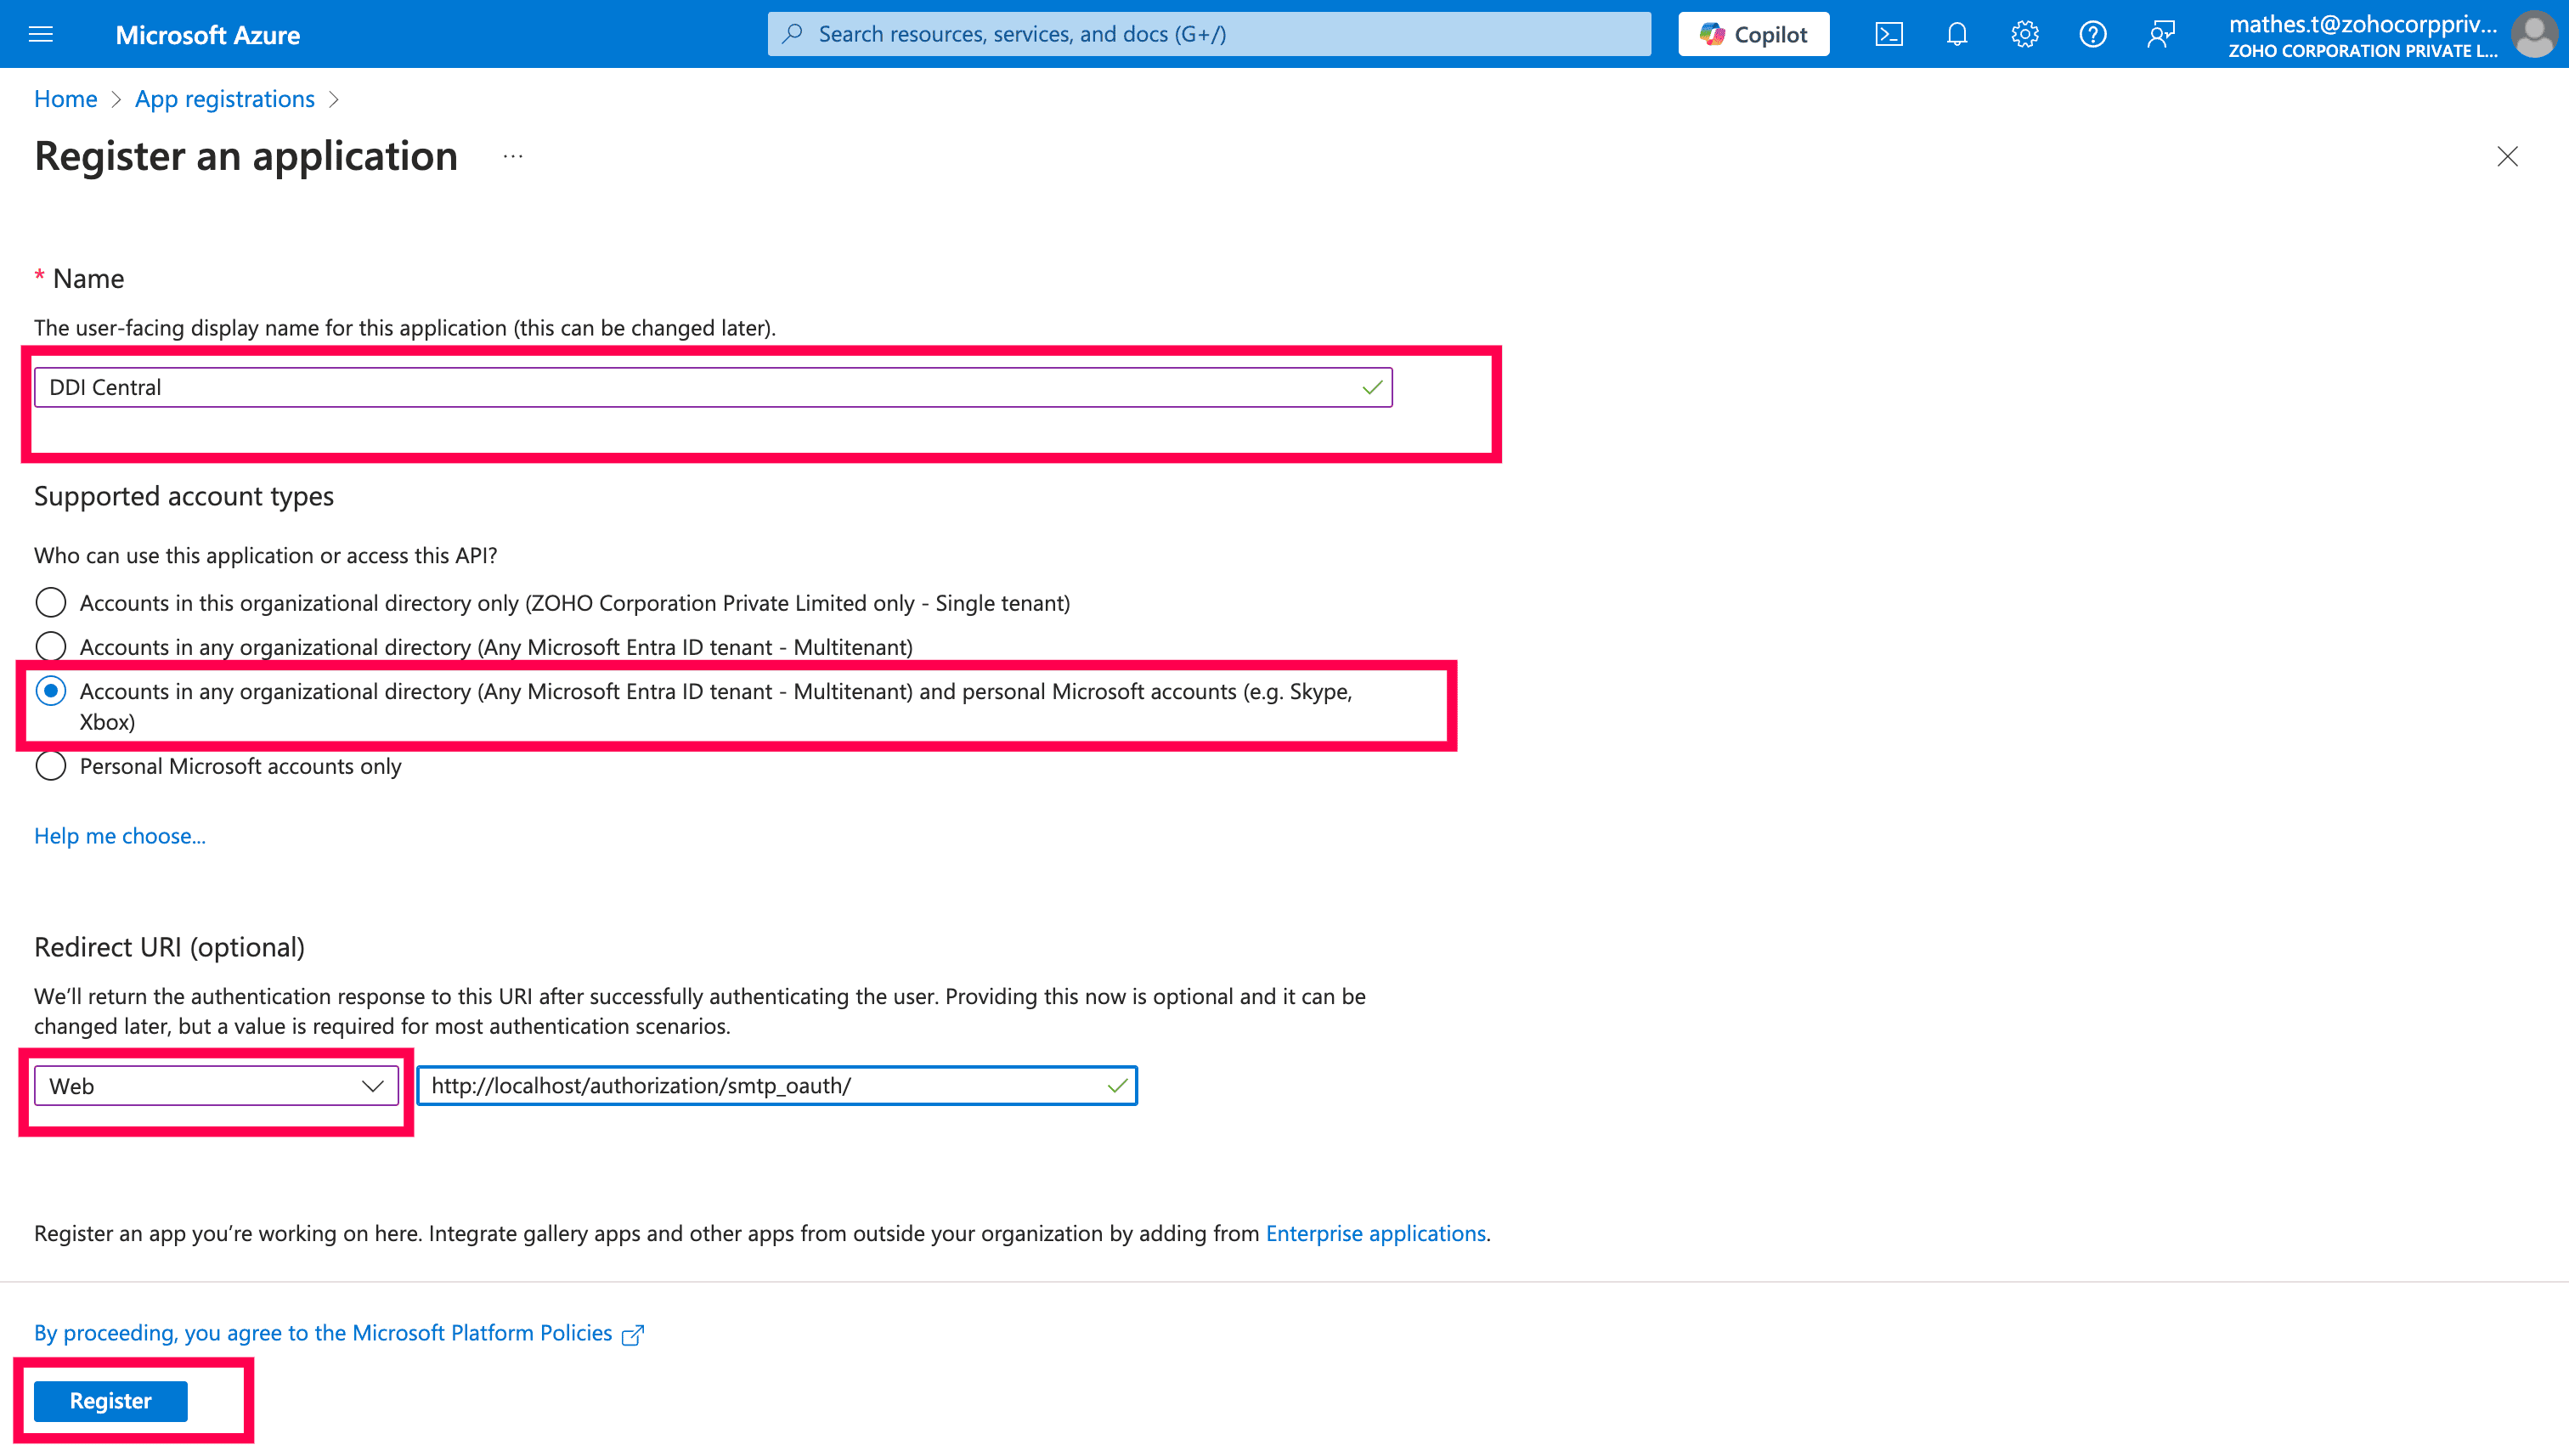
Enter the name of the application as DDI Central.
Choose the account type. The Accounts could be in any organizational directory (Azure AD directory or Multi-tenant) or personal Microsoft accounts (e.g. Skype, Xbox). You may choose to opt different account type based on your requirement
For Redirect URL, choose type as Web and use "http://localhost:{portnumber}/authorization/smtp_oauth/" as redirecting URI. If you intend to use the actual IP address of your machine make sure you manage the whole URL as a DNS Zone and add an SSL certificate for it. Only then the URL will be treated as a valid redirecting URL. Here's an example URL "https://10.16.13.2:9443/authorization/smtp_oauth/".
Then click Register, to create the application.
After registering the application, you will be redirected to the Application home page. Here click on the hyperlinked Display name of your application.
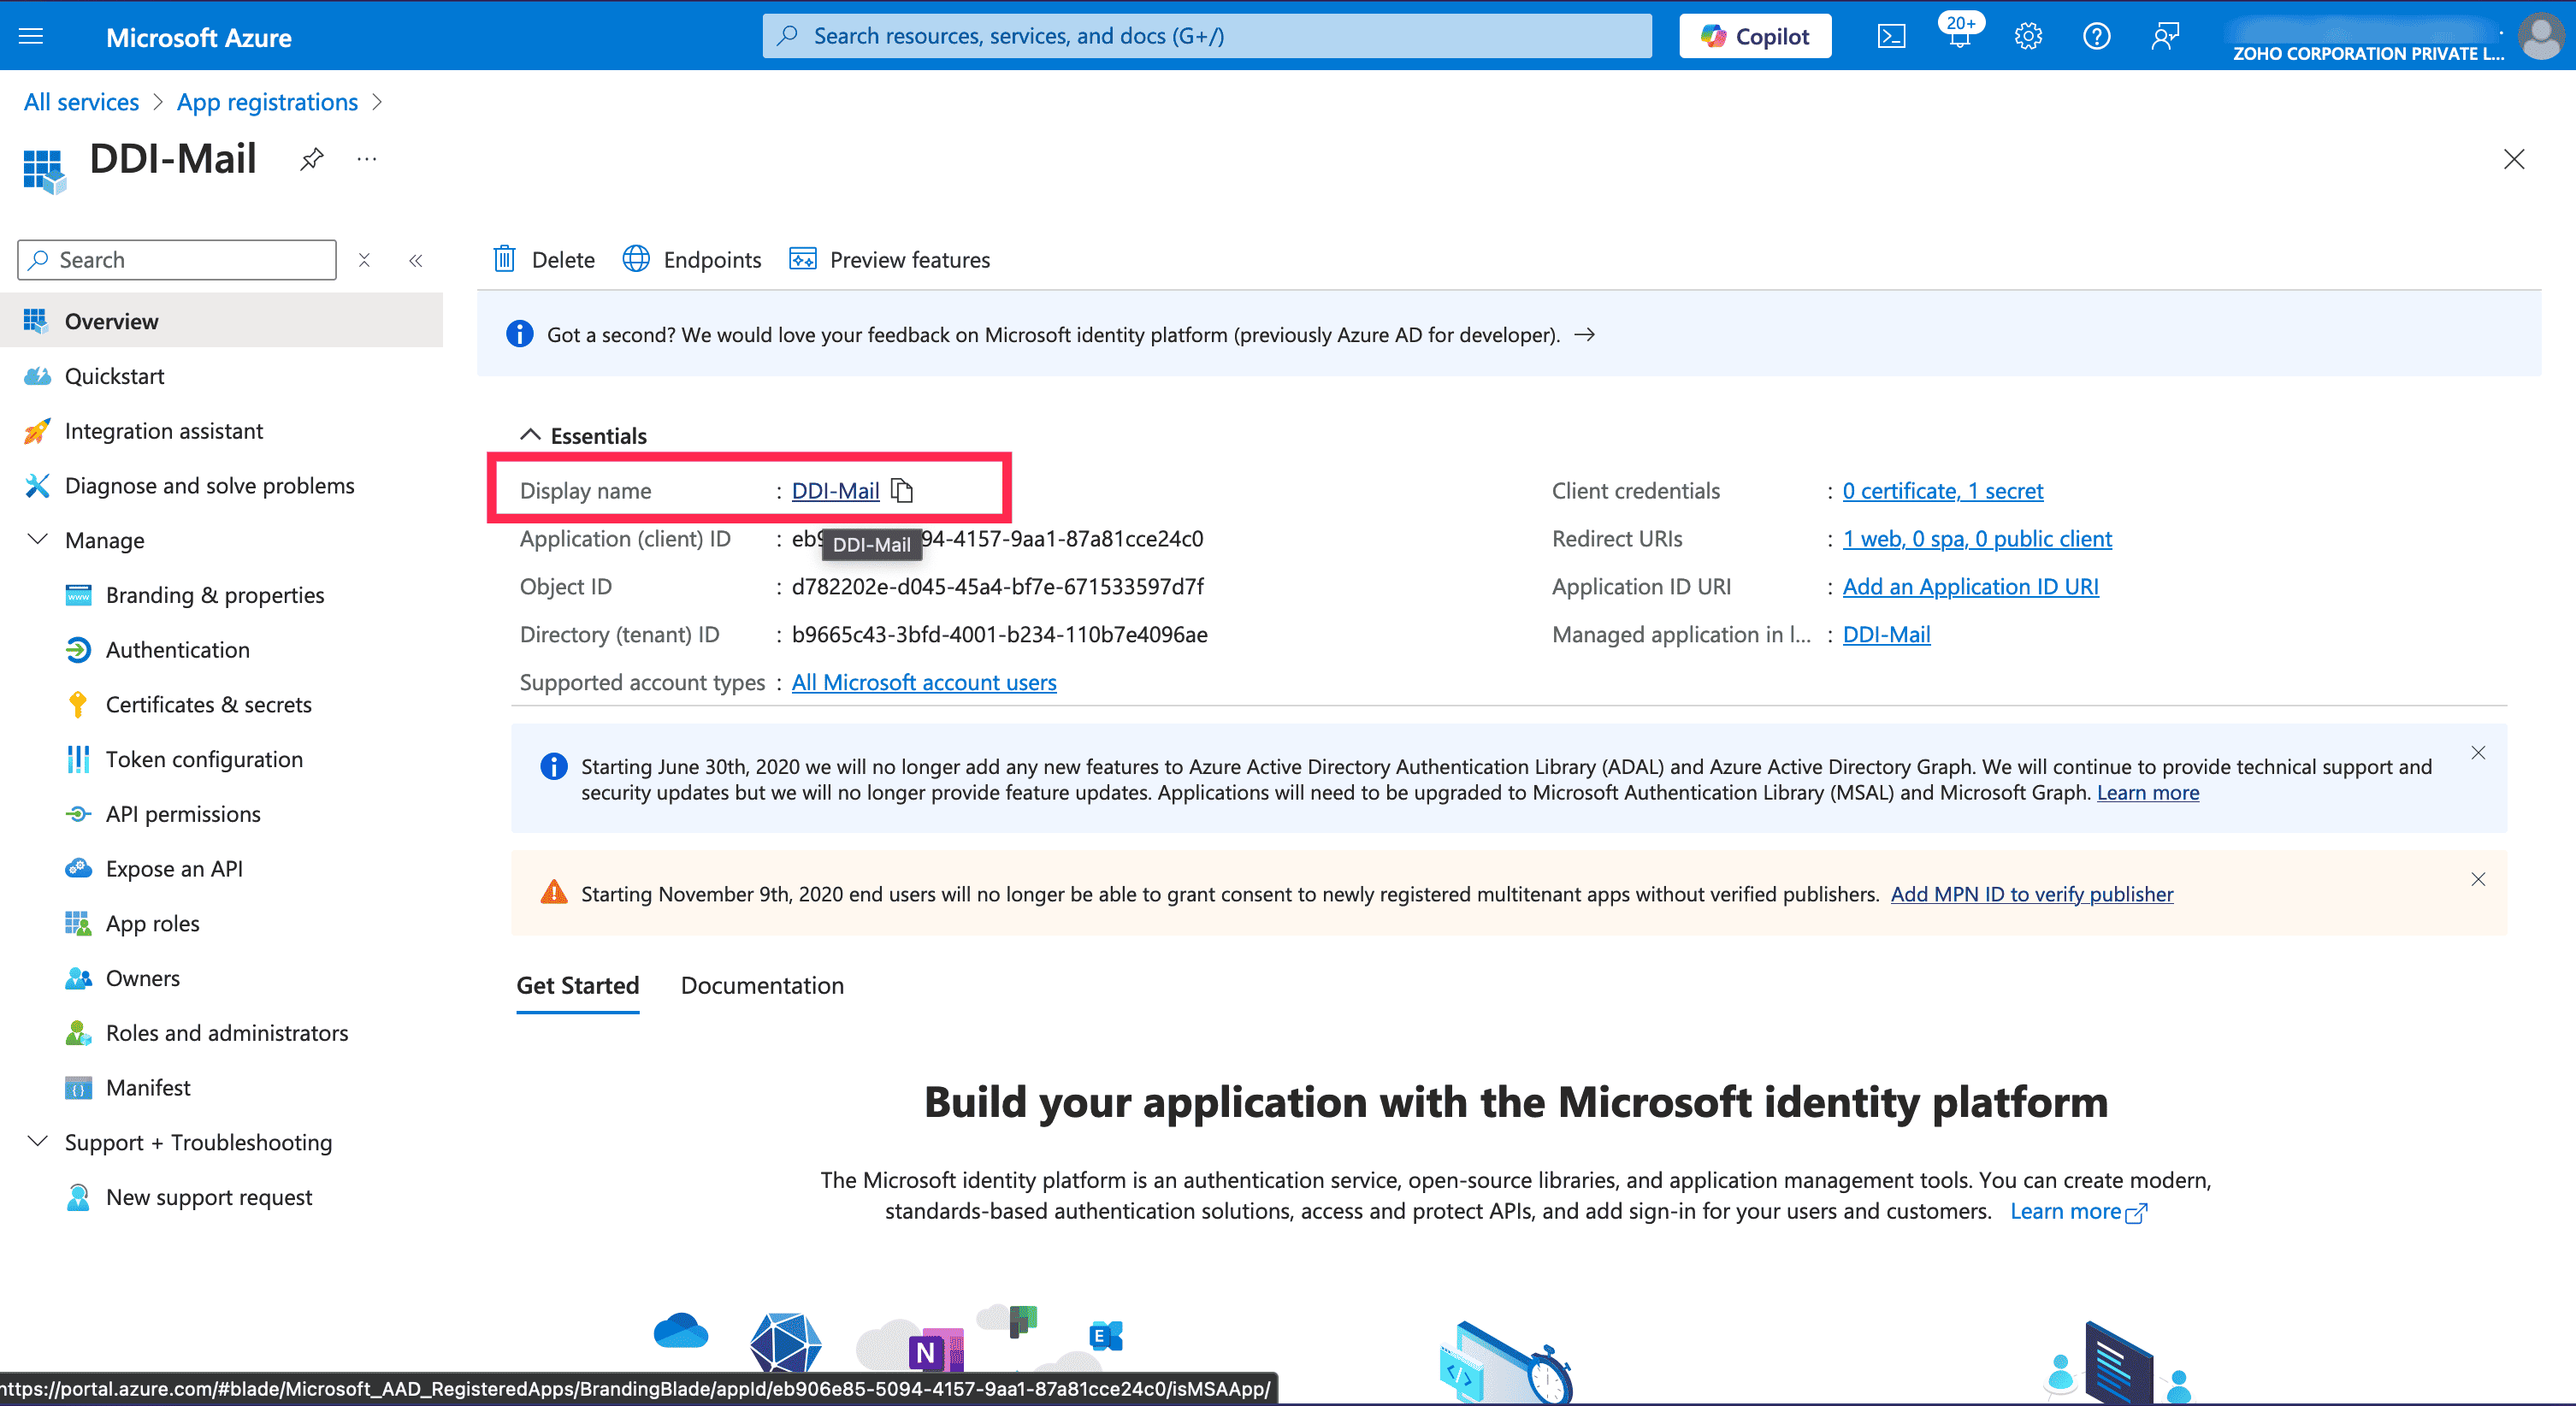
Now navigate to the API Permissions menu located in the left menu bar and click on Add a permission button.
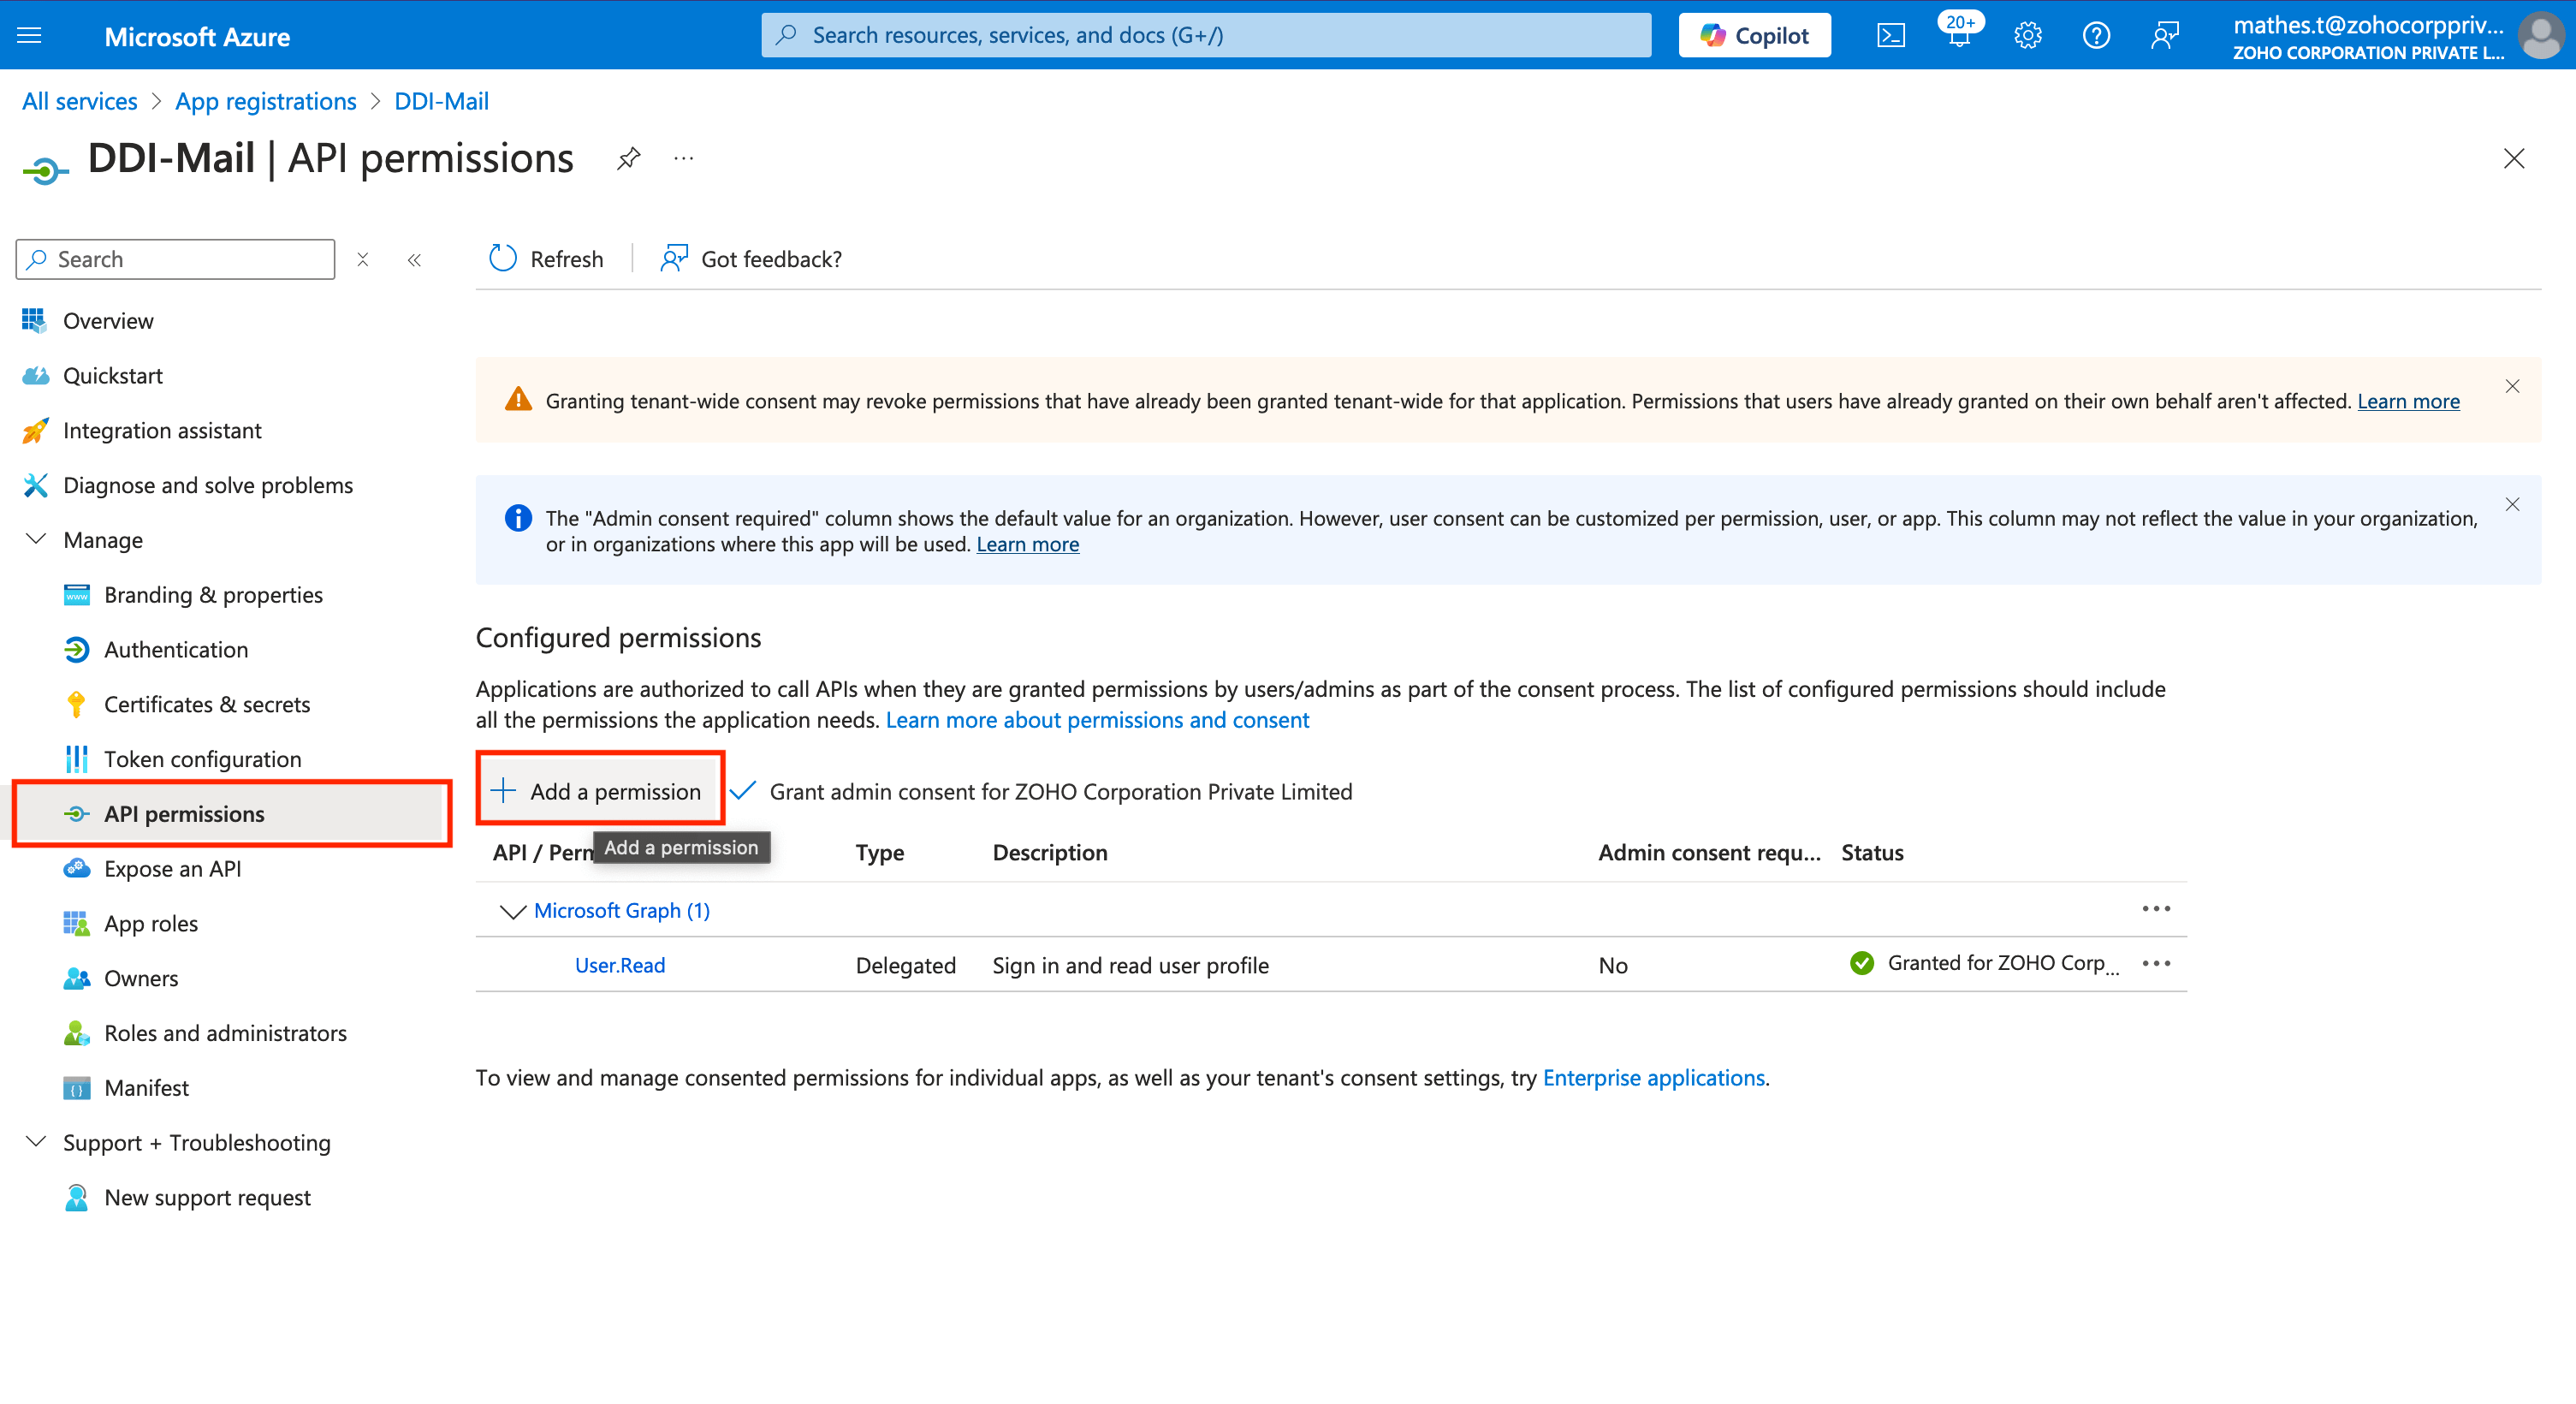
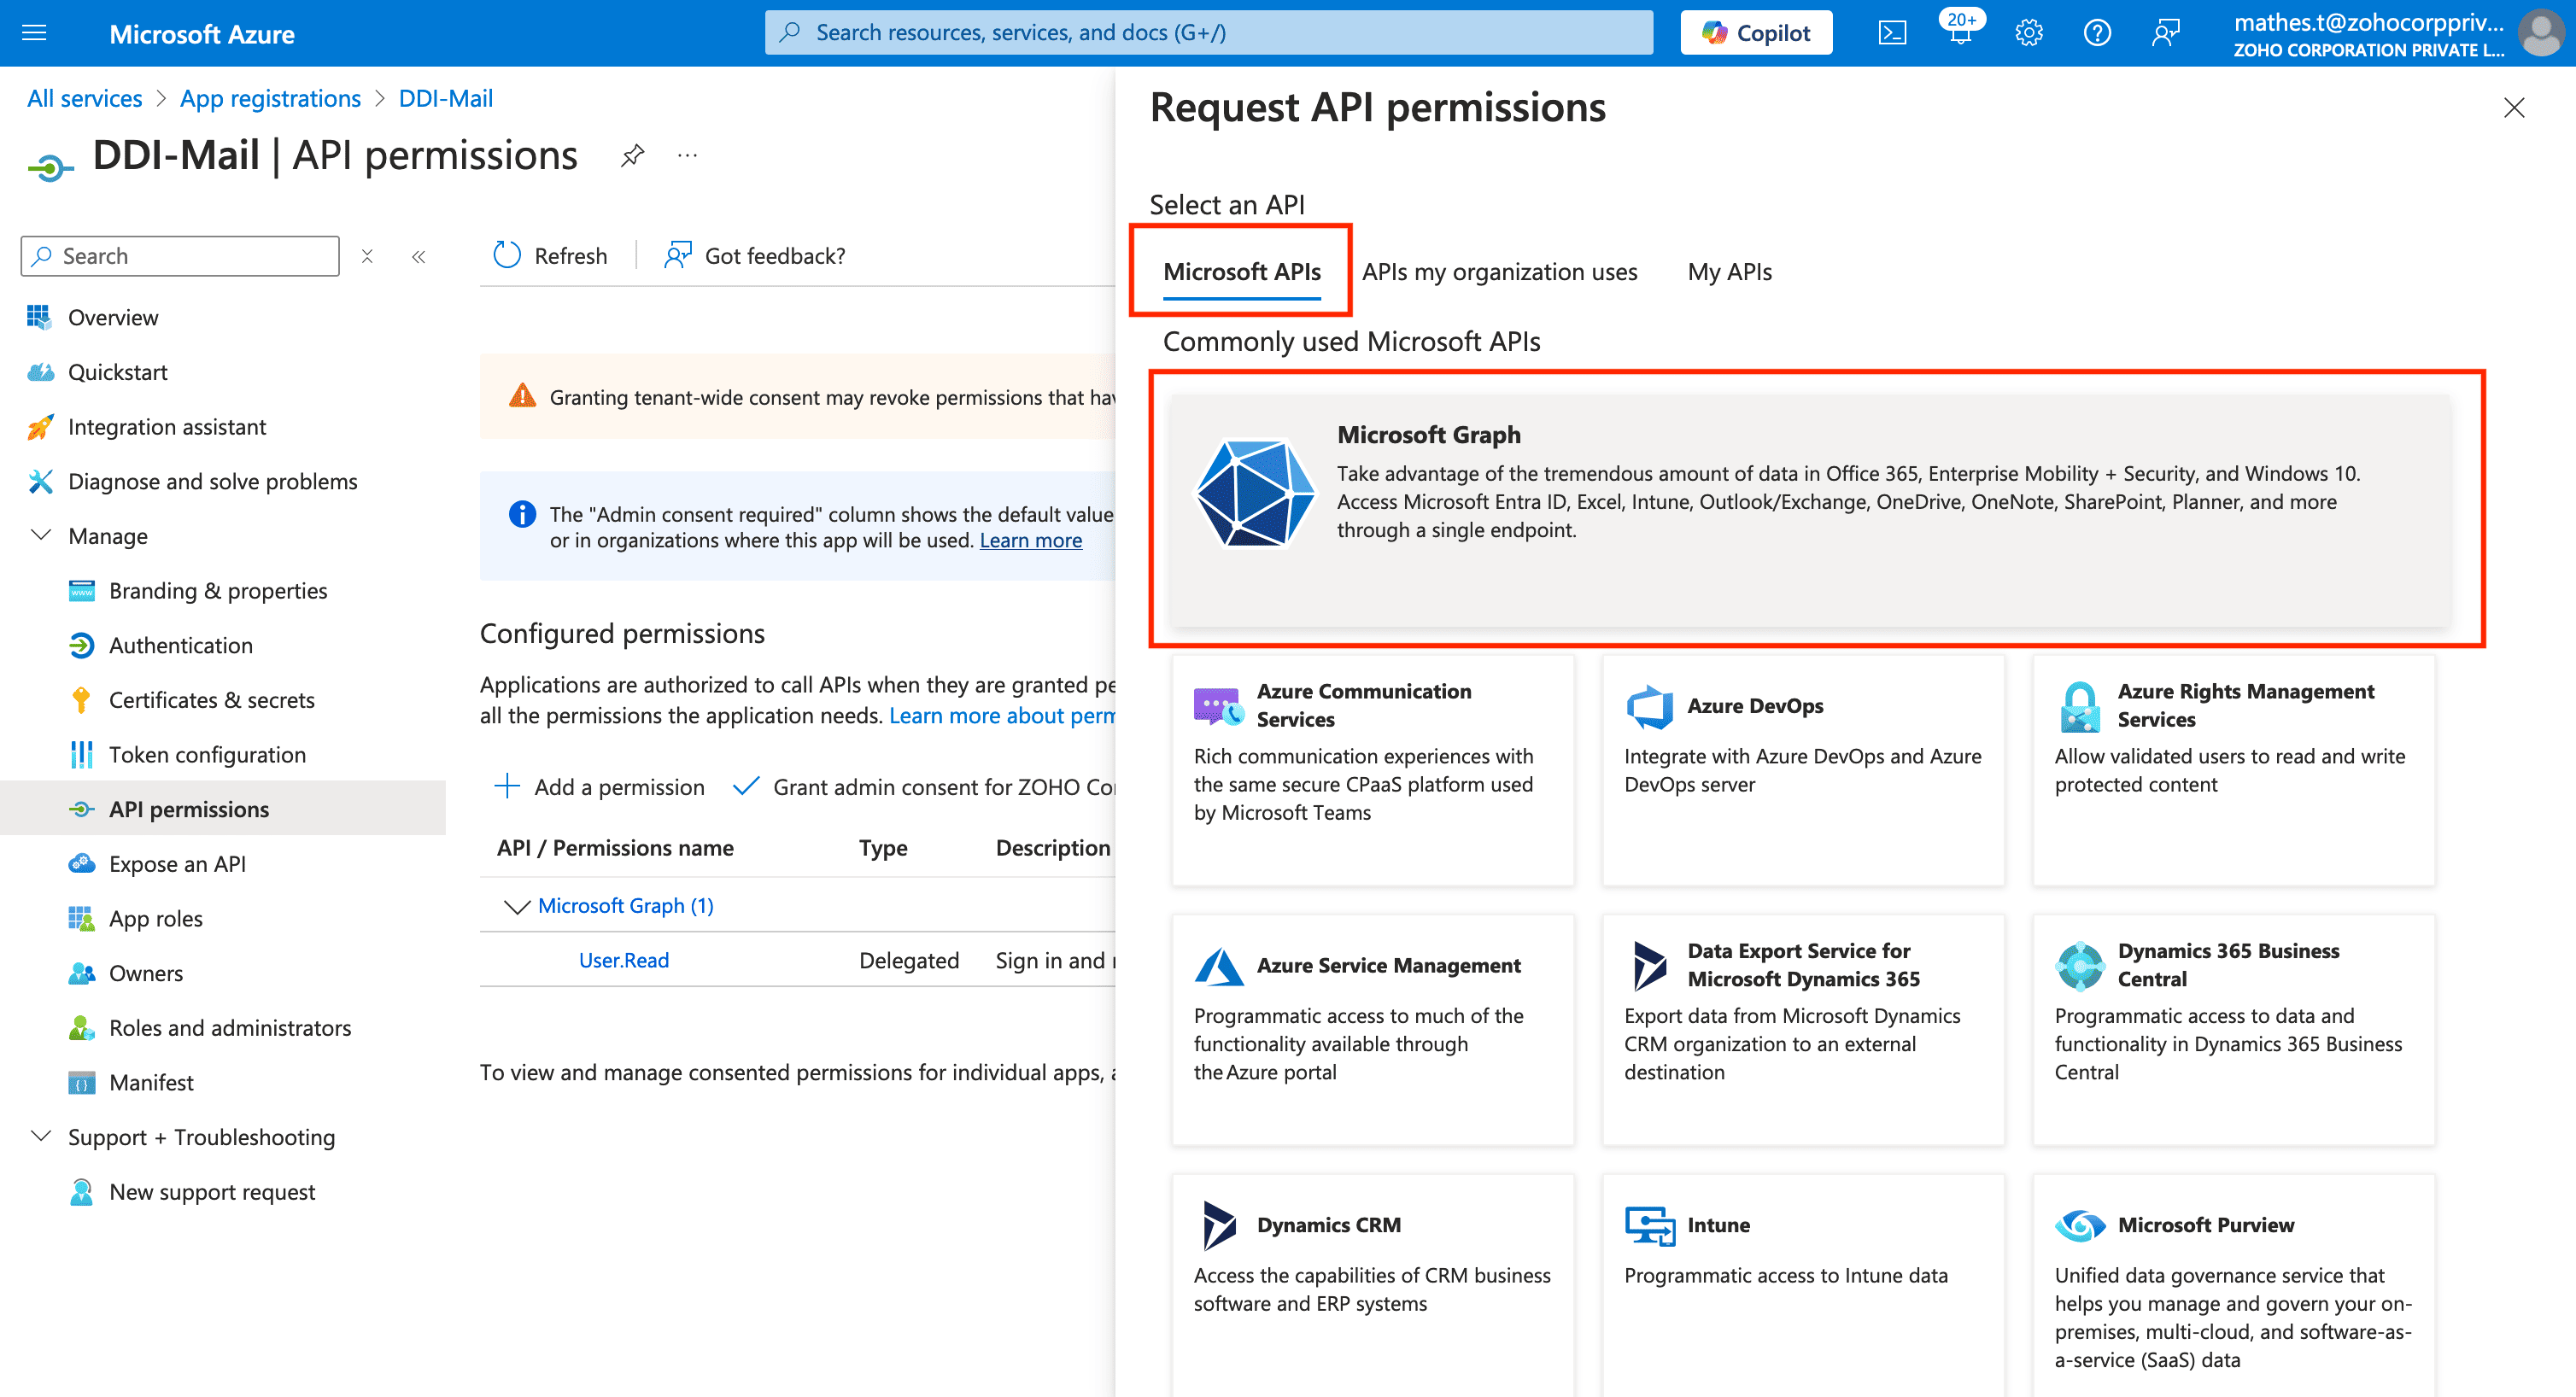
On the Request API Permissions page that appears, Click on the Microsoft Graph section under the Microsoft APIs tab.
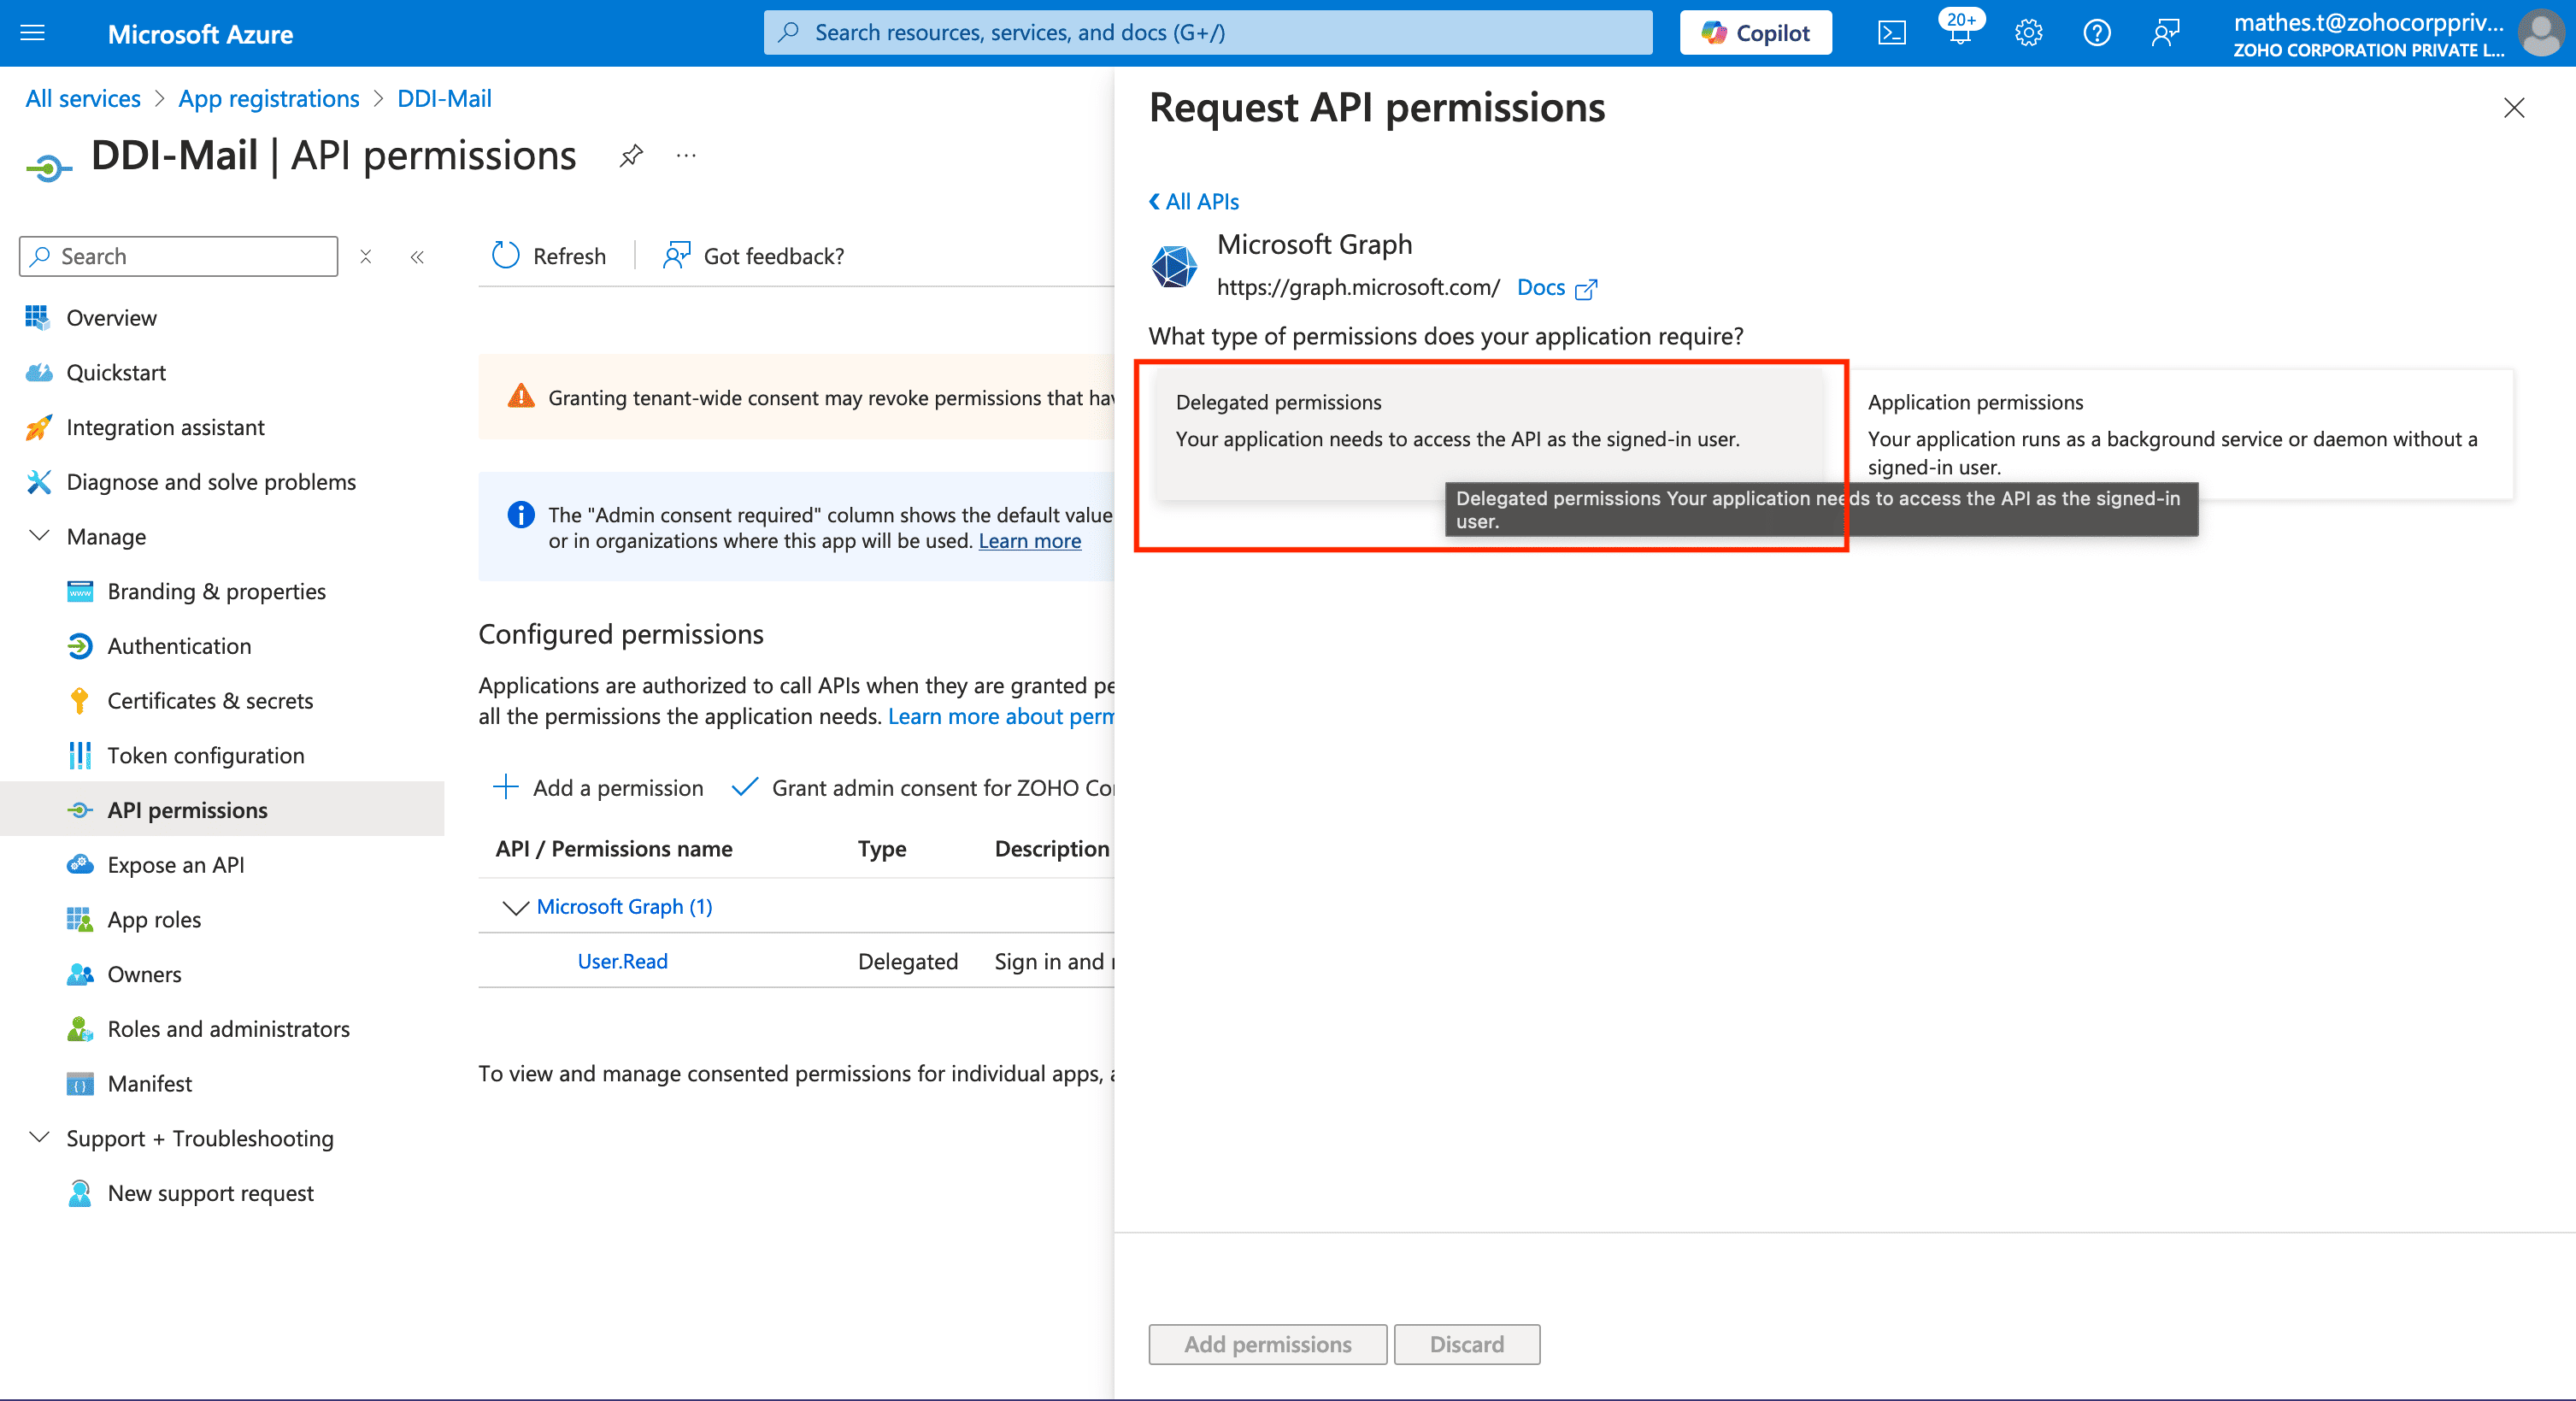
Under the Microsoft Graph page select Delegated Permissions as the type of permissions your application requires
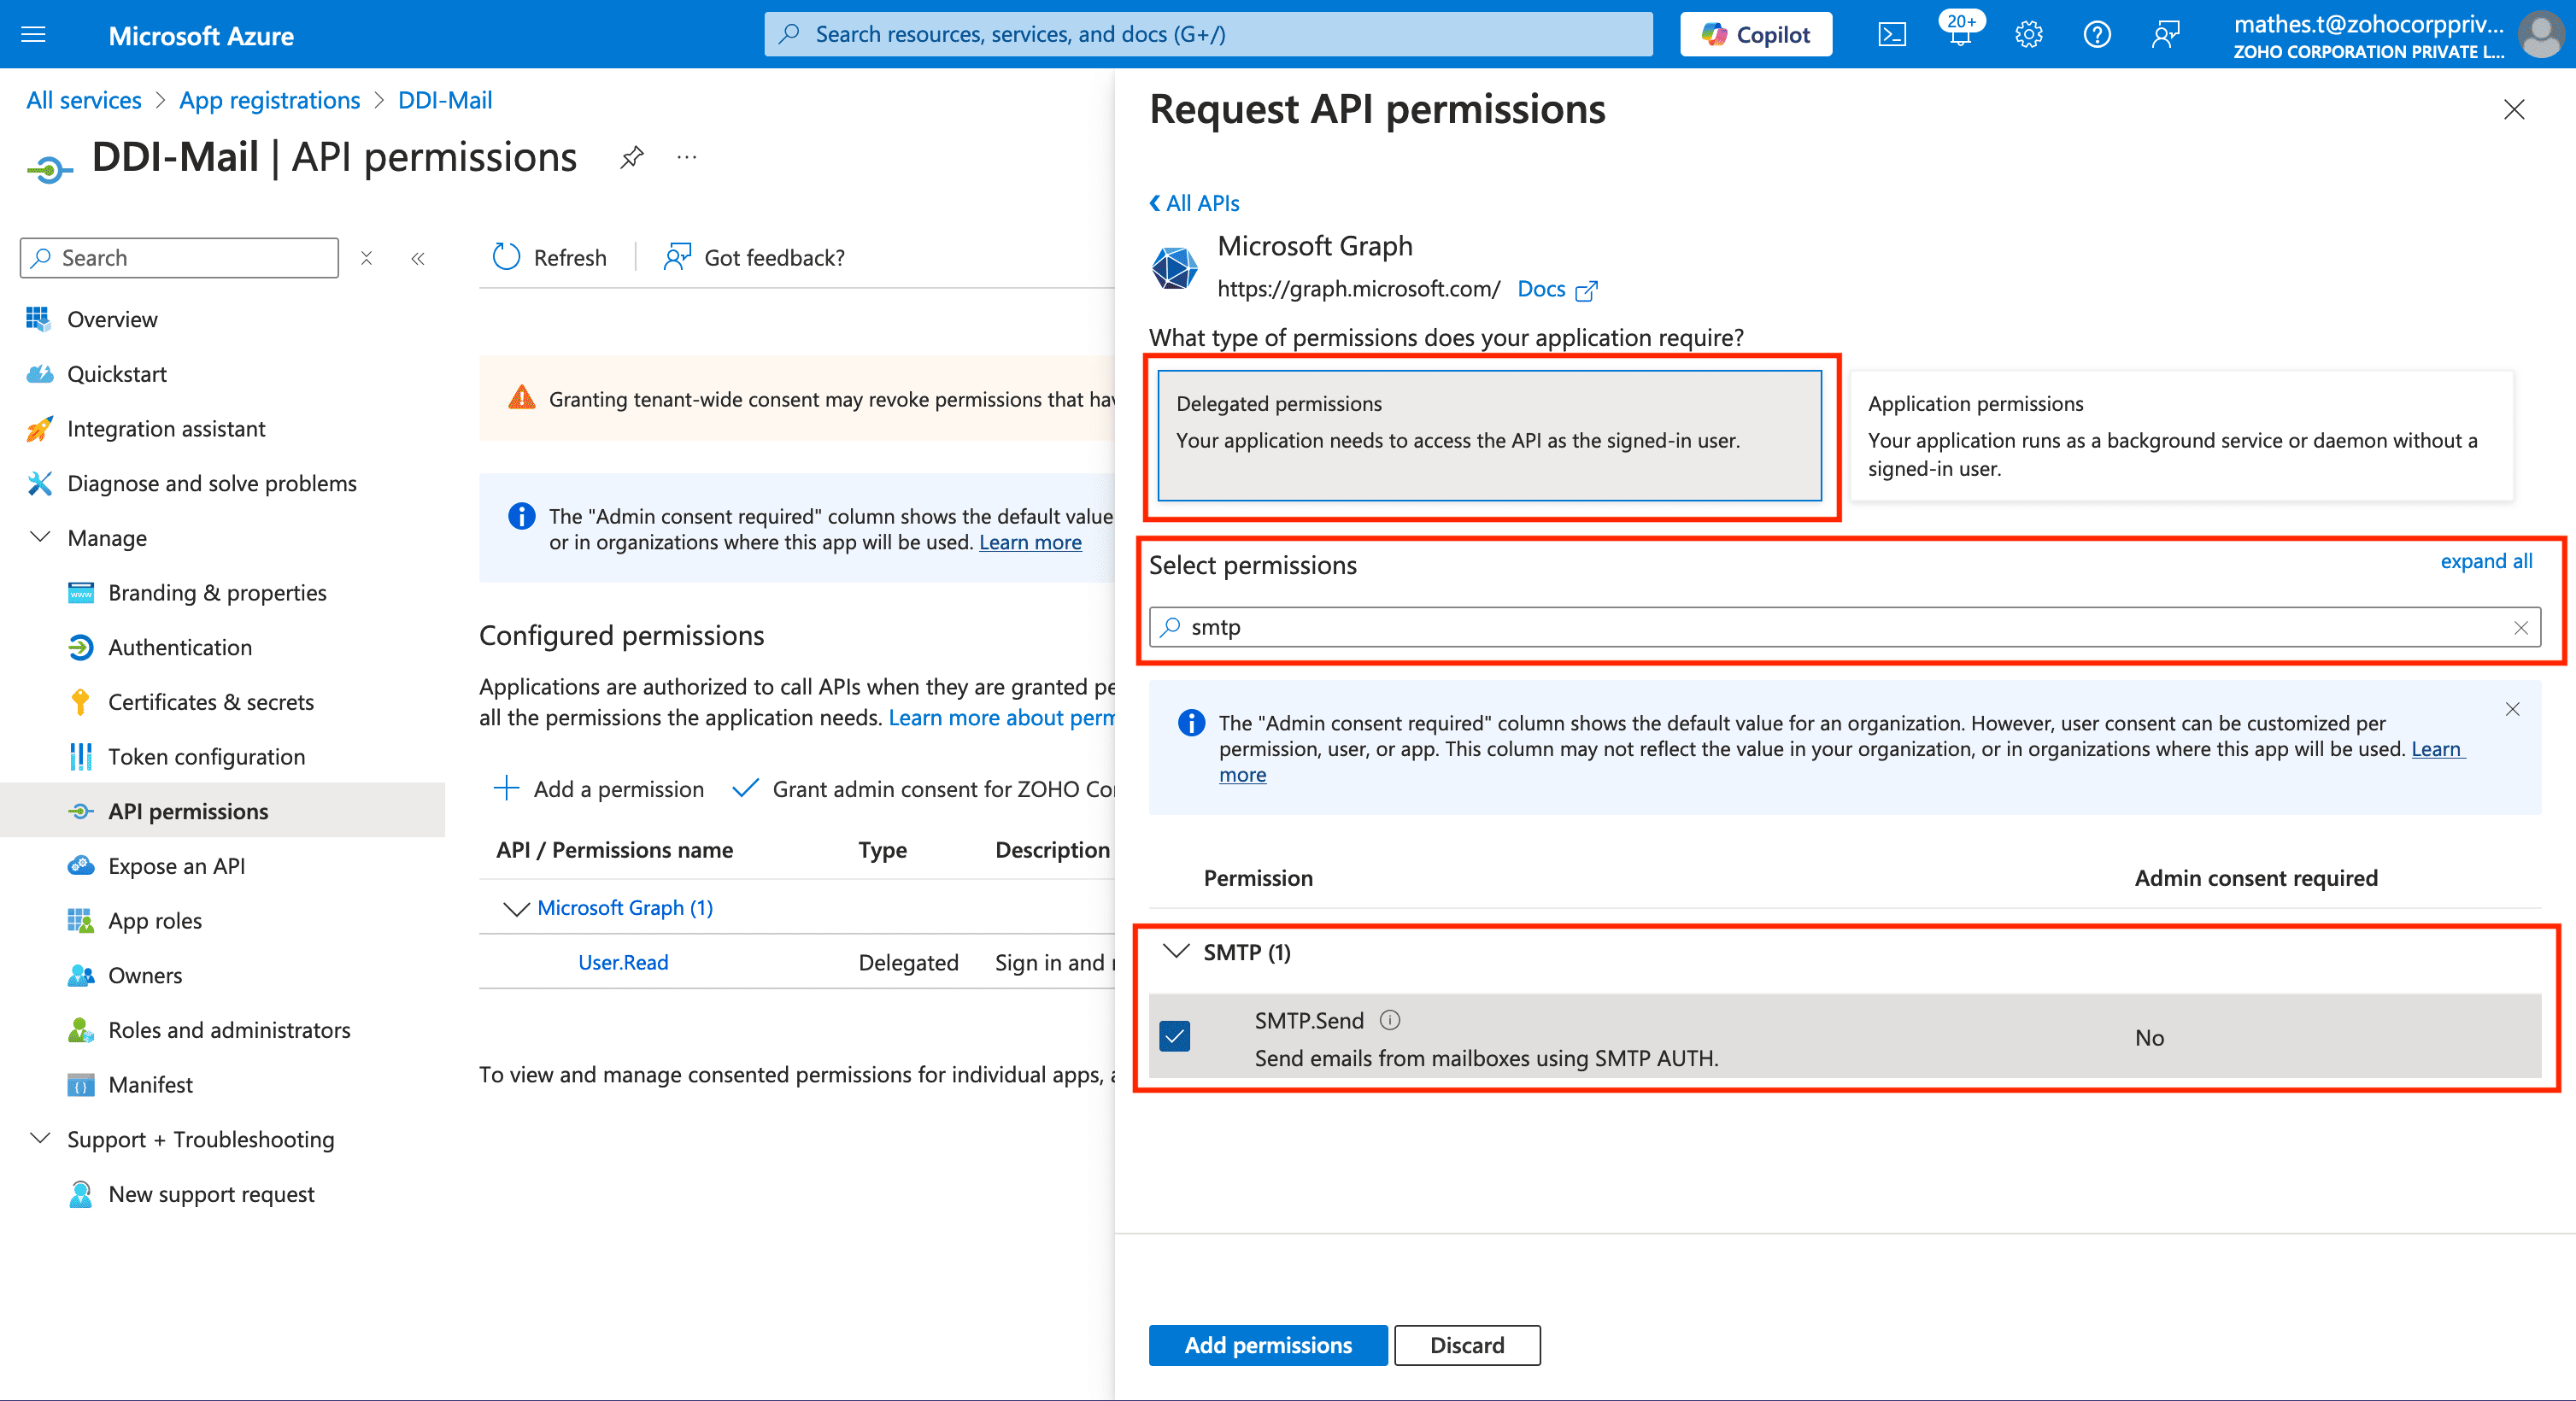
On clicking Delegated permissions, the Select permissions section appears. Now use the search bar to select two essential permissions. First search for the permission SMTP.Send and select it using the checkbox on the left.
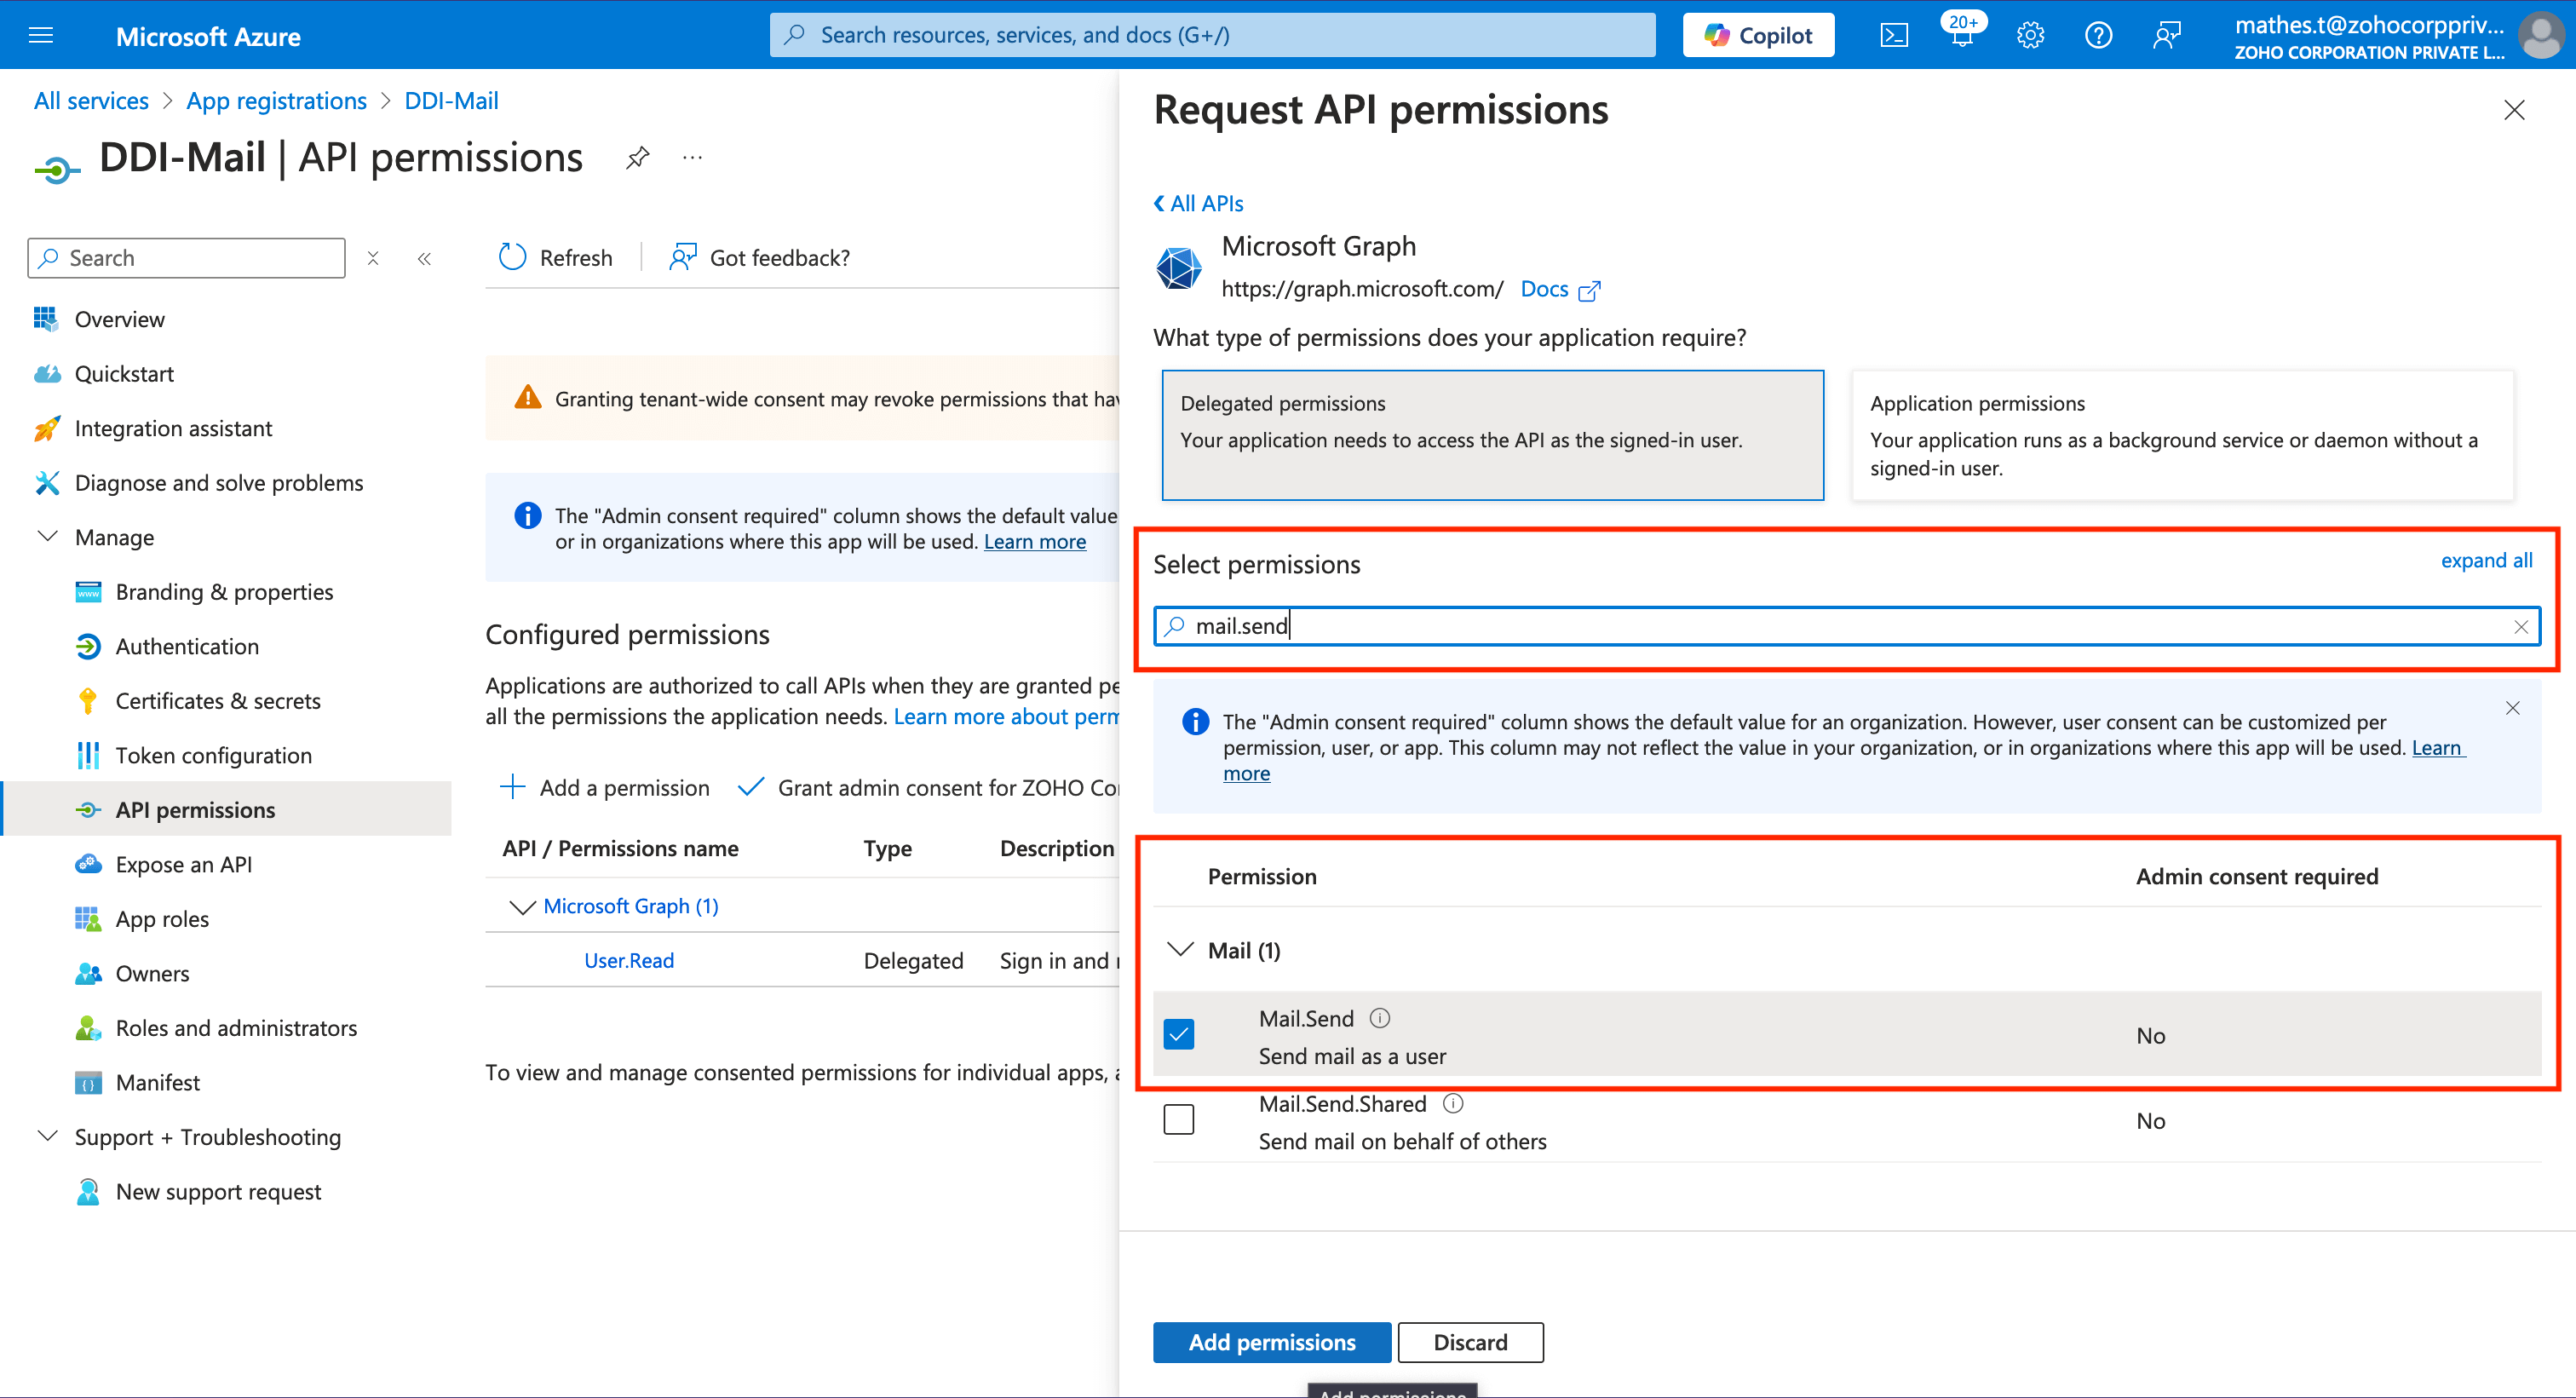
Now search for the other important search permission Mail.Send and select it using the checkbox on the left.Now click the Add permissions button at the bottom to finalize the permissions.
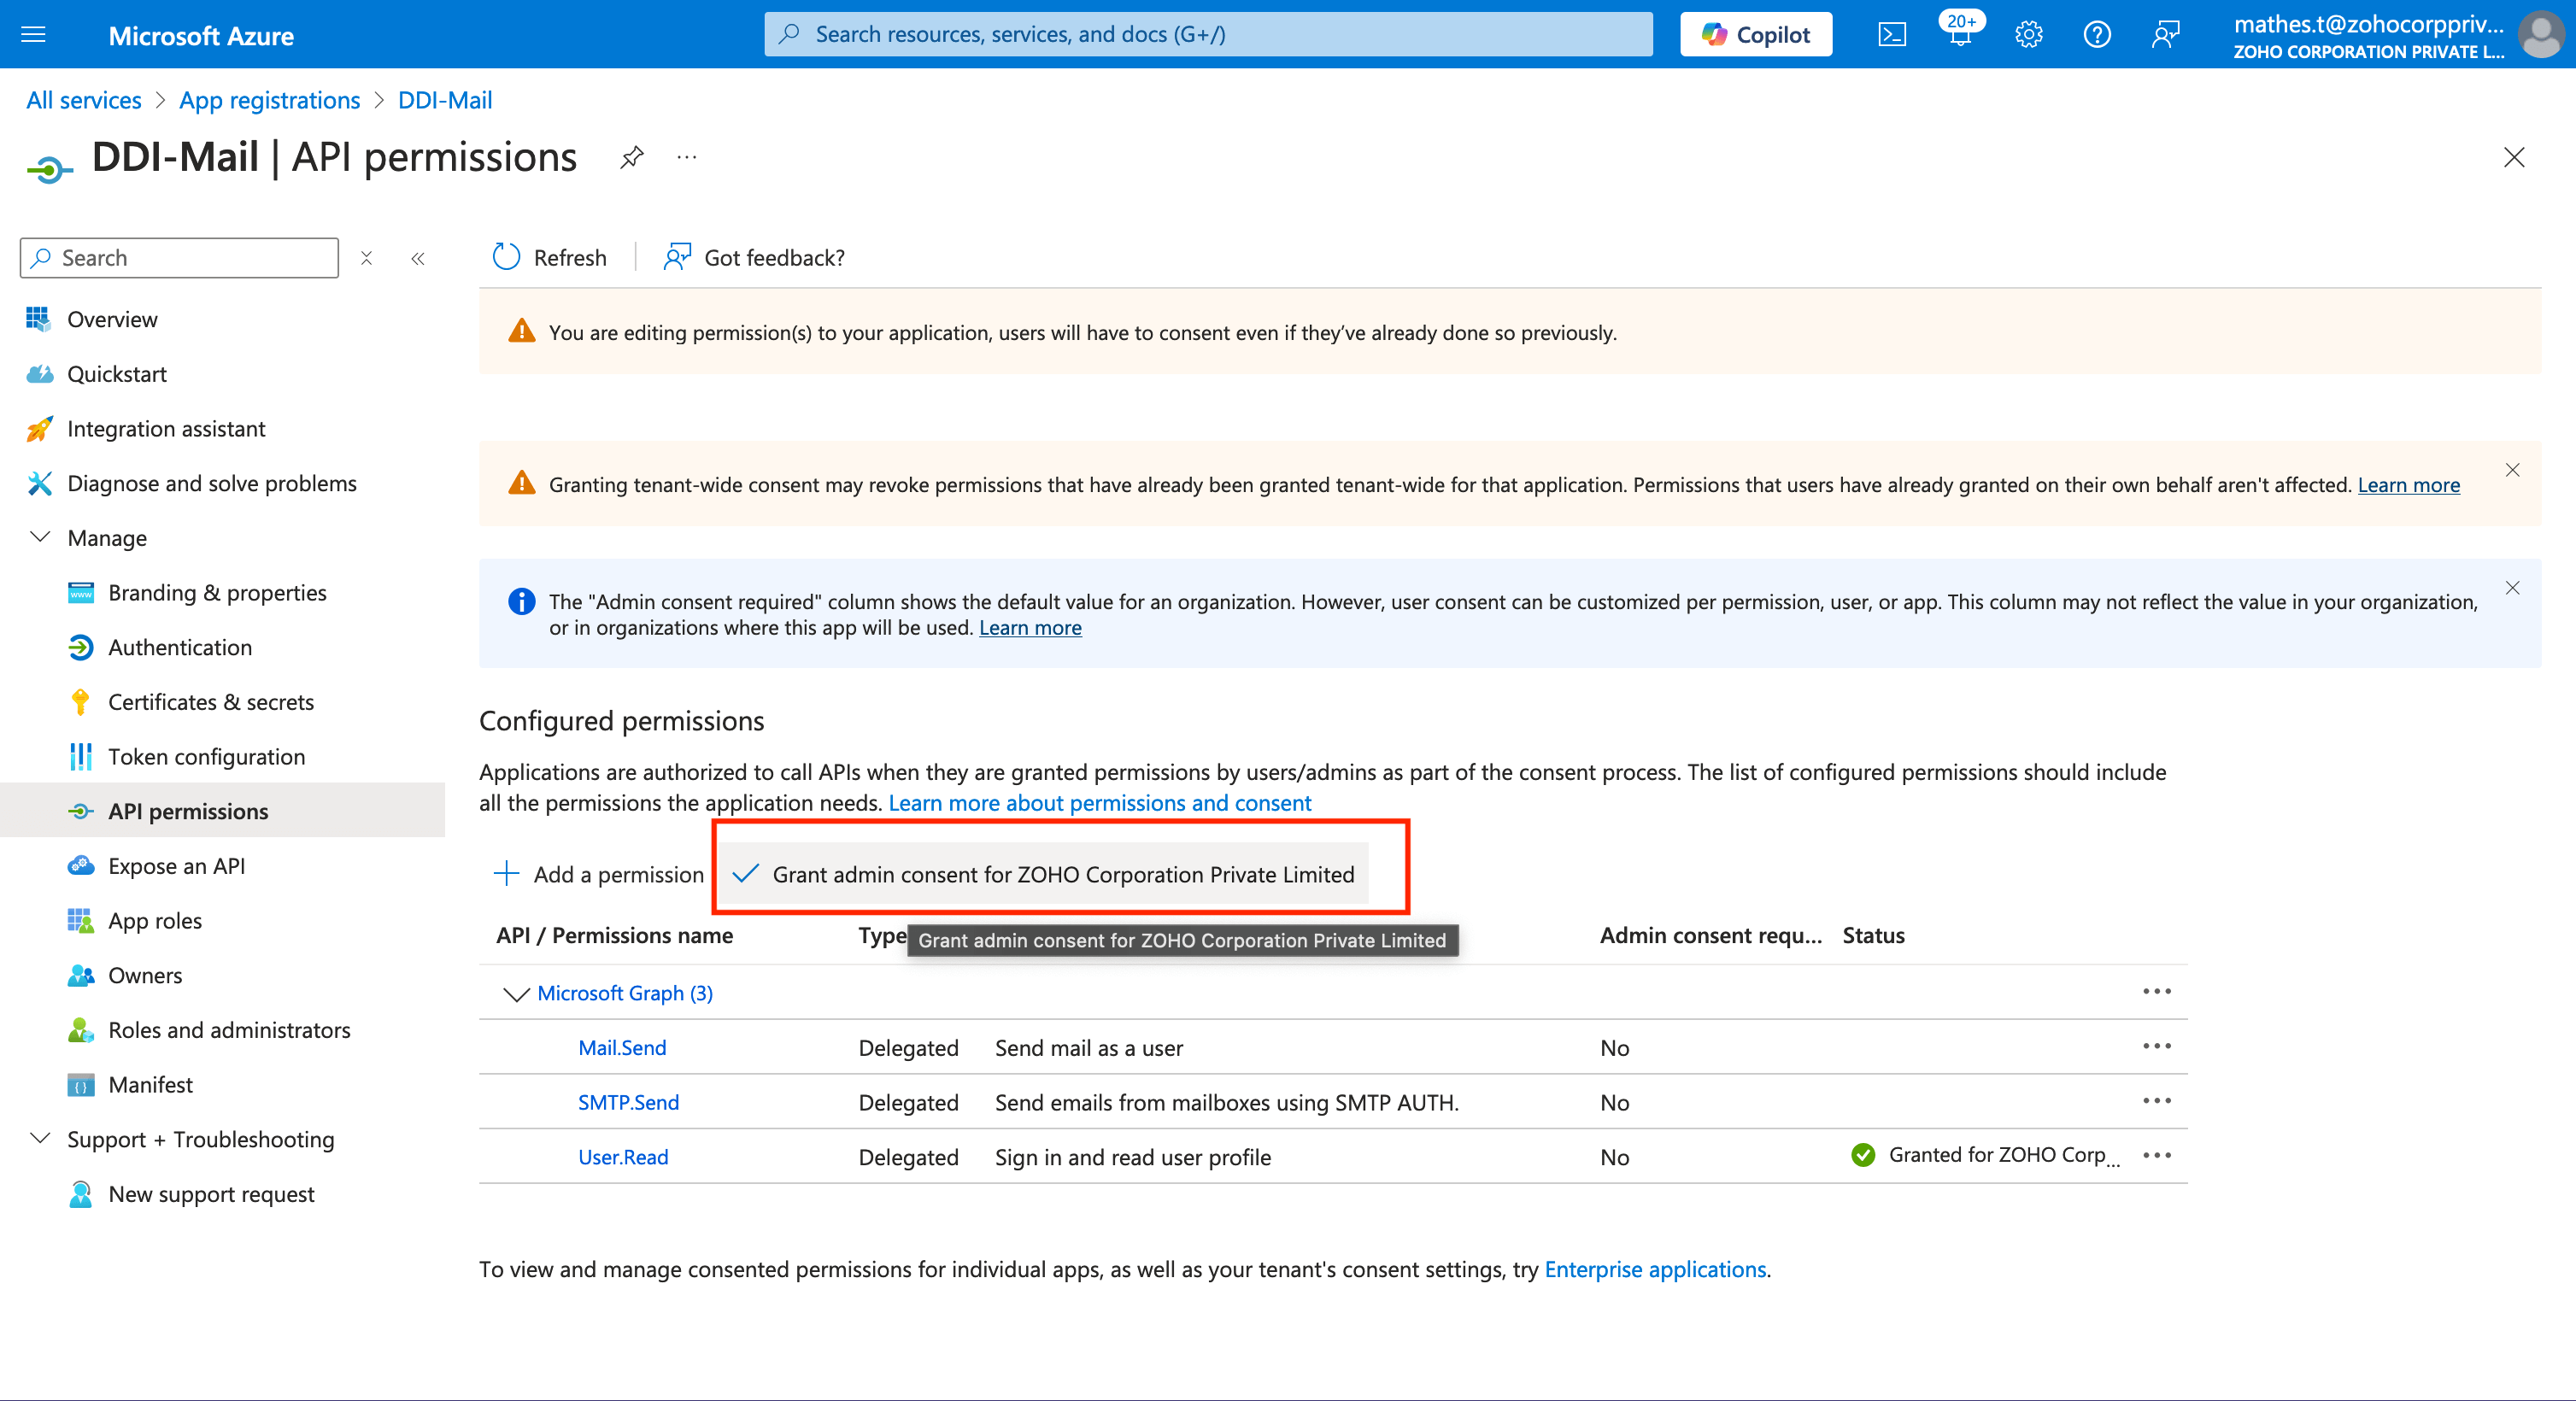
This takes you back to the API permissions page of your application. Now under the Configured permissions panel the new Microsoft Graph permissions' Admin consent status remains blank. To grant Admin consent click the Grant admin consent for [Org name] button adjacent to the Adda permission button.
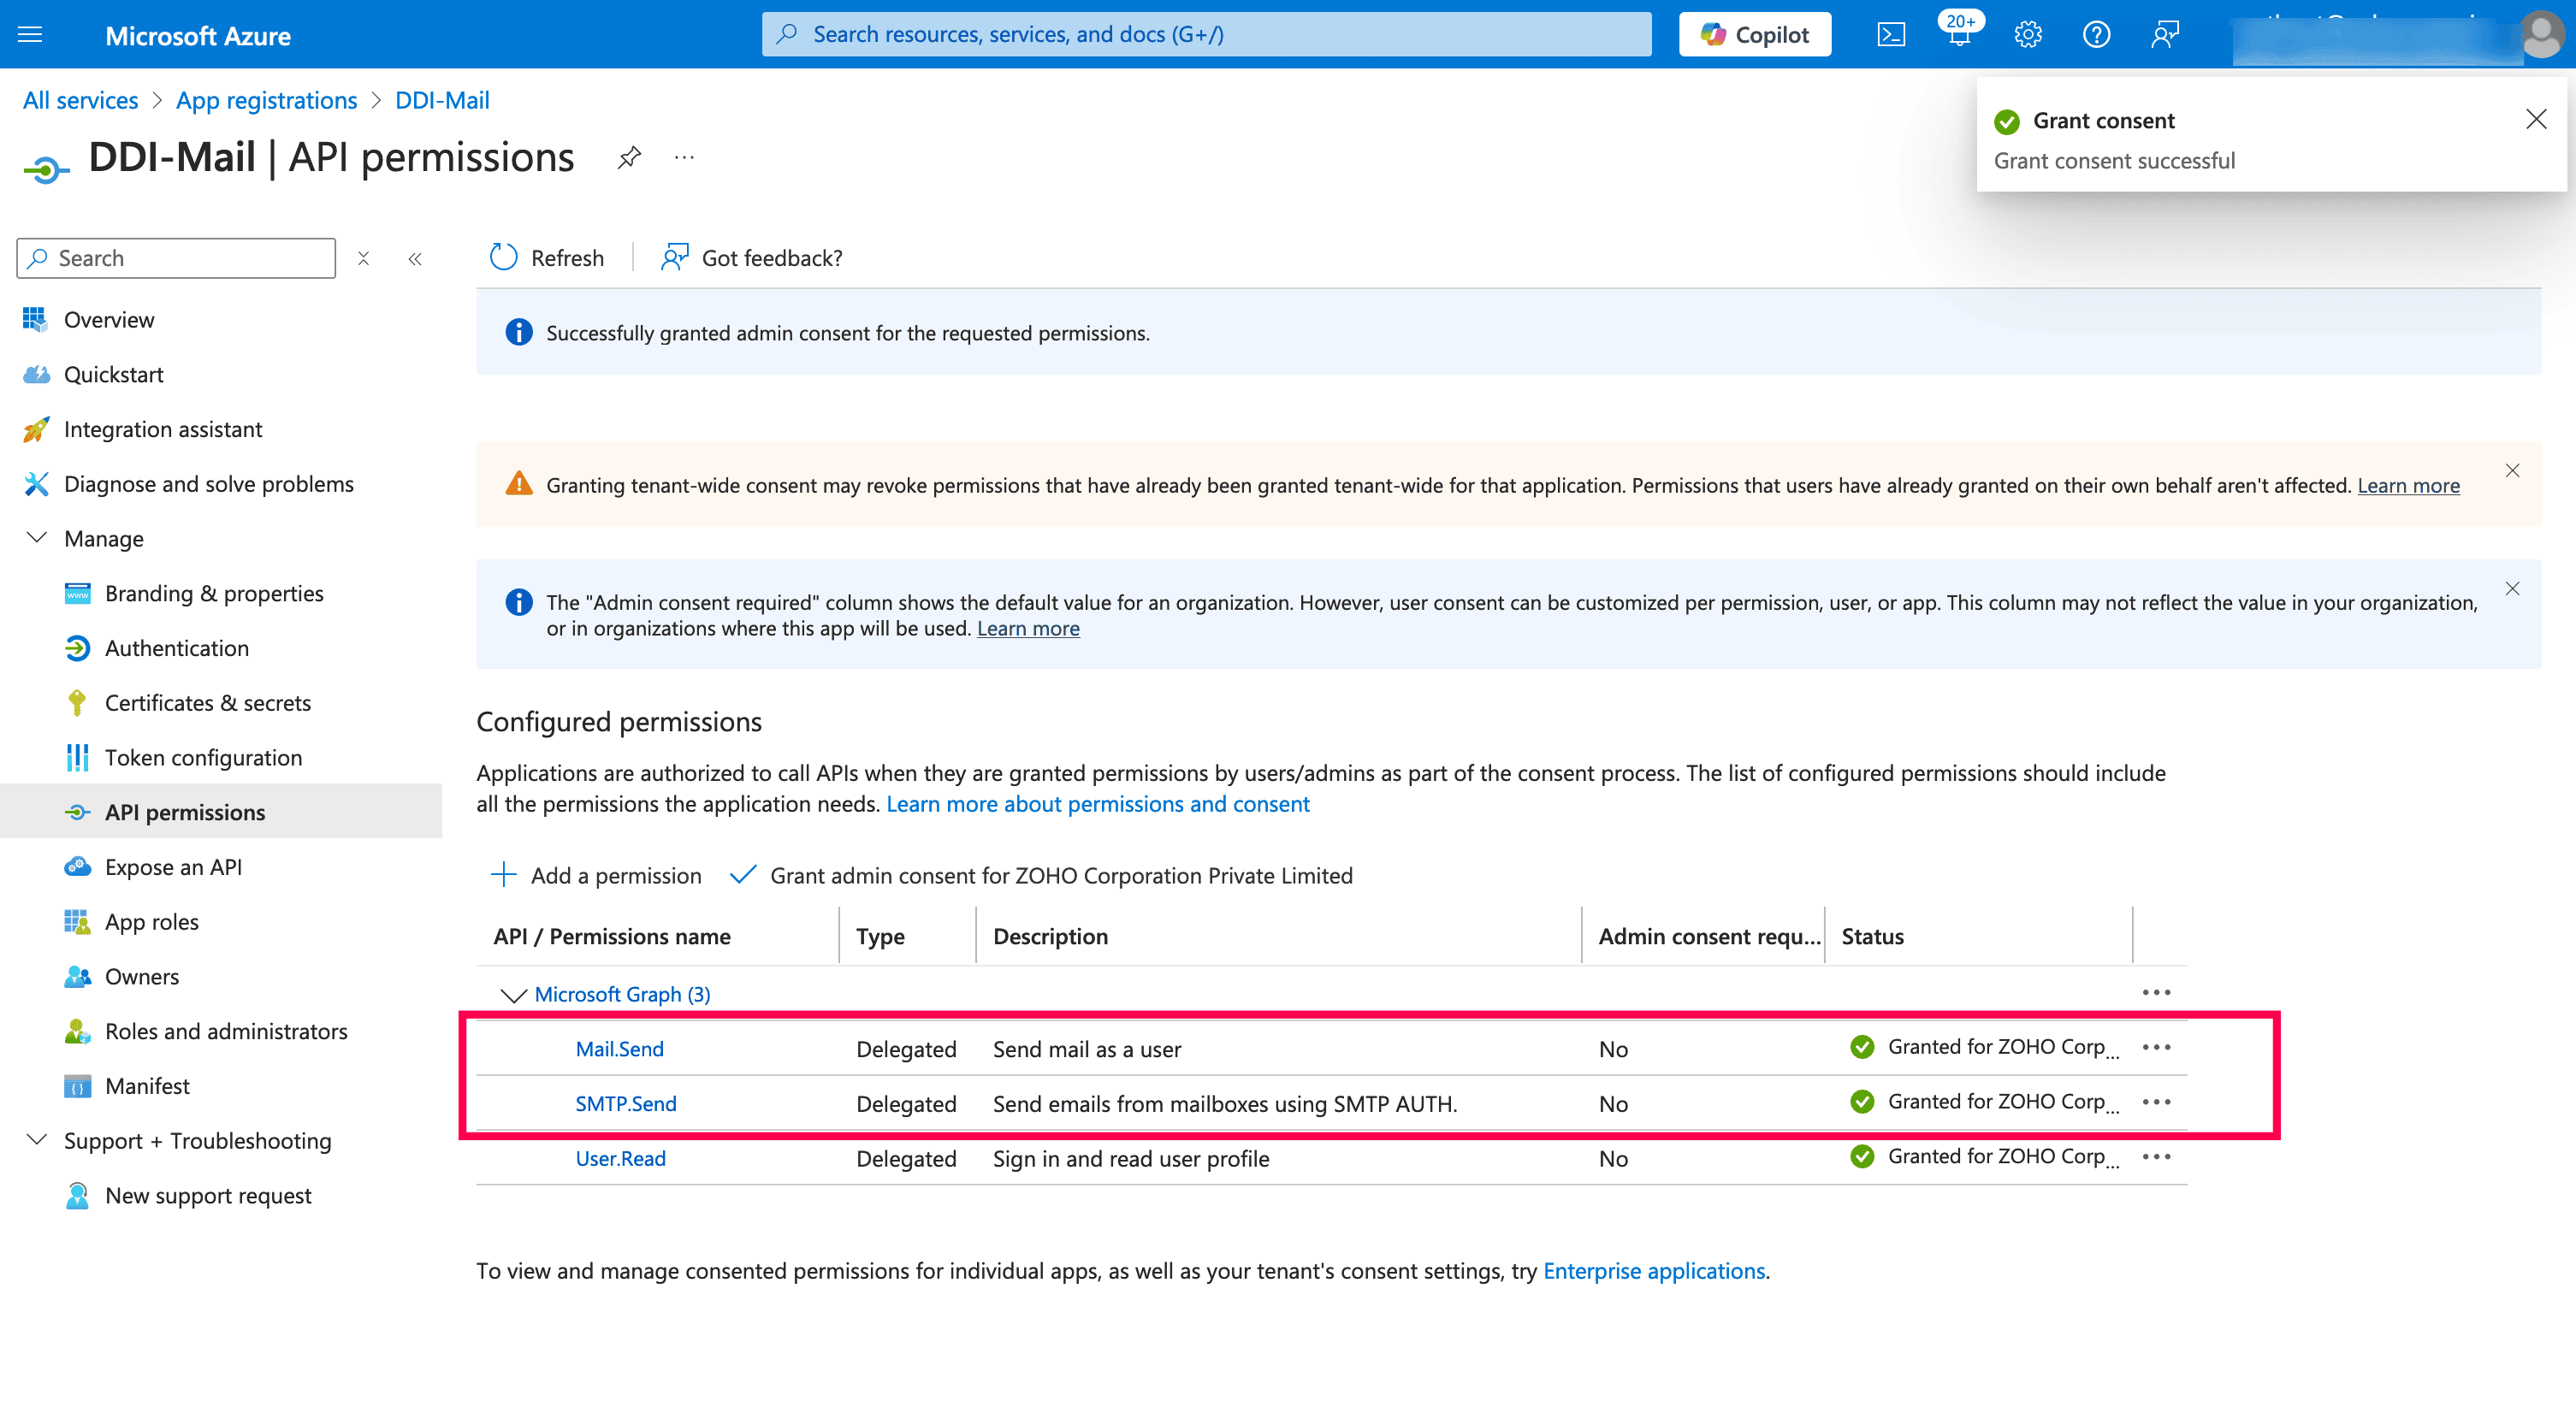
Once the required permissions have successfully been granted Admin consent. You can see the green Granted status as shown in the image below.
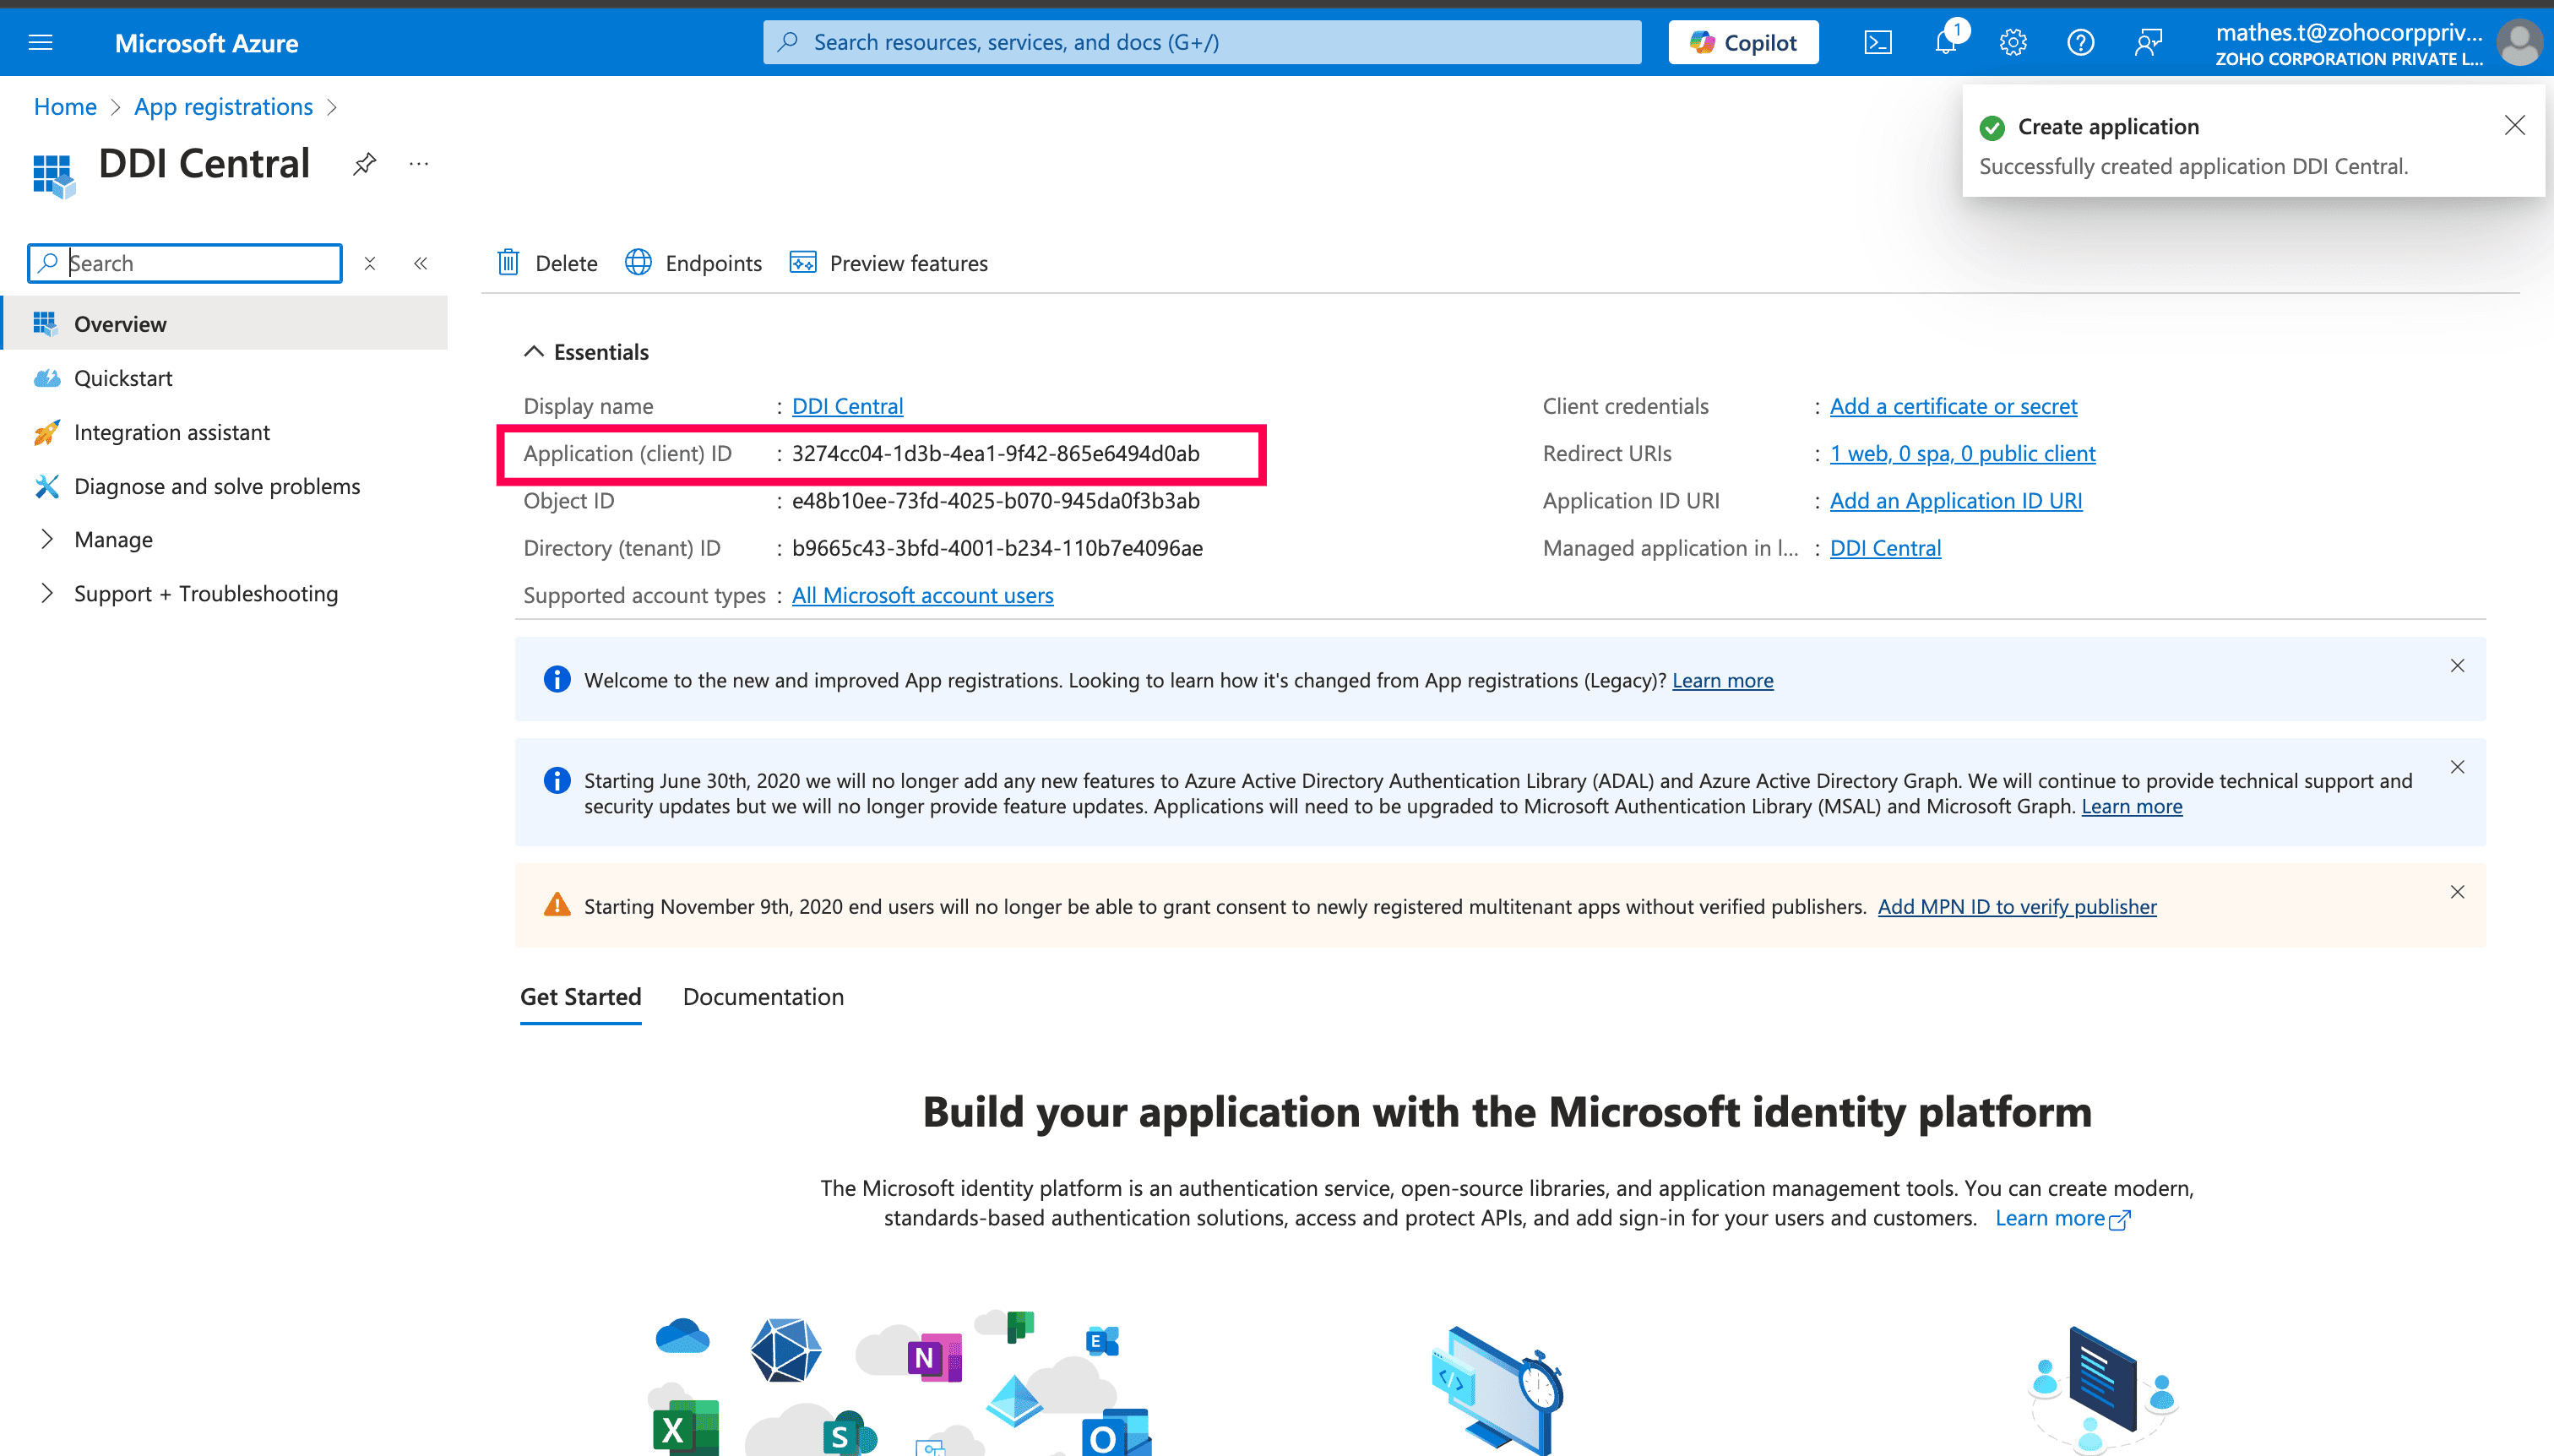
Now navigate to the Application home page by selecting the Overview menu on the left panel. Copy the Application ID, it will be the Client ID.
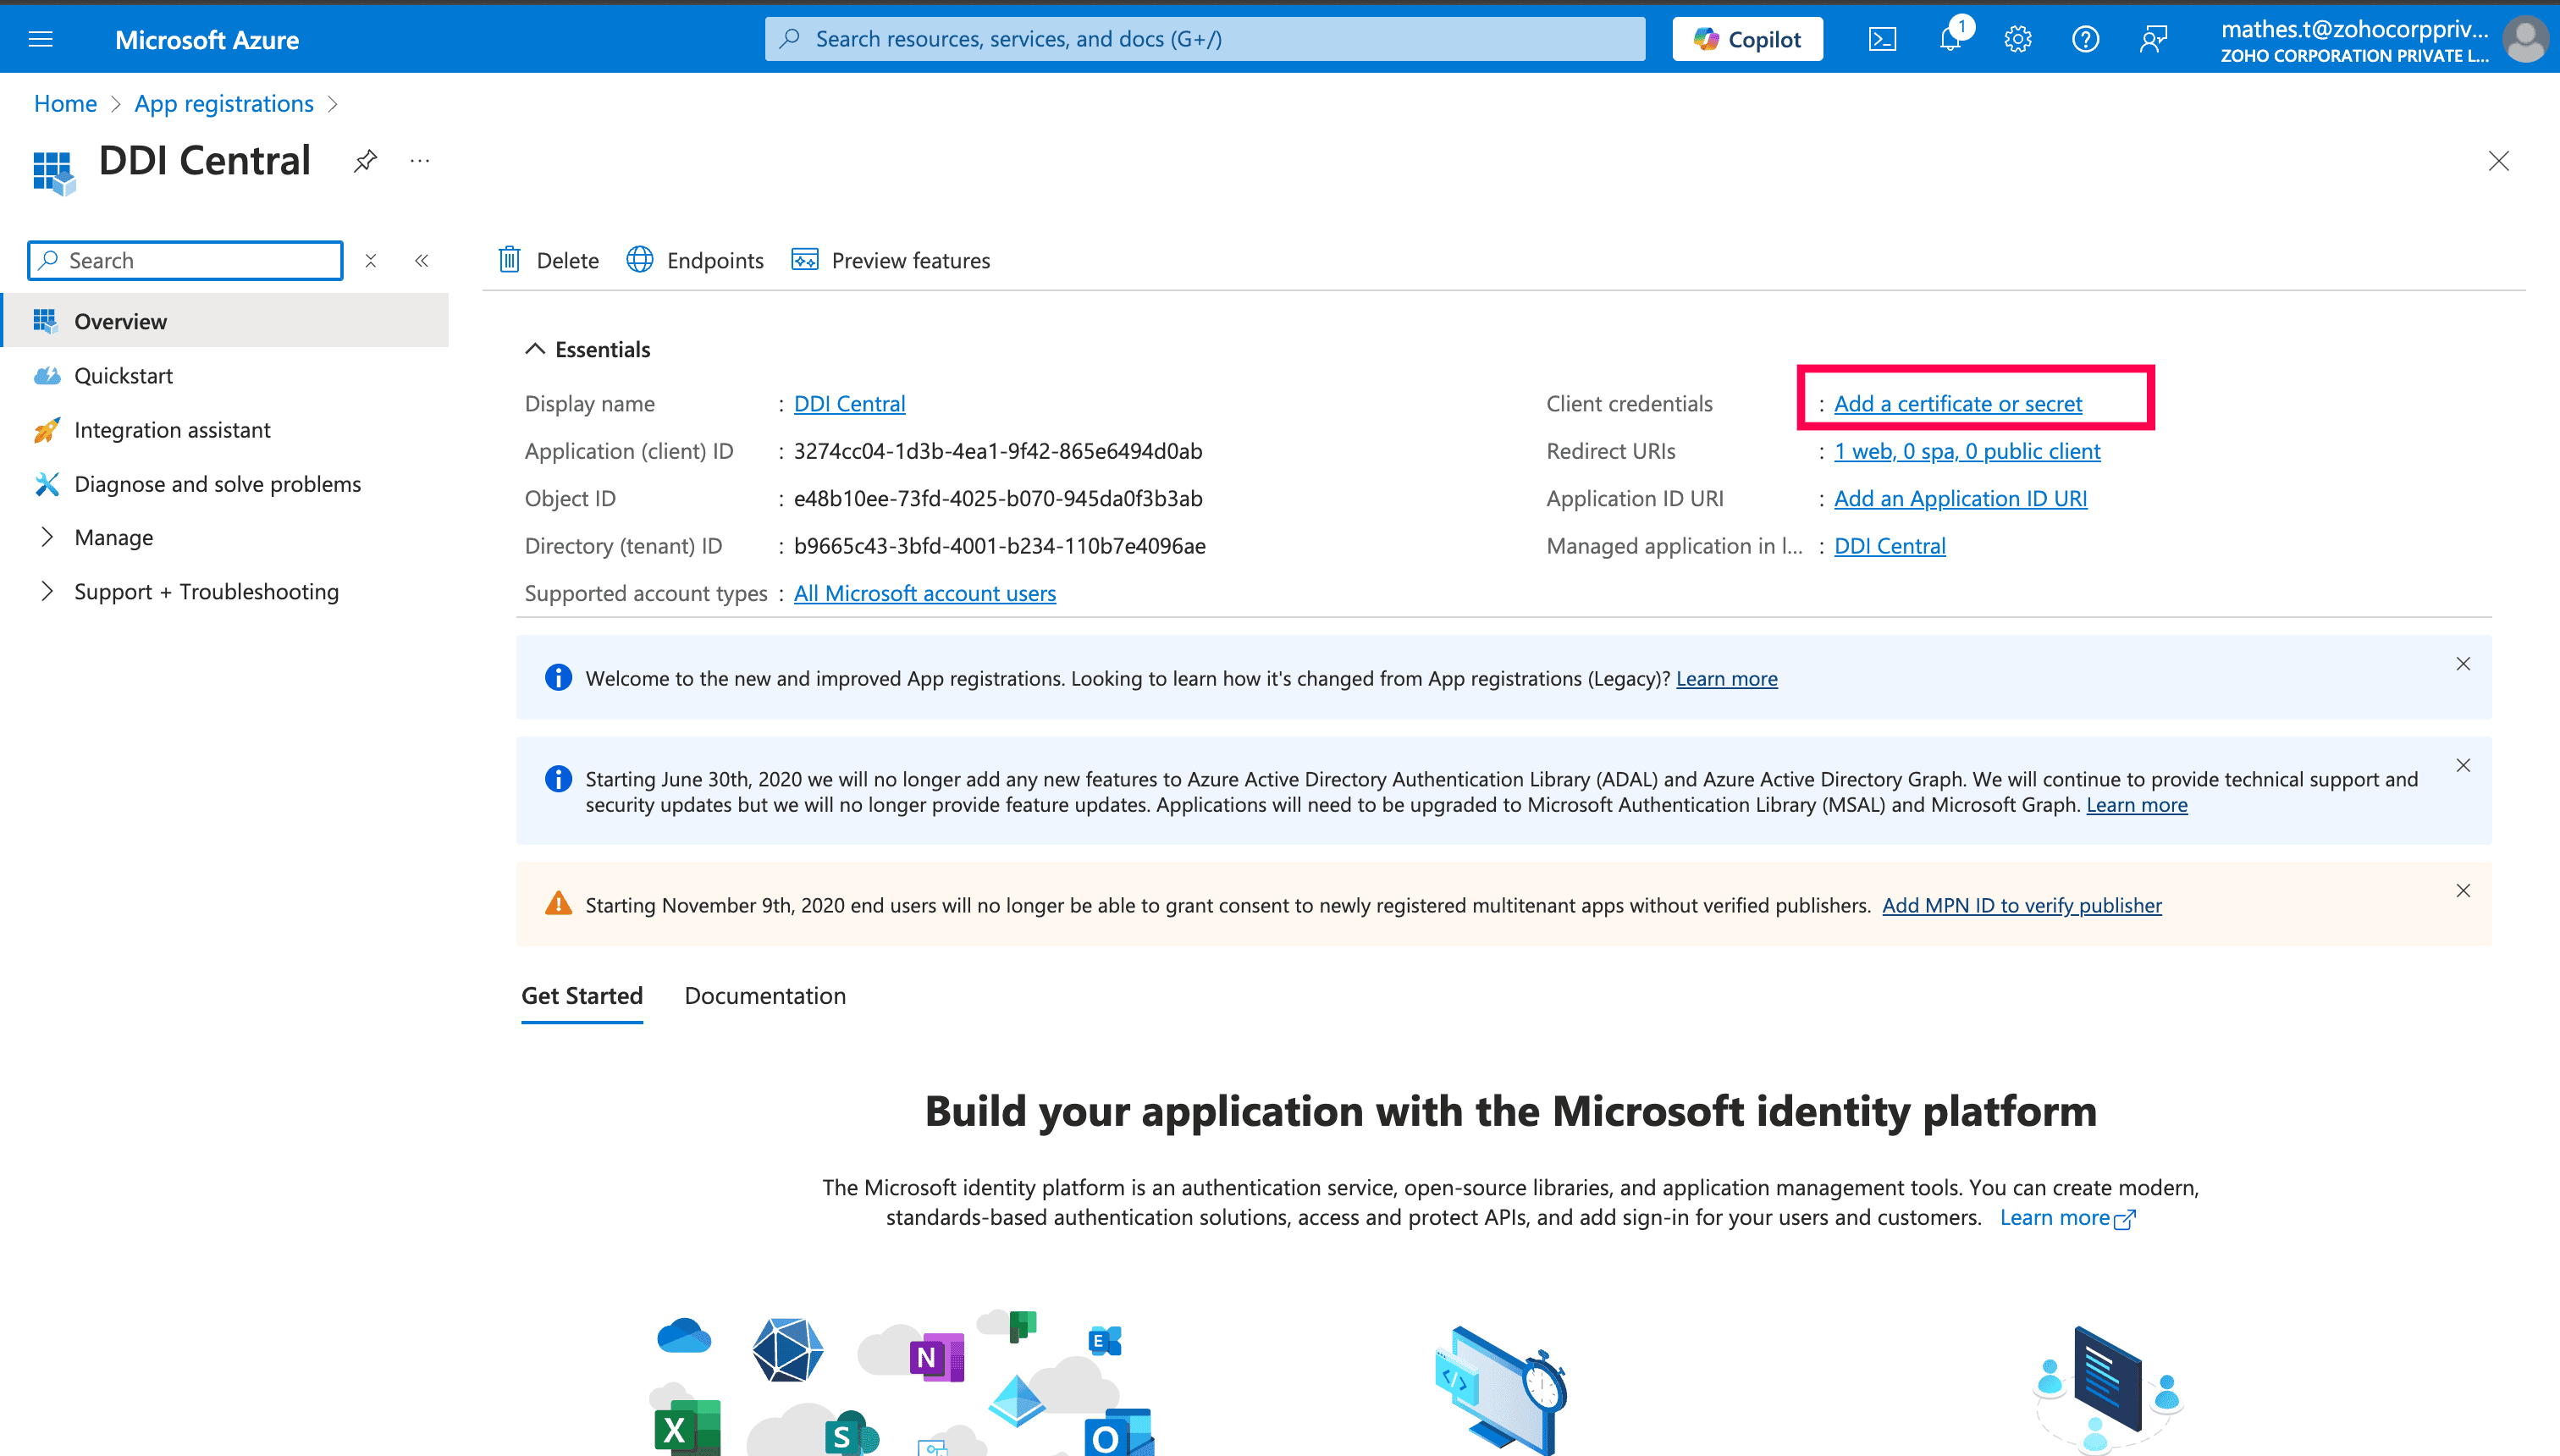
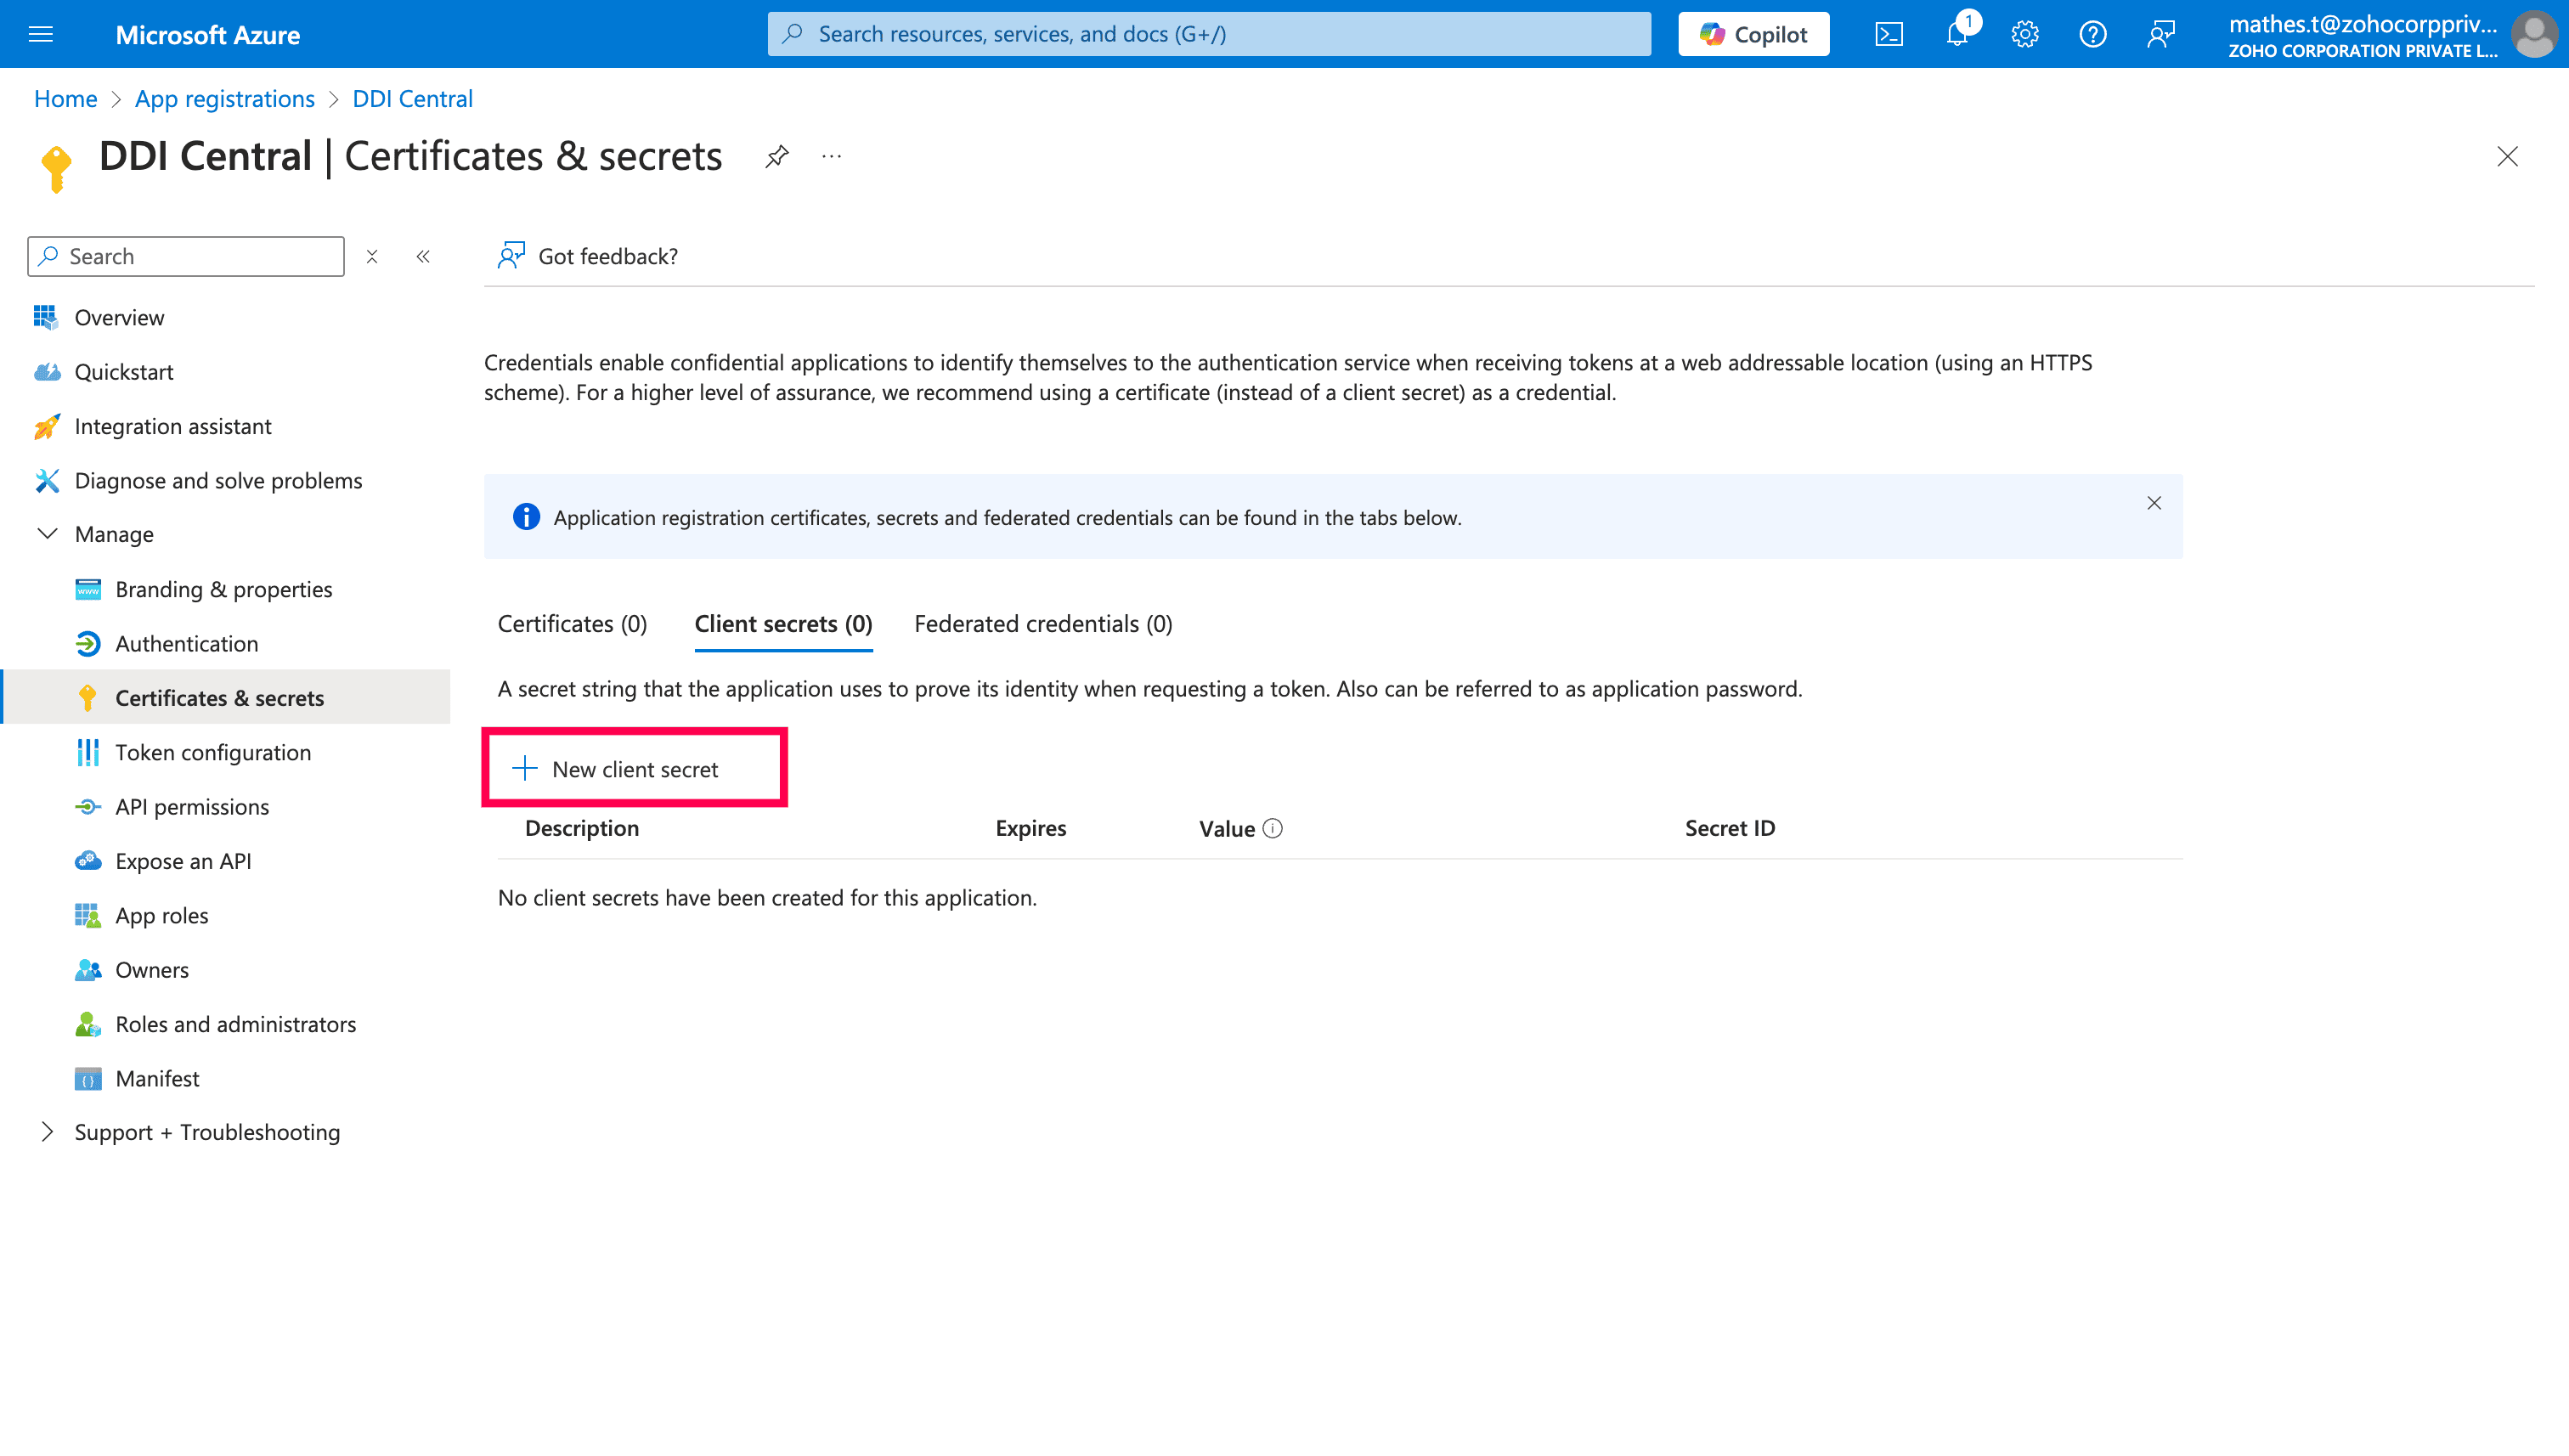
Click Add a certificate or secret to get the Client Secret. Then follow the steps below
Click "New client secret".
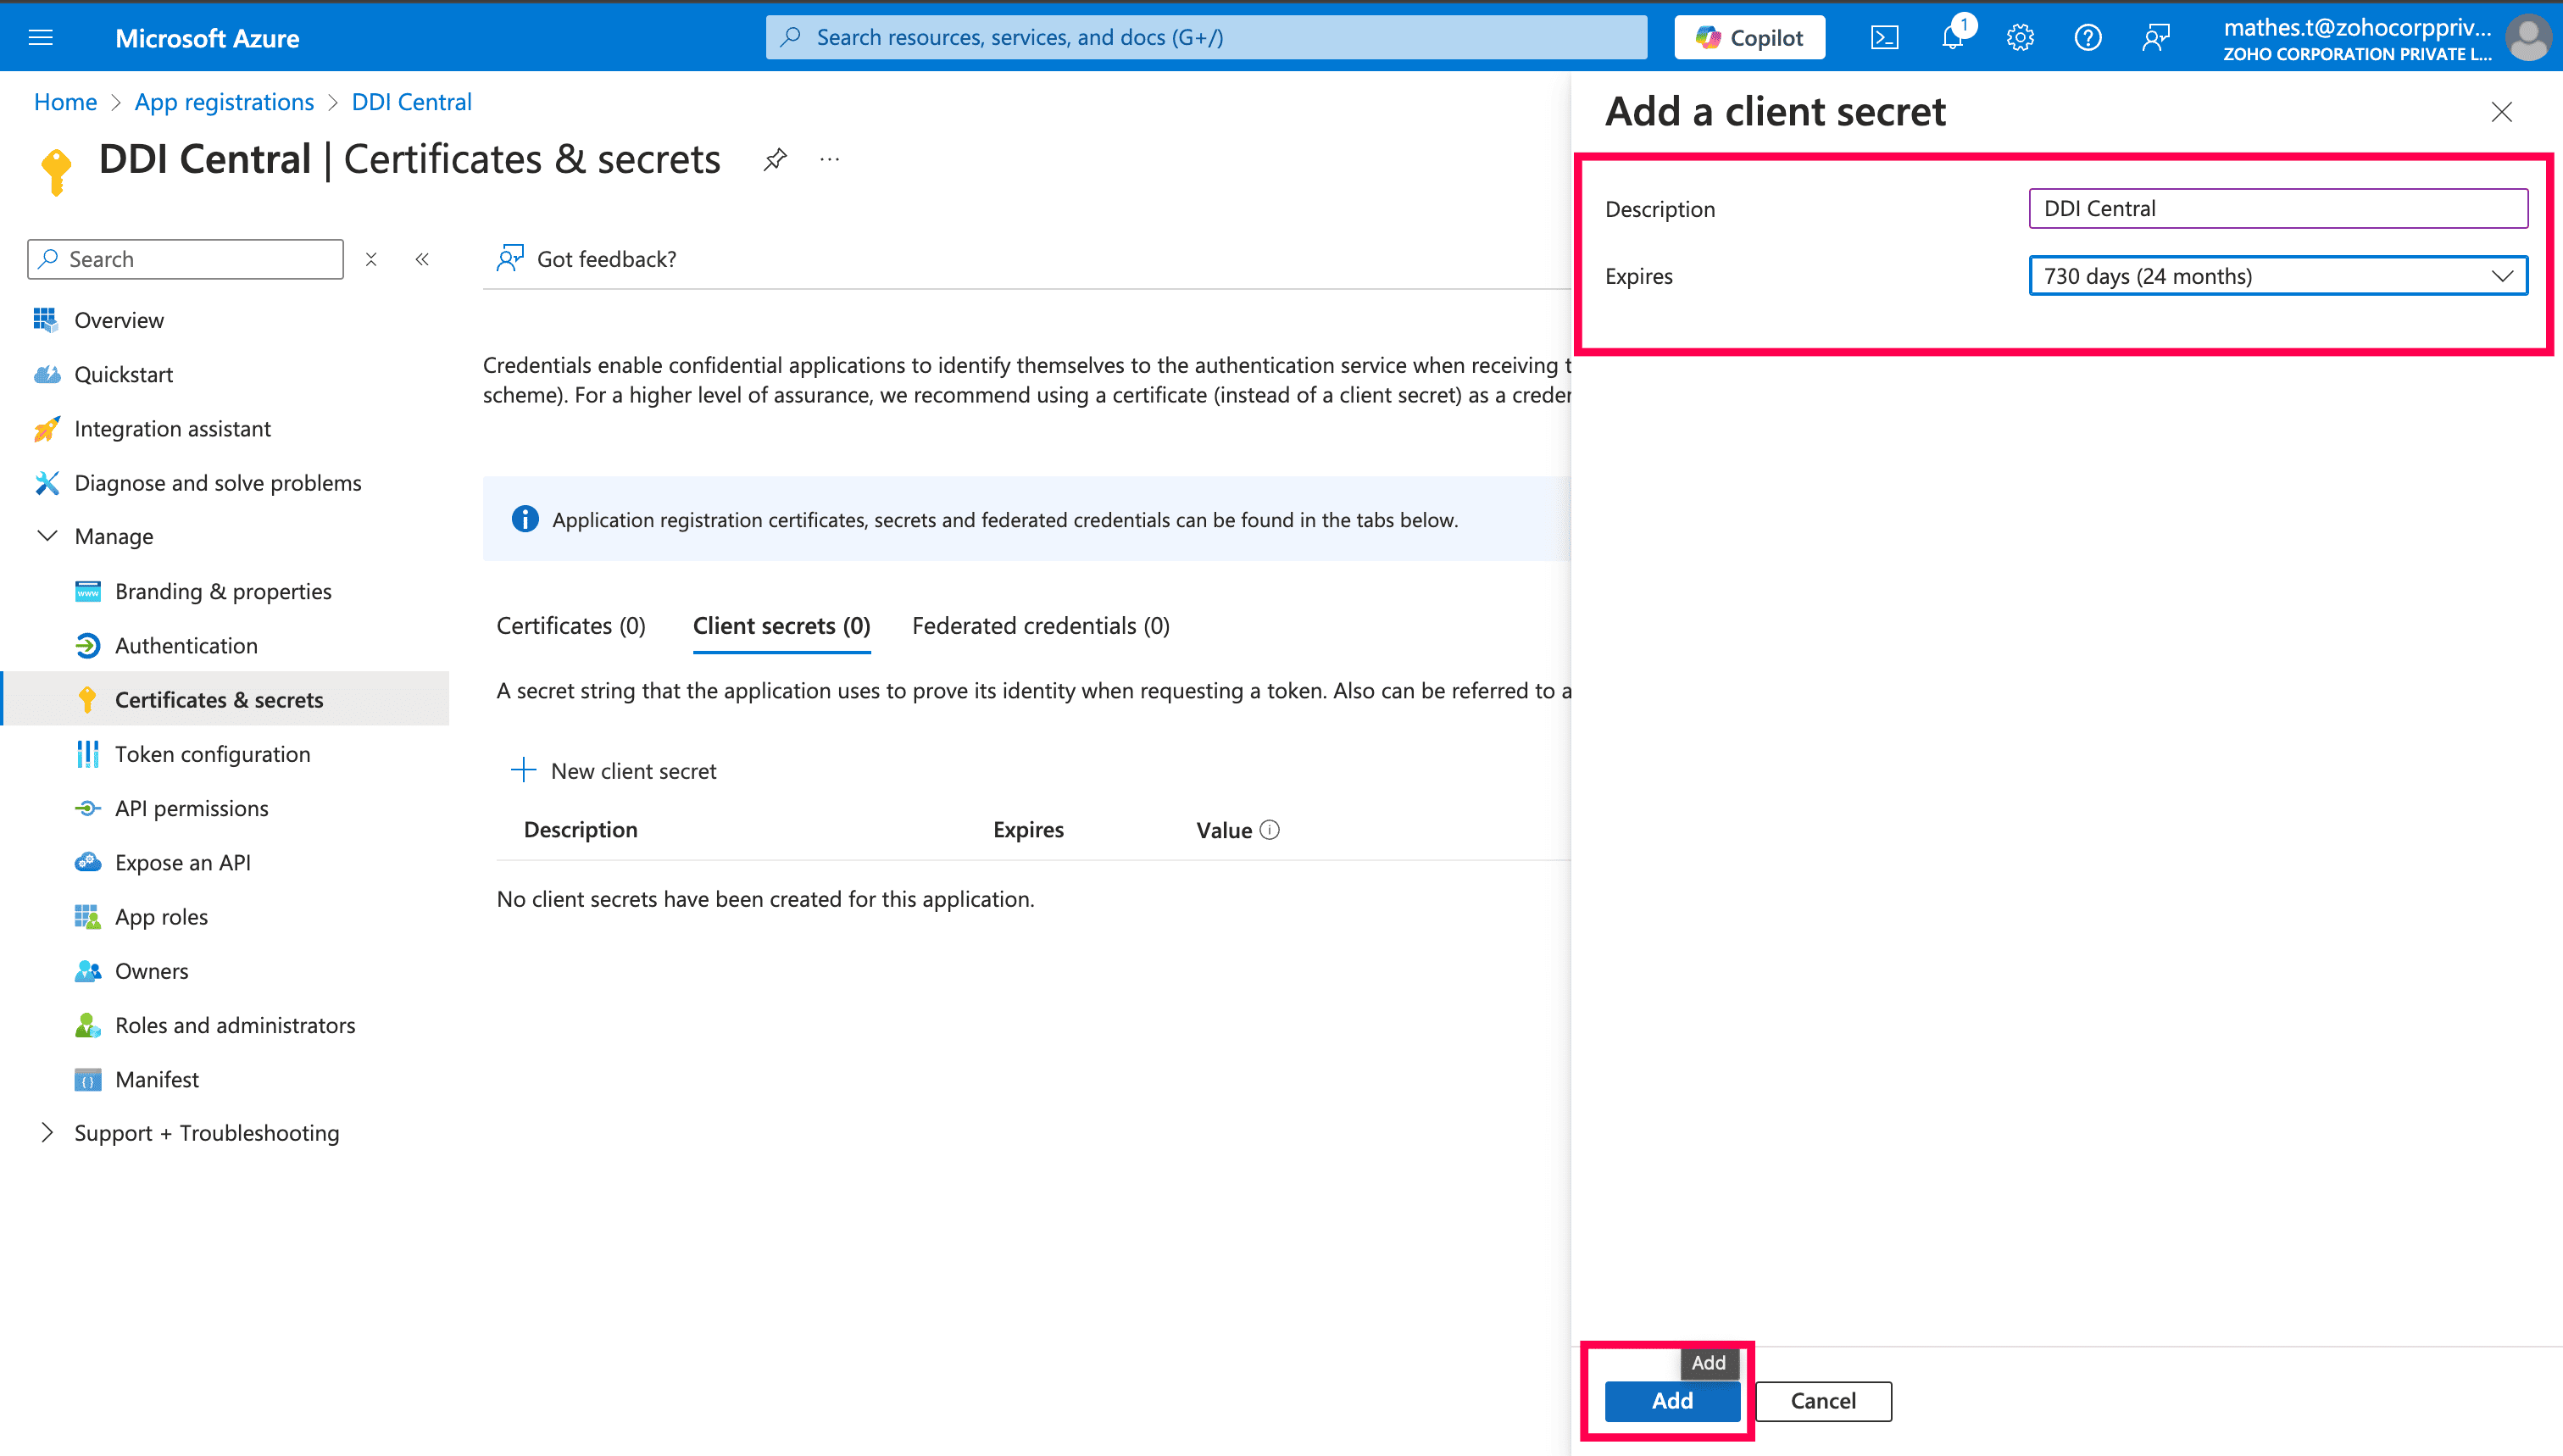
Provide the Description & Expires time for the client secret, and click Add.
Copy the Value, this will be the Client Secret.
Note: Client secret values cannot be viewed, except for immediately after creation. Be sure to save the secret when created before leaving the page, as it will become unreadable after some time.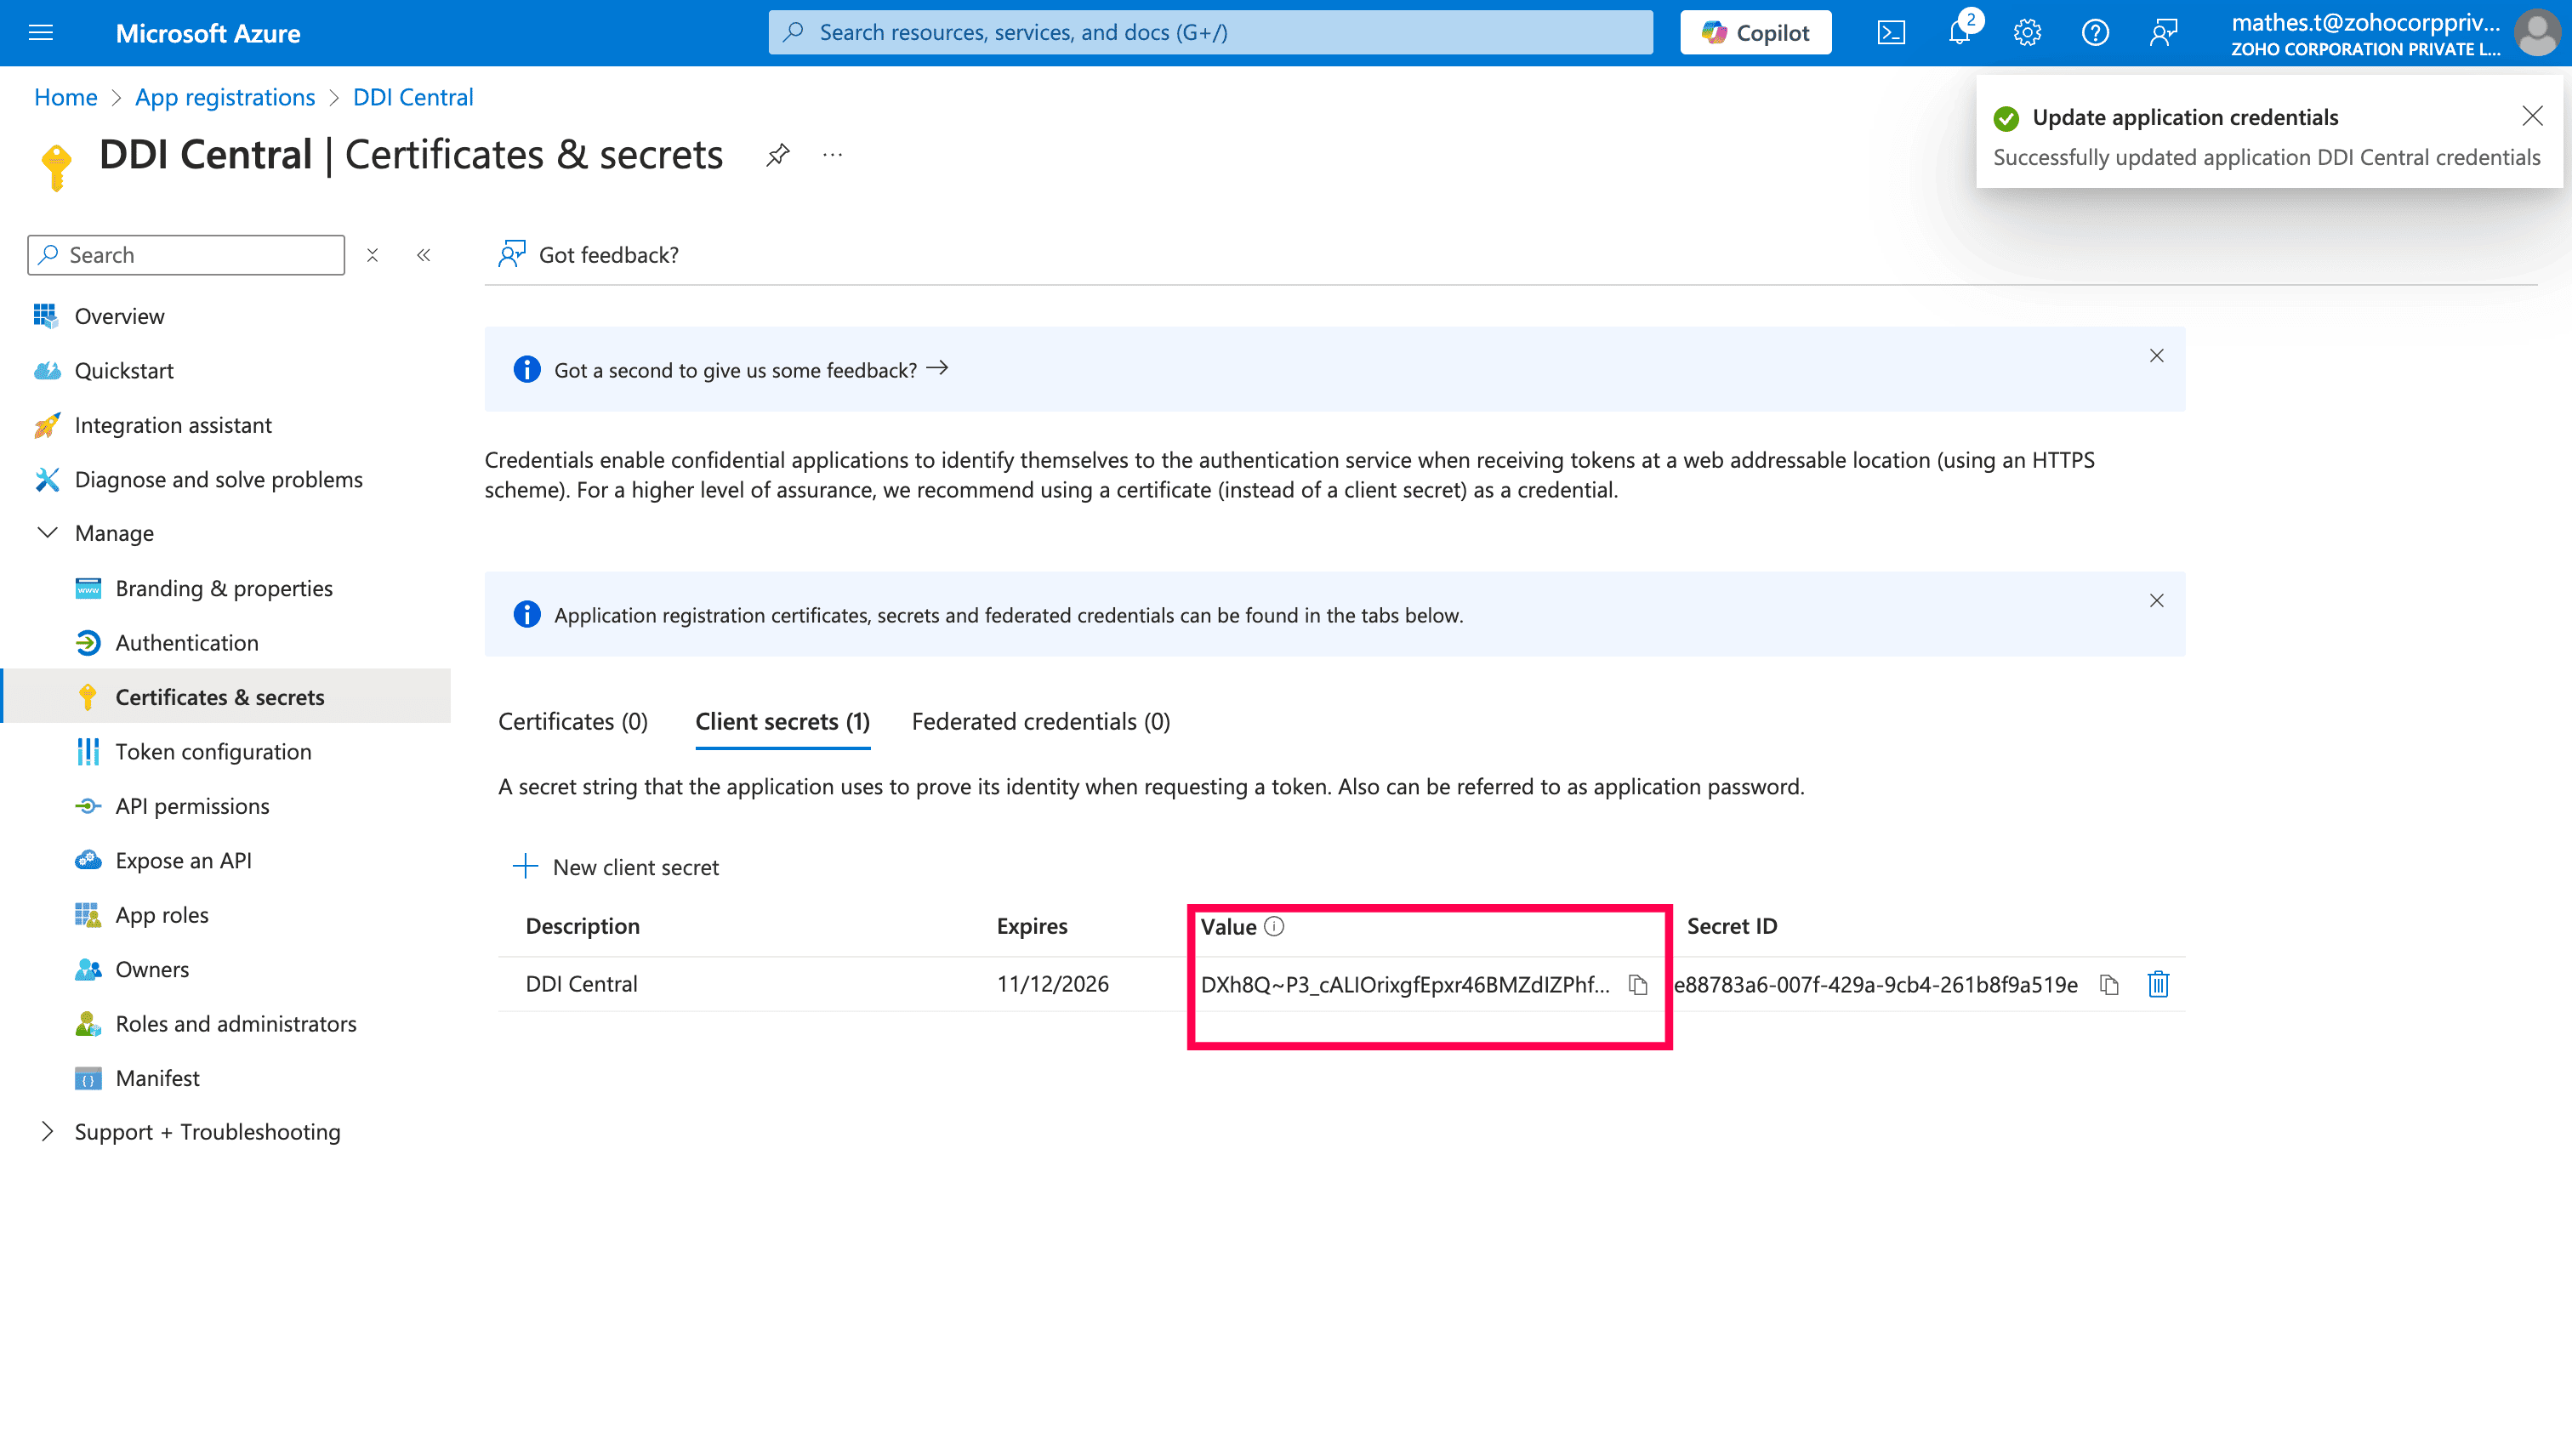
If the value goes unreadable, and you are in need of client secret, you can create a new client secret and use the value.
This client secret will expire depending on the duration you provide. Once it has expired create a new client secret and use the value.
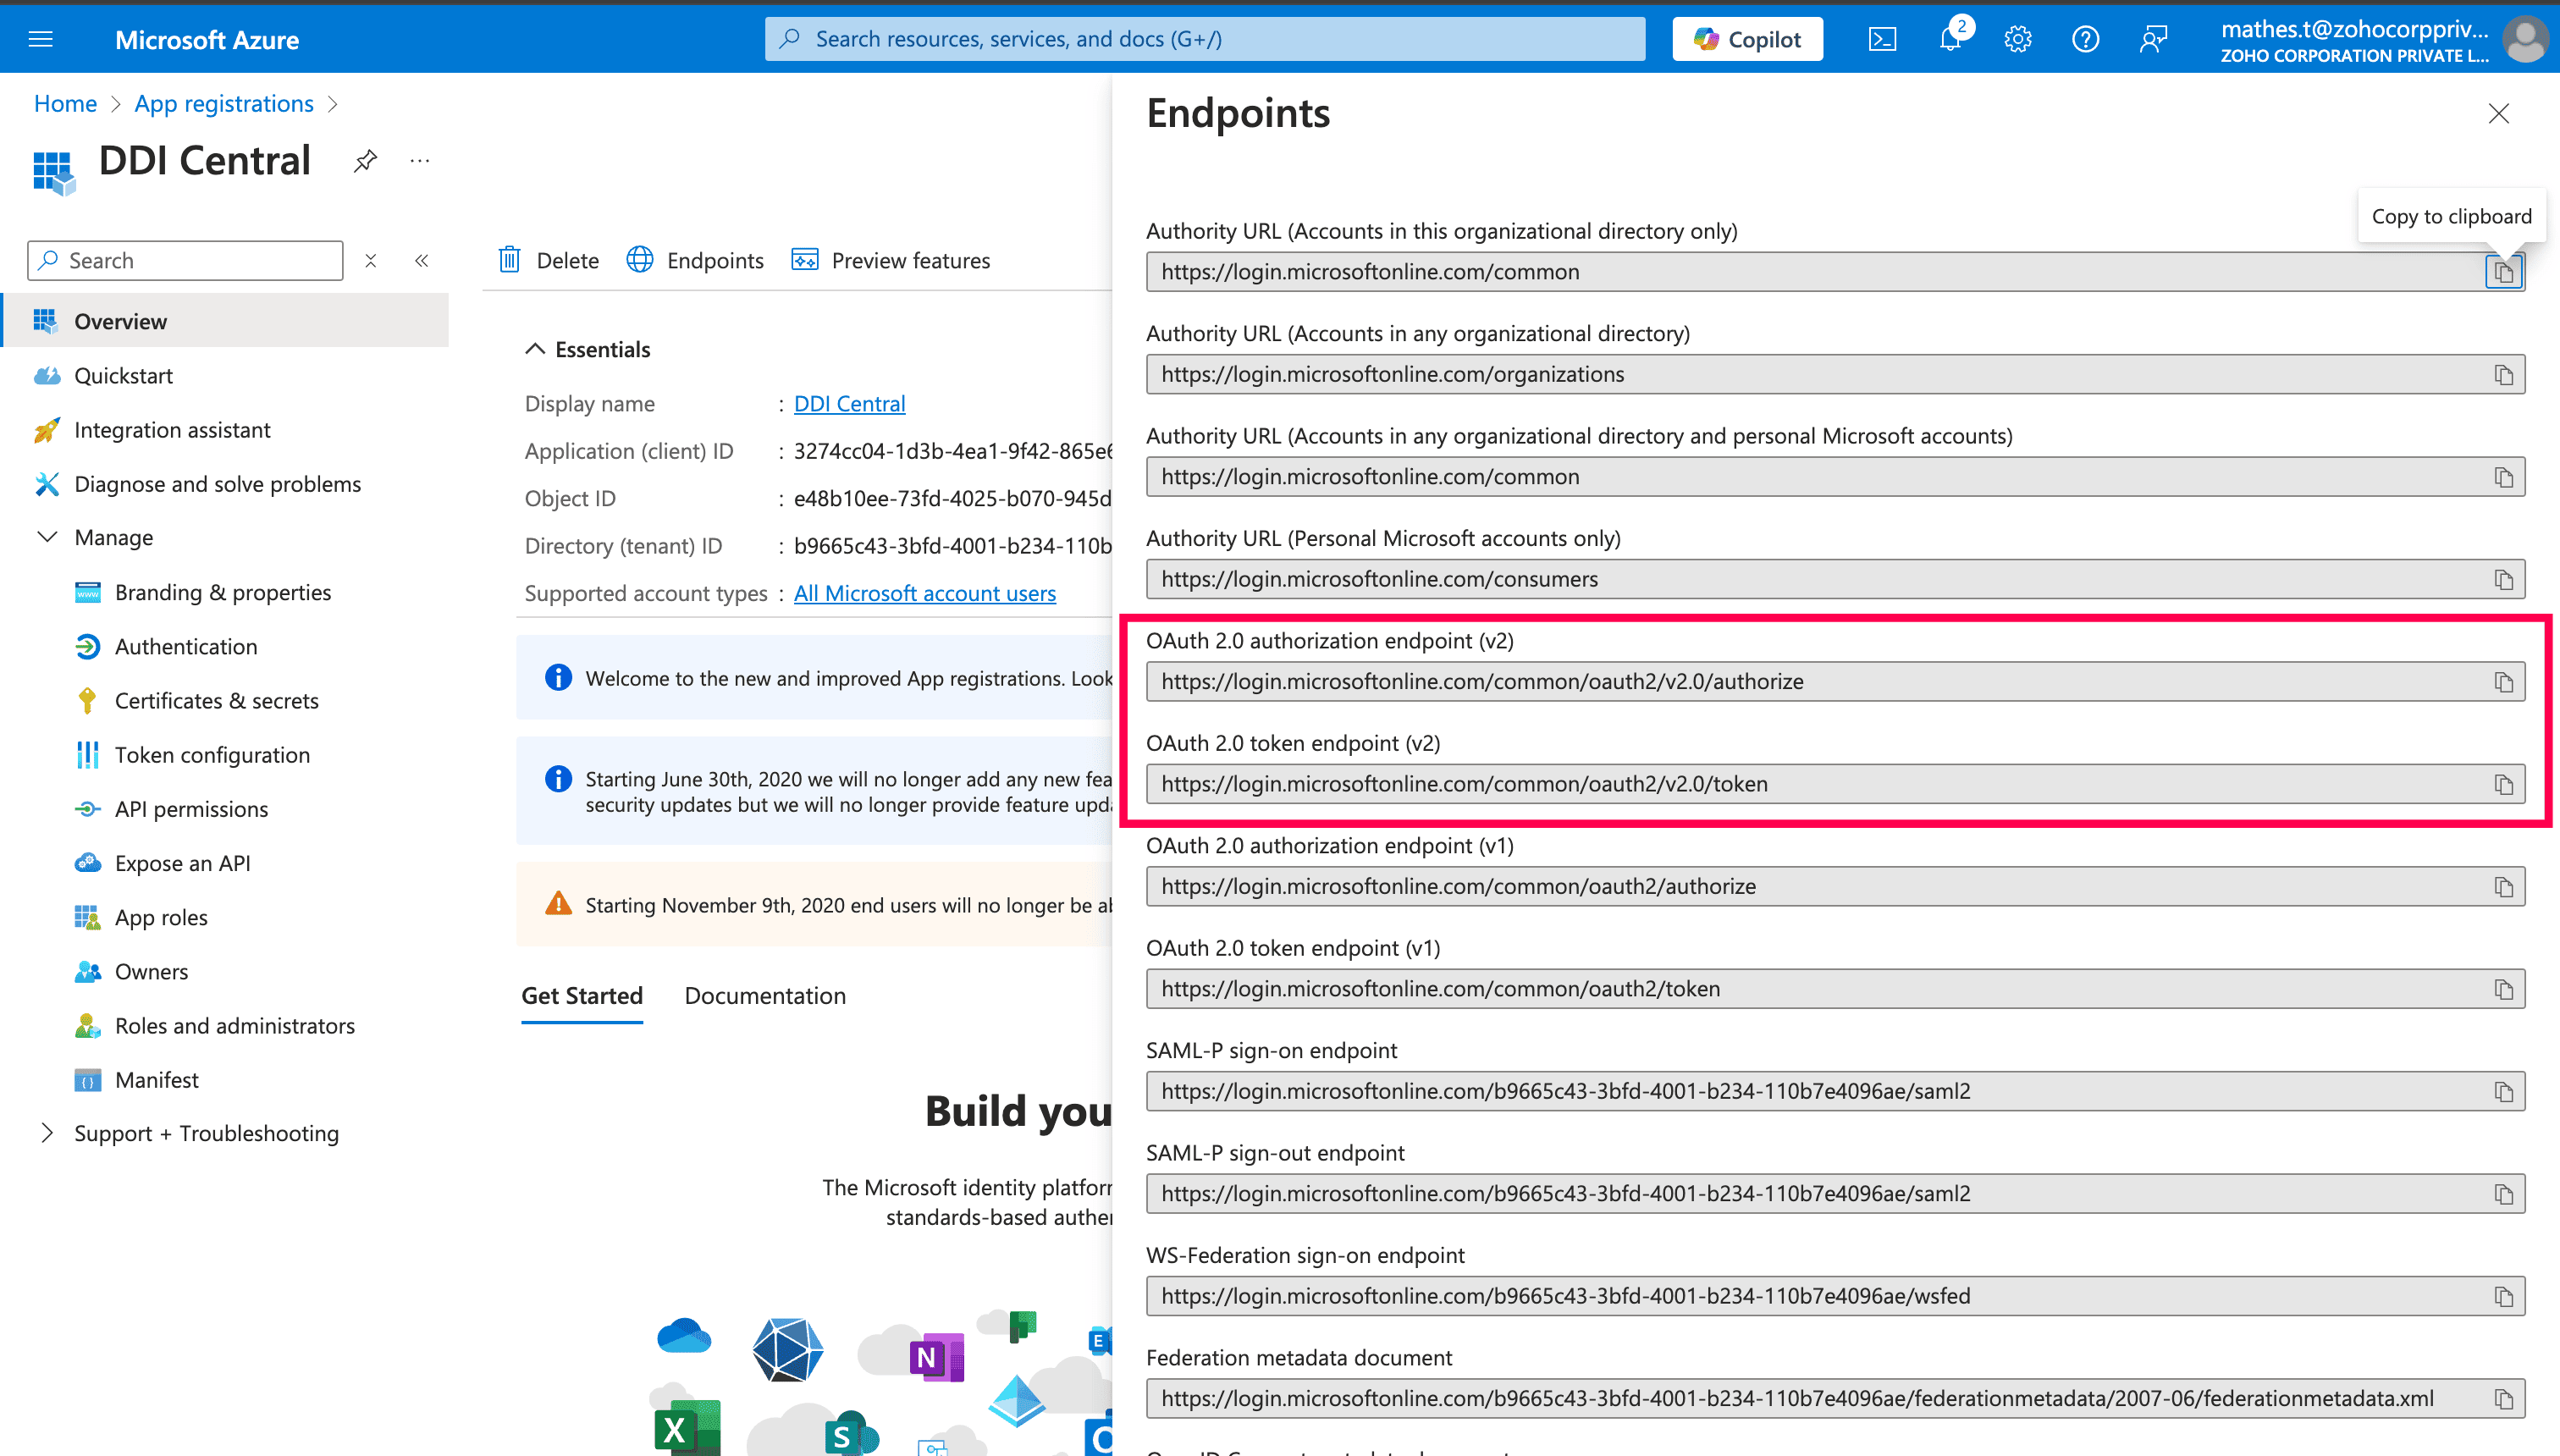
For Authentication URL and Token URL, go to the Application home page (Overview) and navigate to the Endpoints tab, there copy OAuth 2.0 authorization endpoint (v2) as Authentication URL and OAuth 2.0 token endpoint (v2) as Token URL.
Configuring OAuth provider settings in DDI Central
Follow the below steps to configure OAuth provider settings in DDI Central
In the DDI Central Management UI Console interface, navigate to Settings > Auth > OAuth. To add an OAuth provider click on Add OAuth provider. The Add OAuth provider page appears.
Fill the OAuth Provider details
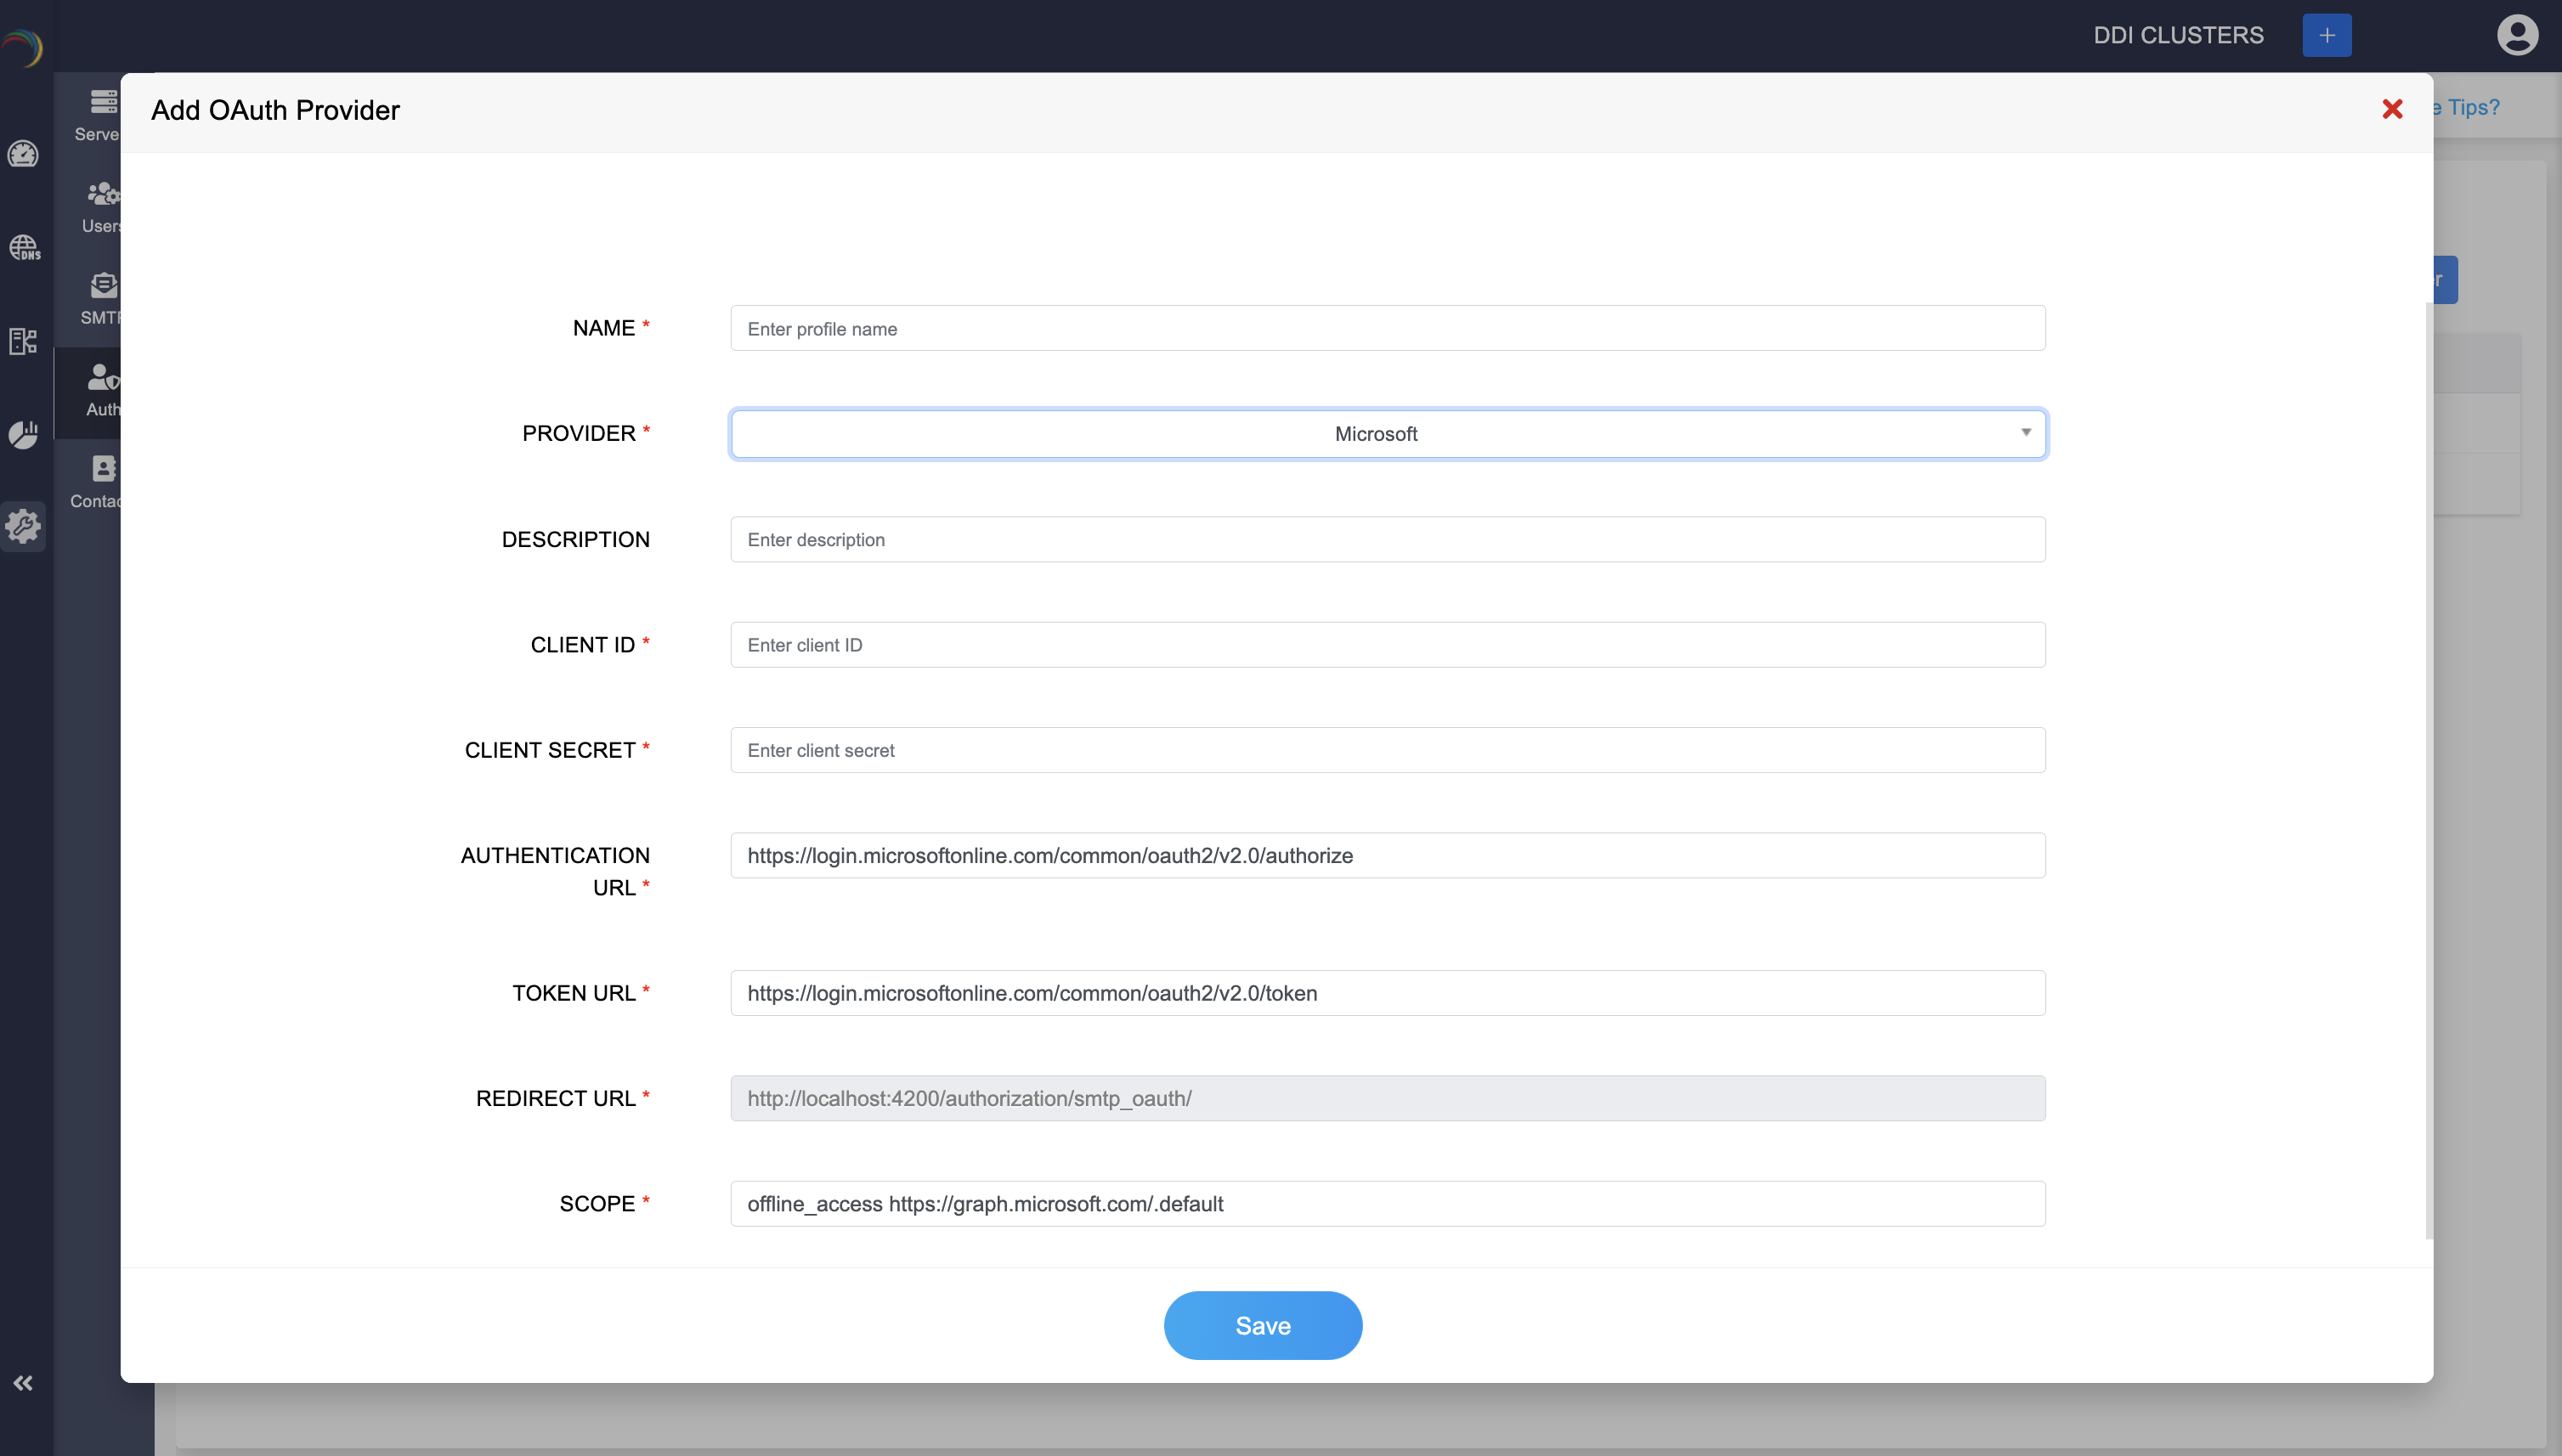
Name: Enter a profile name for the OAuth provider configuration. This name will help you identify the profile.
Provider:Select the OAuth provider of your choice from the dropdown list, Microsoft or Google.
Description: (Optional) Enter a description for this configuration profile to clarify its purpose.
Client ID: Enter the Client ID provided by the chosen OAuth provider.
Client Secret: Enter the Client Secret provided by the chosen OAuth provider.
Authentication URL: Enter the URL for user authentication with the provider.
Token URL: Enter the URL for obtaining tokens from the provider.
Redirect URL: Specify the redirect URL, which is the URL where the OAuth provider will send the authentication response. Make sure the Redirect URL is of the format "http://localhost:{port_number}/authorization/smtp_oauth/".Or if you intend to use the actual IP address of your machine make sure you manage the whole URL as a DNS Zone and add an SSL certificate for it. Only then the URL will be treated as a valid redirect URL. Here's an example URL "https://10.16.13.2:9443/authorization/smtp_oauth/".
Scope: Enter the value for the scope as "offline_access https://graph.microsoft.com/.default".
Once all the details are filled in, click the Save button at the bottom of the form to save your OAuth provider configuration. This completes the setup of an OAuth provider in DDI Central, enabling secure OAuth-based authentication for integrated services.