Mail Server Settings
Configure incoming and outgoing email settings so that your requesters and technicians can send and receive emails.
Beginning with the year 2023, basic authentication will not be supported to connect to Microsoft 365 (formerly Office 365) mailboxes. Click here to know more.
Go to Admin > MSP Details > Mail Server Settings.
On this page, we'll discuss how to configure the following:
 Incoming Mail Settings
Select whether to use the Exchange Web Service (EWS) or external mail servers (POP, IMAP, POPS, or IMAPS).
Then, proceed with the configuration as shown below:
When you choose POP, IMAP, POPS, or IMAPS as the connection protocol:
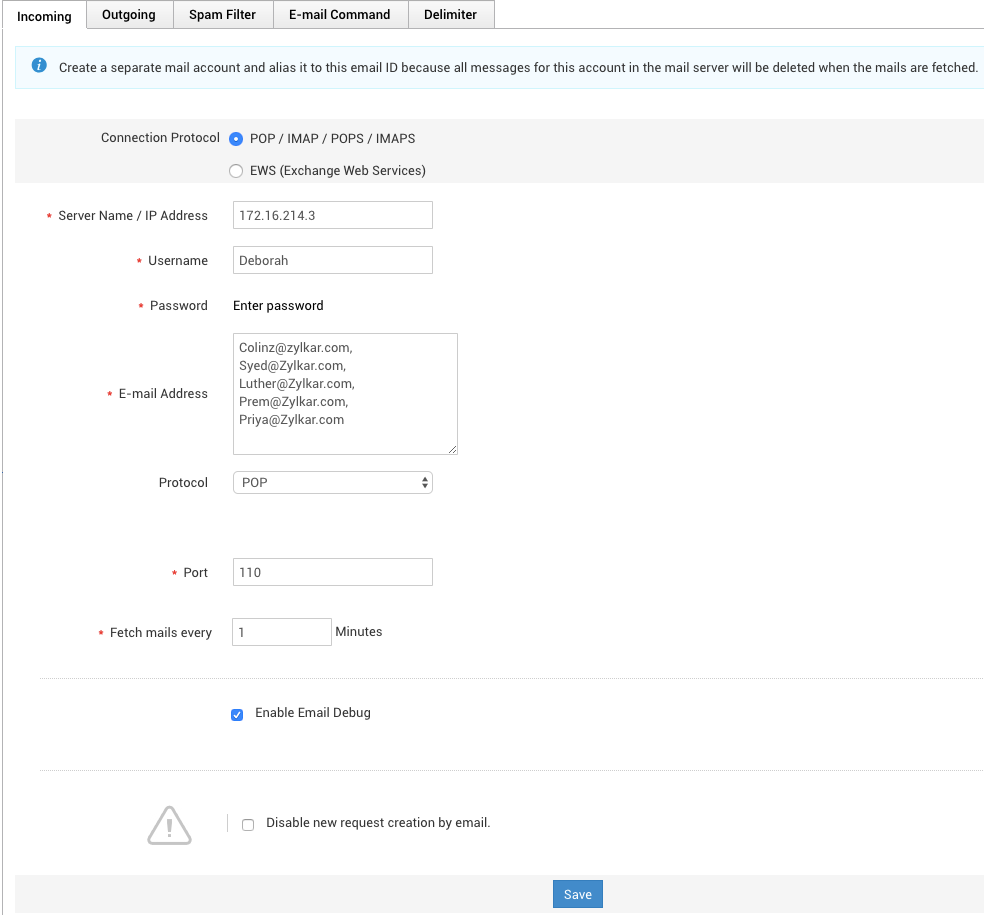
Fill out the displayed fields using the pointers given below:
| Field | Explanation |
| Server Name/IP Address | Provide the server address from which the mails should be fetched |
| User Name and Password | Specify the server credentials. |
| E-mail Address | Email address/es from which service requests must be fetched. |
| Protocol | Select the connection protocol. |
| Port | Specify the port number. |
| Fetch mails every | Provide the time interval within which mails have to be fetched. |
| Disable new request creation by email | Select this option if you want to restrict request creation to non-email sources. Also specify, if any, the allowed email IDs and domains from which request can be created by email. |
When you choose EWS as the connection protocol:
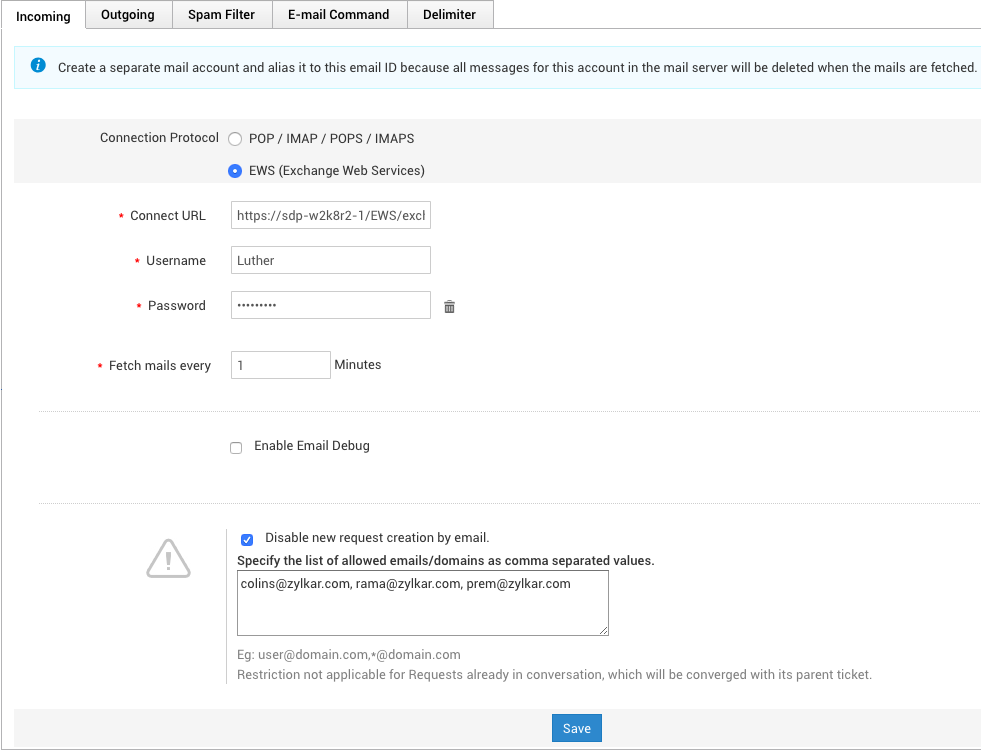
Fill out the displayed fields using the pointers given below:
| Field | Explanation |
| Connect URL | Provide the URL to connect to the server (For example, https://<server_name>/EWS/Exchange.asmx). |
| Username and Password | Specify the server credentials. |
| Fetch mail every | Provide the time interval within which mails have to be fetched. |
| Disable new request creation by email | Select this option if you want to restrict request creation to non-email sources. Also specify, if any, the allowed email IDs and domains from which request can be created by email. |
Moving Error Emails to a Different Folder
In some cases, emails with processing errors can cause mail fetching to stop. ServiceDesk Plus enables you to move these error emails to a different folder, thereby ensuring seamless workflow.
You can create a separate folder in the application directory and direct the error emails to be moved to this folder.
To configure this operation,
-
Enable the Move Messages to error folder checkbox and configure the options using the pointers given below.
-
Name: Provide the name of the folder you have created.
-
Stop mail fetching after <> mails: Enable this checkbox to stop mail fetching when the number of error emails moved to the folder reaches the specified count.
-
Total number of mails in error folder: This displays the number of emails moved to the configured error folder.
-
Move mails to inbox: Click this option to move the emails back to the inbox after resolving the errors.
-
Notify by email when a mail is moved from inbox to error folder: Enable this checkbox if you wish to notify technicians each time an error email is received.
Note that you must enable the option Send e-mail when an application error occurs under notification rules.
-
Resolving Error Emails
When moving emails to the error folder, the details of the each mail and the exception will be saved as text files(.txt). These files will be encrypted as they might contain Personally Identifiable Information(PII) of the customer. Follow the steps given below to resolve the error emails.
-
Click Download. The support files along with the error logs will be decrypted and downloaded in a zip file.
-
Send the files to support@servicedeskplus.com for analysis.
-
Once all emails in the error folder are resolved, click Move mails to inbox. The resolved emails will be further processed in the application based on the workflow of your helpdesk.
The Total number of mails in error folder will be reset when all emails from the error folder are moved to inbox.
Limitations
-
This feature is not applicable for mail servers configured with the POP(S) protocol.
-
In case of connectivity issues when processing emails, the mail fetching process will stop and emails will not be moved to the error folder.
The EWS connection protocol is supported only for Windows machines.
Outgoing Mail Settings
Configure your organization's mail server to send emails. Outgoing mail server settings must be configured to trigger email notifications for the following settings in ESM Directory:
- Two-Factor Authentication
- Backup Scheduling
- Security Settings
- Performance Settings
- Notification Rules
- High Availability
You can use email protocols (SMTP/SMTPs), Exchange Web Services (EWS), or Microsoft Graph to send emails from ServiceDesk Plus MSP. Depending on the connection protocol selected, the configurations vary.
Configure Outgoing Mail Server Settings
Go to Admin > Mail Server Settings > Outgoing.
By default, the outgoing mail server settings from IT Help Desk instance will be copied to ESM Directory. You can update the configurations if needed. Select the Account you would like to apply the configuration and follow the given stepsE
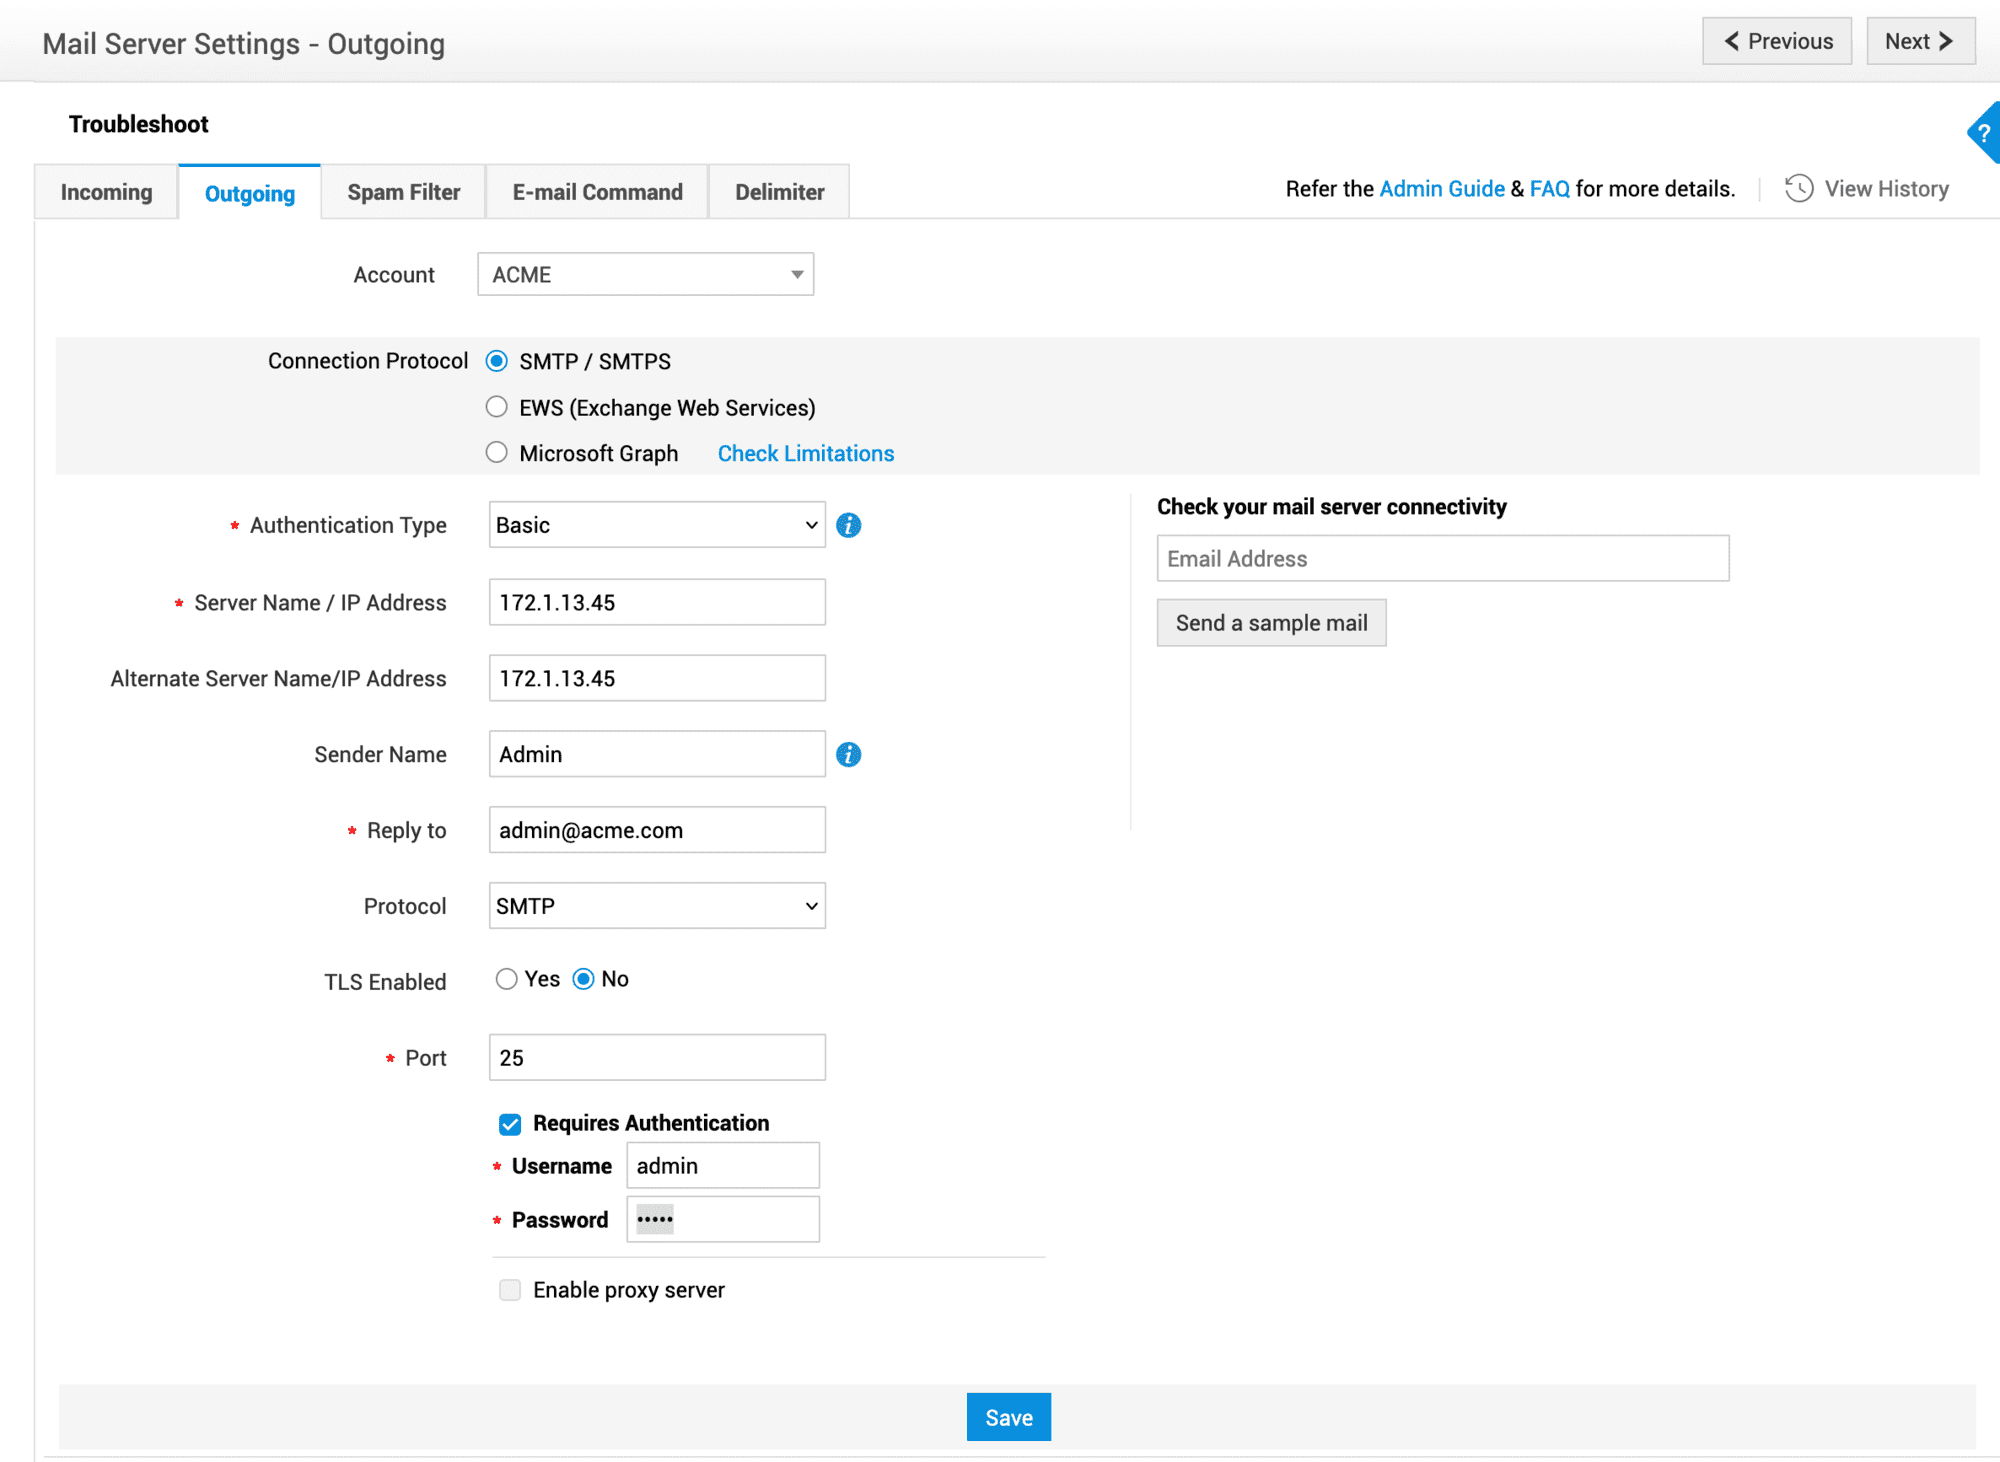
Configure Mail Server with Email Protocols:
- Choose the Connection Protocol as SMTP/SMTPS.
- Choose the Authentication Type. Use the pointers given below to configure the mail server based on the authentication type:
| Field Name | Basic Authentication | OAuth Authentication |
| Server Name / IP Address | Specify the name or IP address of the server through which all emails must be sent. | |
| Alternate Server Name / IP Address | Provide secondary server details, if available. ServiceDesk Plus MSP will use this server to send emails if the primary server is unavailable. | |
| Sender Name | Specify the name to be displayed in emails sent from the application. | |
| Reply to | Specify an email address to be mentioned as From address in outgoing emails. All emails from ServiceDesk Plus MSP will be received from this email address. | |
| Username | - | Enter the username to access the mailbox. |
| Protocol | Select the protocol to connect to the mailbox:
|
|
| TLS Enabled | Select whether Transport Layer Security (TLS) must be enabled. | |
| Port | Specify the port number as per the selected protocol. | |
| Requires Authentication | Provide the necessary login credentials to mandate authentication in the mail server while sending emails. | - |
| Authorization Server Details (Client ID, Client Secret, Authorization URL, Token URL) | - | Obtain these details from the authorization server. |
| Scope | - | Define the accessibility of the obtained OAuth tokens in the mailbox.For SMTP/SMTPS protocols running on port 587, scope will be auto-populated for the following mailbox:
|
| Redirect URL | - | Use this URL to register ServiceDesk Plus and obtain tokens from the authorization server.Ensure the application is accessed using the same host as the redirect URL for OAuth configurations to work. |
| Enable proxy server | If the application requires proxy settings to send emails, enable and configure the proxy settings. | |
| Enable Email Debug | Obtain debug prints of subsequent emails fetched in the application. Enable this option only if recommended by the support team. | |
After setting up the configuration, click Save.
Secondary Mail Server for Outgoing Mails
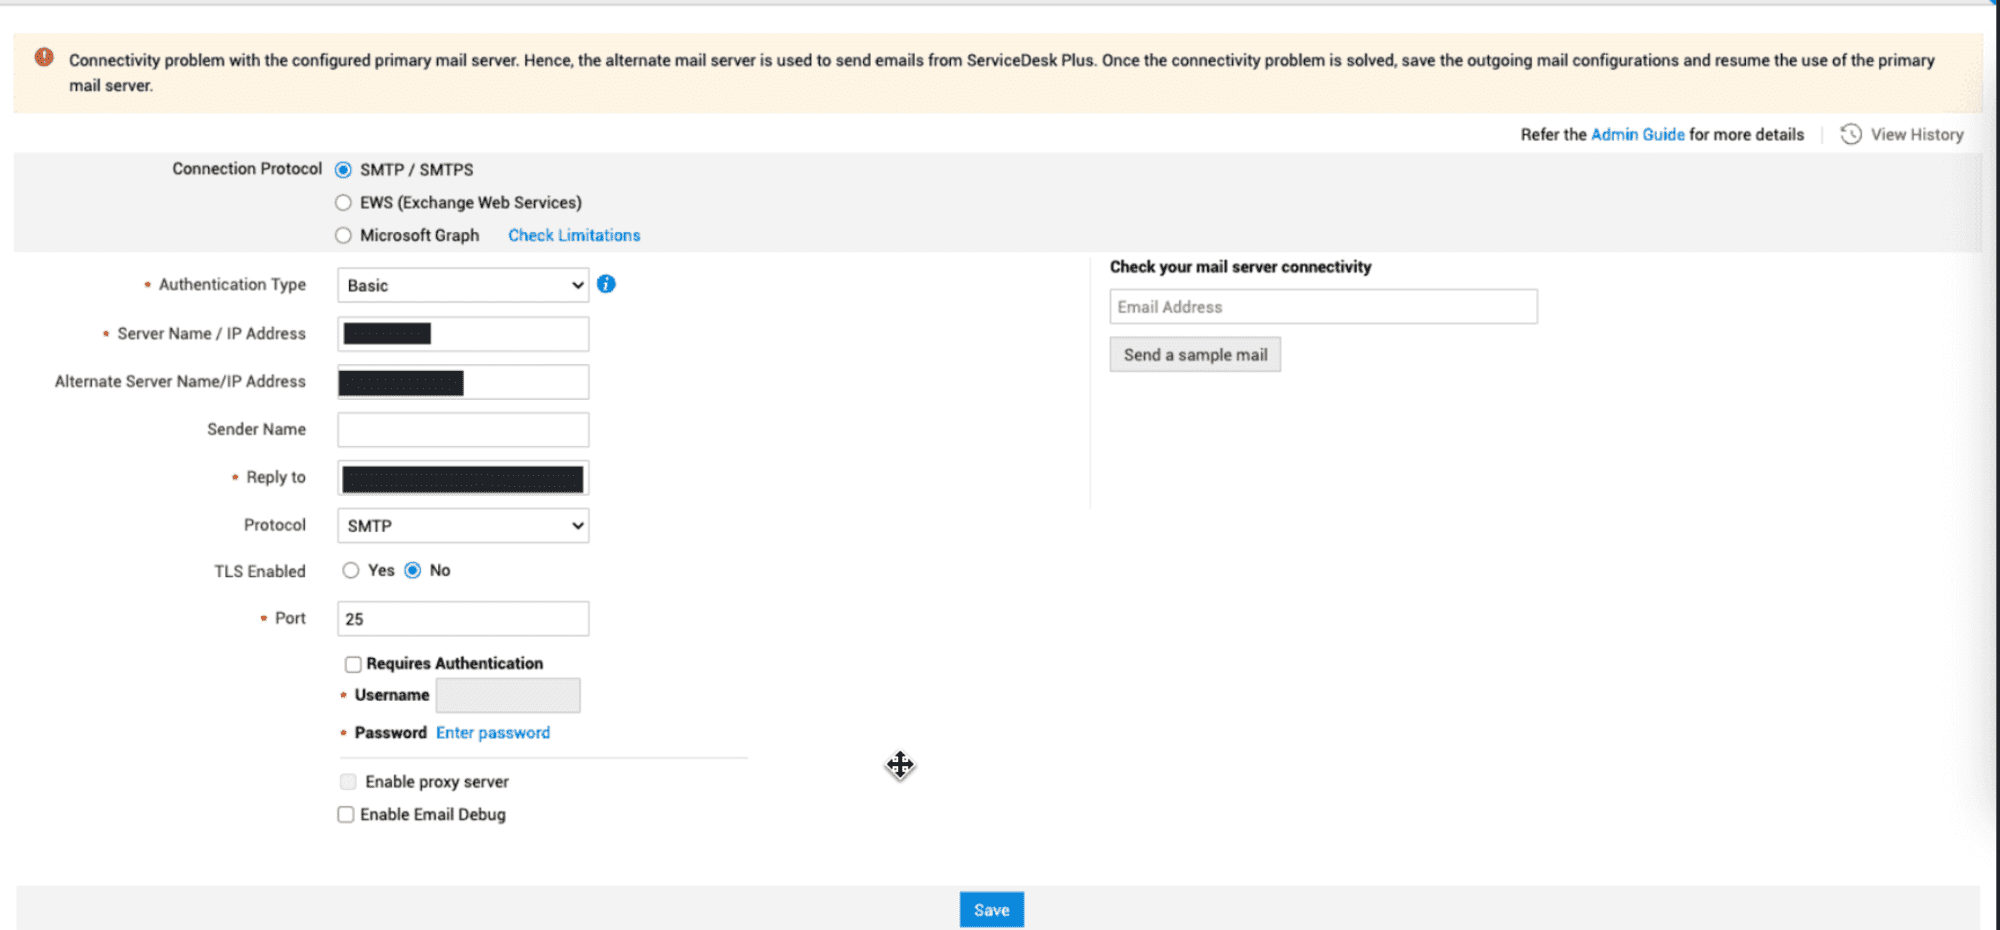
In case of connectivity issues with the primary mail server, ServiceDesk Plus will connect with the alternate server and send emails. Once connected, ServiceDesk Plus will continue to send emails via the alternate server. To reconnect with the primary server, you can do one of the following:
* Restart the application services
* Reconfigure outgoing mail server settings
A UI message will be displayed to inform users as shown in the screen shot:
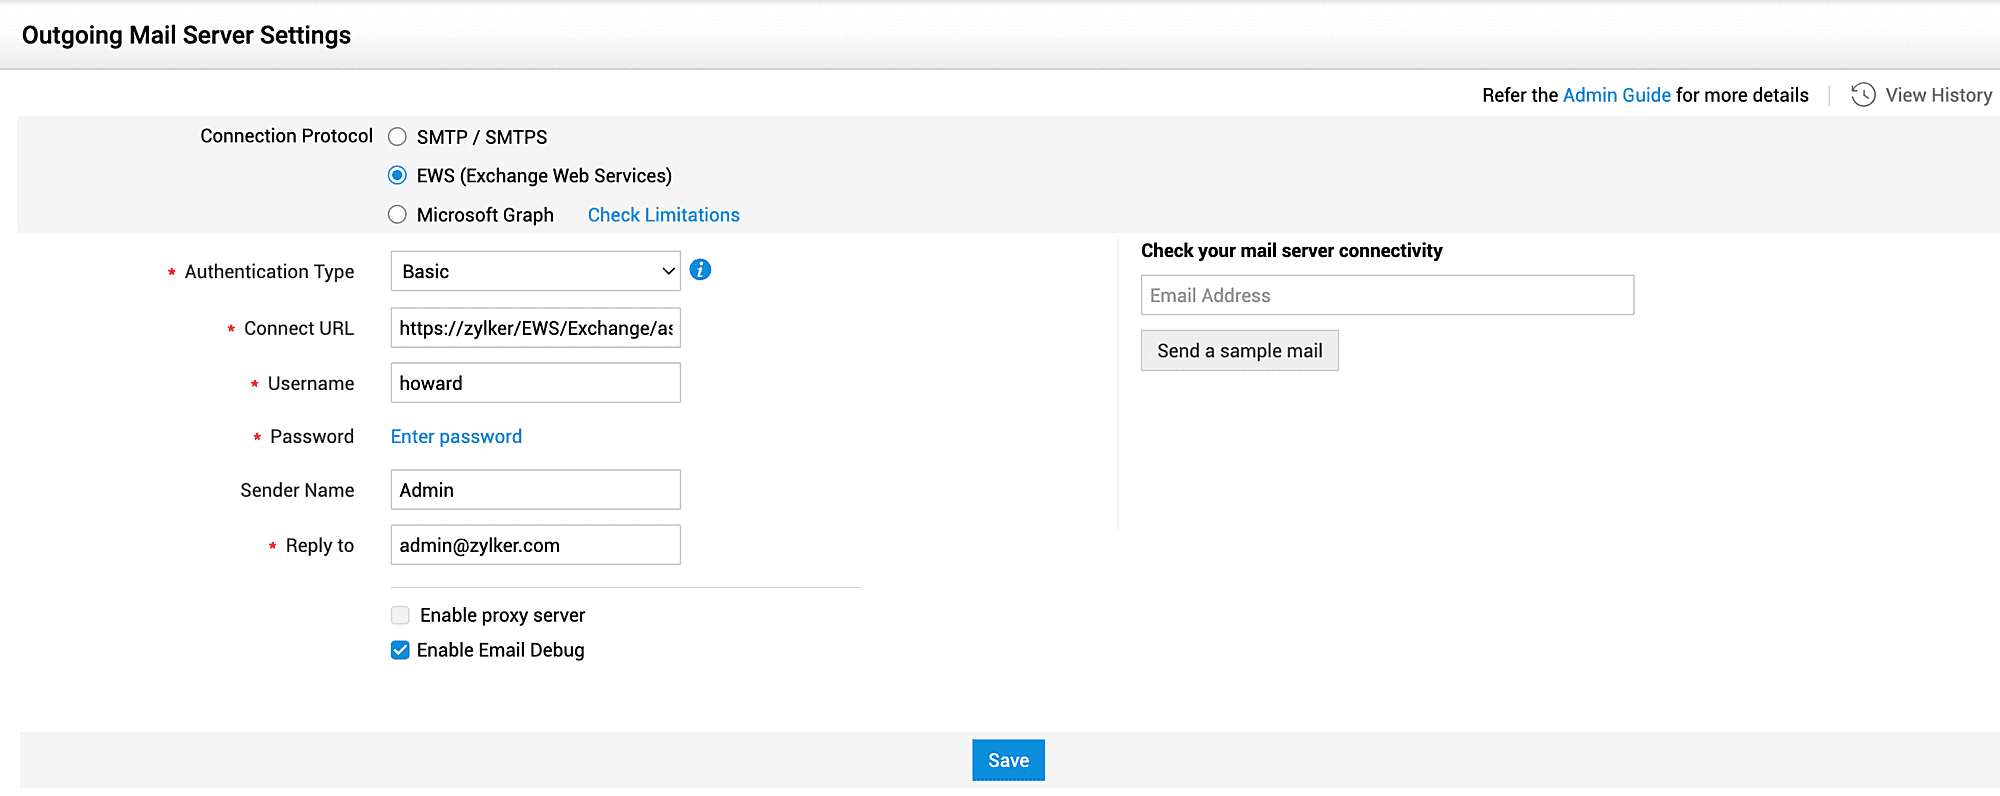
Configure Mail Server with Exchange Web Services:
- Choose the Connection Protocol as Exchange Web Services (EWS).
- Choose the Authentication Type. Use the pointers given below to configure the mail server based on the authentication type:
| Field Name | Basic Authentication | OAuth Authentication |
| Connect URL | Provide the EWS URL to connect to the server (For example, https://<host_name>/EWS/Exchange.asmx). | |
| Username | Enter the username to access the mailbox. | |
| Password | Enter the password of the mailbox. | - |
| Sender Name | Specify the name to displayed in emails sent from the application. | |
| Reply to | Specify an email address to be mentioned as From address in outgoing emails. Reply emails will be received from this email address. | |
| Authorization Server Details (Client ID, Client Secret, Authorization URL, Token URL) | - | Obtain these details from the authorization server. |
| Scope | - | Define the accessibility of the obtained OAuth tokens in the mailbox.For Office365 mailbox, scope will be auto-populated as: https://outlook.office365.com/EWS.AccessAsUser.All, offline_accessKnow more about default values populated as scope. |
| Redirect URL | - | Use this URL to register ServiceDesk Plus and obtain tokens from the authorization server.Ensure the application is accessed using the same host as the redirect URL for OAuth configurations to work. |
| Enable Proxy Server | If the application requires proxy settings to send mails, enable and configure the proxy settings. | |
| Enable Email Debug | Obtain debug prints of subsequent emails fetched in the application. Enable this option only if recommended by the support team. | |
After setting up the configuration, click Save.
Configure Mail Server with Microsoft Graph:
If mail server settings copied from IT Helpdesk instance is configured with Microsoft Graph, configure different Client ID and Reply Email in ESM Directory to avoid errors while editing the settings due to throttling limitations.
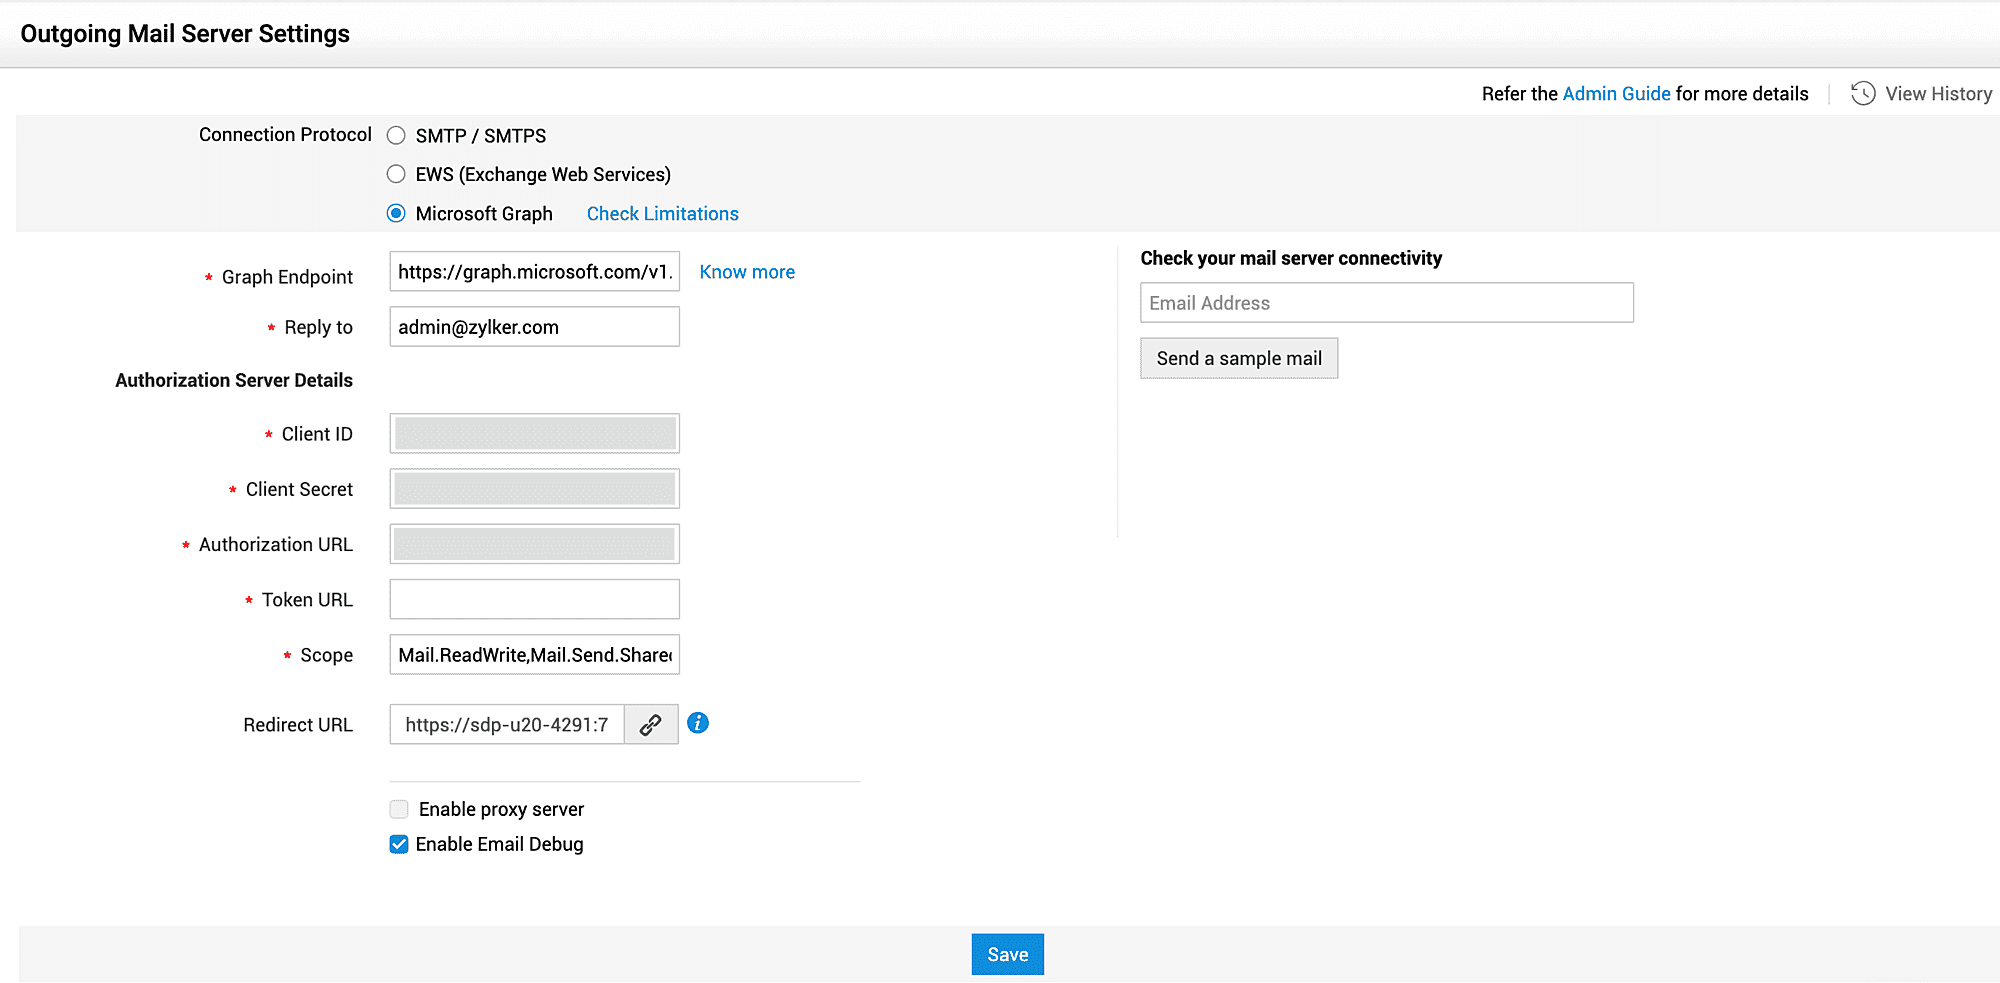
- Choose the Connection Protocol as Microsoft Graph.
- Microsoft Graph supports only OAuth authentication. Use the pointers given below to configure the mail server:
| Field | Explanation |
| Graph Endpoint | The global graph endpoint will be pre-populated here. Modify the endpoint if your organization comes under a specific national cloud. Click here to view the list of graph endpoints corresponding to various national clouds. |
| Reply to | Specify an email address to be mentioned as From address in outgoing emails. Reply emails will be received from this email address. |
| Authorization Server Details (Client ID, Client Secret, Authorization URL, Token URL) | Obtain these details from the authorization server. Microsoft Graph supports Azure as the authorization server. If the same mailbox is configured in both incoming and outgoing mail server settings, ensure the client ID is different to avoid issues due to mail throttling limitations. Learn more. |
| Scope | Define the accessibility of the obtained OAuth tokens in the mailbox.For Microsoft Graph protocol, scope will be auto-populated as: Mail.ReadWrite,Mail.Send.Shared,offline_access Know more about default values populated as scope. |
| Redirect URL | Use the URL to register ServiceDesk Plus MSP and obtain tokens from the authorization server.Ensure the application is accessed using the same host as the redirect URL for OAuth configurations to work. |
| Enable proxy server | If the application requires proxy settings to send mails, enable and configure the proxy settings. |
| Enable Email Debug | Obtain debug prints of subsequent emails fetched in the application. Enable this option only if recommended by the support team. |
After setting up the configurations, click Save.
Edit Mail Server Settings
Administrators can edit the mail server settings as needed. If a mail fetching process is ongoing, the application will prompt to disable mail fetching temporarily. After saving the changes, enable the fetching process manually.
Check Mail Server Connectivity
The outgoing mail server connectivity can be tested by sending a sample email from the mail server. Mention an email address and click Send a sample mail.
If the settings are configured right and the connection is successful, then a sample email will be sent to the mentioned email address. If not, an error message will be displayed on the screen.
To learn more about troubleshooting mail server errors, click here.
Limitations
Due to severe throttling policies of Microsoft Graph API, ServiceDesk Plus has certain limitations when Microsoft Graph protocol is used for sending emails.
Microsoft has set service limits to only four concurrent API requests. Since ServiceDesk Plus MSP can send emails through multiple threads (user replies, forwards, system notifications, or custom triggers), there might be a delay while sending emails.
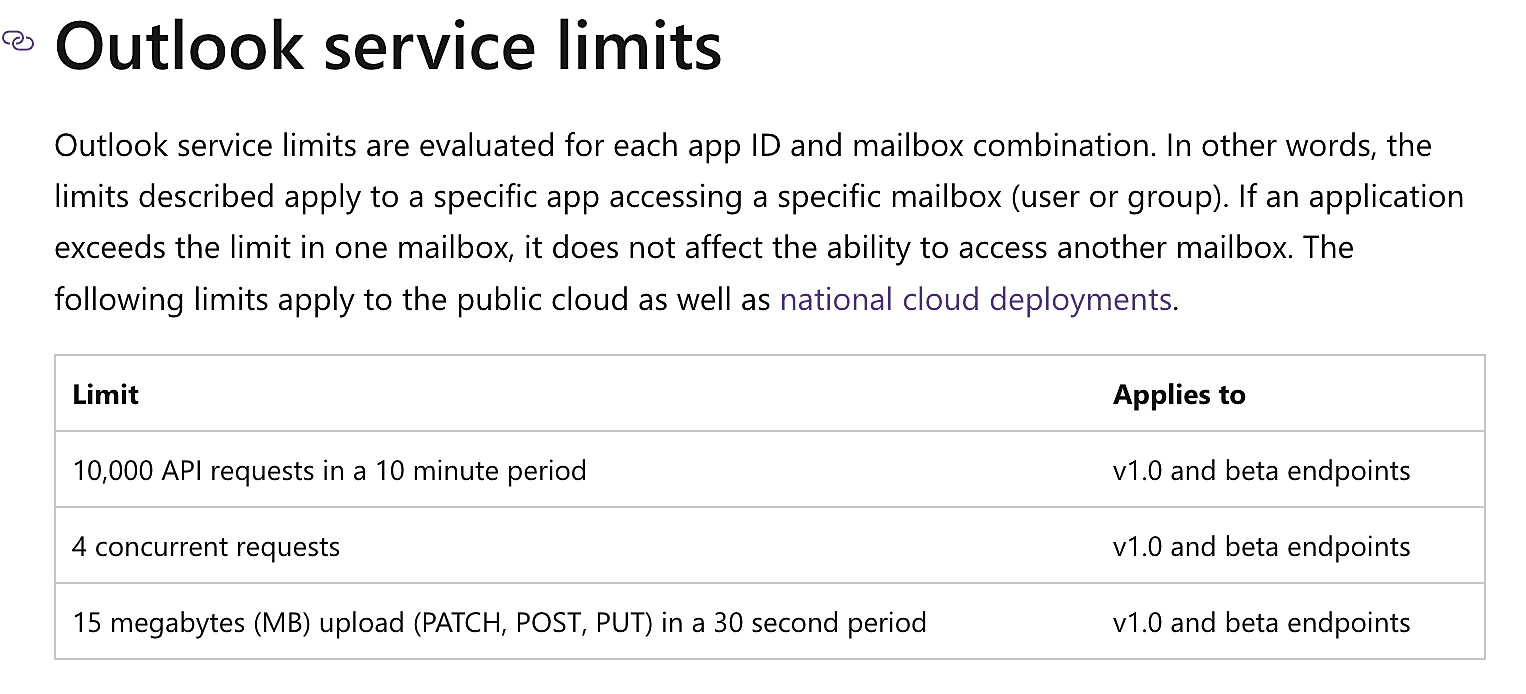
On performing a load simulation setup at our end to test the delay, we have verified the following stats:
| Email Inflow Rate | Email Outflow Rate | Results | |
| Scenario 1 | 600 emails per hour where the inflow rate is constant (~10 emails per minute)10 inline images for every 3 emails | 1800 notifications sent from application (3 notifications for each request created)Average time to send an email = 2~3 seconds | Emails were sent without any delays. |
| Scenario 2 | High inflow rate (sudden surge of 100 emails per minute)10 inline images for every 3 emails | 300 notifications sent from application (3 notifications for each request created)Average time to send an email = ~3 seconds | Emails were sent without much delay. |
| Scenario 3 | High inflow rate (sudden surge of 200 emails per minute)10 inline images for every 3 emails | 600 notifications sent from application (3 notifications for each request created)Average time to send an email = 8~9 seconds | Max. of 10 mins delay in sending an email (time difference between 200th request creation and its notification) |
As per the stats, when the inflow rate surges/an increased number of notifications are configured, there is an evident delay in sending emails.
Therefore, we recommend users not to configure Microsoft Graph protocol as the outgoing mail server in the following cases:
- Your organization environment has a high email inflow/outflow rate
- Your organization email flow rates do not fall within scenario 1 or 2.
Workaround: You can use SMTP protocol for sending emails.
This limitation does not affect incoming mail server as emails are fetched from mailbox in a sequential manner and therefore, no concurrent requests are made .
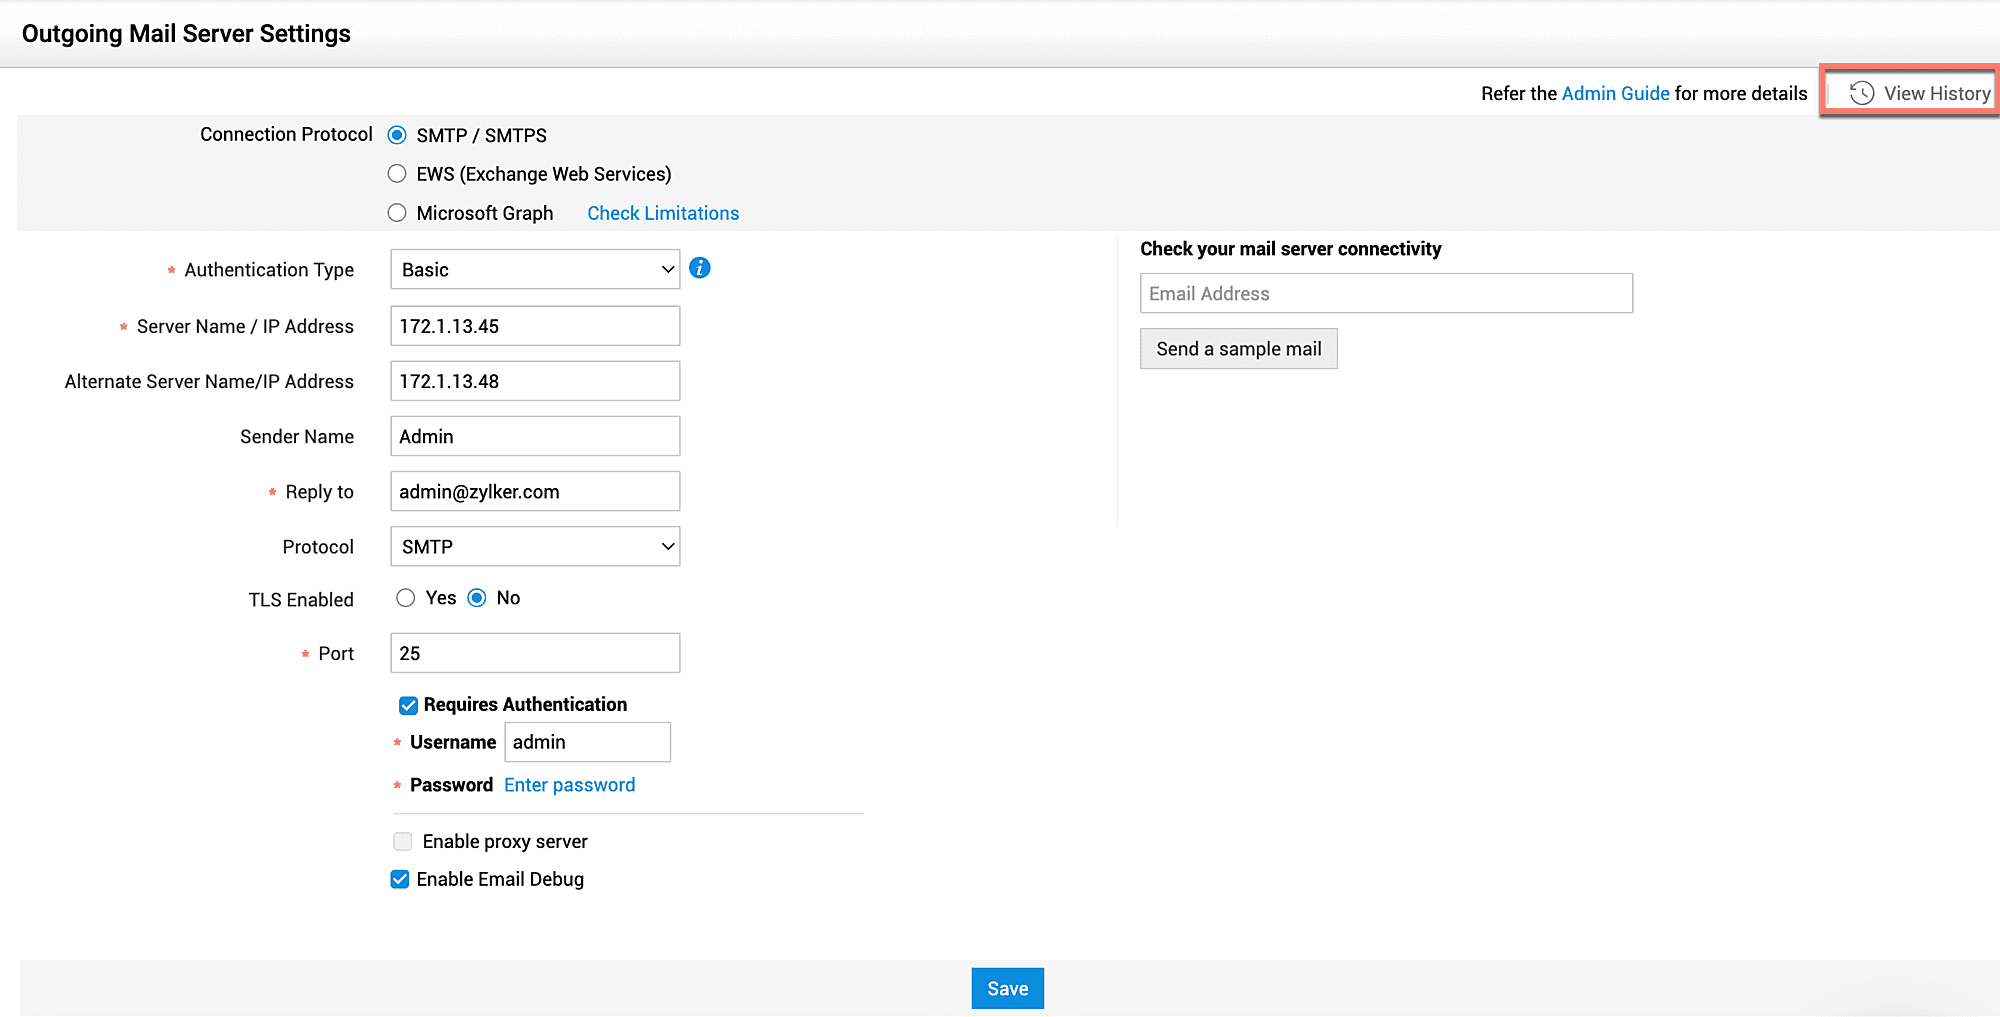
View History
Click View History on the top-right corner of the page to track changes made to outgoing mail server configurations.
OAuth Authentication for Mail Server
Configuring OAuth for Mail Server
Upon generating the auth tokens, you can configure incoming and outgoing mail settings of your organization to connect using:
- POP/IMAP/POPS/IMAPS (For incoming mail servers)
- SMTP/SMTPS (For outgoing mail servers in service desk instance )
- Exchange Web Services (For incoming mail servers and outgoing mail servers in service desk instance)
- Microsoft Graph (For incoming mail servers and outgoing mail servers in service desk instance)
Graph Endpoints
The following table displays the graph endpoints corresponding to different national clouds across the globe:
|
National Cloud |
Microsoft Graph Endpoint |
|
Microsoft Graph global service |
|
|
Microsoft Graph for US Government L4 |
|
|
Microsoft Graph for US Government L5 (DOD) |
|
|
Microsoft Graph Germany |
|
|
Microsoft Graph China operated by 21Vianet |
For an app in US Government,
If you're working in a Microsoft 365 GCC environment, continue using the worldwide endpoints: https://graph.microsoft.com and https://portal.azure.com.
If you're working in a Microsoft 365 GCC High environment, use https://portal.azure.us and https://graph.microsoft.us.
If you're working in a Microsoft 365 DoD environment, use https://portal.azure.us and https://dod-graph.microsoft.us.
 Spam Filter
Define filter criteria to block any unnecessary or spam messages from entering the application. Mails that fulfill the criteria you have defined are dropped, and no requests are created from them.
Configure the Spam Filter as shown below:
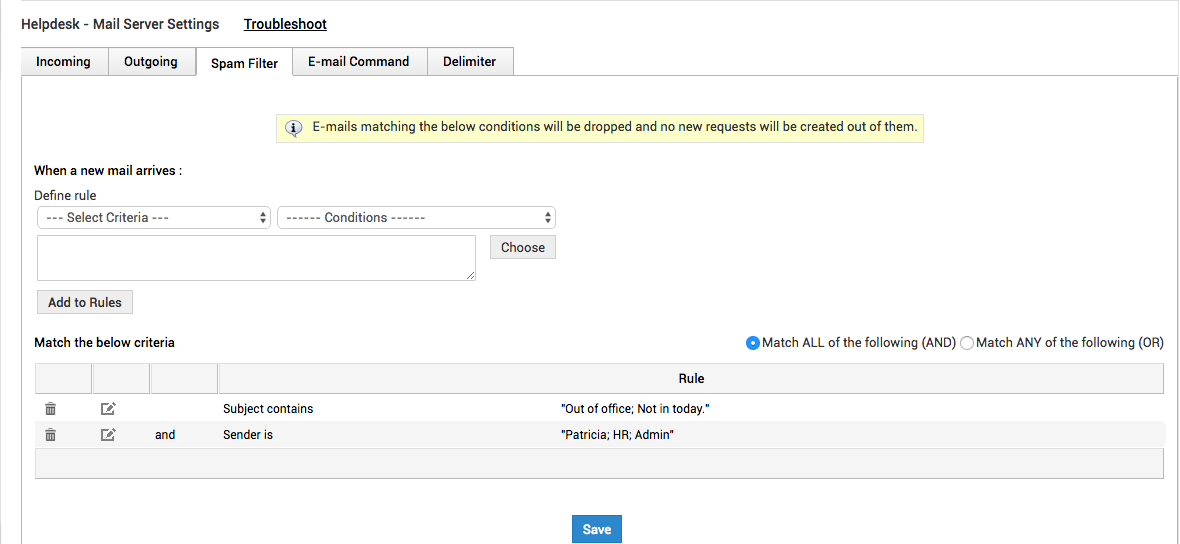
To mark out all spam messages, ensure that you define the rule clearly with choose if the rule must match ALL conditions or any one of the specified conditions.
Under Define rule, select the criteria from the drop-down and select the condition.
Click the Choose button to add comma separted entries to the filter conditions. Say, the Subject field can contain Out of office or Not in today.
Click Add to Rules and Save.
 Email Command
The Email Command in ServiceDesk Plus MSP parses through all incoming emails, extracts the required data, and automates request-related actions such as adding/creating, editing, updating, and picking up requests.
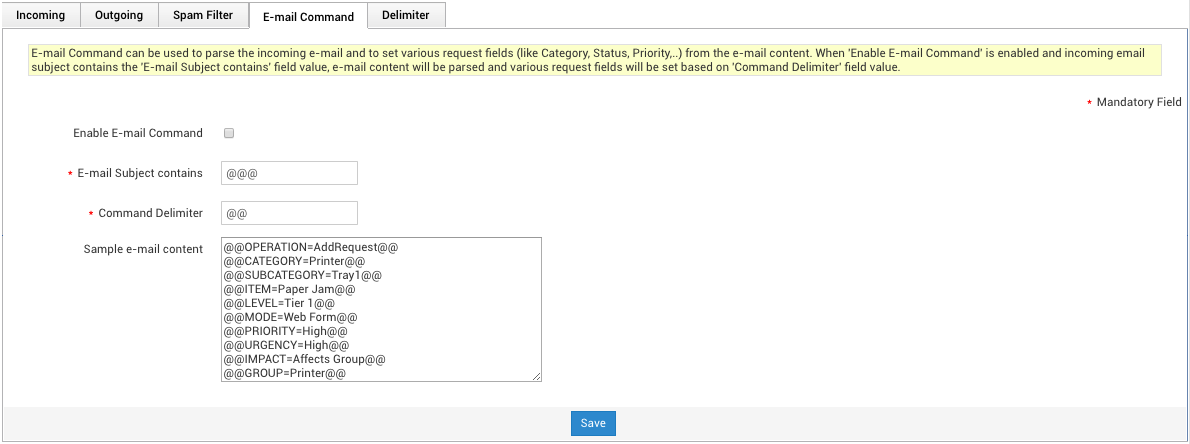
Define request delimiters under Email Command to parse all incoming emails, update the required request fields or perform various operations automatically. Note that only emails from authorized users (with login permissions) will be parsed.
Configure Email Command using the following pointers:
|
Field |
Explanation |
|
Enable Email Command |
Select this option to activate email parsing. |
|
Email Subject Contains |
Enter the exact parsing identifier; emails that do not have this string under their subject will NOT be parsed. |
|
Command Delimiter |
Specify a special character, say $, that will enclose the field/operation and the parser action required.
For example, if the request must be assigned request high priority, the email content will be as follows:
$Priority=High$
To add a new request, the email content will contain:
$Operation=AddRequest$ |
Field Parsing Rules
Fields specified in the email, but absent in the application will not be parsed. If the email specifies more than one value for any field, only the last value will be considered. Other values will be discarded.
If the requester name is not specified in the email, the email sender will be considered as the requester.
Operational Strings
For various request-related operations, use the following strings, enclosed within the specified command delimiter, in the email content:
|
Action |
Operational String |
|
Create a new request |
Operation=AddRequest |
|
Edit or update a request* |
Operation=EditRequest |
|
Close a request* |
Operation=CloseRequest |
|
Pick up/assign a request* |
Operation=PickupRequest |
*The email must contain the Request ID for the operation to be performed.
Emails with Request ID in the subject line, but with no operational strings in the email body will not create new requests. Also, Request ID in the email description takes precedence over the Request ID in the subject line.
Request operations: Roles and Permissions
All update information, including images and attachments, will be added only under the history tab, and not under conversations.
Emails from users with only requester/technician permissions will be parsed only for fields that were available to the user while creating the request. Actions such as picking up, updating, or closure of requests will be based on the permissions available to the requester.
The following fields, depending on user permissions, can be parsed:
|
Level |
Mode |
|
Priority |
Urgency |
|
Impact |
ImpactDetails |
|
Category |
SubCategory |
|
Item |
Group |
|
Technician |
TechnicianEmail |
|
Requester |
RequesterEmail |
|
RequestID |
RequestTemplate |
|
RequestType |
Status |
|
Site |
Asset |
|
Resolution |
Additional Field Label |
Apart from these fields, you can also add or edit resources in requests based on the service templates.
The format for resources is as afollows.
@@resource_api_key.question_api_key=answer@@
Example : @@res_301.qstn_select_302=compaq@@
- Resource answer should be "name" of the available options.
- For select, string, and radio fields, only one possible answer is valid. If more than one answer is given, those will be considered inactive and the corresponding question will be removed from that resource.
- For the check field, multiple answers are supported. If any of the answers given is invalid, that particular answer alone will be removed and the remaining valid answers will be retained.
- If all answers given for the check field are invalid, the corresponding question will be removed. This case will be valid for edit operation, considering that a particular question already has a valid answer.
- If any of the keys repeats more than once with the same or different value, the last key alone will be considered.
- The admin can change the fields that are available to the technician or requester in the default template.
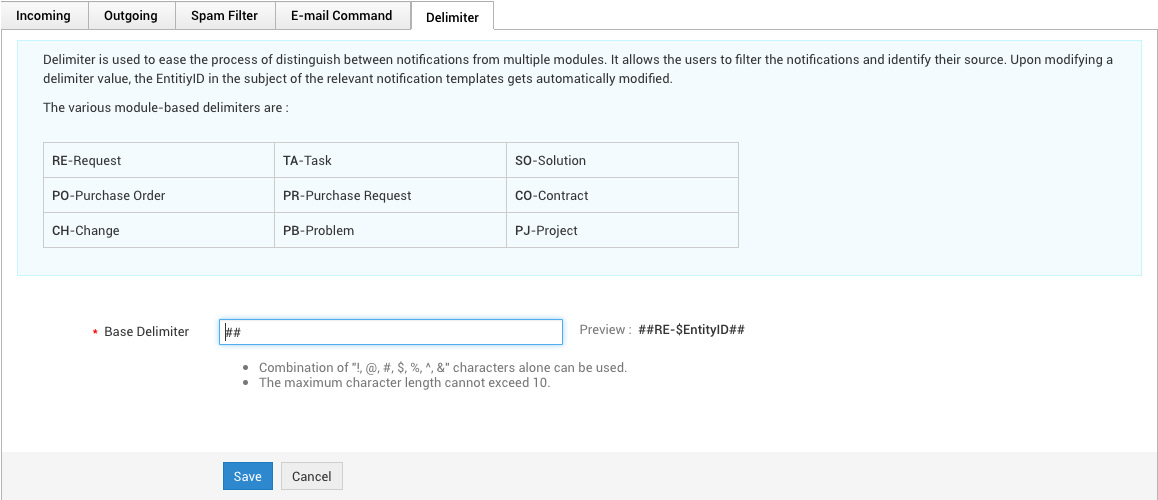
To distinguish and filter notifications by module, you can configure delimiters. For example, RE can refer to the request module or PO can refer to the Purchase module. In ServiceDesk Plus MSP, the module-based limiters are as follows:
|
RE-Request |
TA-Task |
SO-Solution |
|
PO-Purchase Order |
PR-Purchase Request |
CO-Contract |
|
CH-Change |
PB-Problem |
PJ-Project |
Requests from emails are either added as new requests or conversations. For an email to be added as a conversation, the Request ID and the Parent ID of the delimiter must be the same in the subject line of the notification.
The default base delimiter is ##, which can be modified per user requirement. Note that the allowed special characters for the base delimiter are !, @, #, $, %, ^, &. And, the maximum character limit is 10.
Other Configurations
Configure Notifications for Connectivity Issues
When an issue occurs while processing emails, notifications will be triggered to the technicians configured for error notifications in Admin > Notification Rules. However, if the application fails to connect to the mailbox, the current mail fetching schedule will be skipped and the application will try to reconnect to the mailbox during the next schedule. With every schedule, this process will recur in a loop and no emails will be fetched until the application connects to the mailbox.ServiceDesk Plus MSP provides a default threshold value to track down the number of consecutive failures attempts to connect to the mailbox. When this threshold value is reached, SDAdmins and associated technicians can be notified via bell notifications and emails respectively.
To configure the threshold value,
-
Connect to the ServiceDesk Plus MSP Database
-
Execute the following query to know the configuration
select * from mailconfig where category like 'FETCHING_MAILBOX_CONNECTIVITY' |

-
The paramvalue of CONSECUTIVE_RETRY_THRESHOLD denotes the threshold value configured in the application.
-
The paramvalue of NOTIFICATION_ENABLED denotes whether the notifications are enabled/disabled.
The given screenshot displays the default configuration, where 5 is the default threshold value and the notifications enabled by default.
-
Use the following query to update the threshold value:
|
update mailconfig set paramvalue='X' where parameter like 'CONSECUTIVE_RETRY_THRESHOLD' and category like 'FETCHING_MAILBOX_CONNECTIVITY'
|
-
Use the following query to disable the notification:
update mailconfig set paramvalue='false' where parameter like 'NOTIFICATION_ENABLED' and category like 'FETCHING_MAILBOX_CONNECTIVITY' |
-
Use the following query to enable the notification:
update mailconfig set paramvalue='true' where parameter like 'NOTIFICATION_ENABLED' and category like 'FETCHING_MAILBOX_CONNECTIVITY' |
-
Restart the service to implement the changes.
Notifications for Stripped Attachments (version 13000 and later)
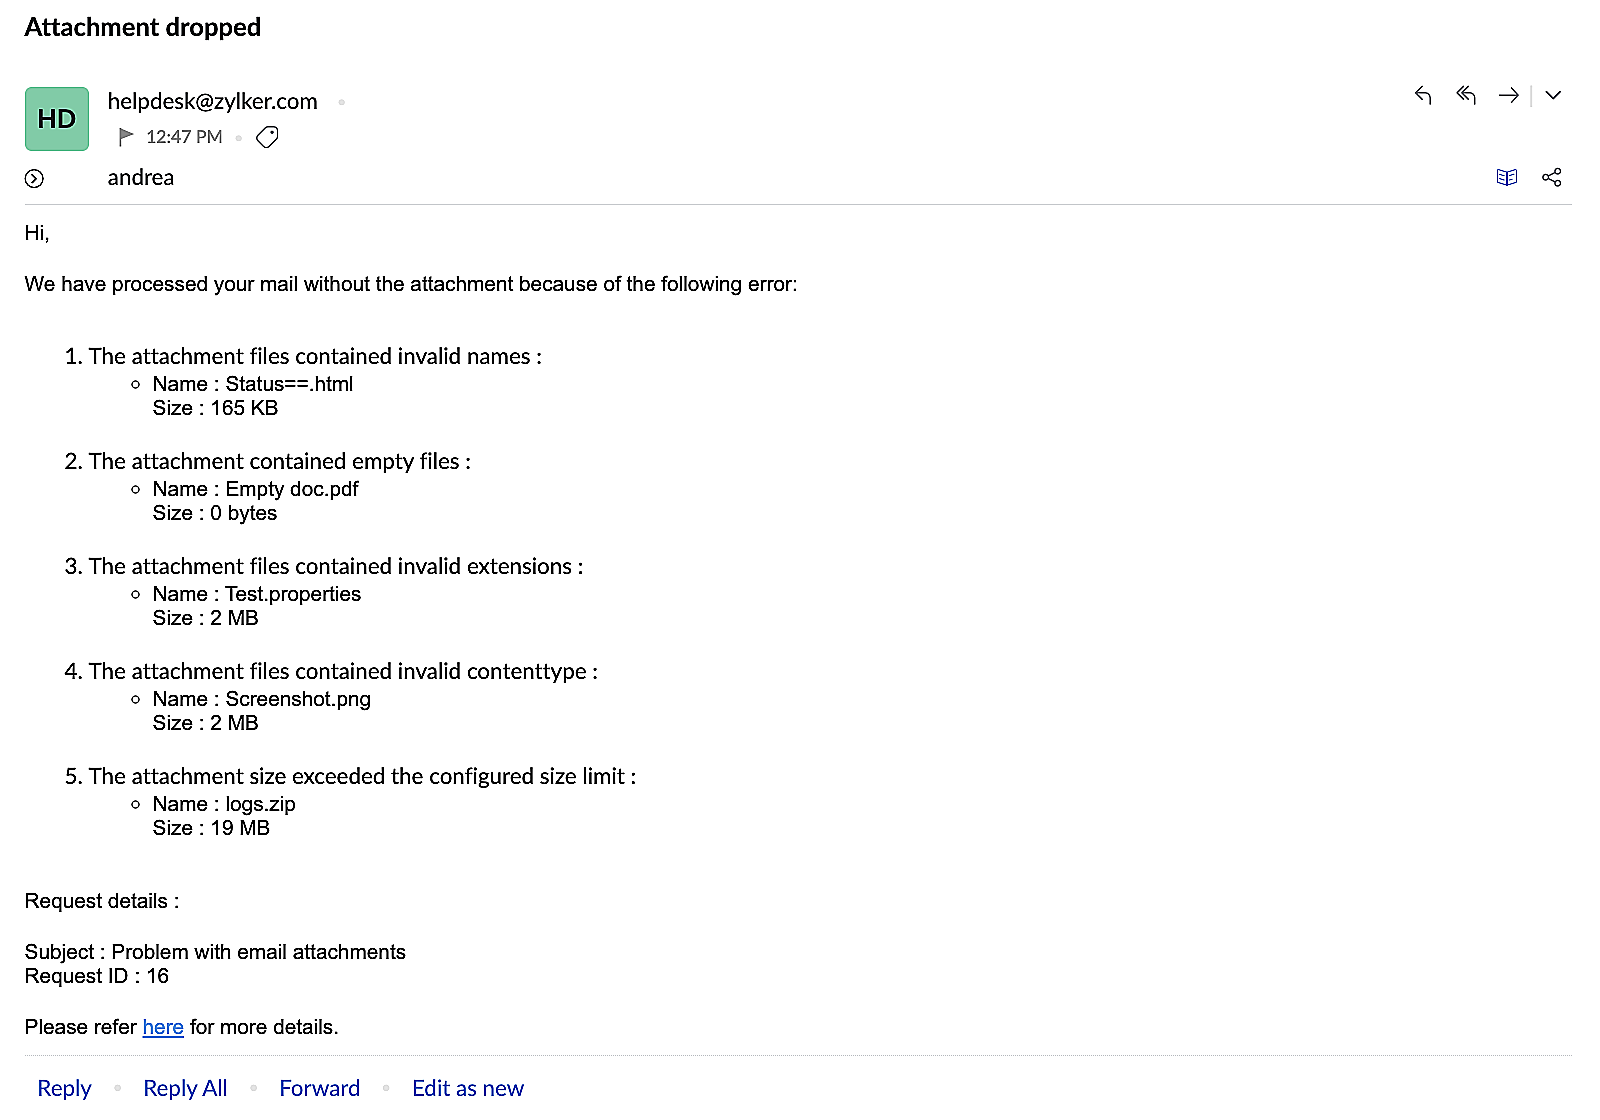
ServiceDesk Plus MSP validates the following entities in incoming email attachments:
-
File Name
-
Extensions
-
Content Type
-
Empty File
-
File Size
If there are any errors in these entities, the attachment will be dropped. The sender and the technicians configured for error notifications will be informed via email.
The notification configuration can be disabled by using the following query:
| update GlobalConfig set paramvalue='false' where category like 'EMAIL_PROCESSING' and parameter like 'sendAttachmentStrippedNotification'; |
Errors and Solutions
This section explains various errors and corresponding solutions.
1. Error: Attachment file name is invalid
Reason: File name of the attachment contains invalid characters.
Solution: Rename the attachment file. Use letters, numbers, dots, hyphens, and underscores in file names.
2. Error: Attachment files contain invalid content type
Reason: Content type in the attachment does not match the file extension. For example, an image file with the file name 'Alter.txt' will be dropped.
Solution: Ensure that the attached files have matching file content and extension.
3. Error: Attachment files contain invalid extensions
Reason: ServiceDesk Plus MSP enables you to allow/restrict certain file types in the application. If the email attachments include files of the restricted type, the attachments will be dropped.
Solution: Ensure that the file type is allowed under Admin > General Settings > Attachments Settings.
4. Error: Attachment contains empty files
Reason: ServiceDesk Plus MSP does not allow empty files as attachments.
Solution: Ensure that the attachment file is not empty. If the file is not empty, it could have been dropped due to Antivirus/Firewall configurations. Please check with your IT administrator to check on antivirus/firewall settings.
5. Error: Attachment size exceeds the configured limit
Reason: Files that exceed the configured size will be dropped.
Solution: Check and modify the maximum attachment size (MB) under Admin > General Settings > Attachment Settings.
Limitations
Due to severe throttling policies of Microsoft Graph API, ServiceDesk Plus MSP has certain limitations when Microsoft Graph protocol is used for sending emails.
Microsoft has set service limits to only four concurrent API requests. Since ServiceDesk Plus MSP can send emails through multiple threads (user replies, forwards, system notifications, or custom triggers), there might be a delay while sending emails.
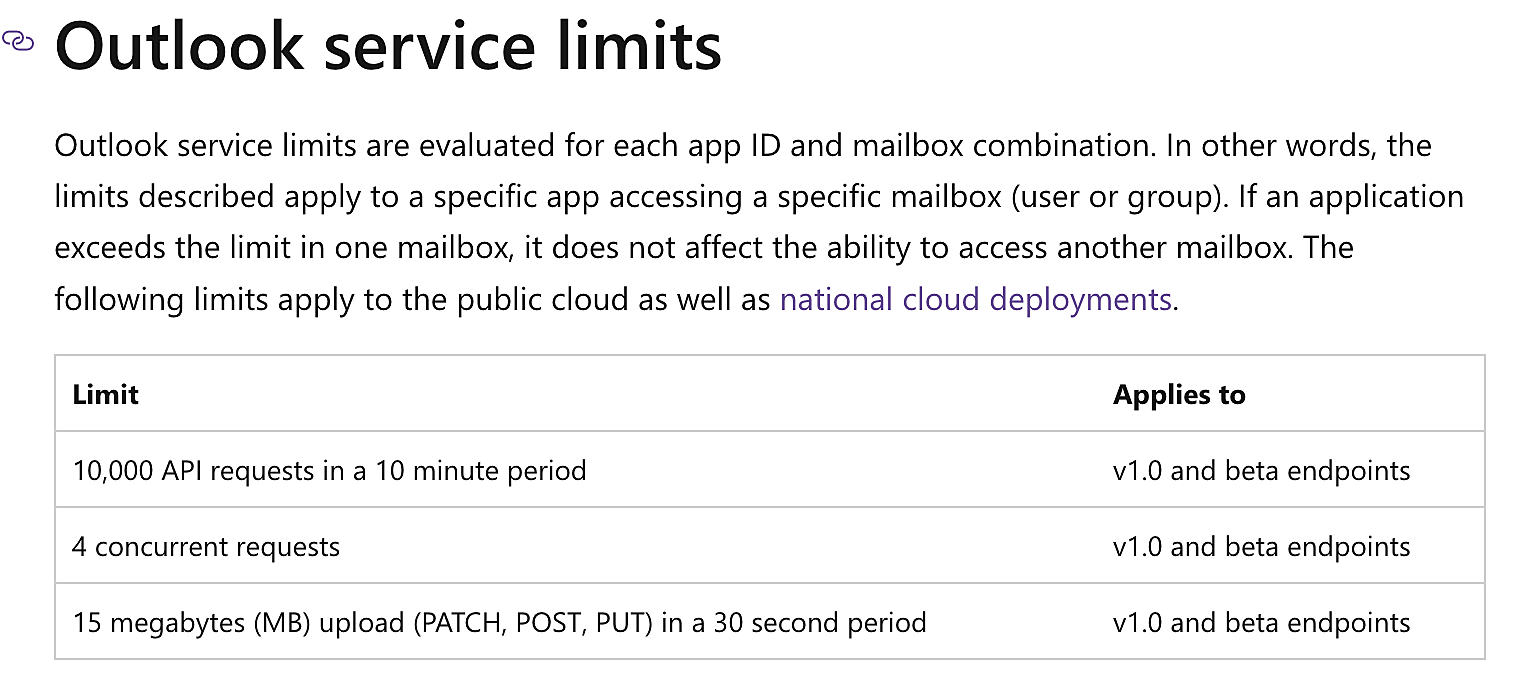
On performing a load simulation setup at our end to test the delay, we have verified the following stats:
|
|
Email Inflow Rate |
Email Outflow Rate |
Results |
|
Scenario 1 |
600 emails per hour where the inflow rate is constant (~10 emails per minute) 10 inline images for every 3 emails |
1800 notifications sent from application (3 notifications for each request created) Average time to send an email = 2~3 seconds |
Emails were sent without any delays. |
|
Scenario 2 |
High inflow rate (sudden surge of 100 emails per minute) 10 inline images for every 3 emails |
300 notifications sent from application (3 notifications for each request created) Average time to send an email = ~3 seconds |
Emails were sent without much delay. |
|
Scenario 3 |
High inflow rate (sudden surge of 200 emails per minute) 10 inline images for every 3 emails |
600 notifications sent from application (3 notifications for each request created) Average time to send an email = 8~9 seconds |
Max. of 10 mins delay in sending an email (time difference between 200th request creation and its notification) |
As per the stats, when the inflow rate surges/an increased number of notifications are configured, there is an evident delay in sending emails.
Therefore, we recommend users not to configure Microsoft Graph protocol as the outgoing mail server in the following cases:
-
Your organization environment has a high email inflow/outflow rate
-
Your organization email flow rates do not fall within scenario 1 or 2.
Workaround: You can use SMTP protocol for sending emails.

