Freshdesk is a customer support software that provides customer support and communication. It focuses on managing customer inquiries, tickets, and feedback via multiple communication channels and offers a ticketing system, automation, and reporting to facilitate customer issue resolution.
Steps to configure SAML SSO for Freshdesk
The following steps will help you enable SAML-based SSO to Freshdesk from ManageEngine Identity360.
Prerequisites
- The MFA and SSO license for Identity360 is required to enable SSO for enterprise applications.
- Log in to Identity360 as an Admin or Super Admin, or Technician with a role that has Application Integration and Single Sign-on permissions.
- Navigate to Applications > Application Integration > Create New Application, and select Freshdesk from the applications displayed.
Note: You can also find Freshdesk from the search bar located at the top.
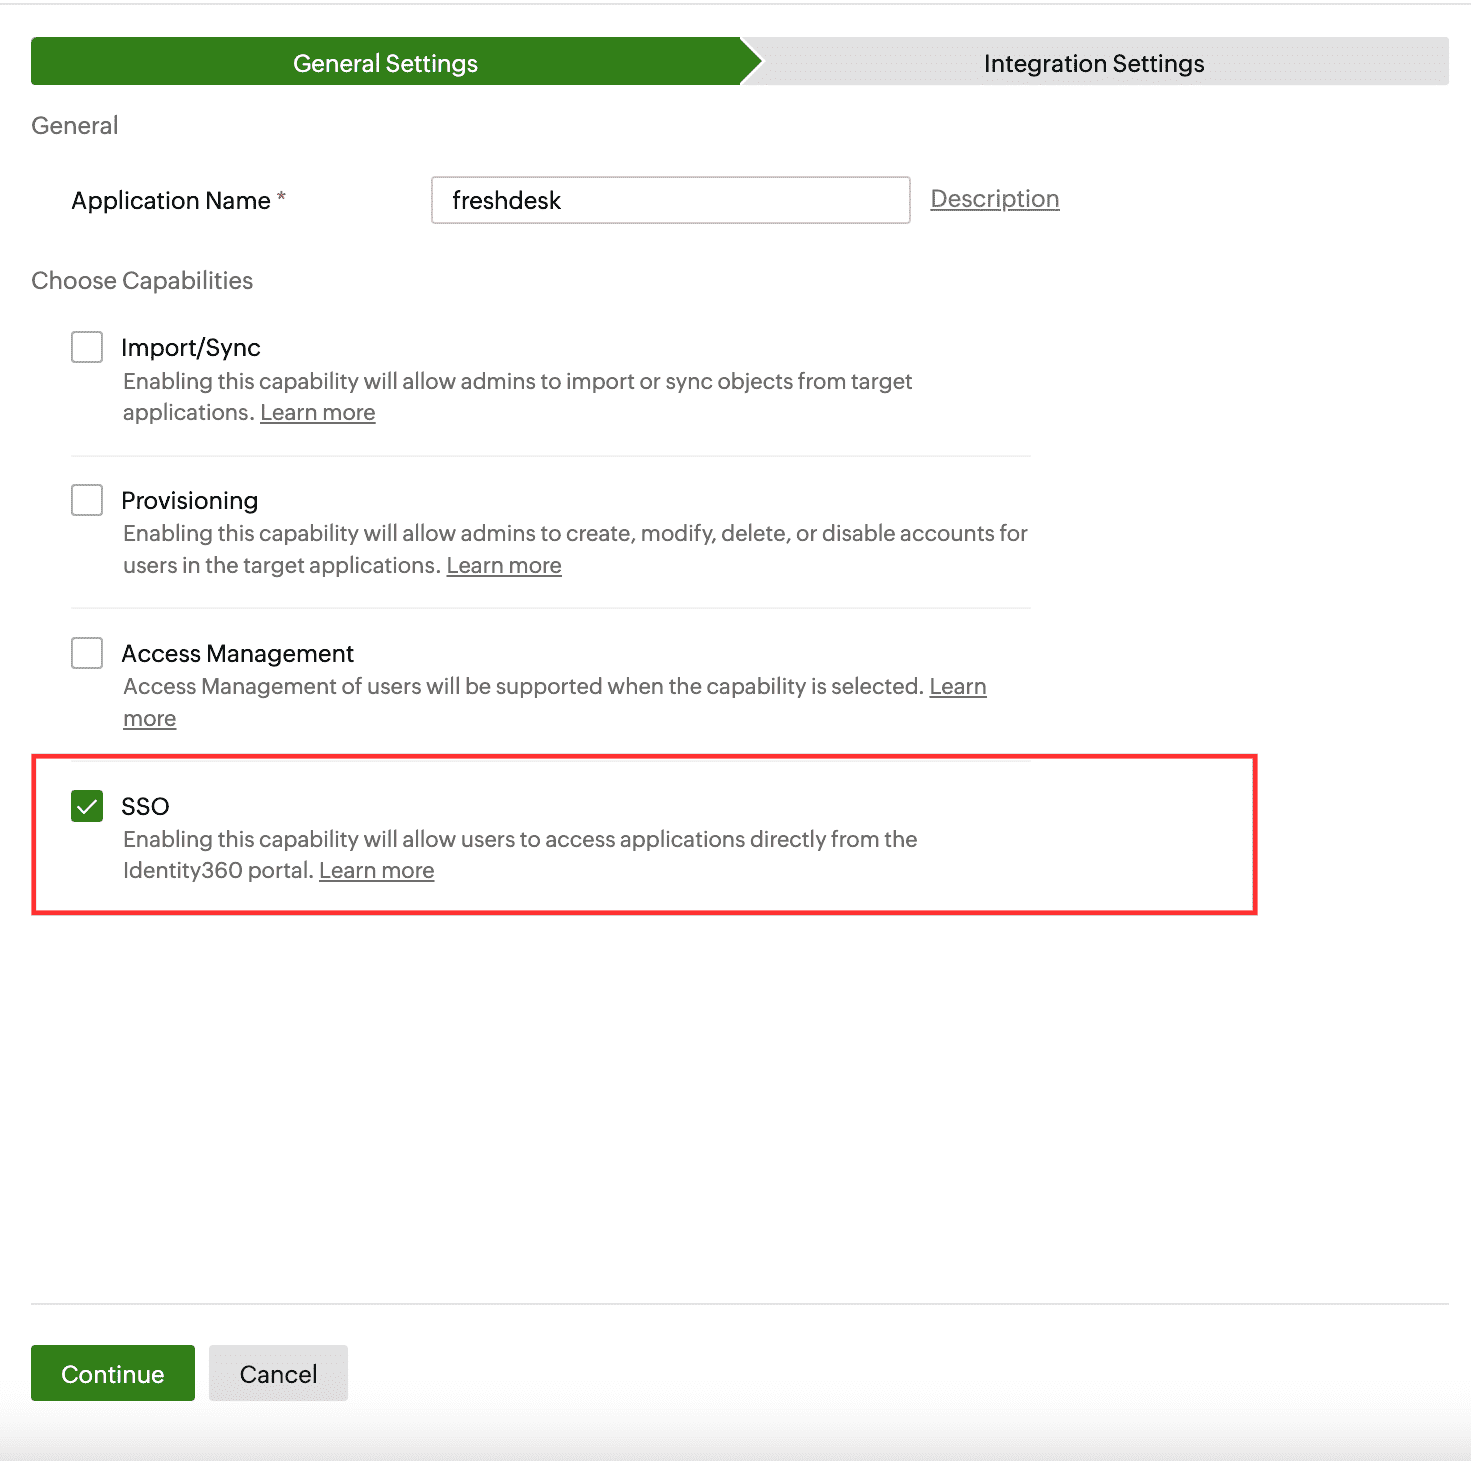
- Under the General Settings tab, enter the Application Name and Description.
- Under Choose Capabilities tab, choose SSO and click Continue.
 General Settings of SSO configuration for Freshdesk
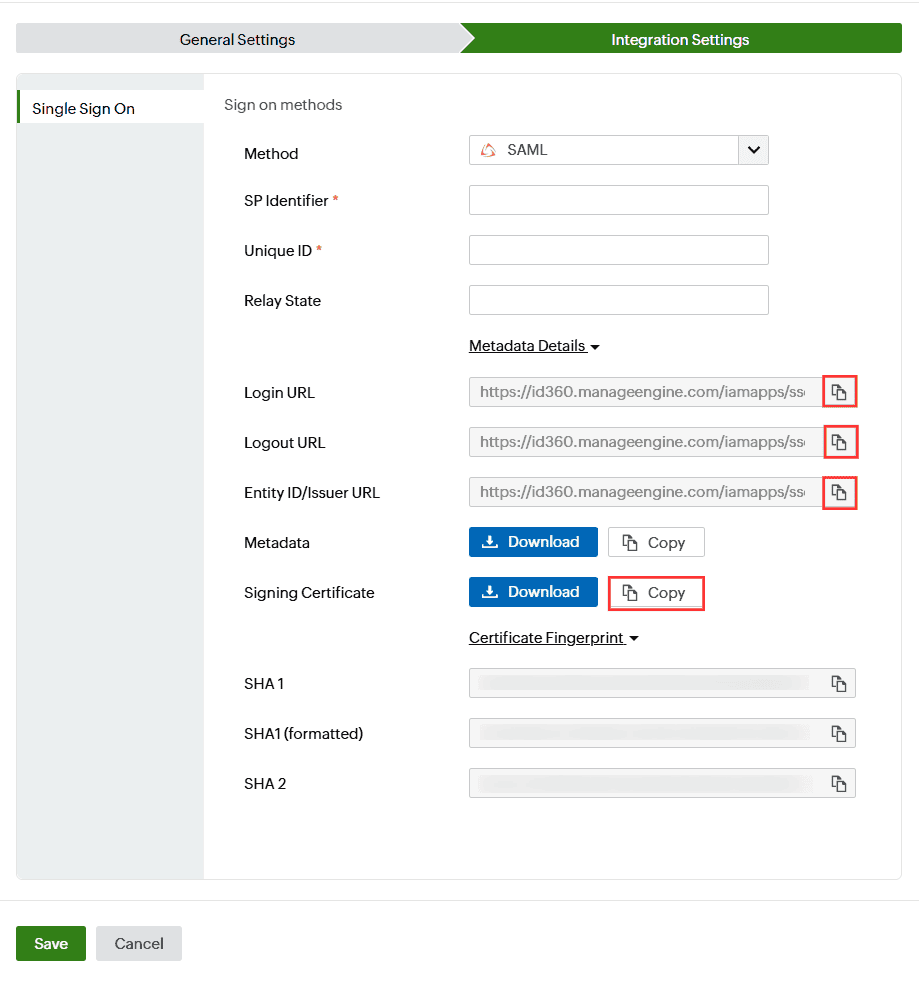
- Under Integration Settings, navigate to the Single Sign On tab and select SAML from the Method drop-down. Click Metadata Details.
- Copy the Login URL, Logout URL, Entity ID/Issuer URL, and Signature Certificate, which will be used during the SSO configuration in Freshdesk.
 Integration Settings of SAML-based SSO configuration for Freshdesk
Freshdesk (service provider) configuration steps
- Log in to the Freshdesk portal and click the Admin icon.
- Scroll down and find the Account section. Select the Security option.
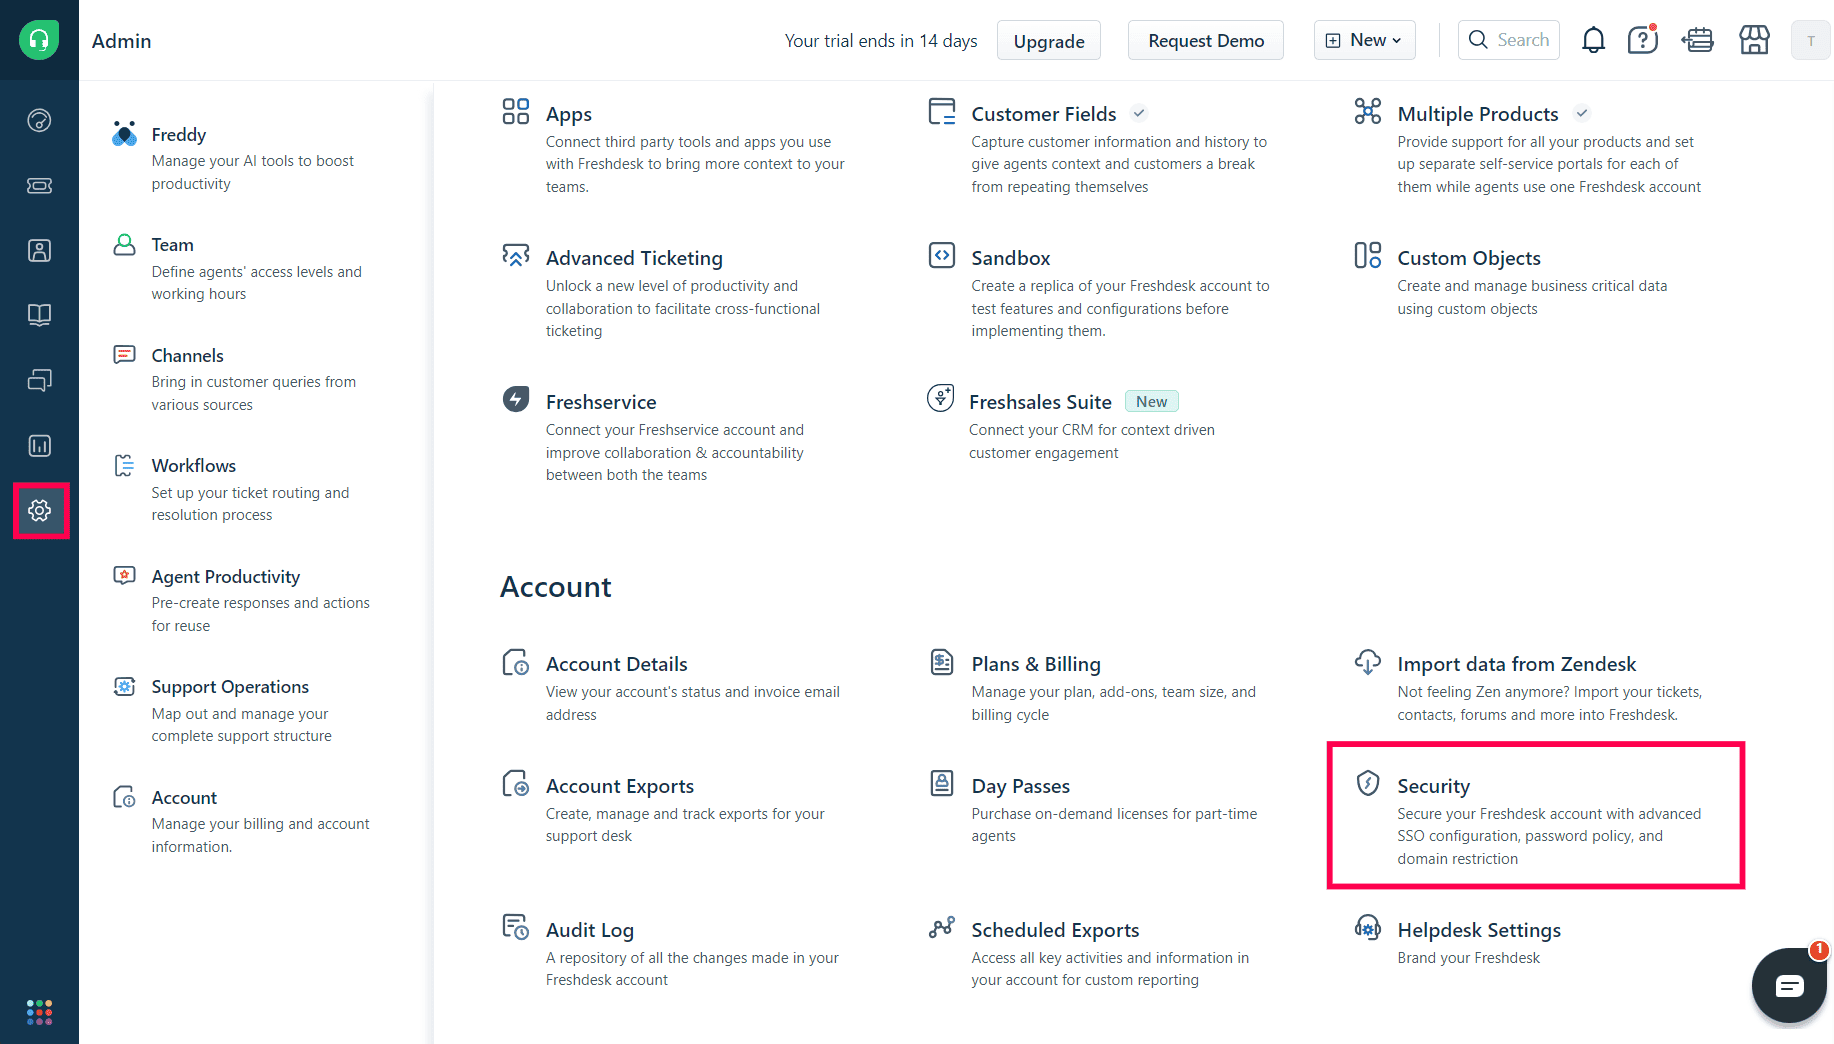 Image showing the account settings of Freshdesk
- Click Configure Freshworks SSO.
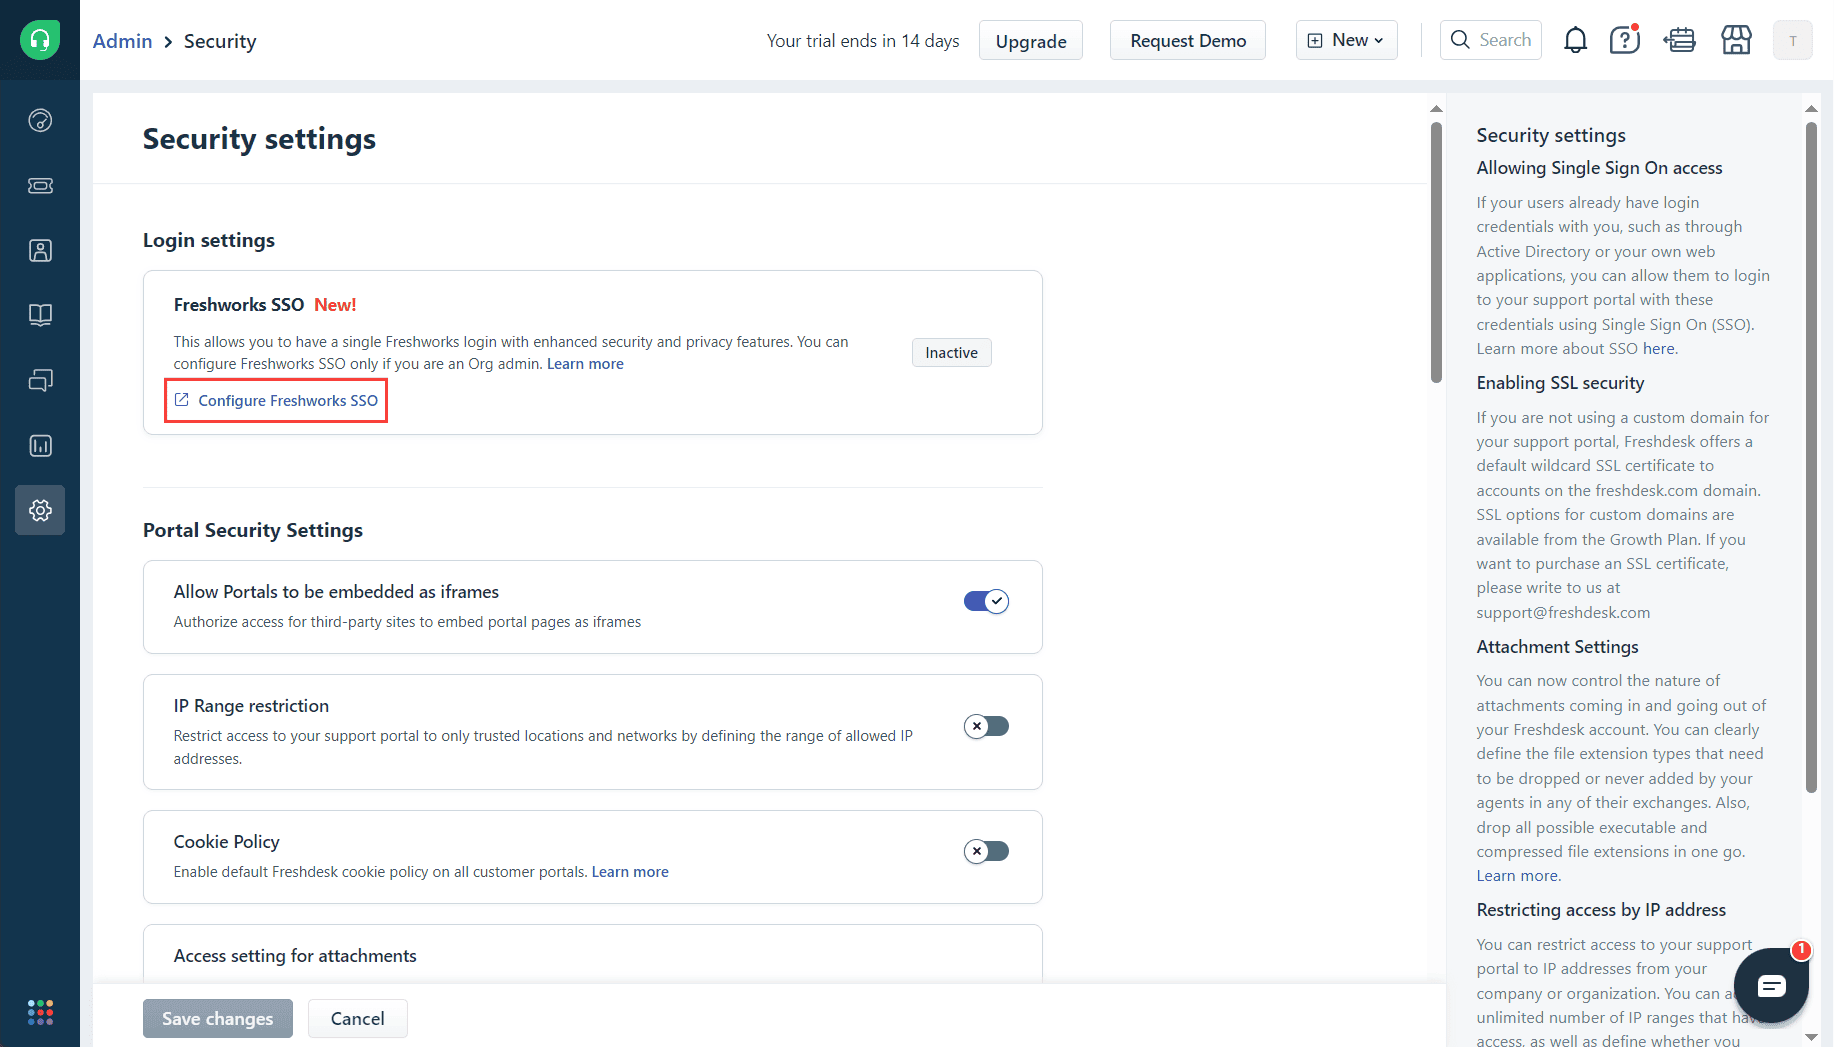 Image showing the security settings of Freshdesk
- You will be redirected to Freshworks' Security Settings page. Click the highlighted icon in the image given below.
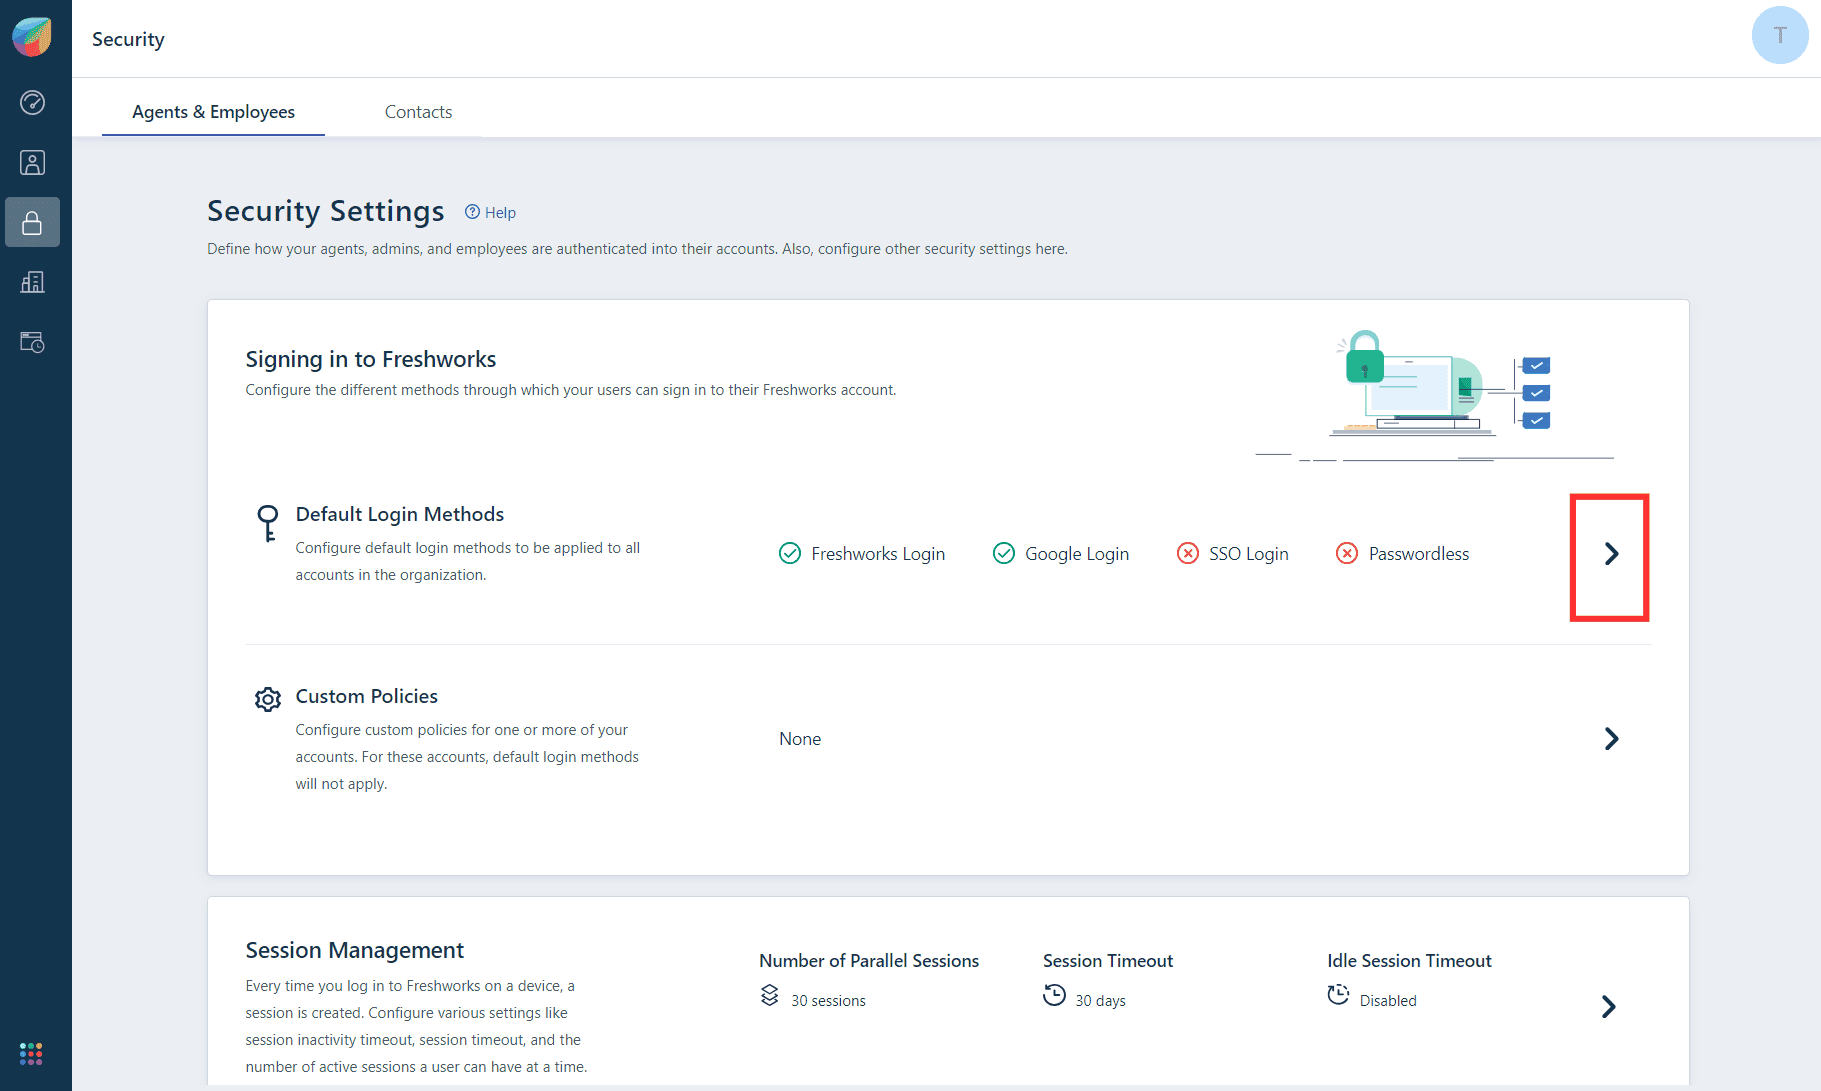 Image showing the security settings of Freshdesk
- You will be redirected to Default Login Method page and use the toggle button enable SSO Login.
Note: If you have previously configured SSO, click + Add another SSO.
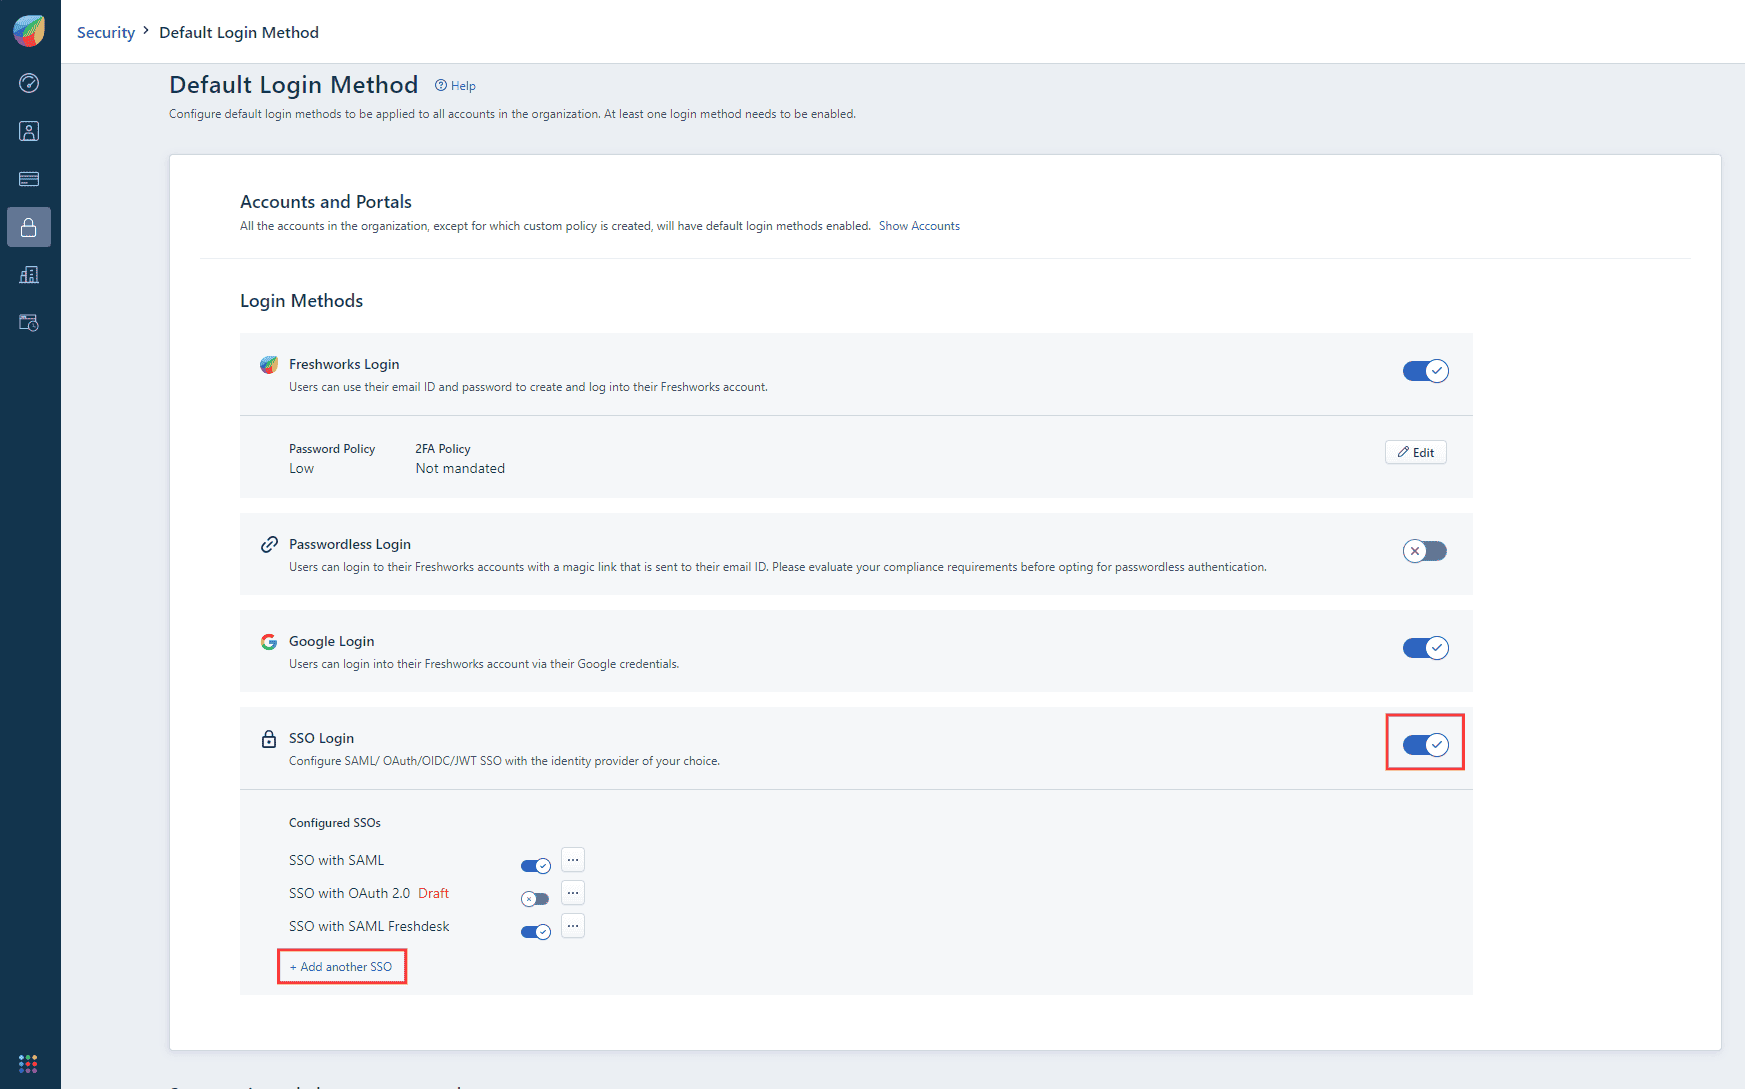 Image showing the selection of SSO capability from Freshdesk
- To configure SAML-based SSO, click SAML under the IdP of your choice section in the Configure SSO side pane.
 Selecting SAML-based SSO in the Freshdesk portal
- Paste the values copied during step 7 of prerequisites in the following fields:
- Entity ID/Issuer URL in the Entity ID provided by the IdP field
- Login URL in the SAML SSO URL field
- Logout URL in the Logout URL field
- Signature Certificate in the Security certificate field
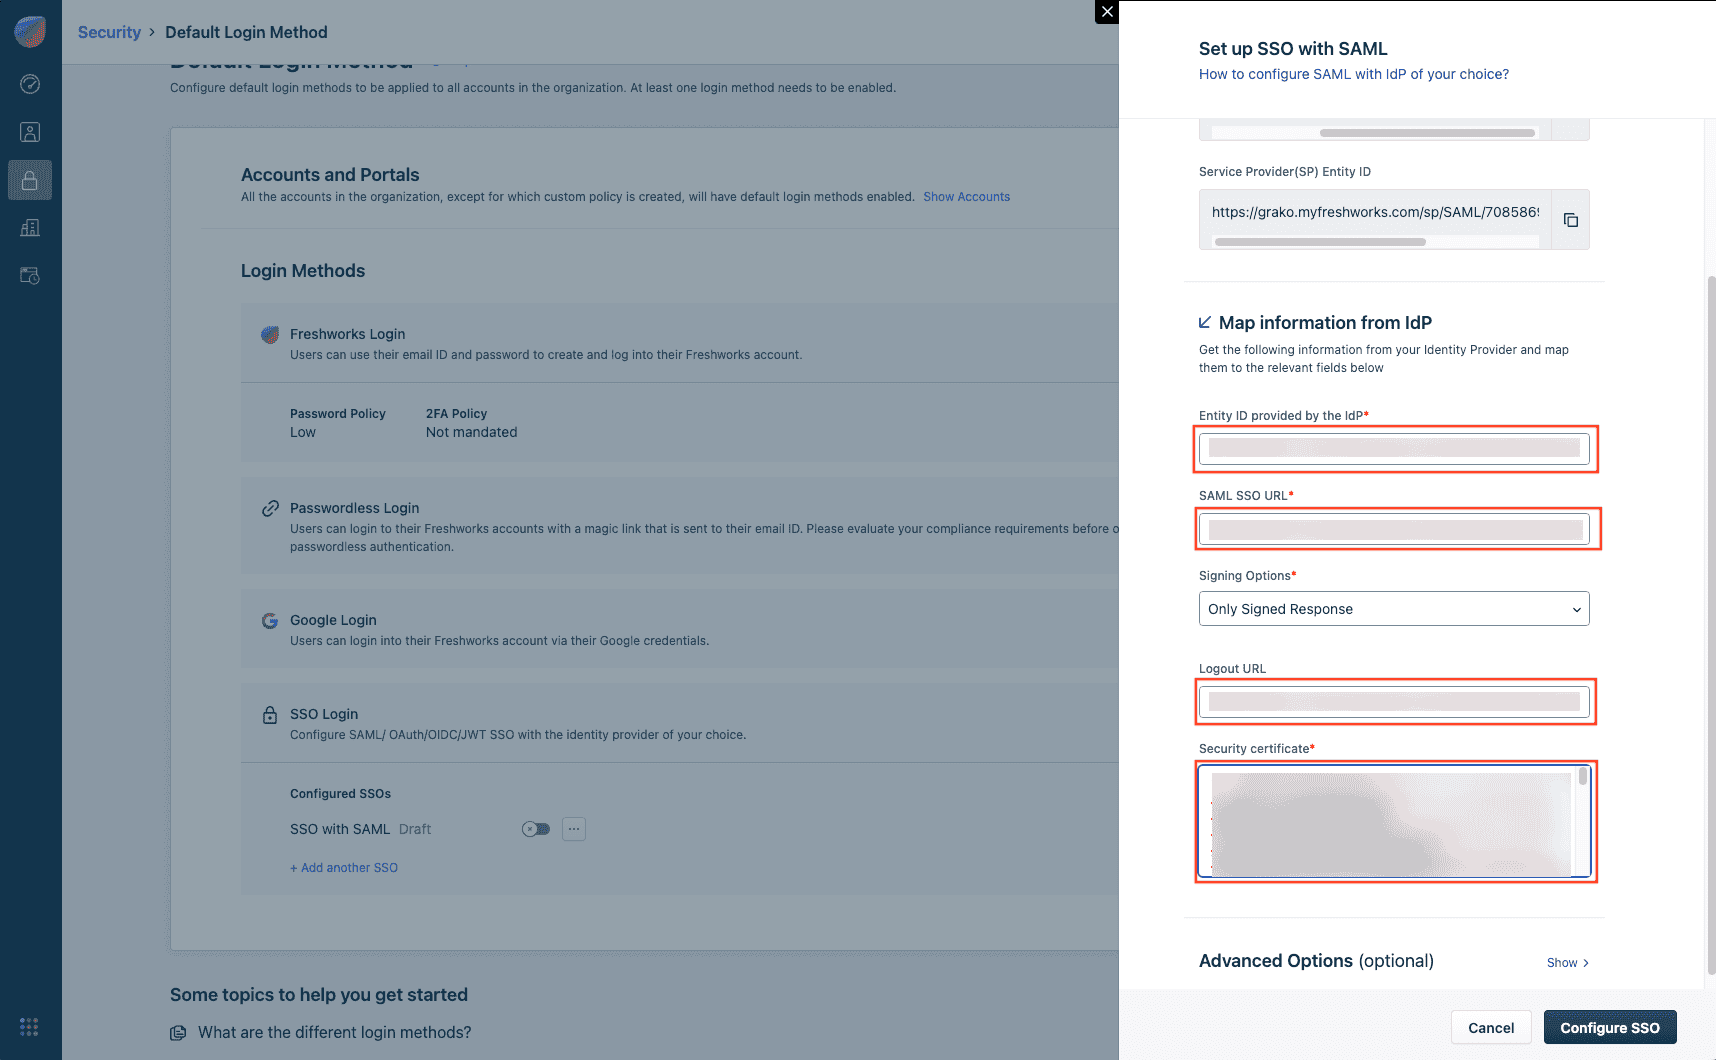 Image showing the configuration of SAML SSO from Freshdesk
- Copy the SP Identifier value from the Service Provider(SP) Entity ID field.
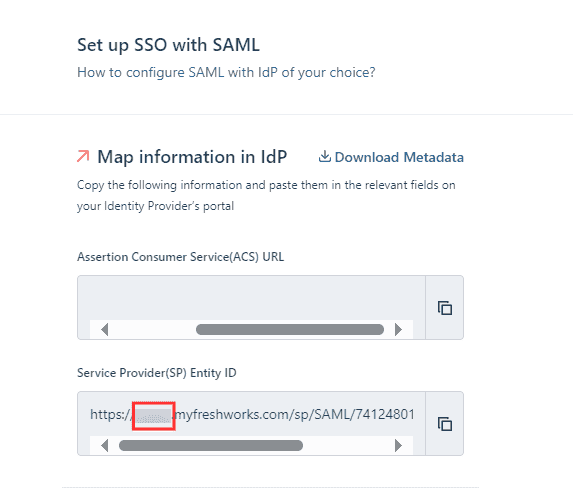 Image showing the Service Provider(SP) Entity ID in Freshdesk Portal
- Copy the Unique ID value from the Assertion Consumer Service(ACS) URL field.
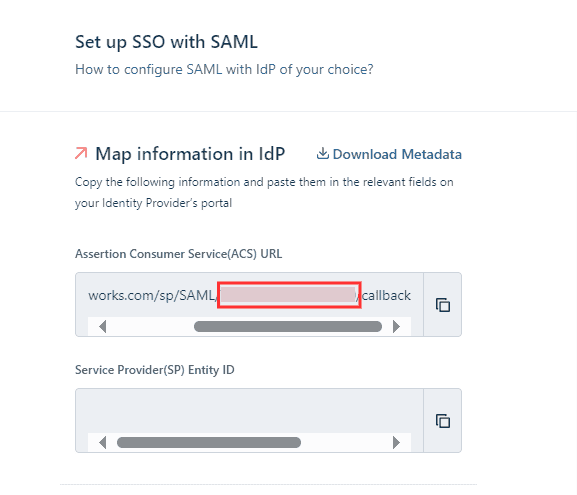 Image showing the ACS URL in Freshdesk Portal
- Click Configure SSO.
Identity360 (identity provider) configuration steps
- Switch to Identity360's application configuration page.
- In the SP Identifier field, paste the value copied from the Service Provider(SP) Entity ID field during Step 8 of Freshdesk configuration.
- In the Unique ID field, enter the value copied from the Assertion Consumer Service(ACS) URL field during Step 9 of Freshdesk configuration.
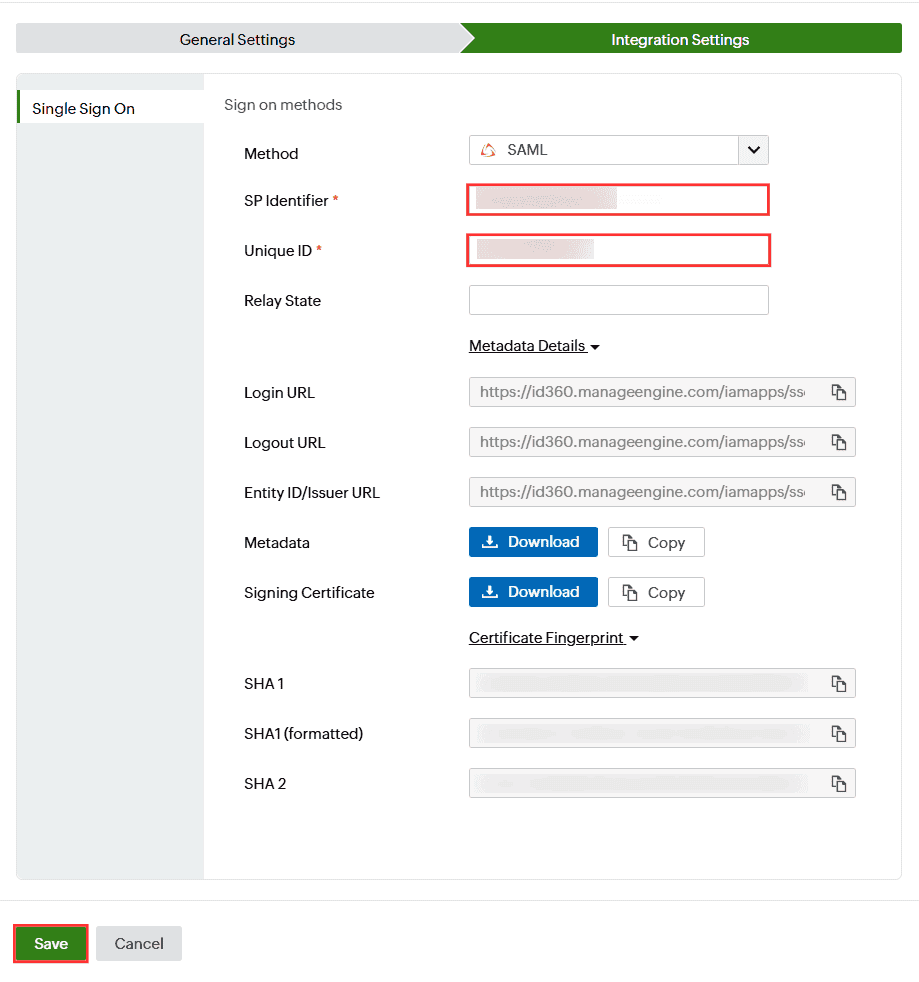 Integration Settings of Freshdesk configuration for SAML method
- Click Save.
- To learn how to assign users or groups to one or more applications, refer to this page.
Your users should now be able to sign in to Freshdesk through the Identity360 portal.
Steps to configure OAuth/OpenID Connect-based SSO for Freshdesk
The following steps will help you enable OAuth/Open ID Connect-based SSO to Freshdesk from ManageEngine Identity360.
Prerequisites
- The MFA and SSO license for Identity360 is required to enable SSO for enterprise applications. For more details, refer to pricing details.
- Log in to Identity360 as an Admin or Super Admin, or Technician with a role that has Application Integration and Single Sign-on permissions.
- Navigate to Applications > Application Integration > Create New Application, and select Freshdesk from the applications displayed.
Note: You can also find Freshdesk from the search bar located at the top.
- Under the General Settings tab, enter the Application Name and Description.
- Under Choose Capabilities tab, choose SSO and click Continue.
 General Settings of SSO configuration for Freshdesk
- Under Integration Settings, navigate to the Single Sign On tab, and select OAuth/OpenID Connect from the Method drop-down. Click IdP Details.
- Copy the Client ID, Client Secret, Authorization Endpoint URL, Token Endpoint URL, and User Endpoint URL, which will be used during the SSO configuration in Freshdesk.
 Integration Settings of of OAuth/OpenID Connect SSO configuration for Freshdesk
Freshdesk (service provider) configuration steps
- Log in to the Freshdesk portal and click the Admin icon.
- Scroll down and find the Account section. Select the Security option.
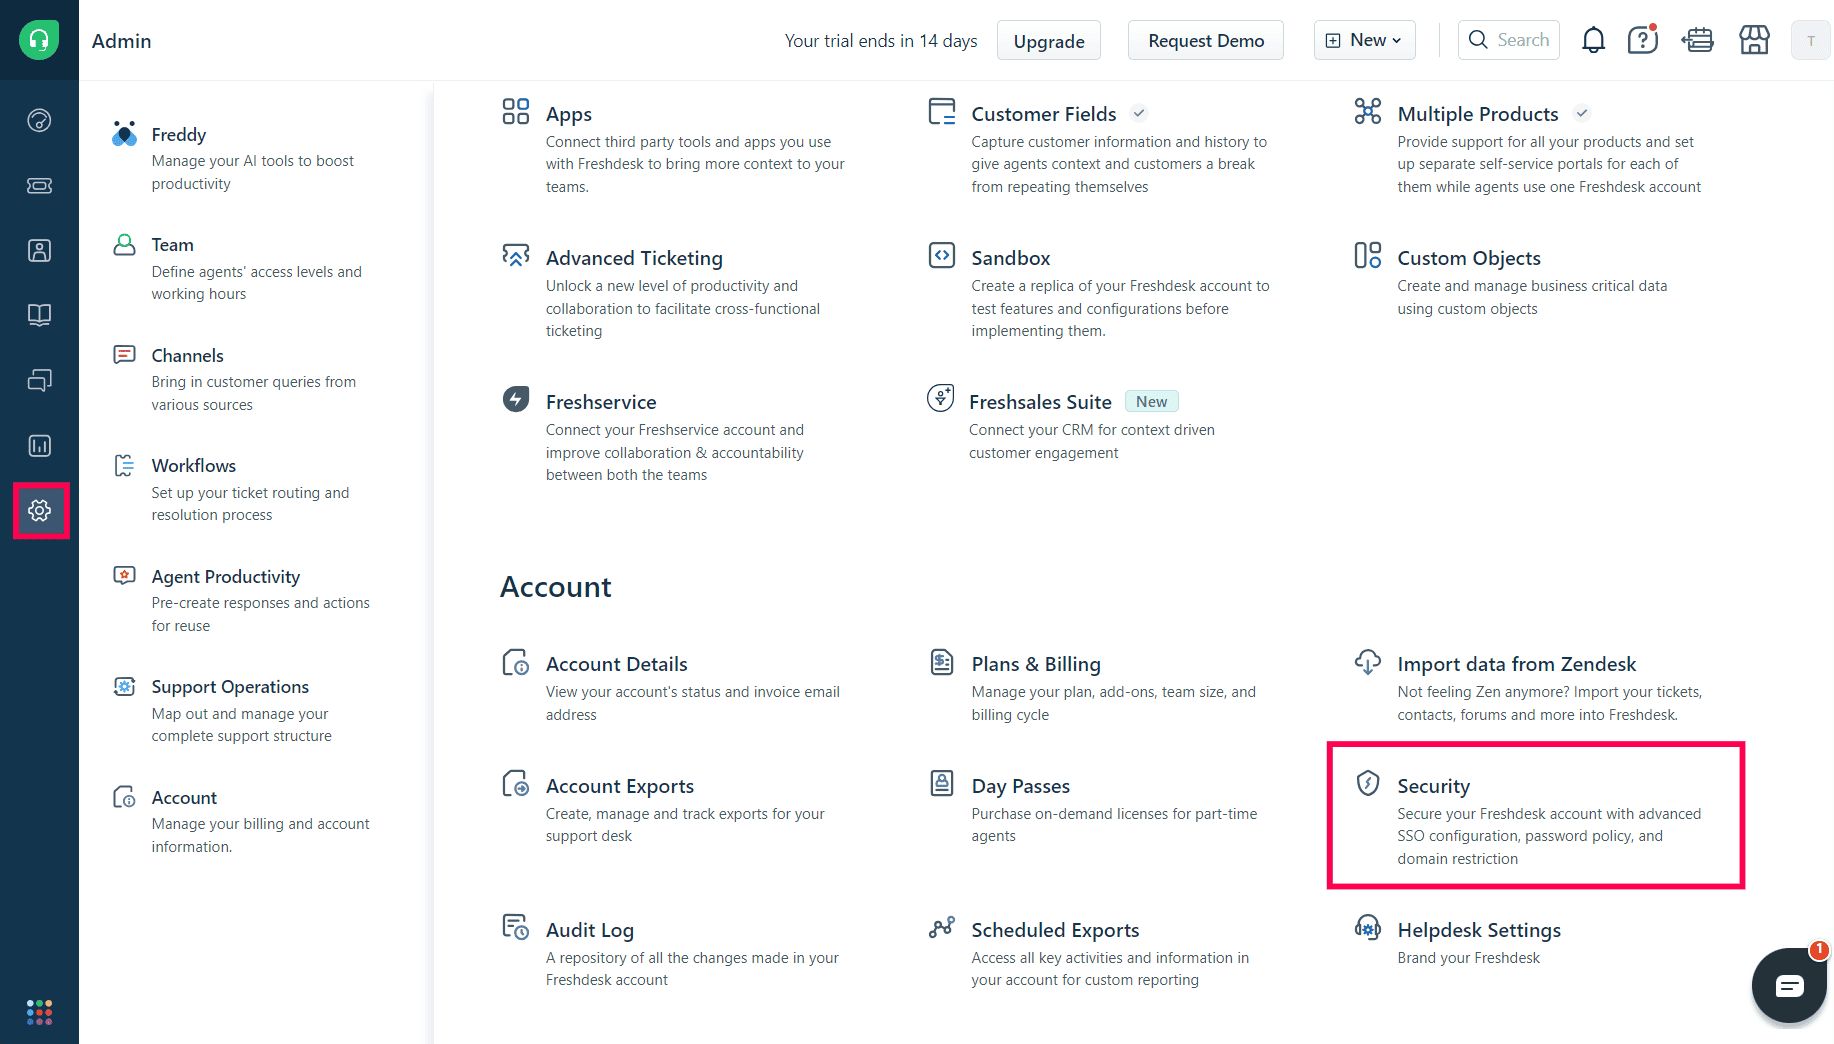 Image showing the account settings of Freshdesk
- Click Configure Freshworks SSO.
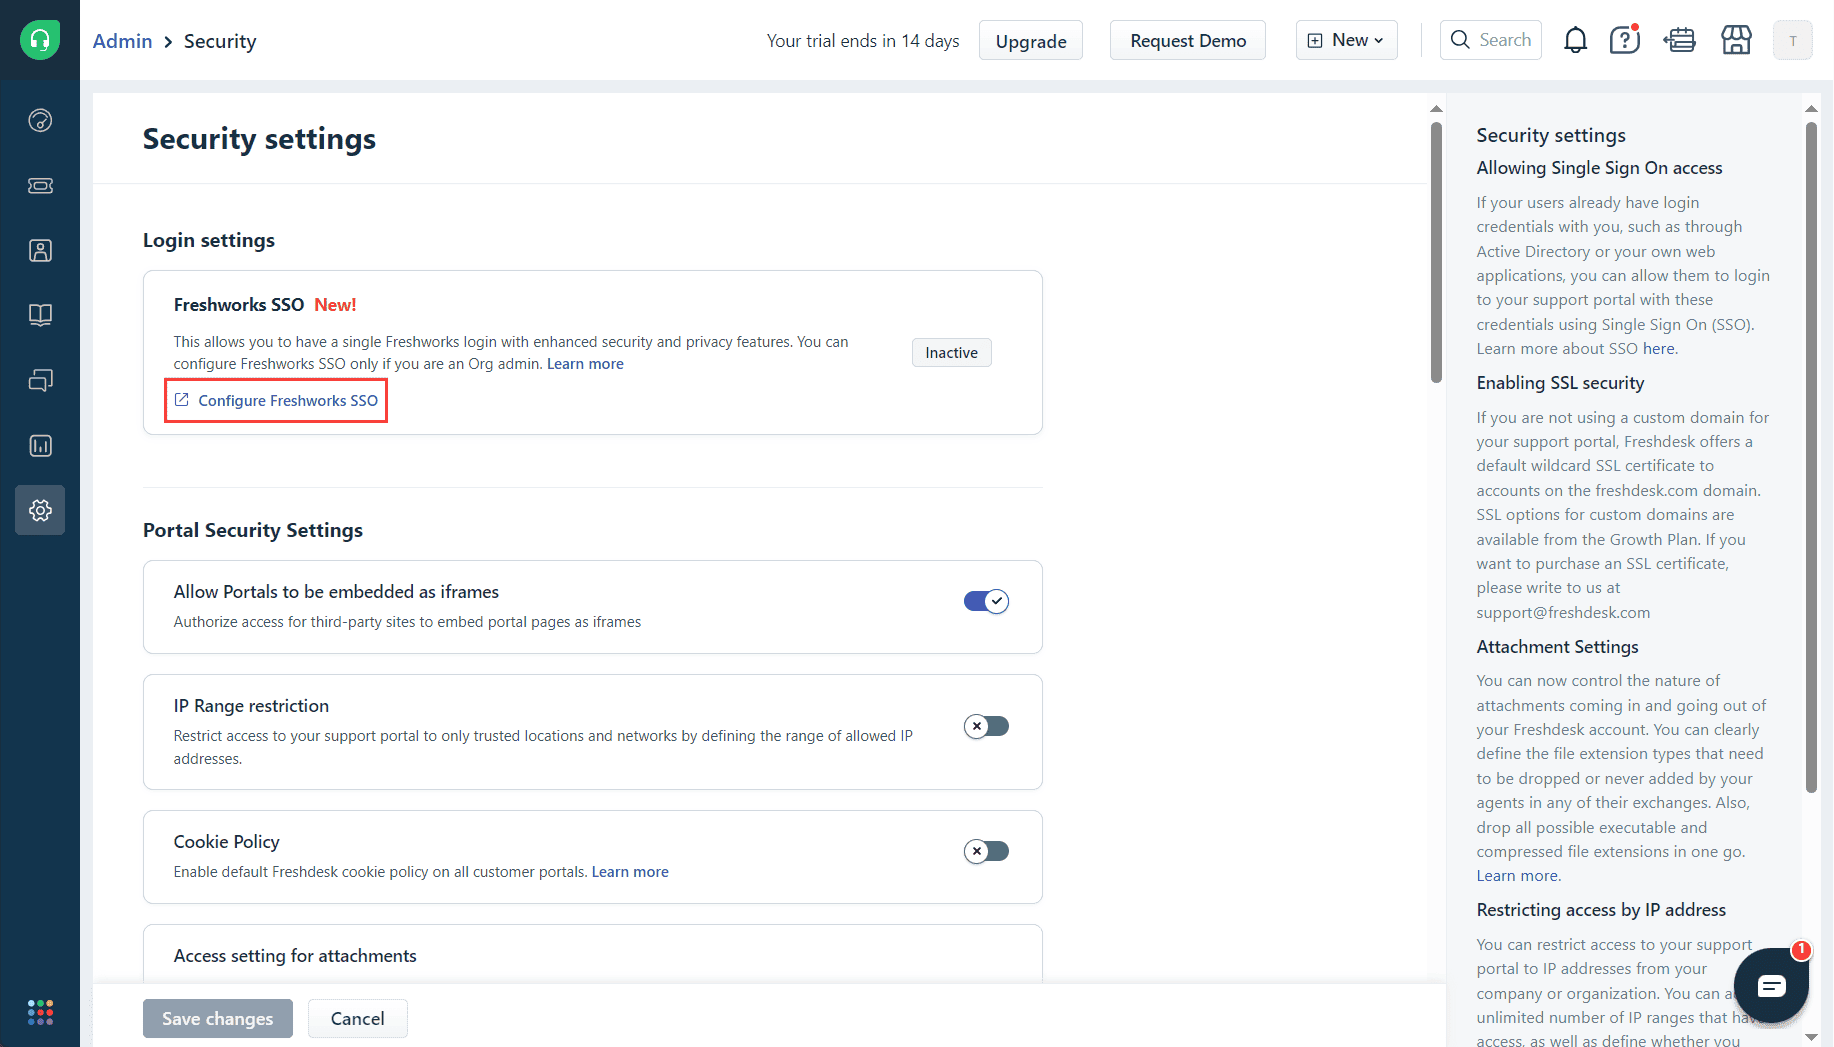 Image showing the security settings of Freshdesk
- You will be redirected to Freshworks' Security Settings page. Click the highlighted icon in the image given below.
 Image showing the security settings of Freshdesk
- You will be redirected to Default Login Method page and use the toggle button enable SSO Login.
Note: If you have previously configured SSO, click + Add another SSO.
 Image showing the selection of SSO capability from Freshdesk
- If you choose to configure OpenID-Connect-based SSO, click OIDC under the IdP of your choice section in the Configure SSO side pane.
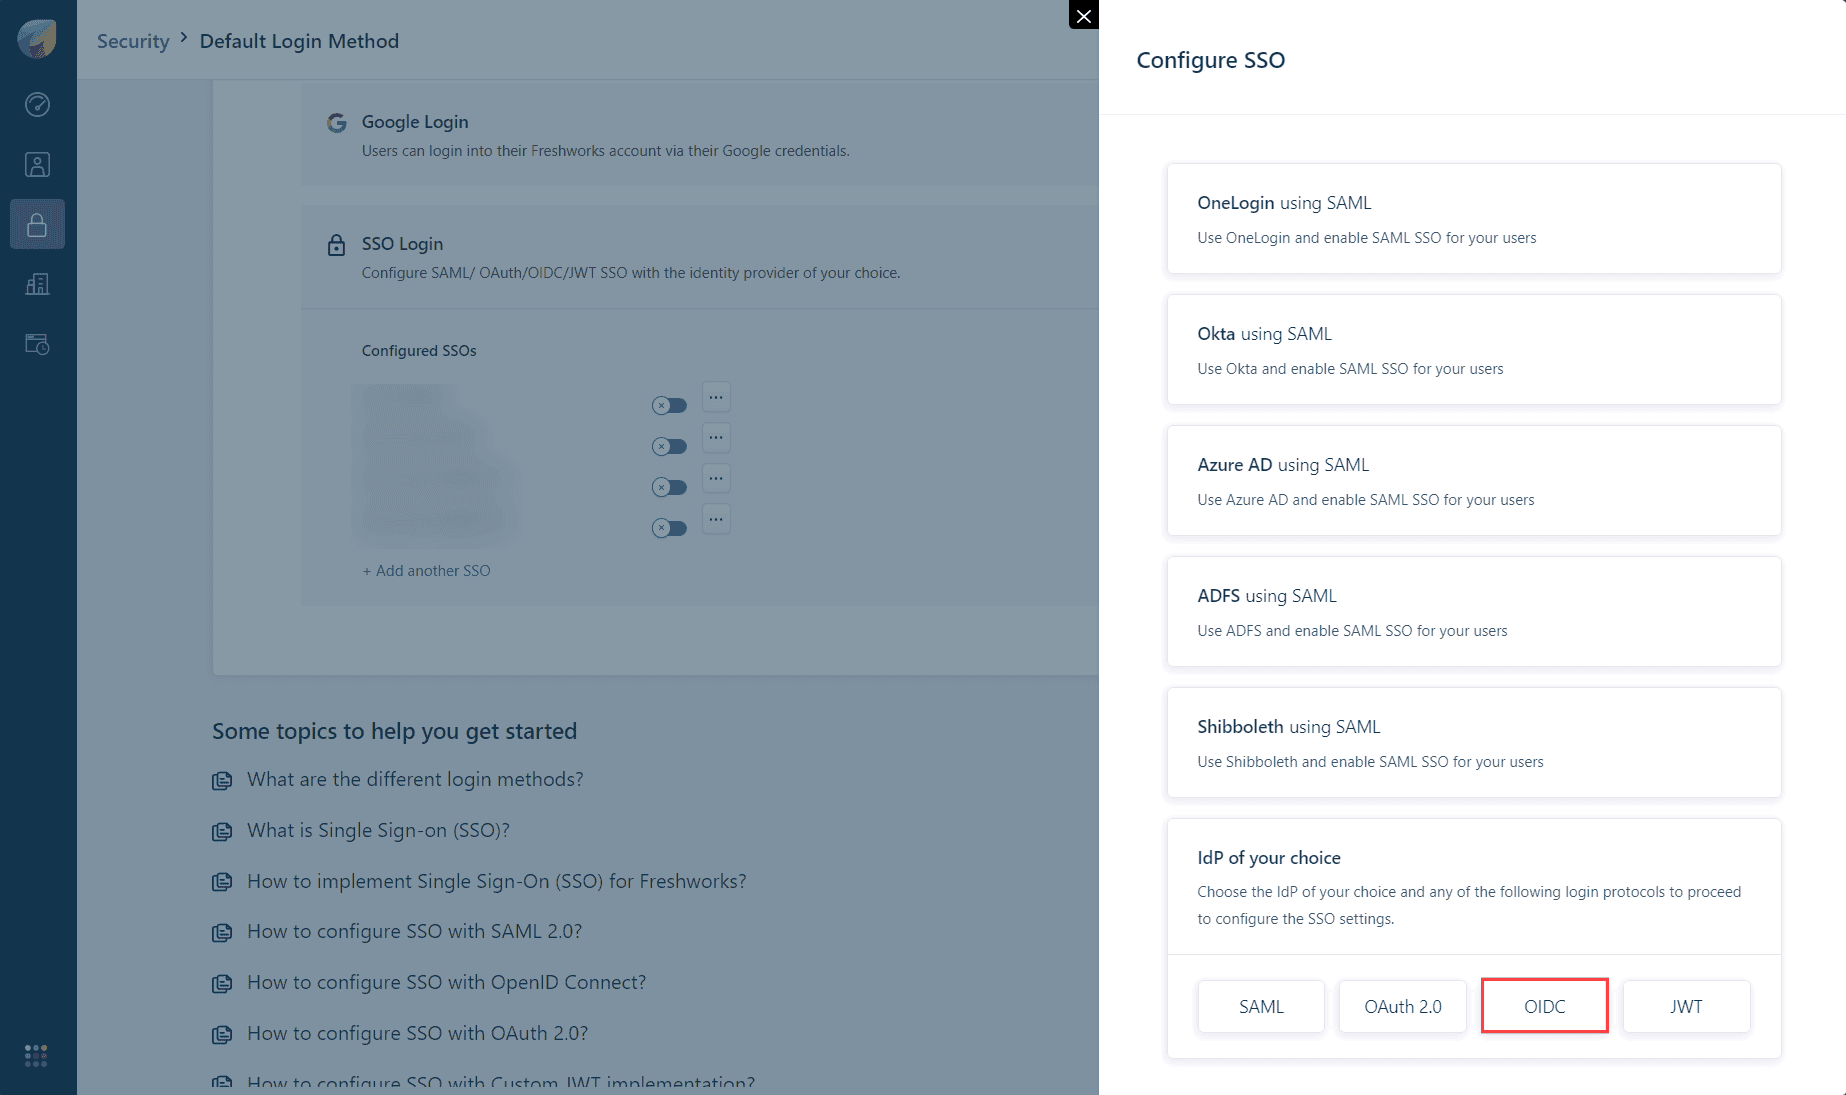 Selecting OIDC-based SSO in the Freshdesk portal
- Paste the values copied during step 7 of prerequisites in the following fields:
- Client ID in the Client id field
- Client Secret in the Client secret field
- Authorization Endpoint URL in the Authorization URL field
- Token Endpoint URL in the Access token URL field
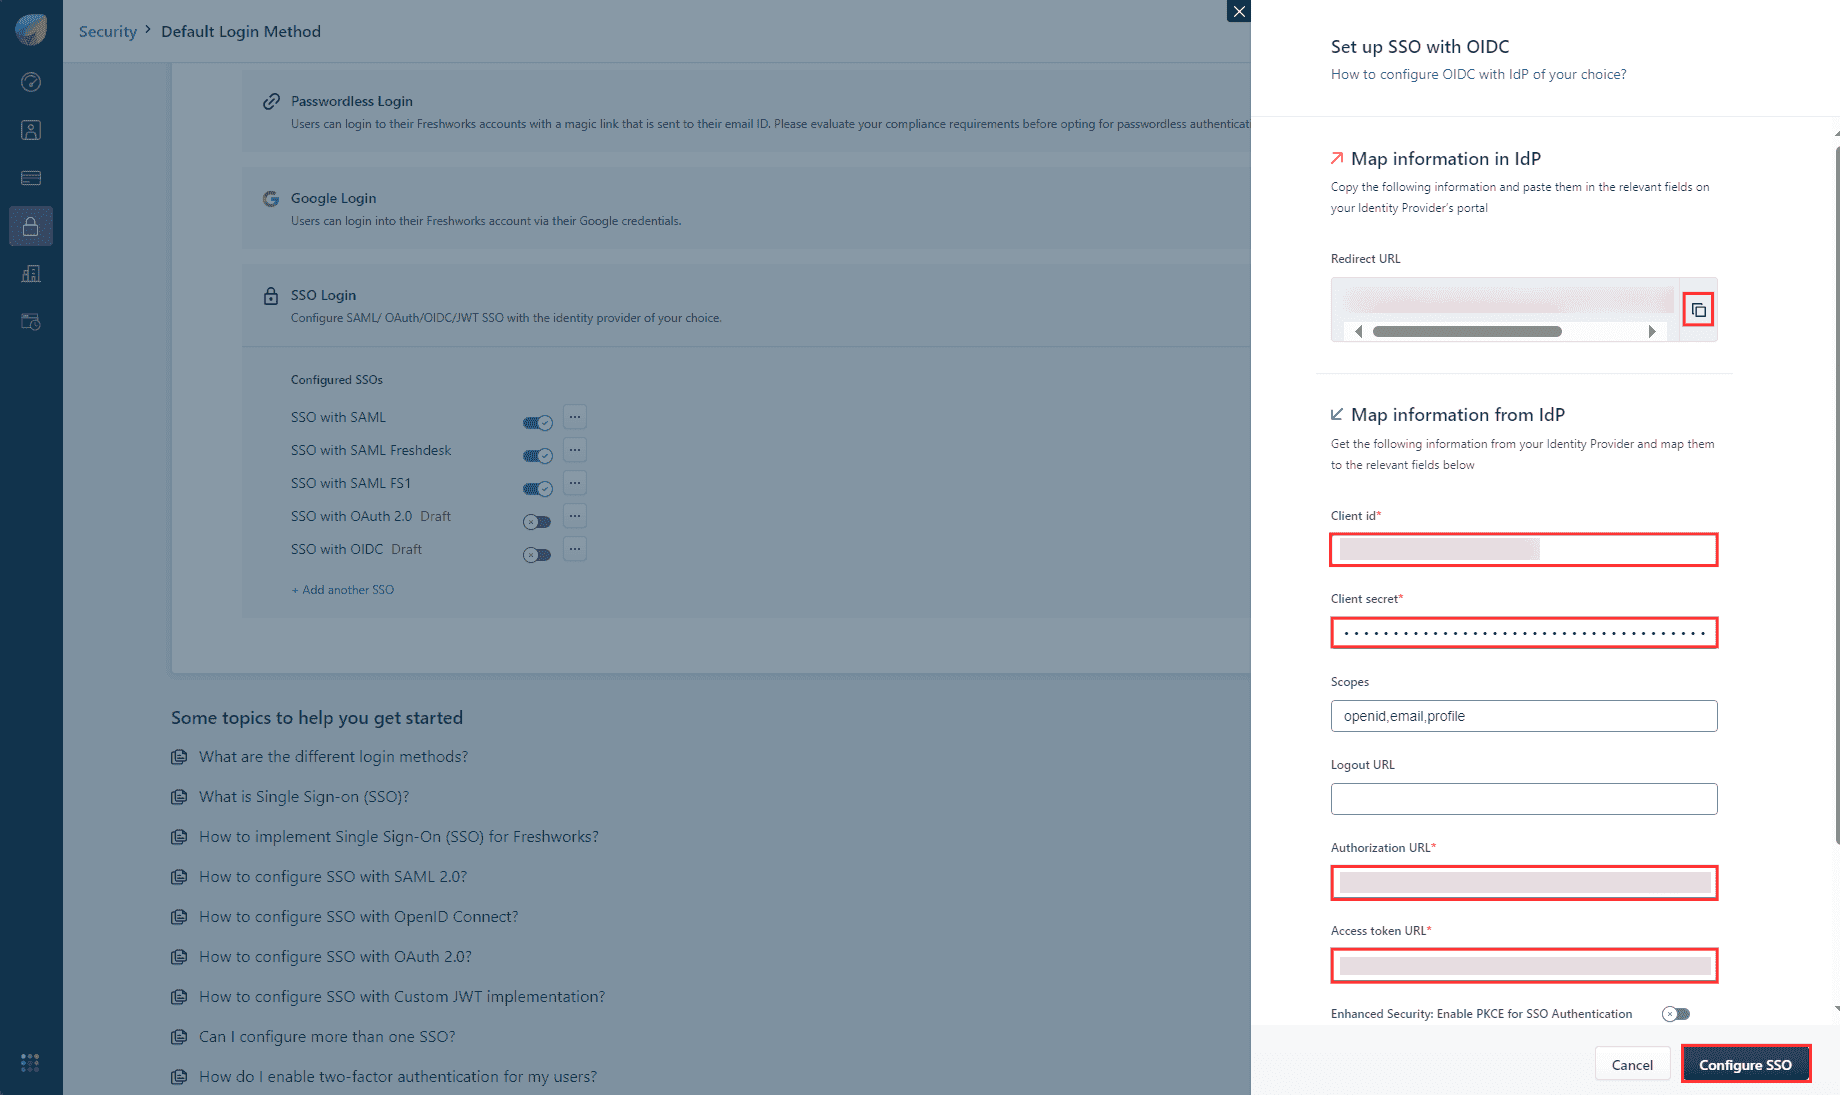 Image showing the SP details for OIDC-based SSO configuration
- If you choose to configure OAuth-based SSO, click OAuth 2.0 under the IdP of your choice section in the Configure SSO side pane.
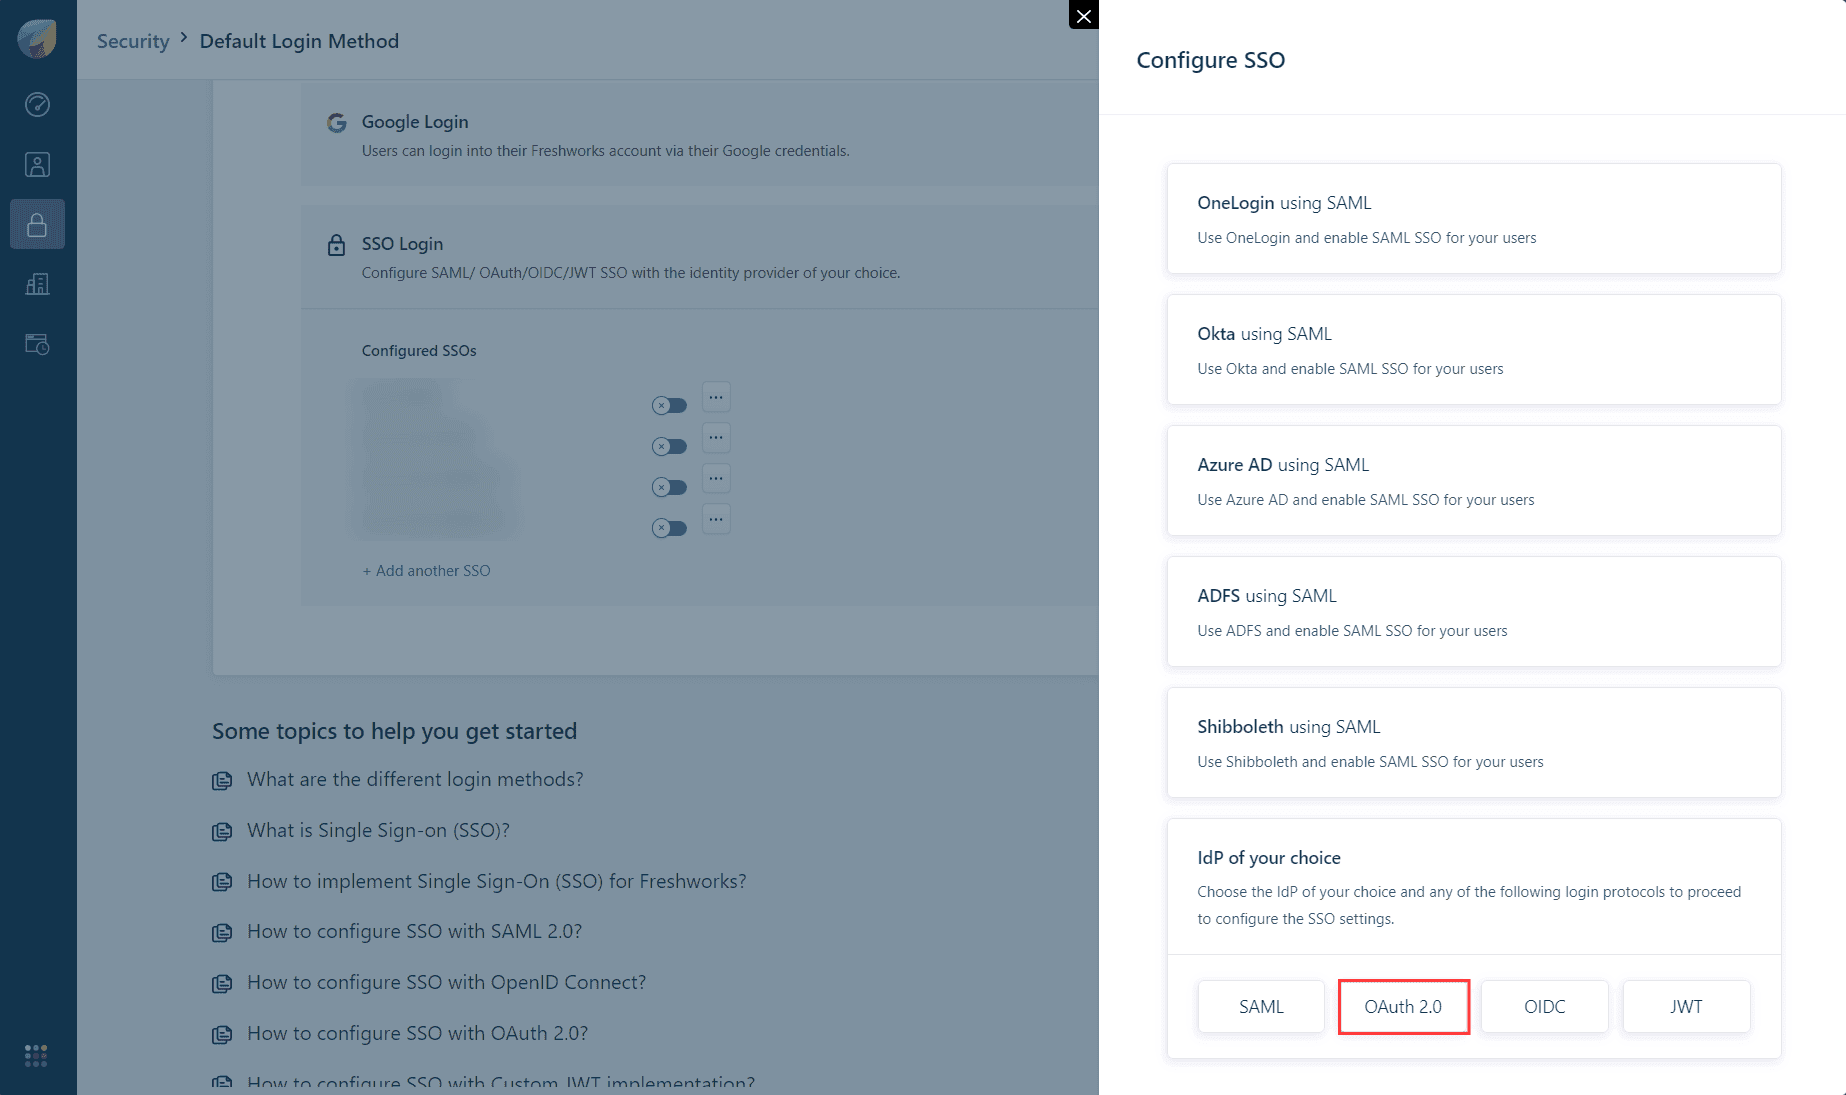 Selecting OAuth-based SSO in the Freshdesk portal
- Paste the values copied during step 7 of prerequisites in the following fields:
- Client ID in the Client id field
- Client Secret in the Client secret field
- Authorization Endpoint URL in the Authorization URL field
- Token Endpoint URL in the Access token URL field
- User Endpoint URL in the User info URL field
 Image showing the SP details for OAuth based-SSO configuration
- Copy the Redirect URL from Freshdesk and click Configure SSO.
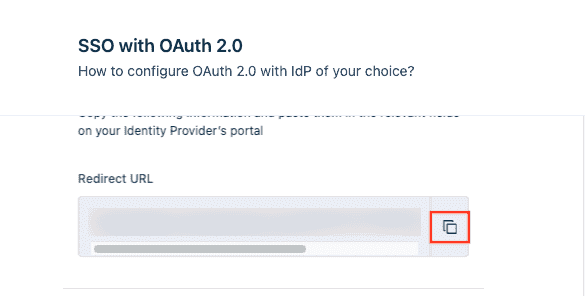 Image showing the Redirect URL in the SP portal
Identity360 (identity provider) configuration steps
- Switch to Identity360's application configuration page.
- In the Login Redirect URL field, enter the Redirect URL value copied during step 8 of Freshdesk configuration.
- If you have opted for OIDC-based SSO, select openid scope, or if you have chosen OAuth-based SSO, select email and profile from the Scopes drop-down list.
Note: Scopes define the level of access that can be requested by the service provider to access a resource. Identity360 supports the following scopes:
- openid: Establishes that this is an OpenID Connect request.
- email: Requests the user's email attribute.
- profile: Requests the user's profile claims (FirstName and LastName).
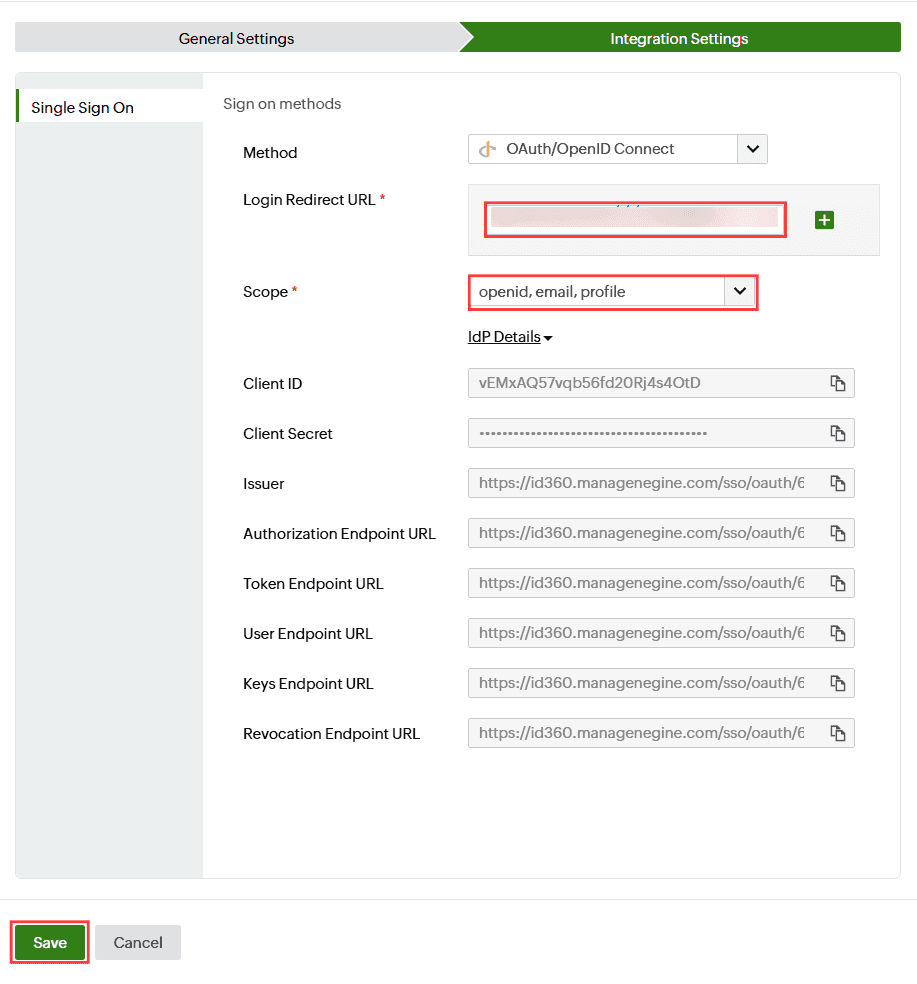 Integration Settings of Freshdesk configuration for OAuth/OpenID Connect method
- Click Save.
- To learn how to assign users or groups to one or more applications, refer to this page.
Your users should now be able to sign in to Freshdesk through the Identity360 portal.
Note: For Freshdesk, only SP-initiated flow is supported.
Steps to enable MFA for Freshdesk
Setting up MFA for Freshdesk using Identity360 involves the following steps:
- Set up one or more authenticators for identity verification when users attempt to log in to Freshdesk. Identity360 supports various authenticators, including Google Authenticator, Zoho OneAuth, and email-based verification codes. Click here for steps to set up the different authenticators.
- Integrate Freshdesk with Identity360 by configuring SSO using the steps listed here.
- Now, activate MFA for Freshdesk by following the steps mentioned here.
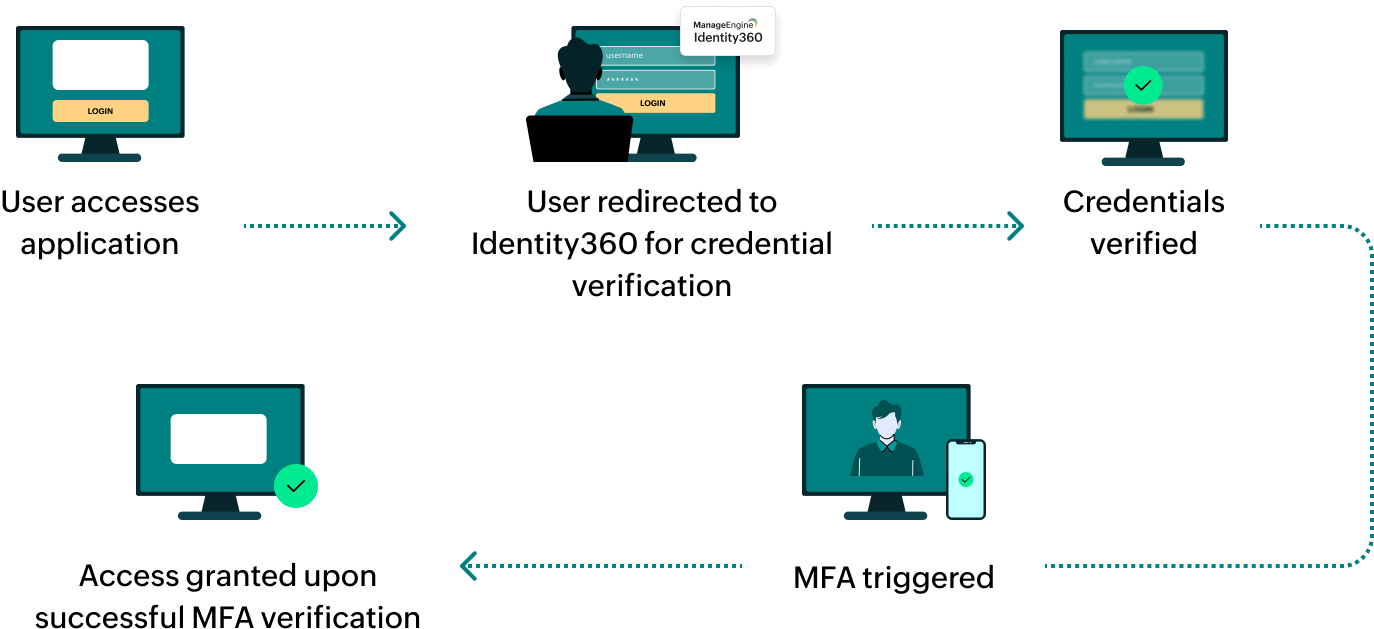
How does MFA for applications work in Identity360?