Manual Microsoft 365 tenant configuration

If the automatic configuration was not successful, the tenant must be configured manually. To do that, navigate to ccount Configuration > Microsoft 365 Tenant > Add New Tenantand select Click here to configure with an already existing Azure AD application.

Prerequisites:

  1. A service user account with at least Exchange Administrator privileges to configure tenants in Exchange Online. Click here to learn how to create such a service account.
  2. An application registration configured in RecoveryManager Plus should be assigned Exchange Administrator privileges. Click here to learn how to add roles to applications.
  3. If the account you use to configure your tenant to RecoveryManager Plus has MFA enabled, you need to use either the Conditional Access or Trusted IP feature in Microsoft 365 to bypass MFA. Once you have configured one of these features, proceed to configure the service account in RecoveryManager Plus.
  4. Create a self-signed X.509 certificate. Download the PowerShell script from this link. Open PowerShell and run the downloaded script using the following command:

    .\Create-SelfSignedCertificate.ps1 -CommonName "CertificateName" -StartDate YYYY-MM-DD -EndDate YYYY-MM-DD.

    The certificate will be created with the name provided in the CertificateName position. In the YYYY-MM-DD field, provide the start and end date for the certificate. Once you run the PowerShell script, you will be requested to provide a password for the PFX file. The PFX and CER files will be exported to the current folder. The password you provided and the certificate files will be required in the later steps.

There are two steps to configure a tenant manually.

  1. Create an Azure AD application.
  2. Configure the Azure AD application in RecoveryManager Plus.

Create an Azure AD application

To create an Azure AD application,

  1. Sign in to the Azure AD portal using the credentials of a Global Administrator account.
  2. Select Microsoft Entra ID and select Manage from the left pane.
  3. Click App registrations > New registration.
  4. Provide a Name for the RecoveryManager Plus application to be created.
  5. Select a supported account type based on your organizational needs.
  6. Leave the Redirect URI (optional) field blank. You will configure it in the next few steps.
  7. Click Register to complete the initial app registration.
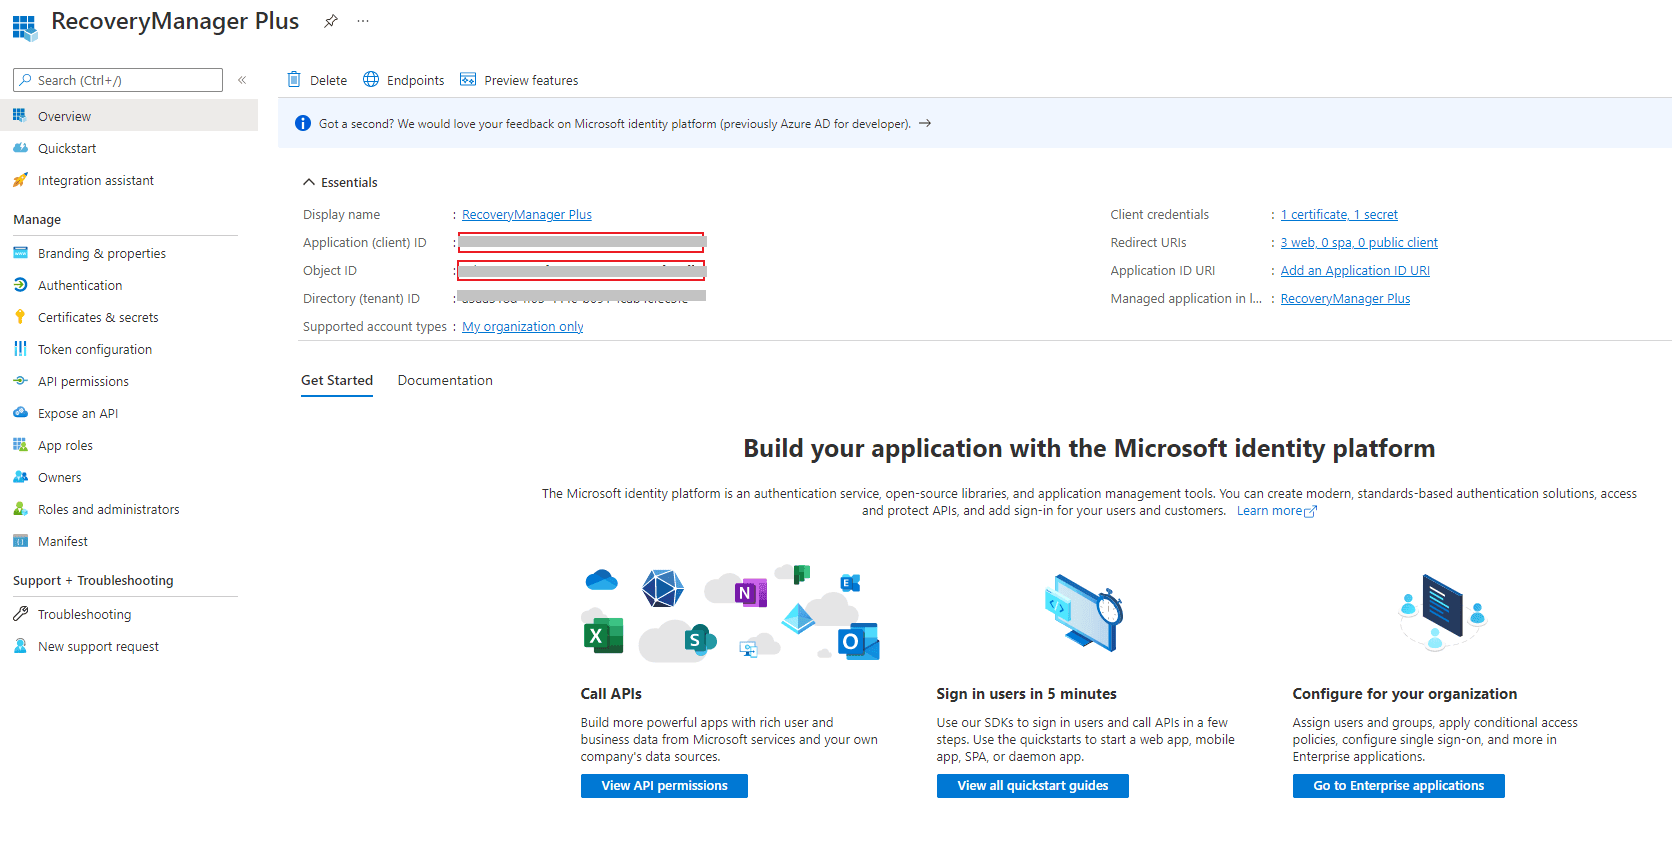
  8. You will now see the Overview page of the registered application.
  9. Click Add a Redirect URI link in the Essentials section.
  10. Click Add a platform under Platform configurations.
  11. In the Configure platforms pop-up, click Web under Web applications.
  12. In the Redirect URIs field, enter http://localhost:port_number/webclient/GrantAccess.

    For example, http://localhost:8090/webclient/GrantAccess or https://192.345.679.345:8090/webclient/GrantAccess.
  13. You can leave the Logout URL and Implicit grant and hybrid flows fields empty. Click Configure.
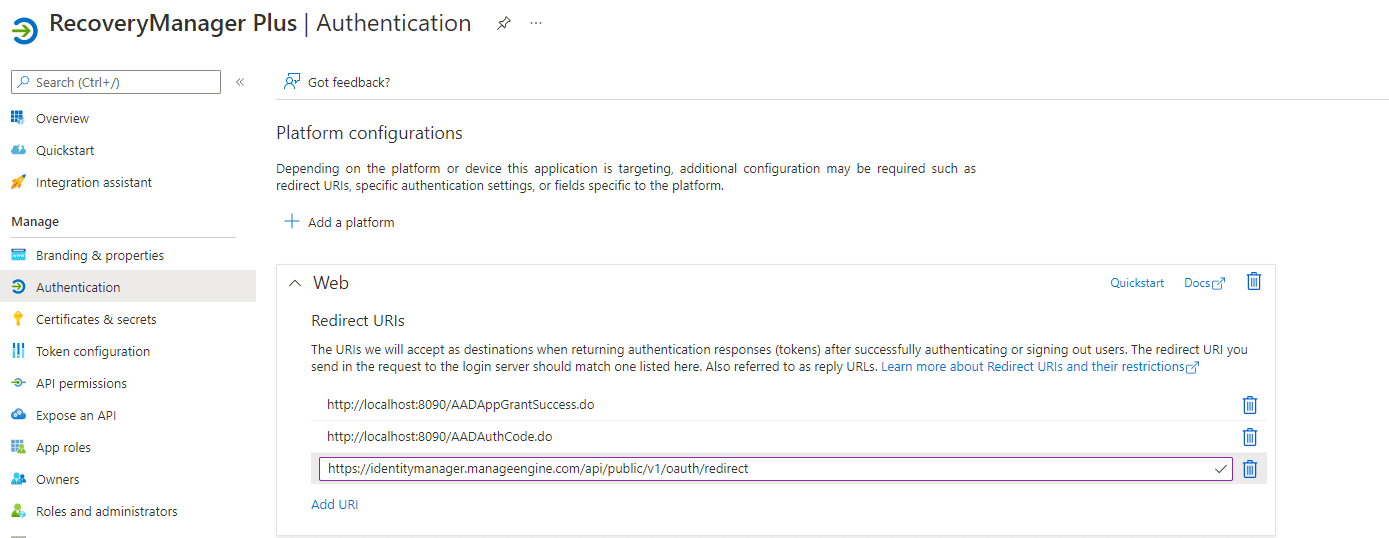
  14. In the Authentication page, under Redirect URIs, click Add URI and add the following URLs.
    • http://localhost:port_number/AADAppGrantSuccess.do
    • http://localhost:port_number/AADAuthCode.do
    • https://identitymanager.manageengine.in/api/public/v1/oauth/redirect
    • Adding Redirect URIs in the Authentication page for manual Microsoft 365 tenant configuration

      Note: The REDIRECT URI must adhere to the following criteria:
    • It must be fewer than 256 characters in length.
    • It should not contain wildcard characters.
    • It should not contain query strings.
    • It must start with HTTPS or http://localhost.
    • It must be a valid and unique URL. Based on the connection type (http/https) you have configured in RecoveryManager Plus, the REDIRECTURL format varies.
      • For http, the URL value is http://localhost:8090. Machine name or IP address cannot be used in place of localhost if http is used.
      • For https, the URL value is https://192.345.679.345:8090 or https://testmachine:8090.
    • To find your machine's IP, open the Command Prompt, type ipconfig, and click Enter. You can find your IPv4 Address in the results shown
  15. Click Save.
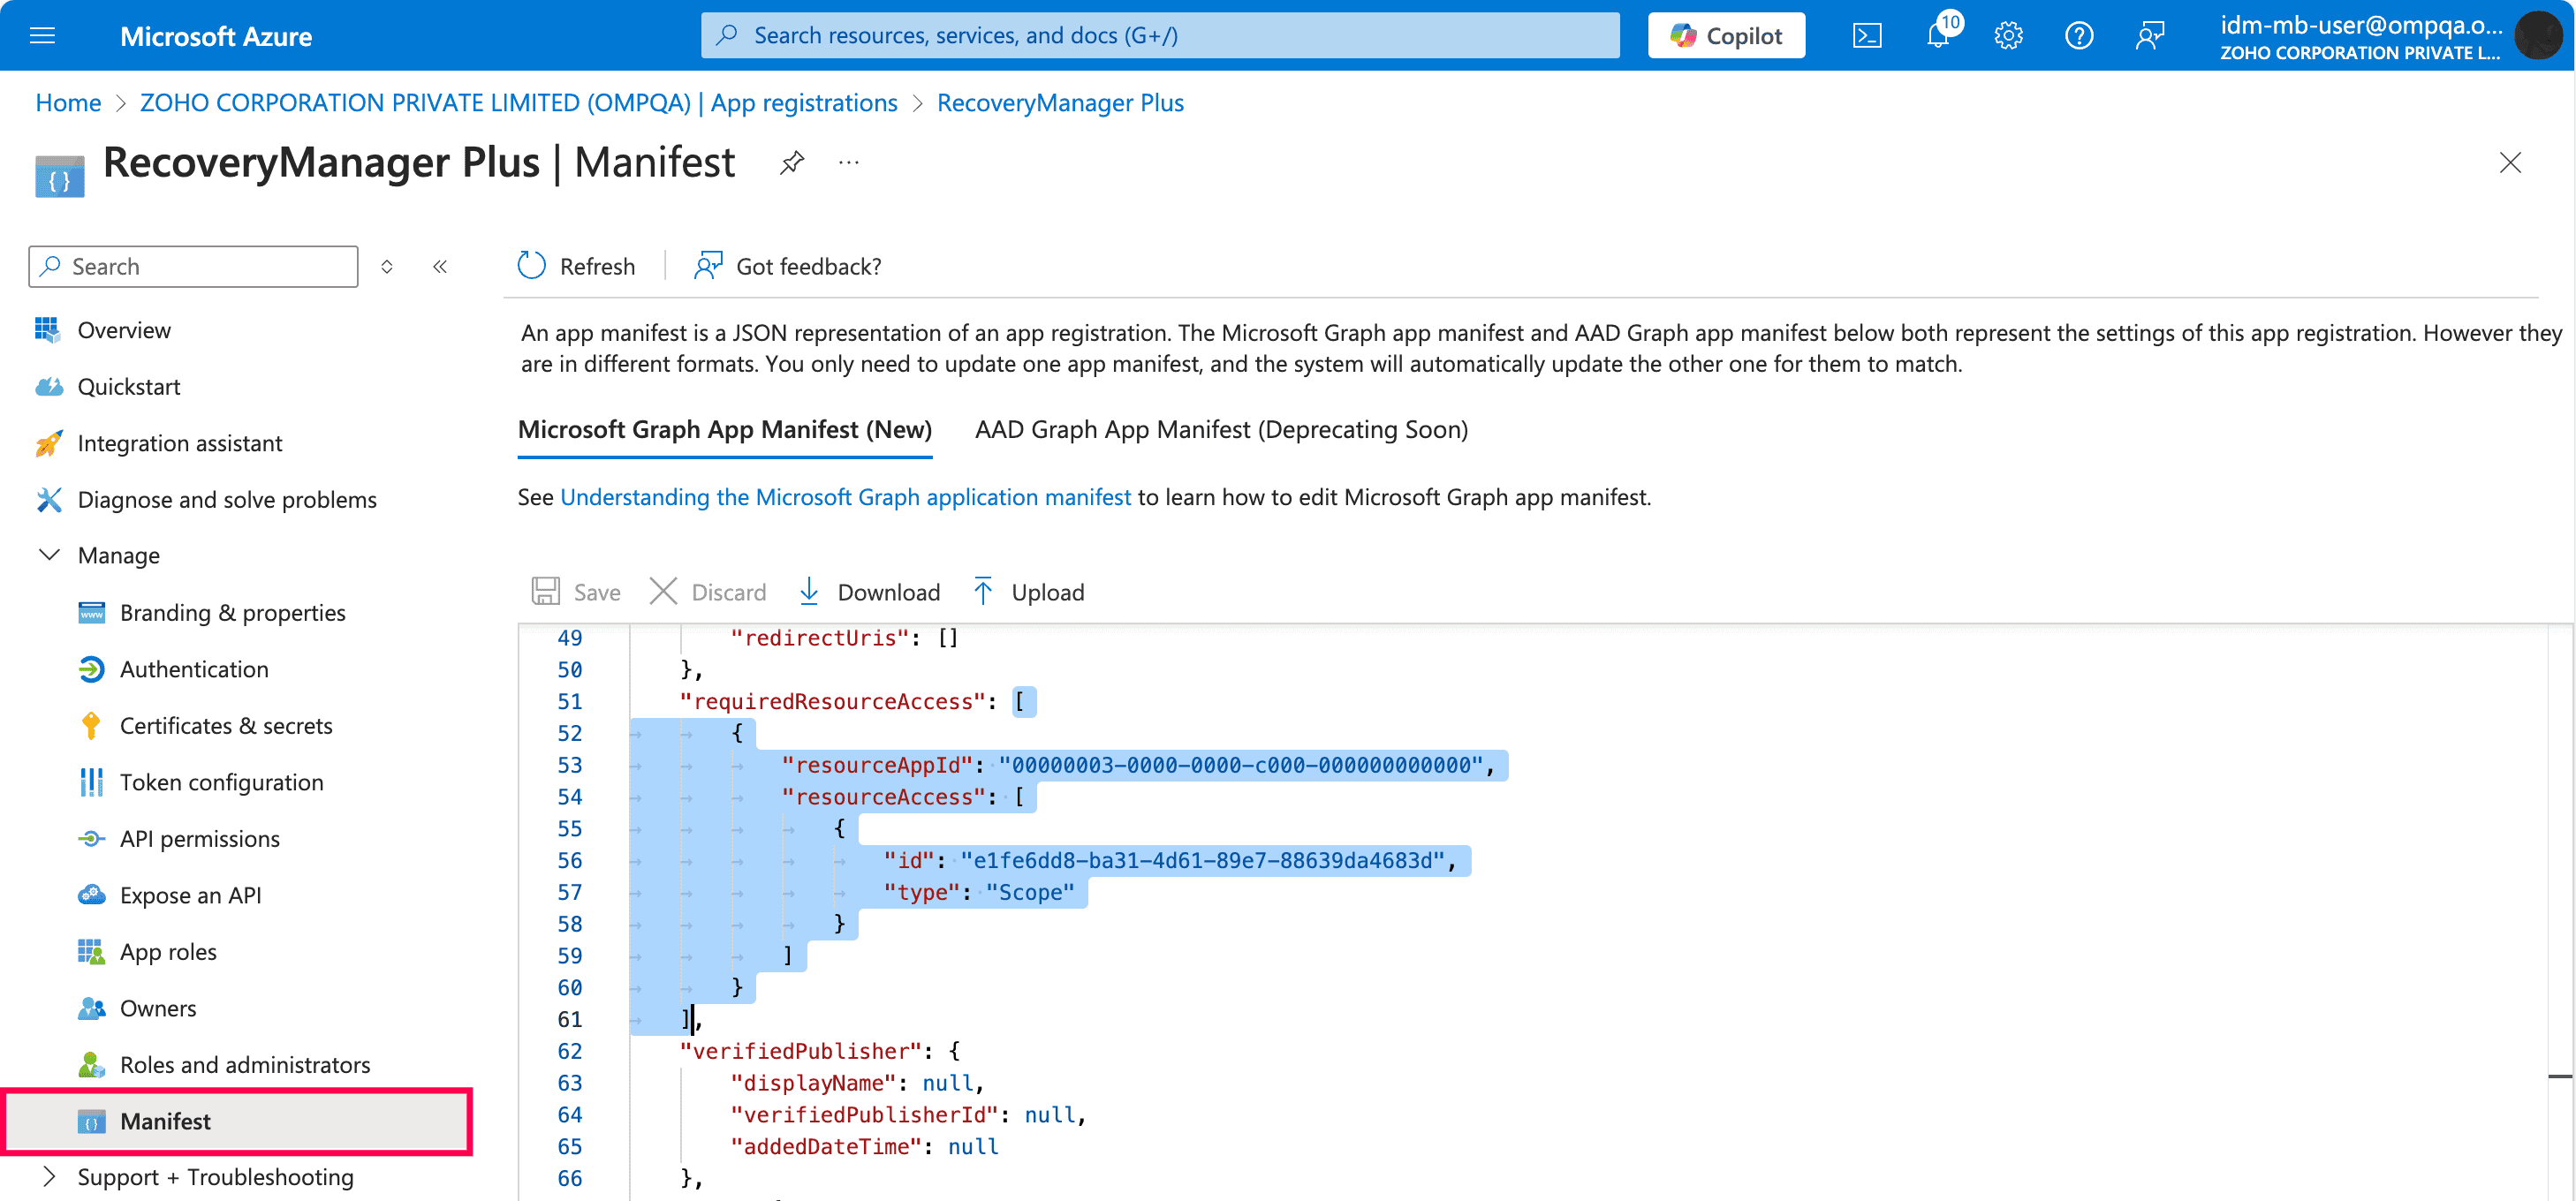
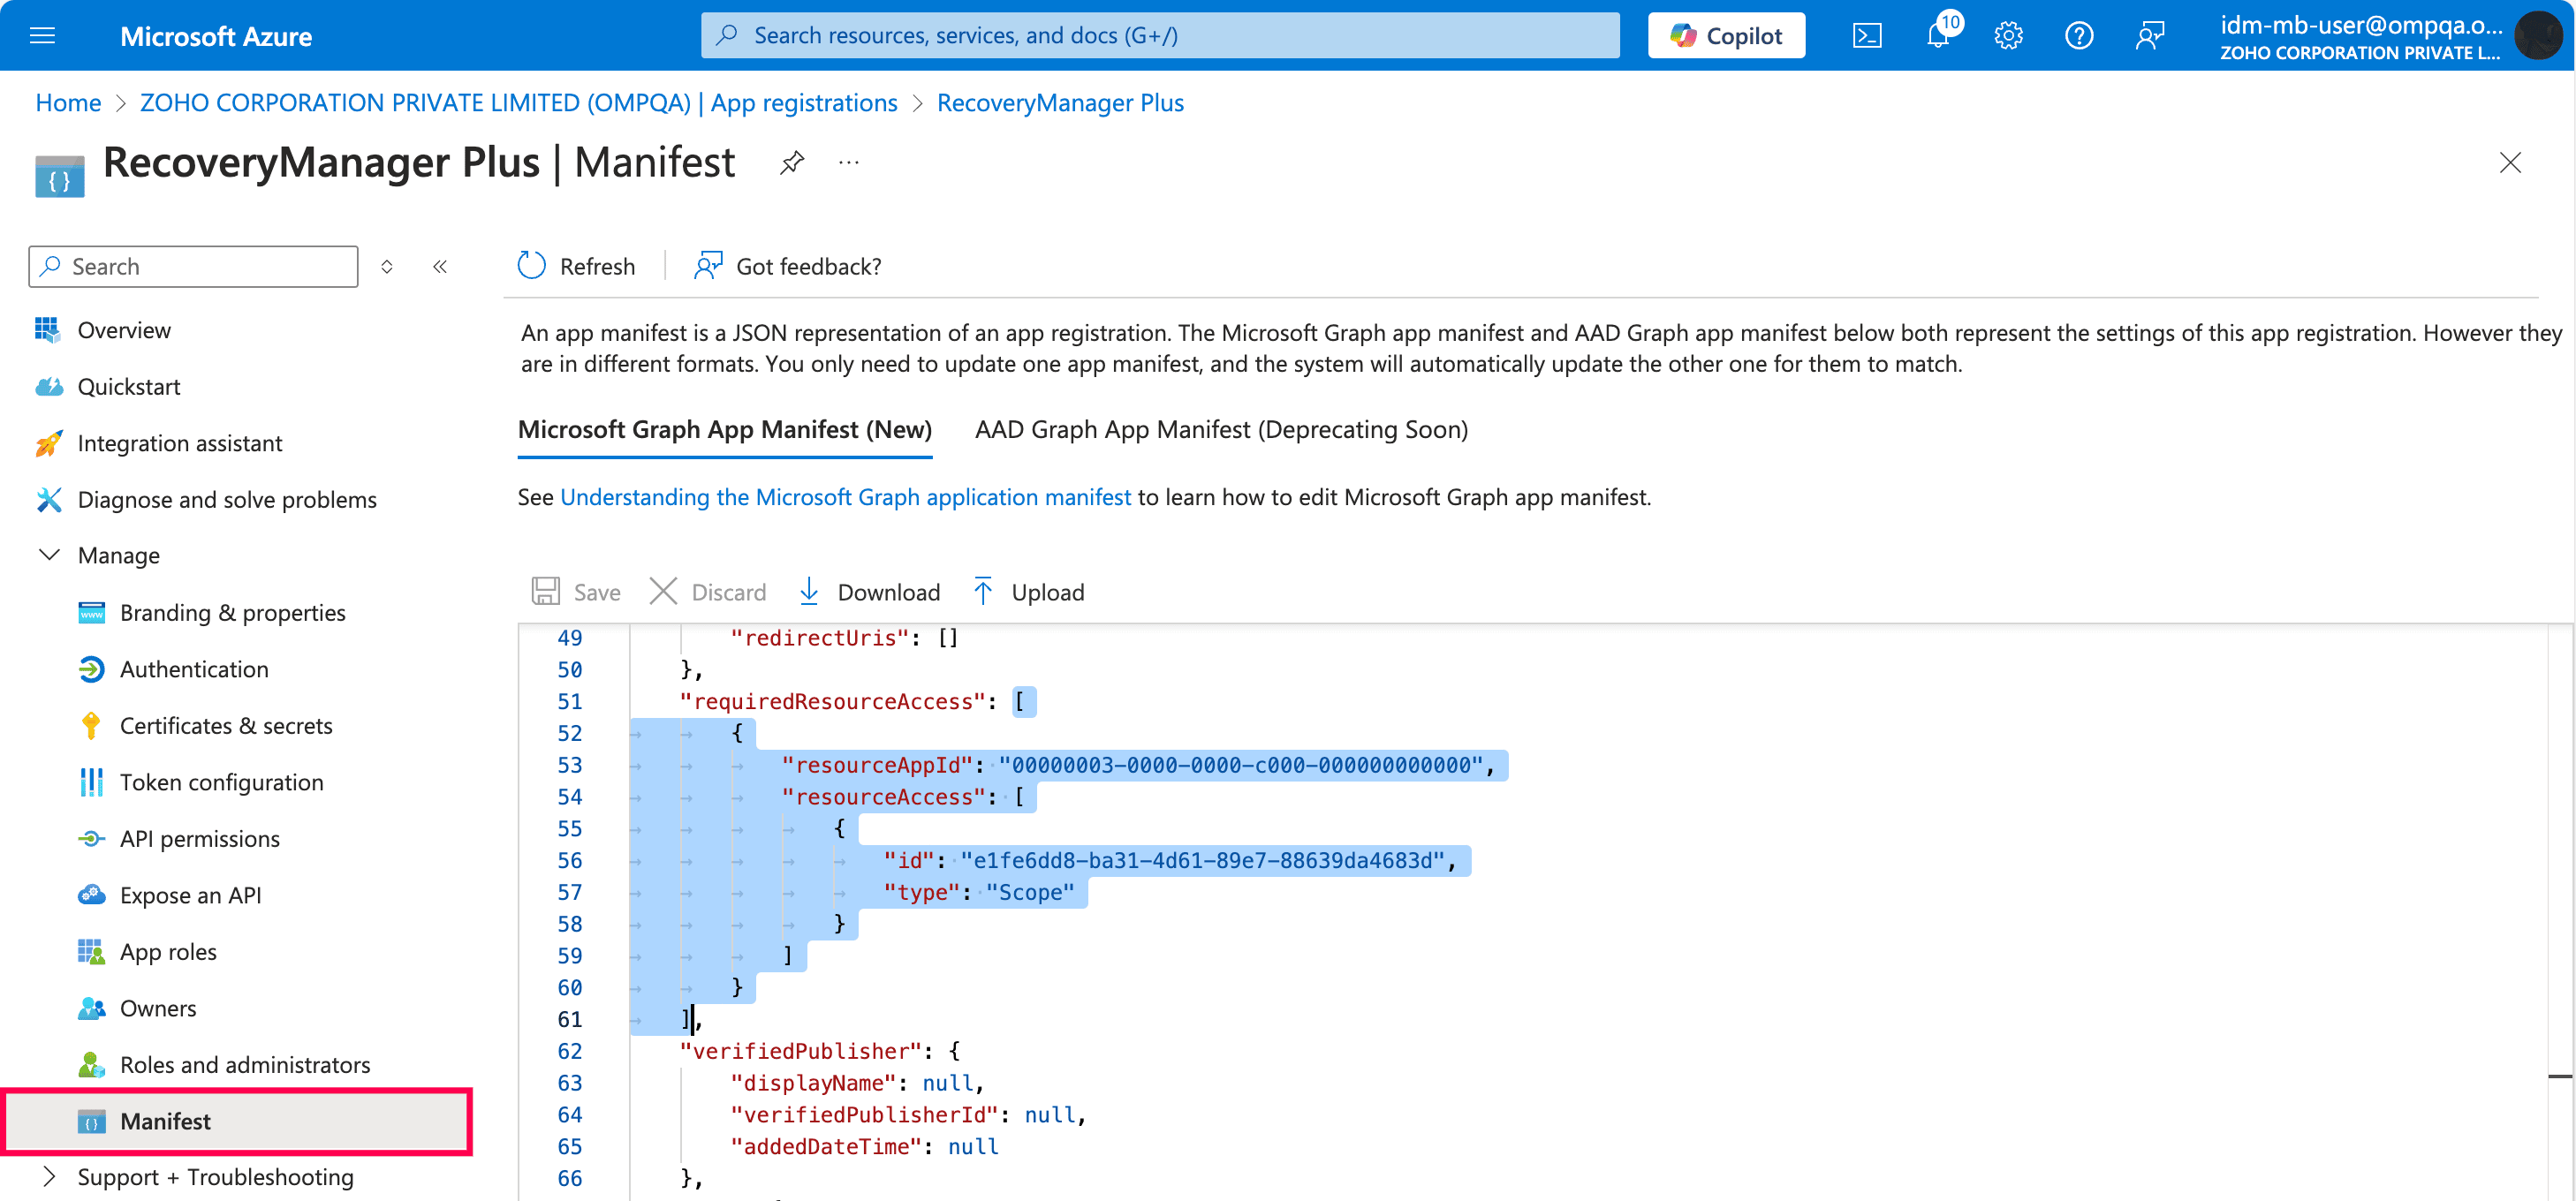
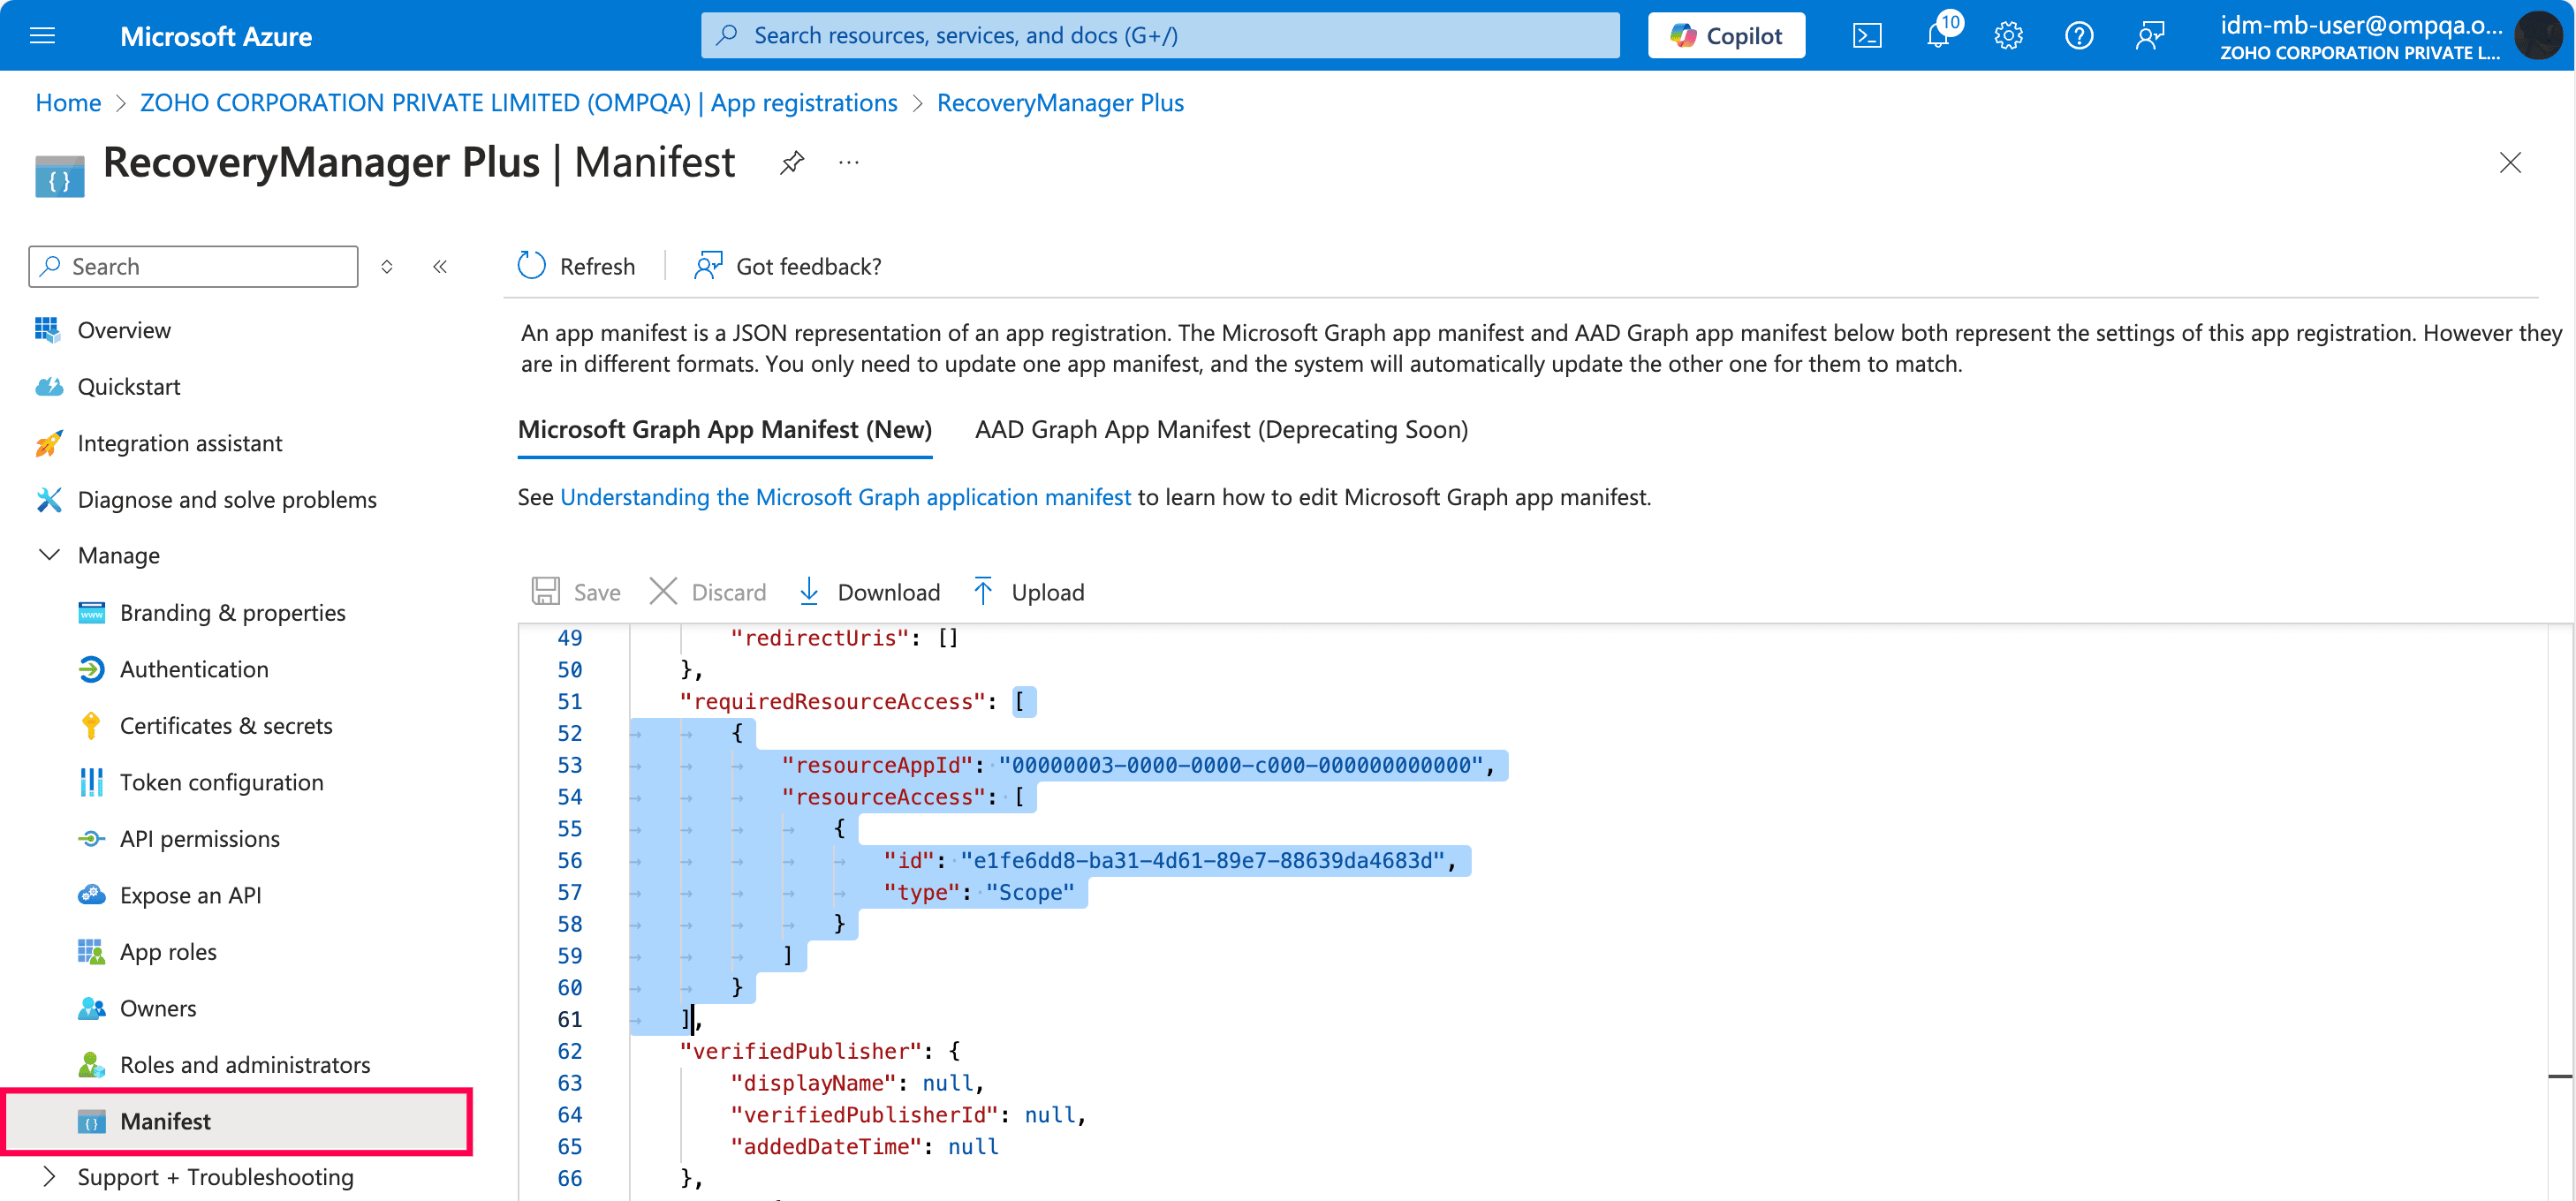
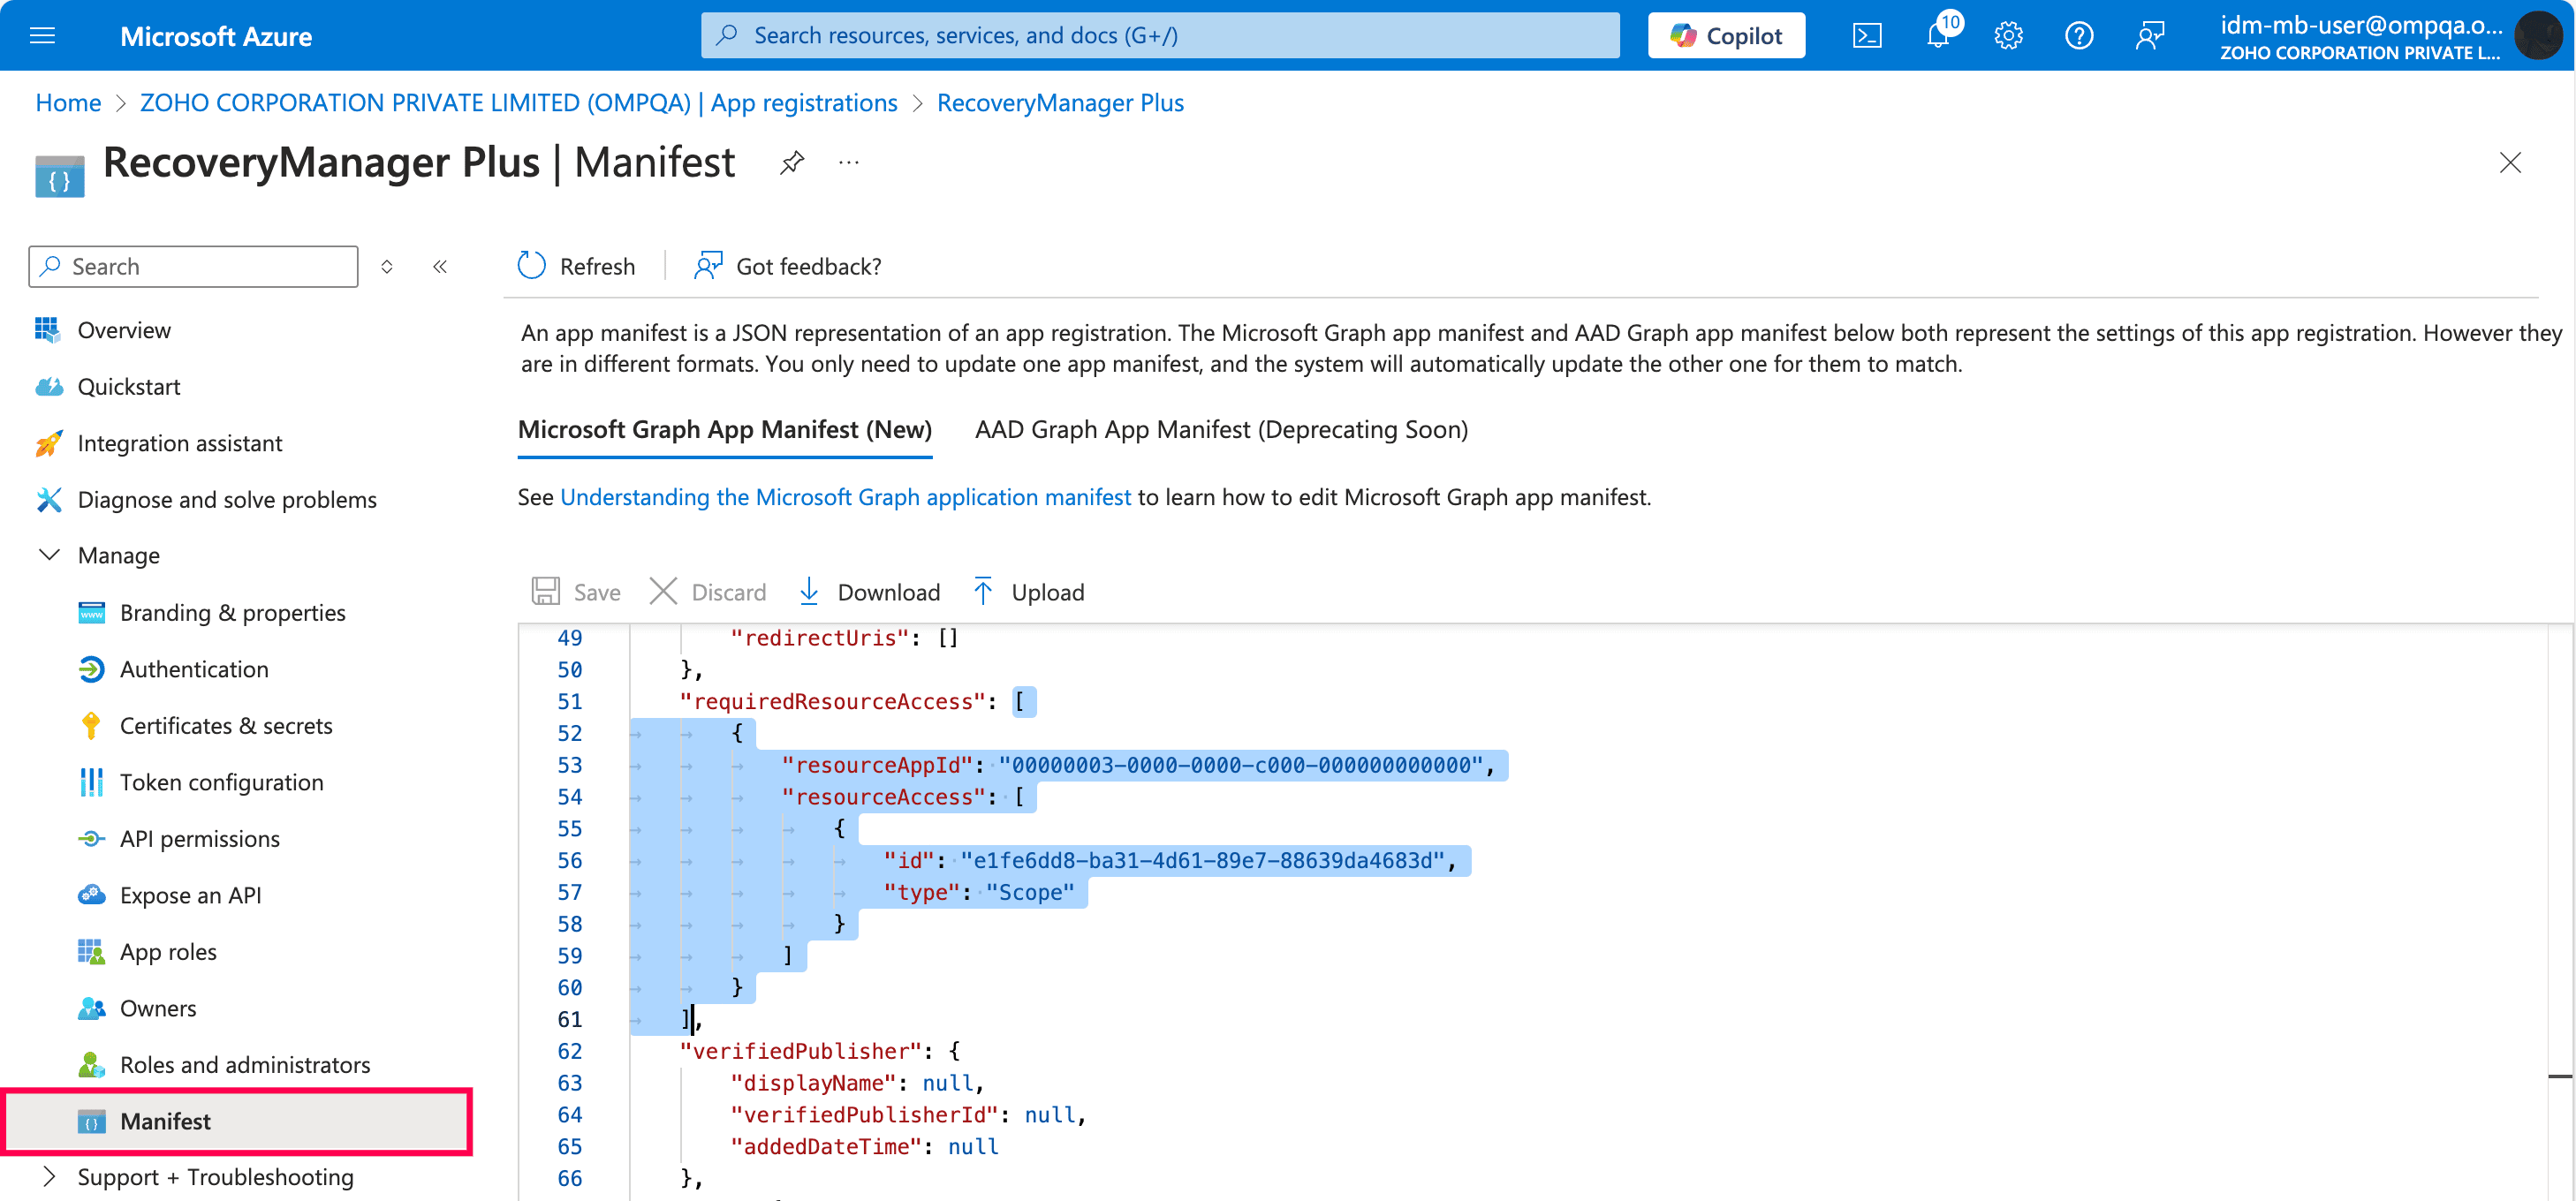
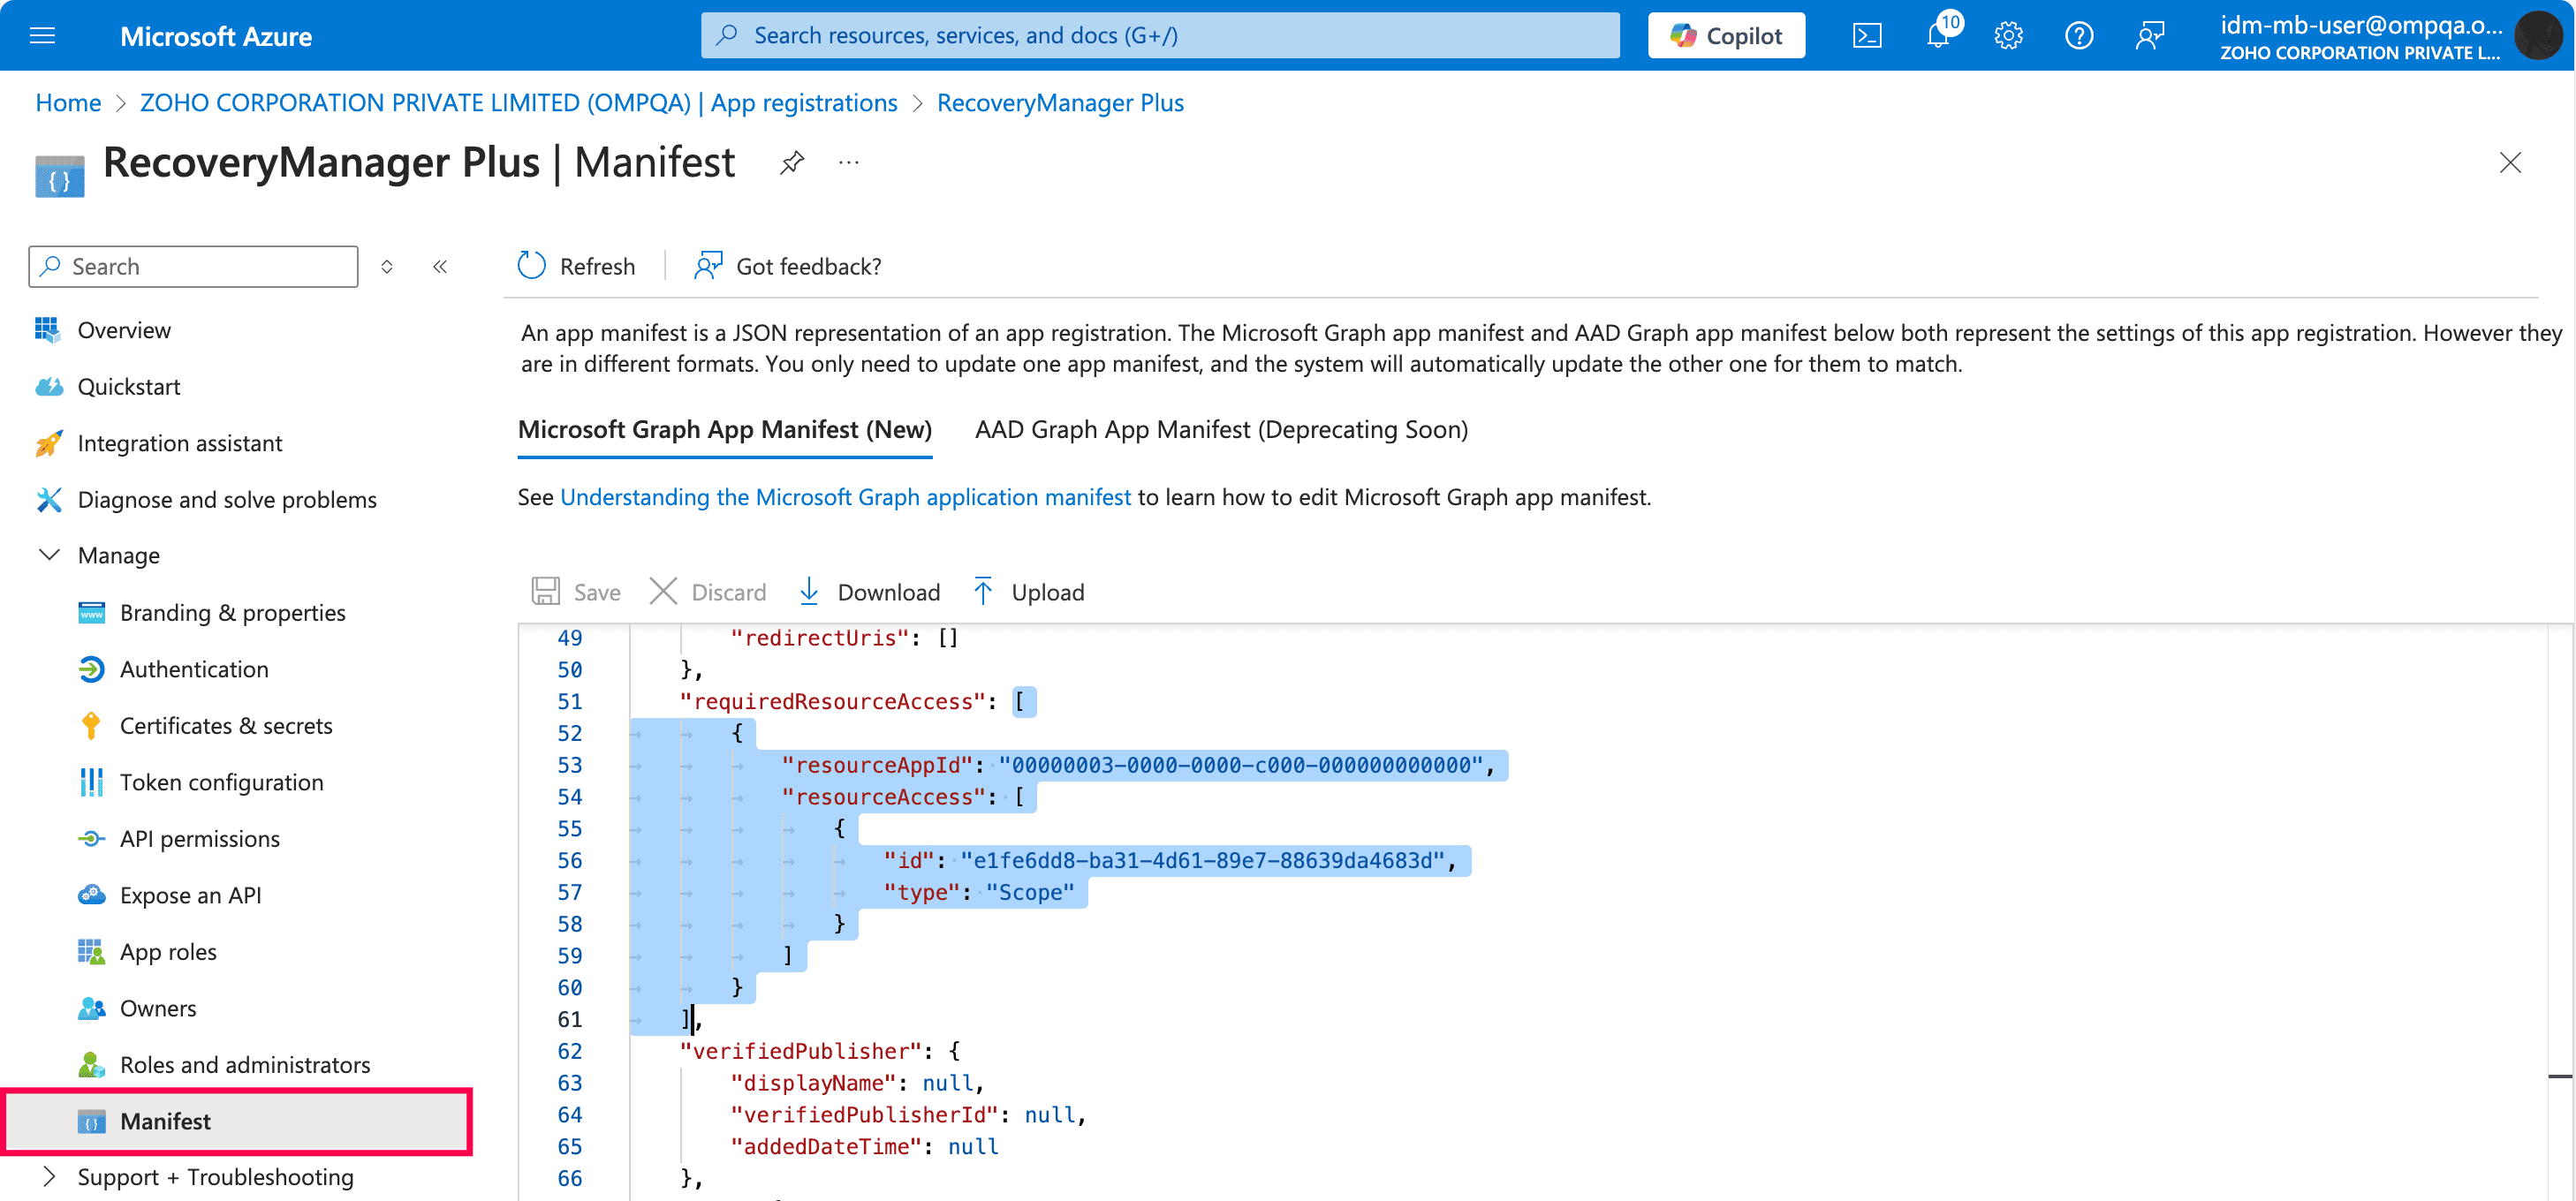
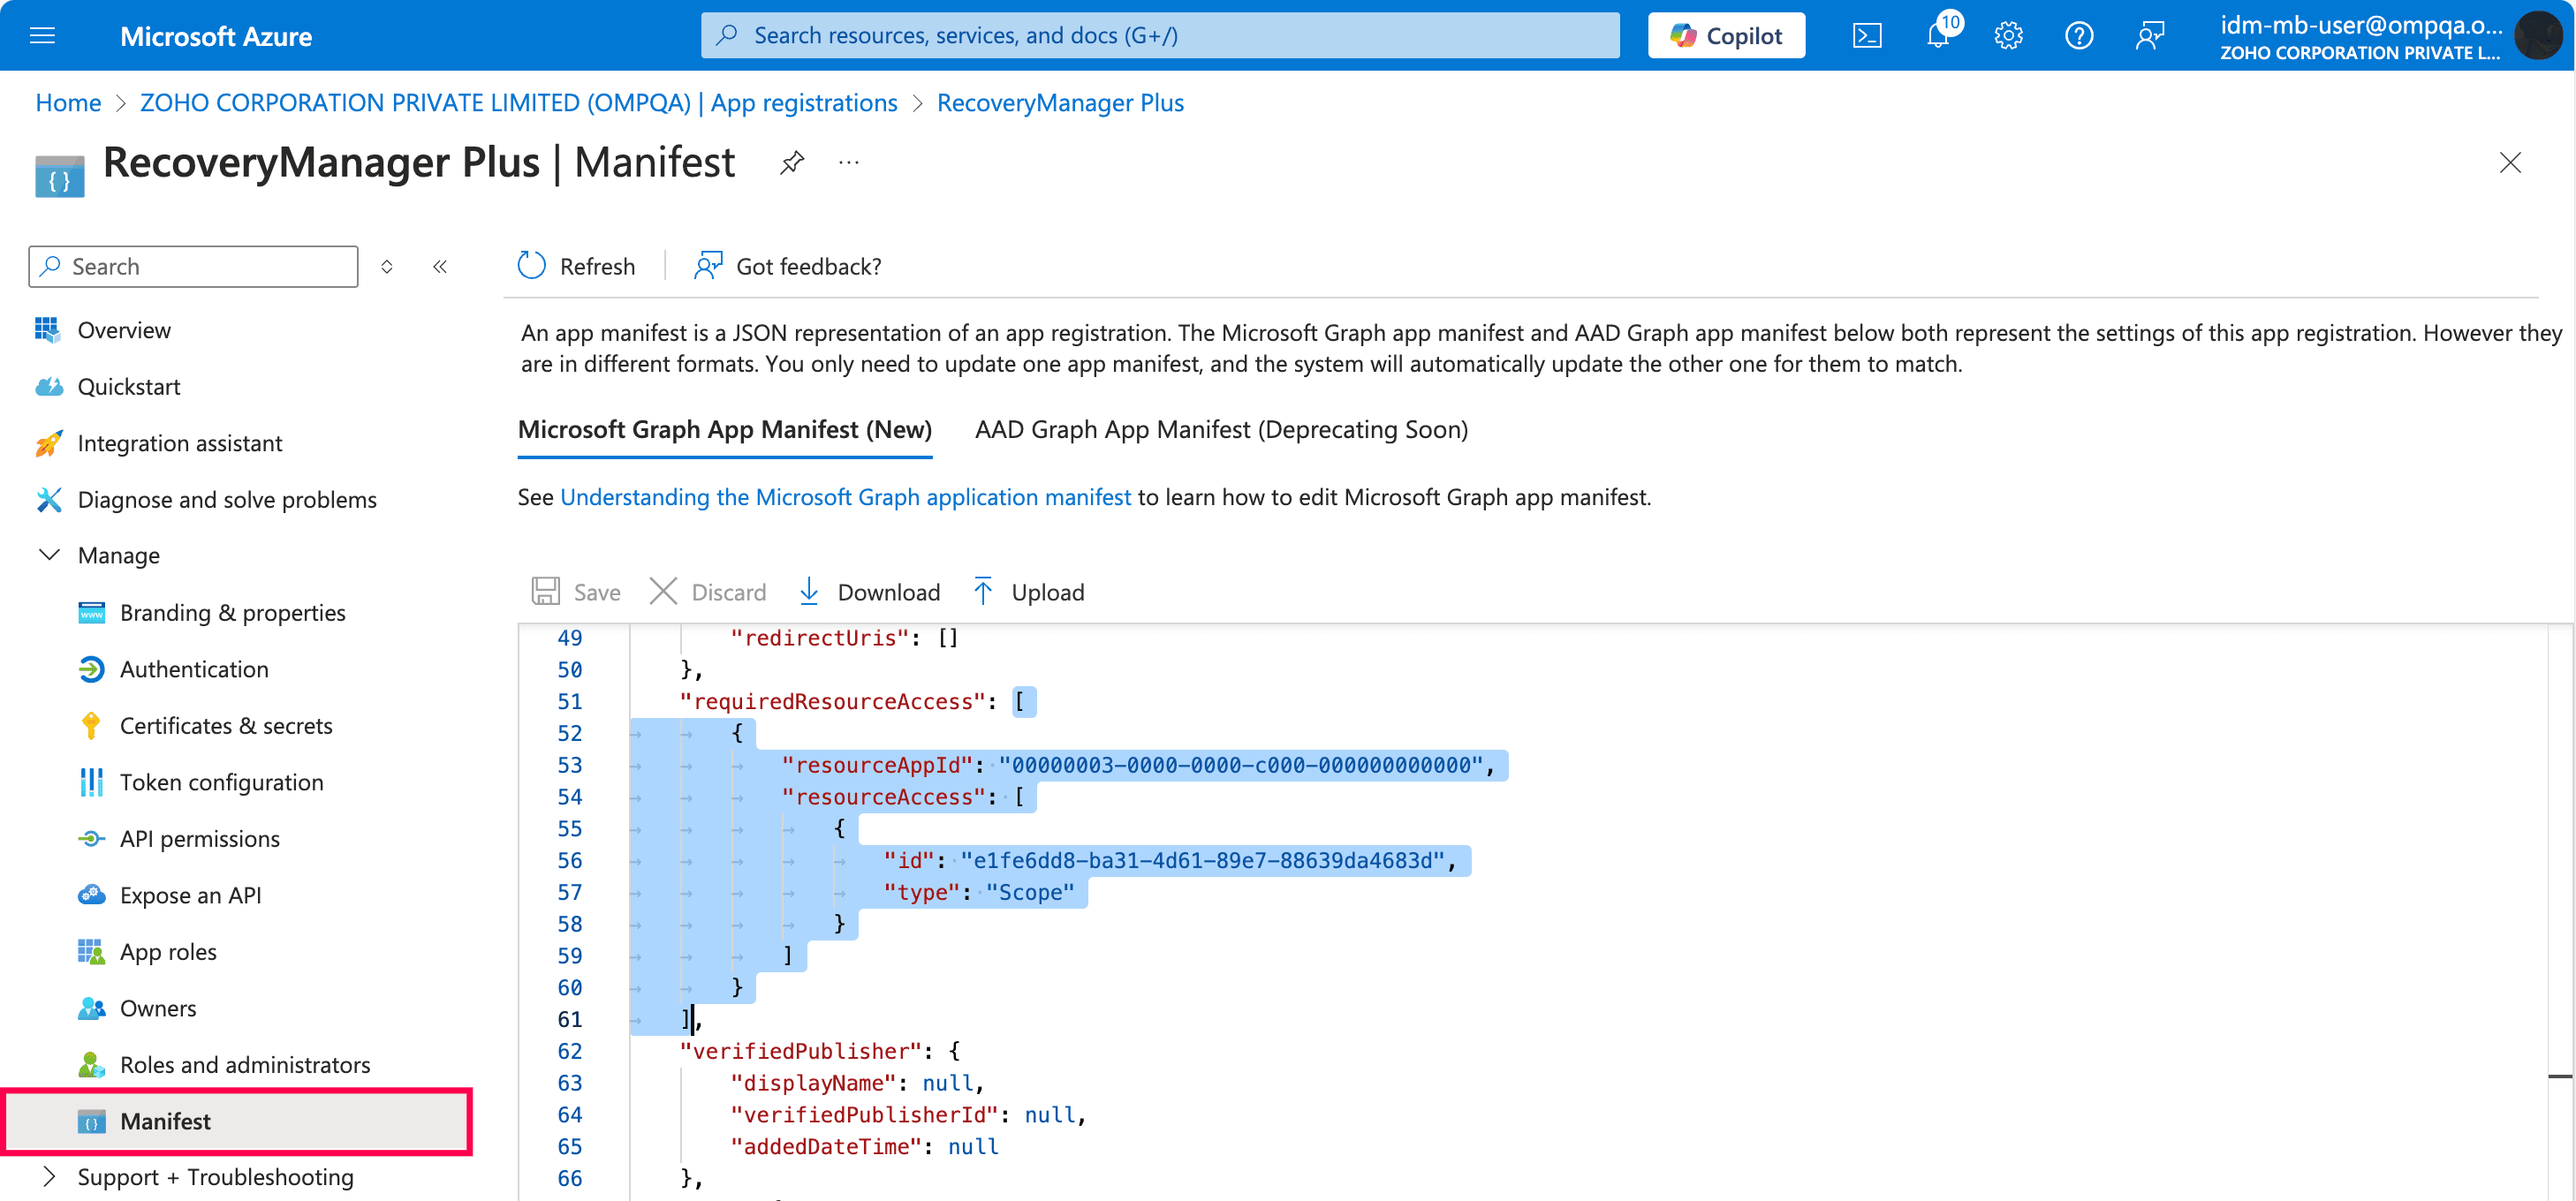
  16. To enable RecoveryManager Plus to access and backup resources from the module(s) you configure, specify the required permissions in the app registration manifest file. To do so, click Manifest from the left pane and look for requiredResourceAccess array in the code that will be displayed.
  17. Specifying the required permissions in the app registration manifest file

  18. Copy the file(s) provided in the corresponding module below and paste it in the highlighted section of the code.
    • All modules
    • If you want to configure all modules, copy the entire content from this file and paste them into the section highlighted in the image below.

      Specifying permissions to configure all modules in the app registration manifest file

      If you have configured all applications and pasted the file, it should look like the image below.
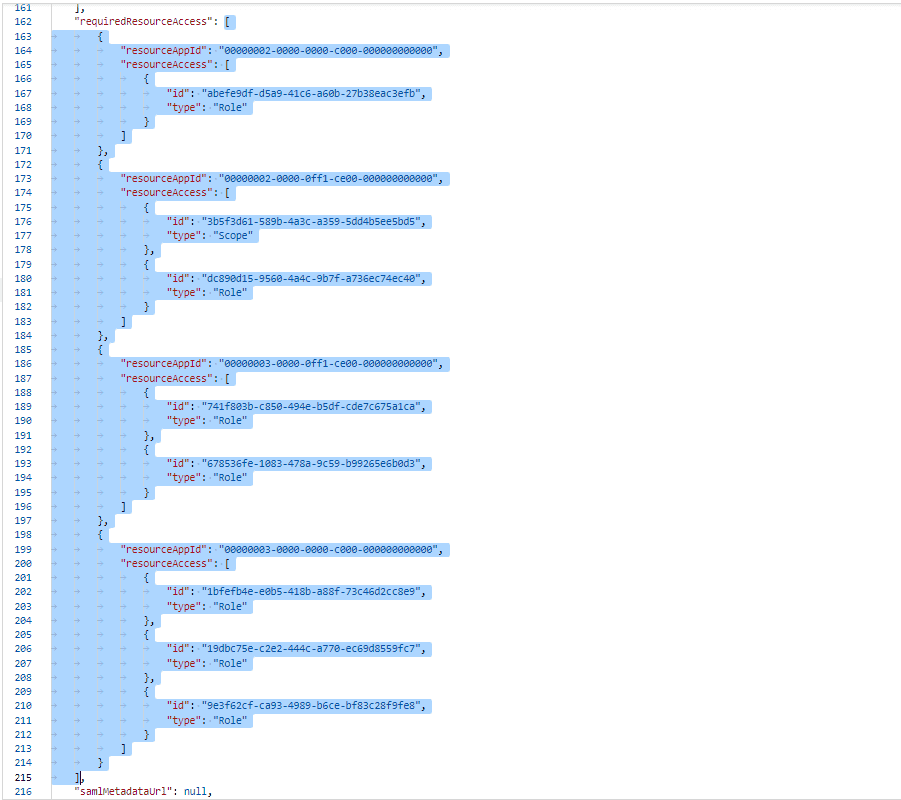
      The app registration manifest file after specifying the permissions

    • Azure Active Directory
      • Copy the content from this file and paste it into the section highlighted in the image below.
      • Specifying permissions for Azure Active Directory in the app registration manifest file

      • The roles that must be assigned to the application are given in the table below.
      Module Role Name Permission Scope
      Azure AD Azure Active Directory Graph Domain.ReadWrite.All Read and write all domain properties
      Microsoft Graph → Application Permissions AppRoleAssignment.ReadWrite.All Manage app permission grants and app role assignments
      AdministrativeUnit.ReadWrite.All Read and write all administrative units
      Application.ReadWrite.All Read and write all applications
      AppRoleAssignment.ReadWrite.All Manage app permission grants and app role assignments
      Directory.ReadWrite.All Read and write directory data
      Domain.ReadWrite.All Read and write domains
      Group.Create Create groups
      Group.ReadWrite.All Read and write all groups
      Policy.Read.All Read your organization's policies
      Policy.ReadWrite.ApplicationConfiguration Read and write your organization's application configuration policies
      Policy.ReadWrite.Authorization Read and write your organization's authorization policy
      Policy.ReadWrite.ConditionalAccess Read and write your organization's conditional
      RoleManagement.ReadWrite.Directory Read and write all directory RBAC settings
    • Exchange Online
      • Copy the content from this file and paste it into the section highlighted in the image below.
      • Specifying permissions for Exchange Online in the app registration manifest file

      • The roles that must be assigned to the application are given in the table below.
      Module Role Name Permission Scope
      Exchange Online Office 365 Exchange Online EWS.AccesAsUser.All Back up and restore mailboxes
      full_access_as_app Use Exchange Web Services to back up and restore mailboxes
      Exchange.ManageAsApp Manage Exchange as Application
    • SharePoint Online and OneDrive for Business
      • Copy the content from this file and paste it into the section highlighted in the image below.
      • Specifying permissions for SharePoint Online and OneDrive for Business in the app registration manifest file

      • The roles that must be assigned to the application are given in the table below.
      Module Role Name Permission Scope
      SharePoint Online and OneDrive for Business SharePoint Sites.FullControl.All Backup and restore sites
      User.ReadWrite.All Read and write the full set of profile properties, reports, and managers of users
      Note:
      • If your tenant is being created in Azure Germany, copy the entire content from this file and paste them into the section highlighted in the image below.
      • If your tenant is being created in Azure China, copy the entire content from this file and paste them into the section highlighted in the image below.

      Specifying permissions in the app registration manifest file of Azure Germany or Azure China

    Note: Copy and paste content only from the open square bracket to the closed square bracket. Ensure that all punctuation marks are retained correctly.
  19. Click Save.
  20. Click API permissions from the left pane.
  21. In the Configured permissions section, click ✓ Grant admin consent for <your_company_name>.
  22. Click Yes in the pop-up that appears.
  23. Click Certificates & secrets from the left pane.
  24. Under the Client secrets section, click New client secret.
  25. This section generates an app password for RecoveryManager Plus. In the Description field of the pop-up, provide a name to identify the app to which the password belongs.
  26. Choose when the password should expire and click Add.
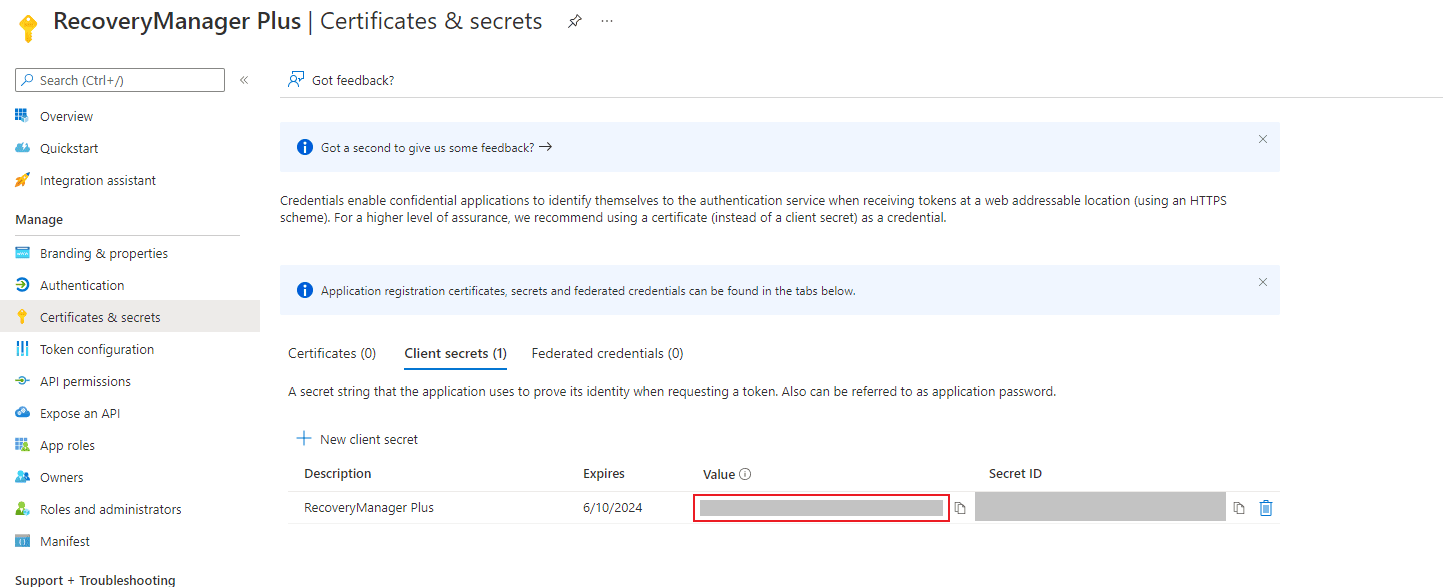
  27. Copy the string under Value and save it. This is the Application Secret Key, which you will require later.
  28. Copying the Client Secret value from the Certificate & secrets section

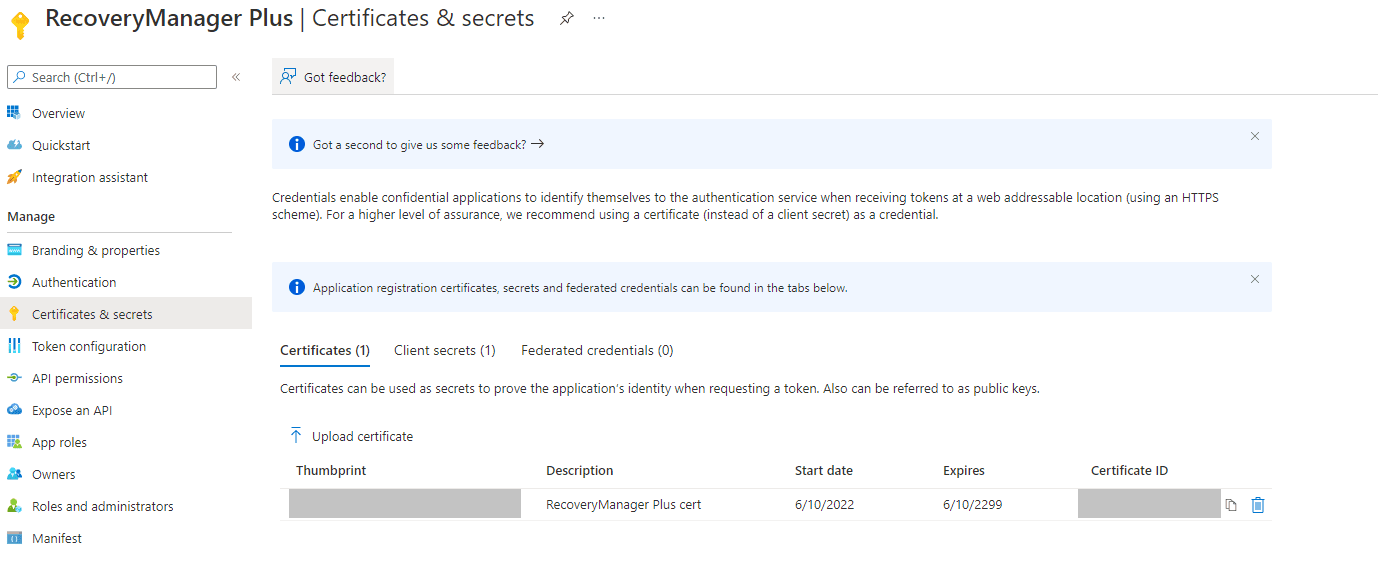
  29. In the Certificates section, click Upload certificate and upload the .CER file generated in the prerequisites section.
  30. Uploading the X.509 certificate in the Certificate & secrets section

  31. Now, navigate to the Overview section in the left pane.
  32. Copy the Application (client) ID and Object ID values and save them. You will need these values to configure your tenant in the RecoveryManager Plus portal.
  33. Copying the Application (client) ID and Object ID

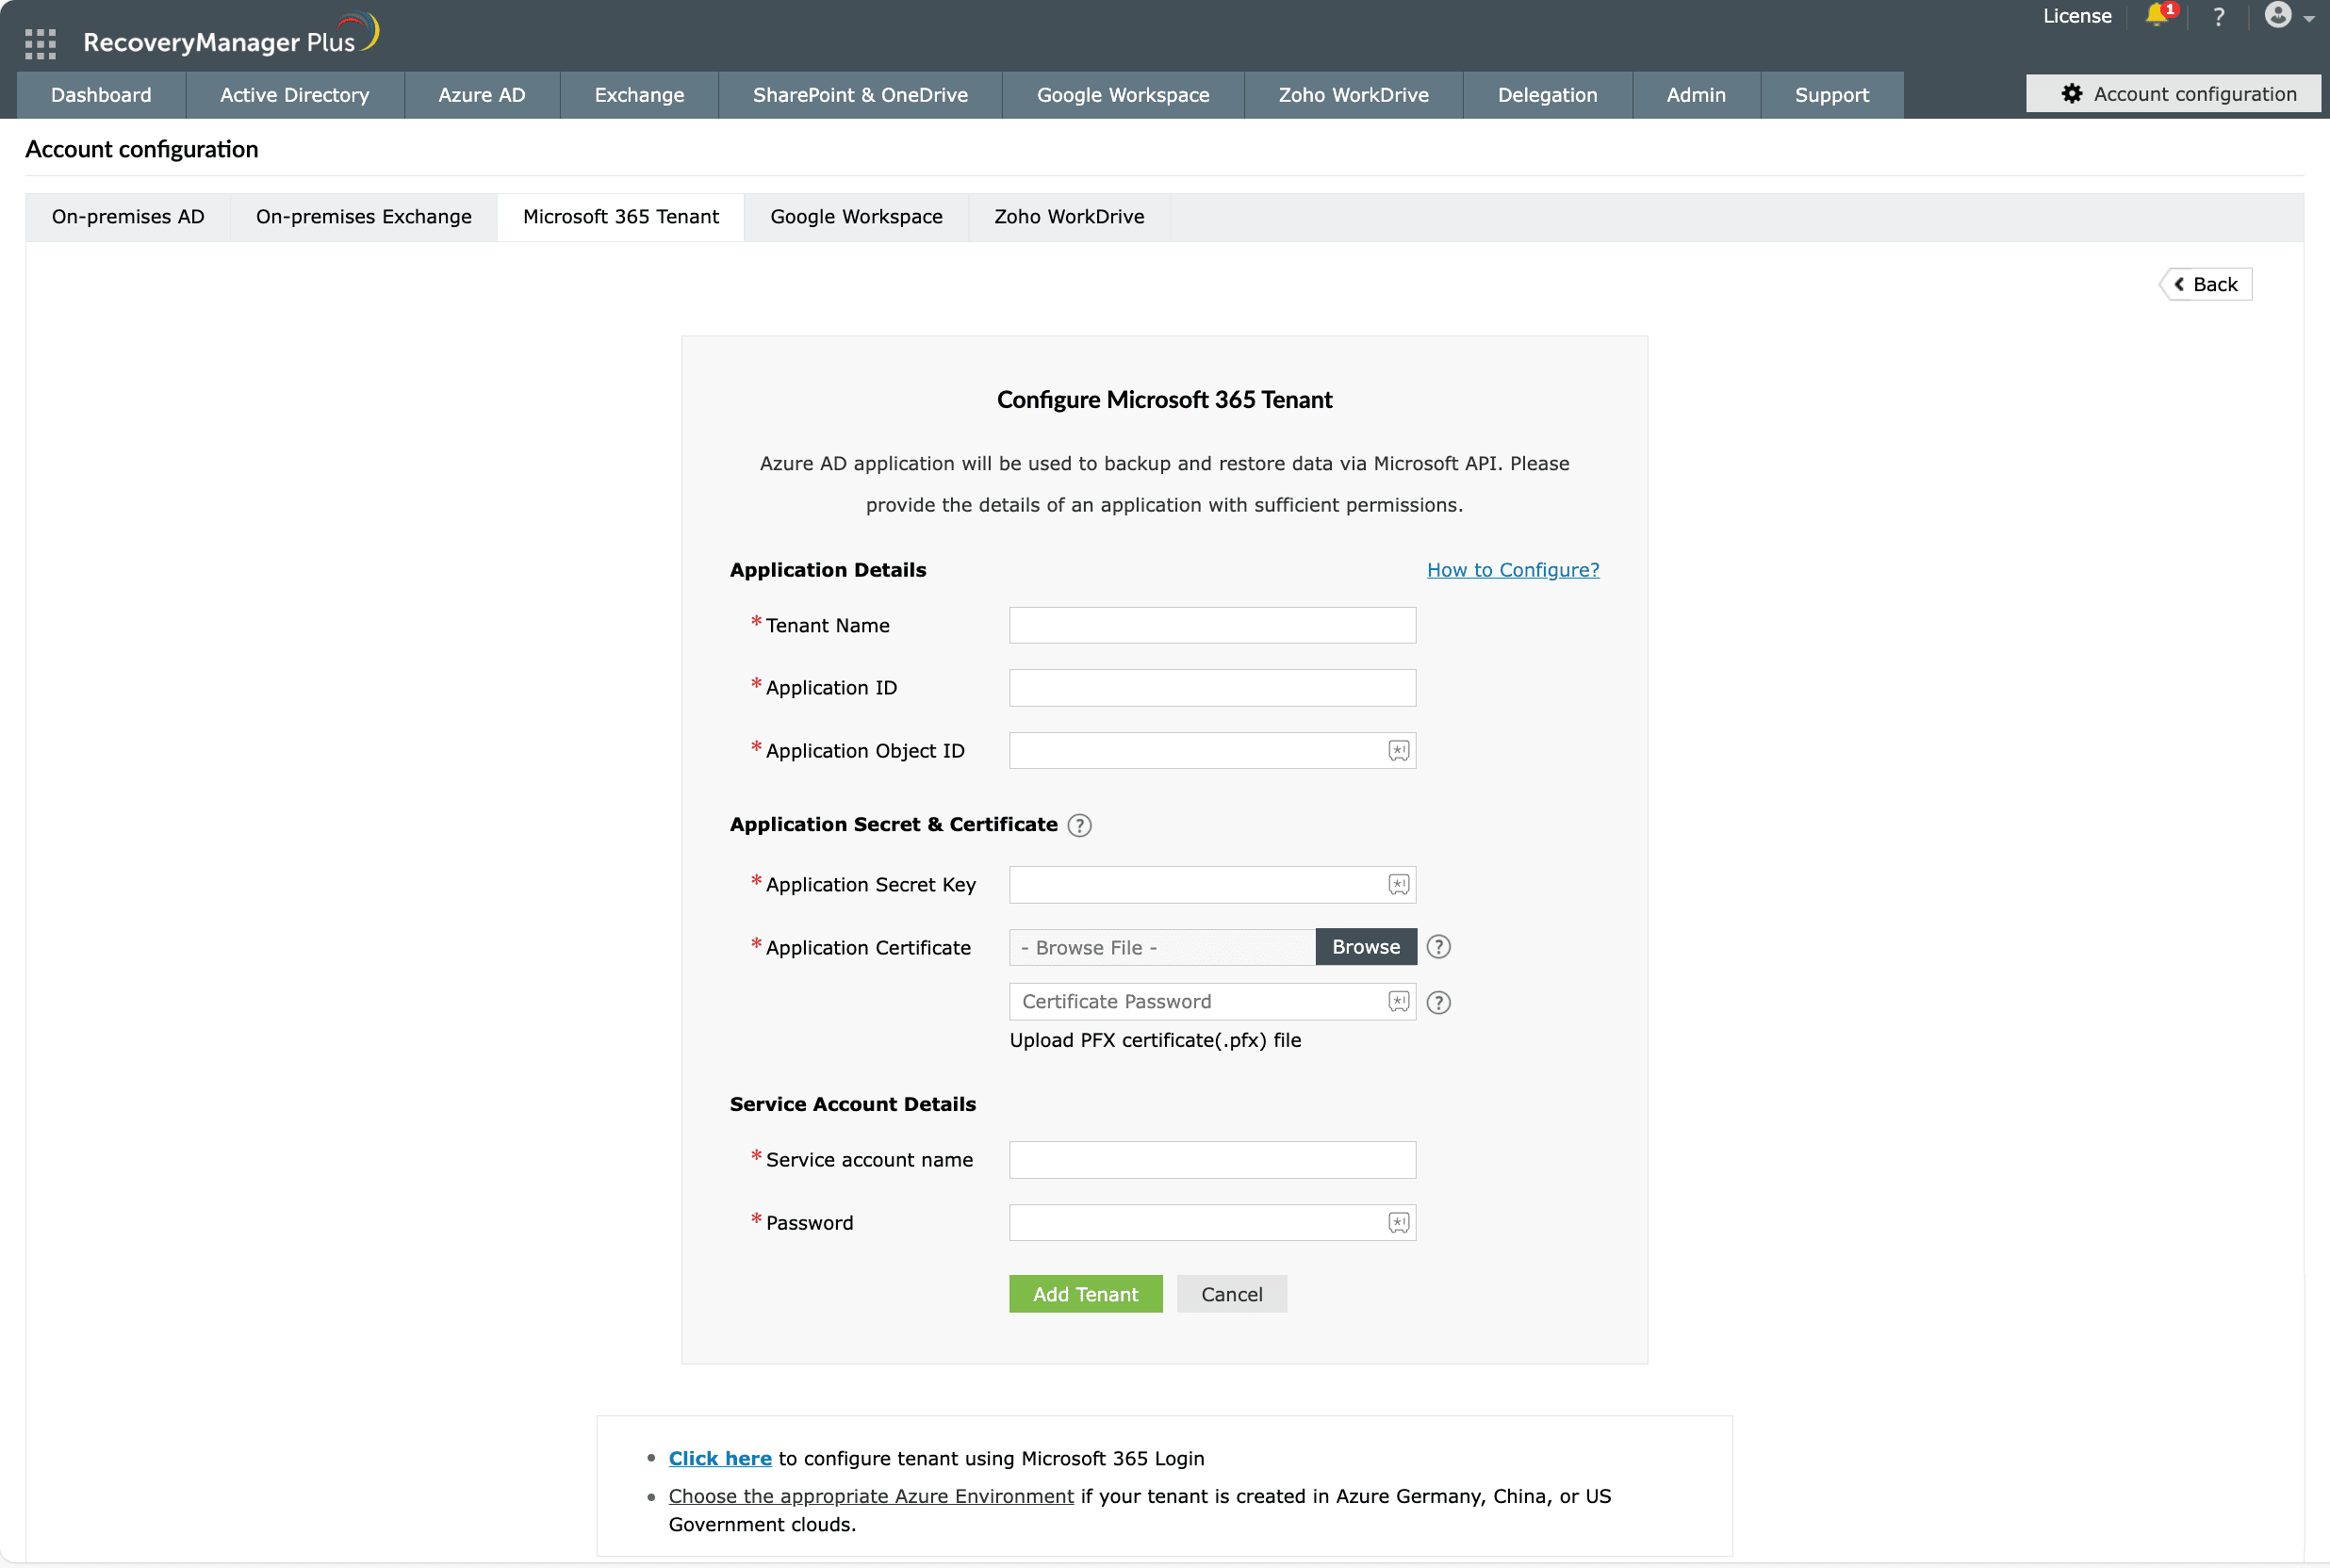
Steps to configure an Azure application in RecoveryManager Plus

  1. Return to the RecoveryManager Plus console where you have the pop-up.
  2. Azure application configuration in RecoveryManager Plus

  3. Enter your Tenant Name. For example, test.onmicrosoft.com.
  4. Paste the Application ID and Application Object ID values copied in Step 29 of the previous section into the respective fields.
  5. For the Application Secret Key, paste the value copied in Step 26 of the previous section.
  6. In the Application Certificate field, click Browse and select the .PFX file generated in the prerequisites section. In the Certificate Password field, enter the password used in the prerequisites section.
  7. Enter the Service account name and Password of the user service account you created for RecoveryManager Plus.
  8. Click Add Tenant.
  9. You should now see that AAD Application Status is successful for the account you configured.
Note: If your service account is MFA-enabled, please check this section.

Copyright © 2023, ZOHO Corp. All Rights Reserved.