Exporting a dashboard
Analytics Plus offers exporting and emailing capabilities, which enable you to view the dashboard when you have to work offline and email them. You can export a dashboard in the following formats.
Export as PPT
Export as HTML
Follow the steps below to export your dashboard as HTML files:
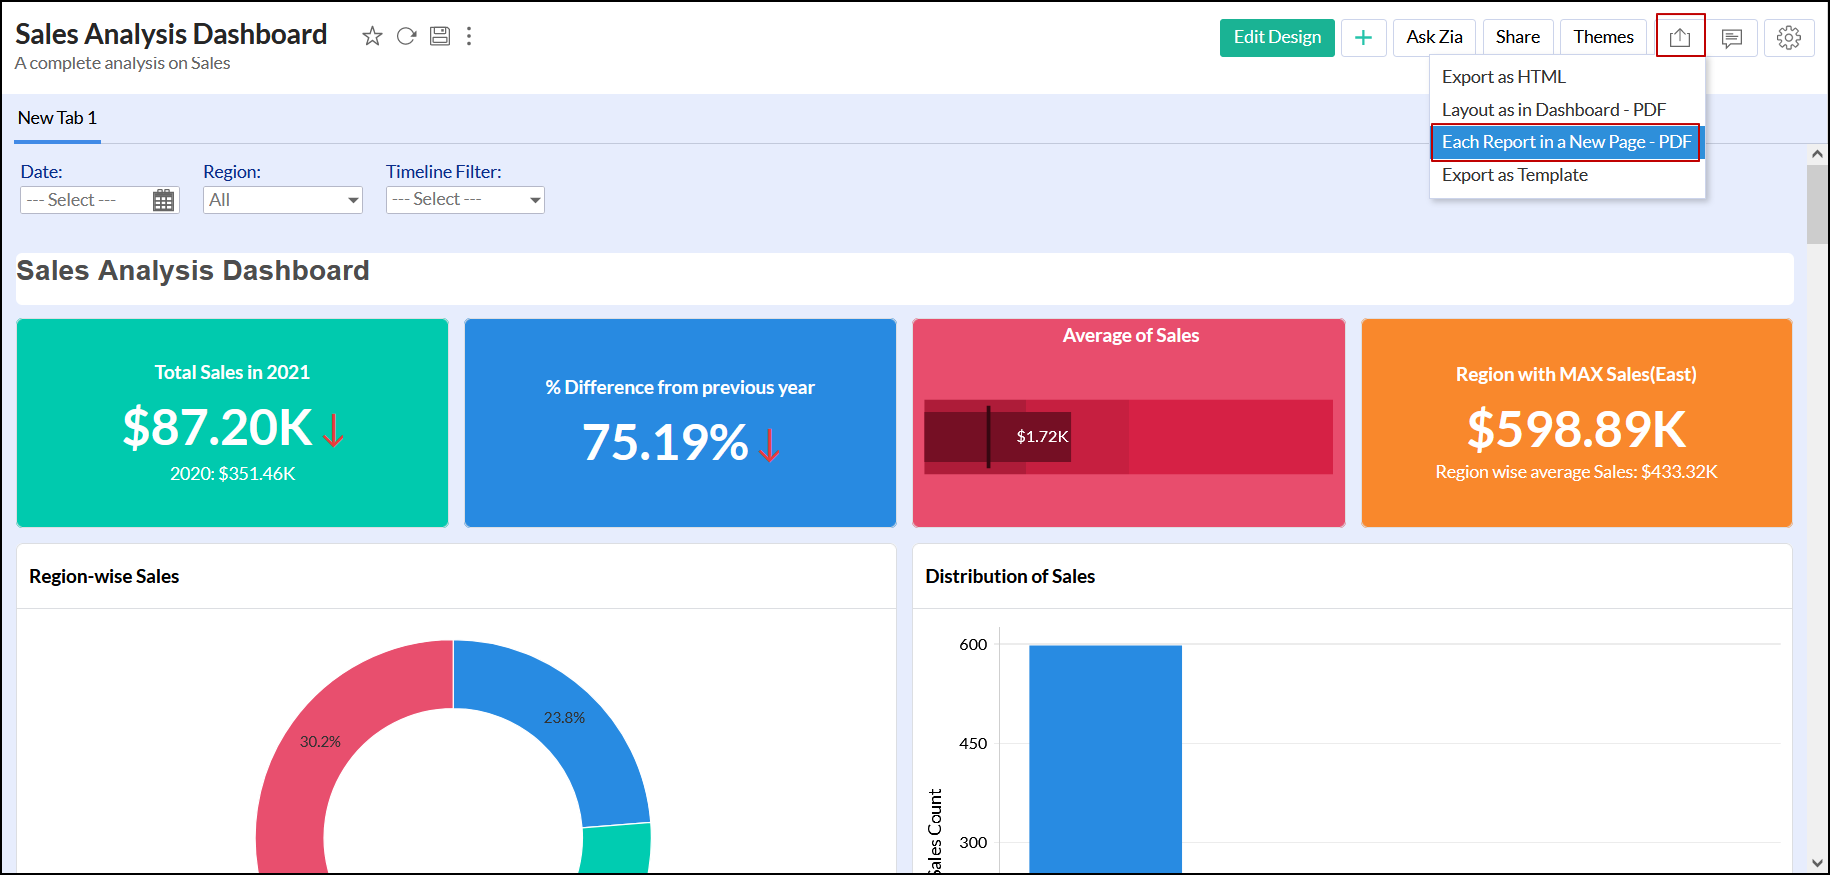
Click the Export icon and select Export as HTML.
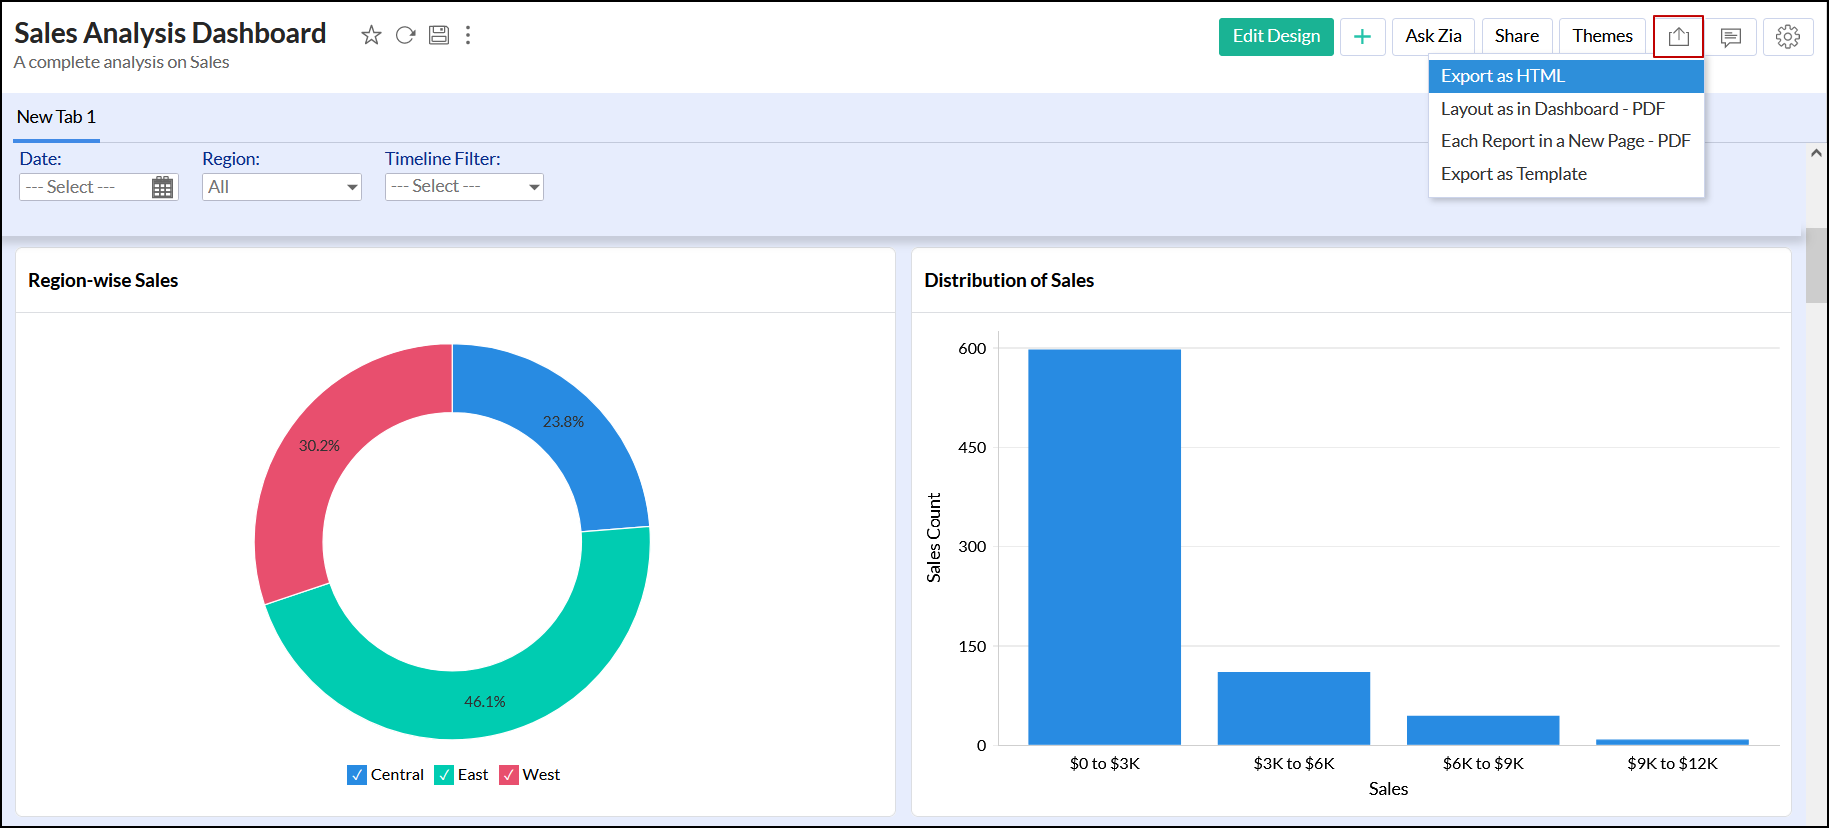
This opens the Export as HTML dialog.
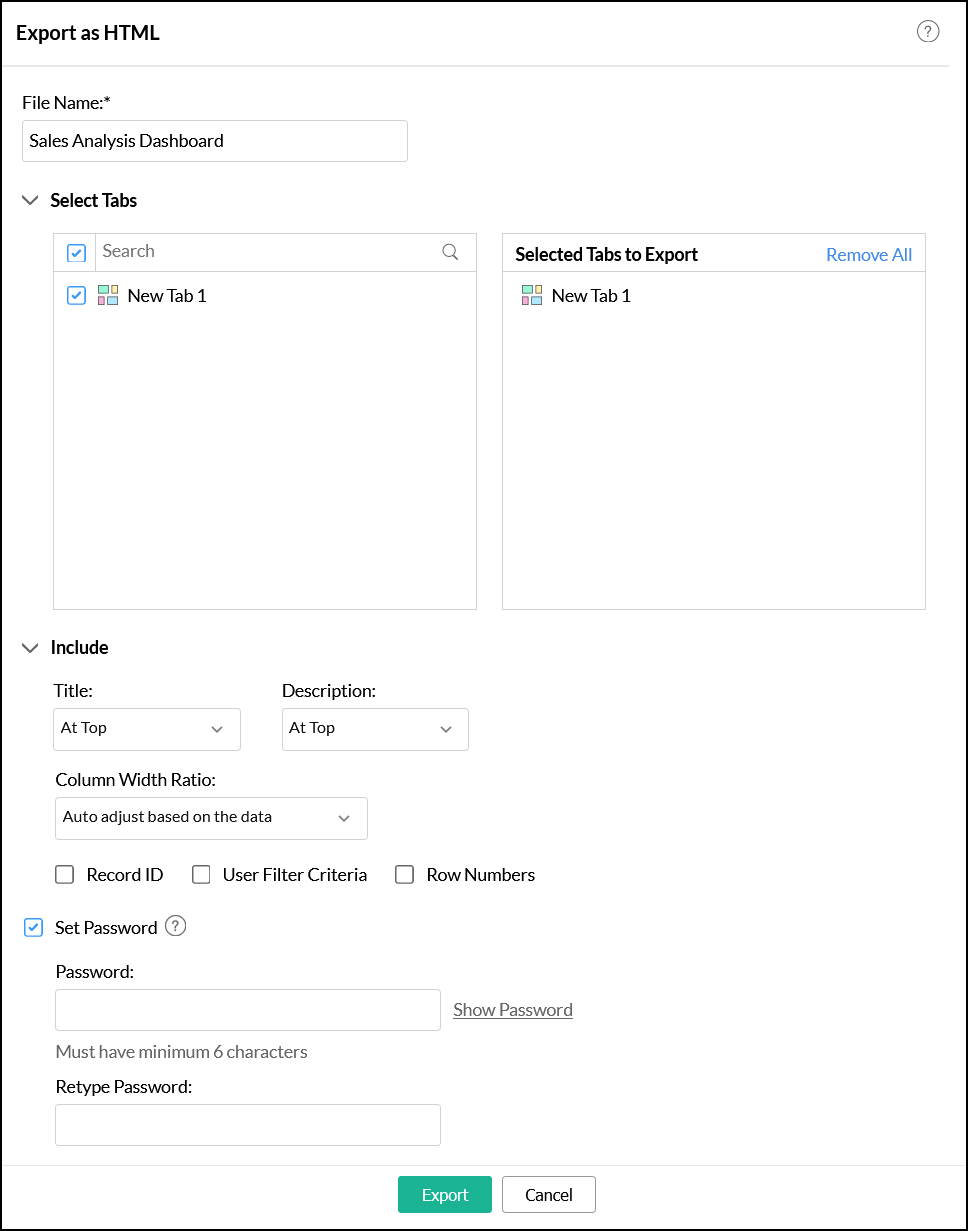
- Specify a name for the HTML file in the File Name field.
- From the Select Tabs section, select the desired tabs of your dashboard to be exported.
- Select the required position to display the title and description from the Include section. The possible options to customize the layout of title and description are: At Top, At Bottom and None (without title or description correspondingly).
- The Column Width Ratio allows you to make the column width uniform across the table styled reports in the dashboard. Choose any one of the below options from the drop down:
- Proportionate width as in the report
- Equal width for all columns
- Auto adjust based on the data
- Select the Record ID checkbox to include the record ID in the exported file. This is applicable only for tables and tabular views.
- Select the User Filter Criteria checkbox to add a label for any user filter applied.
- Select the Row Numbers checkbox to include row numbers in the exported HTML file.
- Select the Set Password checkbox to protect your exported file with passwords. The specified password will have to be shared with all intended recipients separately, as Analytics Plus does not offer options to share your password through the application interface.
- Click Export to export your dashboard as an HTML file.
Export as PDF
ManageEngine Analytics Plus allows you to export the dashboard as PDF in two different layouts:
Layout as in Dashboard
This option allows you to export the dashboard in the same layout as arranged in the dashboard.
Note: This PDF export option is optimized for dashboards containing charts and KPI widgets. Export may fail if it contains table styled reports, especially with large amounts of data.
Follow the steps below to export with Layout as in Dashboard:
Click the Export icon and select Layout as in Dashboard - PDF.
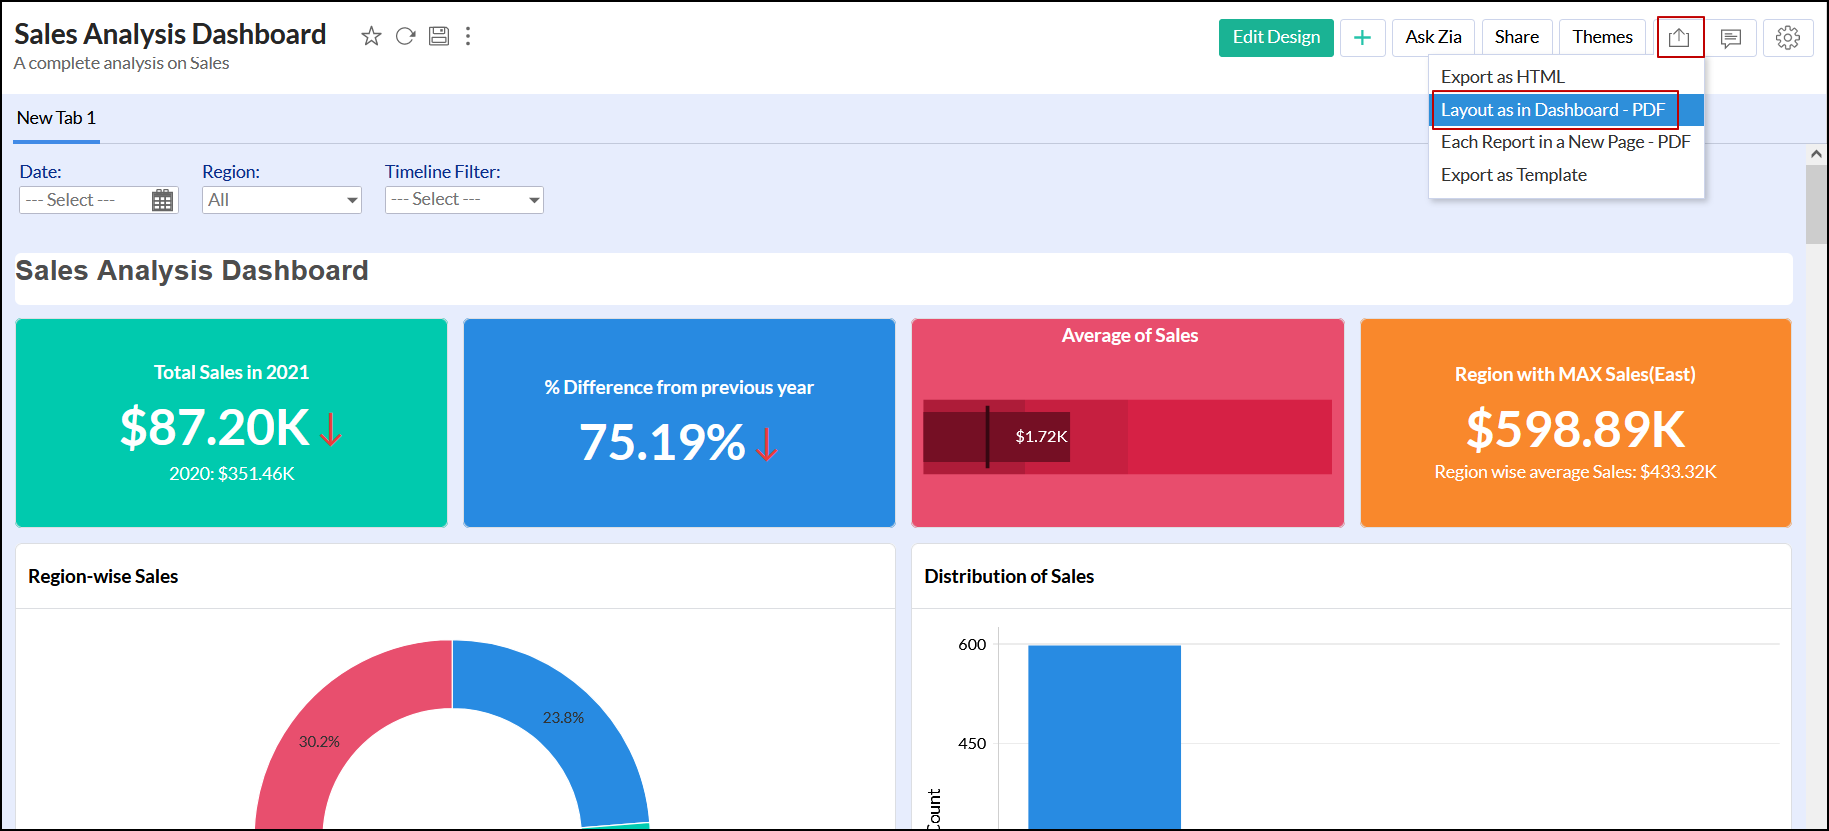
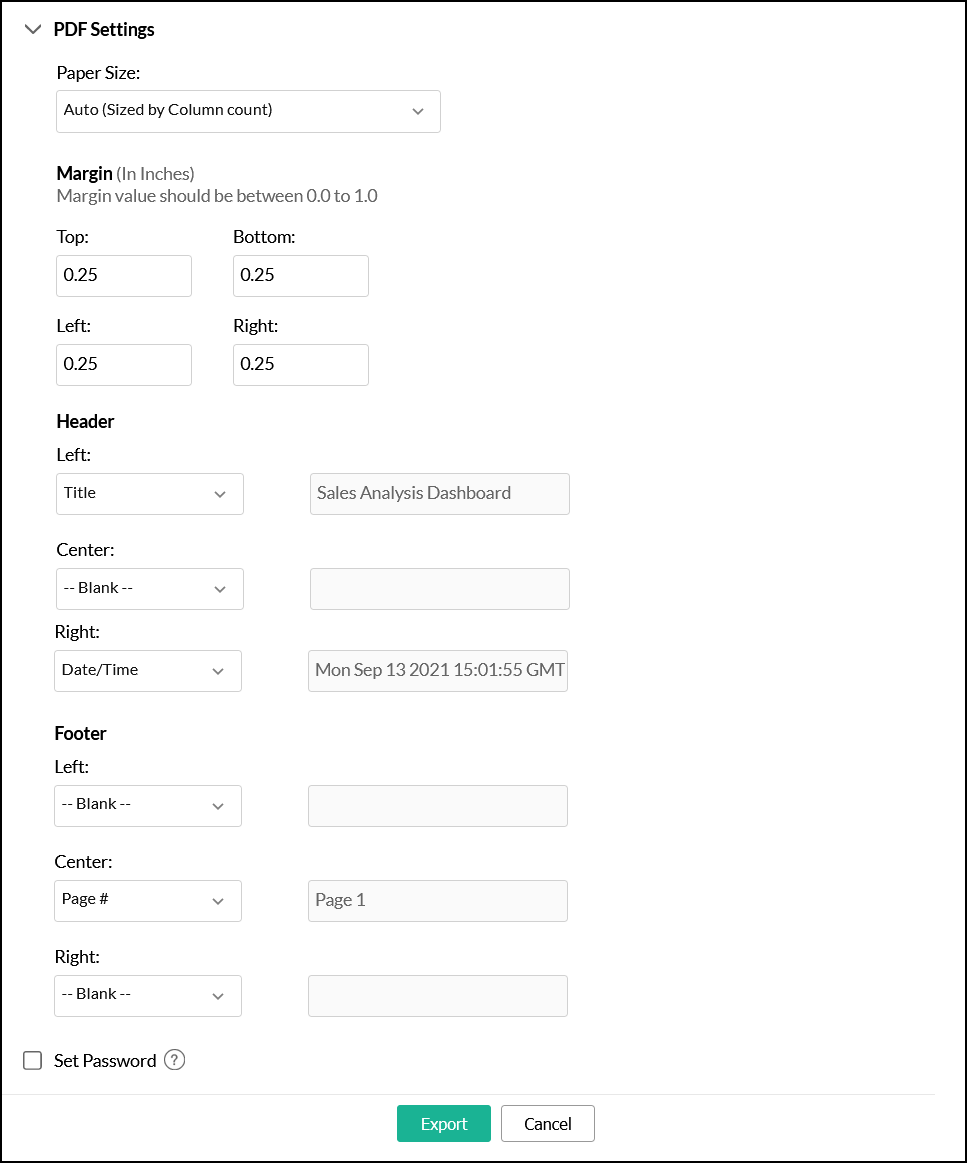
This opens the Export as PDF settings page as shown below.
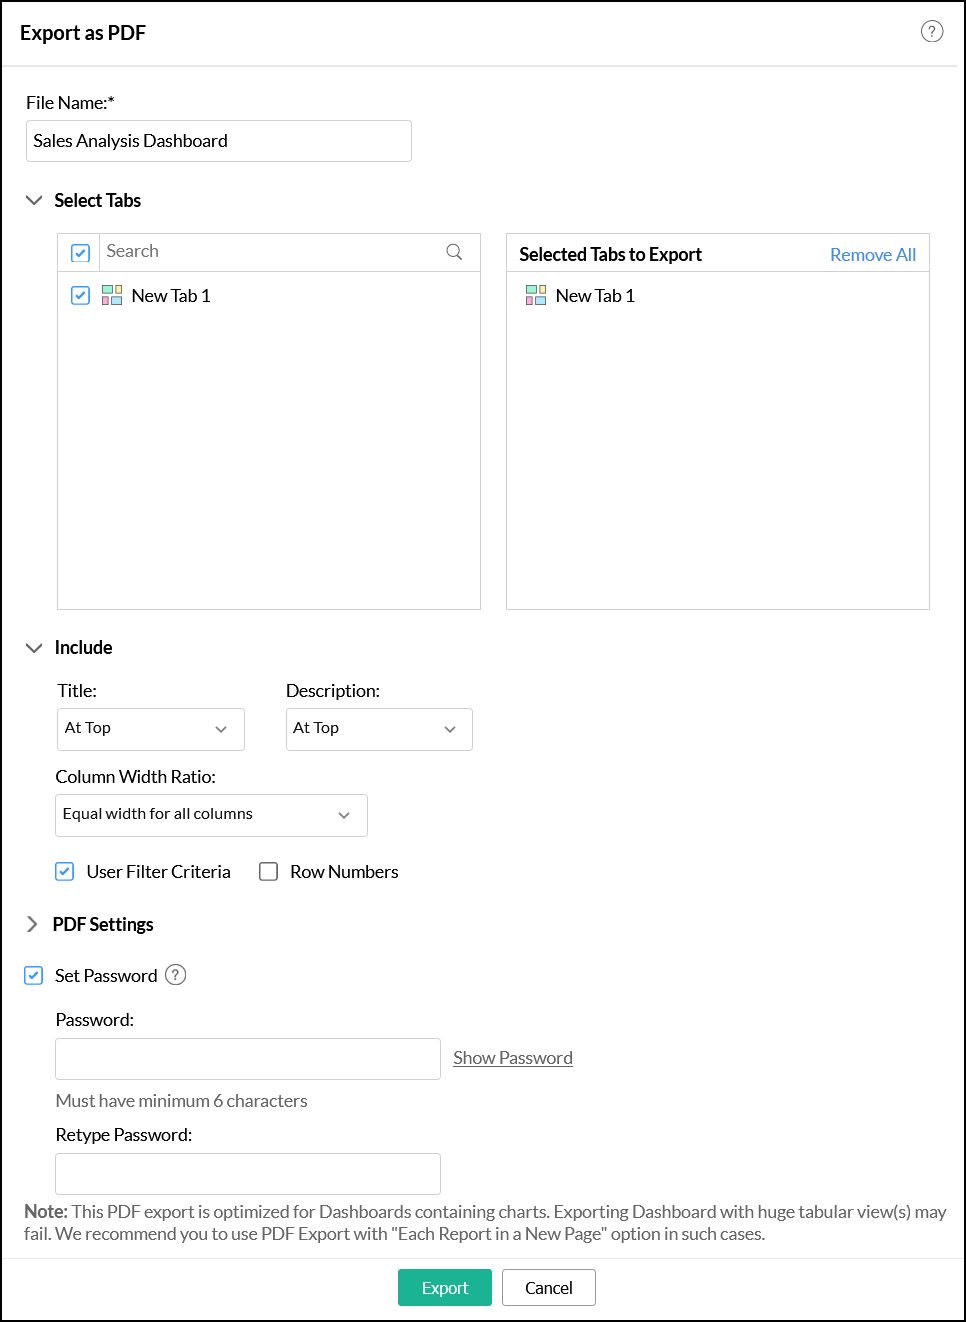
- Specify a name for the PDF file in the File Name field.
- From the Select Tabs, select the desired tabs of your dashboard to be exported.
- Select the required position to display the title and description from the Include section. The possible options to customize the layout of title and description are: At Top, At Bottom and None (without title or description correspondingly).
- The Column Width Ratio allows you to make the column width uniform across the table styled reports in the dashboard. Choose any one of the below options from the drop down:
- Proportionate width as in the report
- Equal width for all columns
- Select the User Filter Criteria checkbox to add a label for any user filter applied.
- Select the Row Numbers checkbox to include row numbers in the exported PDF file.
The following options are available under the PDF Settings section:
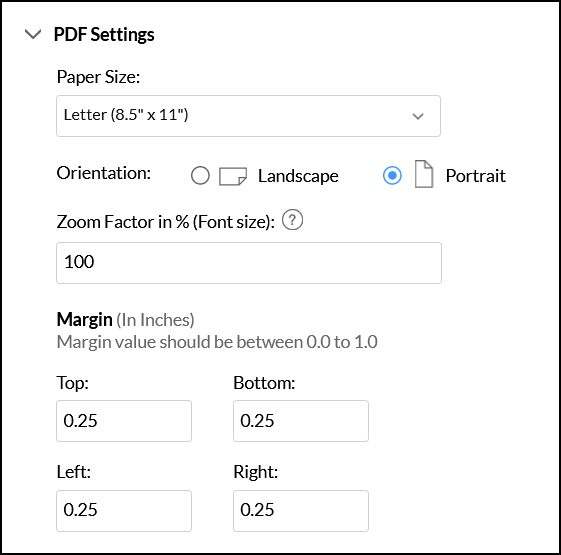
- Choose the desired paper size from the Paper Size dropdown.
- Select the Orientation either Landscape or Portrait.
- Enter your magnifying preference in Zoom Factor in % (Font Size).
- Specify the margins for the exported dashboard file. This value should be between 0.0 to 1.0.
- Select the Set Password checkbox to protect your exported file with passwords. The specified password will have to be shared with all intended recipients separately, as Analytics Plus does not offer options to share your password through the application interface.
- Click Export to export your dashboard as an PDf file with the same layout as arranged in the dashboard.
Each Report in a New Page
This option allows you to export the dashboard in a single column layout displaying each report in a new page in the PDF.
The following are the advantages of exporting a dashboard with each report on a new page:
- Supports exporting dashboard containing tabular views with large data.
- Supports adding a Table of Content.
- Supports adding header and footer.
- Supports customizing the language.
- Supports the export of dashboards with huge amount of data.
- Supports displaying filter criteria applied in the dashboard level and in the reports level.
Follow the steps below to export the dashboard with each report in a new page:
Click the Export icon and select Each Report in a New Page - PDF.
This opens the Export as PDF setting page as shown below.
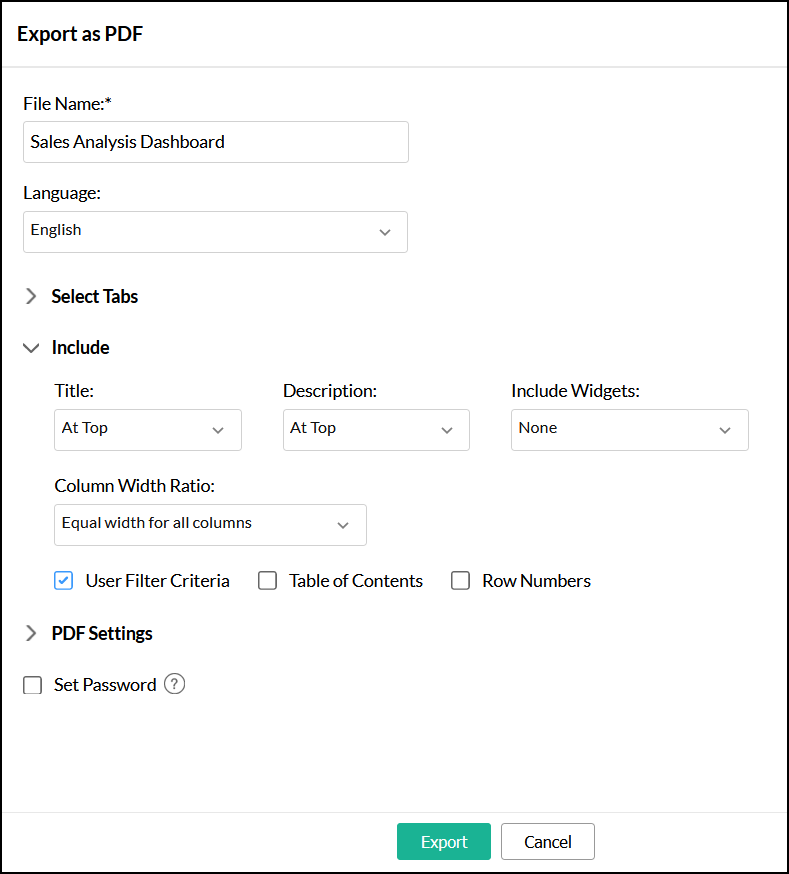
- Specify a name for the PDF file in the File Name field.
- Select the language from the Language drop down.
- Select the desired tabs of your dashboard to be exported from the left column of Select Tabs.
- Select the required position to display the title and description from the Include section. The possible options to customize the layout of title and description are: At Top, At Bottom and None (without title or description correspondingly).
- Specify how to add KPI widgets in exported file using the Include Widgets section. The available options are:
- None: This option allows you to exclude widgets from the exported file.
- Each in a New Page: This option allows you to export each widget in a new page.
- Associate to Nearest Report: This option allows you to display the widget next to the nearest report.
- The Column Width Ratio section allows you to customize the column width for tabular views in the dashboard. You can choose to set an equal width for all columns, or to export the views with a width proportionate to that specified in the report.
- Select the User Filter Criteria checkbox to add a label for any user filter present in the dashboard.
- Select the Table of Contents checkbox to include a table of content of your dashboard in the exported PDF file.
- Select the Row Numbers checkbox to include row numbers in the exported PDF file.
The following options are available under the PDF Settings section:
- Choose the desired paper size from the Paper Size dropdown.
- Specify the margins for the exported dashboard file. This value should be between 0.0 to 1.0.
- The Header and Footer sections allow you to add a header and footer to your exported file. You can choose to add them to the left, right, or center of the exported file. The following information can be added:
- Blank: This option allows you to display an empty header or footer.
- Title: This option allows you to display the title of the file.
- Date/Time: This option allows you to display the date and time of export.
- Page #: This option allows you to display the page number in the exported file.
- Page # of #: This option allows you to display the page number out of the total number of pages present in the exported file.
- Custom Text: You can use this option to enter the required custom header or footer.
- Select the Set Password checkbox to protect your exported file with passwords. The specified password has to be shared with all intended recipients separately, as Analytics Plus does not offer options to share your password through the application interface.
- Click Export to export your dashboard in a single column layout displaying each report in a new page in the PDF.
Export as Template
Analytics Plus allows you to export your dashboard as a template file. This template file can be imported into a different workspace or installation. Click here to learn more about exporting dashboard as template.
Click the Export icon and select Export as Template.
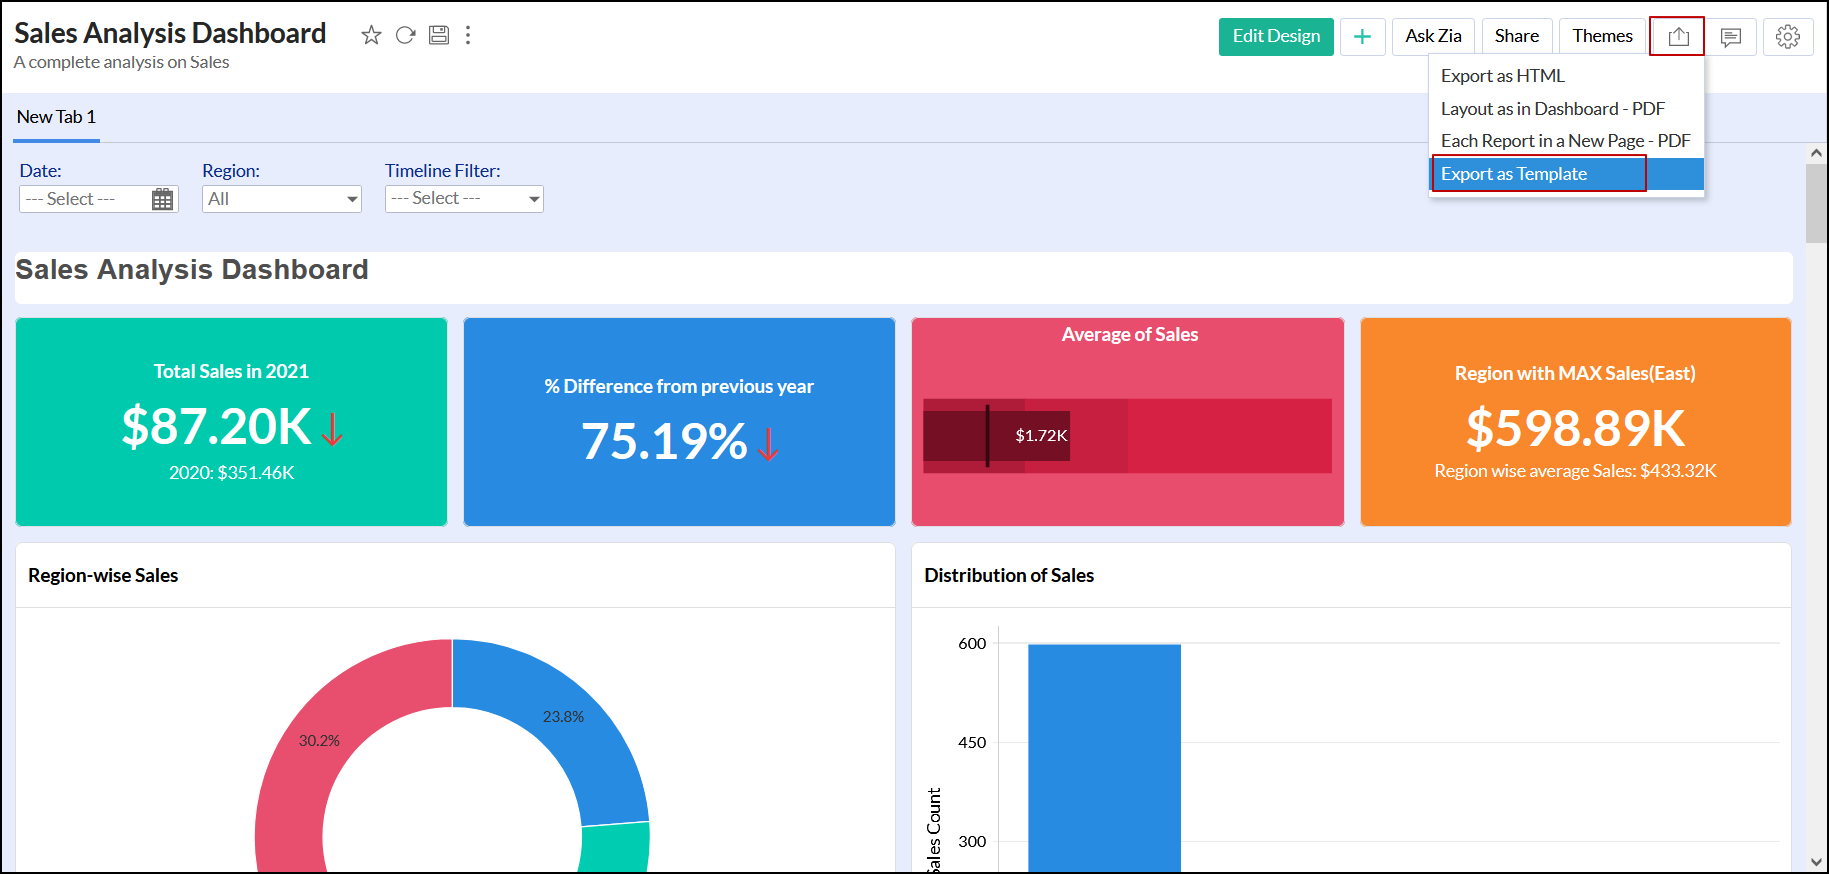
- Provide a name for the template file in the File Name field.
- Click Export to export your dashboard as a template file.
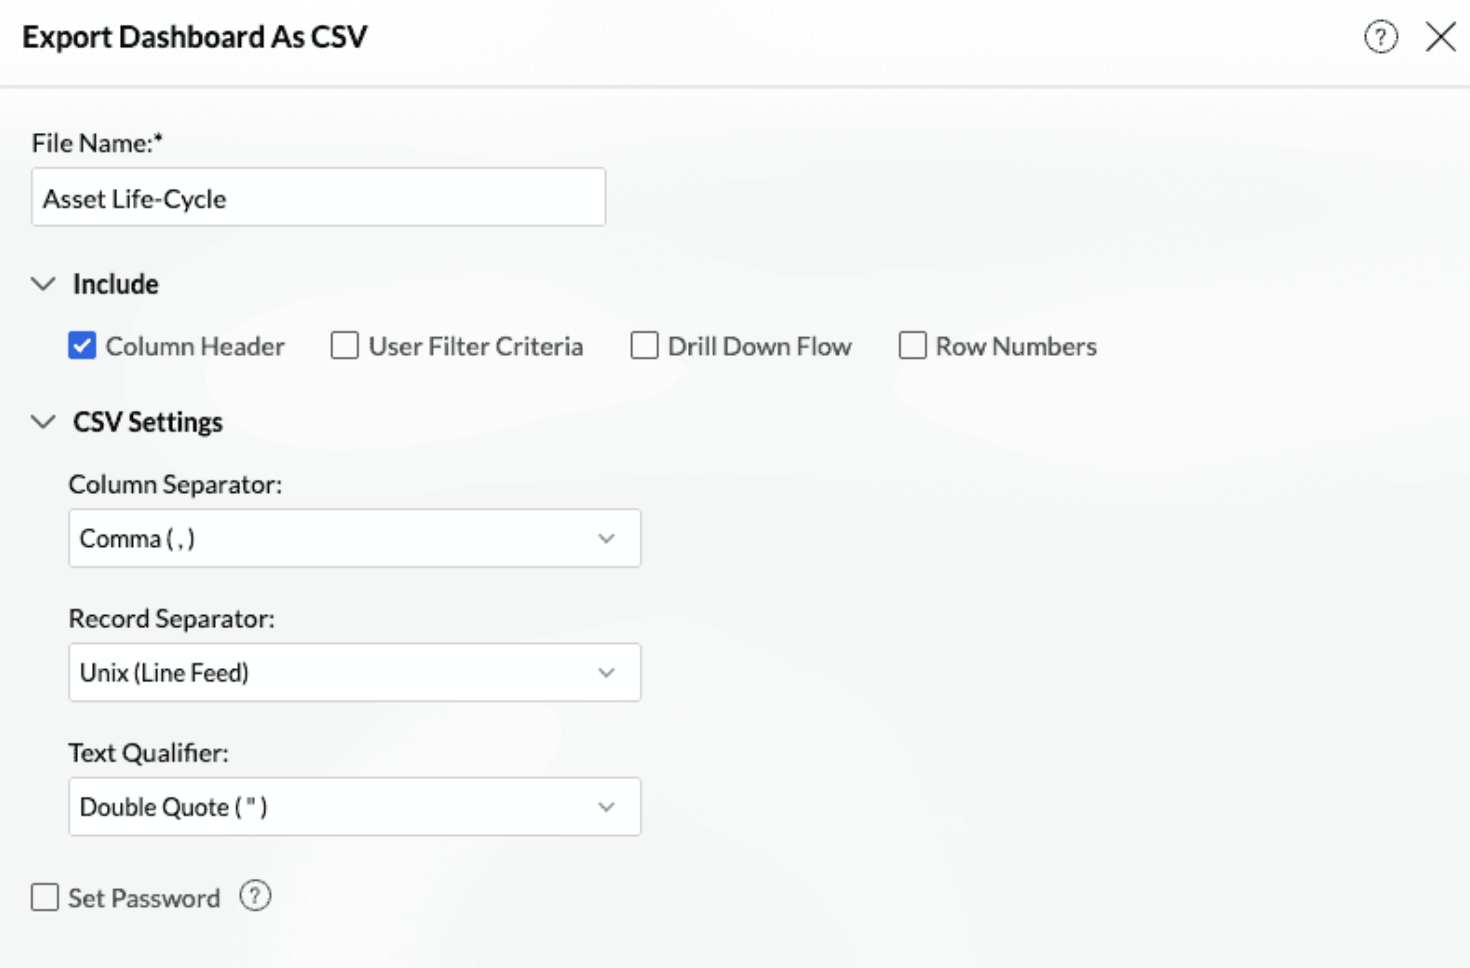
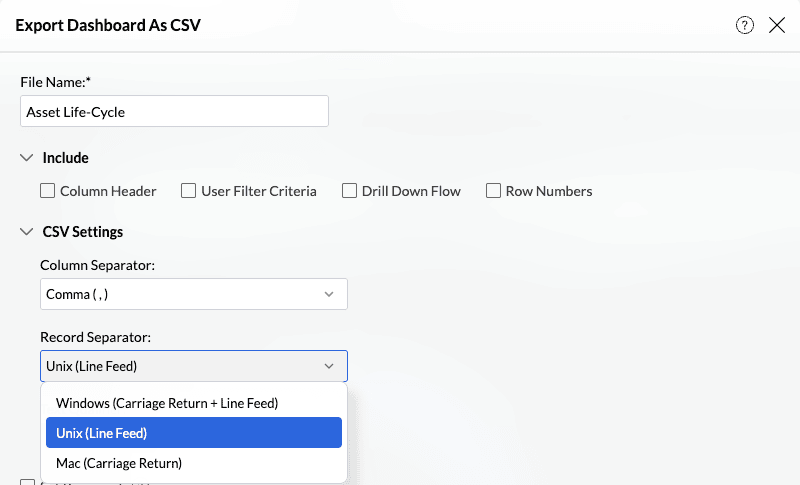
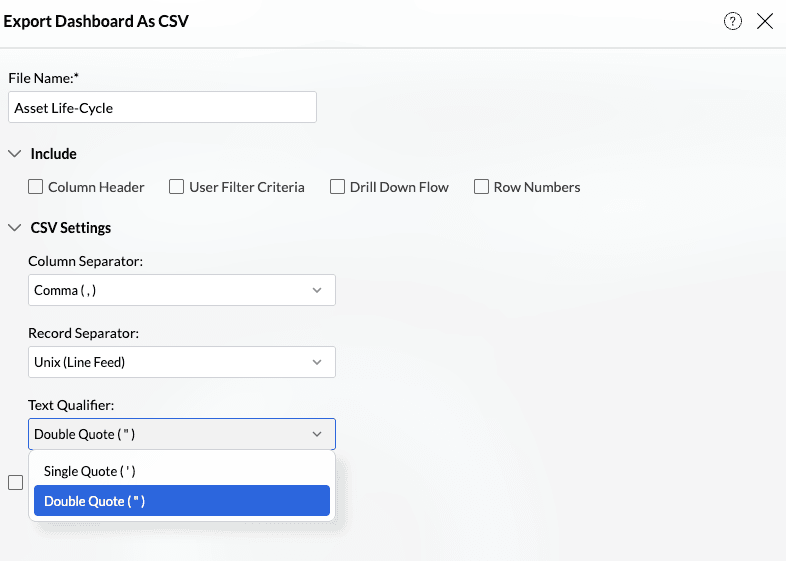
Export as CSV:
Follow the steps given below to export a dashboard as CSV.
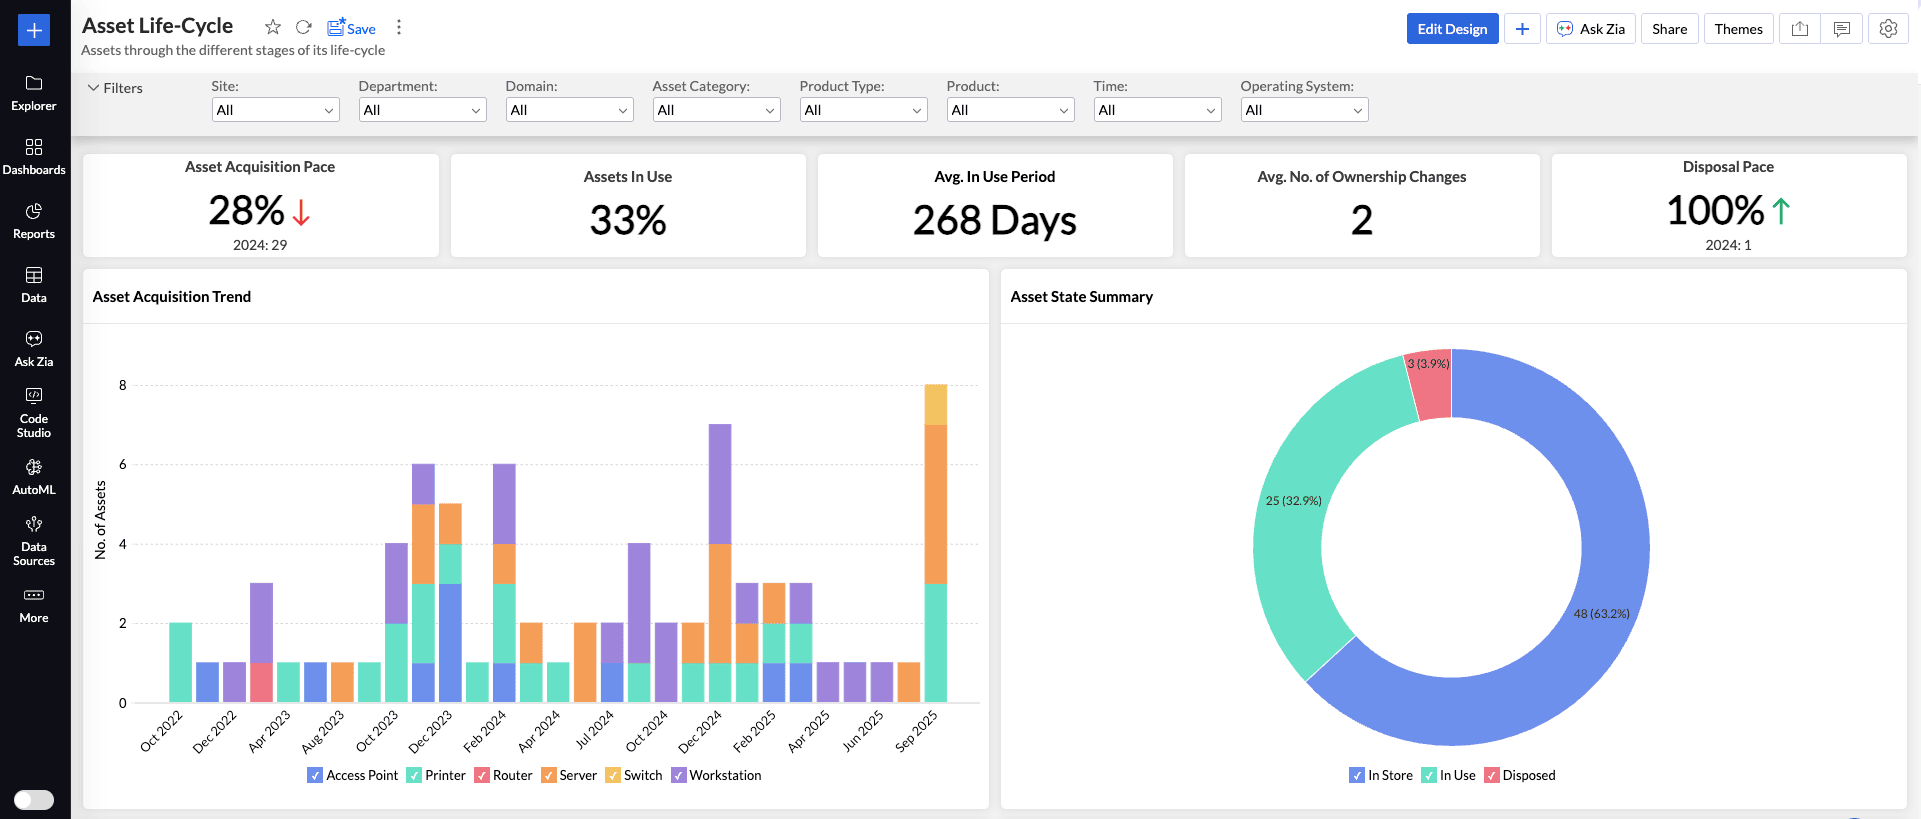
Click the Export icon and then select Export as CSV.
The Export As CSV : Settings page will open.
File Name — Enter the name of the table to be created in Analytics Plus. By default, the file name is used.
Column Header — Includes the first row of your CSV file as column headers in the imported table.
User Filter Criteria — Imports saved user filters along with the CSV data.
Drill Down Flow — Retains drill-down hierarchies defined in the source file.
Row Numbers — Adds a sequential row number column during import.
Column Separator — Defines the character used to separate values in the CSV (e.g., comma, semicolon, tab).
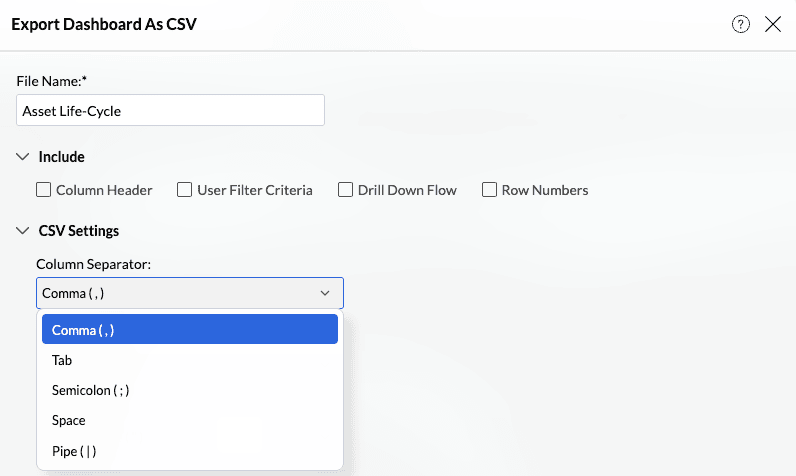
Record Separator — Specifies how rows are separated (e.g., Unix Line Feed \n or Windows Carriage Return + Line Feed \r\n).
Text Qualifier — Identifies the character enclosing text values (e.g., double quotes " " or single quotes ' ').
Set Password — Allows you to import data from password-protected CSV files.