Device Activation Settings
When enrolling new or factory-reset devices through Apple Business Manager (ABM), the settings that have been configured in the MDM console are automatically applied as soon as the device is activated. This automation significantly simplifies the device setup process, allowing for a quick and efficient rollout of devices across the organization. By ensuring that each device is provisioned according to your organization's specific policies and requirements, this feature not only saves time but also enhances compliance and security. As a result, IT administrators can ensure a consistent experience for users while effectively managing device configurations and settings from a centralized platform.

Below is a detailed breakdown of the different sections within the Device Activation Settings:
Basic Settings
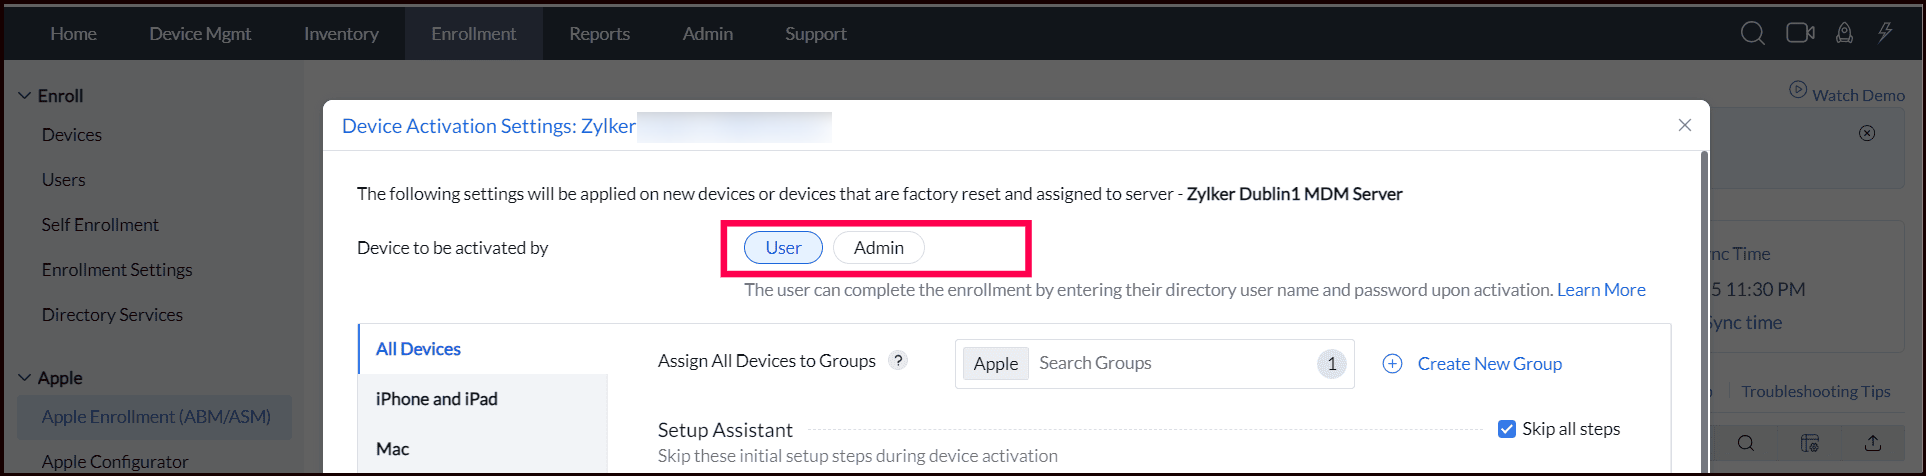
- Device to be Activated by User or Admin: Choose whether the device activation process will be performed by the end-user or by an administrator. If the administrator is selected, the admin will need to manually assign users to devices from the MDM server, ensuring proper user-device association before the device is deployed. If the end-user is selected, they will be prompted to enter credentials, such as their Active Directory username and password, during the activation process. Refer the Configure Device Activation for Userssections to learn more.
Note: A directory service must be integrated with MDM if you choose user activation.
- Assign to Group: Automatically assign the device to a specific group during activation. This can help in categorizing devices based on their role, location, or department, allowing for the automatic deployment of apps, configurations, and policies tailored to that group.
Note: To distribute specific profiles and apps to a group of devices, make sure to assign all devices registered with an MDM server in ABM to a group in the MDM. Then, distribute the required profiles and apps to that group.
Setup Assistant:
Configure the steps that users will encounter during the initial setup of their devices. You can customize the setup experience based on the type of device being enrolled. Admin can skip specific steps or choose "Skip All Steps" to ensure the device is ready to use immediately upon activation. The available configurations include:
- All Devices: This section applies universal settings to all devices, such as skipping specific steps like Siri, iMessage, FaceTime, or other configurations that you may not want users to set up initially.
- iPhone and iPad: Customize the Setup Assistant experience for iPhones and iPads. For example, disable setup screens for specific services like Apple ID, Touch ID/Face ID, or Apple Pay to simplify the user onboarding process.
- Mac: Define settings specific to macOS devices. You can skip initial setup steps, such as the iCloud login or enabling Siri, to ensure that Macs are ready for use as quickly as possible.
- Apple TV: Configure Apple TV devices by bypassing unnecessary setup screens like Siri, location services, or single sign-on.
Note: skipping "Sign in with Apple ID and iCloud" will prevent users from restoring devices via iTunes and iCloud.
| CONFIGURATION | DESCRIPTION |
|---|---|
| Sign in with Apple ID and iCloud | Select to skip Apple ID and iCloud sign in by the user during setup. This does not restrict the user from signing in once the device setup is completed. |
| Touch ID Setup | Select to skip Touch ID configuration during setup. The user can, later on, configure the Touch ID after completing the device setup. |
| Diagnostics | Select to omit a user prompt to send diagnostic data to Apple during device setup. |
| Display Tone | Select to skip the Display Tone setup assistant screen during device setup. |
| Location Services | Select to disable Location Services during setup. If disabled, Location Services are turned off. The user can modify the location settings after completing the device setup. |
| Passcode | Select to prevent users from setting up a Passcode during the setup assistant process. This can be skipped if a passcode profile is distributed through MDM. |
| Payment | Select to prevent users from setting up an Apple Pay account in the setup assistant. This does not restrict the user from configuring it once the device setup is completed. |
| Privacy | Select to omit the Privacy screen during the setup assistant process. |
| Restore backup from old device | Select to restrict user from restoring iCloud / iTunes backup to device. |
| Terms and Conditions | Select to disable the Terms and Conditions step during device setup. If disabled, the Terms and Conditions are accepted by default. |
| Siri | Select to restrict the user from configuring Siri during device setup. If restricted, Siri is turned off. This does not restrict the user from configuring it once the device setup is completed. |
| Zoom | Select to omit the Zoom functionality step during device setup. |
| CONFIGURATION | DESCRIPTION |
|---|---|
| Restore from Android device | Select to prevent users from restoring back up from an Android device. |
| Keyboard Selection | Select to prevent users from choosing a keyboard type during device setup. |
| App Store pane | Select to prevent the App Store setup from appearing during device setup. |
| Home Button Sensitivity | Select to allow users to enroll devices without configuring the Home button sensitivity during setup. |
| iMessage and FaceTime | Select to skip the iMessage and FaceTime prompt during the setup assistant process. This does not restrict the user from configuring the same once the device setup is completed. |
| New feature highlights | Select to skip on-boarding informational screens for user education during the setup assistant process (“Cover Sheet, Multitasking & Control Center”, for example). |
| Screen Time | Select to prevent informing users about Screen Time during device setup. |
| Mandatory software updates | Select to skip the Mandatory software update screen during the setup assistant process. |
| Watch Migration | Select to prevent users from viewing options for Watch Migration during the device setup. |
| Appearance | Select to skip the Choose your Look screen during iOS setup. |
| CONFIGURATION | DESCRIPTION |
|---|---|
| FileVault | Select to prevent users from configuring a FileVault account during device setup. It is recommended to configure and distribute a FileVault Encryption profile through MDM. |
| iCloud diagnostics | Select to omit a user prompt to send diagnostics to iCloud during device setup. |
| iCloud storage | Select to skip iCloud Documents and Desktop screen during device setup. |
| Apple Registration | Select to restrict user from registering the device with Apple during setup. |
| App Store pane | Select to prevent App Store setup from appearing during the device setup. |
| Unlock with Apple Watch | Select to restrict users from unlocking devices with Apple Watch |
| CONFIGURATION | DESCRIPTION |
|---|---|
| Screensaver | Select to allow users to enroll a tvOS device without configuring a screensaver. This does not restrict the user from configuring the same once the device setup is completed. |
| Tap to Setup | Select to skip the option of setting up Apple TV using an associated iOS device (user needs to enter the account information and setting choices separately). |
| Home screen layout sync | Select to prevent users from toggling the TV home screen layout during device setup. |
| TV Provider SignIn | Select to prevent users from signing in to a TV provider during setup. |
| Where is this Apple TV? Screen | Select to omit the Where is this Apple TV step on tvOS devices during setup. |
Shared Devices:
For organizations that utilize shared devices, such as shared iPads or Macs in educational or corporate environments, you can configure settings to optimize the shared usage experience:
User-Controlled: Determine if the device will allow multiple user accounts. This is useful in environments where devices are shared among several users.
Maximum Number of User Accounts: Set a limit on the number of user accounts that can be created on each shared device to manage storage and ensure optimal performance.
Storage Limit per User: Allocate a specific amount of storage space per user on shared devices to prevent a single user from consuming excessive storage resources.
Mac Account Settings
To configure user accounts on devices enrolling through Automated Device Enrollment (ABM/ASM), check the option Create Mac Accounts under the Mac subsection within the Device Activation Settings section.
Here, you will see options to set up Mac accounts during the initial setup of the device:
1.Managed Administrator Account
Configure this section to create a common service account on all your macOS devices enrolling through Automated Device Enrollment (ABM/ASM). This account will have administrator privileges by default, allowing the sysadmin to install software, make changes to system settings, and manage other user accounts.
- Full Name: Enter the full name of the user or administrator for this account.
- Account Name: This is the short name that will be used for the user account, often used as the username.
- Password: Enter a secure password that will be required to log in to the account.
- Hide from Login Window: You can choose to hide this account from appearing in the login window by selecting "Yes." If "No" is selected, the account will be visible at the login screen.
2. Local User Account:
When you enable the "Local user account" option, it allows the creation of a local user account during the Mac device setup process. The account is configured through the Setup Assistant, guiding the user to complete the setup based on the predefined settings.
- Admin Account: If this option is selected, the additional account created will have administrative privileges. An administrator account can make system-wide changes, install software, and manage other user accounts.
- Standard Account: Selecting this option will create a standard user account with limited permissions. A standard account can perform most tasks like using applications and saving files but cannot modify system settings or install software.
Full Name:
- This field allows you to define the full name for the additional account.
You can also use dynamic variables such as %username% to define the pattern for the FullName, though using dynamic variables is not mandatory.
Account Name:
- You can use dynamic Variables like %username% and %organization_name% to create unique patterns for the Account name . For instance, %firstname% and %organization_name% can generate names like "John's ABC Corp."
- Another example is %devicenumber%, which adds a sequential number to device names (e.g., "iPhone 1", "iPhone 2") during enrollment for unique identification. For more information on Dynamic Variables, refer to this guide.
ManageEngine MDM automatically uses the configured naming pattern to populate account details, ensuring that the username is unique and aligned with the user assigned to the device.
- Note: To use dynamic variable like %username% populating the Full Name and Account Name fields, ensure that either Device Activated by is set to User or the user is assigned prior to initiating device enrollment. This allows the system to fetch the necessary user details from Active Directory (AD) during the enrollment process.
Lock Account details:
- If "Lock Account details" is set to Yes, it prevents the user from editing the account.
Local user account creation in Mac will appear as follows:

If "Local account details" is set to "Yes", the "Full Name" and "Account Name" fields will be greyed out and pre-filled. You will only need to enter and verify the password, and optionally provide a password hint, before clicking "Continue" to complete the setup.
Editing Device Activation Settings in MDM
Editing the Device Activation Settings of an existing server in MDM enables administrators to customize how devices are activated during enrollment. These changes will take effect the next time the devices are booted or activated. Follow the steps below to edit an existing server.
- Login to MDM Console and navigate to Enrollment > Apple > Apple Enrollment (ABM/ASM).
- Click on the "Server" tab and select the server you want to modify for user-activated devices.
- Click the ellipsis icon under the Action column next to the server you wish to modify. Select "Modify Settings" from the drop-down.
Configure Device Activation for User
Under Basic Settings, select "User" for the "Device to be activated by" option. This setting ensures that users will activate their devices by entering their credentials (e.g., Active Directory username and password).
Note: This option is not available in the Cloud-MSP version where the Admin method is set as the default.
- Directory Service Integration: If user activation is selected, ensure a directory service is integrated with MDM. Specify the Authentication Mode for Self Enrollment to allow users to activate their devices using their directory credentials.
- Configure Self Enrollment (If Not Set Up Already): Navigate to the Self Enrollment option on the page to configure it. Provide the Authentication Mode and other required settings, and click Save. For more details, refer to the Self Enrollment Guide.
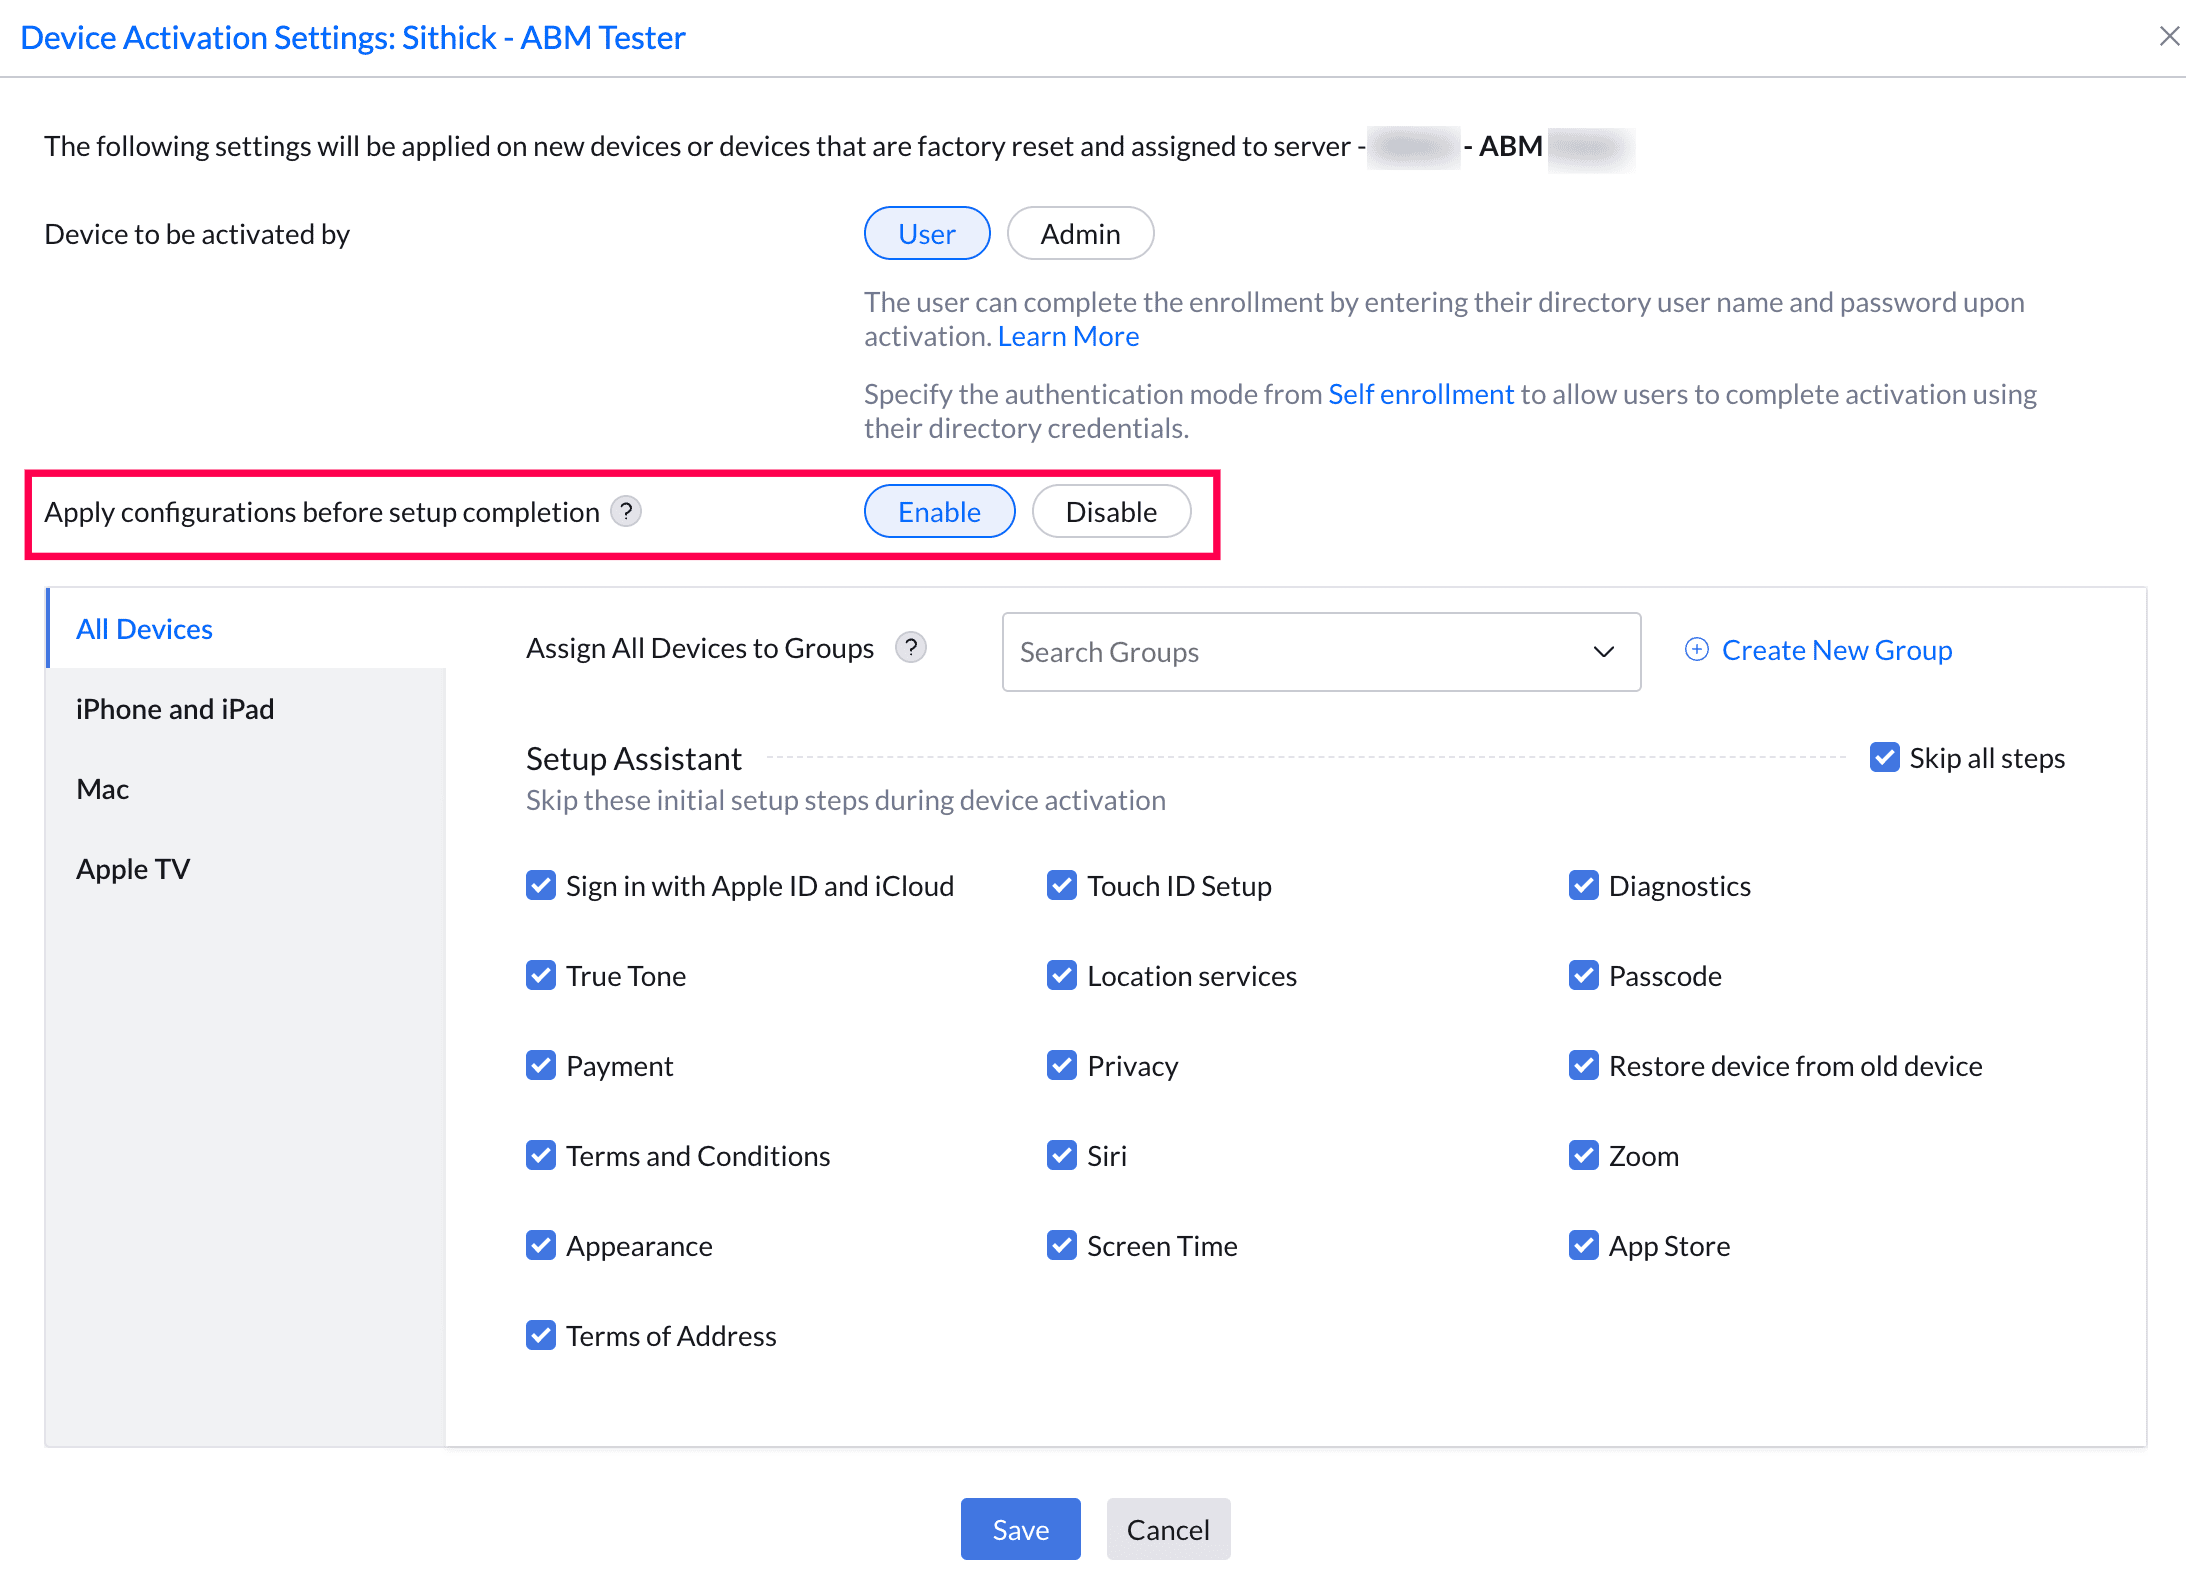
- Apply configurations before setup completion: Apply configurations before setup completion (Await Device Configured) is applicable only when the Device to be activated by setting is configured as User. This configuration can be applied to all the Apple devices(iPhone/iPad/Mac/Apple TV). This option can be enabled on the MDM console->Apple Enrollment (ABM/ASM)->ABM/ASM Servers->Device Activation Settings. Upon enabling, it allows the MDM to apply configurations and policies during the Awaiting Configuration phase of the Automated Device Enrollment (DEP) process provides a locked setup experience, ensuring that all essential configuration profiles, restrictions, and policies are fully deployed before the user gains access to the device. This behaviour is applied once during the out-of-box automated enrollment flow in Setup Assistant.
Note:
1. Apple Native Migrated devices will always remain in the Awaiting Configuration state until a user is assigned, regardless of this setting. This option is available only for the Activation by User enrollment type. The Policies and the Apps applied to the devices are all applied in the configuration stage even when the Apply configurations before setup completion has chosen as Disabled.
2. Enrollment complete in few minutes with the set completion however the installation of the application based on policies and application configurations applied to the device. - Assign to Groups During Activation: Navigate to the Device Activation Settings page. Use the "Assign to Group" option to categorize devices during activation, helping to organize them based on roles, locations, or departments. This feature also enables the automatic deployment of apps, configurations, and policies based on group assignment.
- Save the Changes: Once you have completed the necessary modifications, click "Modify" to save your changes.
What's Next?
Device Activation by Admin and End User
Find out how administrators and end users can activate devices after enrollment by checking out the Device Activation Guide.
Enroll Device through ABM
Learn how to enroll your devices in the MDM system through Apple Business Manager by visiting our ABM/ASM Device Enrollment Help Guide.
Create and Manage Groups
To create groups for effective device management, please navigate to our detailed Creating Groups Guide.