BIOS and Driver Updates
As new hardware components are released, BIOS patches are necessary to ensure that the system can fully support them. This is particularly important for newer CPUs, RAM, and storage devices, where BIOS updates may be required for optimal performance or new features. Some BIOS updates optimize the system's performance by refining hardware initialization, improving power management, or enabling better control over system resources.
Drivers are a critical part of a computer system. As operating systems and software evolve, outdated drivers may no longer be compatible with newer software or operating system versions. Patching drivers ensures continued compatibility, enhancing system functionality and stability. Driver patches introduce new features, optimizations, or better integration with modern hardware, such as supporting newer graphics technologies or offering new functionality for devices.
Hence, it is crucial that you update your system BIOS and drivers regularly. Using Endpoint Central, you can deploy BIOS and Driver Updates via an automated task or manually. Some BIOS are password protected; you can patch them too using Endpoint Central
If you want the BIOS updates and Driver Updates to be managed by Endpoint Central, go to Threats & Patches → Settings → Patch Database Settings.
Under Select the patches that you wish to manage, ensure that Driver and BIOS are selected under Windows, and then click on Save.
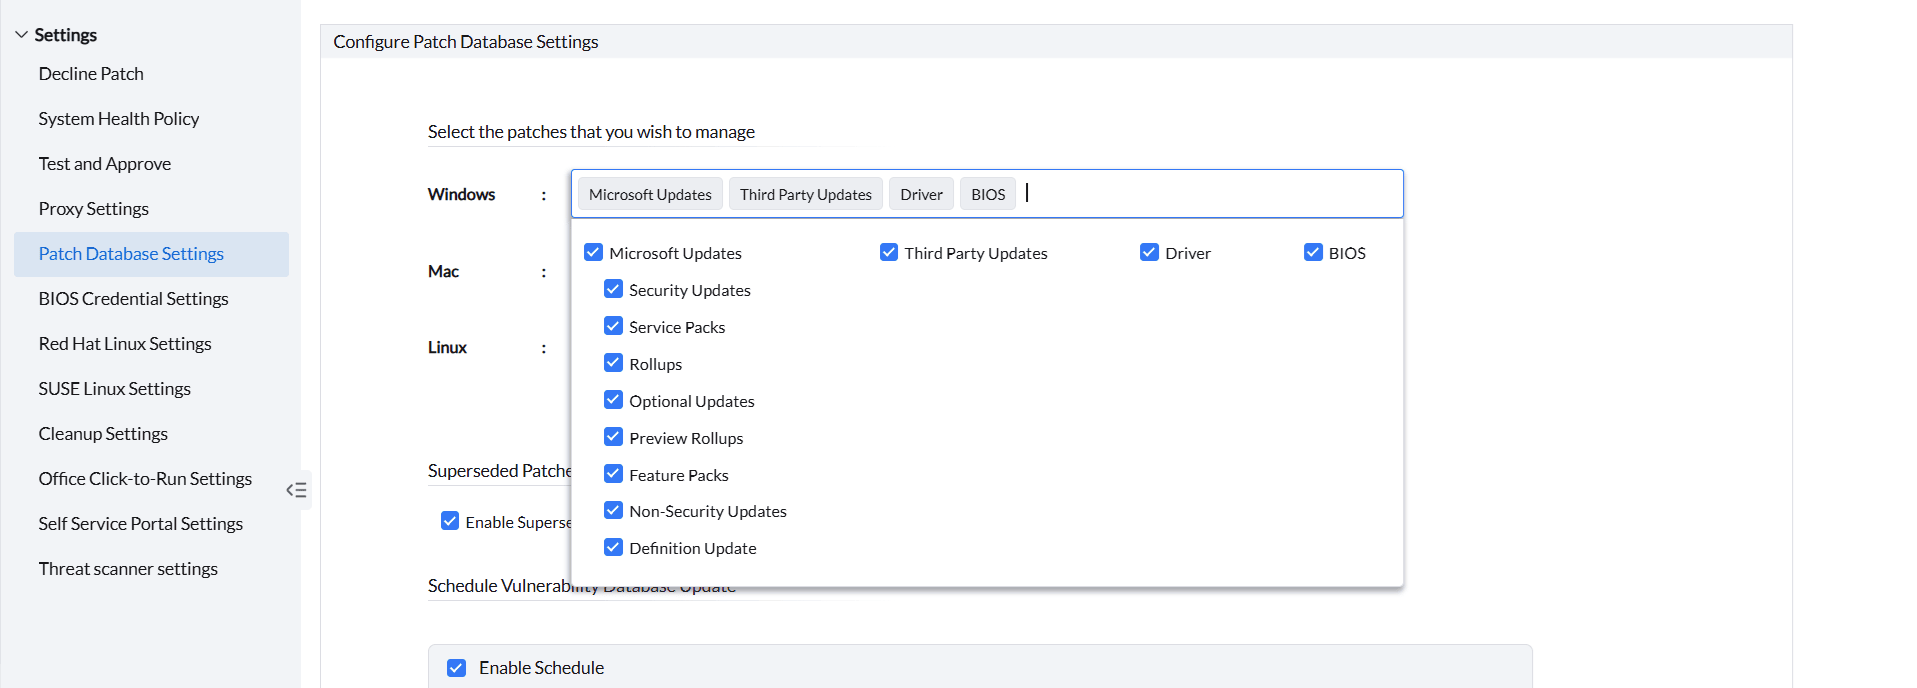
Below is the list of supported devices for Driver and BIOS updates.
Note: BIOS and Driver updates are currently supported in Endpoint Central from build version 10.0.423.
Hardware devices
- Intel High Definition Audio [INTELAUDIO\\FUNC_01&VEN_10EC&DEV_0245]
- Intel High Definition Audio [INTELAUDIO\\FUNC_01&VEN_14F1&DEV_2008]
- Intel High Definition Audio [INTELAUDIO\\FUNC_01&VEN_8086&DEV_280B]
- Realtek High Definition Audio [INTELAUDIO\\FUNC_01&VEN_10EC&DEV_0236]
- Realtek High Definition Audio [INTELAUDIO\\FUNC_01&VEN_10EC&DEV_0295]
- Realtek High Definition Audio[HDAUDIO\\FUNC_01&VEN_10EC&DEV_0663]
- Realtek High Definition Audio[HDAUDIO\\FUNC_01&VEN_10EC&DEV_0665]
- Realtek High Definition Audio[HDAUDIO\\FUNC_01&VEN_10EC&DEV_0288]
- Realtek High Definition Audio[HDAUDIO\\FUNC_01&VEN_10EC&DEV_0275]
- Realtek High Definition Audio[HDAUDIO\\FUNC_01&VEN_10EC&DEV_0273]
- Realtek High Definition Audio[HDAUDIO\\FUNC_01&VEN_10EC&DEV_0255]
- Realtek High Definition Audio[HDAUDIO\\FUNC_01&VEN_10EC&DEV_0233]
- Realtek High Definition Audio[HDAUDIO\\FUNC_01&VEN_10EC&DEV_0270]
- Realtek High Definition Audio[HDAUDIO\\FUNC_01&VEN_10EC&DEV_0668]
- Realtek High Definition Audio[HDAUDIO\\FUNC_01&VEN_10EC&DEV_0235]
- Realtek High Definition Audio[HDAUDIO\\FUNC_01&VEN_10EC&DEV_0861]
- Intel(R) Display Audio [HDAUDIO\\FUNC_01&VEN_8086&DEV_280B]
- Realtek High Definition Audio[HDAUDIO\\FUNC_01&VEN_10EC&DEV_0267]
- Realtek High Definition Audio[HDAUDIO\\FUNC_01&VEN_10EC&DEV_0260]
- Realtek High Definition Audio[HDAUDIO\\FUNC_01&VEN_10EC&DEV_0221]
- Realtek High Definition Audio[HDAUDIO\\FUNC_01&VEN_10EC&DEV_0862]
- Realtek High Definition Audio[HDAUDIO\\FUNC_01&VEN_10EC&DEV_0885]
- Realtek High Definition Audio[HDAUDIO\\FUNC_01&VEN_10EC&DEV_0883]
- Realtek High Definition Audio[HDAUDIO\\FUNC_01&VEN_10EC&DEV_0882]
- Realtek High Definition Audio (With EC)[HDAUDIO\\FUNC_01&VEN_10EC&DEV_0262]
- Intel(R) Display Audio [HDAUDIO\\FUNC_01&VEN_8086&DEV_2882]
- Realtek High Definition Audio[HDAUDIO\\FUNC_01&VEN_10EC&DEV_0282]
- Intel(R) Display Audio [HDAUDIO\\FUNC_01&VEN_8086&DEV_2806]
- Realtek High Definition Audio[HDAUDIO\\FUNC_01&VEN_10EC&DEV_0290]
- Realtek High Definition Audio[HDAUDIO\\FUNC_01&VEN_10EC&DEV_0280]
- Intel(R) Display Audio [HDAUDIO\\FUNC_01&VEN_8086&DEV_2883]
- Realtek High Definition Audio[HDAUDIO\\FUNC_01&VEN_10EC&DEV_0888]
- Intel(R) Display Audio [HDAUDIO\\FUNC_01&VEN_8086&DEV_2809]
- Intel(R) Display Audio [HDAUDIO\\FUNC_01&VEN_8086&DEV_2808]
- Realtek High Definition Audio[HDAUDIO\\FUNC_01&VEN_10EC&DEV_0292]
- Realtek High Definition Audio[HDAUDIO\\FUNC_01&VEN_10EC&DEV_0256]
- Intel(R) Display Audio [HDAUDIO\\FUNC_01&VEN_8086&DEV_2807]
- Realtek High Definition Audio[HDAUDIO\\FUNC_01&VEN_10EC&DEV_0889]
- Realtek High Definition Audio[HDAUDIO\\FUNC_01&VEN_10EC&DEV_0660]
- Realtek High Definition Audio[HDAUDIO\\FUNC_01&VEN_10EC&DEV_0268]
- Realtek High Definition Audio[HDAUDIO\\FUNC_01&VEN_10EC&DEV_0680]
- Realtek High Definition Audio[HDAUDIO\\FUNC_01&VEN_10EC&DEV_0272]
- Realtek High Definition Audio[HDAUDIO\\FUNC_01&VEN_10EC&DEV_0900]
- Realtek High Definition Audio[HDAUDIO\\FUNC_01&VEN_10EC&DEV_0286]
- Realtek High Definition Audio[HDAUDIO\\FUNC_01&VEN_10EC&DEV_0892]
- Realtek High Definition Audio[HDAUDIO\\FUNC_01&VEN_10EC&DEV_0671]
- Realtek High Definition Audio[HDAUDIO\\FUNC_01&VEN_10EC&DEV_0867]
- Intel(R) Display Audio [HDAUDIO\\FUNC_01&VEN_8086&DEV_2805]
- Realtek High Definition Audio[HDAUDIO\\FUNC_01&VEN_10EC&DEV_0283]
- Realtek High Definition Audio[HDAUDIO\\FUNC_01&VEN_10EC&DEV_0298]
- Realtek High Definition Audio[HDAUDIO\\FUNC_01&VEN_10EC&DEV_0269]
- Realtek High Definition Audio[HDAUDIO\\FUNC_01&VEN_10EC&DEV_0274]
- Realtek High Definition Audio[HDAUDIO\\FUNC_01&VEN_10EC&DEV_0662]
- Realtek High Definition Audio[HDAUDIO\\FUNC_01&VEN_10EC&DEV_0293]
- Realtek High Definition Audio[HDAUDIO\\FUNC_01&VEN_10EC&DEV_0295]
- Realtek High Definition Audio [HDAUDIO\\FUNC_01&VEN_10EC&DEV_0880]
- NVIDIA HDMI Audio Device [HDAUDIO\\FUNC_01&VEN_10DE&DEV_0067]
- Realtek High Definition Audio[HDAUDIO\\FUNC_01&VEN_10EC&DEV_0284]
- Realtek High Definition Audio[HDAUDIO\\FUNC_01&VEN_10EC&DEV_0887]
- Realtek High Definition Audio[HDAUDIO\\FUNC_01&VEN_10EC&DEV_0236]
- Sound Blaster Audigy FX[HDAUDIO\\FUNC_01&VEN_10EC&DEV_0899]
- NVIDIA High Definition Audio[HDAUDIO\\FUNC_01&VEN_10DE&DEV_0084]
- NVIDIA High Definition Audio [HDAUDIO\\FUNC_01&VEN_10DE&DEV_0072]
- NVIDIA High Definition Audio[HDAUDIO\\FUNC_01&VEN_10DE&DEV_0071]
- NVIDIA High Definition Audio [HDAUDIO\\FUNC_01&VEN_10DE&DEV_0070]
- NVIDIA High Definition Audio [HDAUDIO\\FUNC_01&VEN_10DE&DEV_0060]
- NVIDIA High Definition Audio [HDAUDIO\\FUNC_01&VEN_10DE&DEV_0051]
- NVIDIA High Definition Audio [HDAUDIO\\FUNC_01&VEN_10DE&DEV_0044]
- NVIDIA High Definition Audio [HDAUDIO\\FUNC_01&VEN_10DE&DEV_0042]
- NVIDIA High Definition Audio [HDAUDIO\\FUNC_01&VEN_10DE&DEV_0041]
- NVIDIA High Definition Audio [HDAUDIO\\FUNC_01&VEN_10DE&DEV_0040]
- NVIDIA High Definition Audio [HDAUDIO\\FUNC_01&VEN_10DE&DEV_001C]
- NVIDIA High Definition Audio [HDAUDIO\\FUNC_01&VEN_10DE&DEV_0018]
- NVIDIA High Definition Audio [HDAUDIO\\FUNC_01&VEN_10DE&DEV_0016]
- NVIDIA High Definition Audio [HDAUDIO\\FUNC_01&VEN_10DE&DEV_0015]
- NVIDIA High Definition Audio [HDAUDIO\\FUNC_01&VEN_10DE&DEV_0014]
- NVIDIA High Definition Audio [HDAUDIO\\FUNC_01&VEN_10DE&DEV_0012]
- NVIDIA High Definition Audio [HDAUDIO\\FUNC_01&VEN_10DE&DEV_0011]
- NVIDIA High Definition Audio [HDAUDIO\\FUNC_01&VEN_10DE&DEV_0010]
|
Configuring password protection for the BIOS in the systems of the network is often the first step of defense in preventing unauthorized access to the system. In addition, this also forbids malicious/unauthorized users from making changes to the system's hardware and software configurations.
However, this added security layer can prove to be a hassle, especially when it comes to deploying BIOS updates across the endpoints in your organization's network. Since these updates require authentication via credentials before installation, this would mean relying on the end-users to input the credentials for a successful installation, thus leading to either productivity breaks or a lesser chance of successful installations.
The Password-protected BIOS Patching functionality lets you deploy updates for the protected BIOS, without having to rely on the end-user for password authentication.
By leveraging this functionality, you can store the pre-configured BIOS passwords of the end-user systems on the Patch Manager Plus server. This ensures that the BIOS updates are deployed and the passwords are automatically fetched and installed from the server storage, for a seamless installation.
Note: Refer to this page to learn how to identify if the BIOS on Dell machines is password-protected.
While this feature is enabled by default in the server, you are required to add and map the credentials before deploying the patches for a successful installation. Here are the steps:
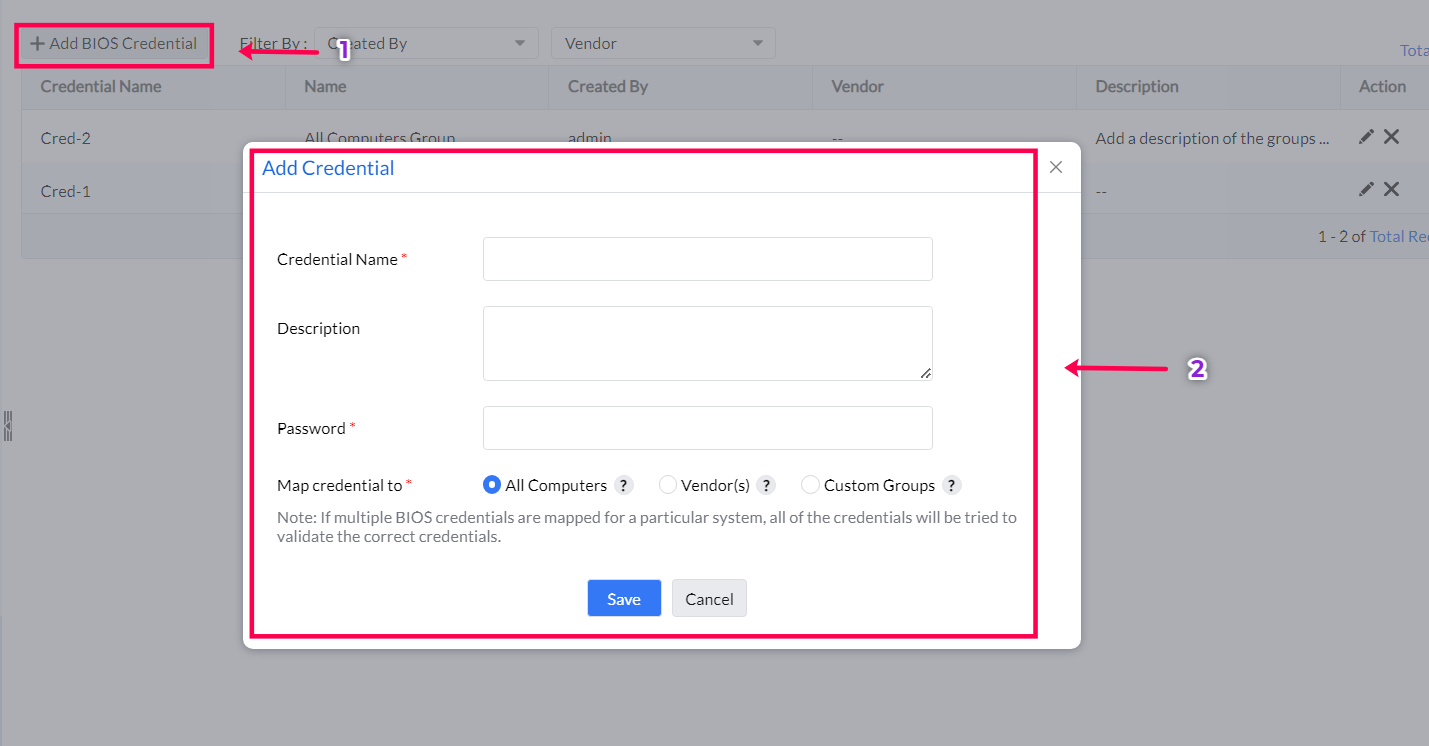
Adding and mapping BIOS credentials
- On the product console, navigate to Admin > BIOS Credential Settings (under Patch Settings)
- Click on Add BIOS Credential
- Enter the Credential Name, Description (optional) and the Password.
- You can map the credentials to any of the following:
- All Computers: Maps the BIOS credentials to all of the computers in the network.
- Vendor(s): Maps the credentials to specific vendor(s) (Dell, HP, and Lenovo).
- Custom Group(s): Maps the credentials to one or more Custom Groups as required.
- Once done, click on Save to add and map the credentials to the required systems.
Deploying BIOS updates
Once the credentials have been mapped, the BIOS updates can be deployed to the systems either via an automated task or manually.
Review the BIOS-Mapping Status of the Systems
You can review and monitor the BIOS-mapping status of all the systems in the network from a single dashboard. To know more about how to review the status of these systems on the console, refer to this page