How to integrate Endpoint Central with Jira?
Introduction
ManageEngine Endpoint Central is a unified endpoint management and security solution that helps enterprises automate every aspect of endpoint management, including patch management, software deployment, remote troubleshooting, IT asset management, and a lot more. It essentially acts as a holistic endpoint management and security solution so that administrators can handle their tasks from a central location in a cohesive and coherent manner.
Jira, on the other hand, as the very term implies, is a service desk software that helps in managing IT requests and tracking work items (issues).
Endpoint Central is ManageEngine's flagship unified endpoint management and security solution that helps organizations in automating the entire spectrum of managing and securing endpoints.
By integrating Jira with Endpoint Central, IT admins can:
- Automate patch management for operating systems (Windows, macOS, Linux), servers, and legacy and third-party applications.
- Simplify and centralize distribution of business-critical applications using over 7,000 pre-built templates.
- Manage IT assets in real time for a granular control over the hardware and software inventory.
- Leverage remote access features such as integrated file transfer and built-in communication channels.
- Troubleshoot multiple monitors, record remote sessions automatically, and collaborate with other technicians.
- Leverage remote power options such as shutdown, lock, Wake-on-LAN, standby, and hibernate.
- Resolve work items (issues) without initiating a remote session using over a dozen system manager tools.
- Automate the generation of audit-ready reports at the click of a button for in-depth analysis.
- Seamlessly perform OS imaging and hardware-independent deployment across remote offices.
- Automate mundane administrative tasks such as configuring IPs for printers and browsers using over 50 configurations.
- Manage mobile devices by centralizing app distribution and associating relevant profiles.
- Track the location of stolen/misplaced mobile devices in real-time, and execute remote commands to lock and regulate the passcode.
- Ensure data security by remotely wiping the data on lost or stolen mobile devices.
Steps to integrate
Below are the possible integration scenarios based on your deployment types of Endpoint Central and Jira Service Management:
- Endpoint Central Cloud with Jira Service Management Cloud
- Endpoint Central On-Premise with Jira Service Management Cloud
- Endpoint Central On-Premise with Jira Service Management Data Center
Endpoint Central Cloud with Jira Service Management Cloud
Note
Administrator privilege in both Jira and Endpoint Central Cloud are required to configure this integration.
- Download and install the Endpoint Central app from the Atlassian Marketplace into your Jira Service Management instance.
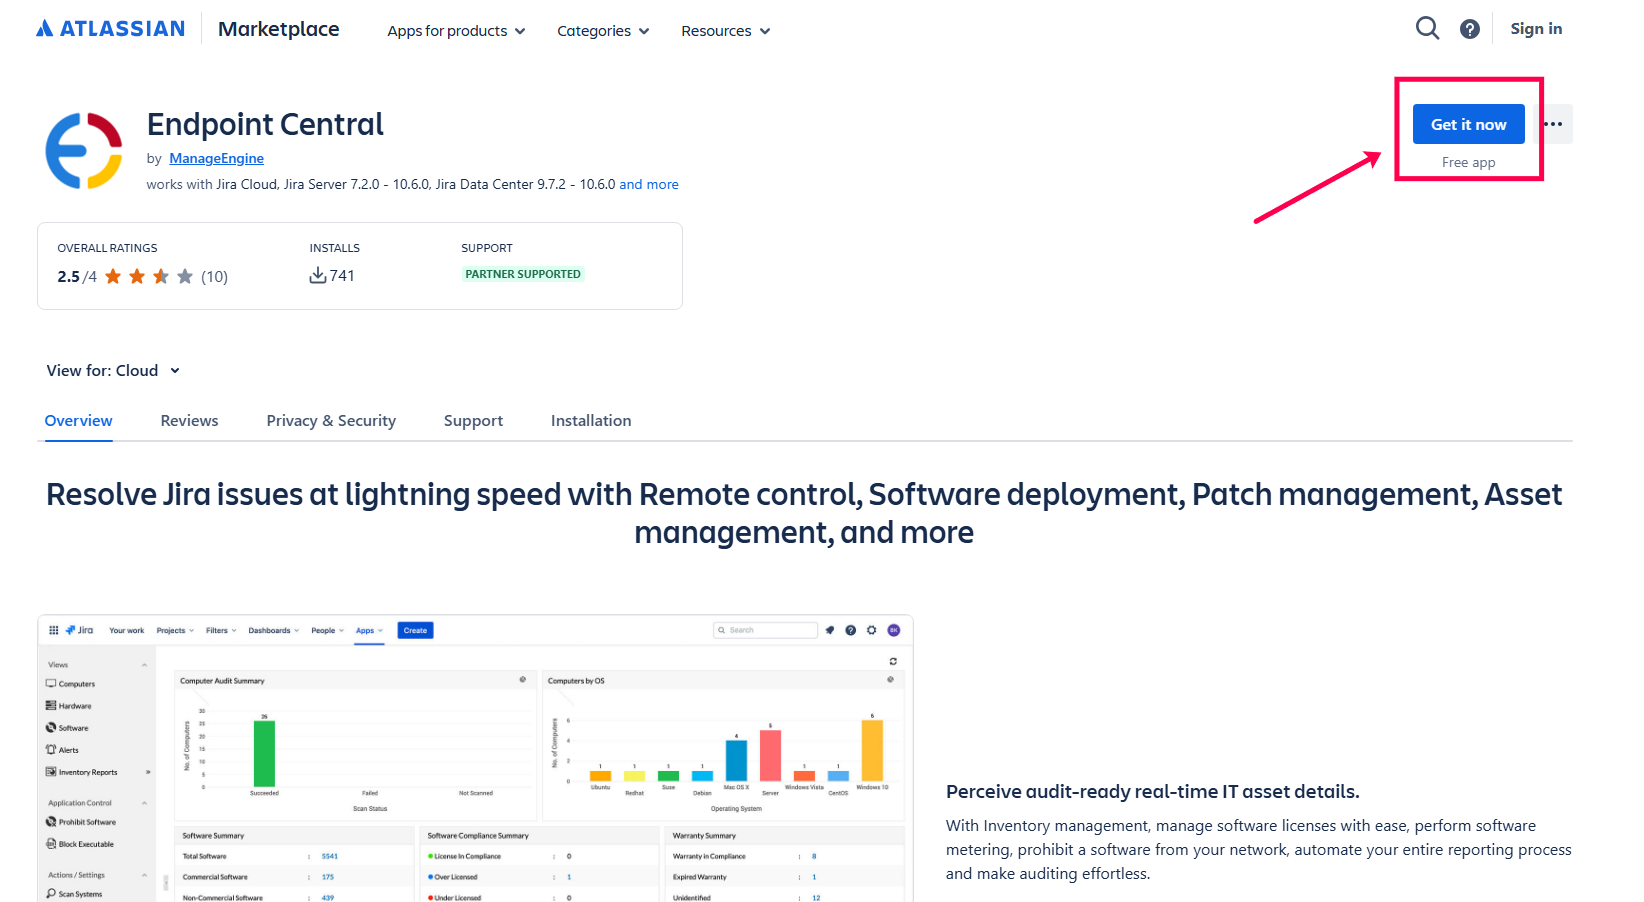
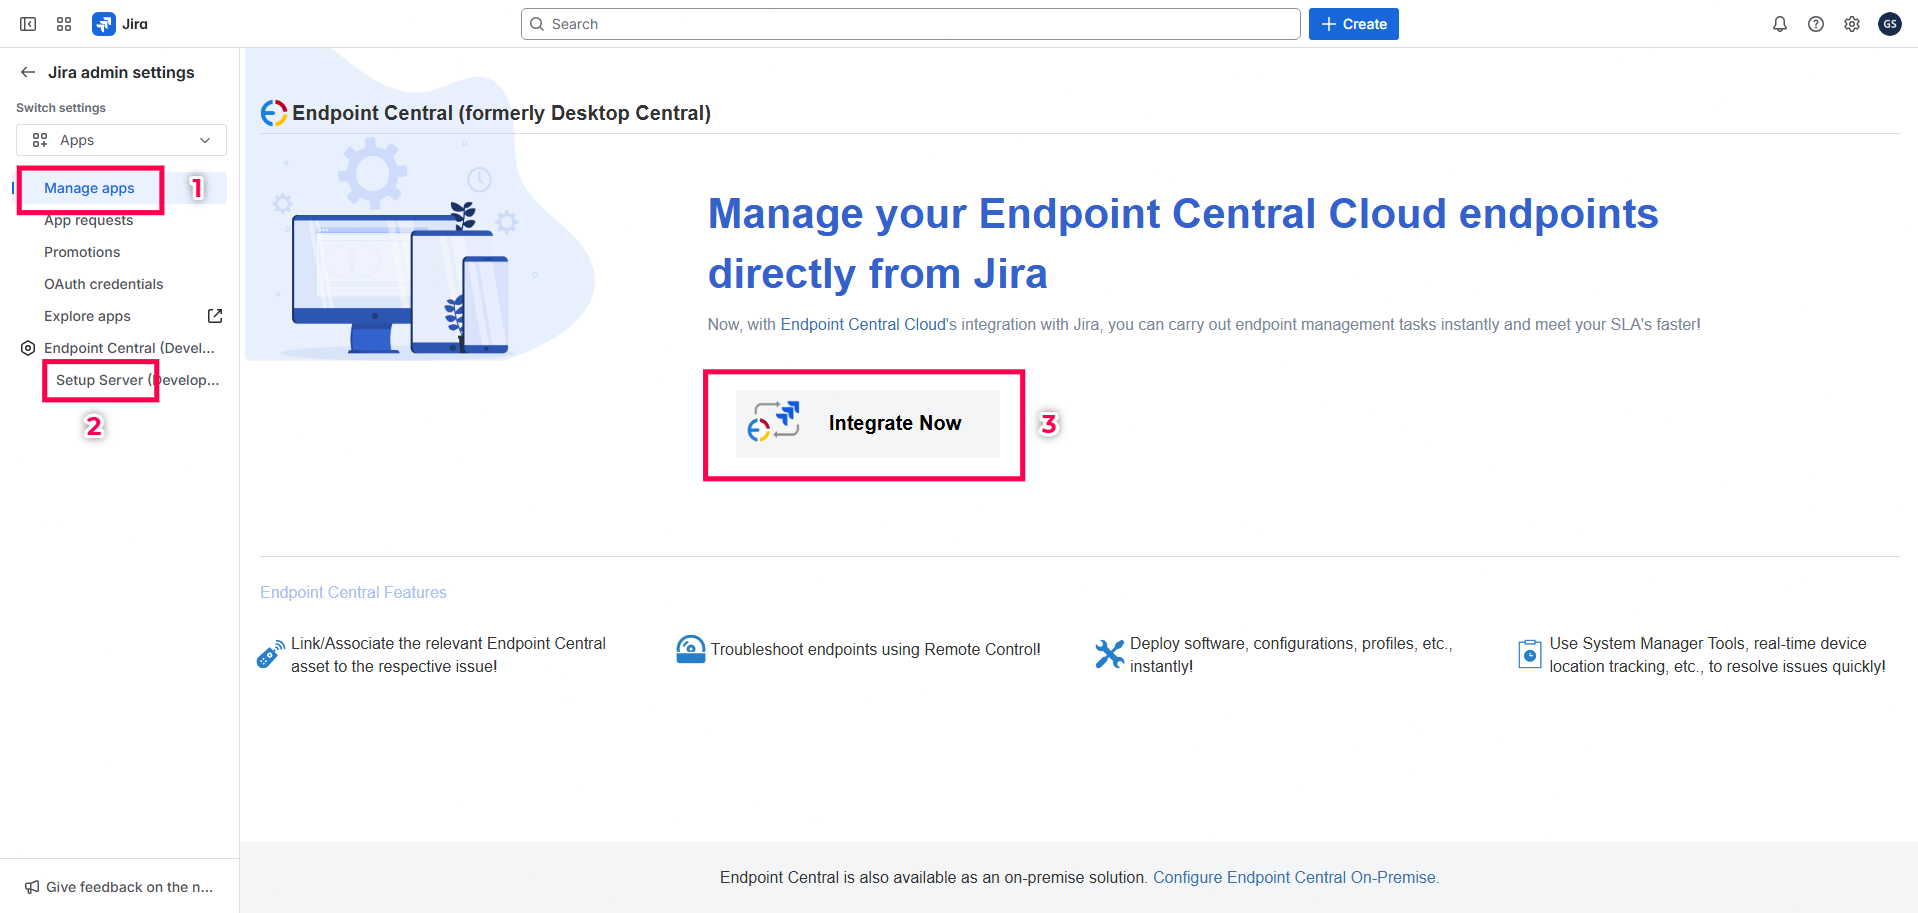
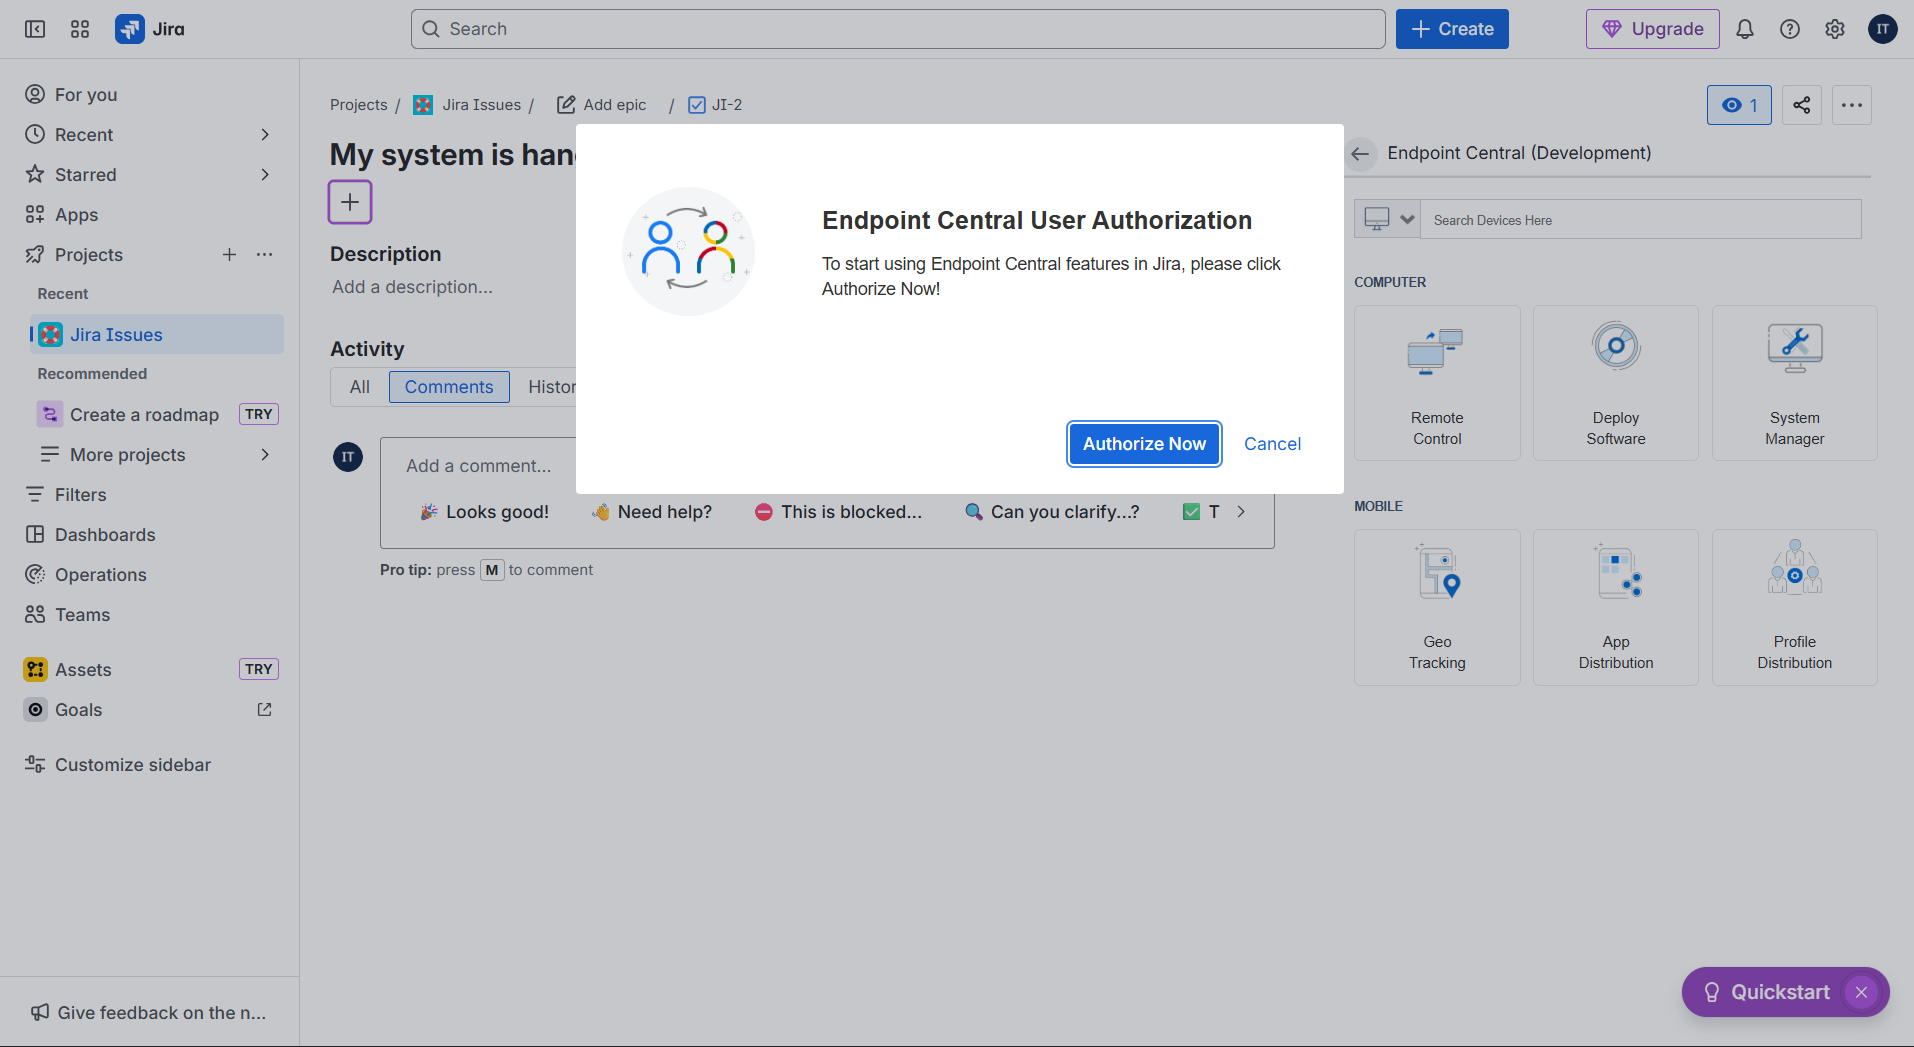
- Once the installation is complete, log in to your Jira Service Management Console. Go to Apps, and on the left pane click Setup Server under Endpoint Central. Click Integrate Now.
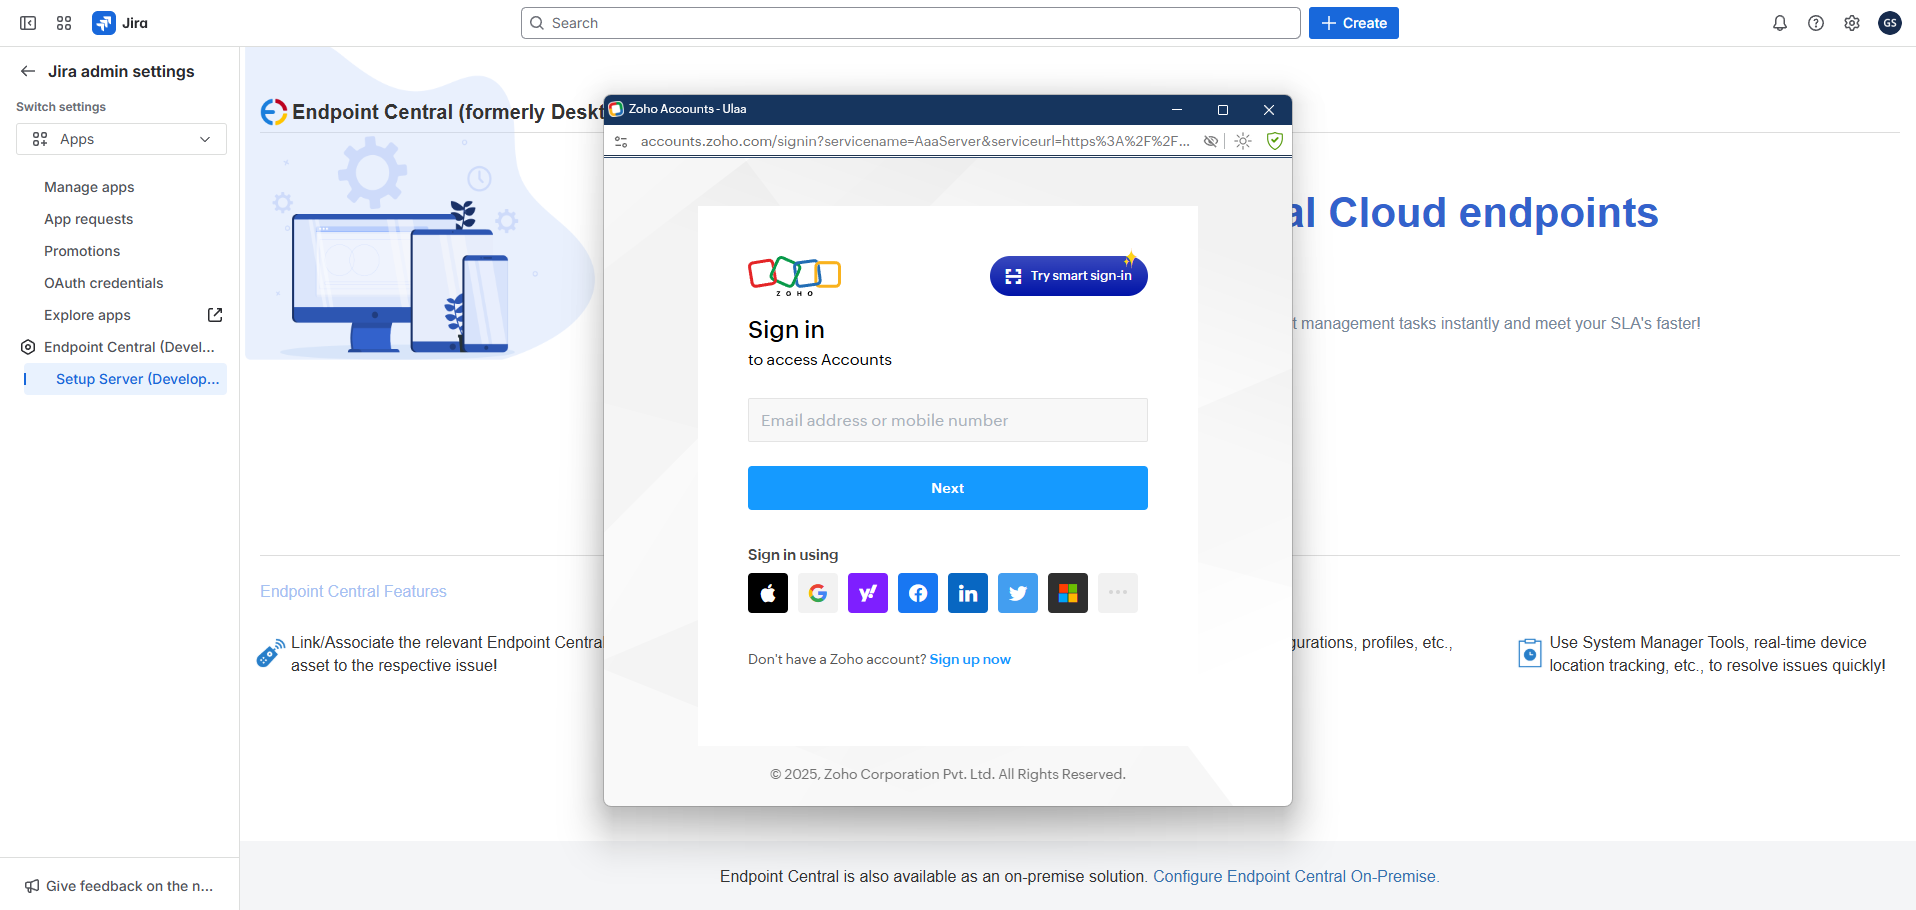
- Here, a pop-up will be shown. If you already have a Endpoint Central Cloud account, please sign in and if not, you can sign up immediately.
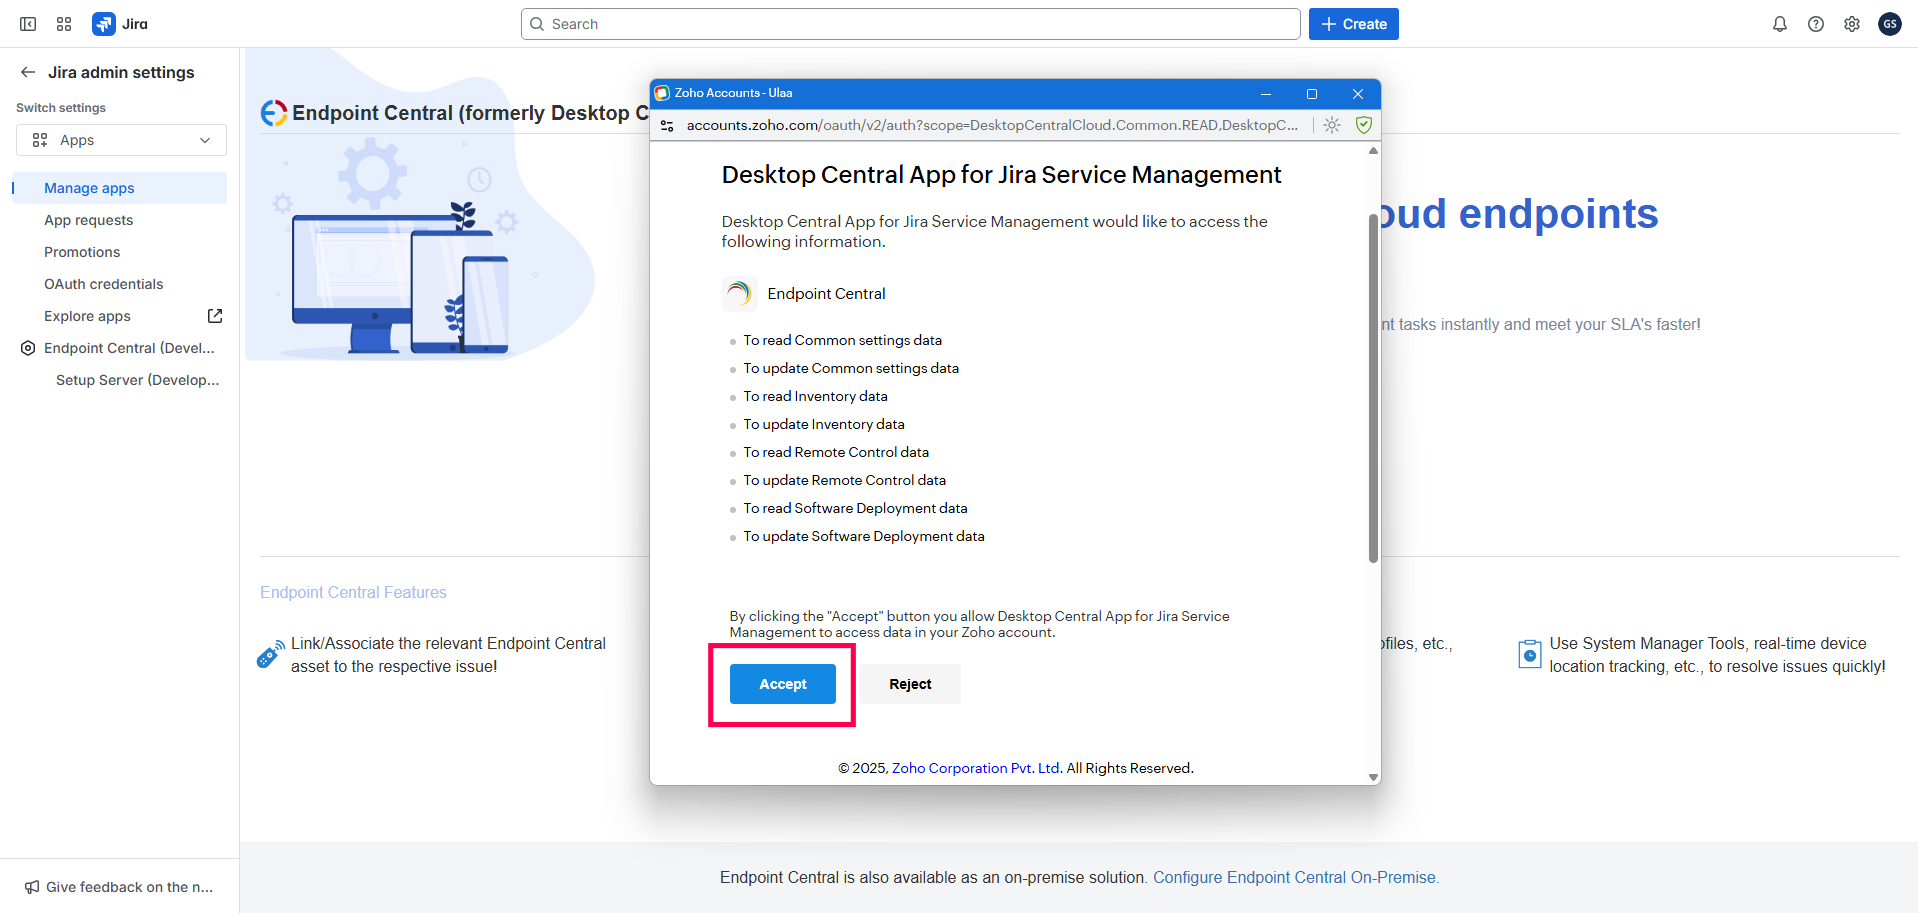
- Once you have successfully logged in to your Endpoint Central account, please click Accept to grant the necessary permissions.
- You have successfully integrated Jira Service Management Cloud with Endpoint Central Cloud.
Other Jira users can securely authenticate themselves directly from the issue window using their Endpoint Central credentials, ensuring proper access control based on their roles and permissions.
Endpoint Central On-Premise with Jira Service Management Cloud
To integrate using Endpoint Central's app, follow the steps given below:
Steps to configure in Jira Service Management Cloud
- Download and install the Endpoint Central app from the Atlassian Marketplace into your Jira Service Management instance.

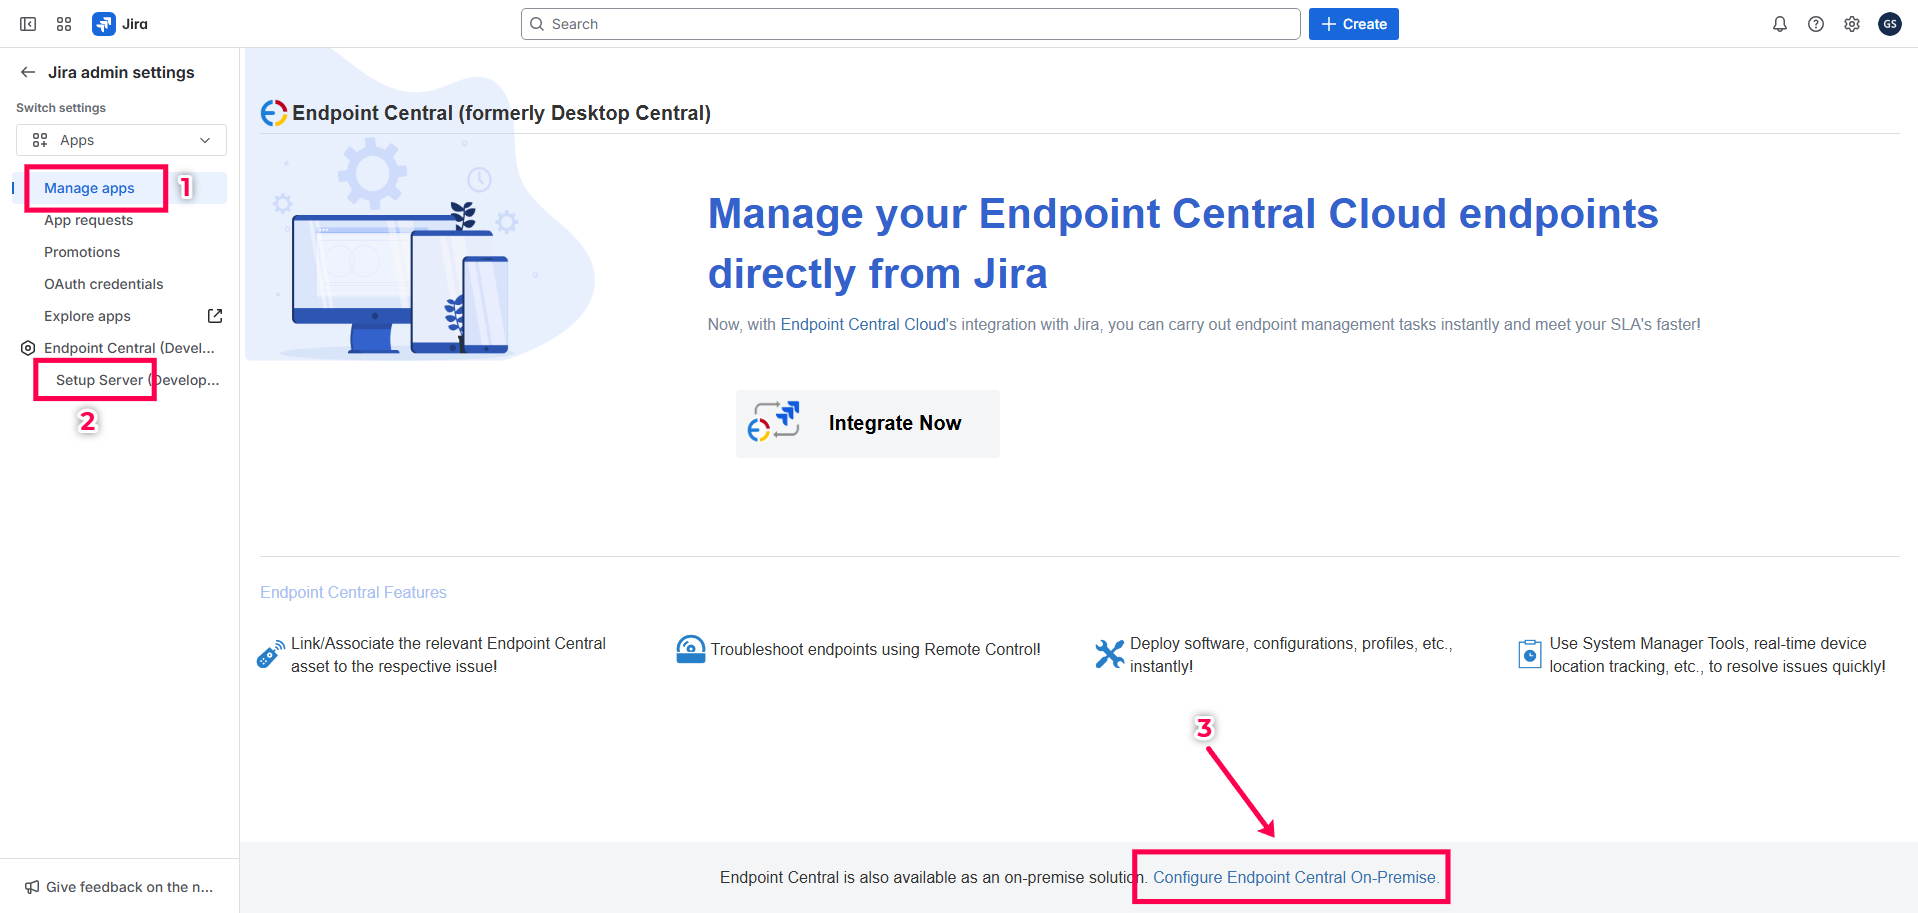
- Once the installation is complete, log in to your Jira Service Management Console. Go to Apps, and on the left pane click Setup Server under Endpoint Central.
- Then, scroll to the bottom of the page and click the link labeled "Configure Endpoint Central On-Premise".
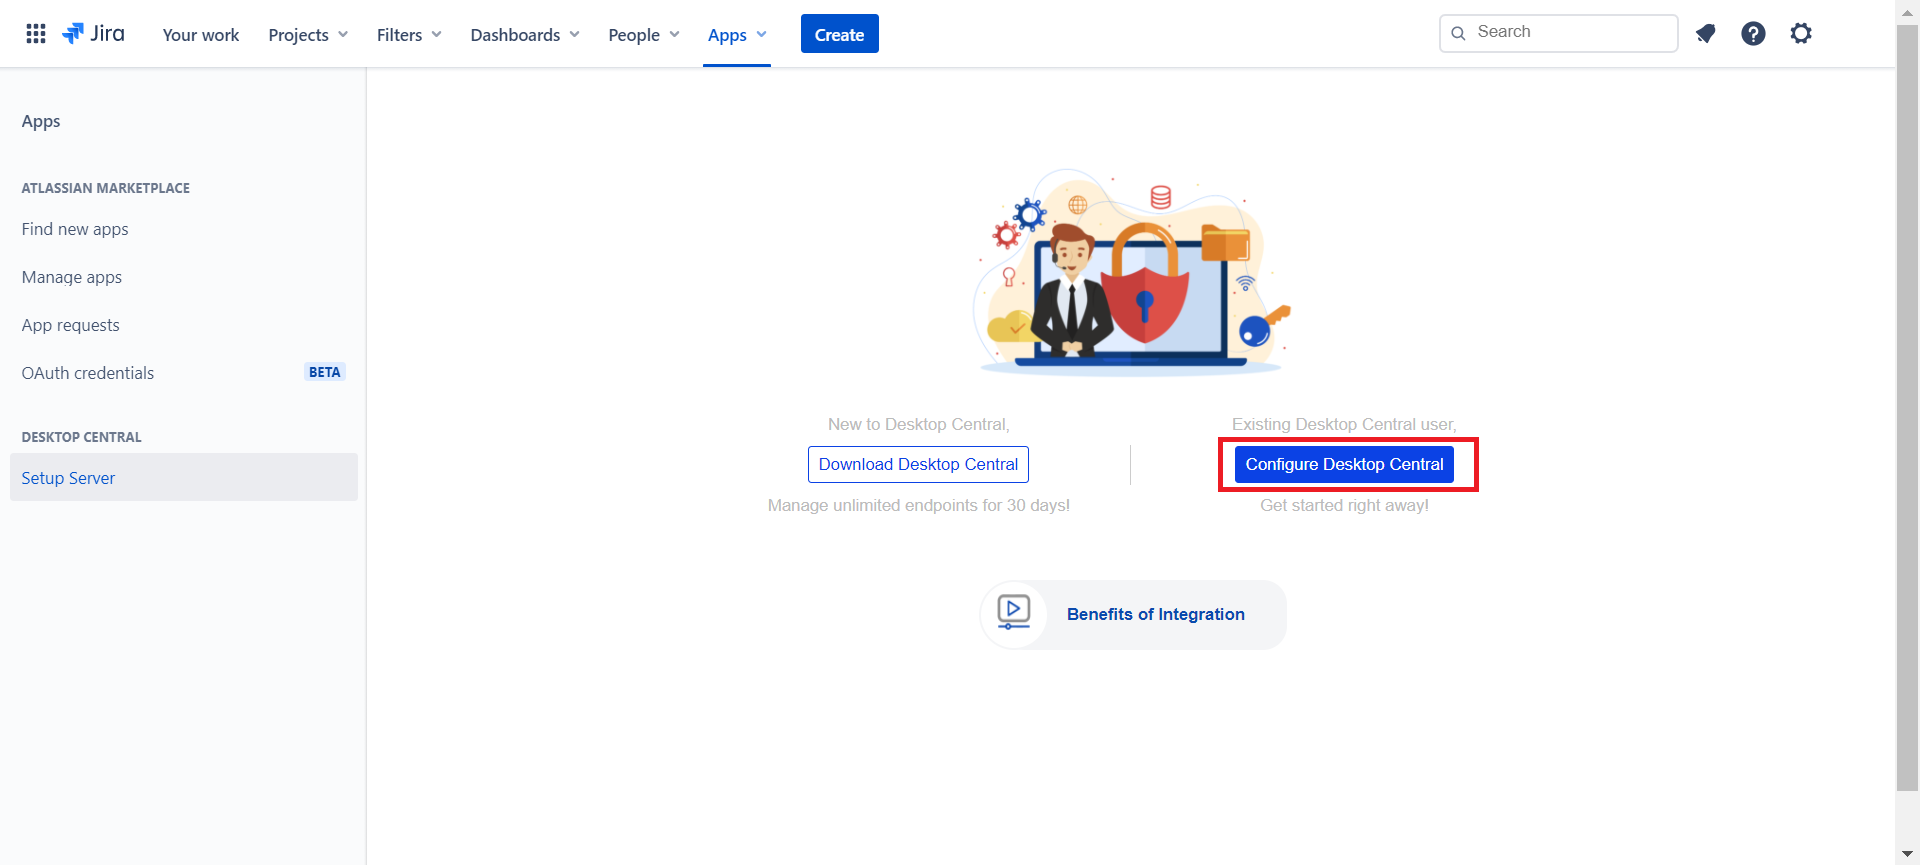
- Click Configure Endpoint Central.
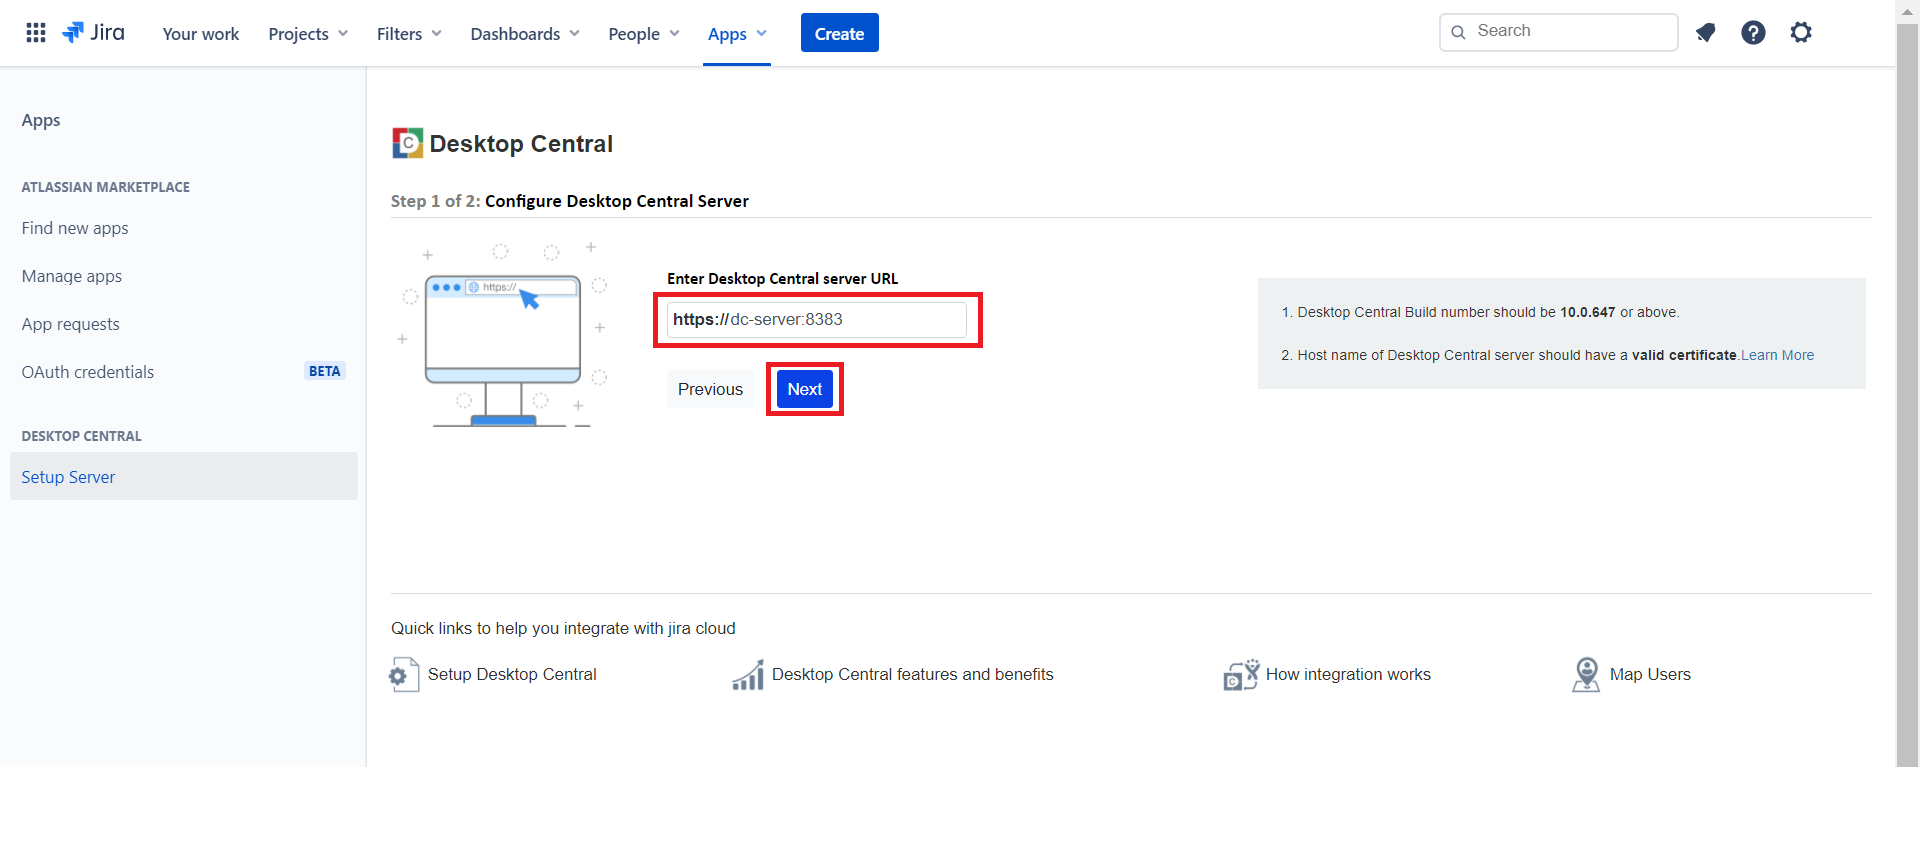
- Here, enter the server URL with the port number. For example:
https://dc-server:8383
- Now, Provide the Username and Password of the technician who has administrative privilege in Endpoint Central. Next, choose the type of user authentication, either Active Directory Authentication or Local Authentication. After that, click Finish.
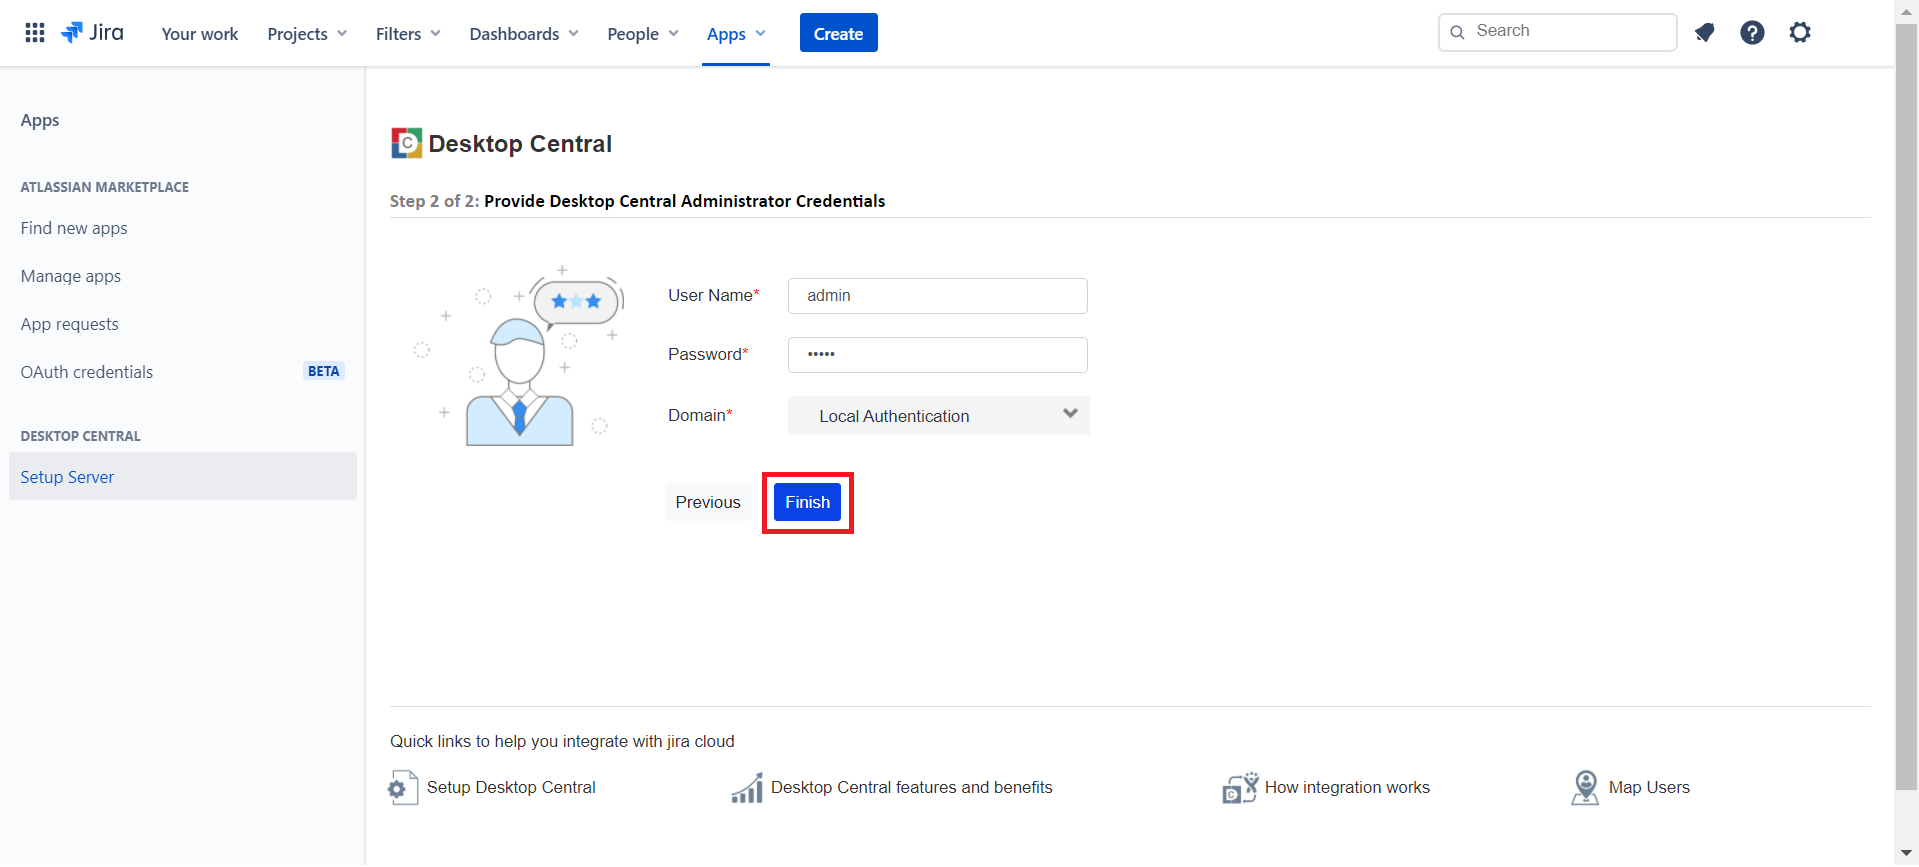
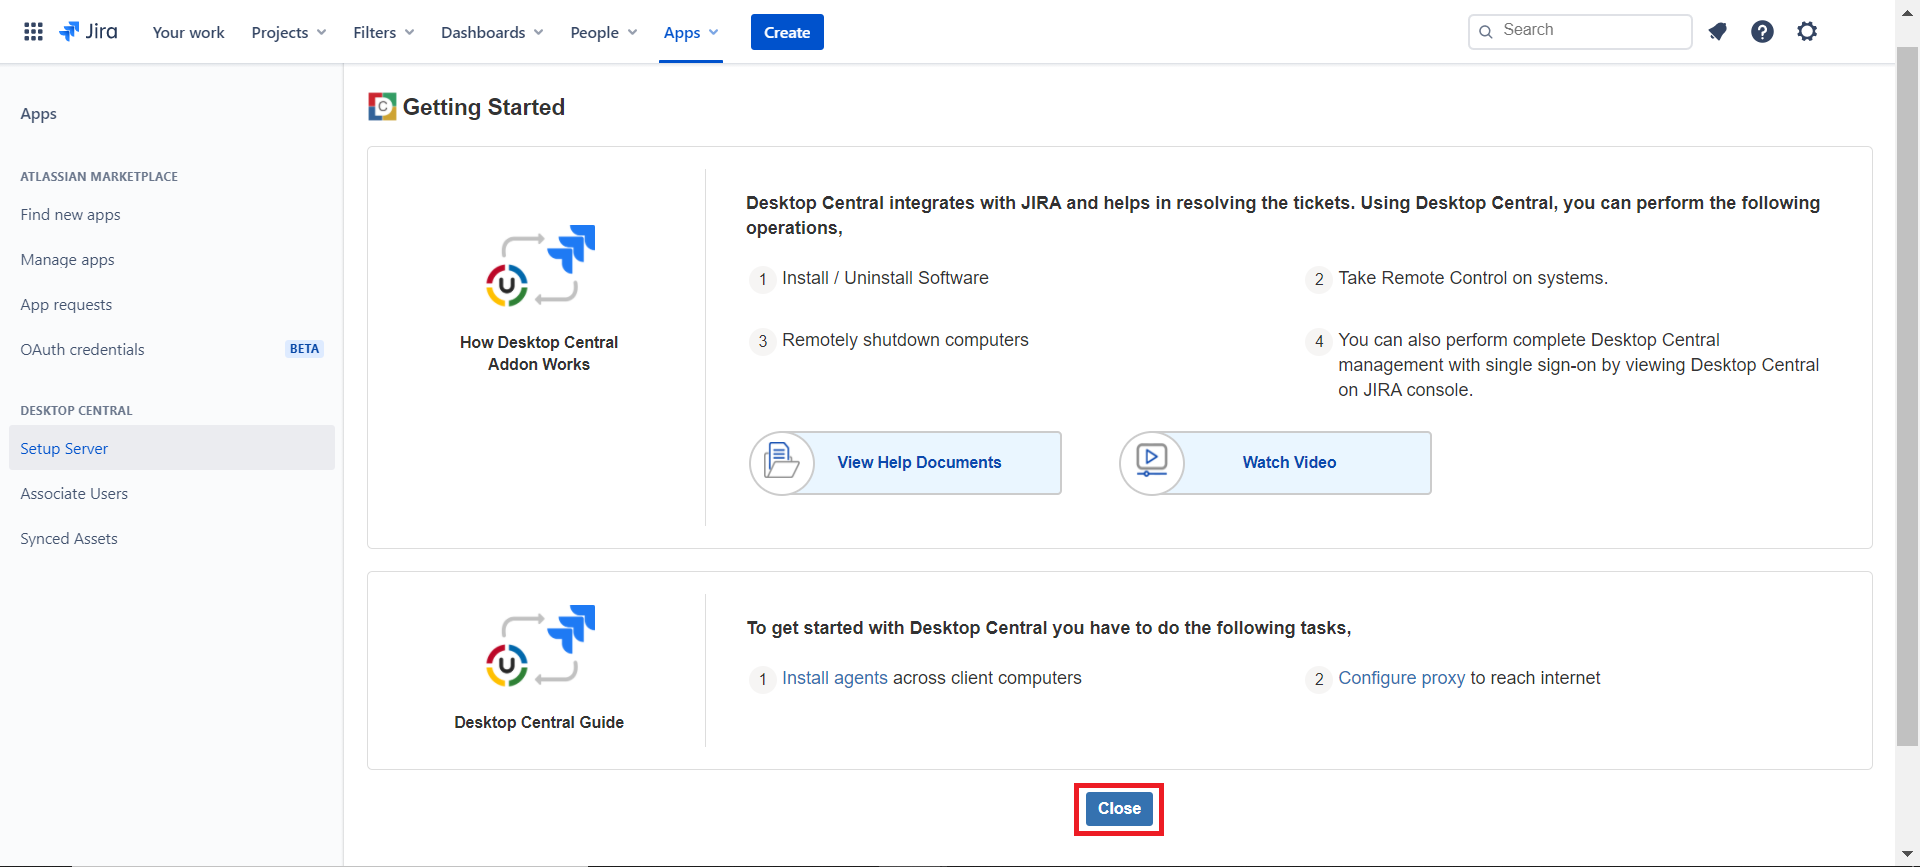
- You will be redirected now to the Getting Started page. Go through the page and click Close.
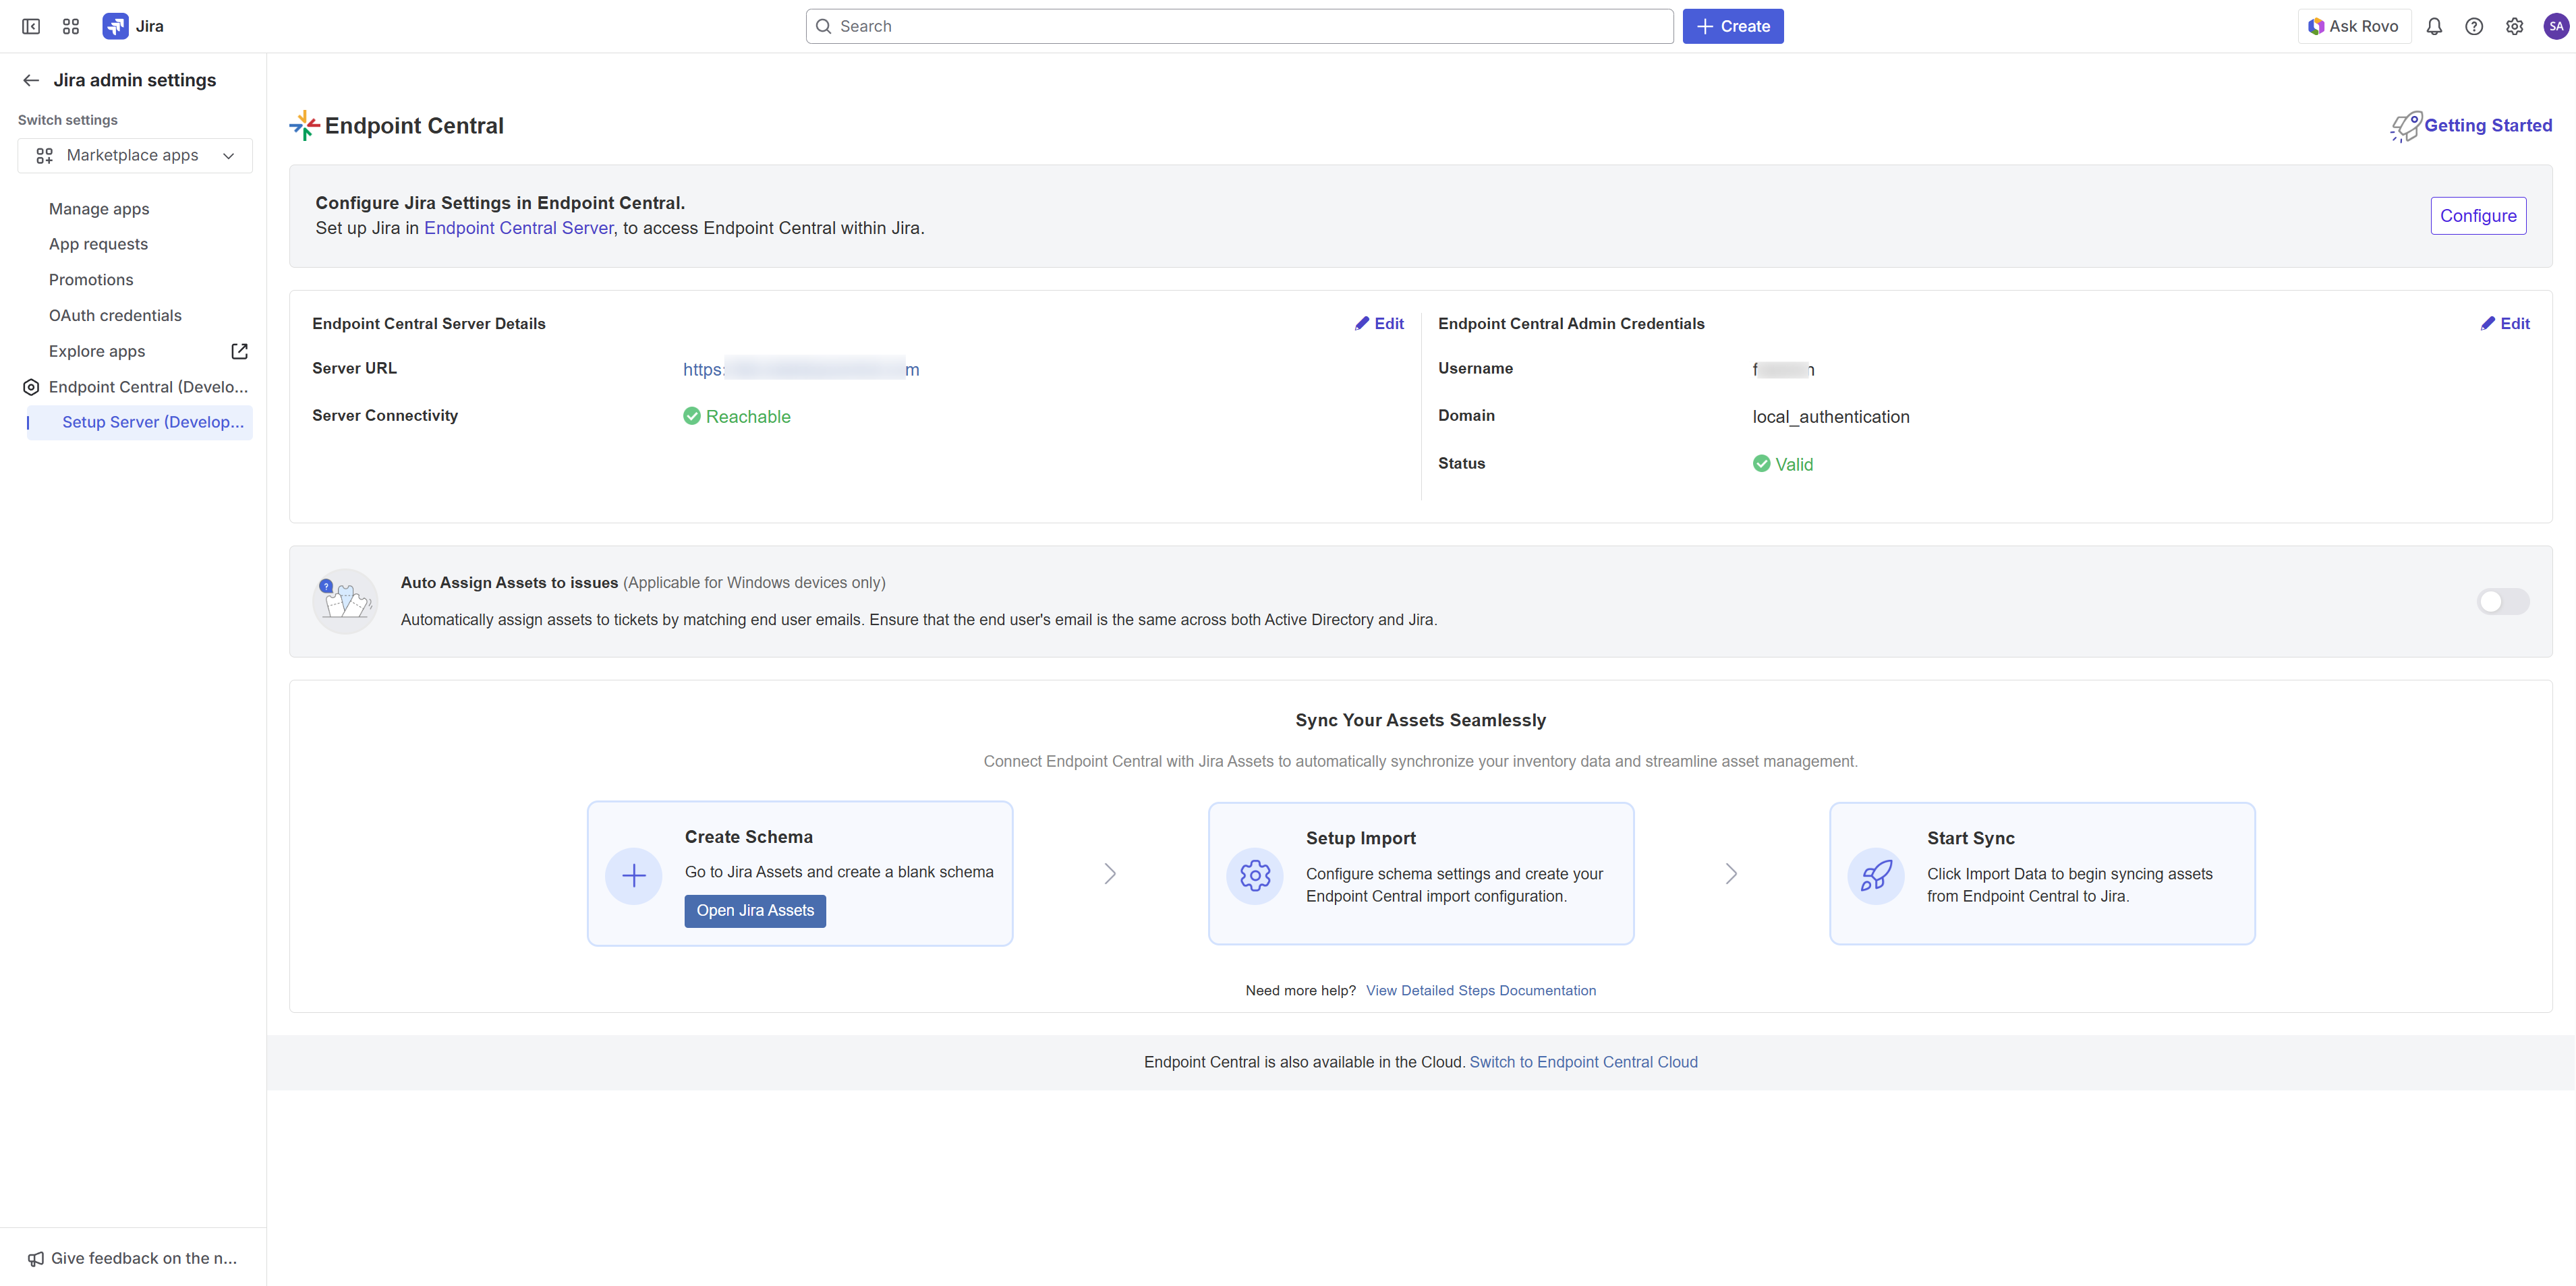
- In this page, you will find the summary of the integration between Endpoint Central and Jira.
Steps to configure in Endpoint Central On-Premise
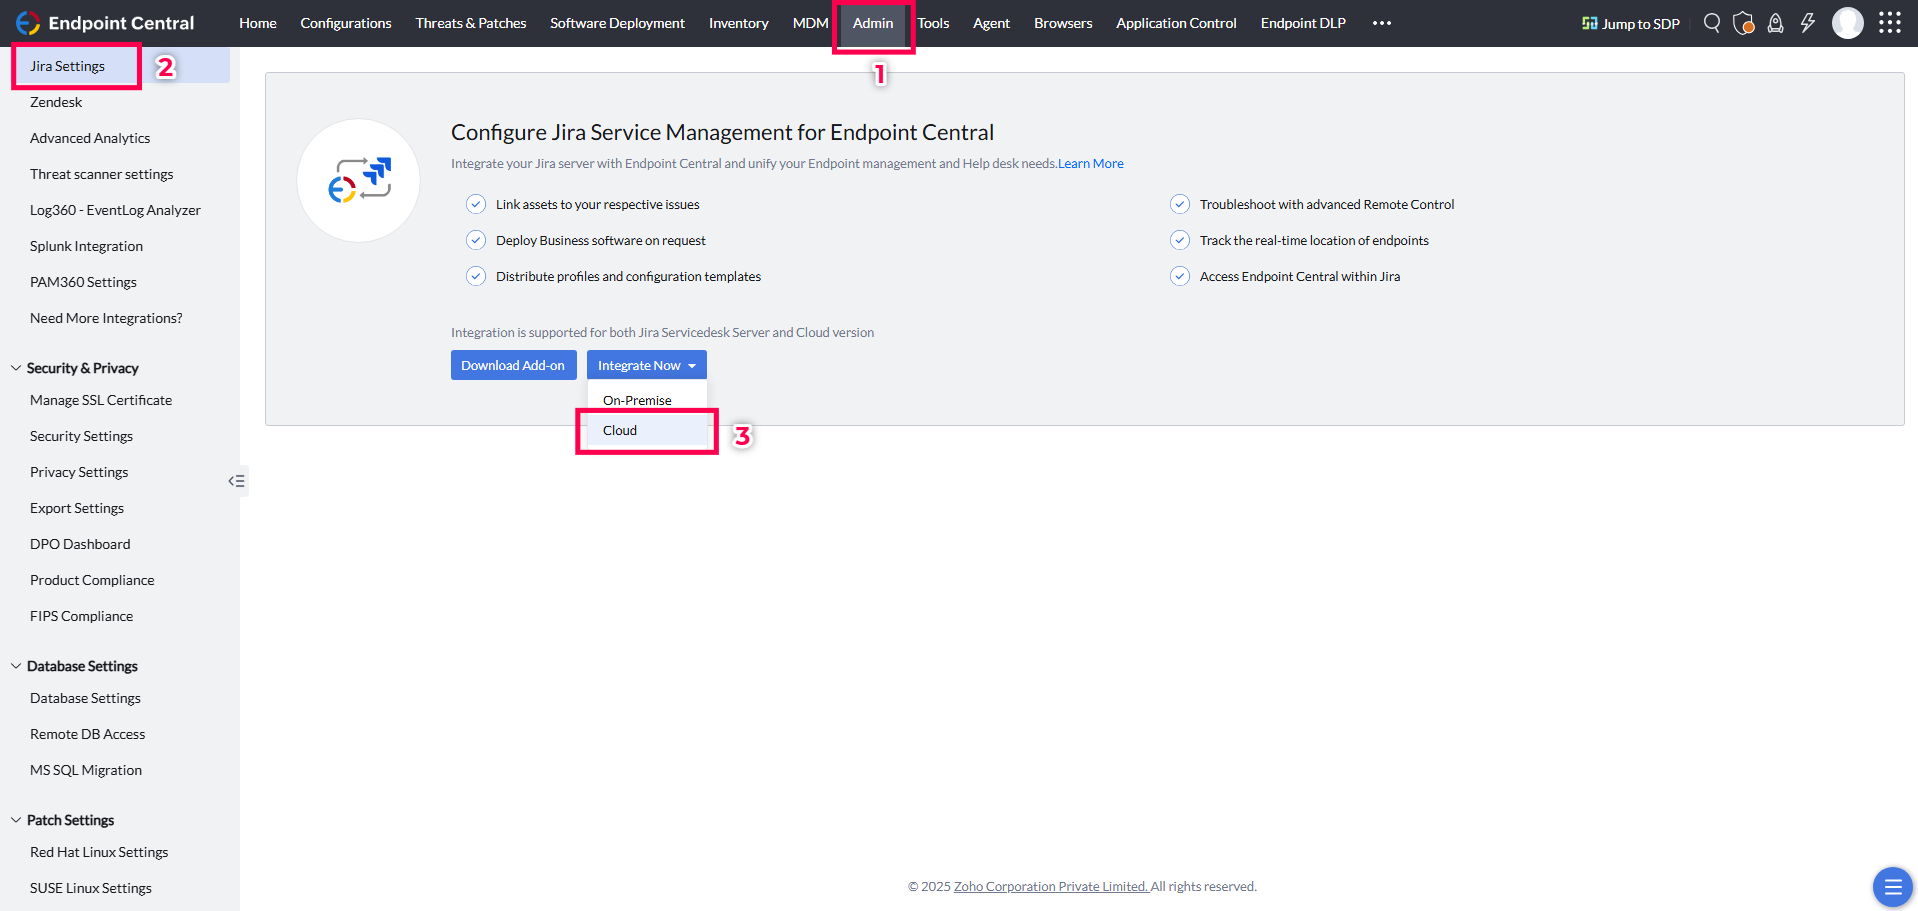
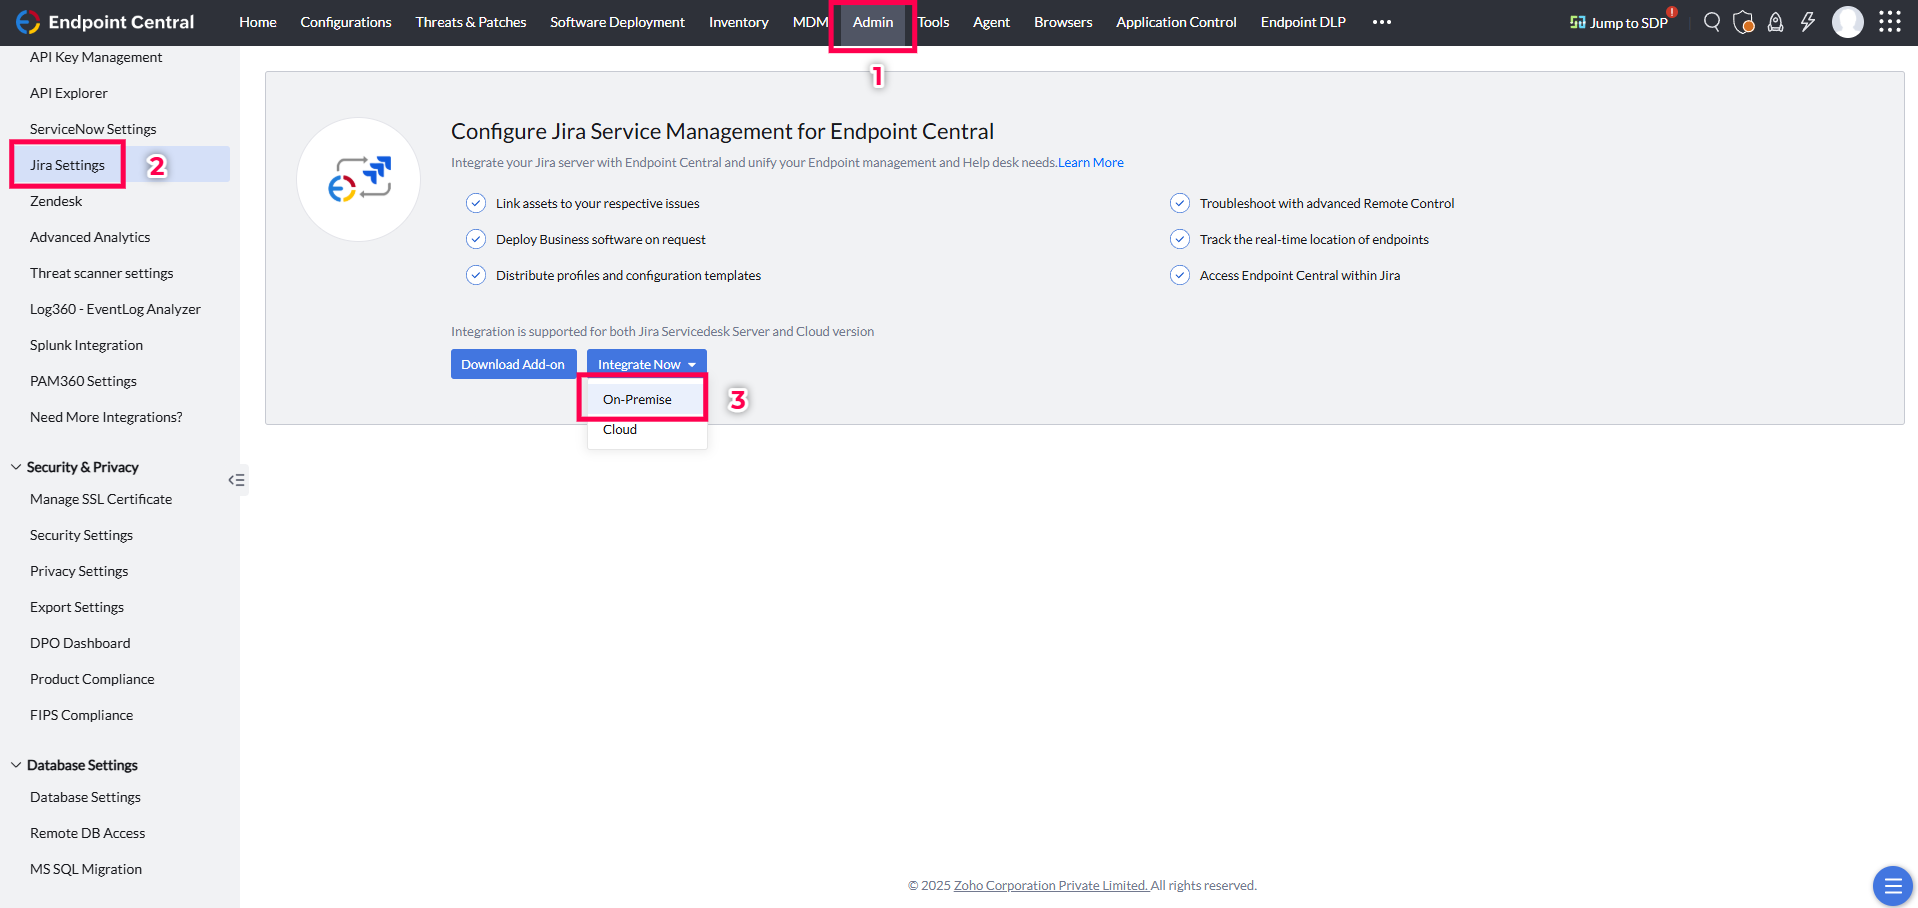
- Login to Endpoint Central and go to the Admin tab, under Integrations, click Jira Settings.
- Here, click Integrate Now and choose Cloud from the drop-down menu.
- Now, enter the Jira domain name opposite to the Jira base URL field.
Note
Do not enter .atlassian.net in the field as it is appended automatically.
- Subsequently enter the Jira User Email and Click the Generate option on the right, that is placed near to the API Key field.
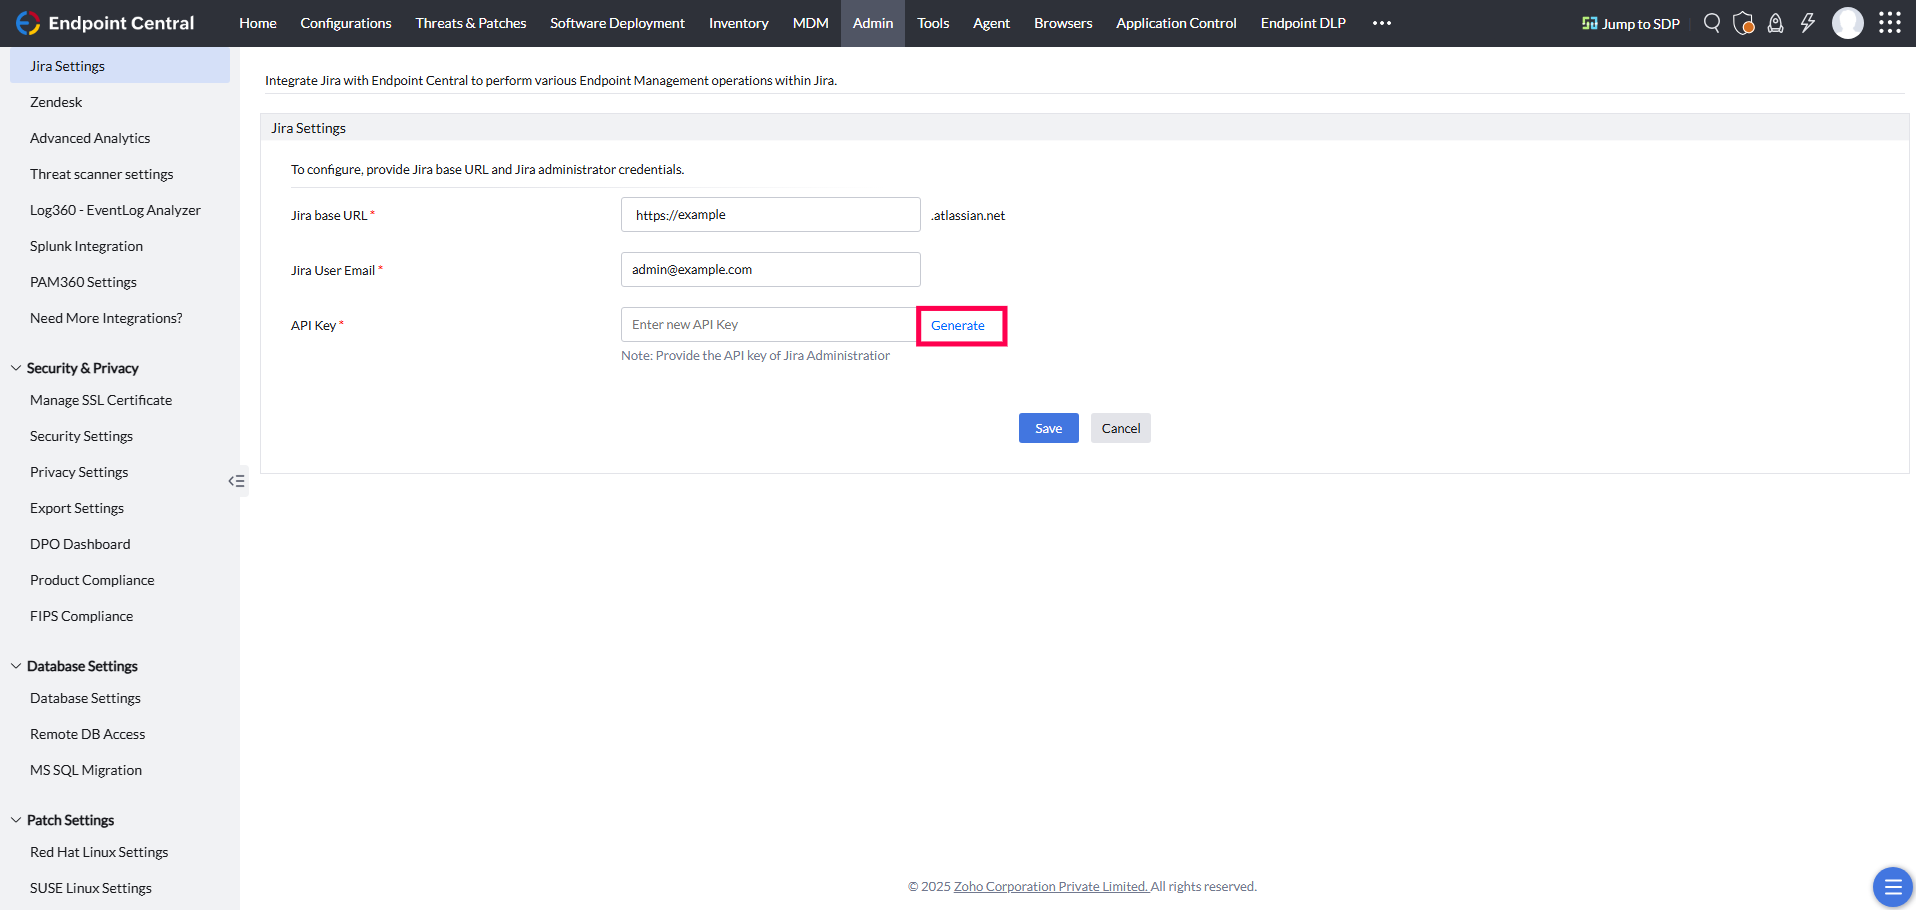
- Now, click Create API token.
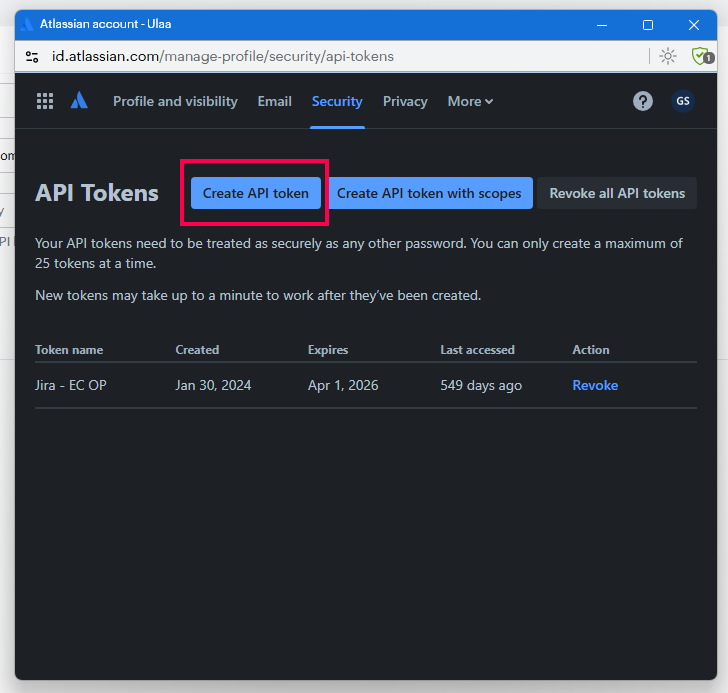
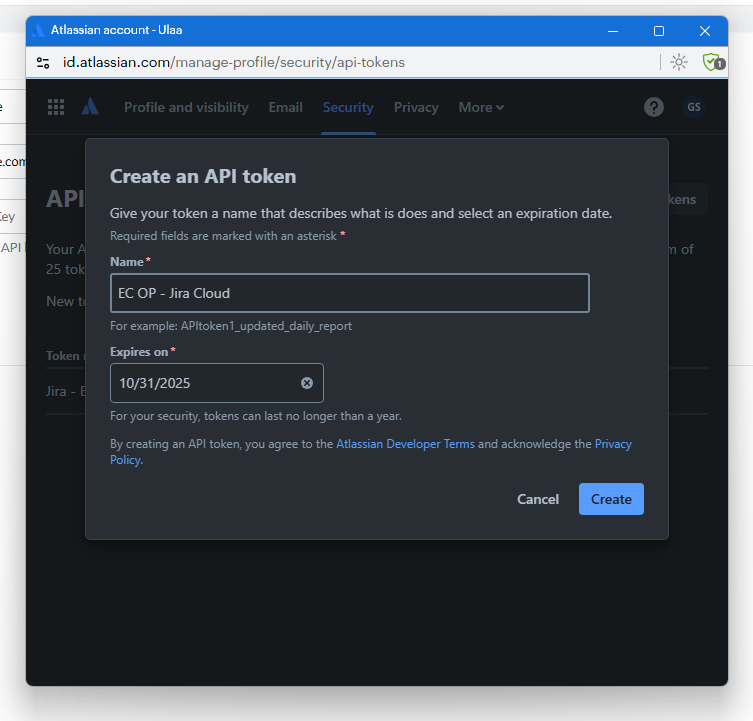
- Provide a Name and Expiry Date for the API token and click Create.
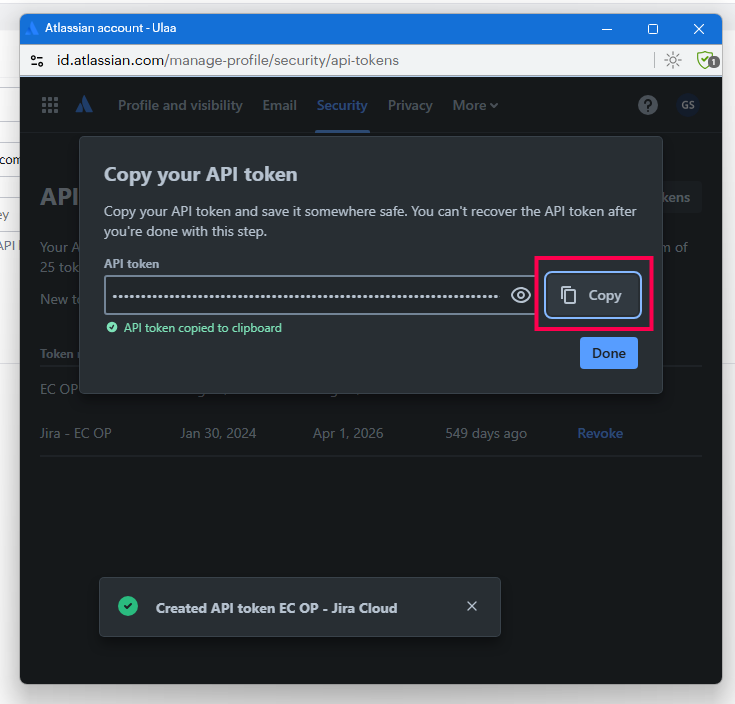
- After that, copy the key and paste it opposite the API Key field. Click Save.
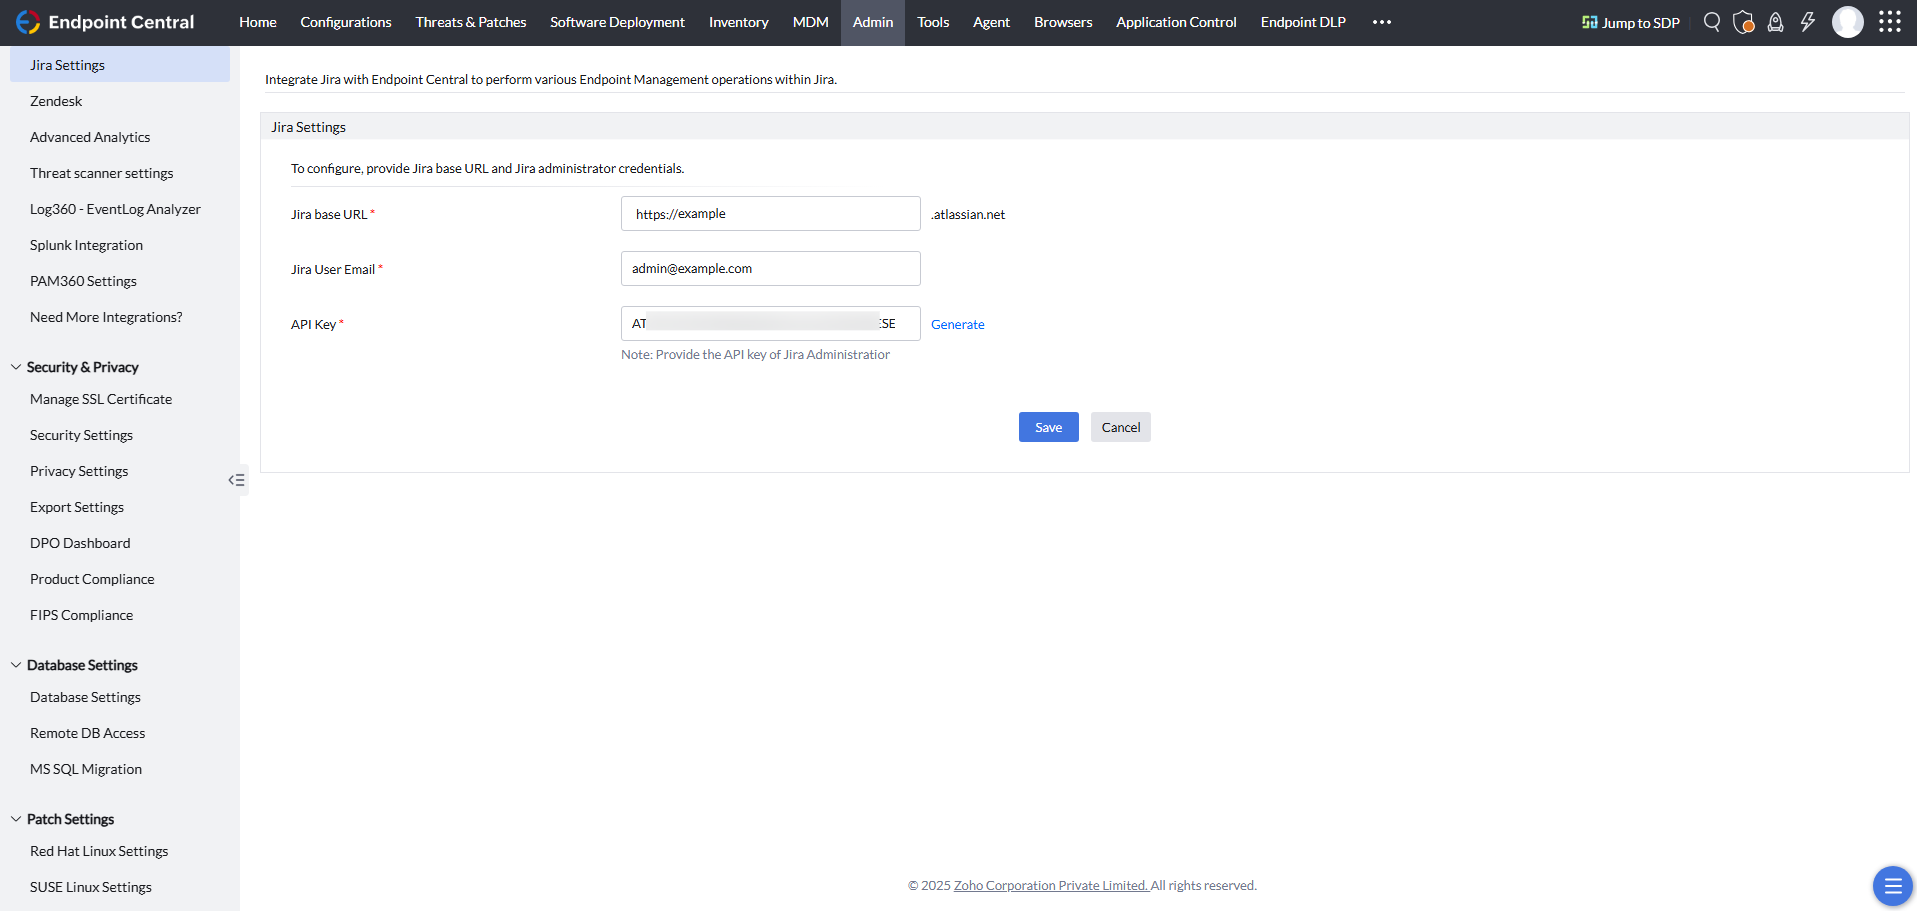
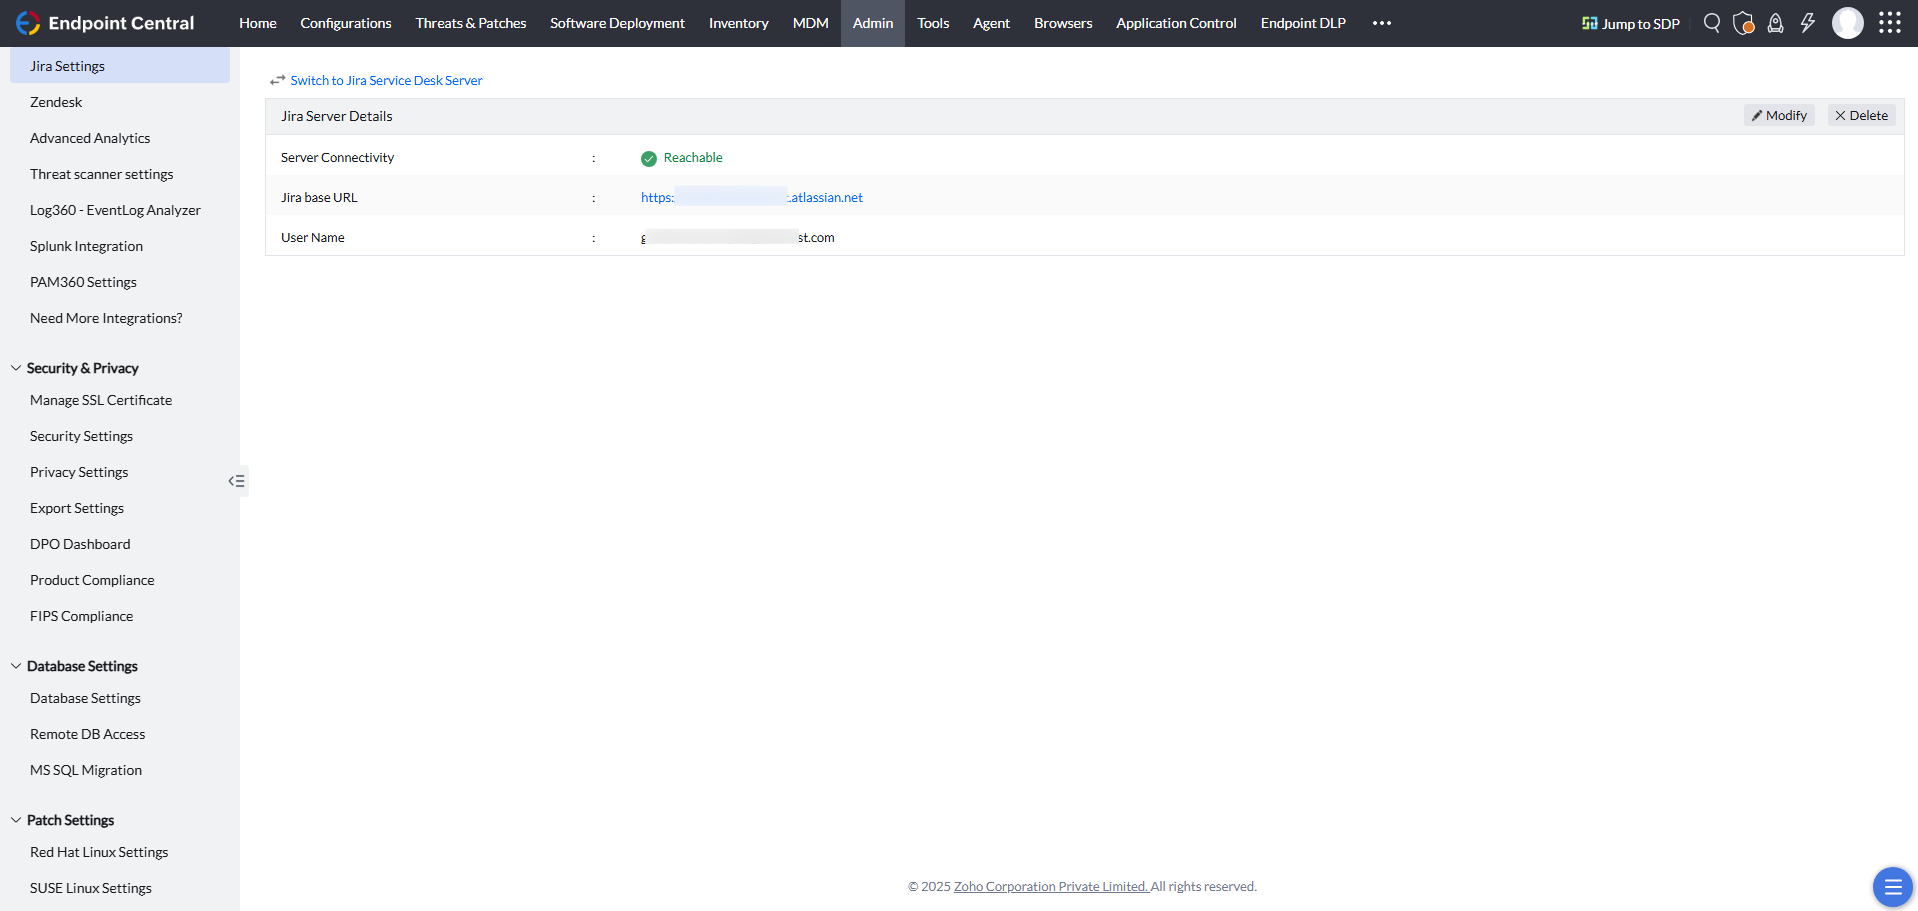
- You have successfully integrated Endpoint Central with Jira Service Management Cloud.
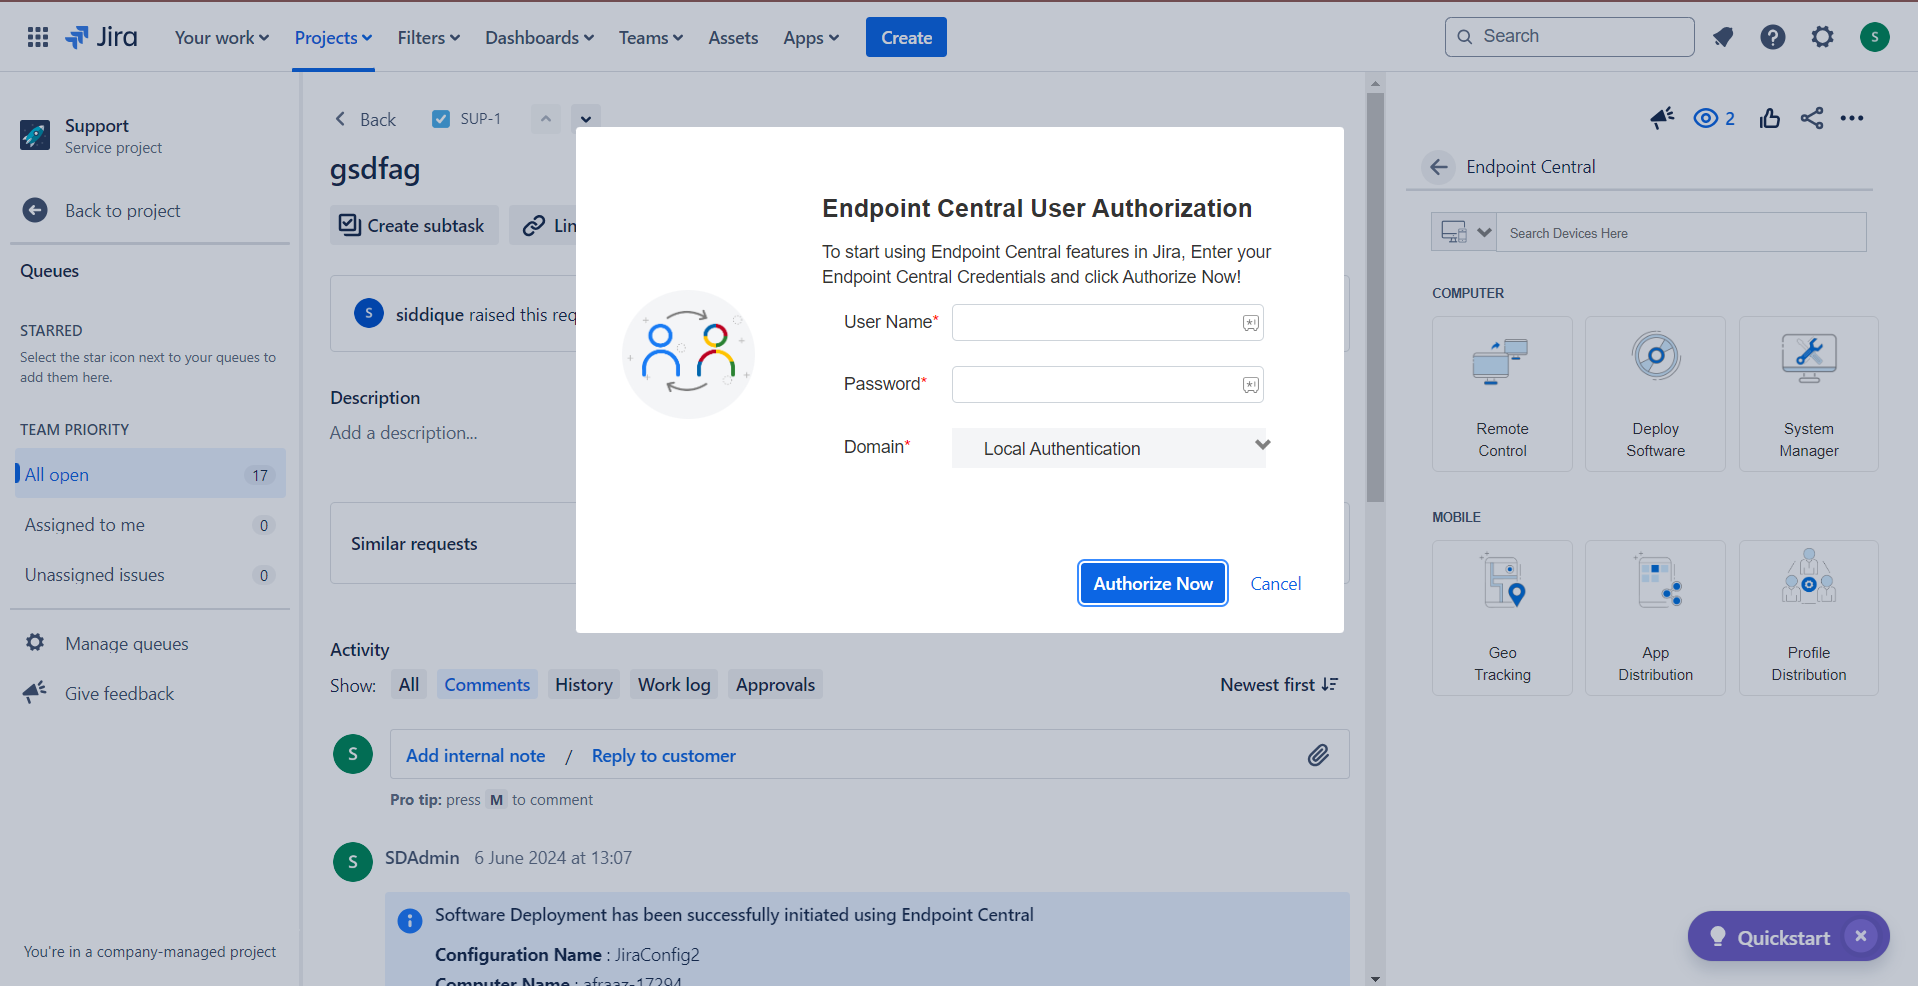
Other Jira users can securely authenticate themselves directly from the issue window using their Endpoint Central credentials, ensuring proper access control based on their roles and permissions.
Endpoint Central On-Premise with Jira Service Management Data Center
Steps to configure in Jira Service Management Data Center
To integrate using Endpoint Central's app, follow the steps given below:
- Download and install Endpoint Central app from Atlassian Marketplace into your Jira Service Management instance.

- Under Manage apps, navigate to Setup Server, and click Close.
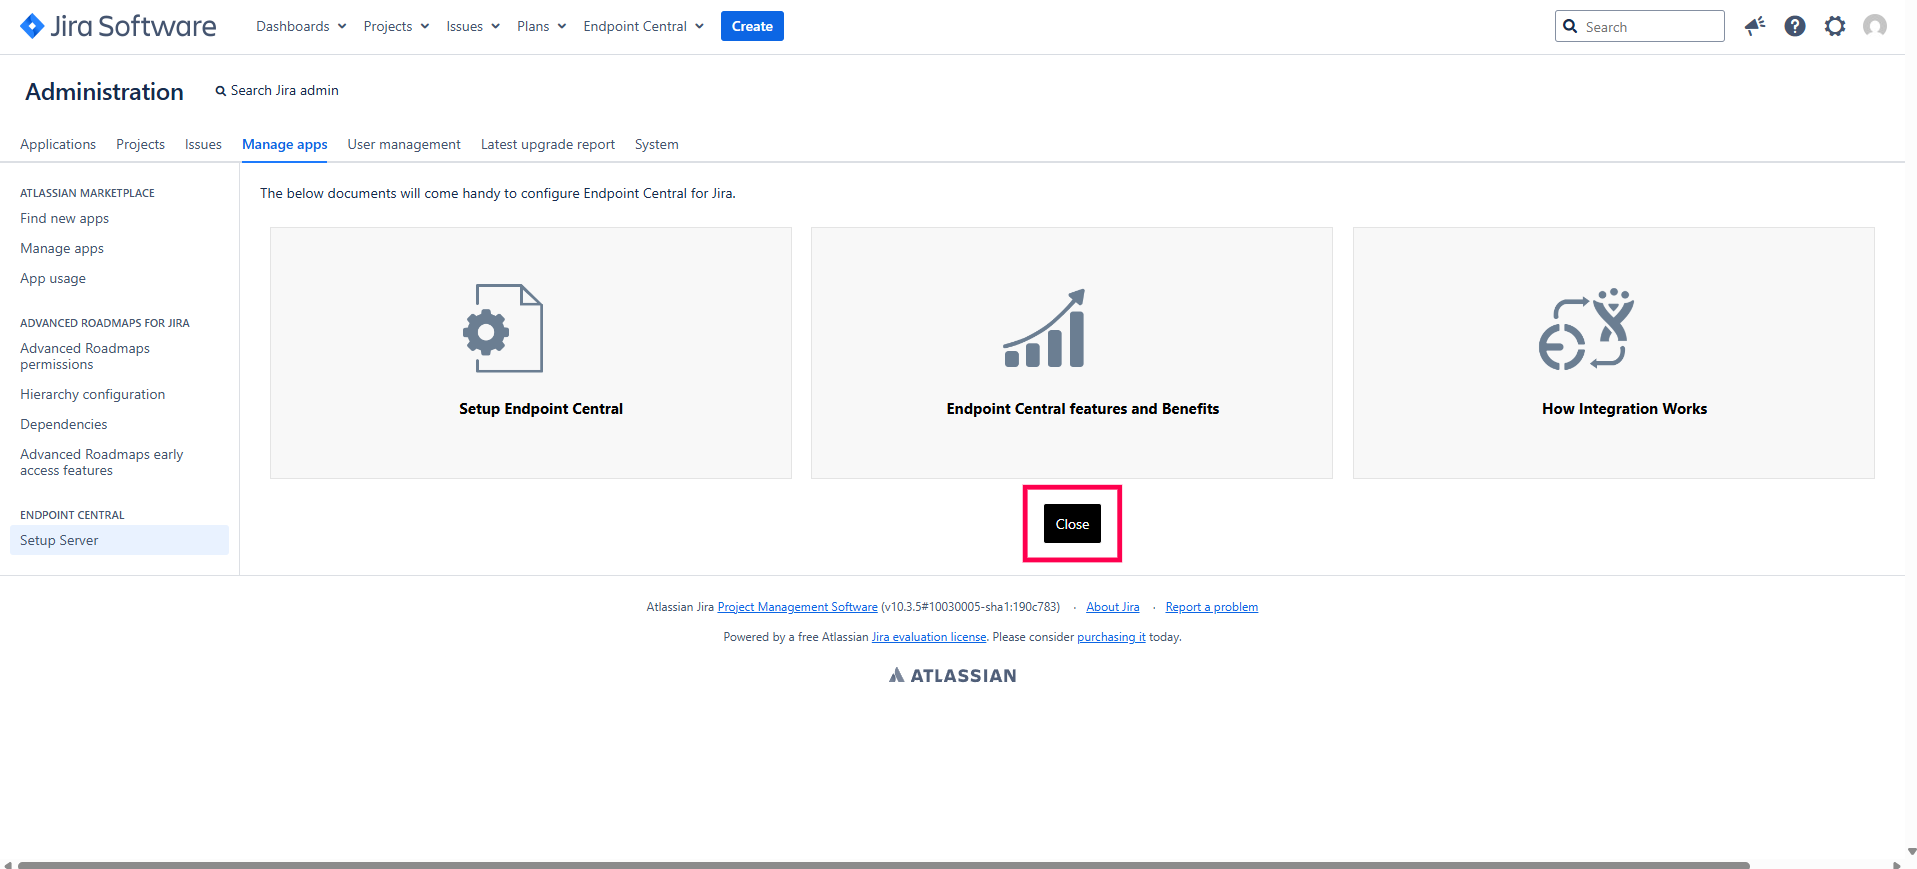
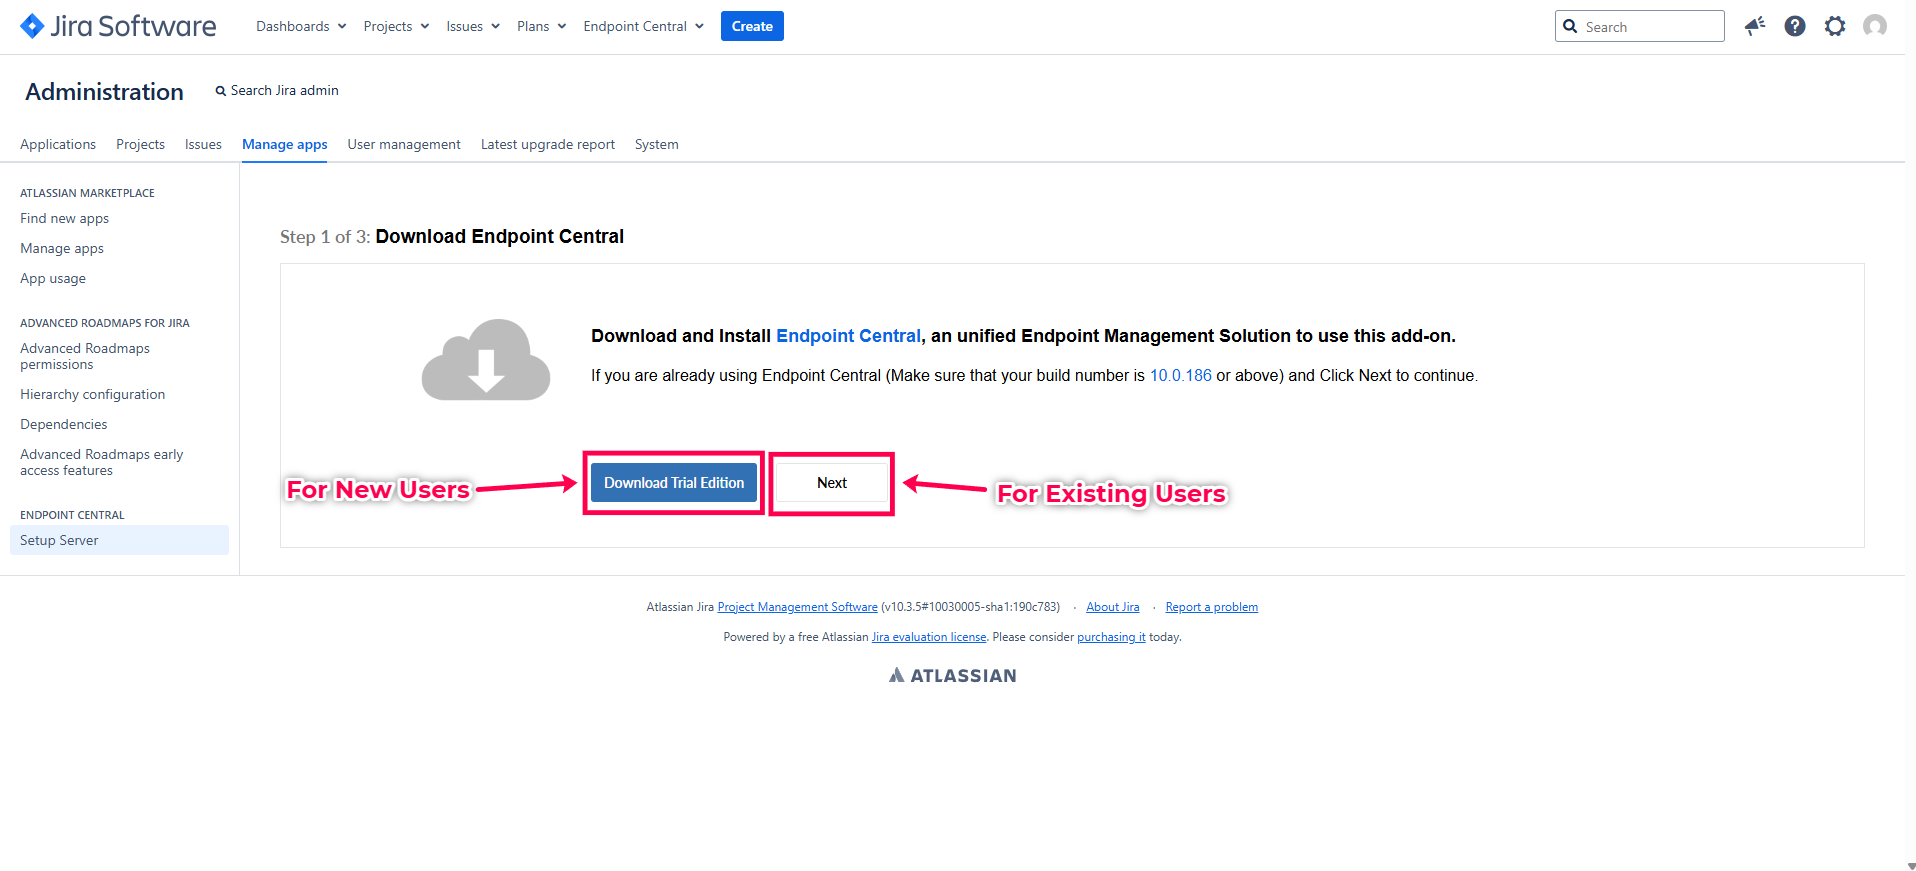
- If you are already using Endpoint Central, click Next to continue. If you are new to Endpoint Central, download and install the free trial, and then proceed with the integration setup.
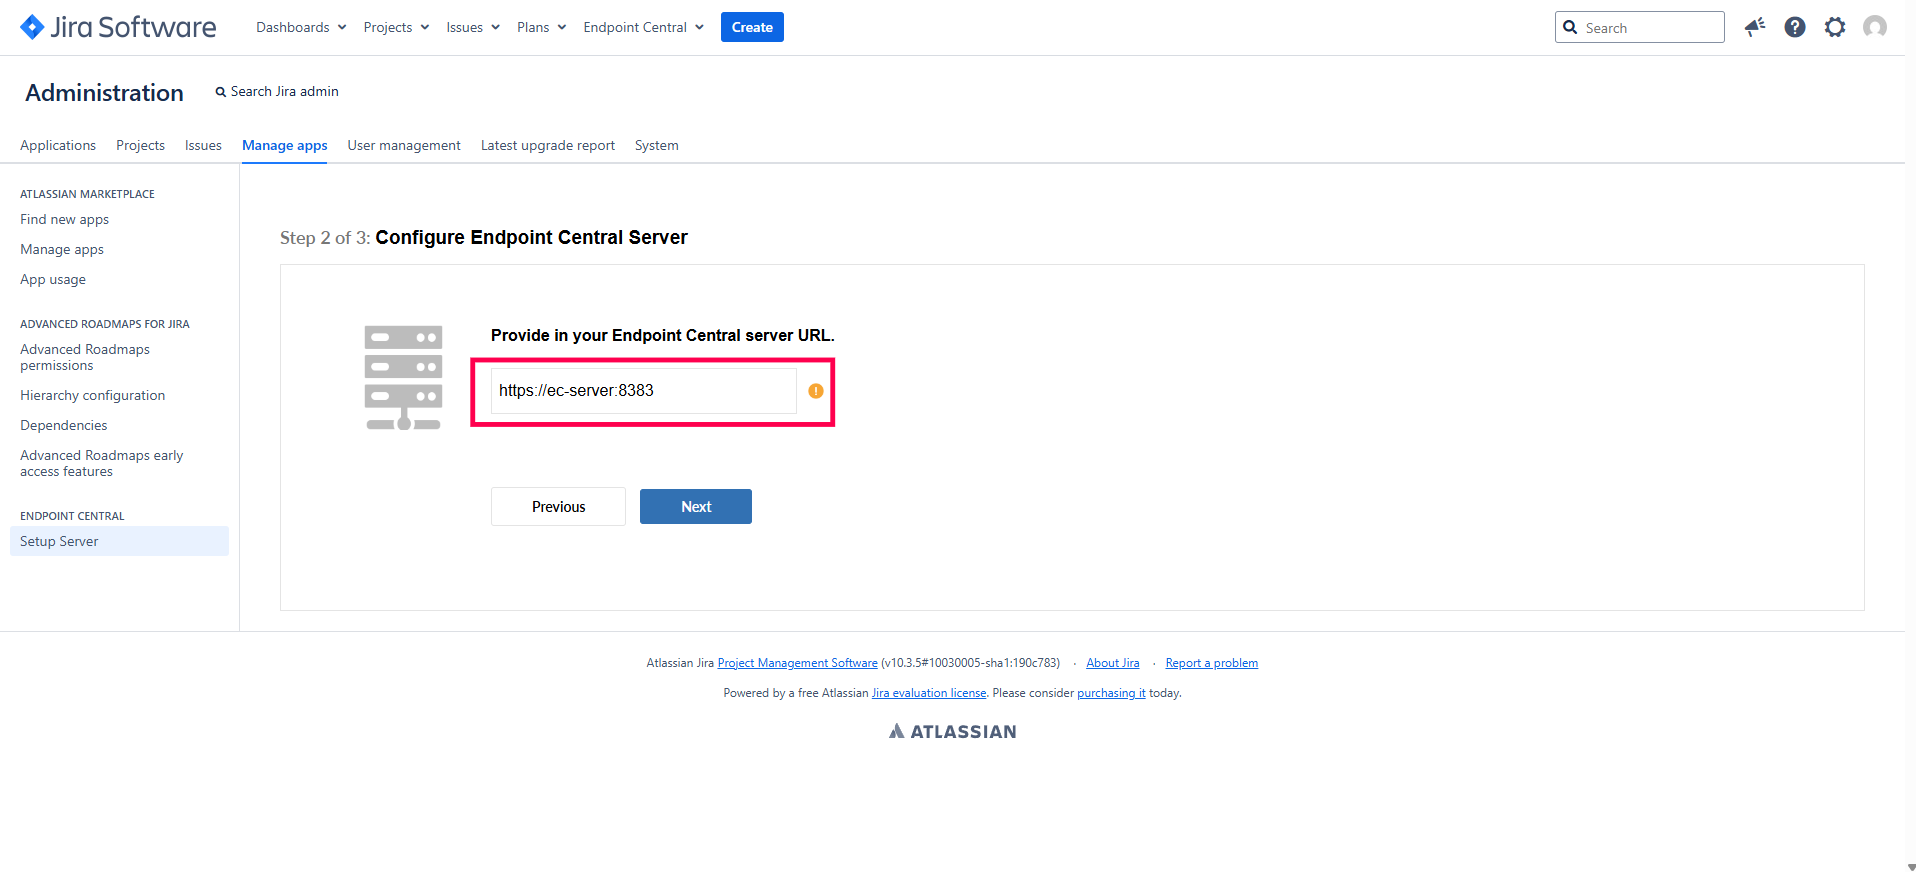
- Enter your Endpoint Central server's URL (along with the port number and the protocol - either
http:// or https://), and click Next.
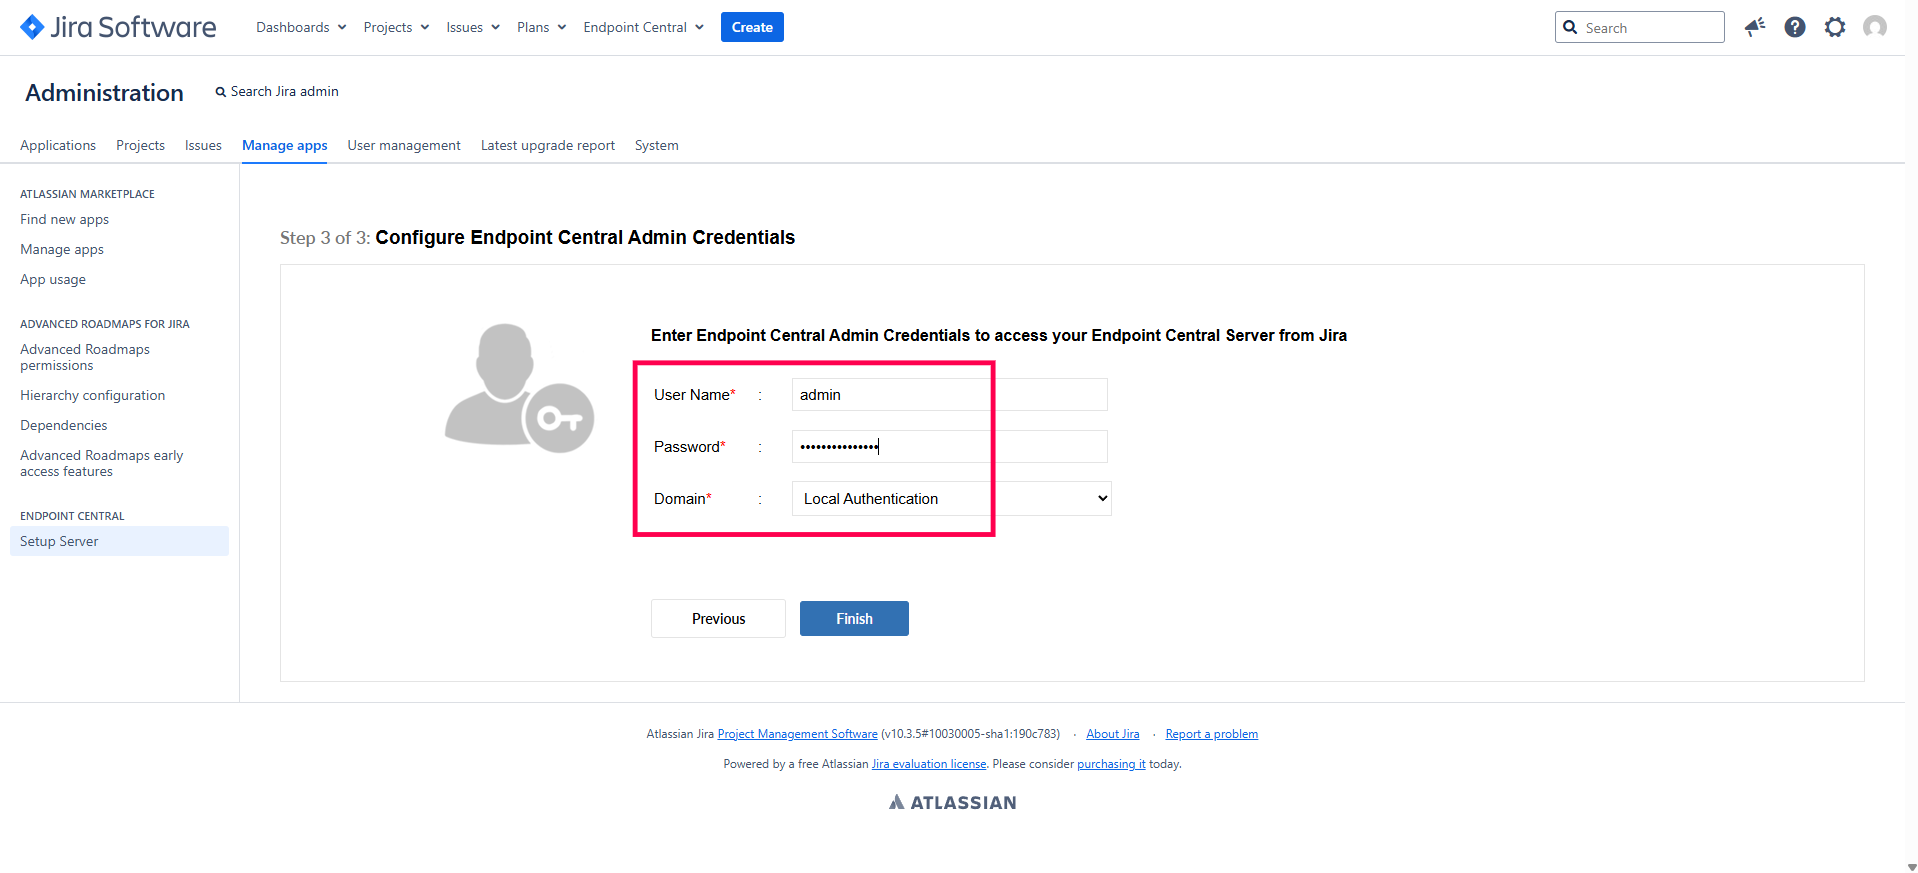
- Provide the user name and password of Endpoint Central's admin. Click Finish to complete the configuration.
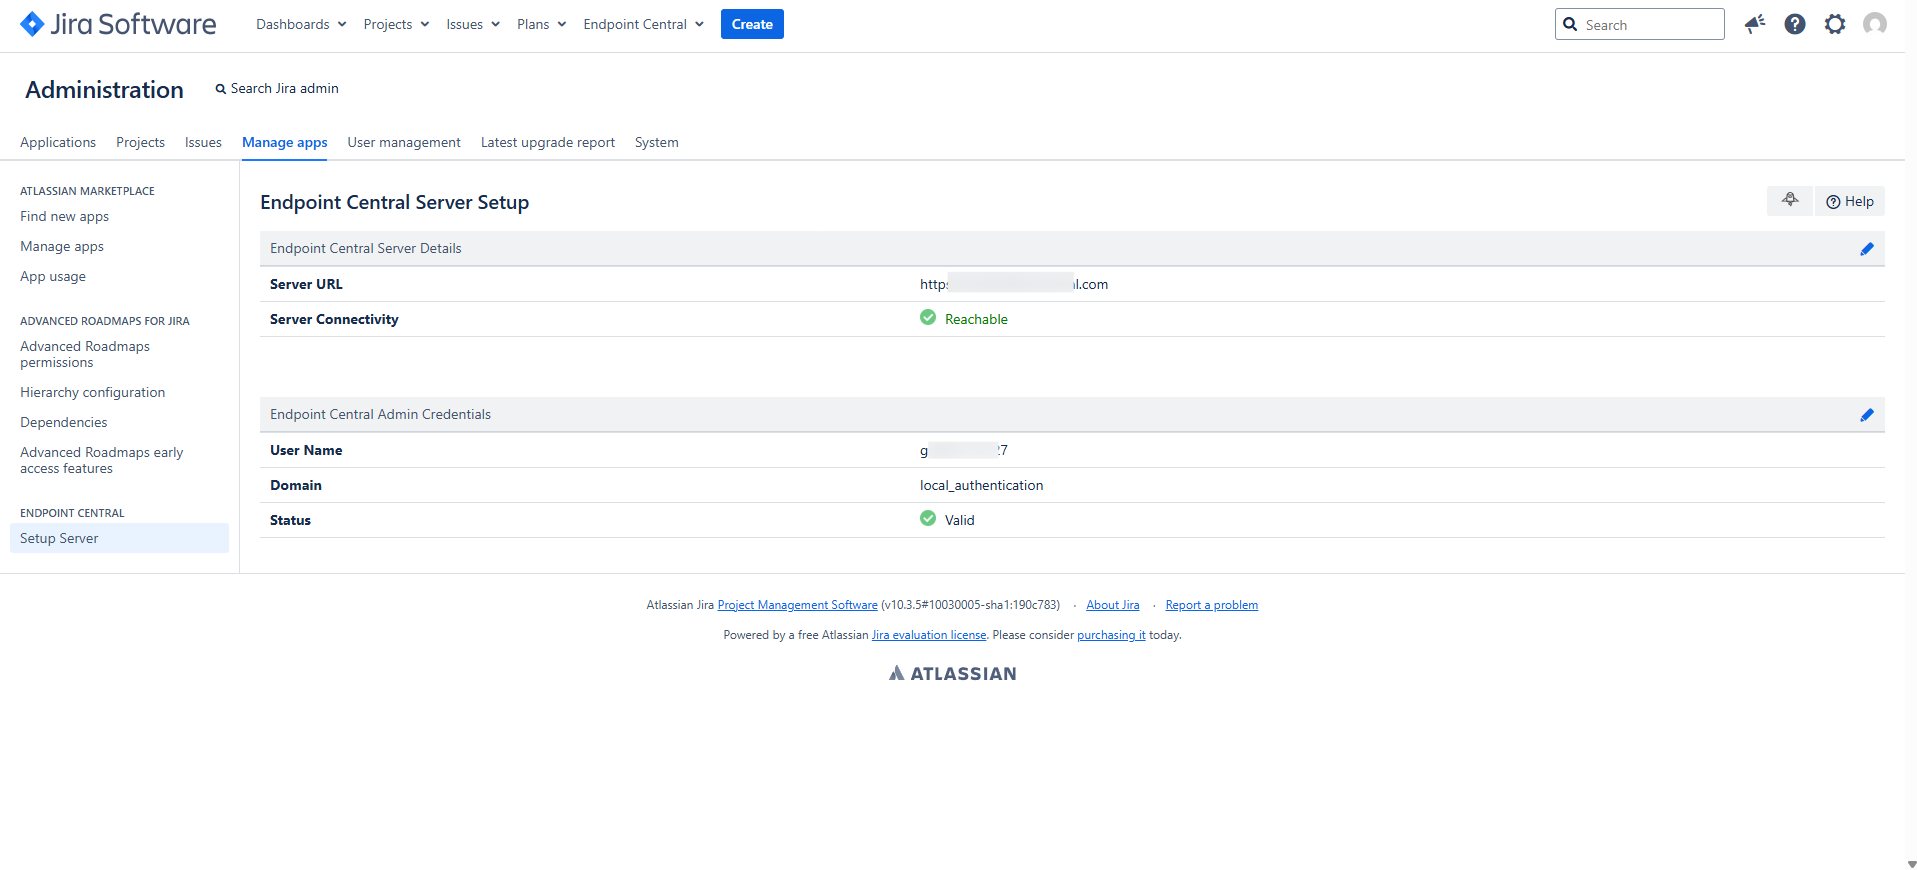
Steps to configure in Endpoint Central On-Premise
- Login to Endpoint Central and navigate to Admin > Jira settings.
- Click Integrate Now and choose On-premise.
- Provide the URL of Jira Data Center Server and provide the user name and password of Jira admin user and click Save.
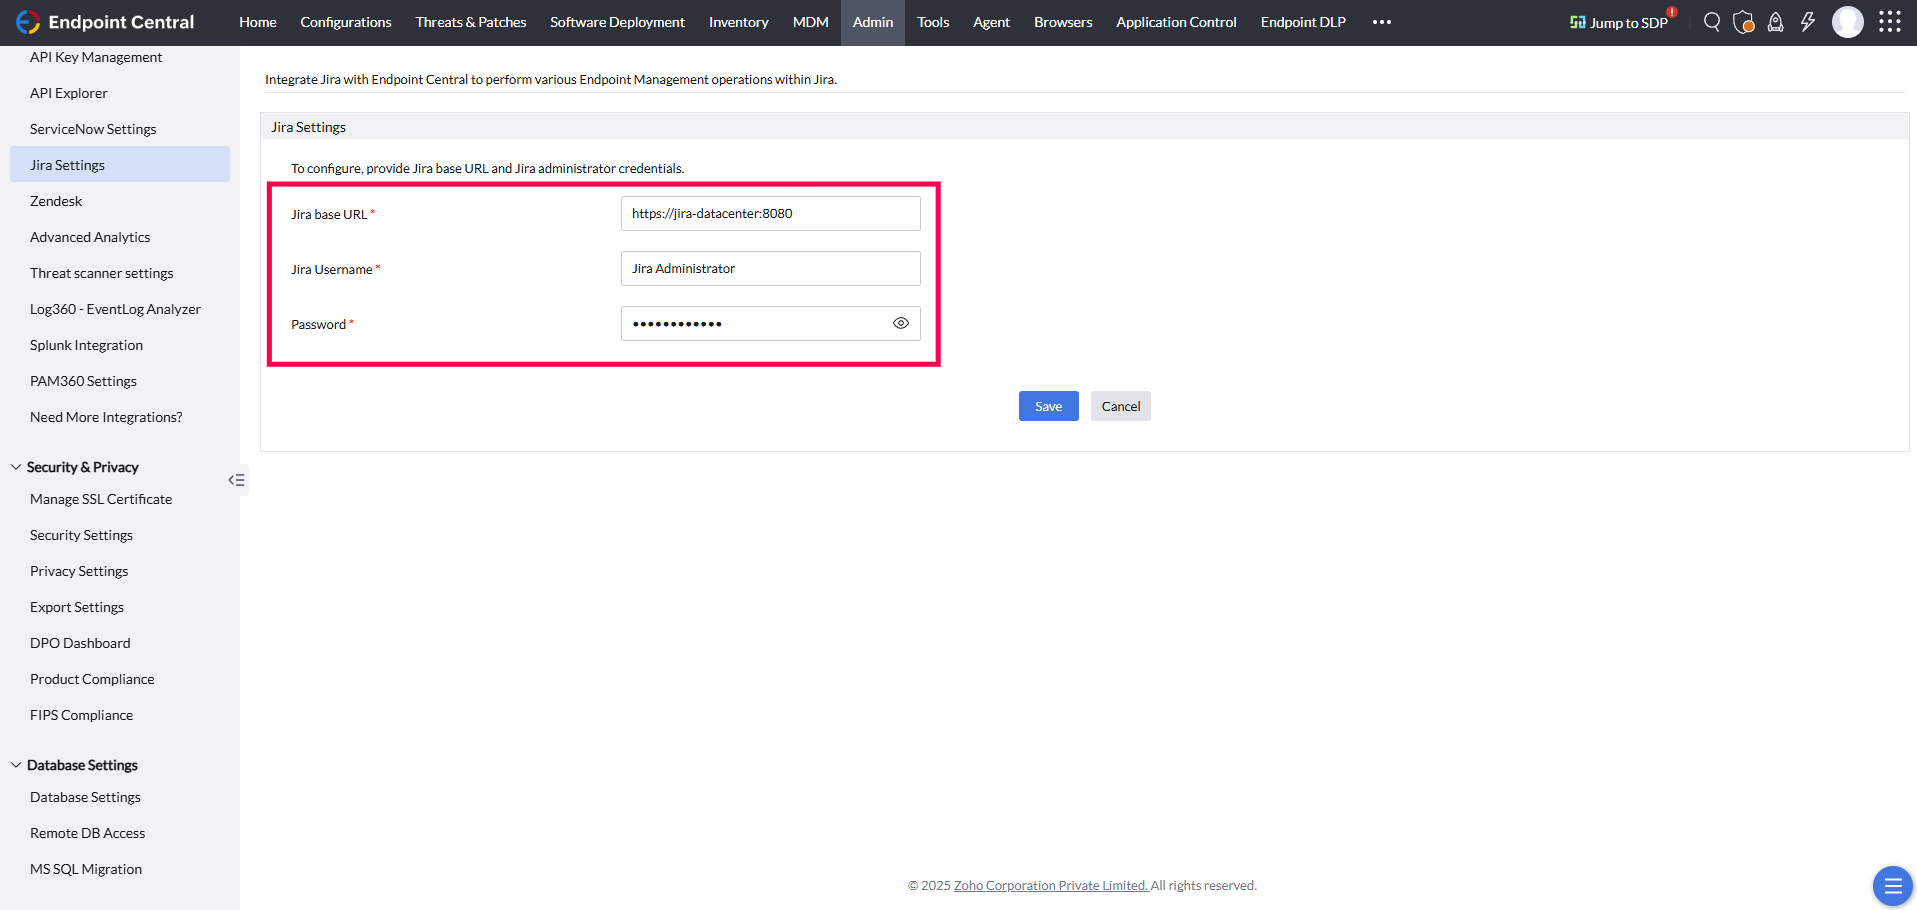
- You have successfully configured Endpoint Central app.
Other Jira users can securely authenticate themselves directly from the issue window using their Endpoint Central credentials, ensuring proper access control based on their roles and permissions.

Sync Endpoint Central Assets to Jira Assets
You can seamlessly sync asset data from Endpoint Central to Jira Assets. This allows automatic and scheduled sync of asset inventory from Endpoint Central into Jira, helping you to maintain accurate and up-to-date asset information across both platforms.
To sync assets from Endpoint Central to Jira Assets, follow these steps:
- Go to Jira Assets and click Create Schema. Select Blank Schema from the options.


- Enter a suitable Name and Key for the schema, then click Create.
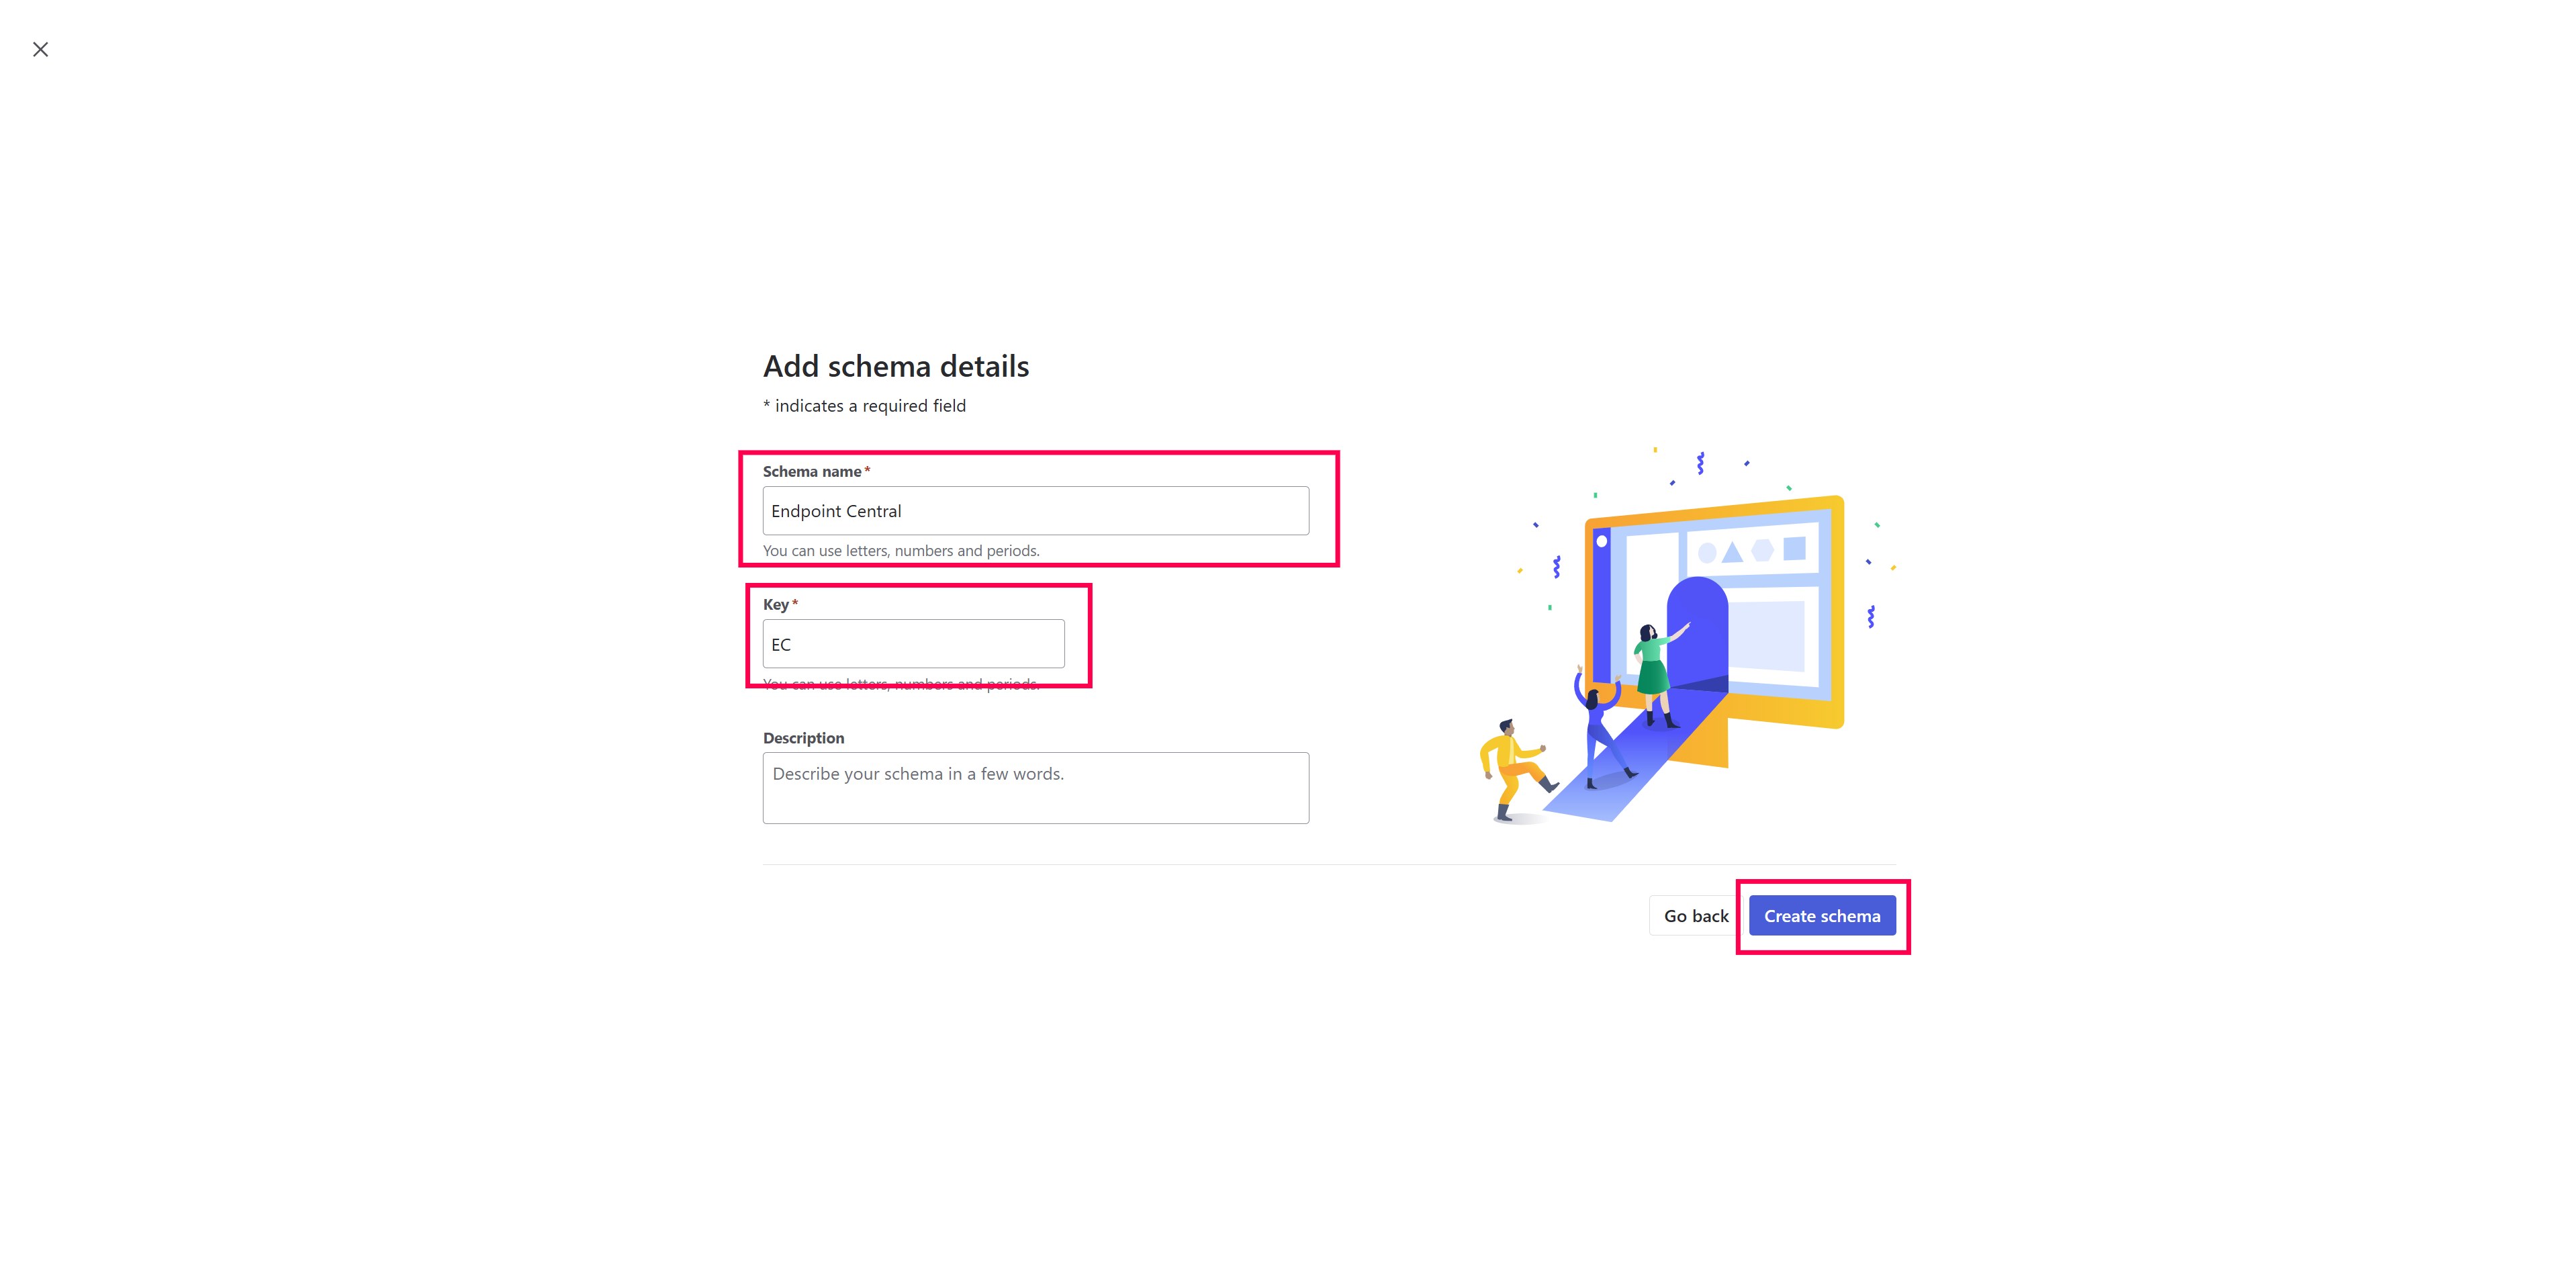
- Open the newly created schema, click the Settings icon, and navigate to the Import tab.


- Click Create Import, select Endpoint Central as the source, and then click Next.
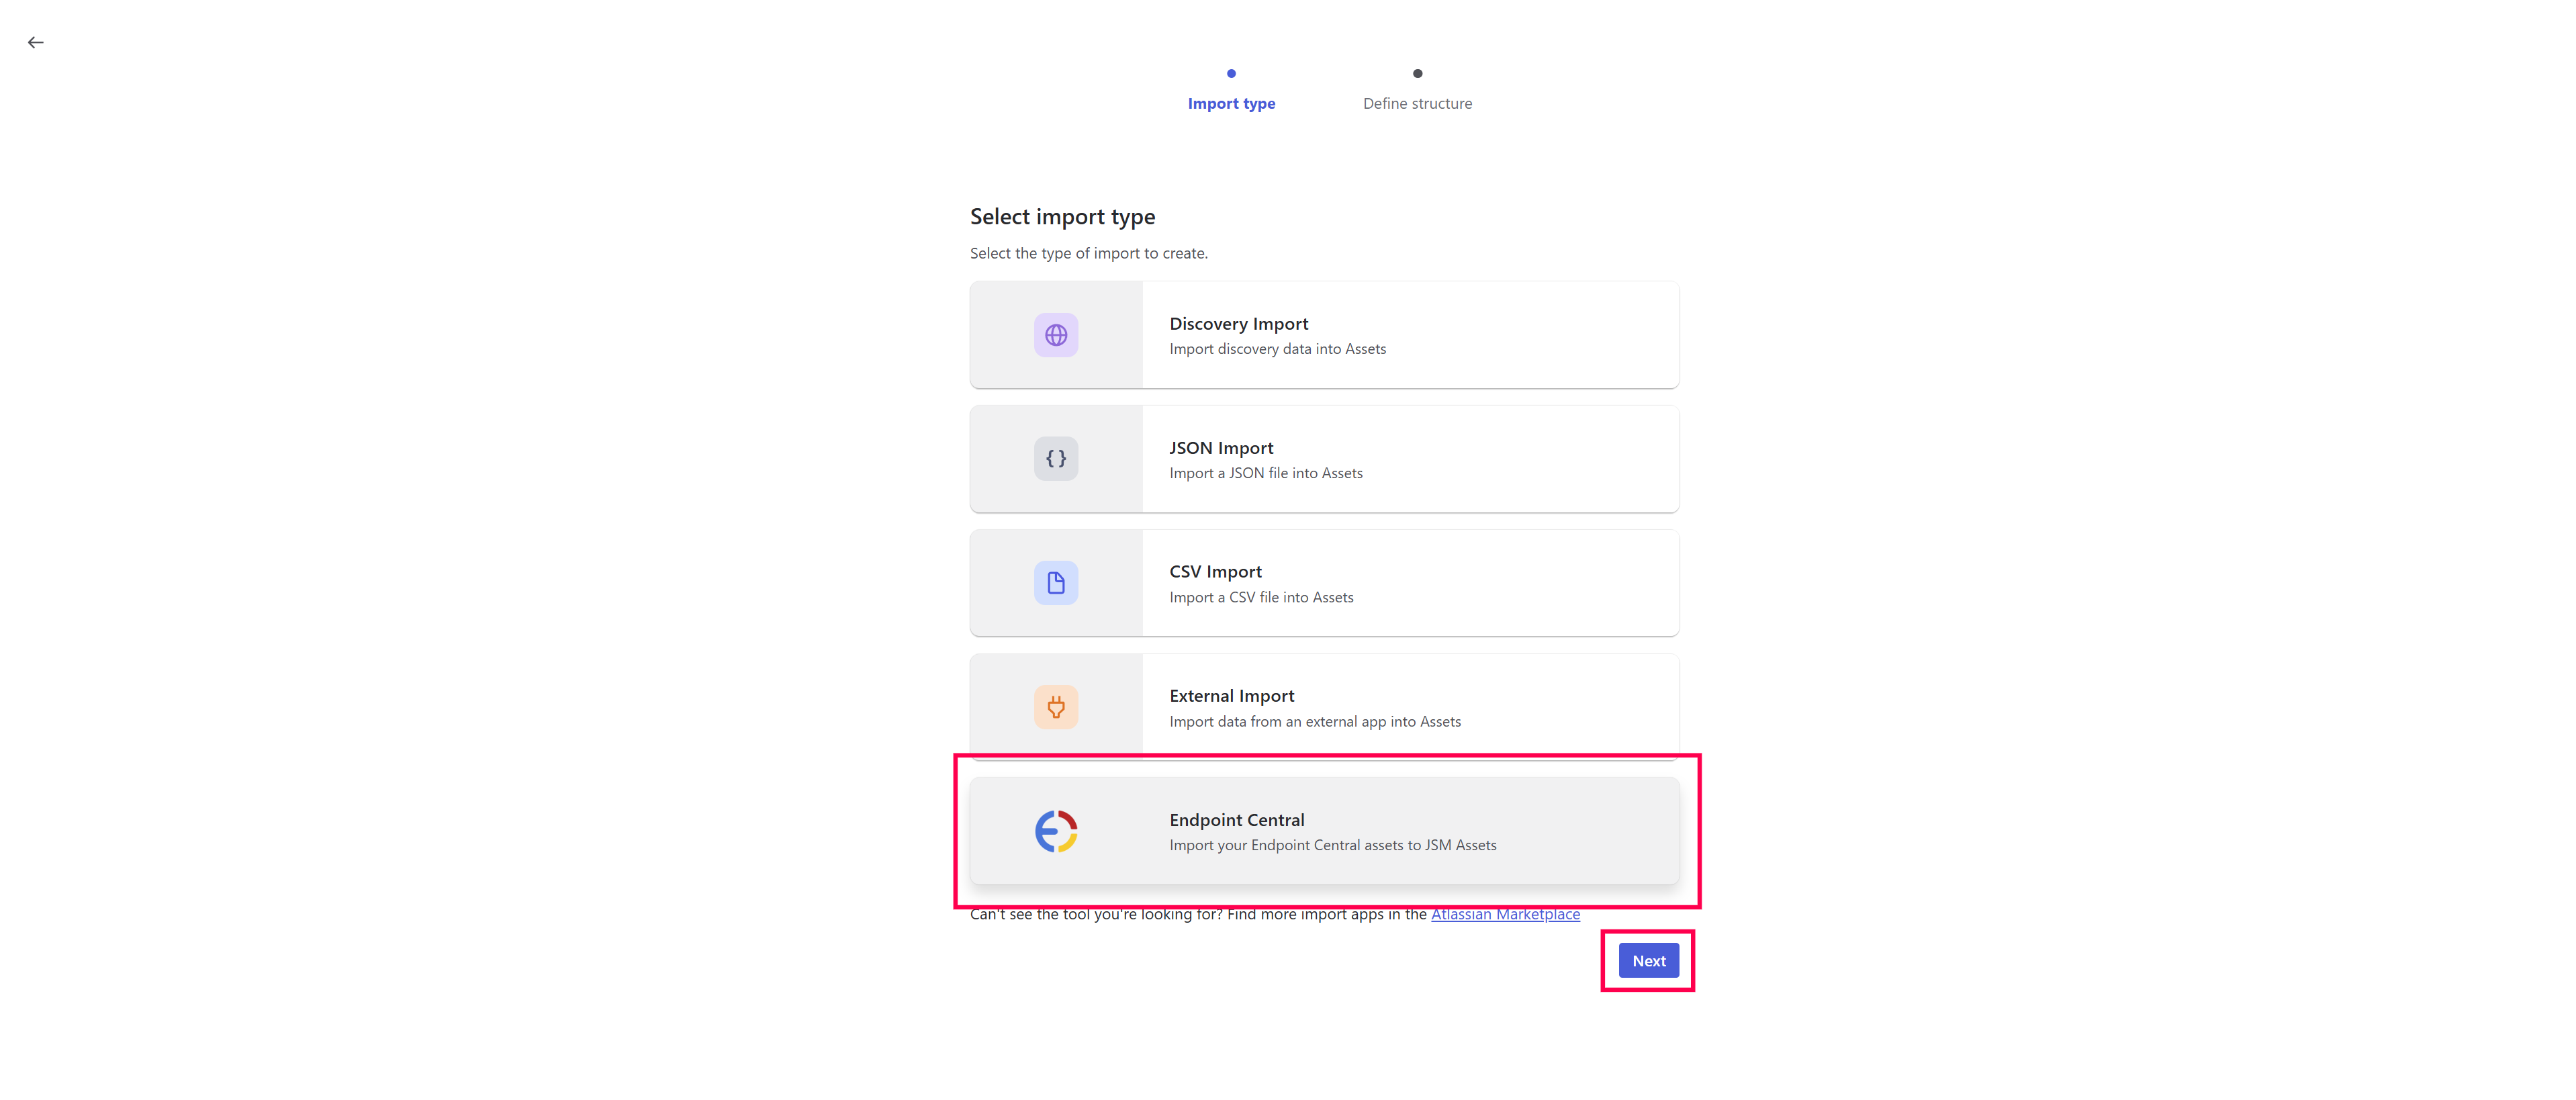
- Enter a Name for the import configuration and click Create.

- Once the import is created, click Import Data to start syncing assets from Endpoint Central.

- After the initial sync, data will continue to sync automatically based on the configured interval in the Endpoint Central app settings.
This feature is supported only for:
- Endpoint Central On-Premise integration with Jira Service Management Cloud
- Endpoint Central Cloud integration with Jira Service Management Cloud
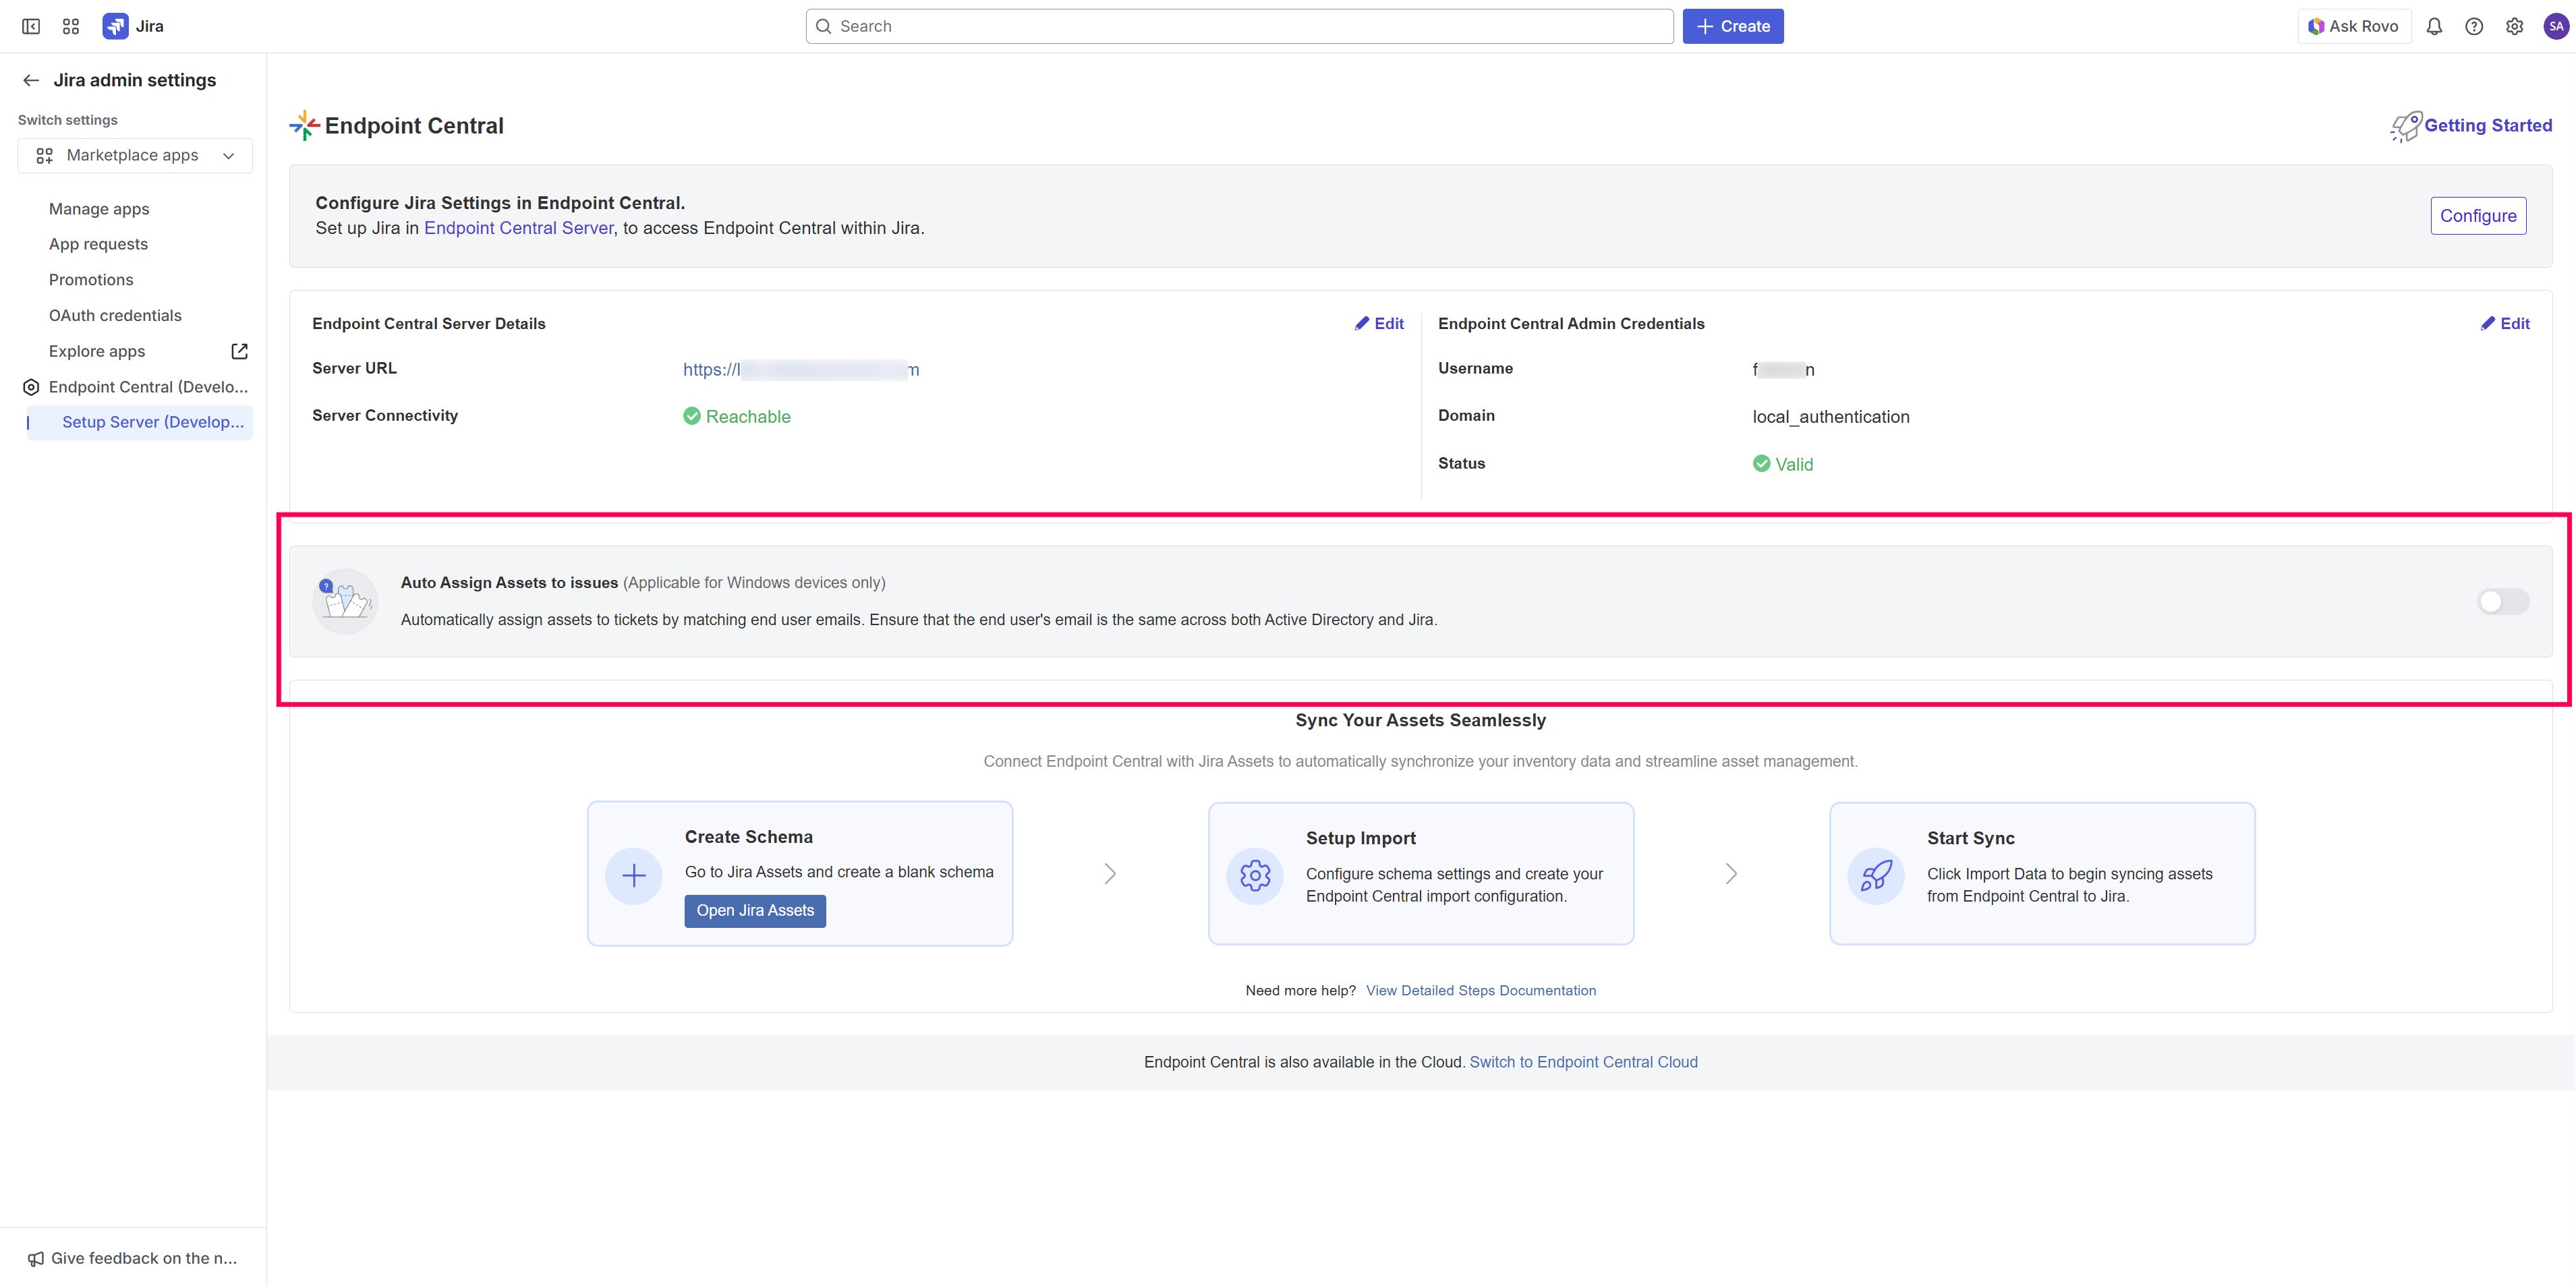
Auto assign Assets to Work Items (Issues)
By enabling the Auto Assign assets feature, the machine is automatically mapped to that issue whenever an issue request is created in Jira. This saves a lot of trouble for the issue resolver as there is no longer a need to map the machines manually.
Go to the Setup Server page, enable Auto Assign assets.
This feature is supported only for:
- Machines running Windows OS supported by Endpoint Central agents. Refer to the supported OS list.
- Endpoint Central On-Premise integration with Jira Service Management Cloud
Related Articles

