Azure Integration for Certificates and TLS Secrets Management from Azure Key Vault
Key Manager Plus (KMP) integrates with Microsoft Azure Key Vault — a cloud service for managing SSL certificates and secrets. This integration enables users to request, renew, and manage the SSL certificates stored in the Azure Key Vault by importing them into the Key Manager Plus repository. You can automatically renew certificate requests and automate the end-to-end lifecycle management of SSL/TLS certificates stored and managed in the Azure Key Vault, directly from the Key Manager Plus web interface.
- How does the KMP - Azure Key Vault Integration Work?
- Importing Azure Key Vaults
- Managing Certificates from Azure Key Vaults
a. Discovering Certificates from Azure Key Vaults
b. Creating a Certificate Request
c. Renewing, Deleting, Filtering all Versions of Certificates - Azure TLS Secret Management from Key Manager Plus
a. Discovering TLS Secrets from Azure Key Vault
b. Managing Azure TLS Secrets from Key Manager Plus
1. How does the KMP — Azure Key Vault Integration Work?
Let's say you manage a number of Key Vaults in the Azure portal and each of those Key Vaults contains a number of SSL certificates. KMP lets you add your Azure credentials in the product and then automatically imports the Key Vaults corresponding to your Azure credentials into the KMP repository. Once your Key Vaults are added, you may discover the certificates that are stored in the Key Vaults using the discovery operation. KMP allows you to create new certificate requests and renew the existing certificates that are both created in KMP and imported from Azure Key Vault. You can import and manage different versions of the same certificate from the Key Vaults.
- To perform the KMP - Azure Key Vault integration, the following Azure Credentials are required: Application/client ID, Directory/tenant ID, Subscription ID, and client secret.
- You must provide API Access permission to the Key Vault from which you wish to import certificates into KMP. The Key Vaults you are importing into KMP must also have the following permissions: Key permissions, Secret permissions, Certificate permissions under Access Policies.
- The Key Vault owner must have permission to list the key vaults. To grant this, go to Access Control (IAM) >> Add >> Add role assignment and select Assign access to as User, group, or service principal.
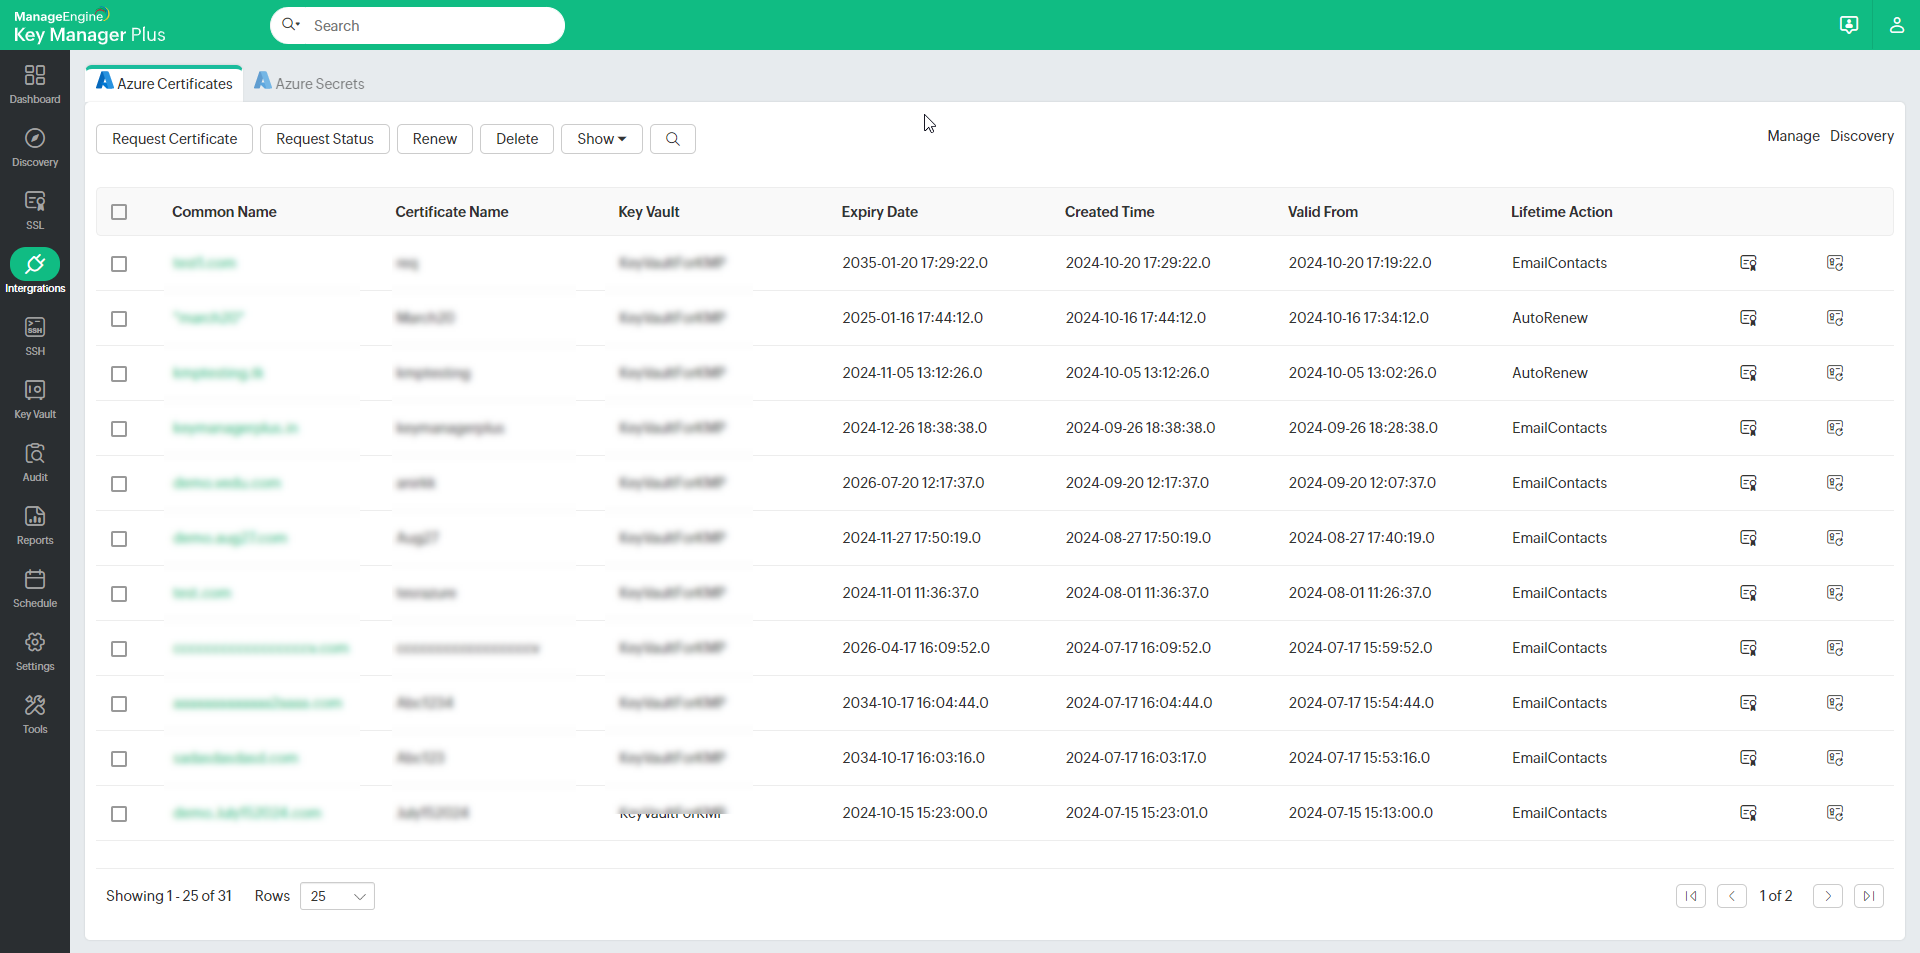
2. Importing Azure Key Vaults
To begin importing Key Vaults and their corresponding certificates from the Azure portal, you must add your Azure credentials in the KMP interface.
a. Adding Azure Credentials
To import all key vaults that are being managed in the Azure portal, you must add your Azure credentials in KMP. Follow the below steps:
- Navigate to Integrations >> Others >> Azure.
- Go to Manage and click Add.
- In the Add Azure Credentials pop-up, enter the following attributes:
- Credential Name - Enter a unique credential name
- Subscription ID
- Directory ID
- Application ID
- Key
- Click Save.
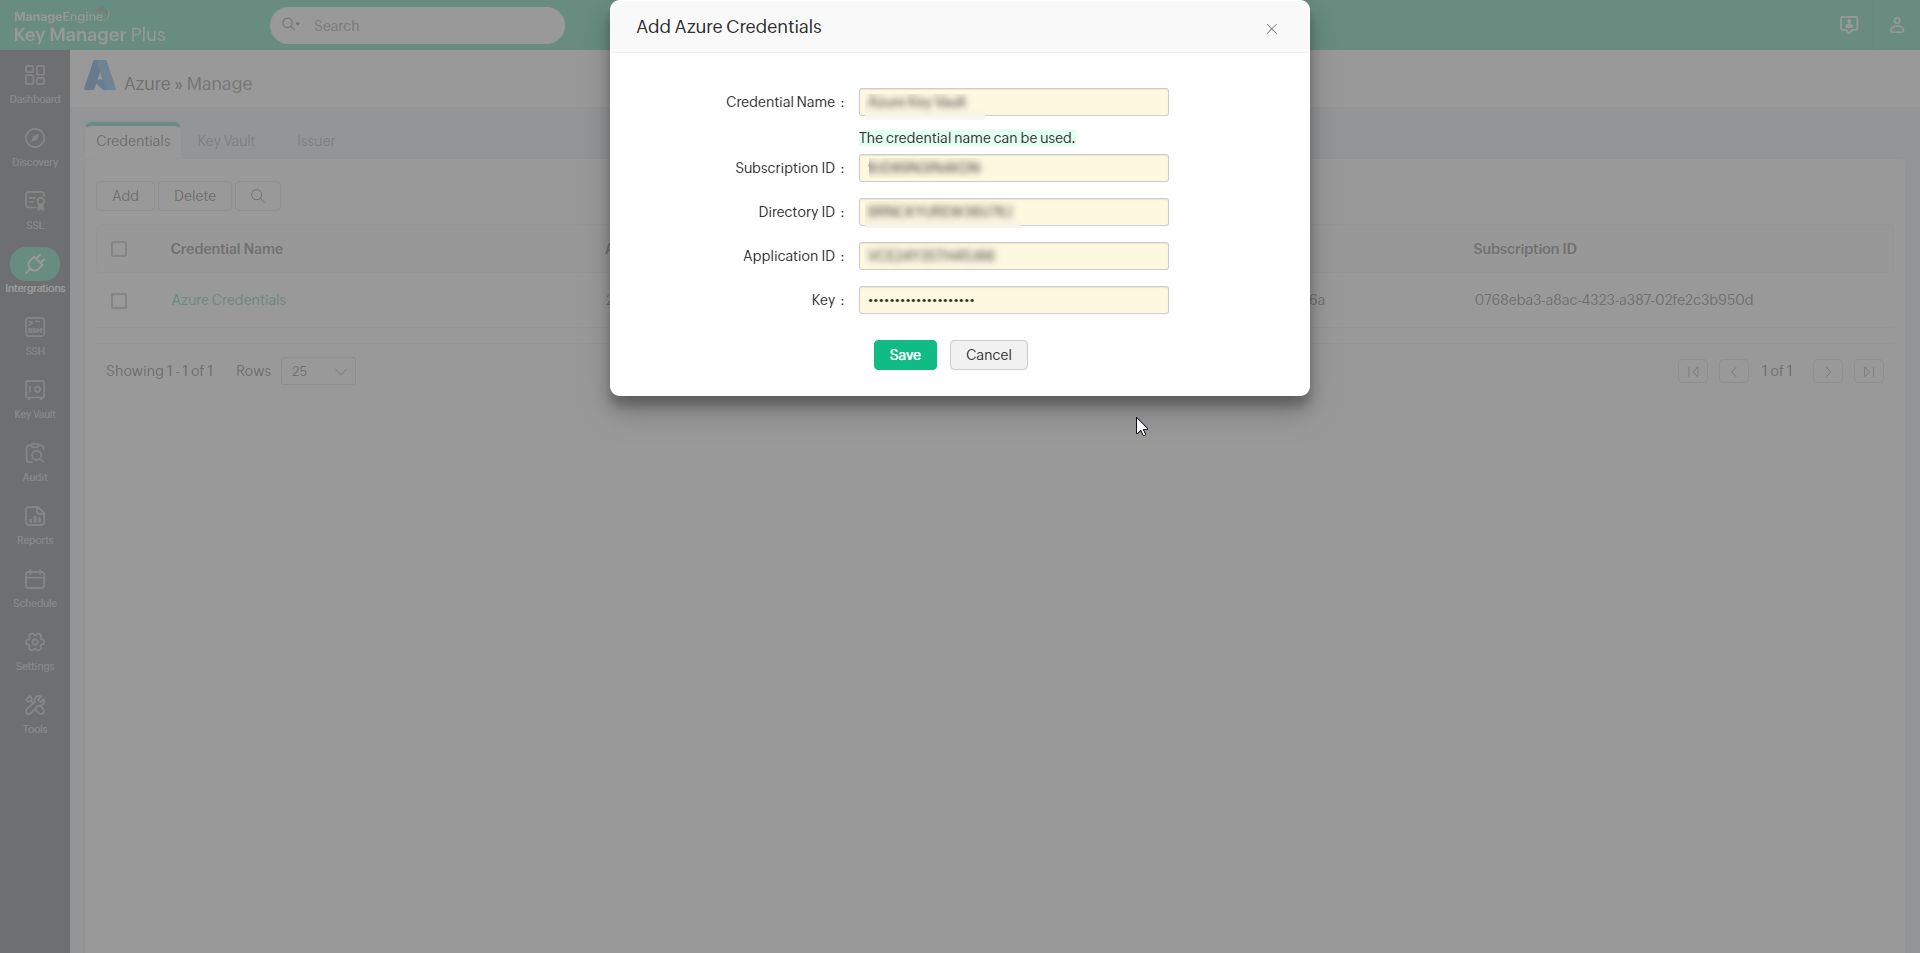
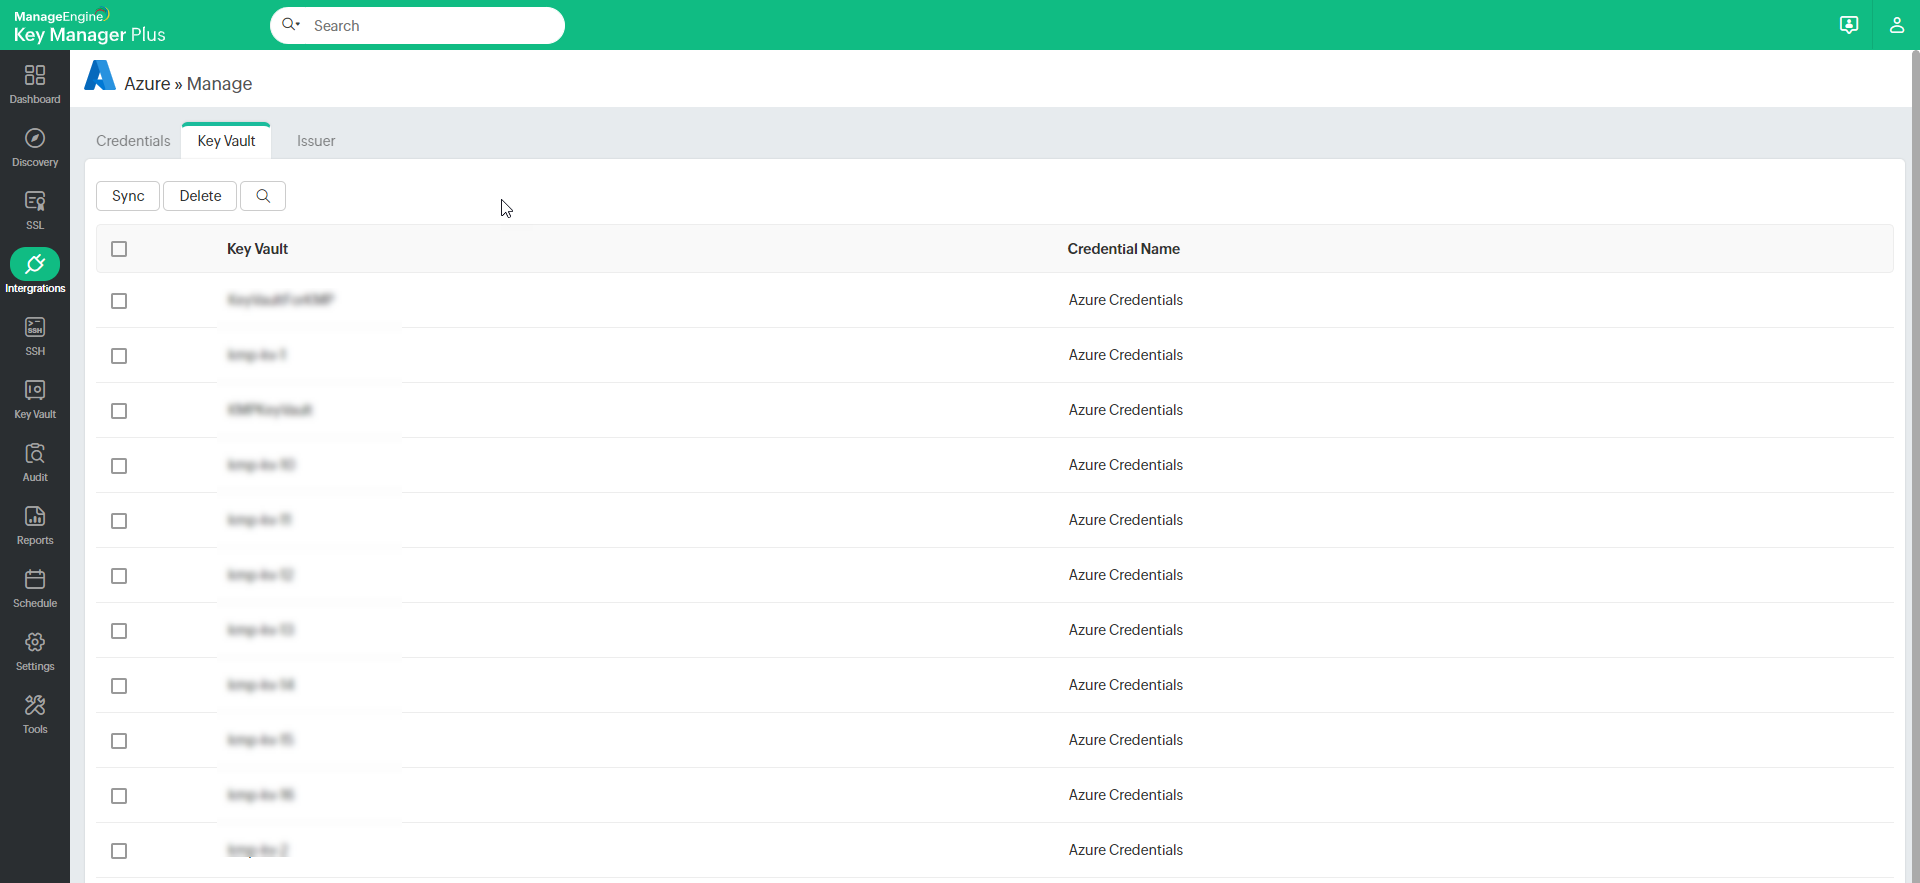
Once your credentials are saved, all the key vaults that are related to the saved credential will be automatically imported into KMP. All the imported vaults will be visible under the Key Vault tab. In case the key vaults are not imported, click the Sync button to manually kick-start the process. If you have any Issuer IDs saved in your Azure portal, press Sync and choose a Key Vault from the pop-up that appears. Now all the issuer certificates from the selected Key Vault will be listed under the Issuer tab.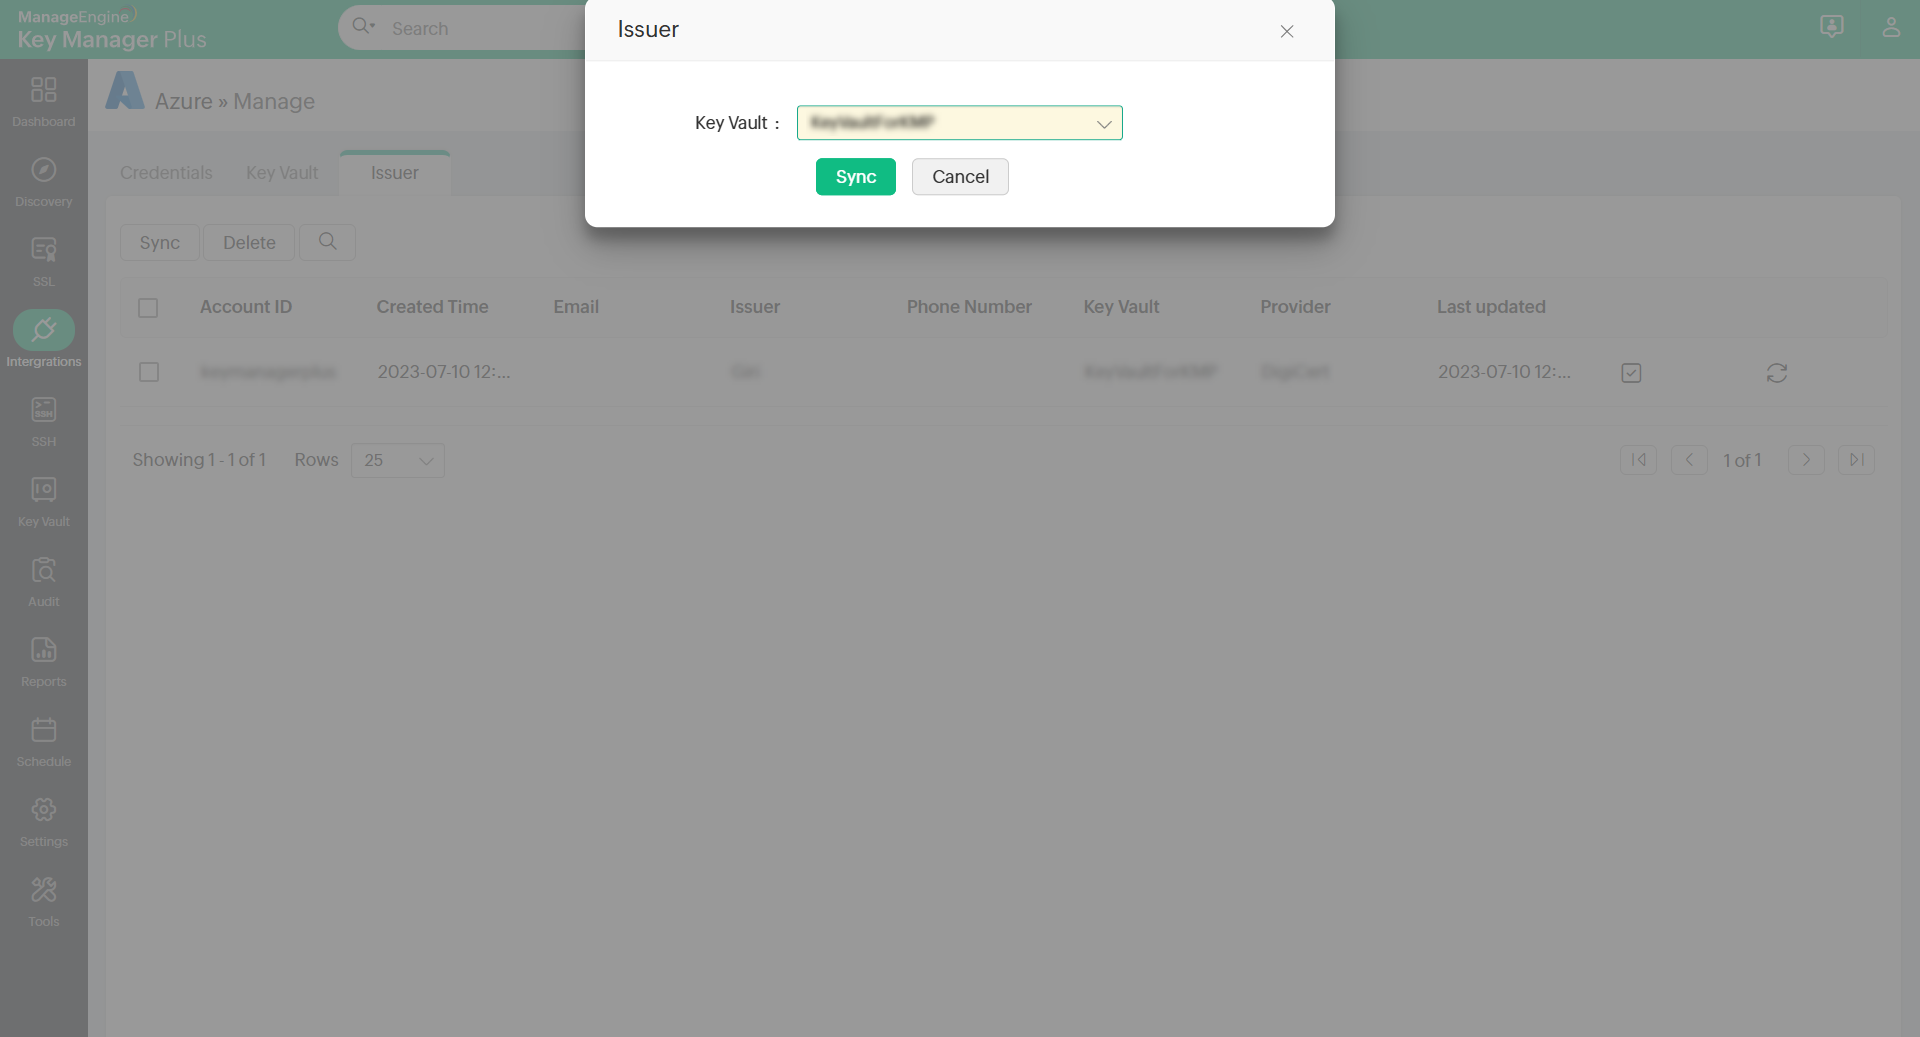
3. Managing Certificates from Azure Key Vaults
a. Discovering Certificates from Azure Key Vaults
Key Manager Plus enables you to discover, import, and configure expiry notifications for SSL certificates managed in the Azure portal.
- You can either navigate to Discovery >> Azure or Integrations >> Others >> Azure >> Discovery to start the discovery process.
- Choose the following attributes from the drop-downs:
- Credential Name - The Azure credential from which you wish to import key vaults.
- Key Vault - Choose the required key vault from which you wish to import certificates. In case you find that the certificates list is not fully updated, click the sync icon available beside the Key Vault drop-down to manually sync the certificate list from the Azure portal.
- Select the Import Previous Versions option to import all available versions of the certificates in the key vault. Click Import.
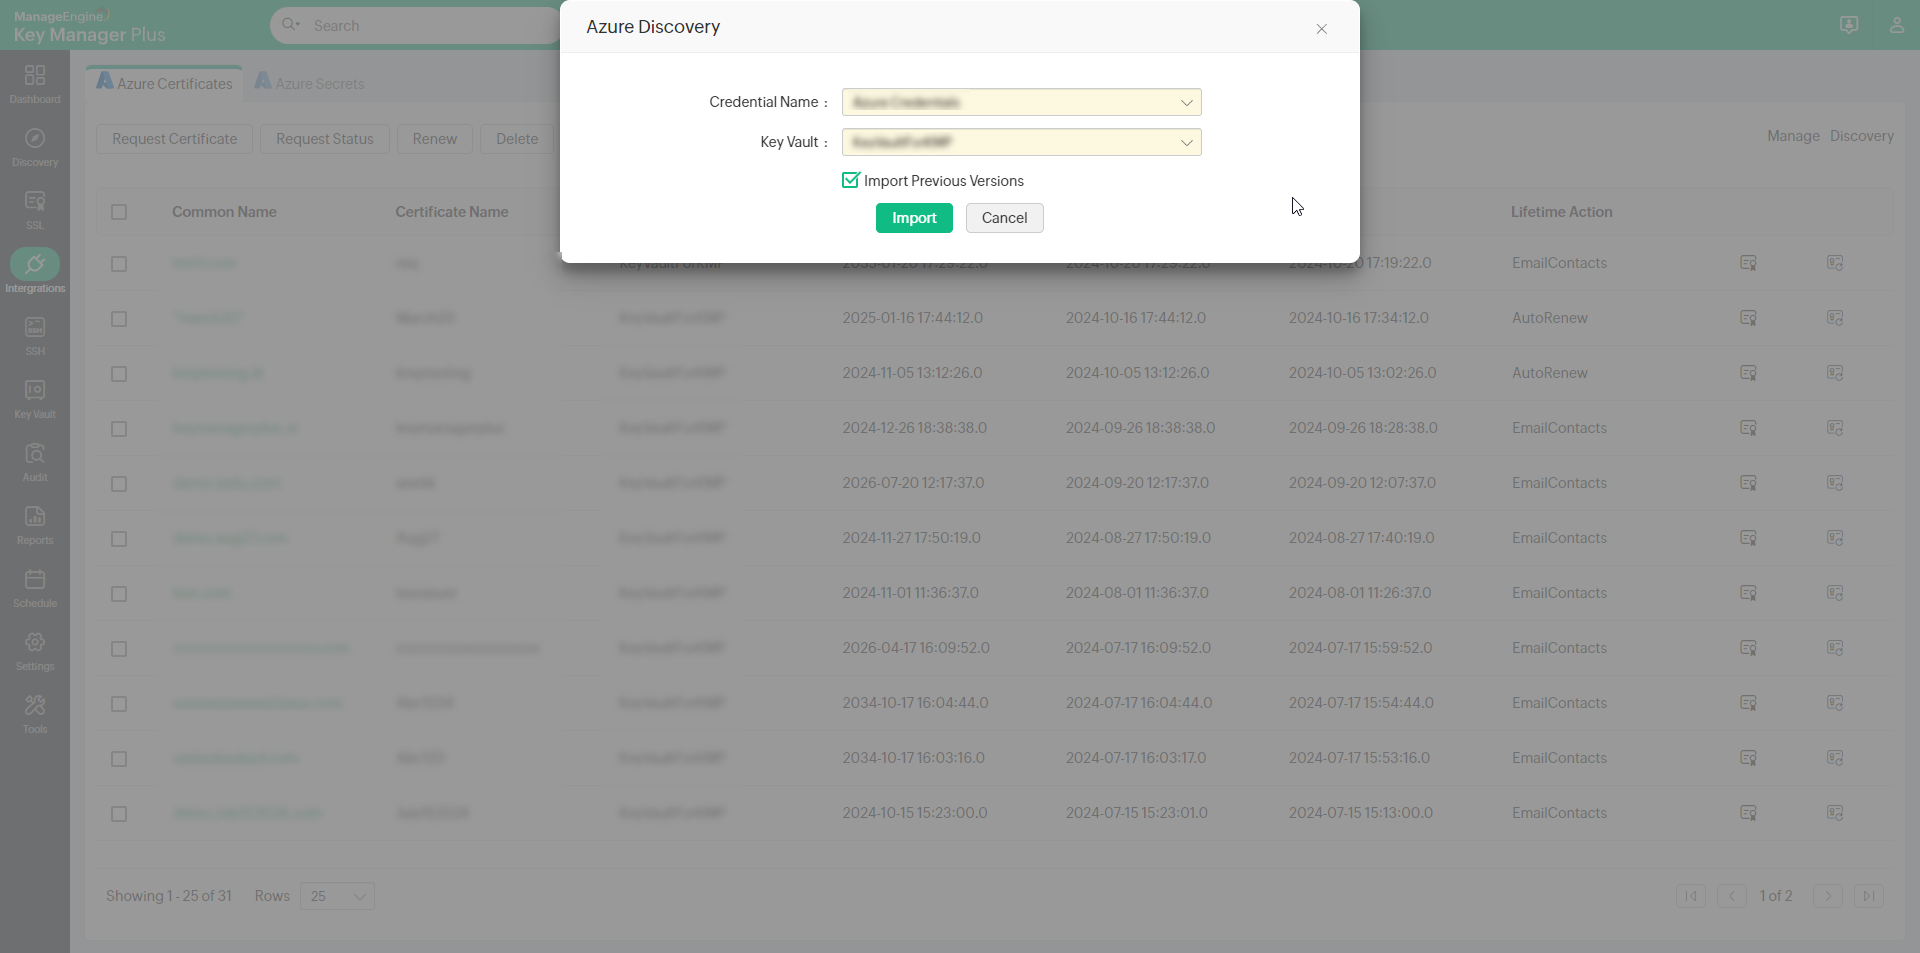
Now all the certificates from the selected Azure Key Vault will be imported and populated in the Azure tab.
Note: Please note that every version of a certificate will be considered as an individual certificate in KMP and therefore will impact your license count.
b. Creating a Certificate Request
Key Manager Plus allows you to create SSL certificate requests for your Azure credential in the Azure key vault that you require. You can even create new versions of existing certificates by providing the same certificate name. All the certificate requests created in KMP will be automatically updated in the Azure portal. Follow the below steps:
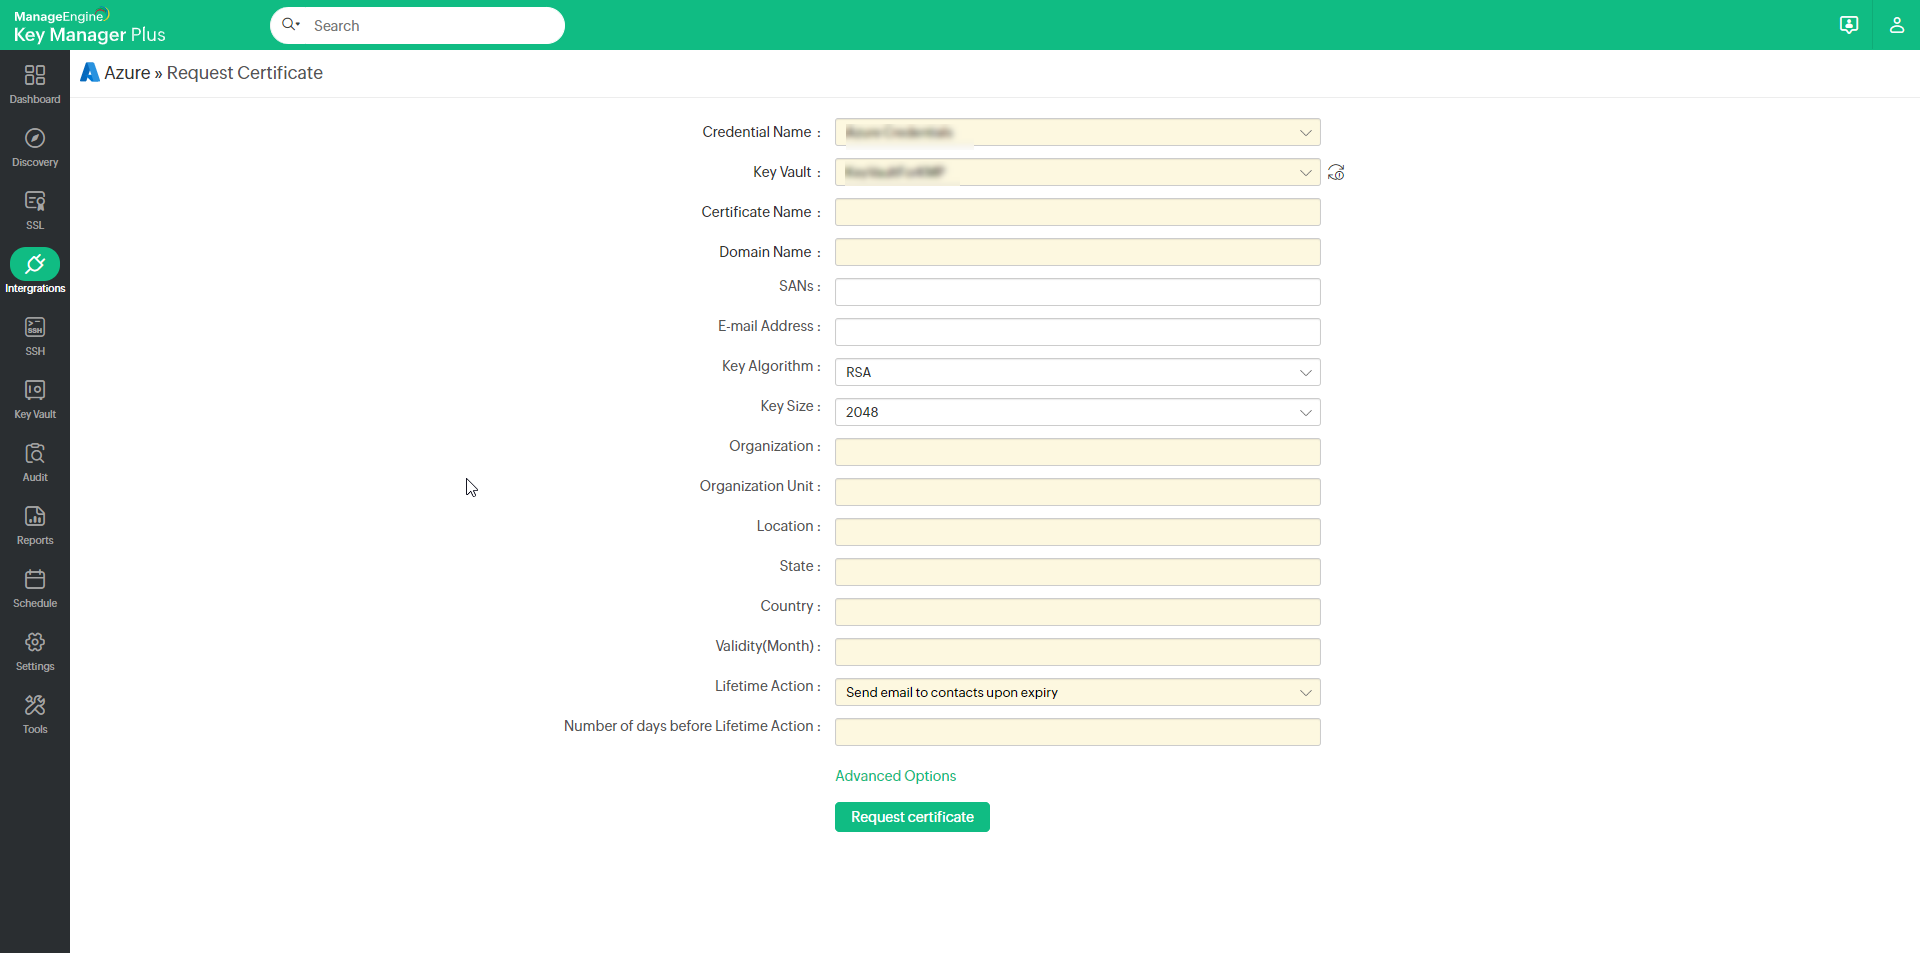
- Navigate to Integrations >> Others >> Azure and click Request Certificate.
- Choose your Azure Credential and the required key vault from the drop-down.
- Provide attributes such as the certificate name, domain name, SANs - You can add multiple SAN values separated by a comma.
- Enter an email address, choose a Key Algorithm and Key Size from the drop-downs and enter location details.
- Enter the certificate validity in months and choose a Lifetime Action from the drop-down. You can choose to either auto renew the certificate upon expiry or choose to send an email notification to your certificate contacts in the Azure portal.
- Enter the number of days before which the chosen Lifetime Action must be invoked.
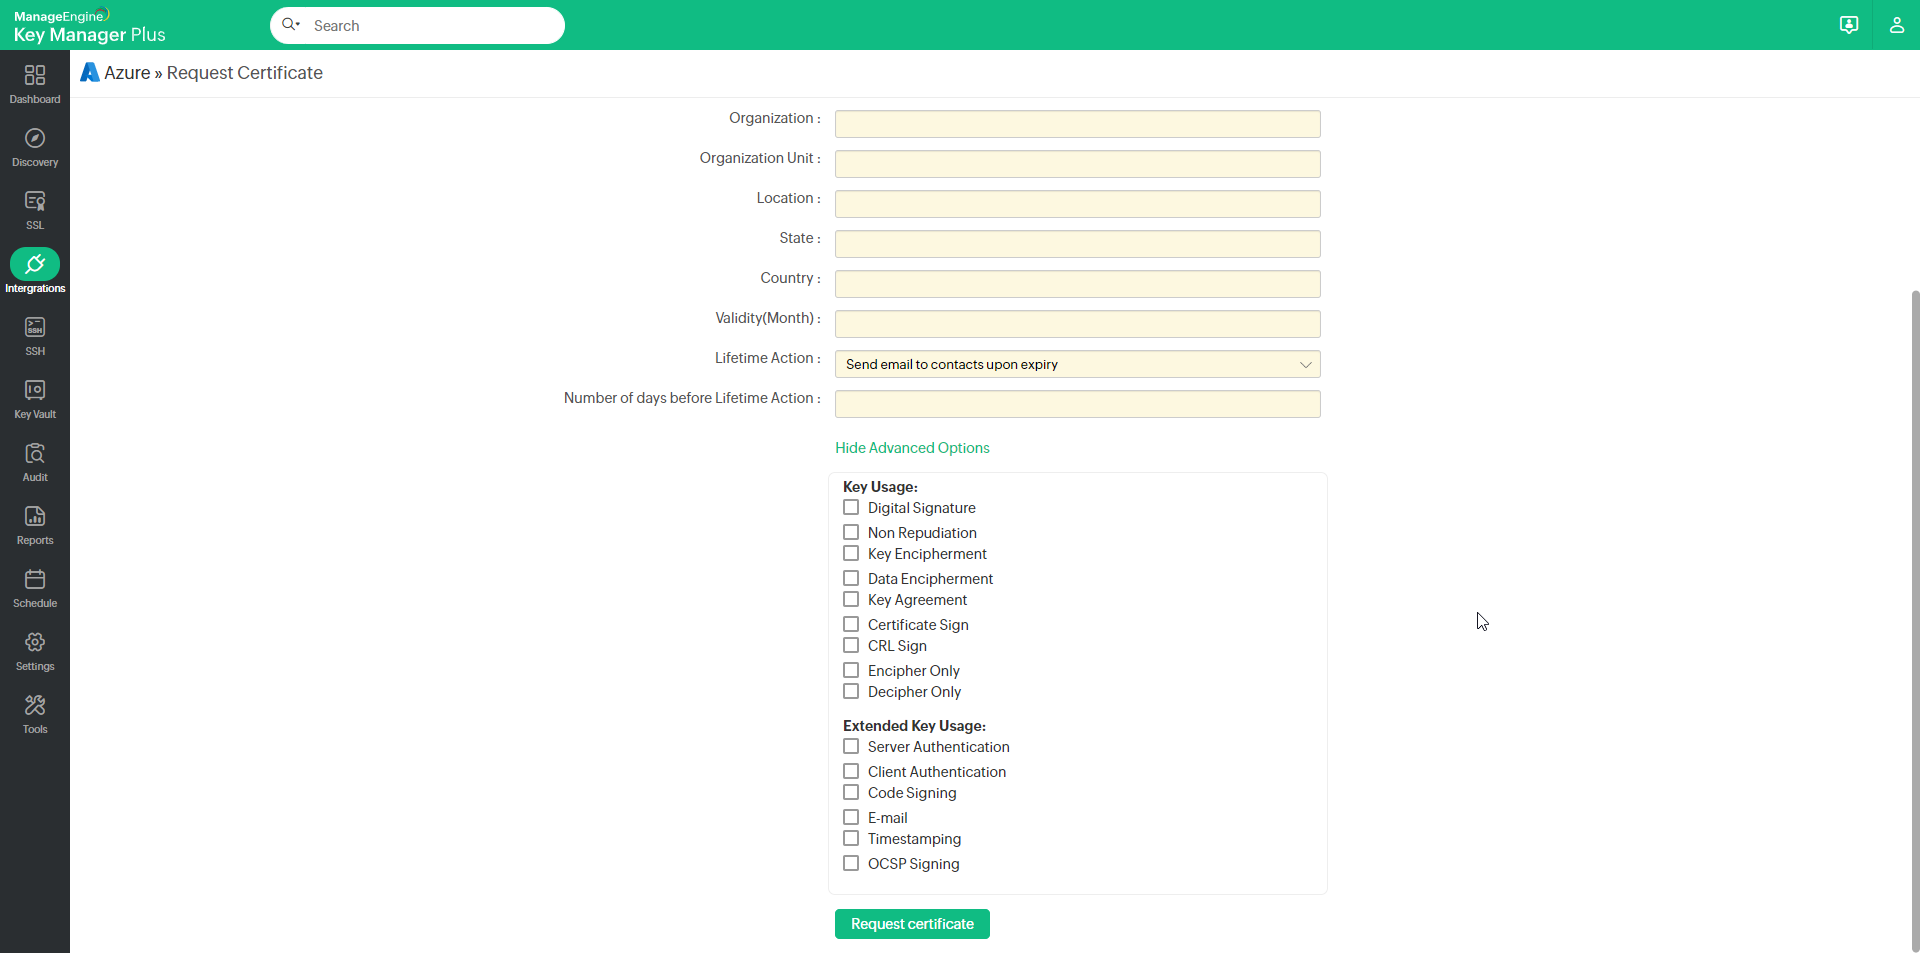
- To add optional properties to the new certificate, click Advanced Options to expand the menu. Here, there are two categories of options, Key Usage and Extended Key Usage. Select the required options to set the preferred flags for the certificate to denote the purpose for which the new certificate may be used. The Key Usage options include Non Repudiation, Digital Signature, Data or Key Encipherment, Server/Client Authentication etc. You can choose the properties and mark them as critical by selecting the Critical checkbox.
- After adding all the details, click Request Certificate. A new certificate request is created in both KMP and the Azure portal.
Once the request is created, go to the Request Status tab to view the status and other details pertaining to a certificate. To obtain the latest certificate from your request, click the Obtain Certificate option available beside the certificate.
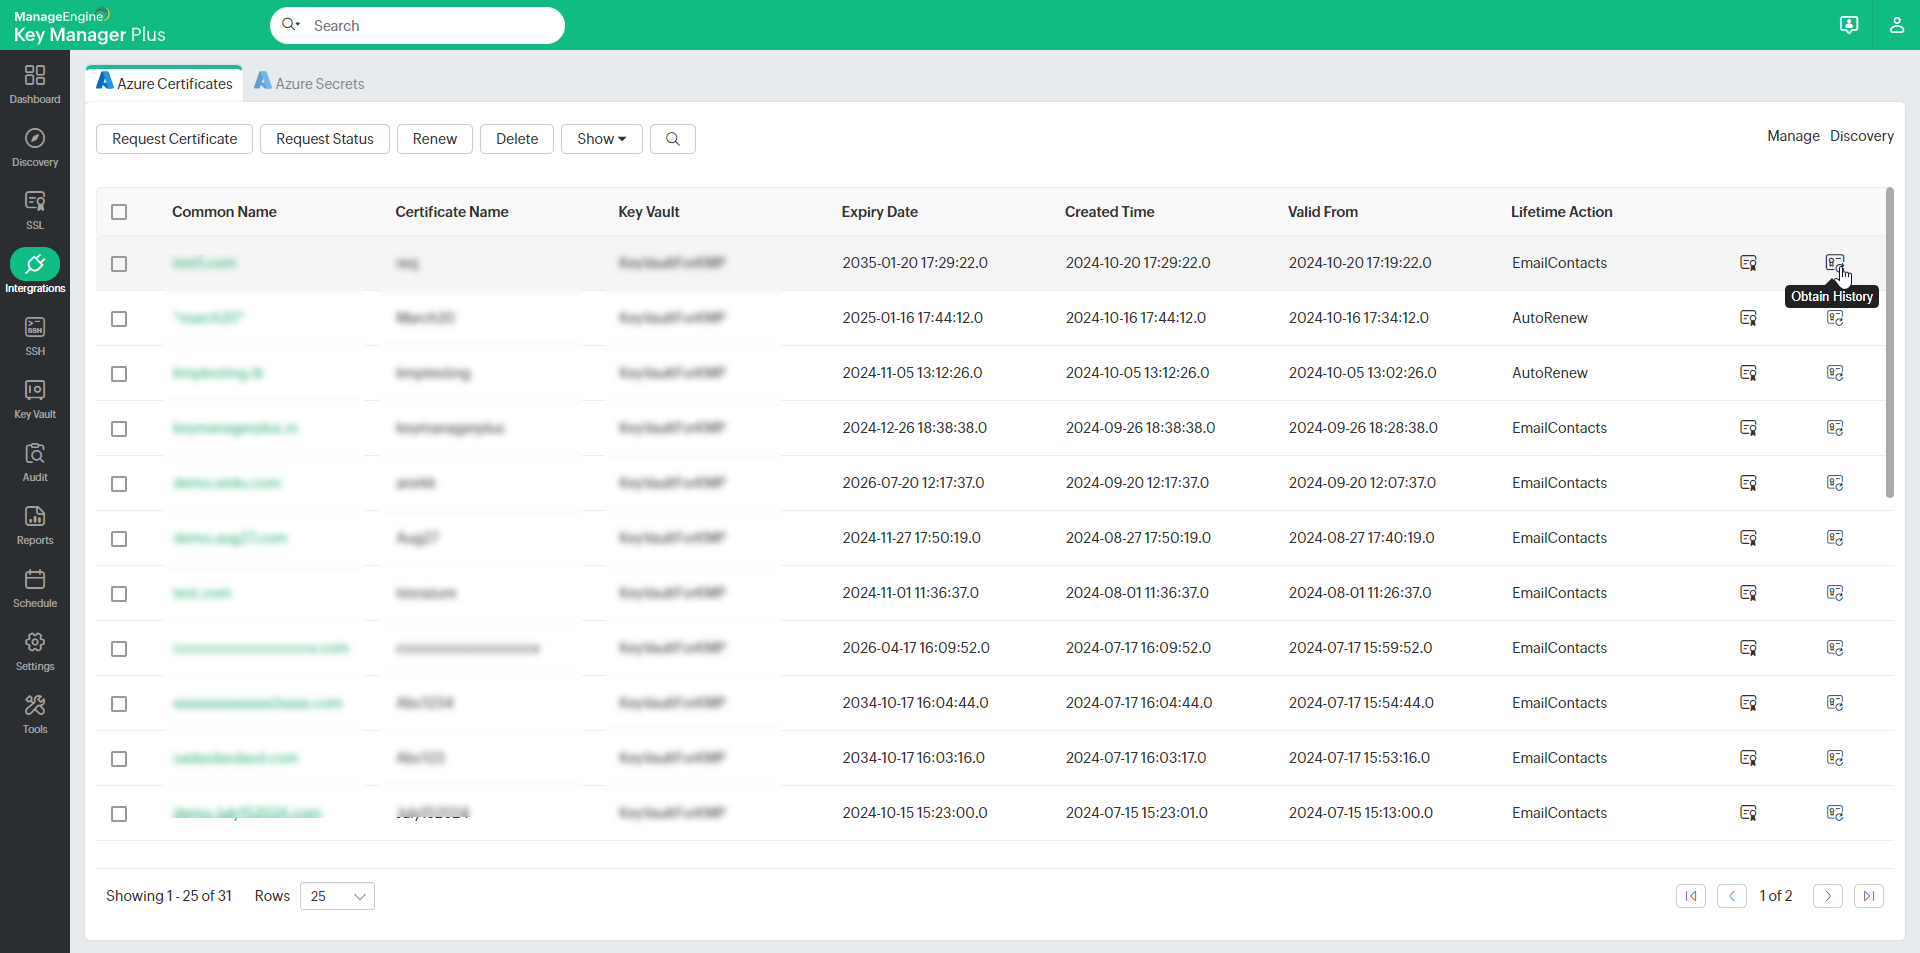
The following operations can be done on the certificates being managed from the Azure tab:
- Obtain Certificate - This option retrieves the selected certificate from the Azure portal.
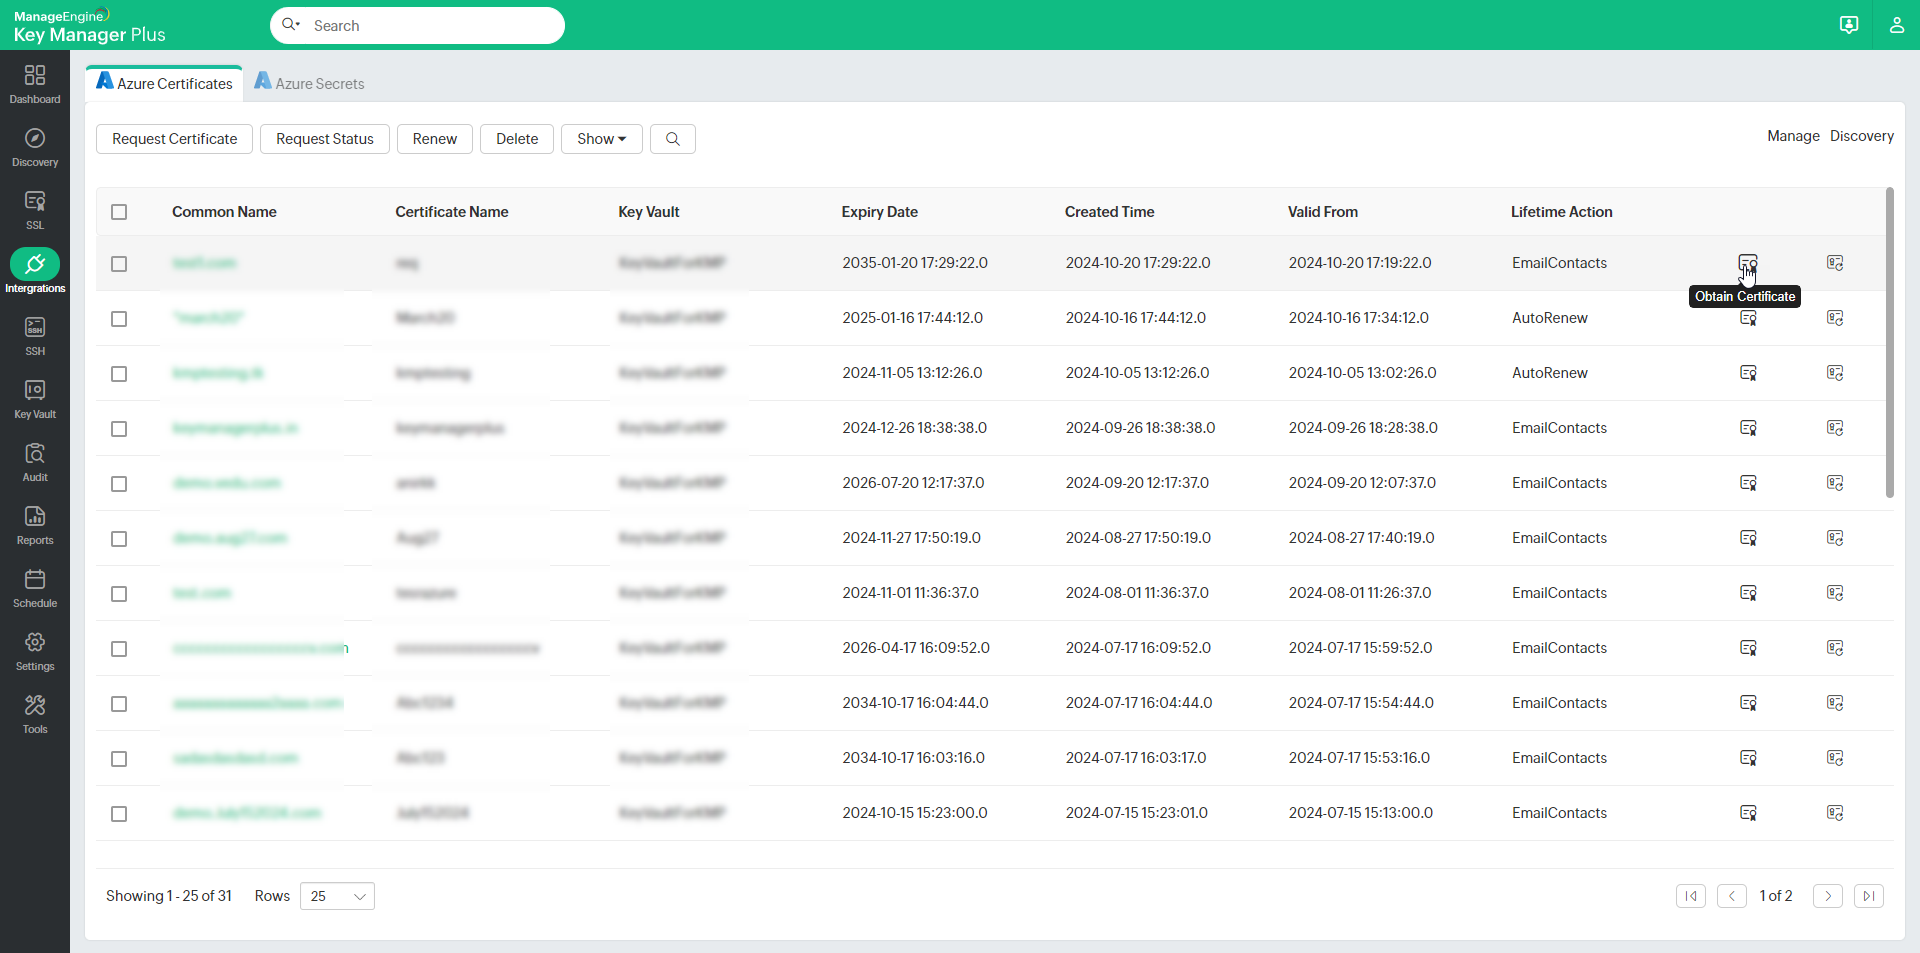
- Obtain History - This option retrieves all the versions of the selected certificate from the Azure portal.
c. Renewing, Deleting, Filtering all Versions of Certificates
i. Renewing Certificates
Key Manager Plus allows you to renew Azure certificates right from the KMP interface.
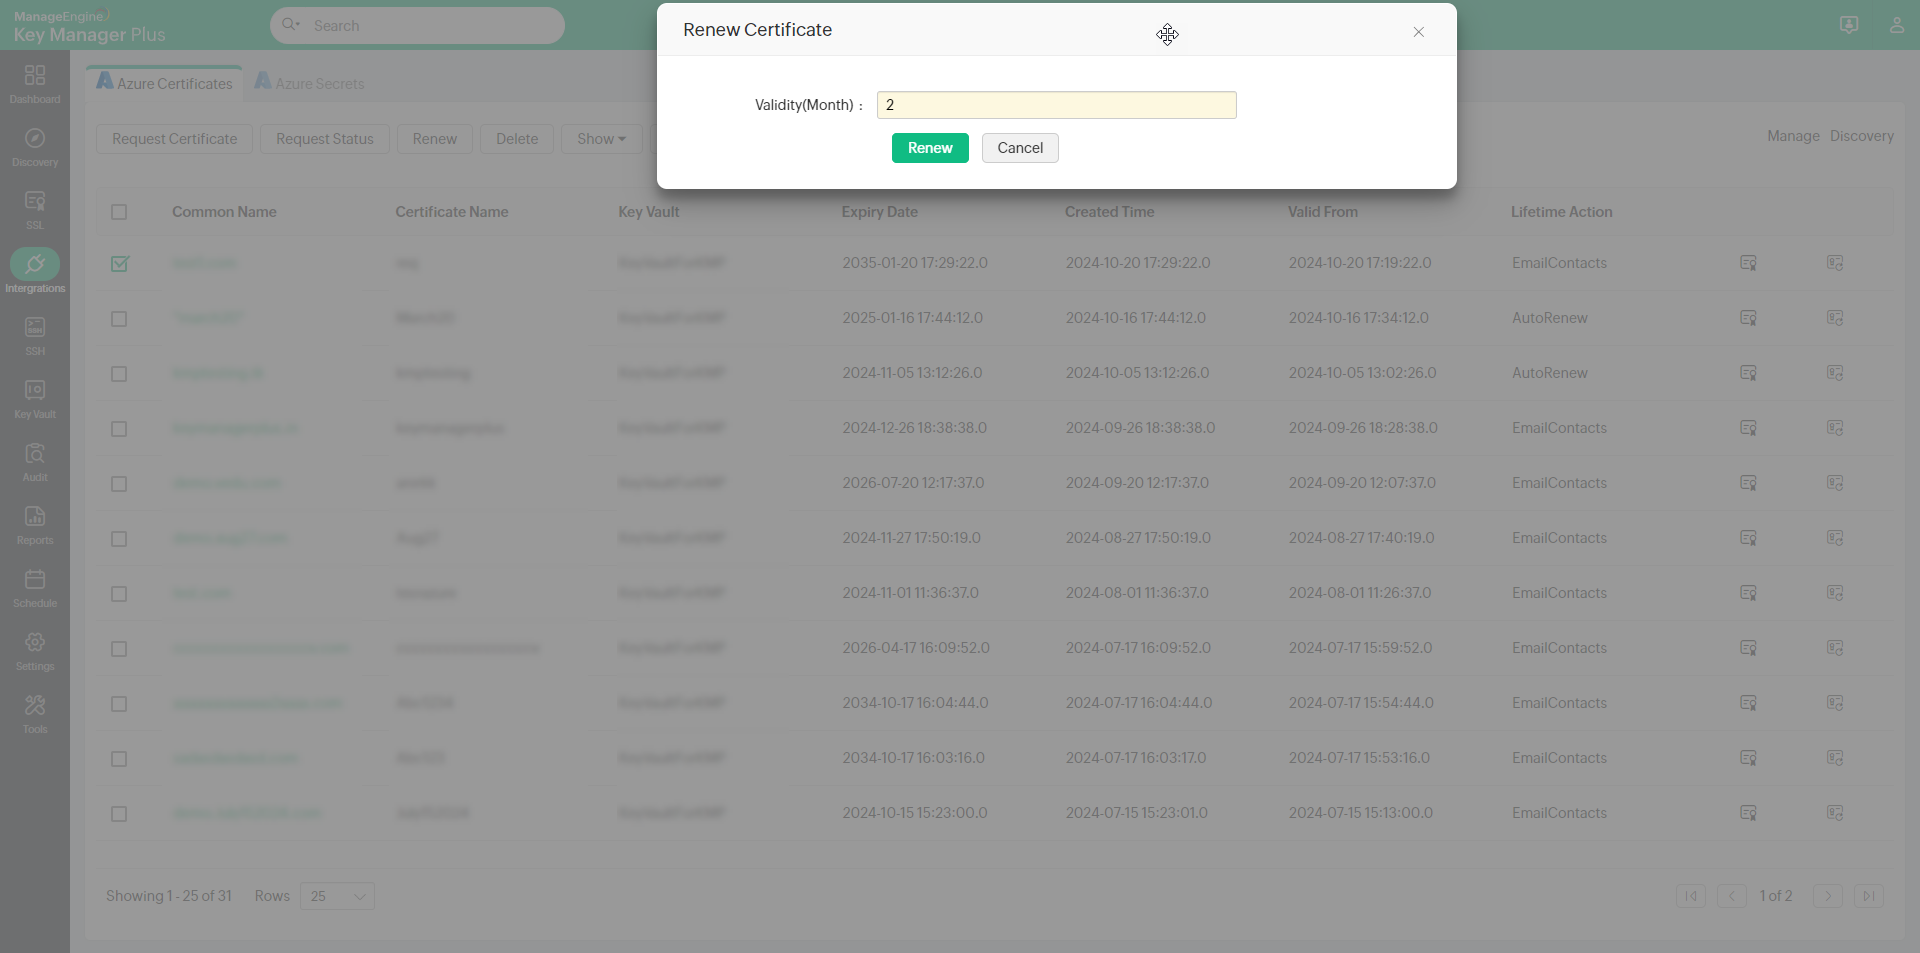
- Select a certificate that you wish to renew and click the Renew option at the top.
- Enter the validity in months and click Renew. The certificate will be renewed with the specified validity period and will be updated in both KMP and the Azure portal.
Note: Please note that you cannot renew the following certificates:
1. Certificates that were issued by a third-party issuer and are currently being managed in the Azure Portal.
2. Previous versions of existing certificates.
ii. Deleting Certificates
To delete the certificates from Key Manager Plus:
- Select one or more certificates using the checkboxes.
- Click Delete from the top.
Note: Please note that the certificate will be deleted only from the KMP interface and this operation will not impact the certificate's status in the Azure portal.
iii. Filtering Certificates
To filter versions of certificates in Key Manager Plus:
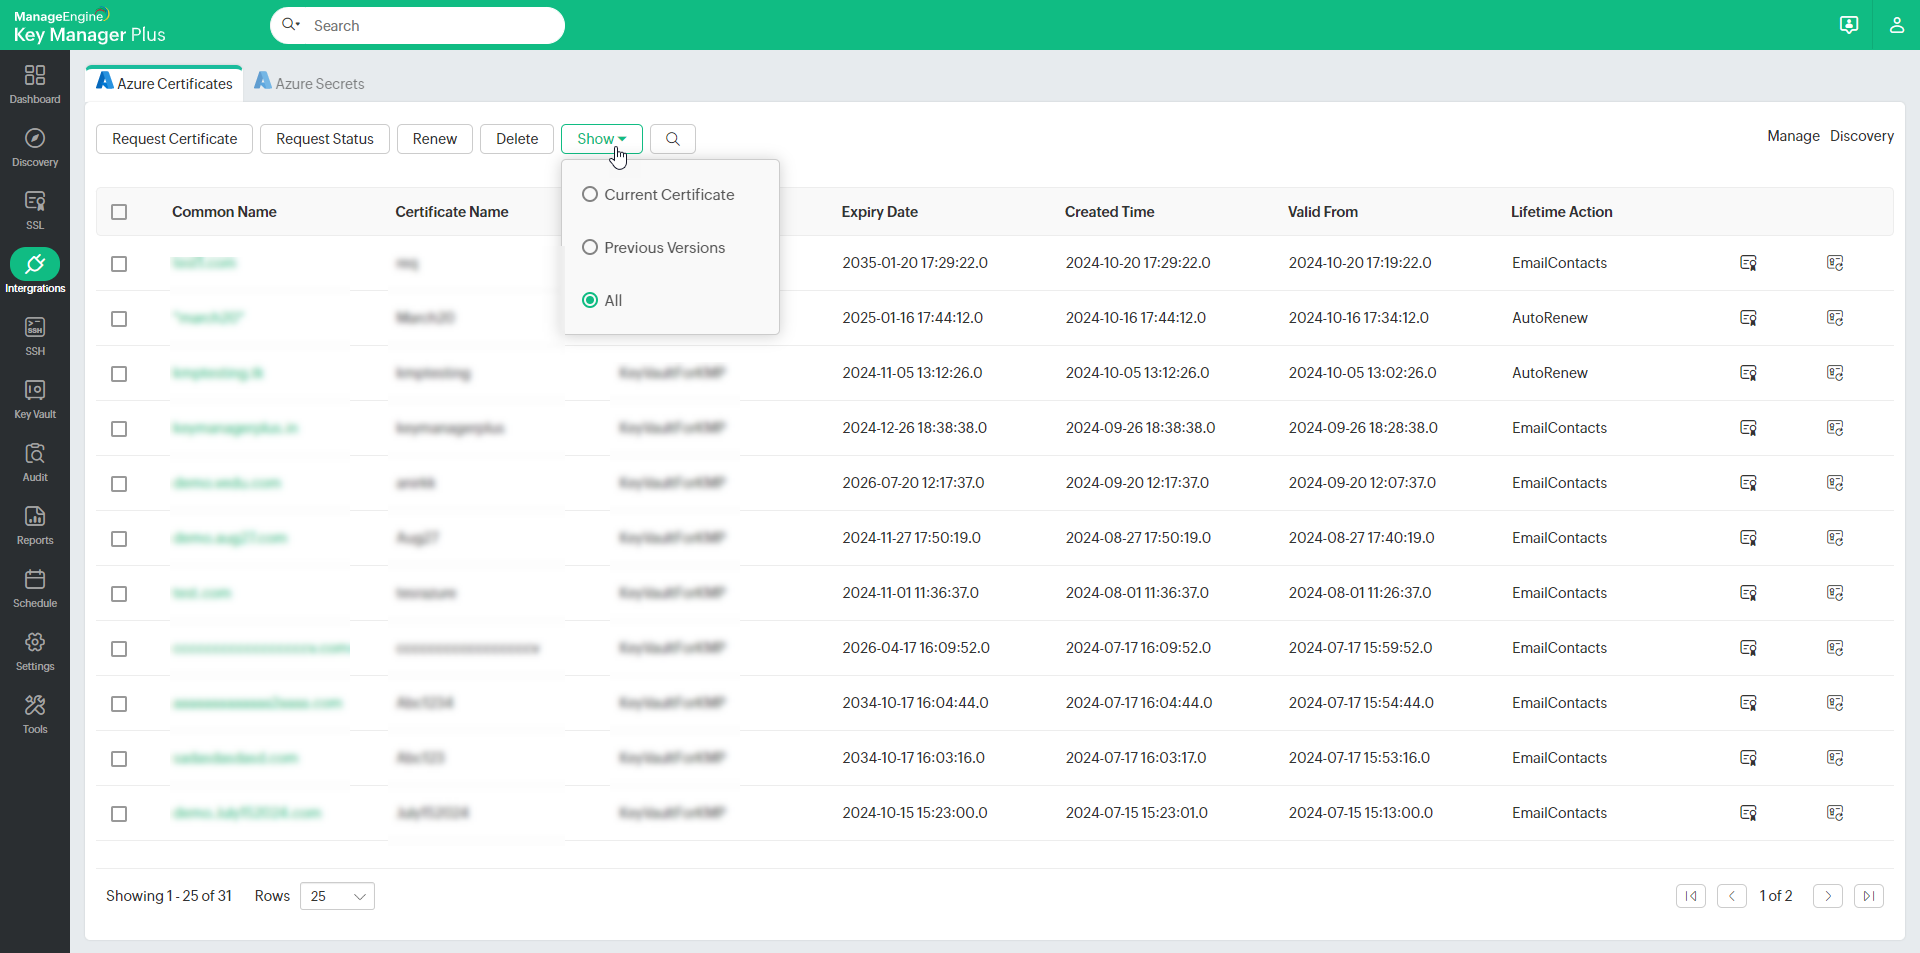
- Click the Show drop-down and choose from the options:
- Current Certificate - This option will display only the current versions of the certificates.
- Previous Versions - This option will display older versions of the available certificates.
- All - This option will display all versions of the available certificates.
4. Azure TLS Secret Management from Key Manager Plus
Note: From build 7050 onwards, Azure TLS secrets are considered in the license count within Key Manager Plus. Any secrets discovered from or created for Azure Key Vault will be included in the total number of keys for licensing purposes.
As part of the integration, you can manage the Azure TLS secrets stored in Azure key vault alongside SSL certificates from Key Manager Plus. Additionally, Key Manager Plus allows you to create new TLS secrets and deploy them to the desired Azure key vault.
Note: Only TLS secrets of the Azure key vault will be managed under Azure Secrets of Key Manager Plus.
a. Discovering TLS Secrets from Azure Key Vault
To discover TLS secrets stored in Azure Key Vault and effectively manage them, Key Manager Plus offers a seamless solution. Follow the below steps to discover the TLS secrets from Azure Key Vault to Key Manager Plus.
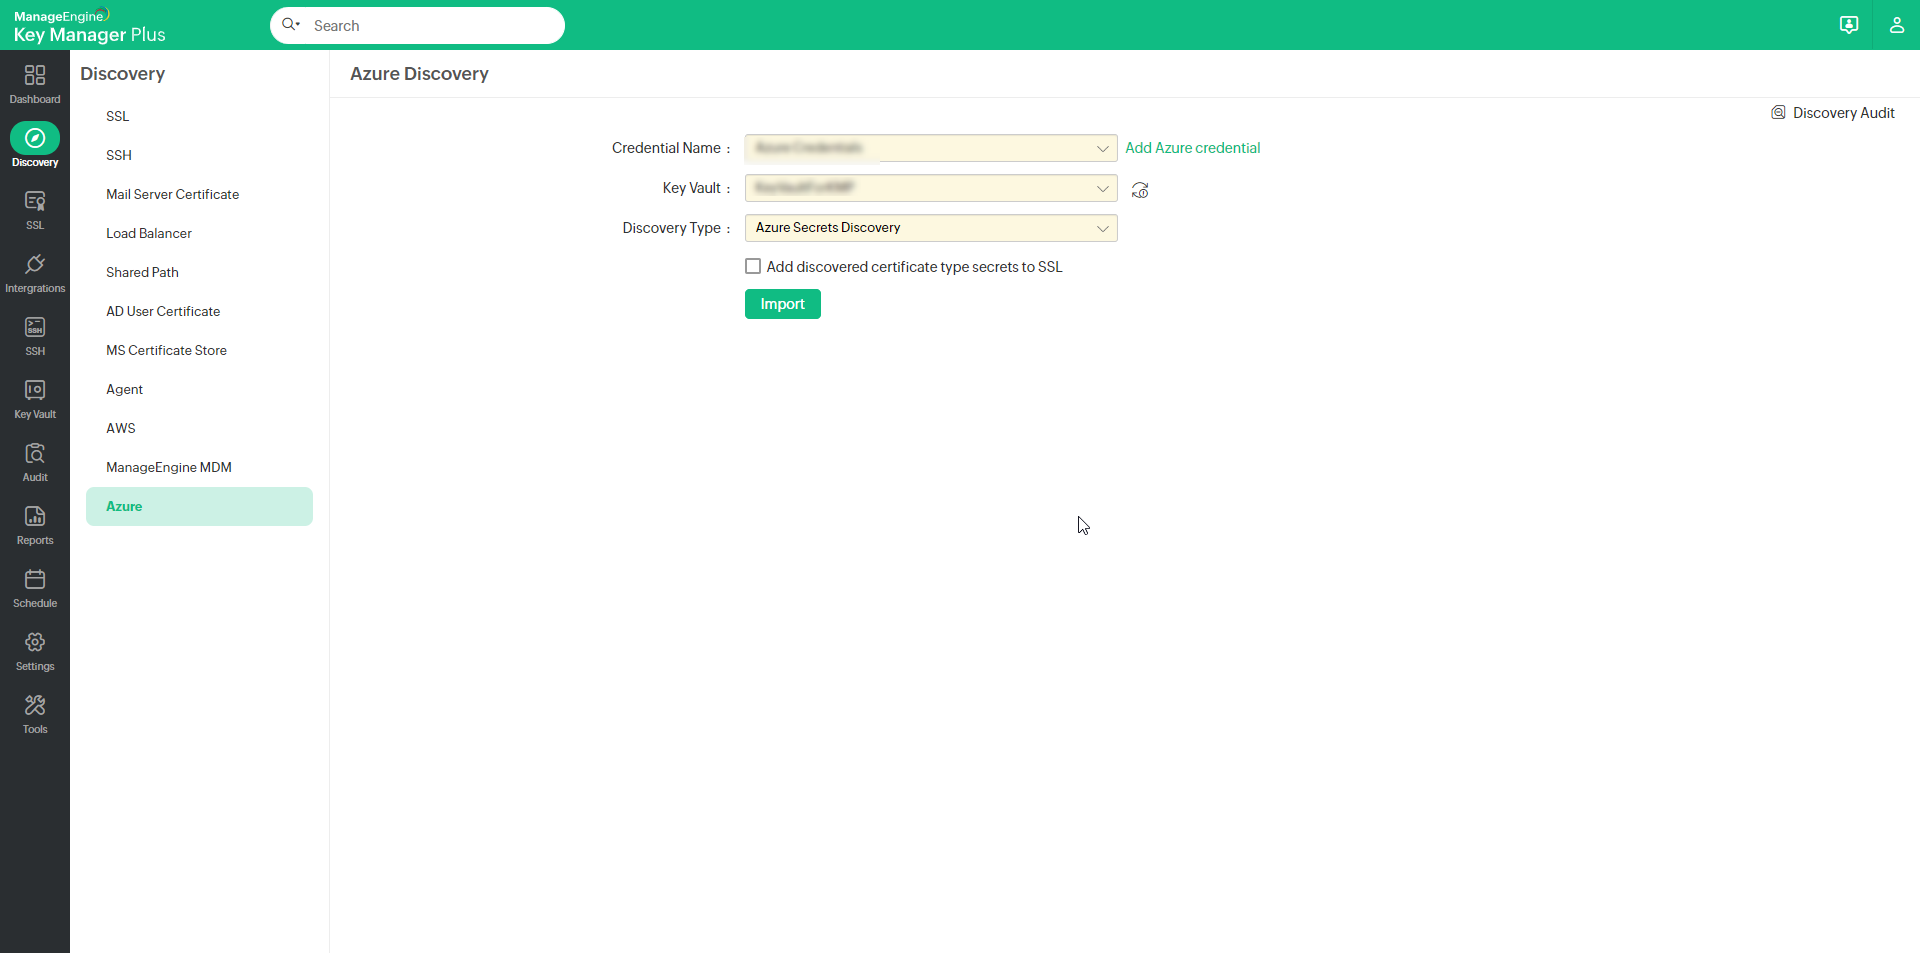
- Navigate to Discovery >> Azure or Integrations >> Others >> Azure >> Azure Secrets >> Discovery in Key Manager Plus.
- Choose the appropriate Azure Credential Name, Key Vault and Discovery Type to initiate the discovery process for the desired TLS secrets. To add a new Azure credential for importing TLS secrets, use the Add Azure Credential button beside the Credential Name field.
- If you wish to store the certificates discovered through secrets in Key Manager Plus' SSL repository, enable the checkbox labeled 'Add discovered certificate type secrets to SSL'.
- Finally, click on Import to discover TLS secrets from Azure Key Vault effortlessly to Key Manager Plus.
b. Managing Azure TLS Secrets from Key Manager Plus
To effectively manage Azure TLS secrets using Key Manager Plus, follow these steps:
- Navigate to Integrations >> Others >> Azure >> Azure Secrets in Key Manager Plus. Here, you will find a comprehensive list of all the discovered and newly created TLS secrets of Azure Key Vaults.
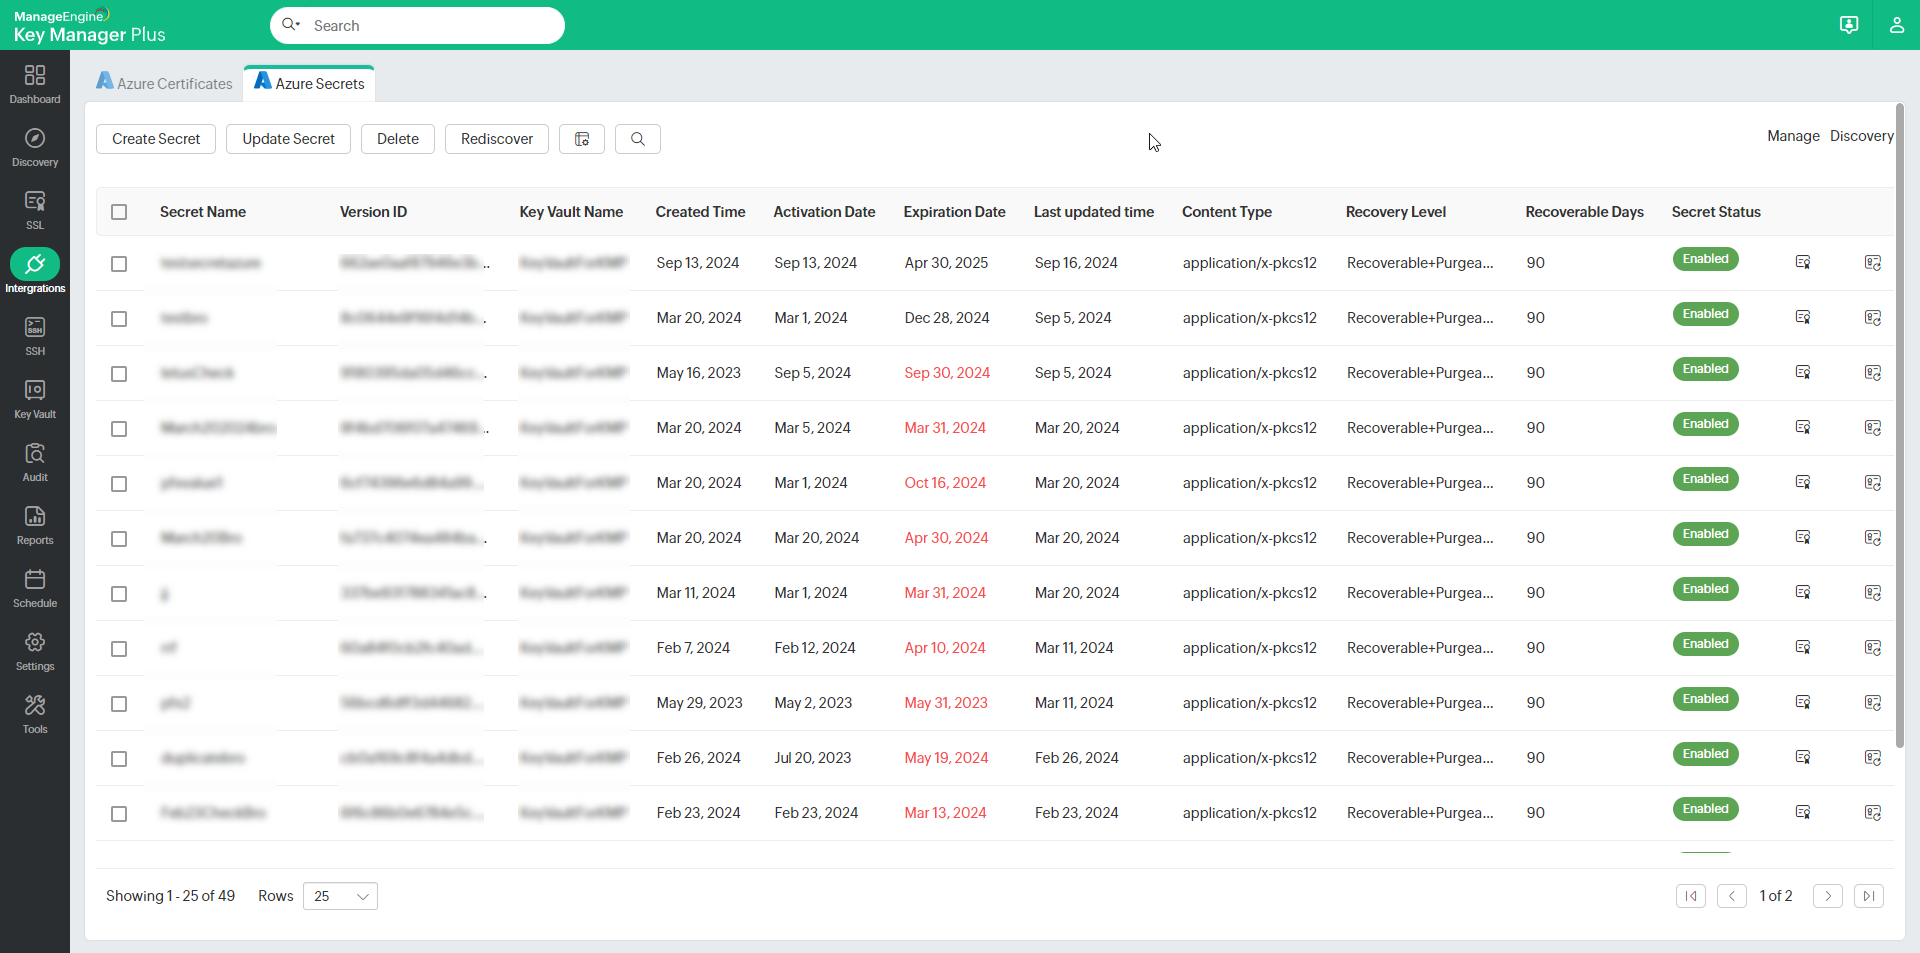
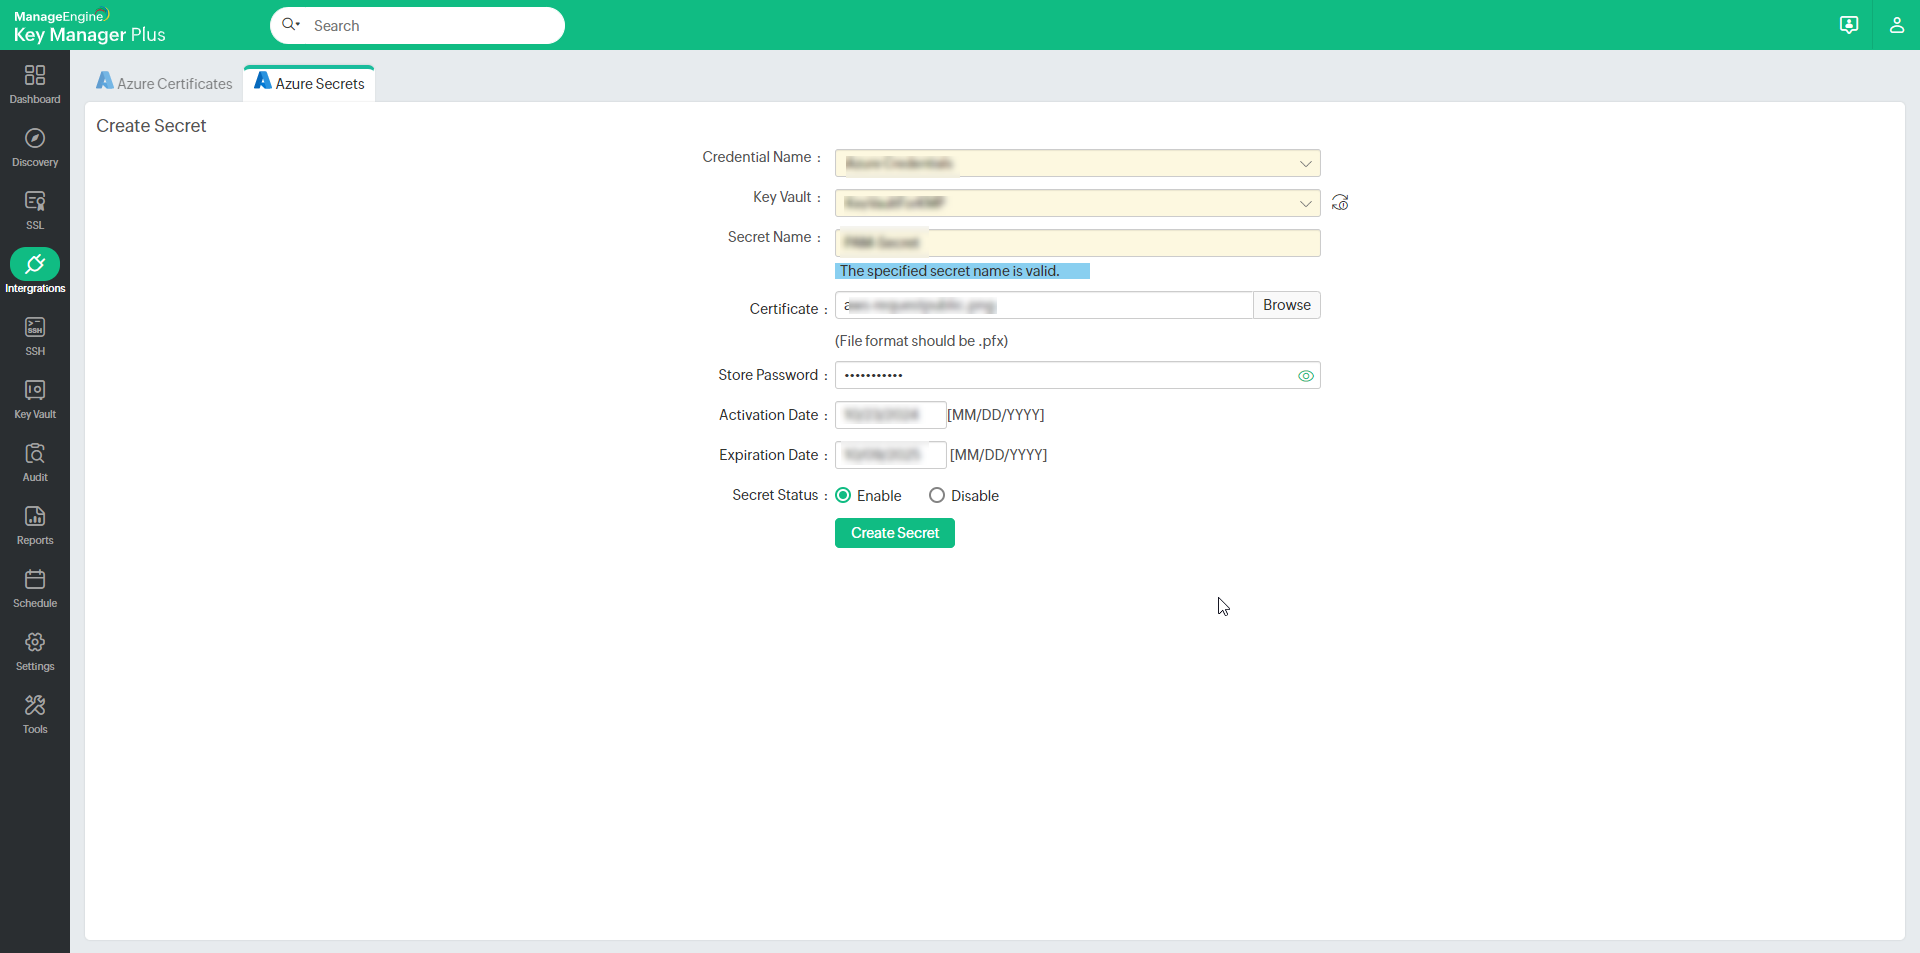
- To create a new Azure TLS secret from Key Manager Plus, click Create Secret in the top pane. Provide the required information in the pop-up window, such as Credential Name, Key Vault, and Secret Name, and upload the SSL certificate in .pfx format. Fill in the remaining fields, select the Secret Status, and click Create Secret.
- For updating a Azure TLS secret, select the respective secret and click Update Secret in the top pane. In the pop-up window, modify the Activate/Expiration Date and Secret Status as needed, and click Save.
- In some cases, the version of a Azure TLS secret might be updated in the Microsoft Azure portal and not synchronized with Key Manager Plus. To maintain sync status, follow these steps:
- Select the relevant Azure TLS secret, click Rediscover in the top pane, and allow the rediscovery process to complete. This will update the TLS secret to the latest version.
- To obtain the new version of a secret's certificate, click on the Obtain Certificate icon next to the Secret Status. Choose the appropriate credential associated with the secret's key vault and click Obtain Certificate. The new version of the secret's certificate will be updated in Key Manager Plus, and you can verify or export it by clicking on the View Associated Certificate icon.
- If needed, you can delete Azure TLS secrets from Key Manager Plus using the Delete button in the top pane. Select the desired Azure TLS secrets for deletion and click Delete to proceed.
Note: Remember that deleting a Azure TLS secret from Key Manager Plus does not permanently remove it from Azure Key Vault. To delete the TLS secret permanently, you must do so from the Azure portal.