Configure email forwarding for a mailbox in Exchange Online
The table is a comparison on how to configure email forwarding for a mailbox in Exchange Online using the native admin center and M365 Manager Plus.
Exchange admin center (EAC)
Steps to configure email forwarding for a mailbox in Exchange Online using the native admin center
- Log in to EAC and navigate to Recipients > Mailboxes .
- Select a mailbox for which you want to configure email forwarding from the list of user mailboxes displayed.
- Under Mailbox > Email forwarding , click Manage email forwarding.
- Turn ON the Forward all emails sent to this mailbox setting.
- Click the Search email button from the Forwarding address text box to find an internal recipient to forward emails to.
- To forward to an external address, select Forward to an external email address and enter the external address.
- If you want to keep a copy of the forwarded email, select the Deliver message to both forwarding address and mailbox option
- Click Save and Close to exit from the Manage email forwarding display pane.
M365 Manager Plus
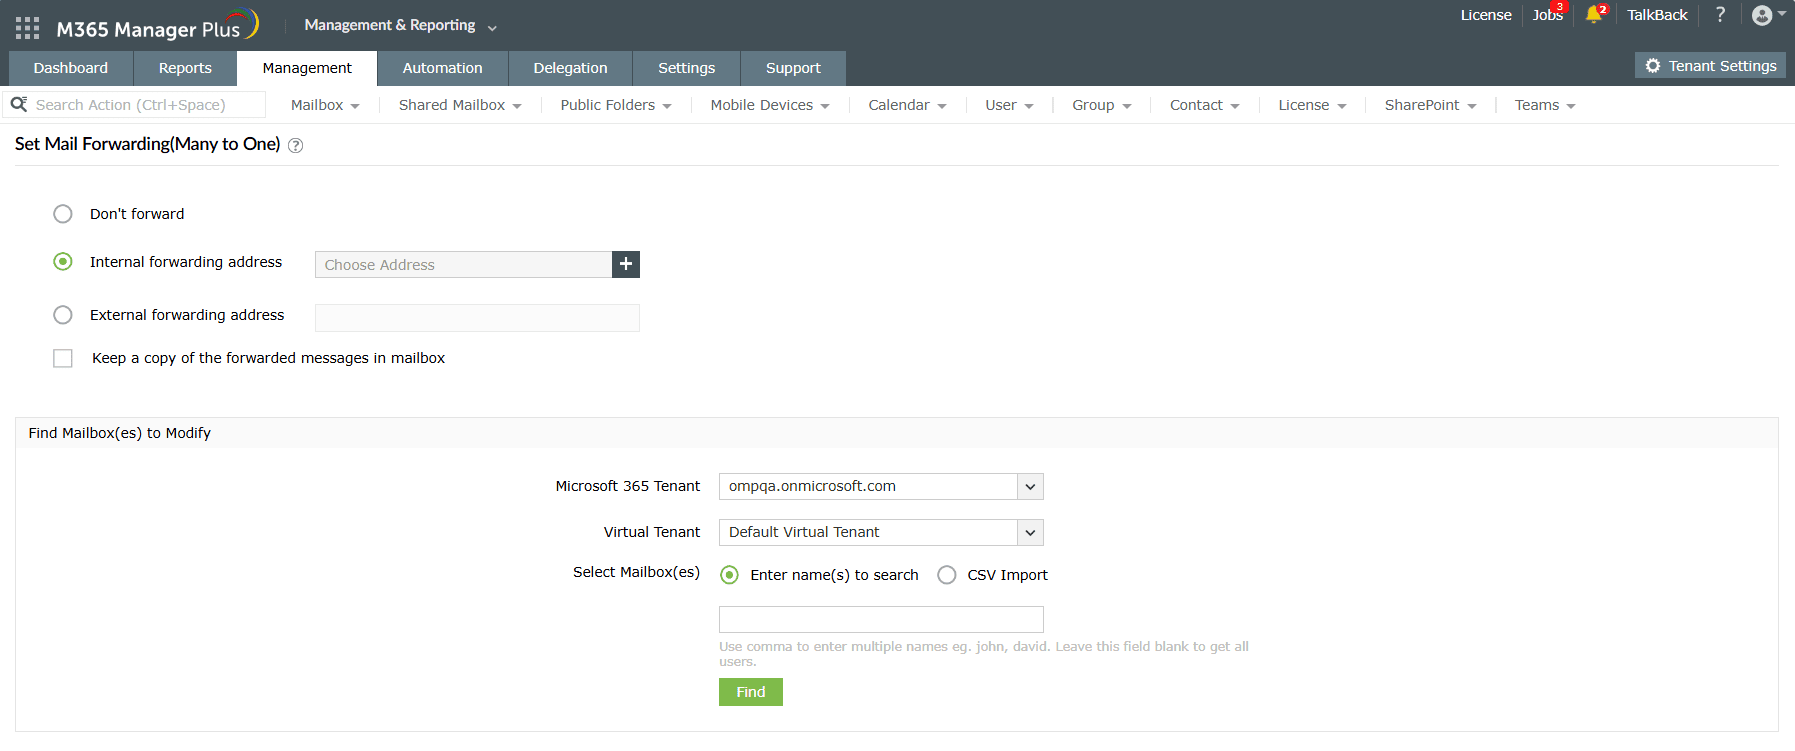
Steps to add or remove email addresses for a mailbox in Exchange Online using M365 Manager Plus
- Log in to M365 Manager Plus and navigate to the Management tab > Exchange Online > Mailbox Management .
- Under the Exchange Mailbox Tasks section, select Set Mail Forwarding (Many to One ) to forward mails from one or more mailboxes to another mailbox, or select the Set Mail Forwarding (One to One) to forward mails from one mailbox to another.
- Click the + icon in the Internal forwarding address field to add an internal address.
- Enter the external address in the External forwarding address.
- Check the Keep a copy of the forwarded messages in mailbox checkbox to keep a copy of the forwarded messages.
- Search for mailbox(es) from the Find Mailbox(es) to Modify section and click Apply .

Limitations of using EAC admin center
- Administrators need to be assigned the necessary role and permission to modify Exchange mailboxes and its permissions.
- Administrators must check if the target mailbox has the necessary permission to receive emails.
- Configuring email settings and modifying them in bulk require PowerShell scripting, which can be complex for non-technical users.
- Managing a large number of mailboxes can be cumbersome within the admin center, potentially leading to inefficiencies and difficulty in organizing and tracking mailboxes effectively.
- While the admin center provides some automation features, it may not offer the level of automation required for complex mailbox management tasks.
Benefits of using M365 Manager Plus to bulk add group members
- Assign tasks to technicians without the need to elevate their native privileges.
- M365 Manager Plus offers a wide range of management capabilities for Exchange environment, including mailbox management, shared mailbox management, calendar management, public folder modification, and more, all from a single interface.
- M365 Manager Plus provides a user-friendly interface for configuring mailbox settings, user permissions, and security policies, often without needing PowerShell.
- Highly customizable features that allow organizations to tailor their platform to their specific needs and requirements. Additionally, it is scalable, capable of supporting organizations of all sizes.
- Management actions come built-in with M365 Manager Plus and can be performed at the click of a button.
Hassle-free Exchange management.
Try now for freeStreamline your Microsoft 365 governance and administration with M365 Manager Plus
Get Your Free TrialRelated Resources
-
Entra ID administration
- How to create custom roles in Microsoft Entra ID
- How to setup SSO in Microsoft Entra ID
- How to configure Conditional Access in Microsoft Entra ID
- What is Microsoft Entra ID?
- What are Microsoft Entra ID administrative units
- How to configure external authentication methods in Microsoft Entra ID
- How to set up self-service group management in Entra ID
- How to takeover unmanaged directory as administrator
- How to change authentication type of subdomain
- What is self-service signup in Entra ID
- Delete a tenant in Microsoft Entra ID
- Manage custom domain names in Microsoft Entra ID
- Multi-tenant organization interaction
-
Entra ID auditing and reporting
-
Entra ID bulk user management
-
Entra ID dynamic groups
-
Entra ID group management
- How to enforce naming policy on Microsoft 365 groups in Entra ID
- How to clean up resources related to all user groups
- How to create basic groups and add members in Entra ID
- Group management cmdlets
- How to add group to another group in Entra ID
- How to delete a group in Entra ID
- How to remove a group from another group in Entra ID
- Check import status
- Edit group settings in Entra ID
- Migrate users with individual licenses to groups
- Restore deleted groups in Microsoft Entra ID
- Set expiration for Microsoft 365 groups in Entra ID
-
Entra ID group membership
- How to utilize Microsoft Entra groups in Entra ID
- How to add group members in Entra ID
- How to add group owners in Microsoft Entra ID
- How to add or remove group member automatically in Entra ID
- How to create group of guest users using native admin center
- How to manage groups and group memberships in Entra ID
- How to remove guests from all user groups in Entra ID
- How to utilize groups and administrator roles in Entra ID
- Add or remove a group from another group in Entra ID
- Bulk group members addition in Entra ID
- Bulk remove group members from Entra ID groups
- How to remove members/owners of a group in Entra ID
-
Entra ID group reports
-
Entra ID license management
- How to automate inactive license management for Entra ID users
- How to change license assignments for user in Entra ID
- How to assign licenses to groups in Entra ID
- How to leverage group-based licensing for optimizing license management in Entra ID
- License assignment troubleshooting
- Assign licenses in Microsoft Entra ID
- Azure AD license membership modification
- Remove licenses in Microsoft Entra ID
- View license plans and details in Microsoft Entra ID
-
Entra ID User management
- How to manage permissions using access reviews in Microsoft Entra ID
- How to restrict guest access permissions in Entra ID
- How to clean up unmanaged Microsoft Entra accounts
- How to assign custom security attributes to users in Entra ID
- How to clean up stale accounts using access reviews
- How to share accounts with Entra ID
- How to update custom security attributes to users in Entra ID
- Add guest users
- Add users to Azure AD
- Assign user roles with Entra ID
- Close user account in an unmanaged Microsoft Entra organization
- How to revoke user access in Microsoft Entra ID using PowerShell
- Microsoft 365 delete users
- Remove custom security attribute assignments from users
-
Entra ID user reports
- How to monitor risky sign-ins in Microsoft Entra ID
- License usage reports in Microsoft Entra ID
- How to get the last logon date of users in Microsoft Entra ID
- How to view Microsoft 365 login attempts using PowerShell and Microsoft Entra ID
- How to report the MFA status for users in Microsoft Entra ID
- How to monitor recently created users in Entra ID
- Track password changes by admins in Microsoft Entra ID
- How to monitor user role changes in Entra ID
- How to track self-service password resets in Microsoft Entra ID
- How to create custom sign-in reports in Entra ID
- How to find deleted users in Entra ID
- How to verify deleted users in Entra ID
- Filter users based on custom security attributes
- Download Microsoft 365 user list
-
Entra ID workbooks
- How to create custom Microsoft Entra ID workbooks
- What are Microsoft Entra ID workbooks
- How to handle privilege escalation in Microsoft Entra ID
- How to monitor risky sign-ins using Microsoft Entra ID workbooks
- How to monitor your Microsoft 365 MFA setup using Entra ID workbooks
- How to audit for app permission threats with Microsoft Entra workbooks
- Conditional Access Gap Analyzer workbook in Microsoft Entra ID
-
Exchange Online administration
- How to change deleted items retention for Exchange Online mailboxes
- How to change the branding of clutter notifications in Exchange Online
- How to configure message delivery restrictions for Exchange Online mailboxes
- How to configure moderated recipients in Exchange Online
- How to create user mailboxes in Exchange Online
- How to enable and disable MAPI for a mailbox in Exchange Online
- How to enable or disable Outlook on the web for a mailbox in Exchange Online
- How to manage mail contacts in Exchange Online
- How to manage permissions for recipients in Exchange Online
- How to manage resource mailbox in Exchange Online
- How to save sent items in a delegators mailbox in Exchange Online
- How to create and edit shared mailboxes in Exchange Online
- How to add or remove email address for a mailbox in Exchange Online
- How to configure email forwarding for a mailbox in Exchange Online
- How to convert a mailbox in Exchange Online
- How to delete or restore user mailboxes in Exchange Online
- How to manage user mailboxes in Exchange Online
-
Exchange Online groups
- Create and manage groups in Exchange admin center in Exchange Online
- How to create and manage distribution list groups in Exchange Online
- How to create and manage dynamic distribution list groups in Exchange Online
- How to create distribution group naming policy in Exchange Online
- How to manage guest access to Microsoft 365 groups in Exchange Online
- How to manage role groups in Exchange Online
- How to override the distribution group naming policy in Exchange Online
- How to view members of a distribution group in Exchange Online
-
Microsoft Teams
-
Public Folders
- Create public folder calendar in Exchange Online
- How to restore deleted public folder in Exchange Online
- How to setup public folders in new organization
- Migrate public folders to Microsoft 365 groups in Exchange Online
- Recover deleted public folder mailbox in Exchange Online
- How to mail-enable and mail-disable public folders in Exchange Online