How to create custom roles in Microsoft Entra ID
Microsoft Entra ID plays a crucial role in managing user access and permissions within organizations. It offers a range of built-in roles designed to streamline user administration, each with a fixed set of permissions tailored for specific tasks. However, as organizations grow in size and complexity, these predefined roles often fall short of meeting diverse operational needs. Large enterprises may require more granular and customized control over user permissions to delegate specific administrative tasks effectively.
This is where custom roles come into play, allowing organizations to create tailored role definitions to help achieve use cases like targeted access to a select set of objects, such as specific applications or service principals. Custom roles can also provide the ability to view only the audit logs, which enables specific users to monitor activities without granting any additional administrative privileges. For example, you can create a role that gives some of your IT admins access to audit logs to check license usage, enabling them to modify the license assignments, while only limiting this to the devices in your environment.
Let's see how to create and assign custom roles in Microsoft Entra ID, and discover how to streamline the process using ManageEngine M365 Manager Plus, a comprehensive tool for reporting, managing, monitoring, auditing. M365 Manager Plus is an all-inclusive solution that empowers you to create alerts for crucial activities in your Microsoft 365 environments, assign administrative roles to users without elevating their Microsoft 365 privileges, and more.
How to create custom admin roles in Microsoft Entra ID and M365 Manager Plus
Microsoft Entra ID
- Log in to the Microsoft Entra admin center with a user account that has at least the Privileged Role Administrator role assigned to it.
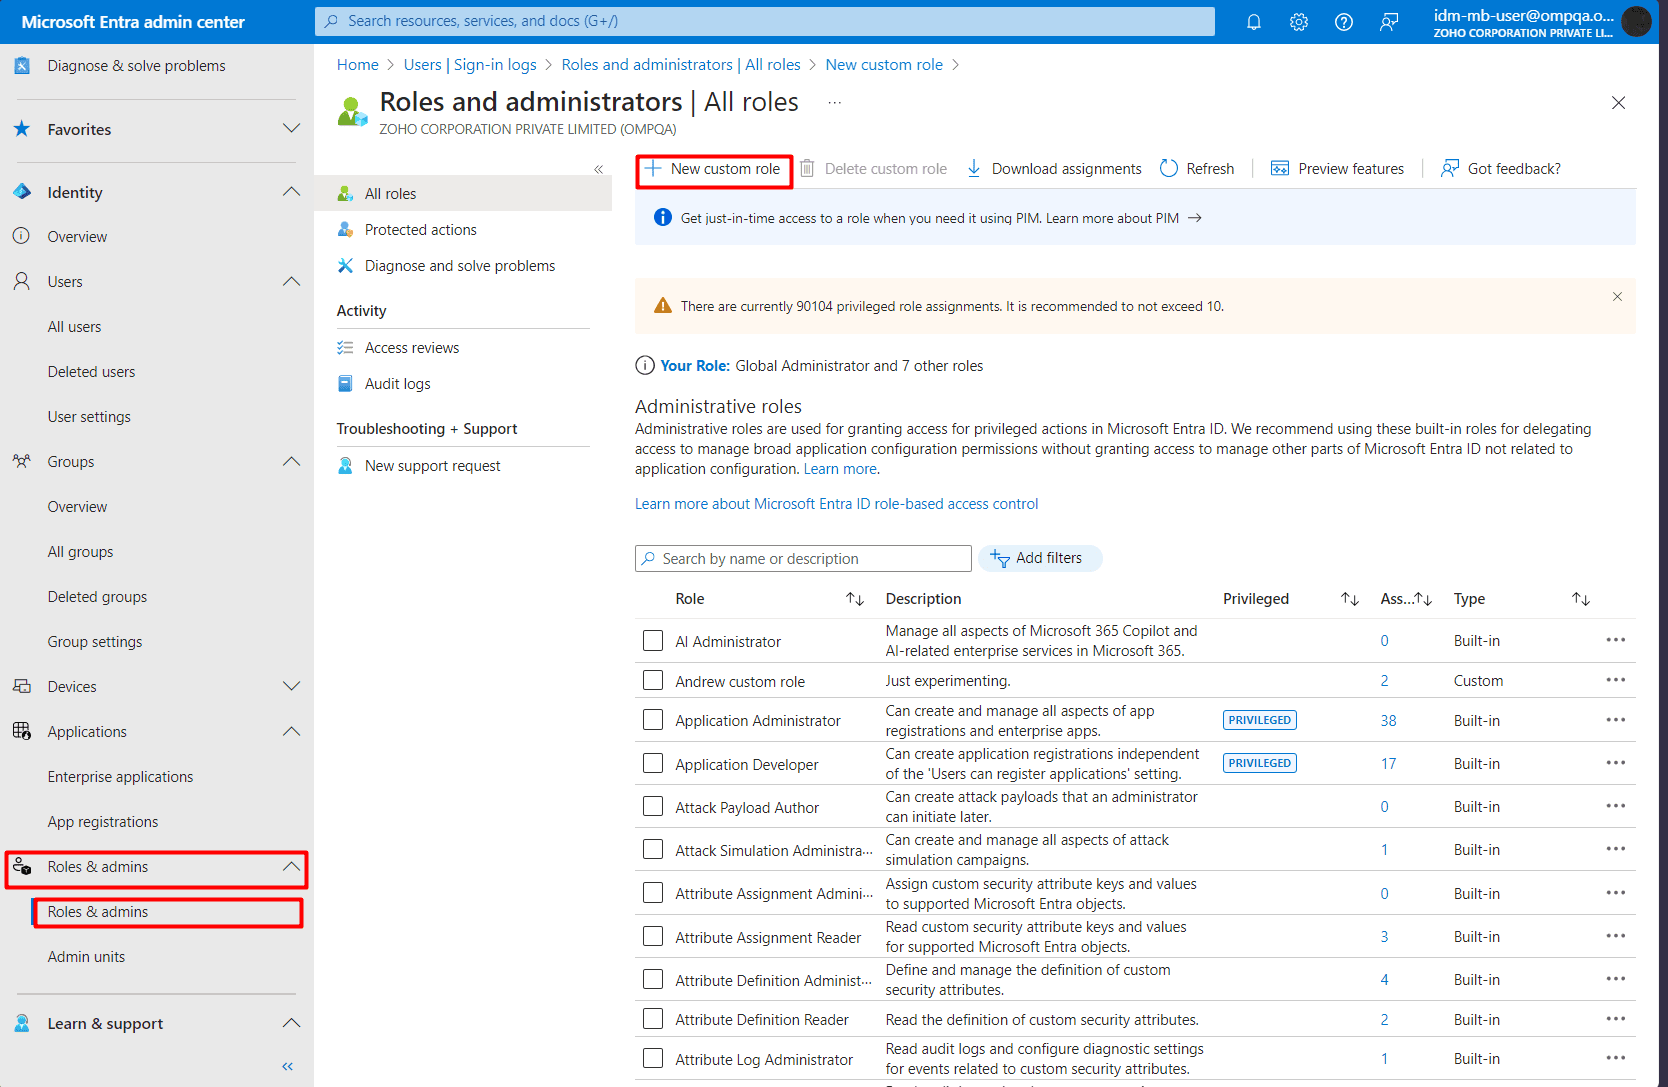
- Navigate to Identity > Roles & Admins > Roles & Admins and click New Custom Role.
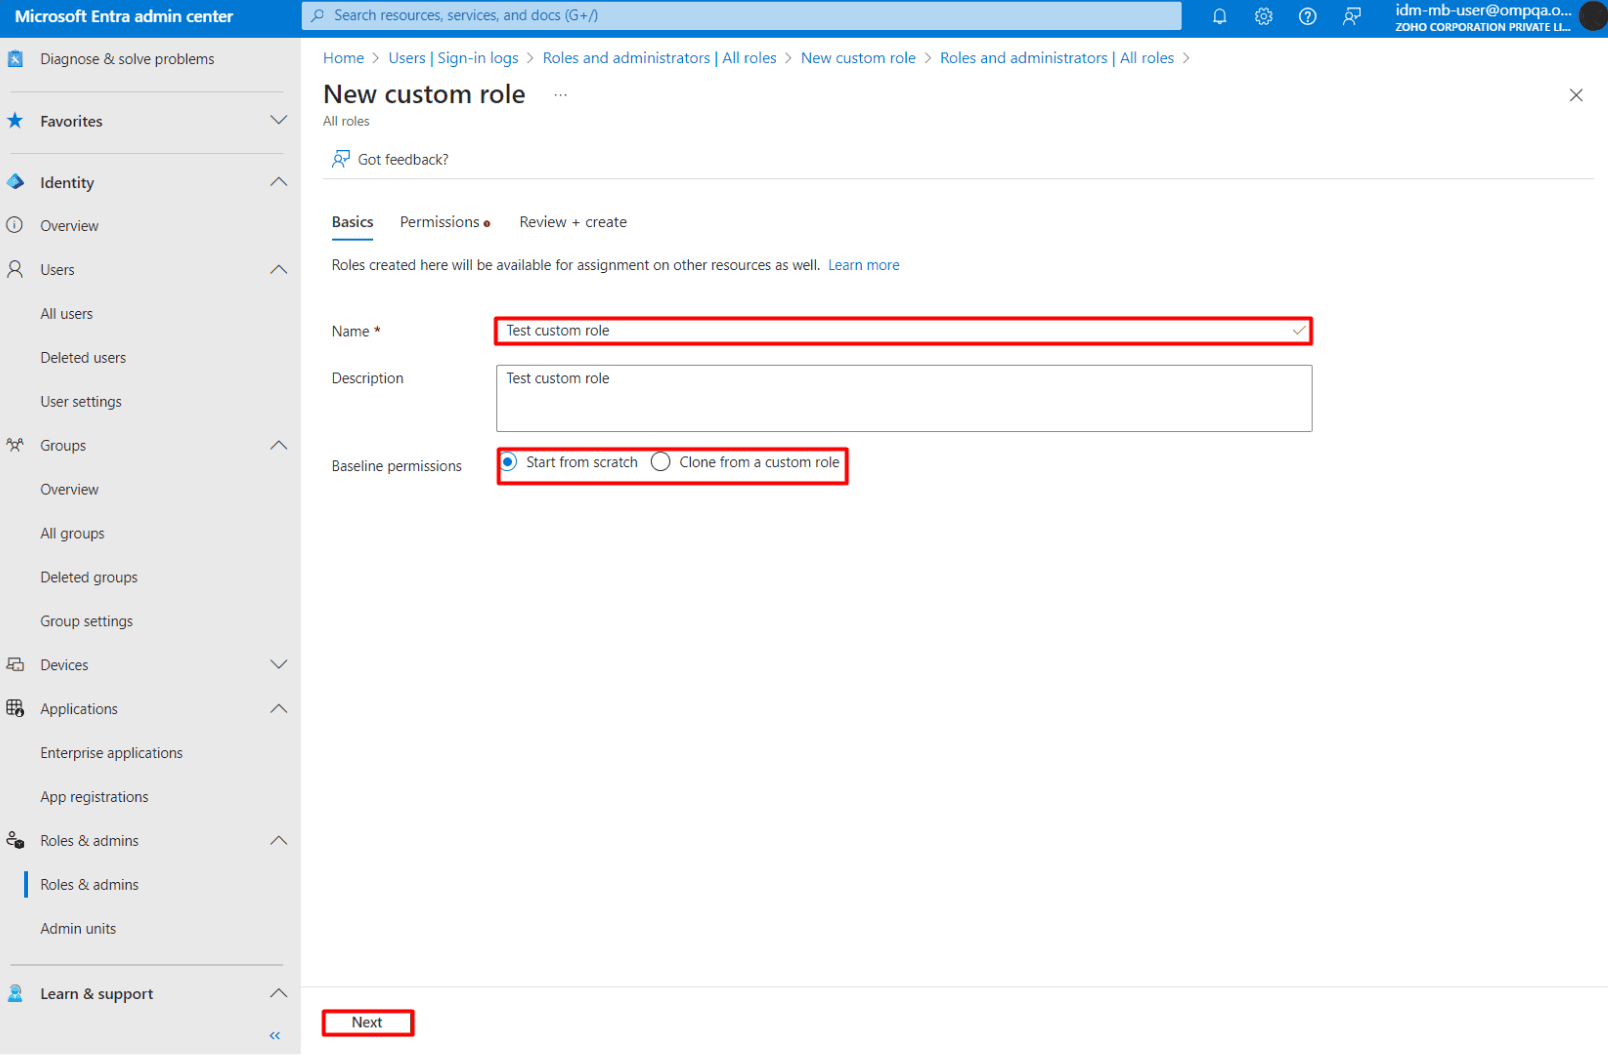
- Type in a Name and Description for your custom role and choose from the Baseline permissions field if you want to Start from scratch or Clone from a custom role. If you choose the latter, select the role you want to use as a template from the Role to clone dropdown. After filling in the fields, click Next to proceed.
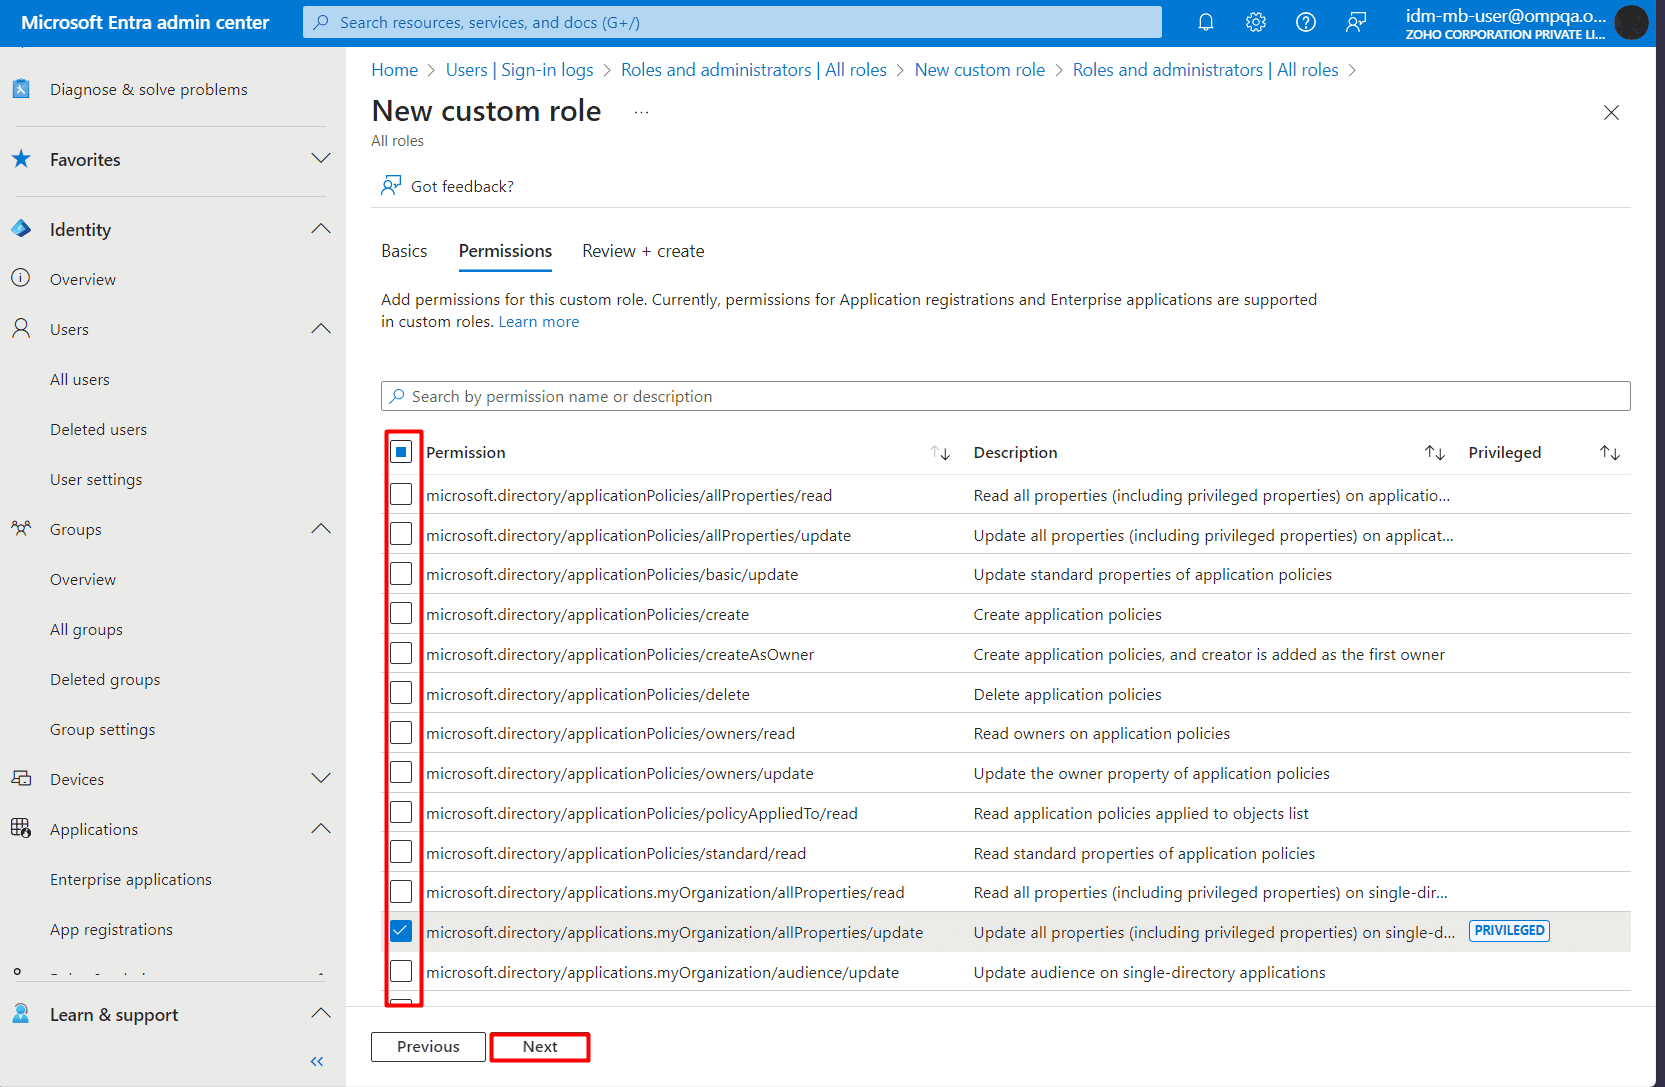
- Select the permissions that you would like to assign to the role by clicking on the check box next to it. You can also confirm if a certain permission is considered privileged by checking the Privileged tag next to it in the Privileged column. For this example, we will select the applications.aIIProperties/update and auditLogs/allProperties/read permissions. When done, click Next.
- Review your custom role's name, description, and selected permissions. Then, click Create.
M365 Manager Plus
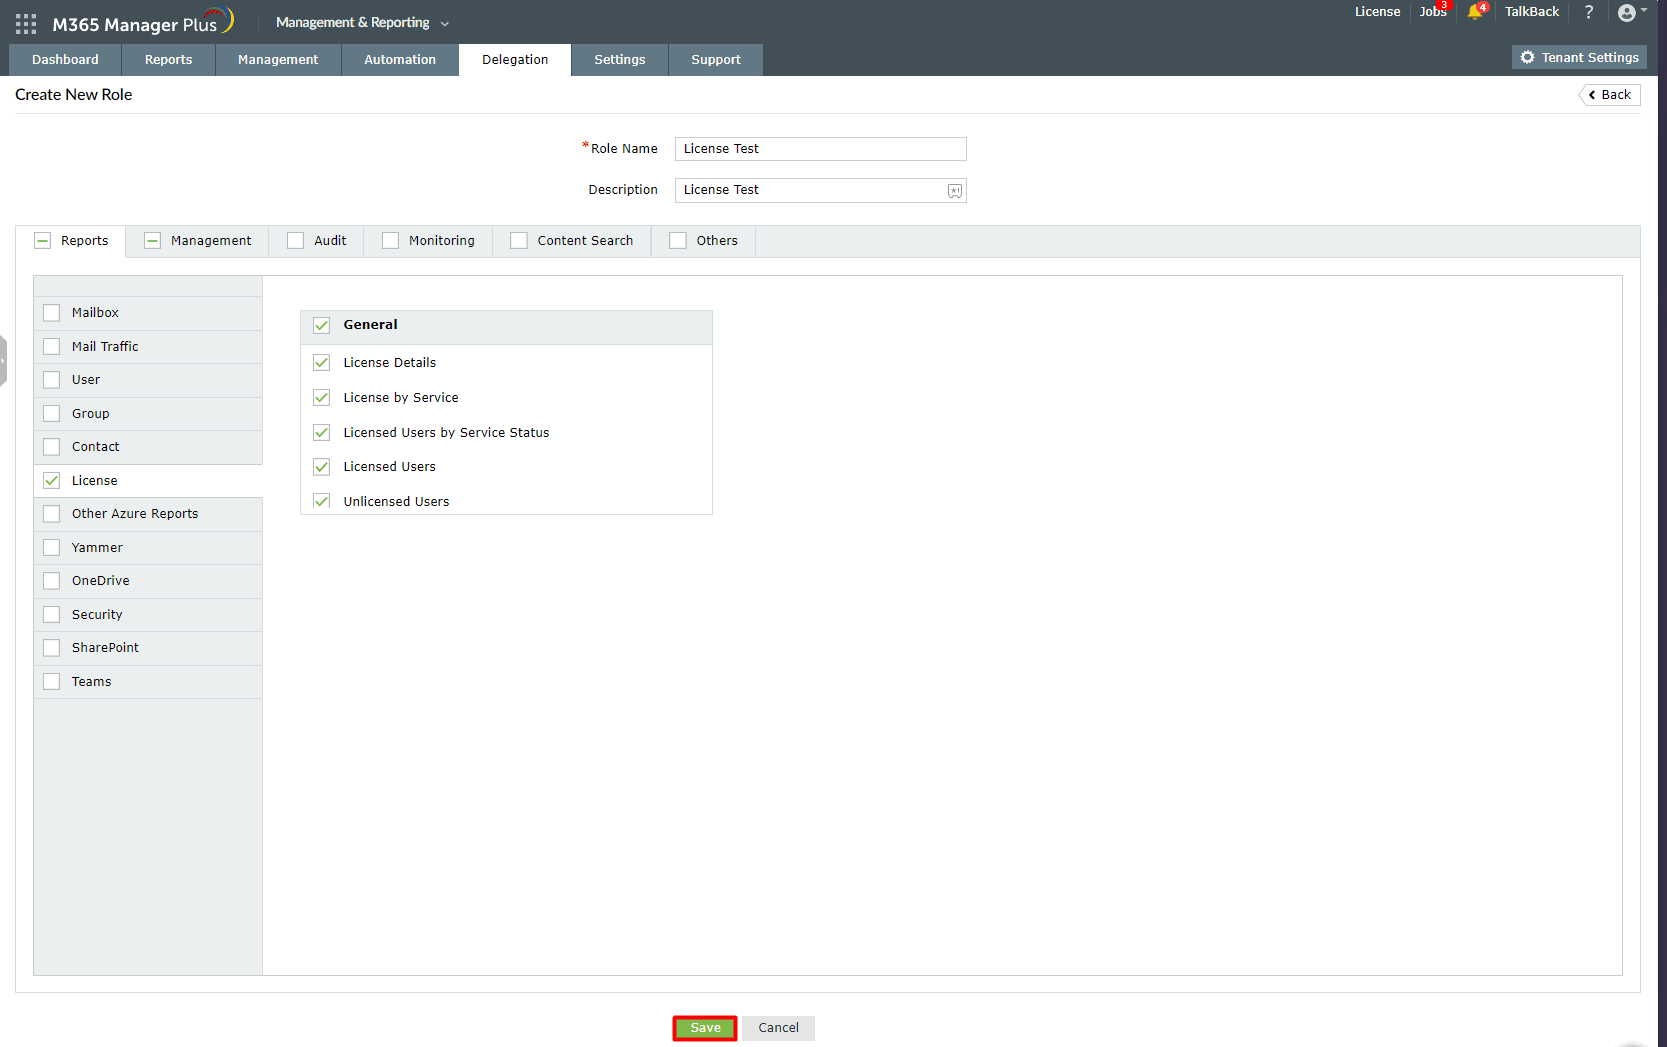
- Log in to M365 Manager Plus, navigate to Delegation > Help Desk Roles, and click Create New Role.

- Enter the Role Name and Description in the respective text boxes.
- Select the tasks you want to delegate. You can select any number of reports and tasks that you want to delegate.
- Click Save.
How to assign administrative roles in Microsoft Entra ID
This table compares how to assign the custom roles you created in Microsoft Entra ID and M365 Manager Plus.
Microsoft Entra ID
- In the Roles and Administrators page, search for the custom role you created and click it.
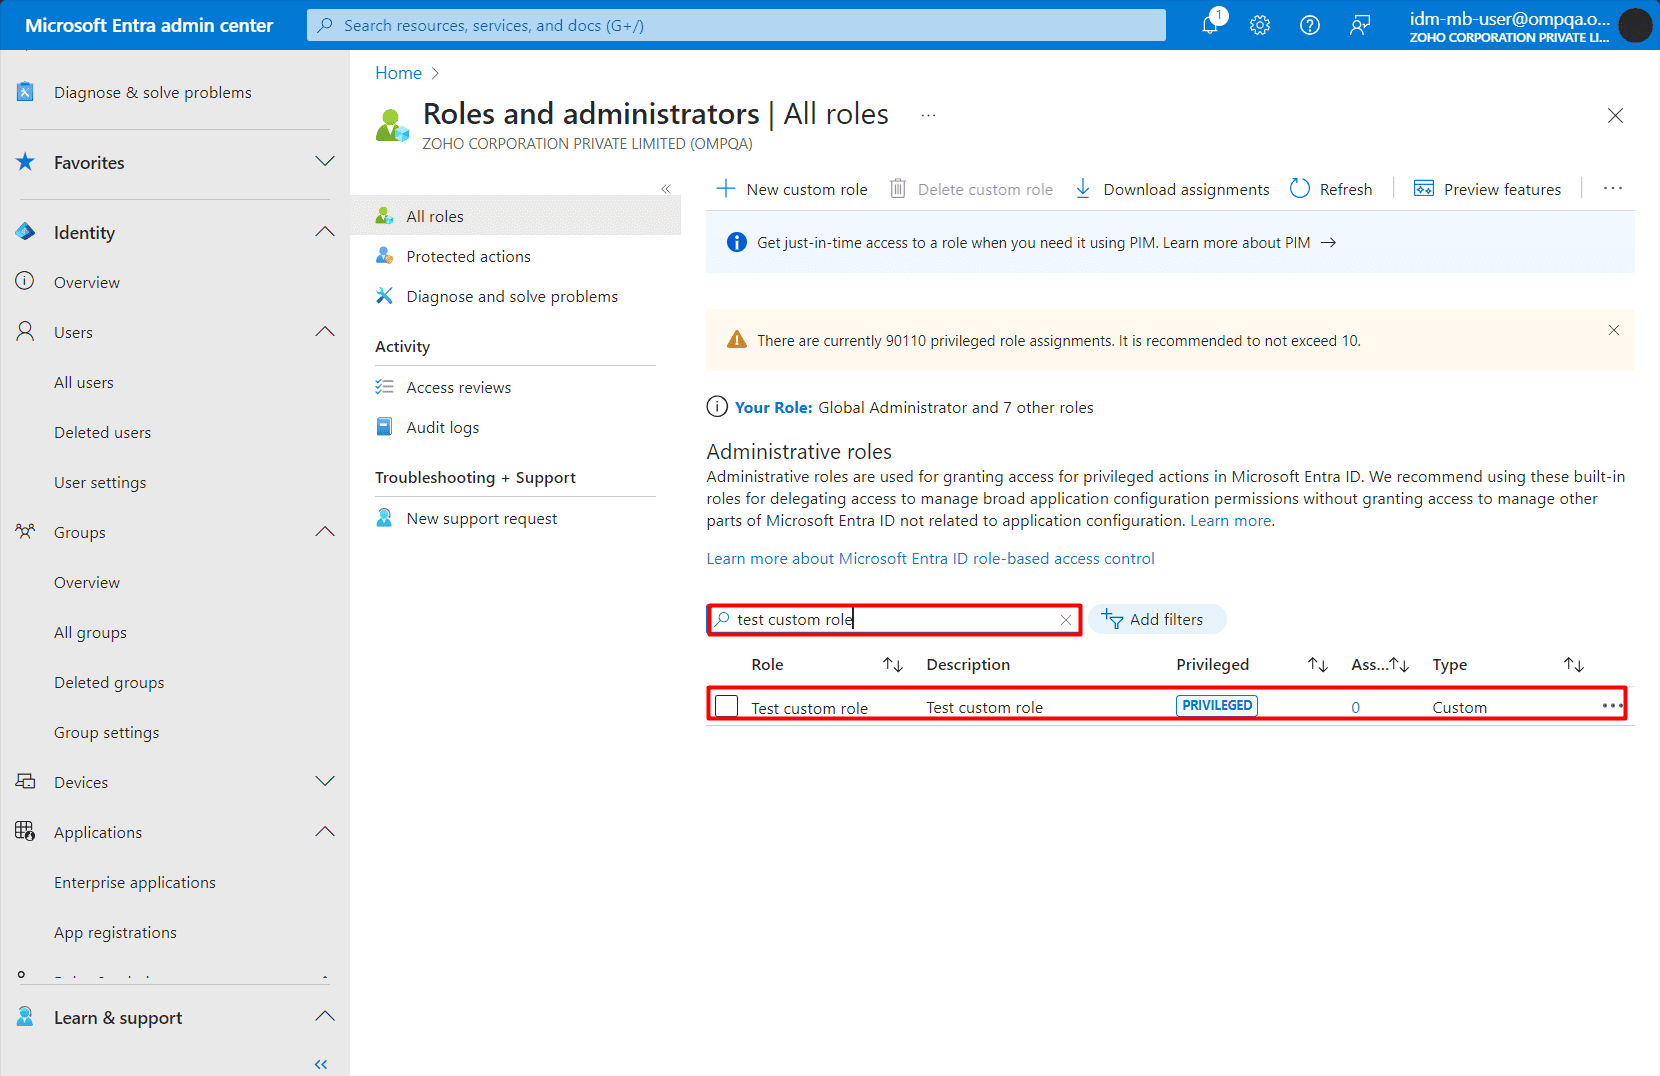
- Click Add Assignments.

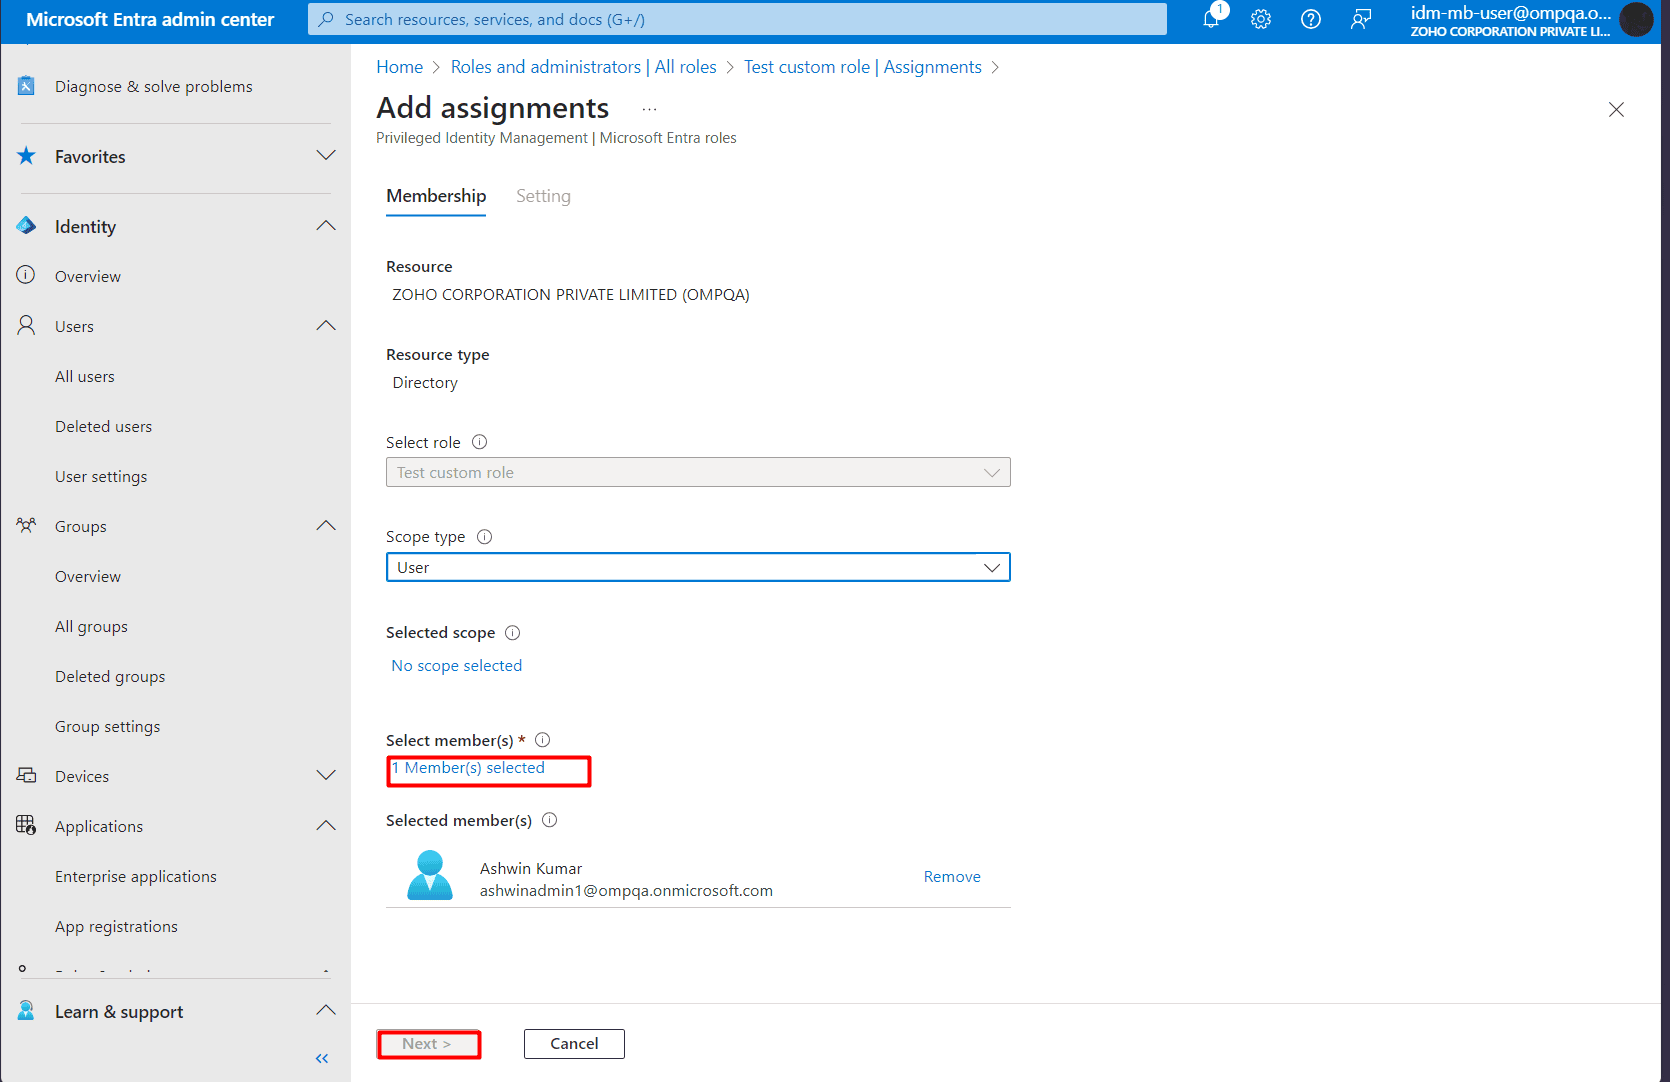
- Select the members you want to assign the role to, under the Select Members field, and click Next.
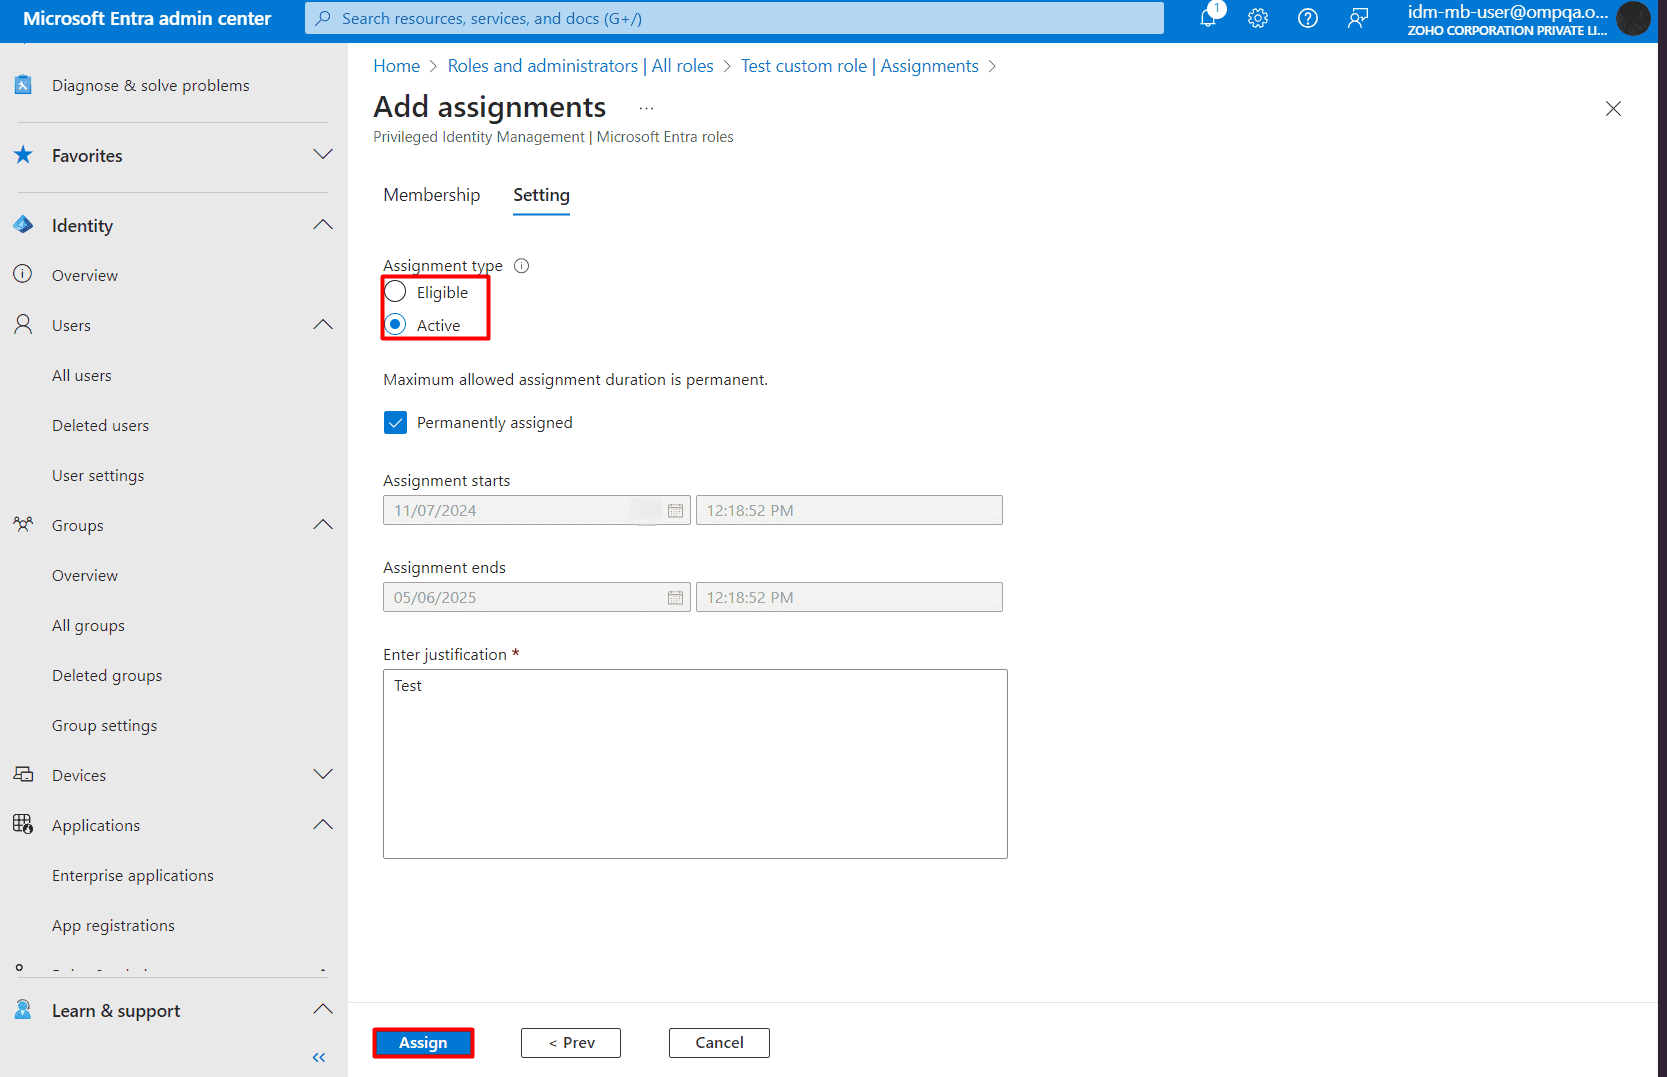
- You can select any of the two assignment types; Eligible for when you want the user to activate the role or perform another action to use it, such as requesting an approval, and Active when you want to assign the role directly.
- You can configure how long the role can be assigned to the user using the Assignment starts and Assignment ends field. If you wish to assign the role without any time limit, click on the Permanently assigned check box.
M365 Manager Plus
- Navigate to Delegation > Help Desk Technicians and click Add New Technician.
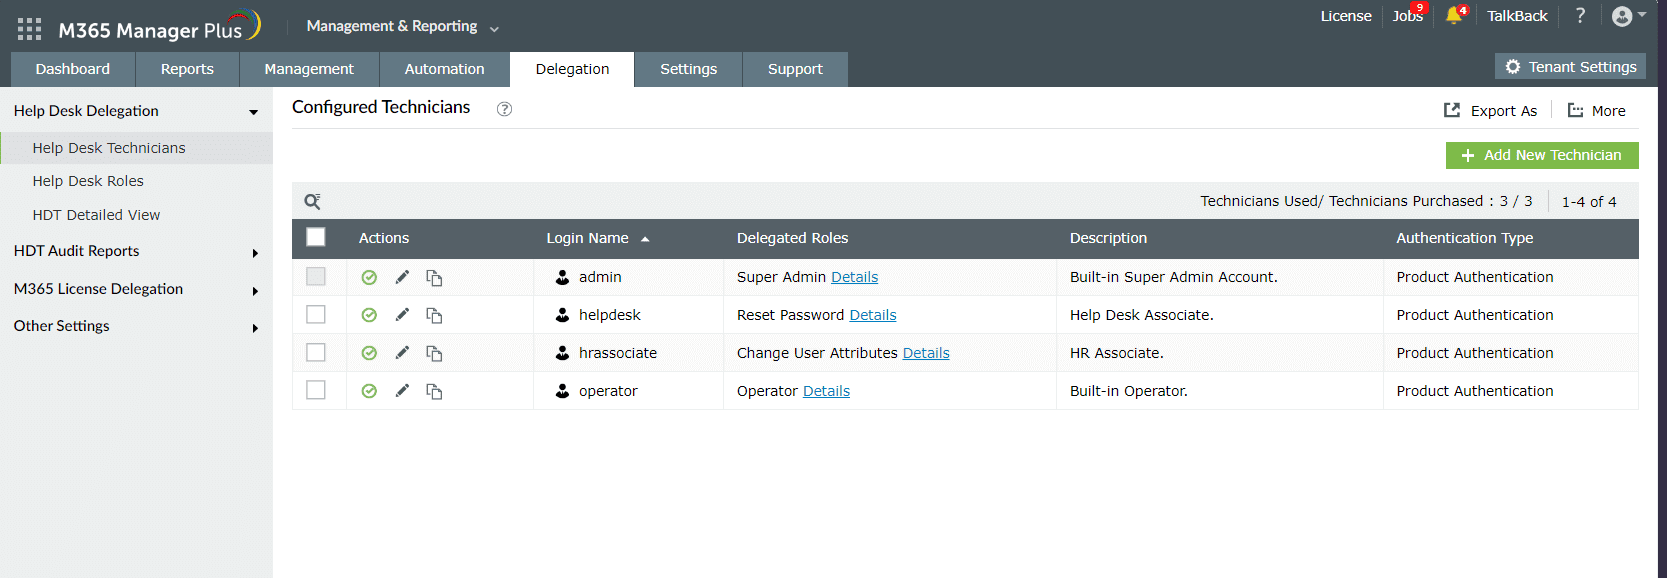
- Select the Authentication Type from the drop-down menu as Microsoft 365 Authentication or Active Directory Authentication.
- For Microsoft 365 Authentication, select the Microsoft 365 Tenant, and you can add users from the selected tenant.
- For Active Directory Authentication, select the AD Domain and enter the Domain User Name in the User Principal Name format. You can also add multiple usernames separated by commas.
- Add the users you wish to assign the role to in the Select Microsoft 365 Users field.
- Choose the role you created from the Help Desk Roles drop-down.
- From the Delegate Microsoft 365 Tenants drop-down, select the Microsoft 365 tenants which you wish to delegate the selected help desk roles.
- Click Add to finish creating new Help Desk Technicians.

How M365 Manager Plus' custom role creation is safer and intuitive than Microsoft Entra ID
Custom roles in Microsoft Entra ID provide organizations with the ability to tailor user permissions for enhanced security and compliance, allowing for precise access to resources like audit logs or specific applications. However, these roles can pose risks if misconfigured, potentially leading to over-permissioning and security vulnerabilities.
In contrast, ManageEngine M365 Manager Plus's admin role delegation mitigates these risks by enabling administrators to assign tasks without elevating user privileges across the broader Microsoft 365 environment. You can also delegate granular access permissions, individual tasks, and reports to technicians without elevating their Microsoft 365 privileges.
Here are the benefits M365 Manager Plus provides compared to those in Microsoft Entra ID's role administration process.
- By limiting access strictly to the M365 Manager Plus admin cente r, users can perform necessary functions—such as password resets and account unlocks—without needing full administrative rights to Microsoft 365. This controlled approach simplifies delegation while maintaining tighter security since even if you get a hold of the user's credentials, you will still need access to the M365 Manager Plus admin center to make any changes to the environment.
- With the Technician Audit Log feature of M365 Manager Plus, track what a technician did with their delegated rights. For example, discover what audit reports were generated, which alerts were created, and more.
- You can create virtual tenants to house user objects that satisfy certain conditions under a single point of control, just like an administrative unit. Consolidate all your privileged accounts in one location for easy report generation, task execution, and frequent auditing—without the need to process other accounts.
Benefits of using M365 Manager Plus for Microsoft 365 administration
- Gain access to detailed and critical Microsoft 365 reports without requiring any exclusive licenses.
- Export reports generated in M365 Manager Plus in CSV as well as HTML, PDF, and XLSX.
- Filter your reports once and save them as custom reports that you can access in just a few clicks.
- Keep tabs on risky sign-ins and other activities for Microsoft Entra ID and other services such as Exchange Online, SharePoint Online, and Microsoft Teams, all from a single console.
- Manage users, mailboxes, groups, sites, and contacts effortlessly in bulk without PowerShell scripting.
- Efficiently monitor the health and performance of Microsoft 365 features and endpoints around the clock.
Effortlessly schedule and export reports on your Microsoft 365 environment.
Try now for freeStreamline your Microsoft 365 governance and administration with M365 Manager Plus
Get Your Free Trial