Group Policy best practices and settings for enhanced security
Effective management of Group Policy Objects (GPOs) is essential for enhancing security within an organization. Implementing best practices for GPO management ensures that policies are enforced consistently, minimizing vulnerabilities and enhancing overall security. By following these recommendations, you can achieve a more secure, compliant, and efficiently managed IT environment.
Essential Group Policy settings to strengthen security
Here are the top 10 Group Policy settings for enhanced security:
- Prevent Windows from saving the LAN manager hash
- Restrict access to the command prompt
- Control software installation permissions
- Regulating access to the Control Panel
- Disable access to removable media drives, DVDs, CDs, and floppy drives
- Disable forced system restarts
- Disable the guest user account
- Block anonymous SID enumeration
- Set a lower maximum password age requirement
- Set a higher minimum password length requirement
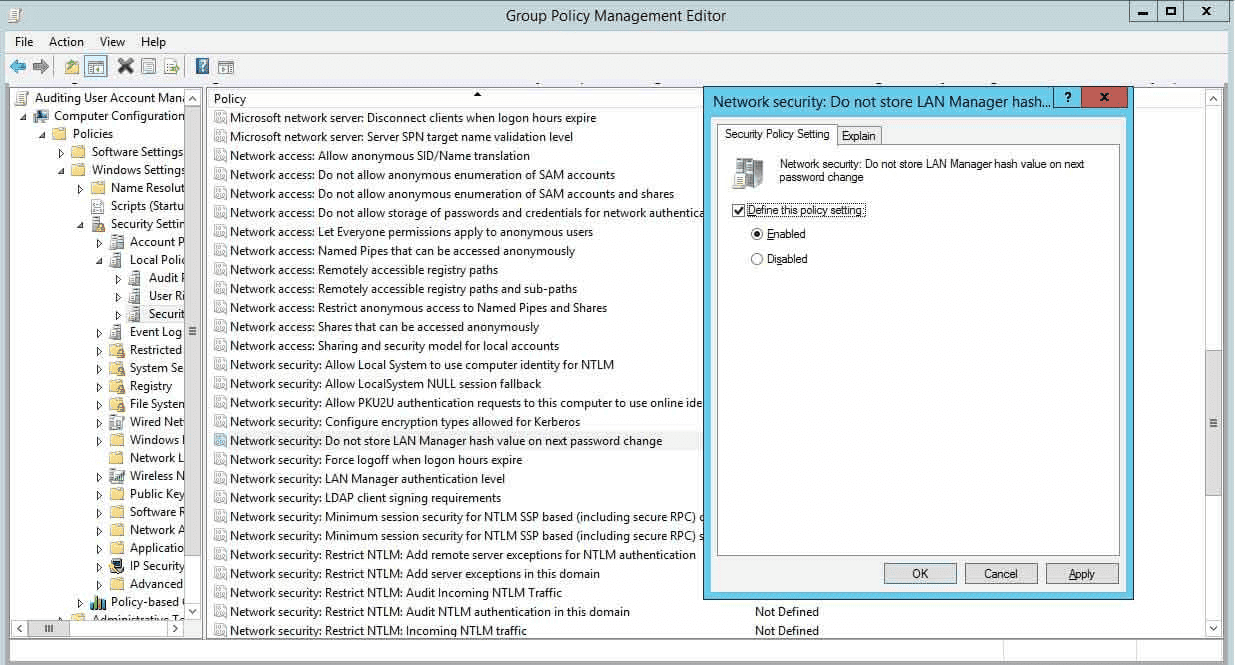
Prevent Windows from saving the LAN Manager hash
To enhance security, it's important to prevent Windows from storing LAN Manager (LM) hashes of user passwords. The LM hash, an older hashing algorithm, is known to be weak and vulnerable to attacks, making it easier for hackers to exploit. By disabling the storage of LM hashes, you reduce the risk of password cracking and improve overall system security.
This process involves configuring system settings to ensure that Windows only stores the more secure Windows NT hashes. Taking this step helps safeguard user credentials and protects against potential unauthorized access. Follow the below steps to implement these restrictions.
- Open the Group Policy Management Editor window.
- Navigate to Computer Configuration > Windows Settings > Security Settings > Local Policies > Security Options.
- Double-click the Network security: Do not store LAN Manager hash value on next password change policy in the right pane.
- Choose Enabled.
- Click Apply and OK.
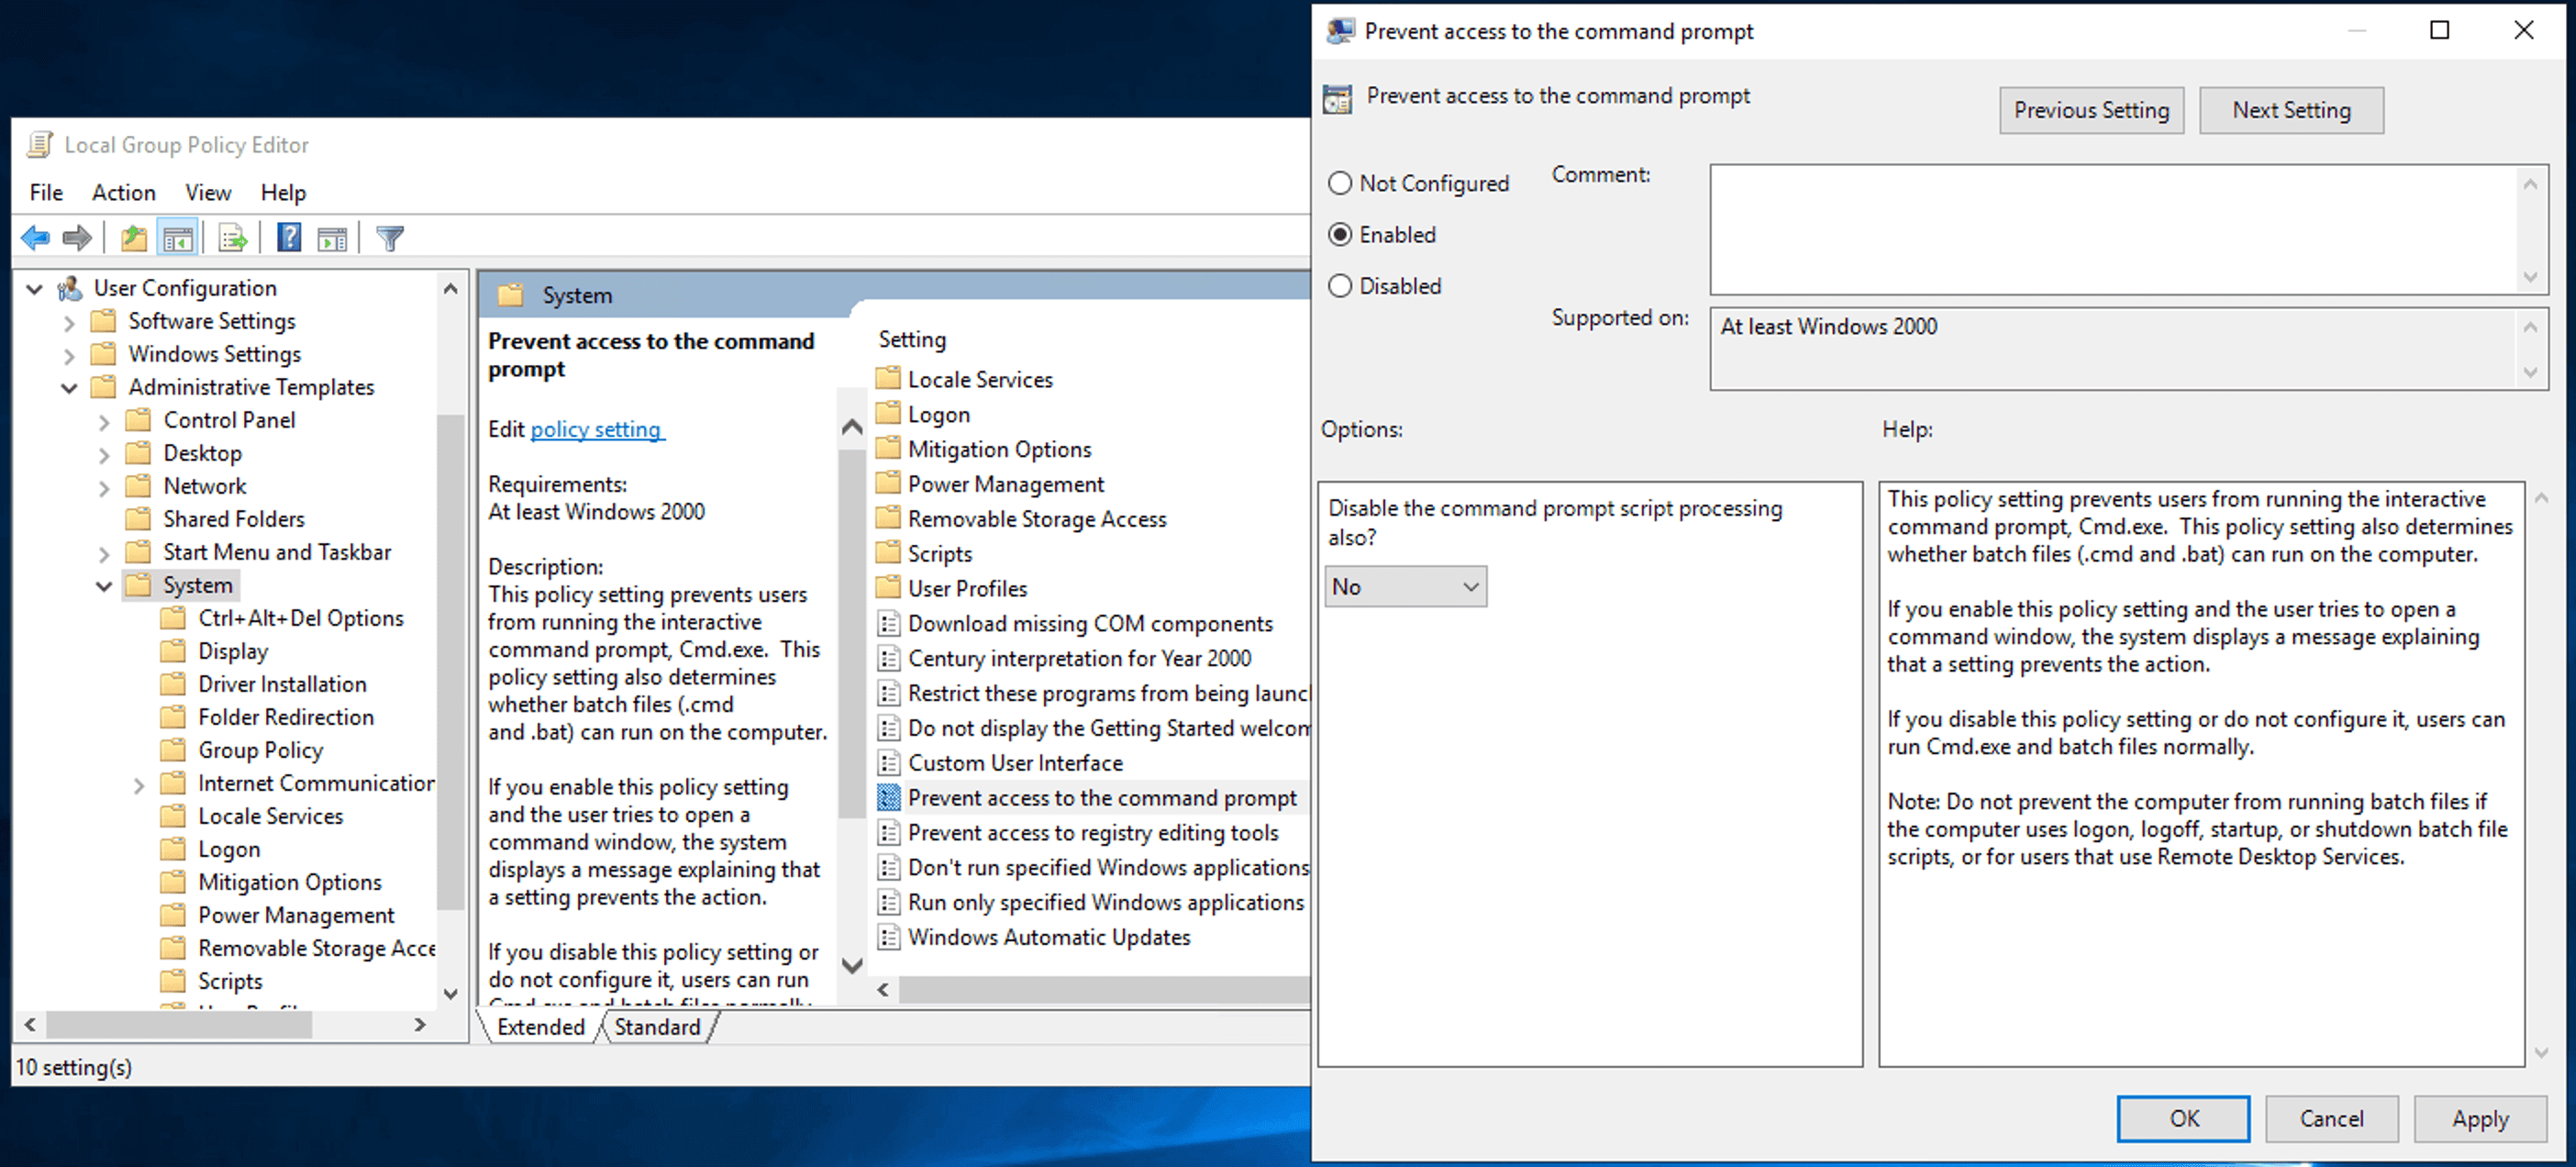
Restrict access to the command prompt
Command prompts can execute commands that provide elevated access and bypass system restrictions. To protect system resources, it's advisable to disable the command prompt.
Once disabled, if someone attempts to open a command window, the system will display a message indicating that certain settings are preventing this action. Follow the below steps to implement these restrictions.
- Open the Group Policy Management Editor.
- Navigate to User Configuration > Administrative Templates > System.
- Double-click the Prevent access to the command prompt policy in the right pane.
- Select Enabled to apply the policy.
- Click Apply and OK.
Control software installation permissions
Allowing users to install software can lead to the installation of unwanted applications that may jeopardize your system's security. System administrators often need to perform regular maintenance and cleanup to address these issues.
To avoid potential risks, it is prudent to prevent software installations with a Group Policy. Follow the below steps to do so.
- Open the Group Policy Management Editor.
- Navigate to Computer Configuration > Administrative Templates > Windows Component > Windows Installer.
- Double-click the Prohibit User Installs policy in the right pane.
- Set the policy to Enabled to implement it.
- Click Apply and OK.

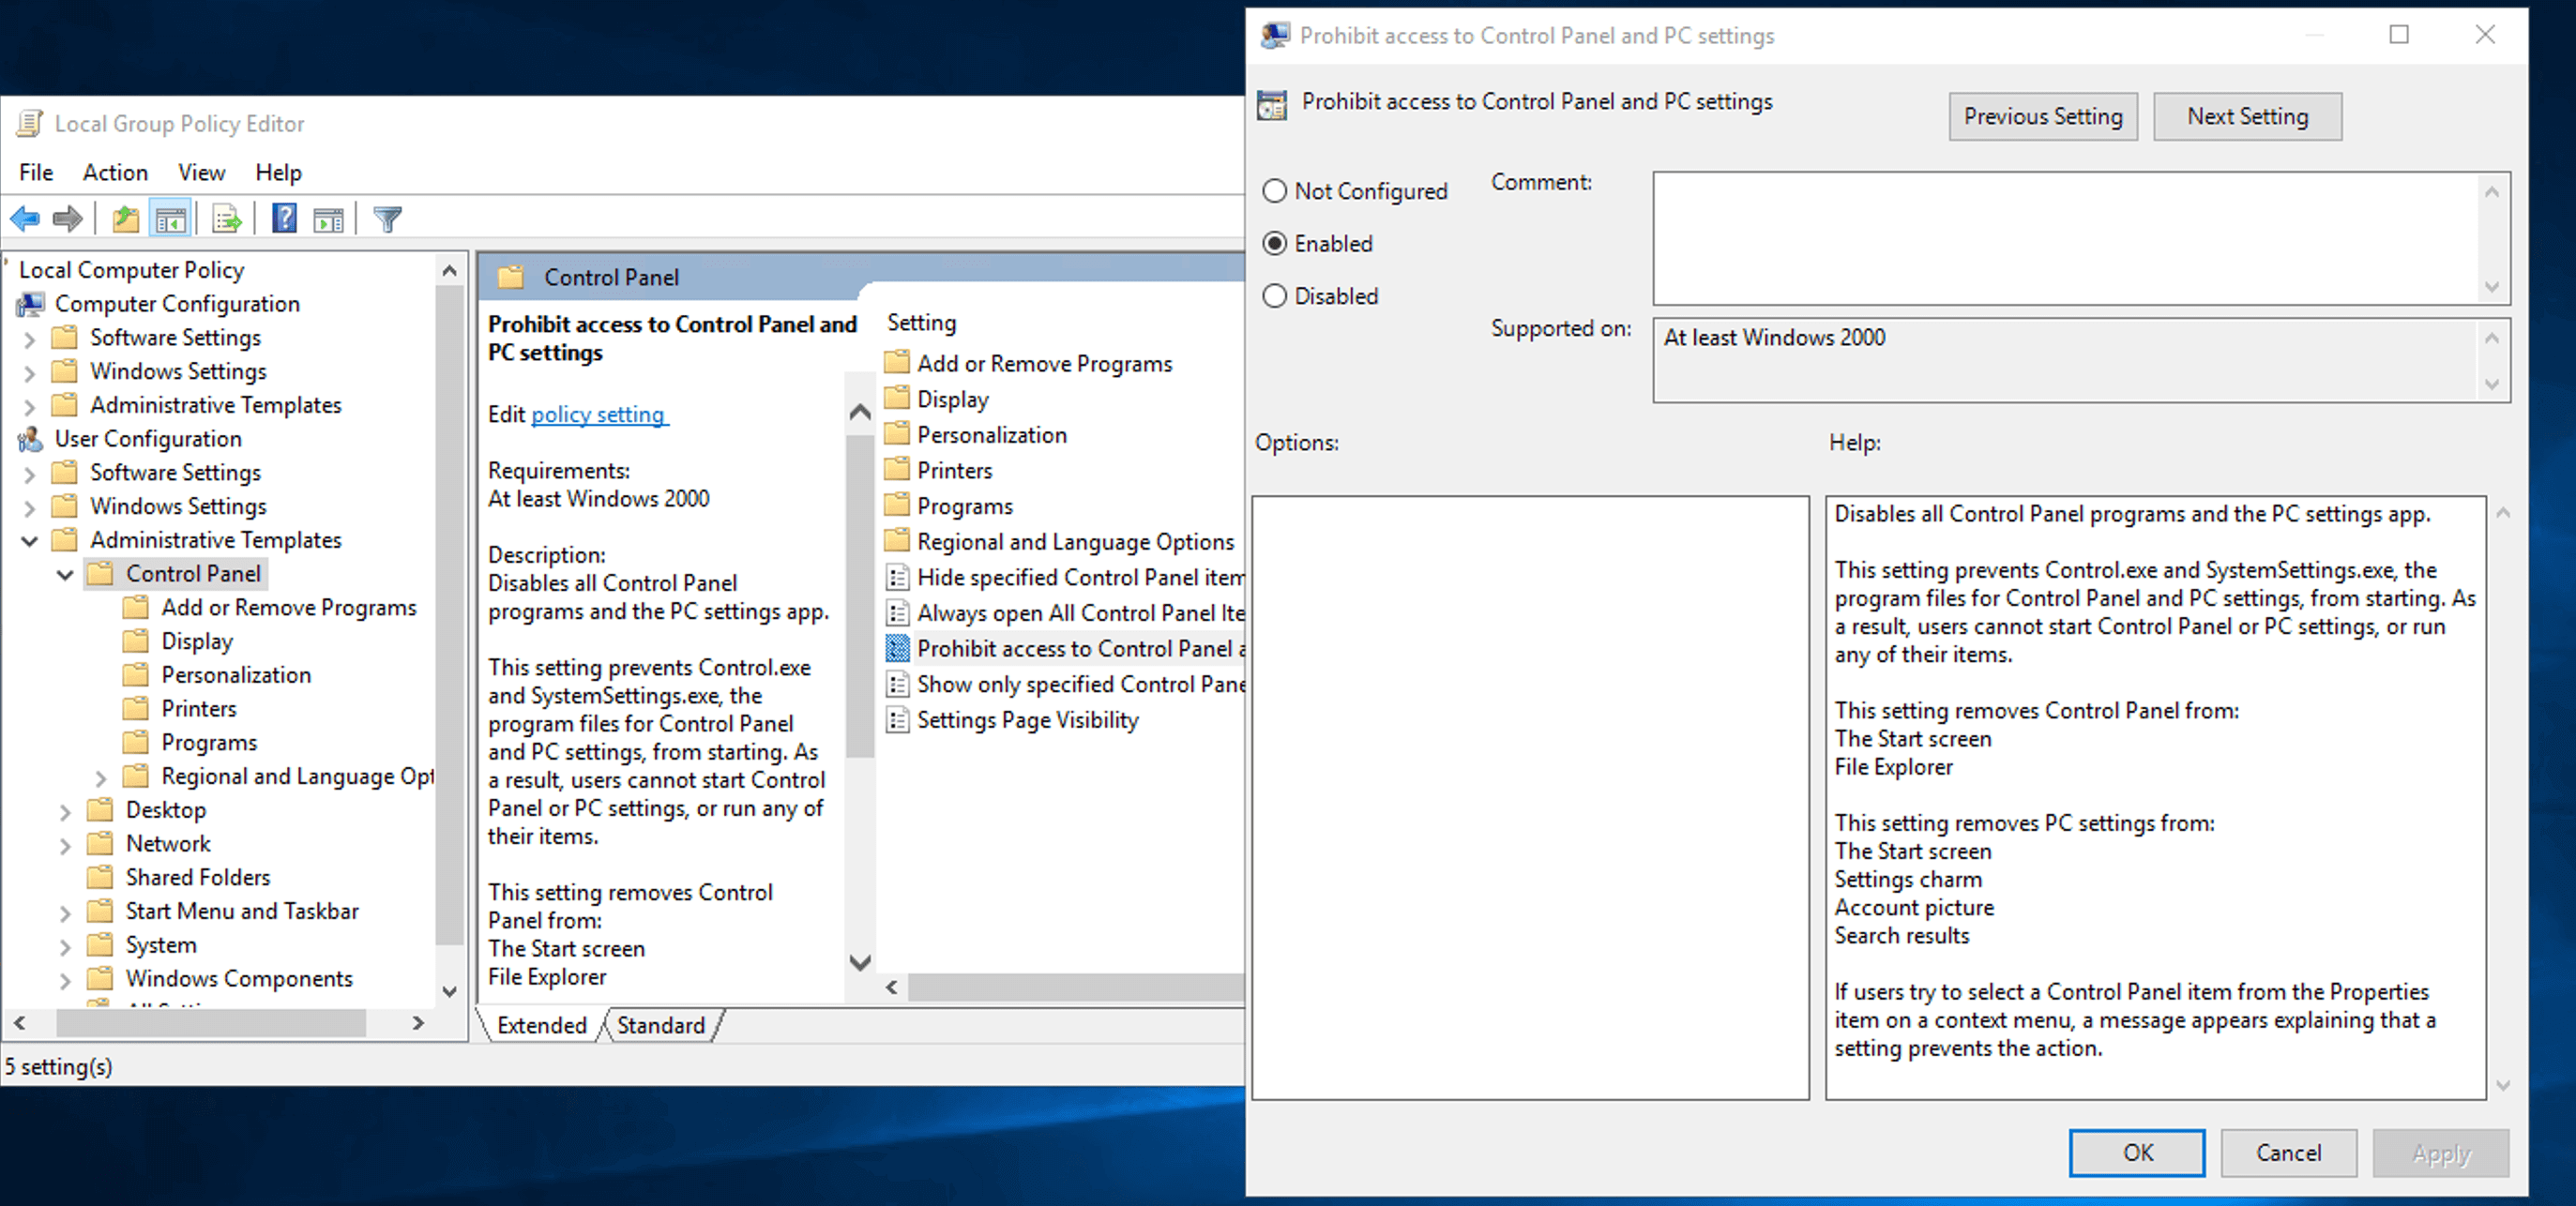
Regulating access to the Control Panel
Restricting access to a computer's Control Panel enhances security within your business environment. Since the Control Panel provides comprehensive control over your computer's settings, limiting access helps safeguard data and other resources. Follow the below steps to implement these restrictions.
- Open the Group Policy Management Editor.
- Go to User Configuration > Administrative Templates > Control Panel.
- In the right pane, open the properties of the Prohibit access to Control Panel and PC settings policy by double-clicking it.
- Choose Enabled from the three available options.
- Click Apply and OK.
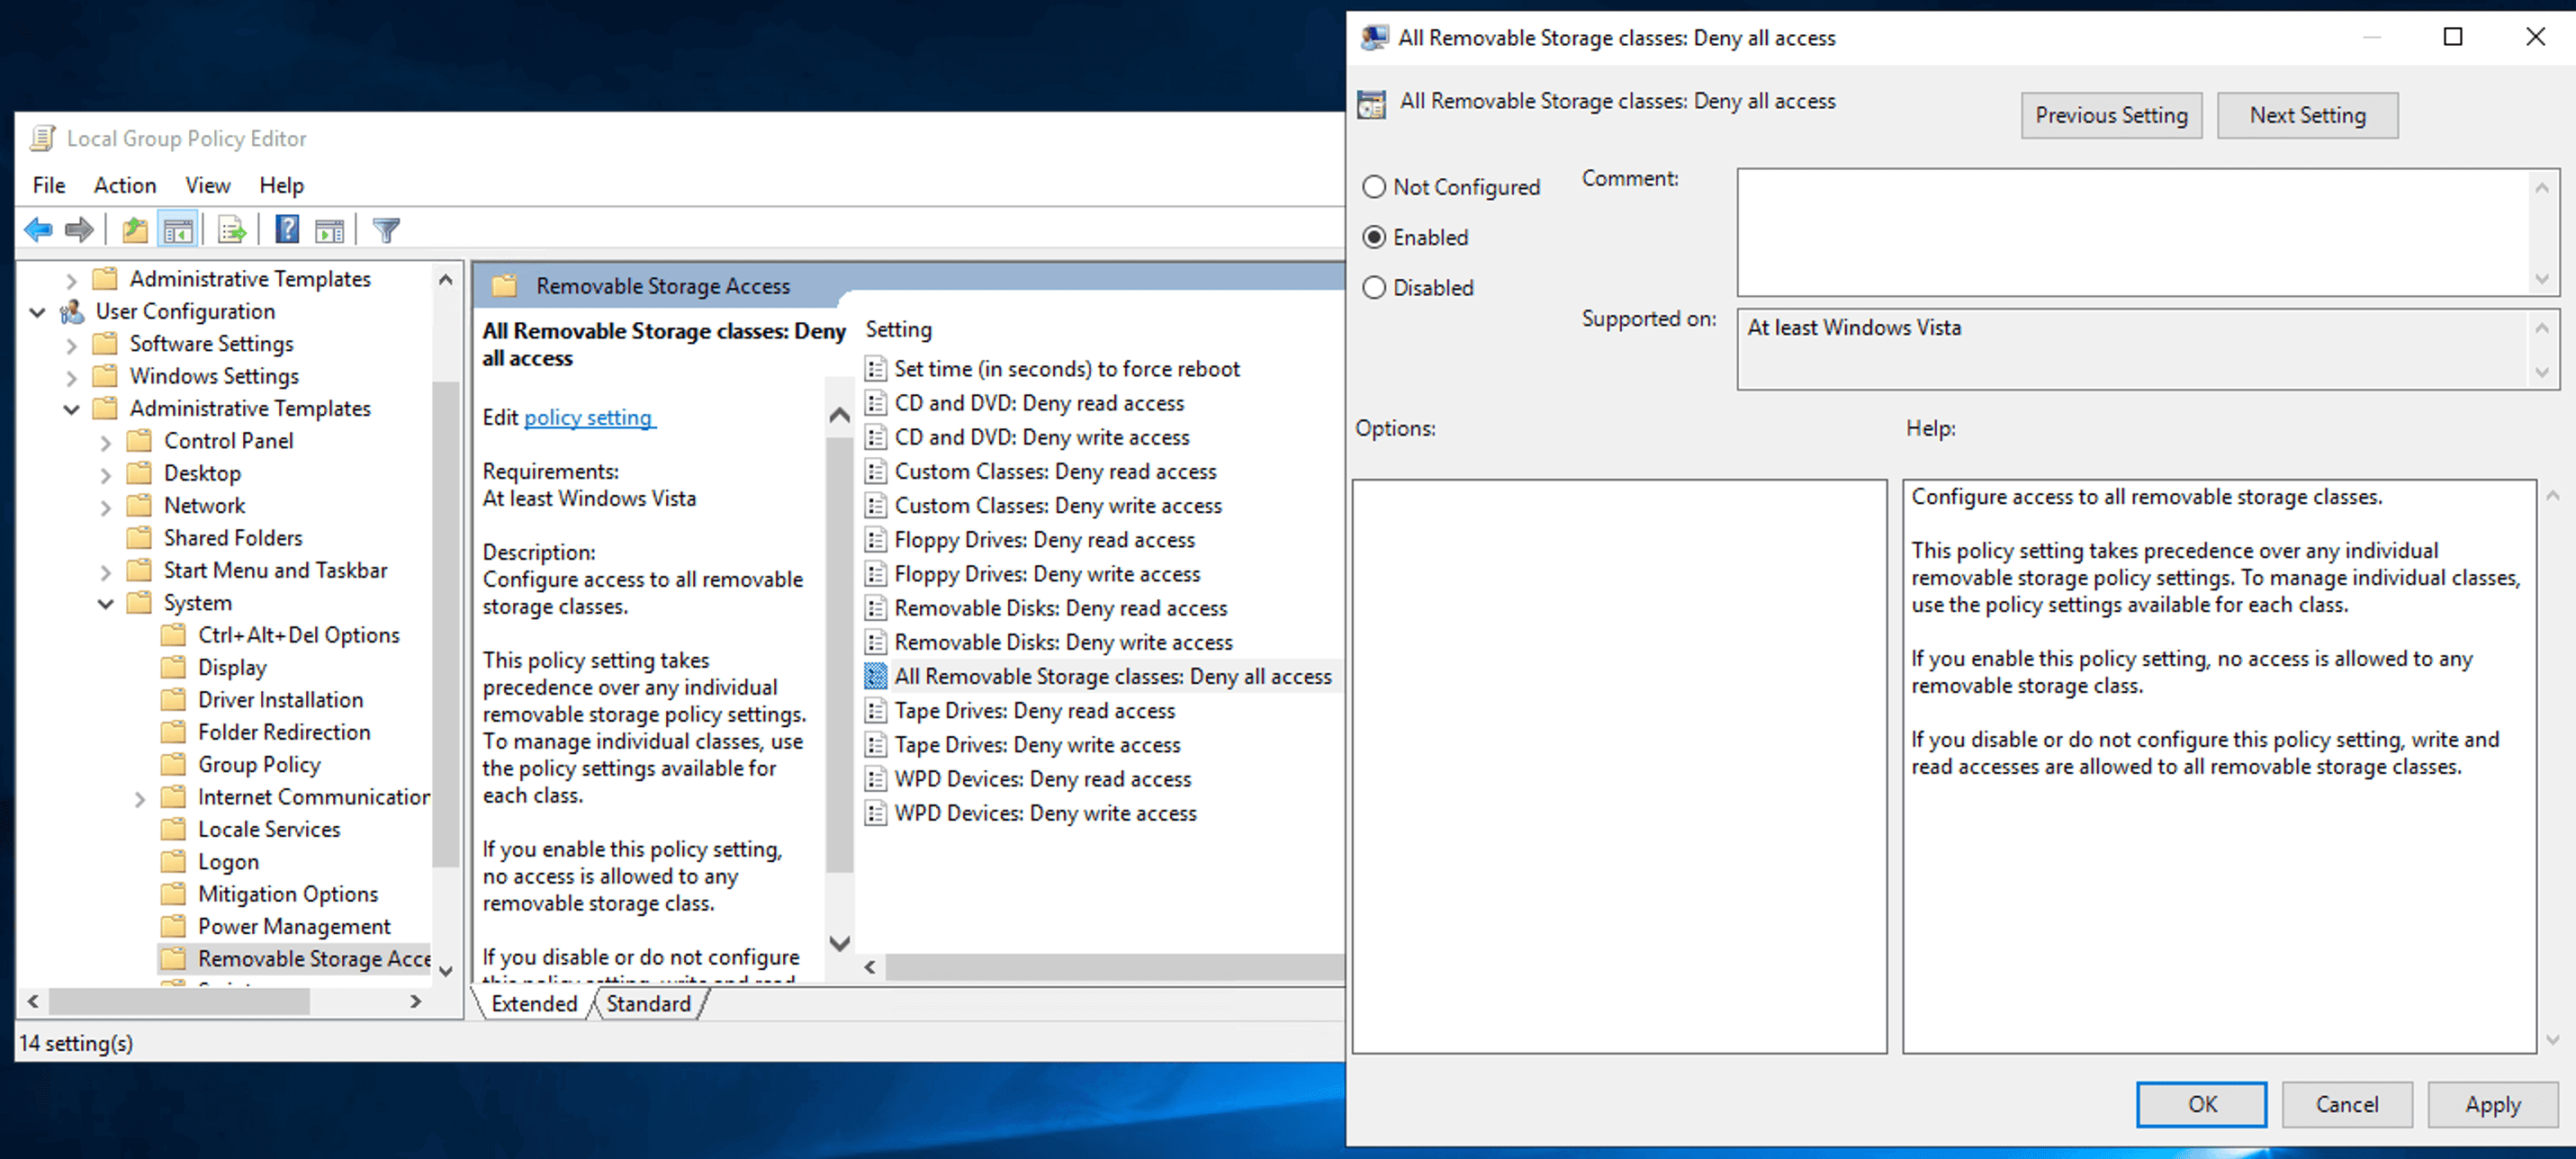
Disable access to removable media drives, DVDs, CDs, and floppy drives
Removable media drives, including DVDs, CDs, and floppy drives, are particularly vulnerable to viruses and malware. If a user connects an infected drive to a network computer, it can potentially spread malicious software throughout the entire network.
To prevent these security risks and protect your systems, it's best to disable access for all such drives entirely. Follow the below steps to do so.
- Open the Group Policy Management Editor.
- Navigate to User Configuration > Administrative Templates > System > Removable Storage Access.
- Double-click the All removable storage classes: Deny all accesses policy in the right pane.
- Set the policy to Enabled to implement it.
- Click Apply and OK.
Disable forced system restarts
Forced system restarts are quite common, especially when Windows prompts users to restart after a security update. These automatic restarts can result in loss of unsaved work and reduced productivity. By disabling forced restarts, admins can ensure updates are applied in a controlled manner, allowing users to save their work and schedule restarts at more convenient times.
To prevent automatic restarts, you can disable this feature with a Group Policy. Follow the below steps to do so.
- Open the Group Policy Management Editor.
- Navigate to Computer Configuration > Administrative Templates > Windows Component > Windows Update.
- Double-click the No auto-restart with logged on users for scheduled automatic updates installations policy in the right pane.
- Set the policy to Enabled to implement it.
- Click Apply and OK.

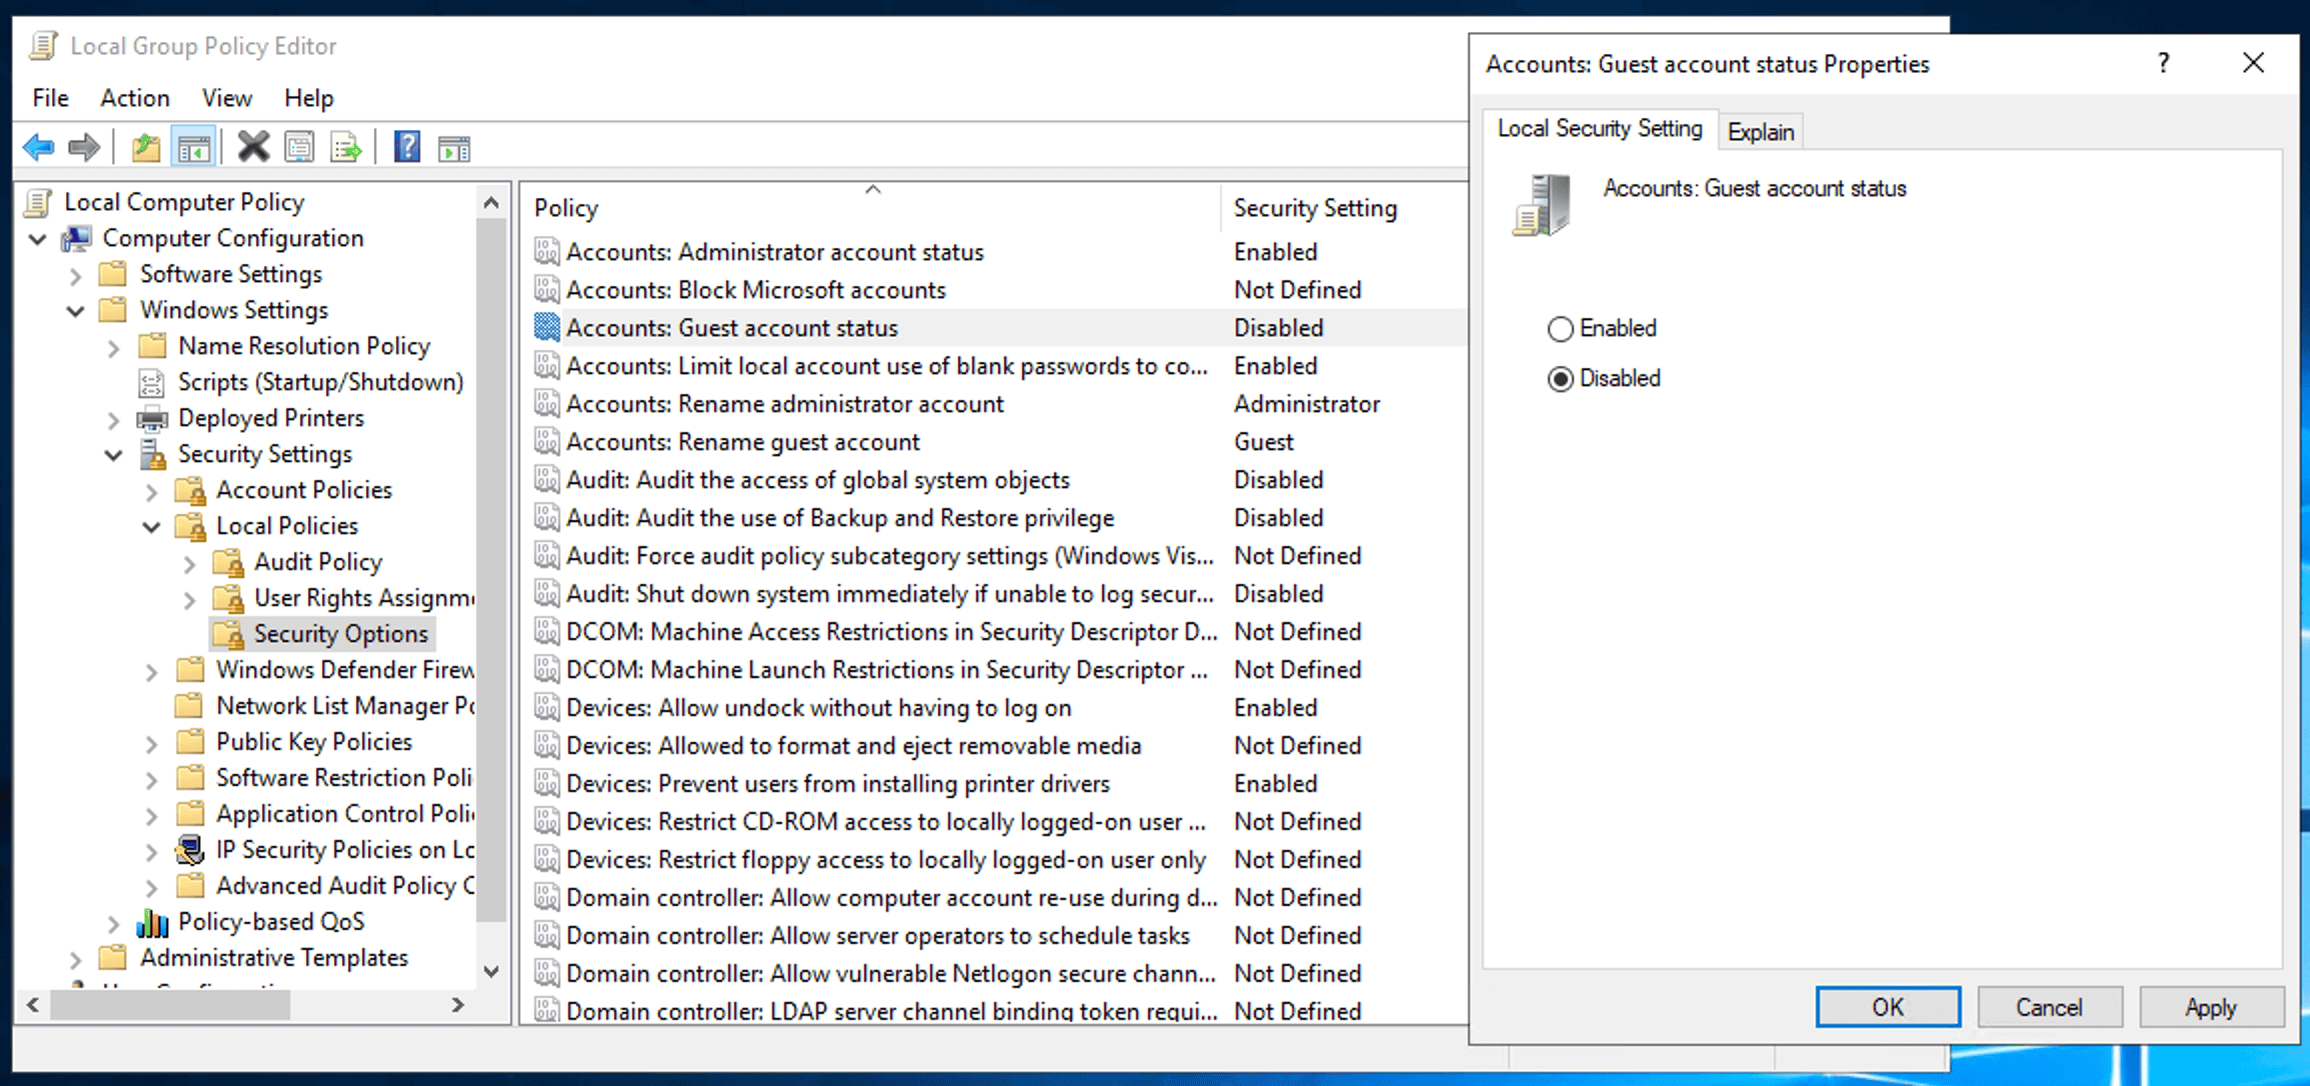
Disable the guest user account
A guest account can provide access to sensitive data, as it allows entry into a Windows computer without requiring a password. Activating this account can lead to unauthorized misuse and potential abuse of your systems.
Fortunately, guest accounts are disabled by default. However, it?s important to verify this in your IT environment. If the account is enabled within your domain, disabling it will help prevent unauthorized access and safeguard your systems. Follow the below steps to do so.
- Open the Group Policy Management Editor.
- Navigate to Computer Configuration > Windows Settings > Security Settings > Local Policies > Security Options.
- Double-click the Accounts: Guest Account Status policy in the right pane.
- Check the Disabled option.
- Click Apply and OK.
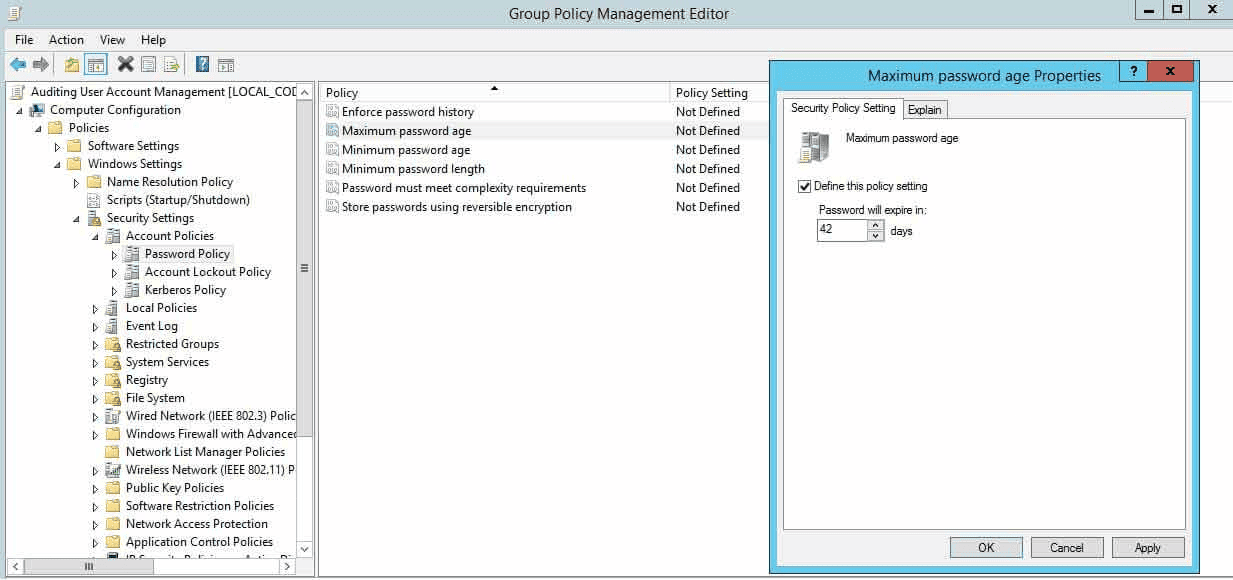
Set a lower maximum password age requirement
If MFA cannot be enabled in your environment, it is crucial to keep the password age short to ensure frequent password changes. A longer password expiration period increases the risk of password theft by reducing how often users must update their passwords. Shorter expiration intervals are generally recommended for enhanced security.
By default, Windows sets the maximum password age to 42 days. Follow the below steps to set a lower age requirement.
- Open Group Policy Management Editor.
- Navigate to Computer Configuration > Windows Settings > Security Settings > Account Policies > Password Policy.
- Double-click the Maximum password age policy in the right pane.
- Check the Define this policy setting box and specify a value.
- Click Apply and OK
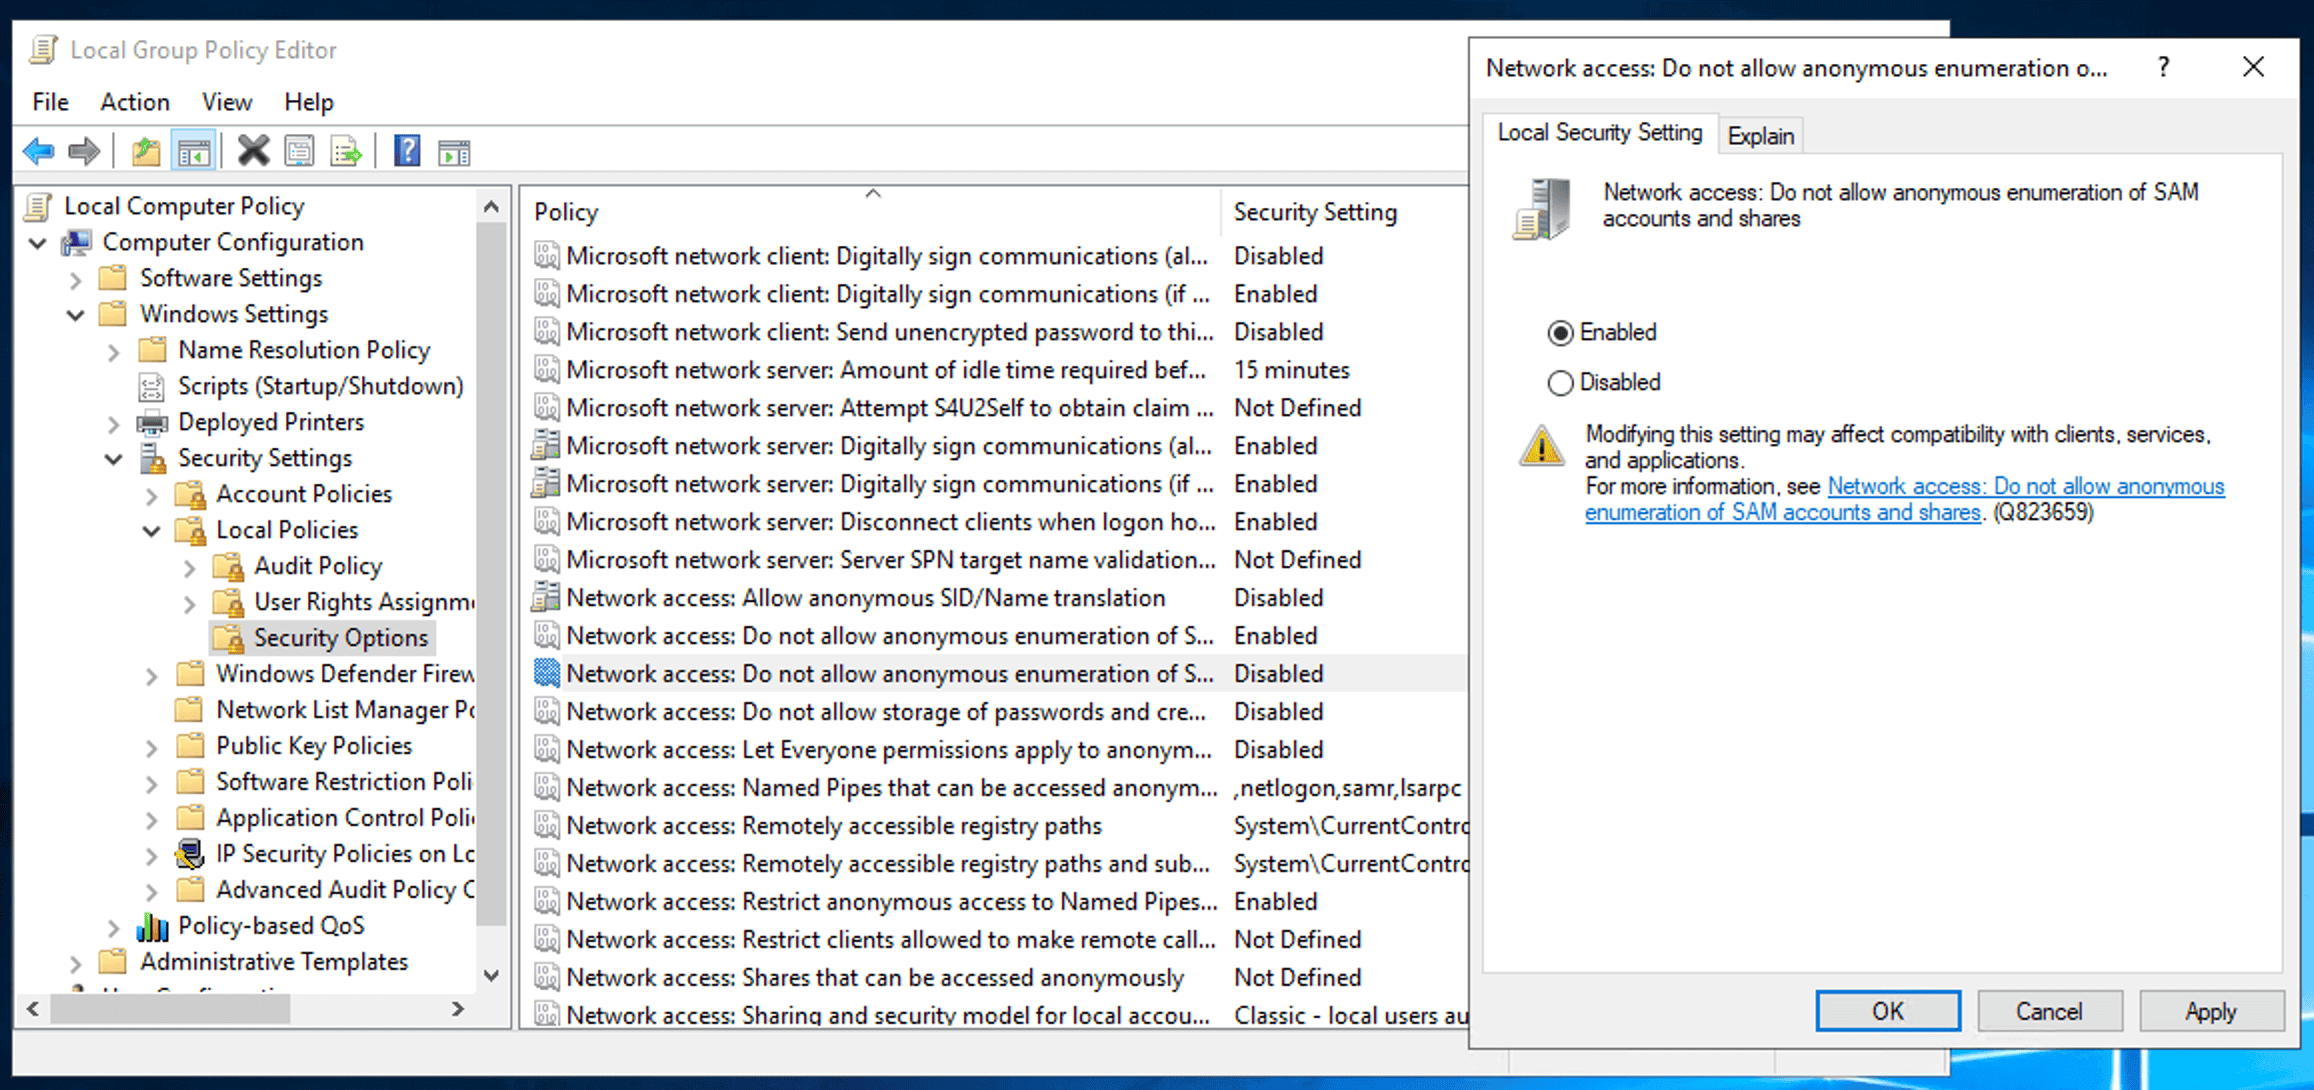
Block anonymous SID enumeration
In AD, each security object, including users and groups, is given a unique Security Identifier (SID). By blocking anonymous SID enumeration, you make it more difficult for potential attackers to gather information about users and groups within your network.
By default, this setting is disabled to ensure that unauthorized users cannot access or enumerate SIDs without proper authentication. Ensuring that this setting is enabled is an important step in safeguarding your network and maintaining security. Follow the below steps to do so.
- Open the Group Policy Management Editor.
- Navigate to Computer Configuration > Windows Settings > Security Settings > Local Policies > Security Options.
- Double-click the Network Access: Do not allow anonymous enumeration of SAM accounts and shares policy in the right pane.
- Select Enabled.
- To save your setting, click Apply and OK
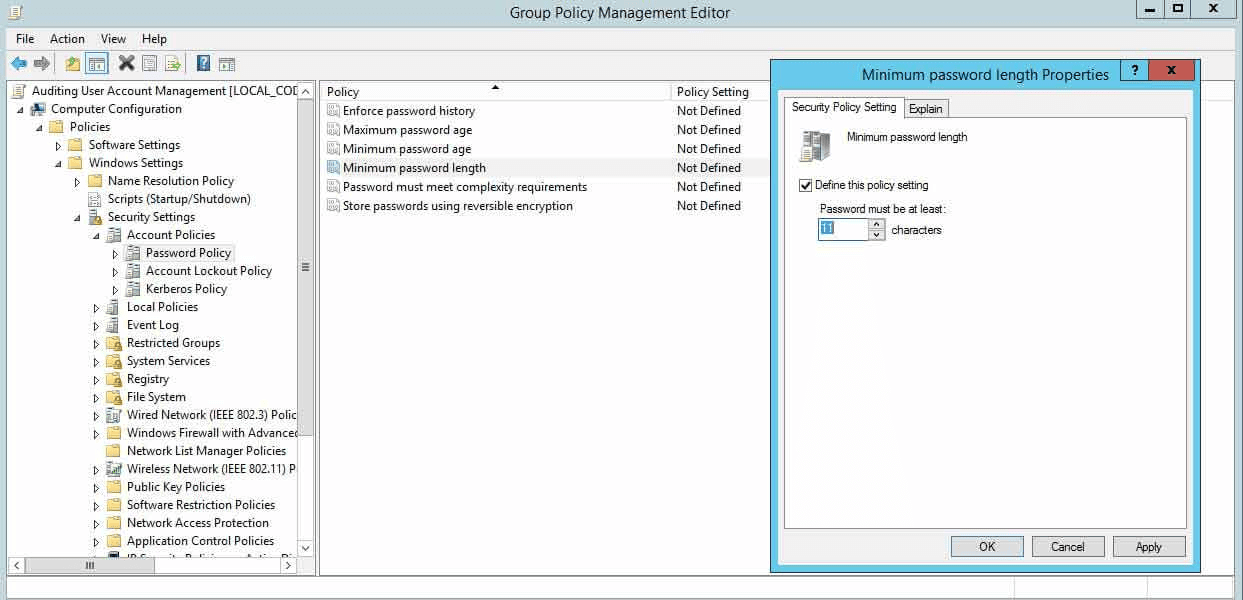
Set a higher minimum password length requirement
It is recommended to set passwords for elevated accounts to a minimum of 15 characters to ensure a higher level of security, while for regular accounts, a minimum of 12 characters should be used. Using shorter minimum lengths increases the risk of password-related security breaches. The default minimum password length setting is zero characters, which means you will need to specify a higher number to meet these security requirements.
Setting appropriate minimum lengths helps safeguard your accounts from unauthorized access and potential security threats. Follow the below steps to do so.
- Open the Group Policy Management Editor.
- Navigate to Computer Configuration > Windows Settings > Security Settings > Account Policies > Password Policy..
- Double-click the Minimum password length policy in the right pane.
- Check the Define this policy setting box and specify a value.
- Click Apply and OK
How ADManager Plus manages and controls Group Policy modifications
ADManager Plus offers robust solutions for creating and managing Group Policies, ensuring that your AD environment remains secure and efficient. It simplifies and controls this process by providing comprehensive tools and features designed to monitor, manage, and secure Group Policy changes. It allows administrators to set granular permissions for users and groups, controlling who can view or modify GPOs, thus reducing the risk of unauthorized changes and maintaining policy integrity.
Additionally, ADManager Plus offers comprehensive reporting capabilities, enabling administrators to generate predefined reports that facilitate effective monitoring and review of policy modifications. It also enhances compliance by enforcing policies to ensure that only authorized changes are made, helping to meet both internal and external regulatory requirements.