Methods of Agent Deployment
If you have enabled Agent Mode, you can deploy the agent in the Windows machine through any of the methods given below,
Agent Deployment Methods
AssetExplorer installed in Windows server:
AssetExplorer installed in Non-Windows server:
AssetExplorer installed in Windows server
If AssetExplorer is installed in a Windows server, then you can deploy the agent using the following methods,
-
Import from Active Directory logon script
-
Deploying Agent from AssetExplorer Application
-
Manual Installation of Agent
-
Installing Agent through PsExec utility
Method #1: Import from Active Directory logon script
An instant method to push the agent in all the Windows machine within a domain is through Active Directory logon script. Instead of providing permission to all the scanned workstations for file transfer, the agent is installed once the user logs into the machine. In addition, the agent can be deployed to all the newly added workstations automatically on scheduling an AD Import, .
To install the agent from Active Directory,
-
Create a network share like, \\MyServer\MyShare
-
Click Download Agent and run the agent.msi file.
-
Save the agent and the script in the network share.
-
In your Domain controller, click Start -> Administrative Tools -> Active Directory Users and Computers.
-
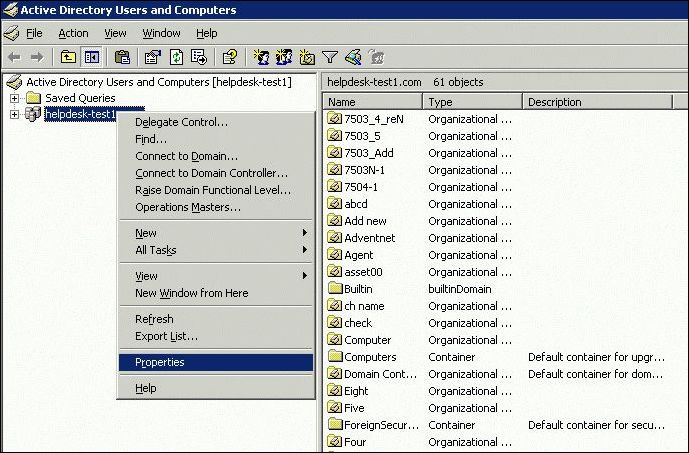
In the console tree, right click on your domain, and select Properties.

-
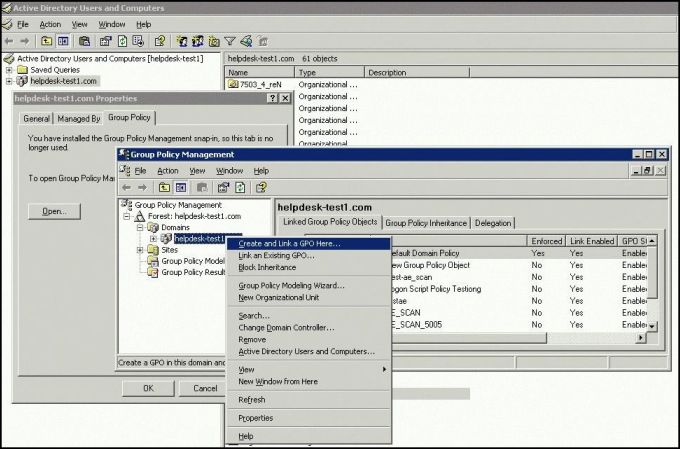
Select Group Policy tab, and click Open (New) button. The Group Policy Management window pops up.
-
Right click on the name of domain or the Organizational unit for which you would like to configure the script. Click Create and Link a GPO Here... option.

-
Type a name for the new GPO say, AGENT DOWNLOAD and click Ok. The GPO is added to the existing list.
-
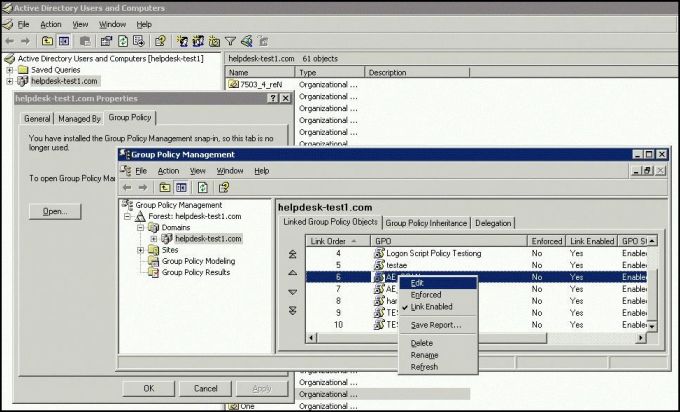
Right click on the newly created GPO and click on Edit option.

-
In the new window go to the User Configuration -> Windows settings -> scripts -> double click Logon.
-
In the new Logon Properties window click on Add. Now Browse and select the script "\\MyServer\MyShare\InstallAgent.vbs". The script should be accessible by the target workstations.
-
Specify the Script parameters as msi file name with path (eg. \\MyServer\MyShare\ManageEngineAssetExplorerAgent.msi) and click Ok.
-
Close the Group Policy Window and click Ok.
-
Quit the Active Directory Users and Computer Window.
-
When the client computer starts the agent is automatically installed.
|
Note
|
1. The agent can be deployed to all the Windows Workstations and Servers within the domain.
2. The agent is deployed when the user logs into the machine. |
Method #2: Manual Installation of Agent
To download and install the agent as a service.
-
Click Download Agent button.
-
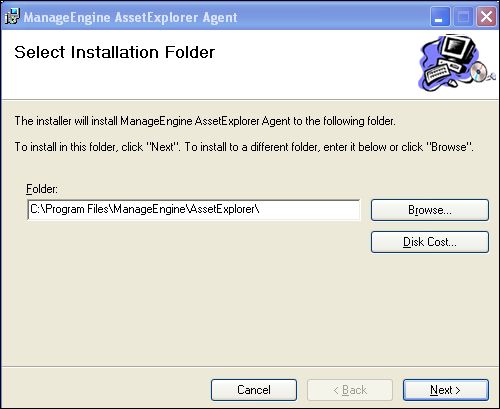
Run the ManageEngineAssetExplorerAgent.msi file. The ManageEngine Asset Explorer Agent Setup Wizard pops-up.
-
Click Next >.
-
Choose the Installation folder name under which the Agent must be installed. By default, the folder name is specified as C:\ManageEngine\AssetExplorer directory.

If you want to change the installation directory, then, click the Browse button beside the directory path. From the file chooser window, choose the directory of your choice and click Ok.
-
Click Next >.
-
The next step is Agent Configurations, if you have not yet configured the agent, you can specify the server details and agent settings. Click Next >.
-
You also have an option to enable scan when ever the system starts up. Click Next to install the agent.
Method #3: Installing Agent through PsExec Utility
You can install agents through PsExec utility in Windows Workgroup.
-
Download the PsTools.
-
Install the software in one of the Windows machine.
-
From the command prompt, go to the directory where the PsTools is installed.
-
Execute the command as given below, to install the agent on each computer listed in the file.
psexec.exe @<file name> -u <domain name\user name> -p <password> msiexec /i <msi file name>
For example:
psexec.exe @ComputersList.txt -u WORKGROUP\administrator -p password msiexec /i "\\ae-test1\msi\ManageEngineAssetExplorerAgent.msi"
AssetExplorer installed in Non - Windows Server
If AssetExplorer is installed in a Non - Windows server say, Linux, you can still use the Agent Mode to scan Windows machines. But, you can neither configure the Agent details from Agent Settings page nor install and upgrade the agent from the linux server.
Some of the methods through which you can configure and deploy the agents are,
-
Importing from Active Directory logon script
-
Installing Agent through PsExec utility
Method #1: Import from Active Directory logon script
To deploy the agent through Active Directory, use the logon script and provide additional parameters as given below,
<agent with directory name> <server protocol> <server ip> <server name> <server port> <agent port>
For example:
\\server\share\ManageEngineAssetExplorerAgent.msi http 192.168.112.153 assetexplorer 8080 9000
On entering the additional parameters, follow the steps as in Active Directory logon script.
Method #2: Installing Agent through PsExec Utility
You can install agents through PsExec utility in Windows Workgroup.
-
Download the PsTools.
-
Install the software in one of the Windows machine.
-
From the command prompt, go to the directory where the PsTools is installed.
-
Execute the command as given below, to install the agent on each computer listed in the file.
psexec.exe @ComputersList.txt -u administrator -p Zoho123SDP msiexec /i <msi file name> SERVERIP=<server ip address> SERVERNAME=<servername> PROTOCOL=<http or https> PORT=<port no> AGENTPORT=<agent port> SCANATBOOT=<0 or 1>
For example:
psexec.exe @ComputersList.txt -u WORKGROUP\administrator -p password msiexec /i "\\Linux_Agent.msi" SERVERIP=199.1.1.1 SERVERNAME=assetexplorer PROTOCOL=http PORT=8080 AGENTPORT=9000 SCANATBOOT=1
Configuring Agent details using Orca editor
To configure the agent details, you need to modify the .msi file using Orca editor and then proceed with the installation. Once the parameters are configured, you can install the agent using Active Directory logon script or through PsExec utility.
-
Download the Orca editor.
-
Install the editor in one of the Windows machine.
-
Download the agent from AssetExplorer server and copy it to the Windows machine having the Orca editor.
-
Right-click the .msi file and select Edit with Orca option. The Orca editor window pops-up, listing all the tables on the left hand side.
-
Click Property table.
-
In the right panel, right-click and select Add Row option.
-
Enter the property as SERVERNAME and value as the name of the AssetExplorer server. Also, provide the following details,
|
PROPERTY |
VALUE |
|
SERVERIP |
IP Address of the AssetExplorer Server |
|
PORT |
Port No. of the AssetExplorer Server |
|
PROTOCOL |
Protocol used by the server, whether it is http or https. |
|
AGENTPORT |
Port No. of the Agent. This port should be open in the Windows machine to install the agent. |
-
Save the provided details.
-
Close the editor and proceed with the installation.
