Changing Endpoint Central Server's Name/IP/Port Details in Agent
Problem
Agents not communicating with the server after migration.
Cause
The new server details like FQDN, IP, Port numbers are not available with the agent.
Resolution
Changing the following details in the Endpoint Central Agents:
- The Name or the IP Address of the Endpoint Central Server
- The HTTP and HTTPS ports that are used by the Endpoint Central Agents to communicate with the Server
- The mode of the communication as HTTP or HTTPS
To change the values, either a GPO or a cscript can be used. This page explains about creating a GPO to change the server contact details in agents.
GPO can only be used in a Windows environment. To change details in Mac and Linux machines or to execute a cscript (for Windows), follow the steps in this page.
Steps:
- To get the updated server details, go to the product console, navigate to Reports-->Query Reports-->New Query Report and execute the following query:
SELECT
SERVER_MAC_NAME,SERVER_MAC_IPADDR,SERVER_FQDN,SERVER_PORT,HTTPS_PORT FROM DCServerInfo

- The report will have the following details:
<DCServerName> <DCServer IP Address> <DCServer HTTP port> <DCServer HTTPS Port>
Copy the details and have it saved.

- Also make a note of the mode of communication (HTTP or HTTPS) from: Admin-->Security Settings
- Copy the configureDCAgentServerCommunication.txt file, save it as configureDCAgentServerCommunication.vbs.
- Download GPO_AgentServerComm.txt, rename it as GPO_AgentServerComm.ps1 and save it in the same location where configDCAgentServerCommunication.vbs is saved.
- Run Windows PowerShell in administrative mode and navigate to the location where the script is present and execute the script GPO_AgentServerComm.ps1 with arguments as mentioned below:
GPO_AgentServerComm.ps1 configDCAgentServerCommunication.vbs
<DCServerName> <DCServer IP Address> <DCServer HTTP port> <DCServer HTTPS Port> <DCServerAgent Comm Protocol>
Example:
GPO_AgentServerComm.ps1 configDCAgentServerCommunication.vbs
DC-COMP.DC.COM 192.192.192.192 8020 8383 https
- In the Power shell window, Enter the name of the GPO to be created and press Enter.
- Now, enter the Distinguished Name of the OU or Domain to which the policy is being linked.
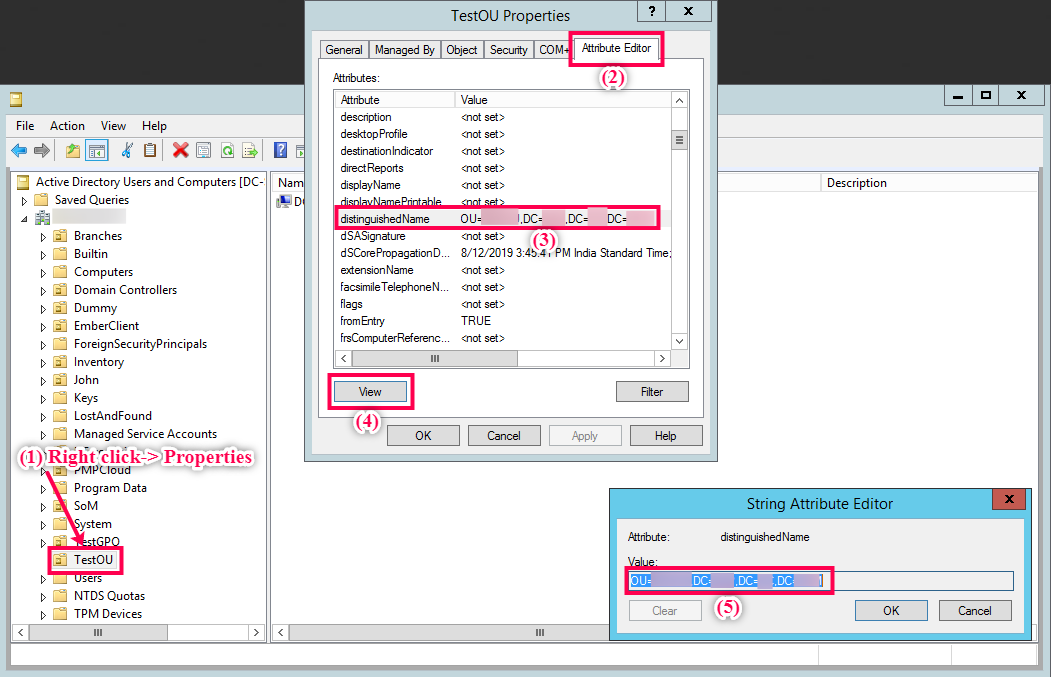
- Follow the steps mentioned below to get the Distinguished name:
- Open Active directory users and computers in Administrative tools.
- Right click on the OU / Domain that needs tobe linked.
- Select Properties-->Attribute Editor-->distinguishedName-->View.
- Copy and paste the value of distinguishedName in the PowerShell window and hit Enter

- If you want to 'Add' another Domain, press y and add the required domain. Press n once all the required domains have been added. This will automatically initiate the application of the GPO.
Applies to: Server Migration, Agent-Server Communication
Keywords: Update Server Details, Agent-Server Communication

