Manage Correlation Rules
Out-of-the-box correlation rules
EventLog Analyzer provides more than 50+ pre-defined rules on various categories such as File Management, Group Management, User Management, Machine Management, Authentication, Windows Firewall rules, Authorization, Audit Policy and Software Management.
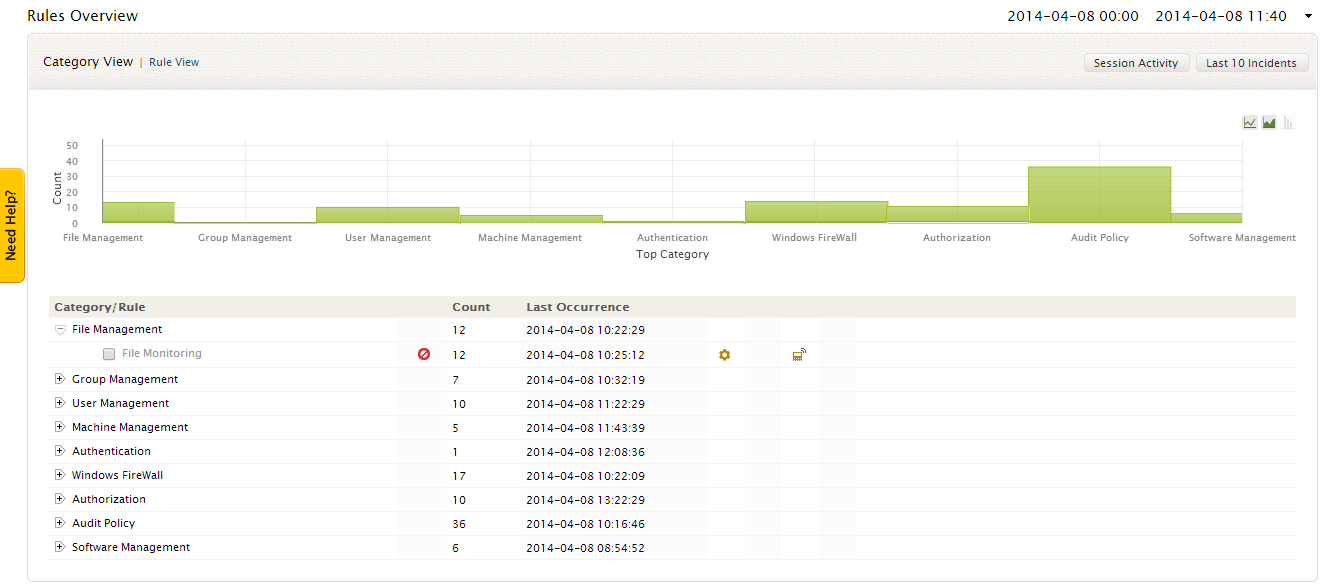
The Rules Overview window provides you with
- Intuitive drill-downable graphical dashboard on correlation rules.
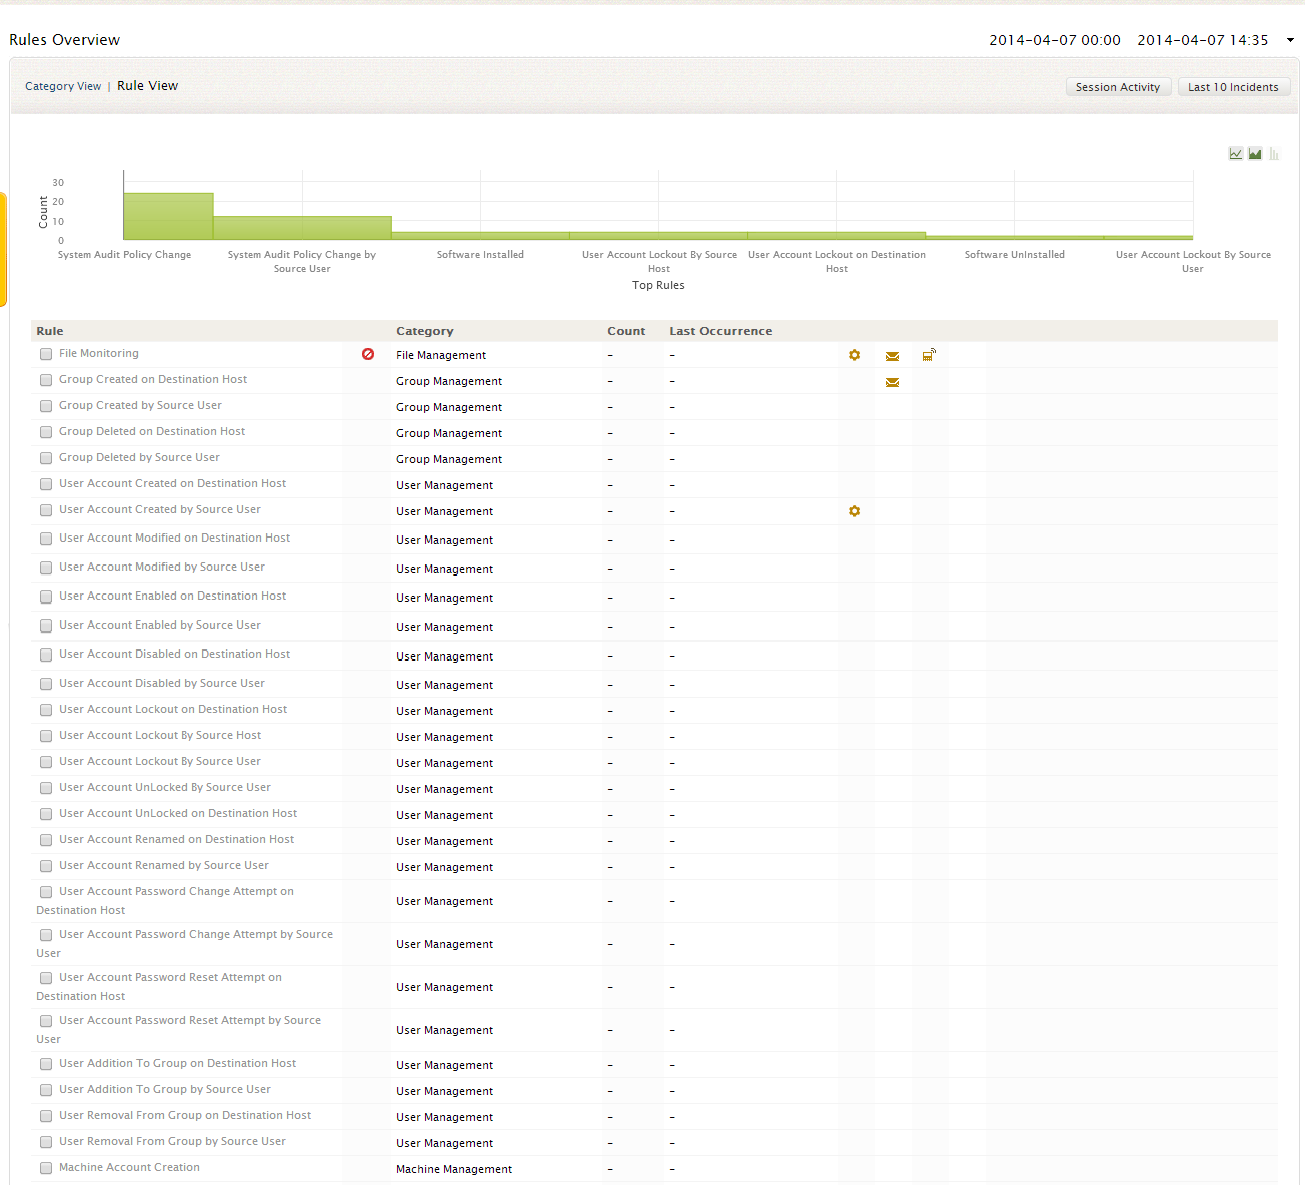
- Rules Table provides the list of predefined correlation rules, event count and last occurrence time of the event.
- The users can also configure, set notifications, enable/disable the rules from this window.
- You can drill down to the raw logs of any particular rule, by clicking on the event count of the corresponding rule
Category/Rule View
To view the rules based on the above specified categories, click on the 'Category View' link at the top
To view the entire rule list without the category based classification, click on the 'Rule View' link
Enabling/Disabling rules
By default, all the predefined rules are enabled for all log data source added to EventLog Analyzer server. If the you want to disable a rule/set rules, then
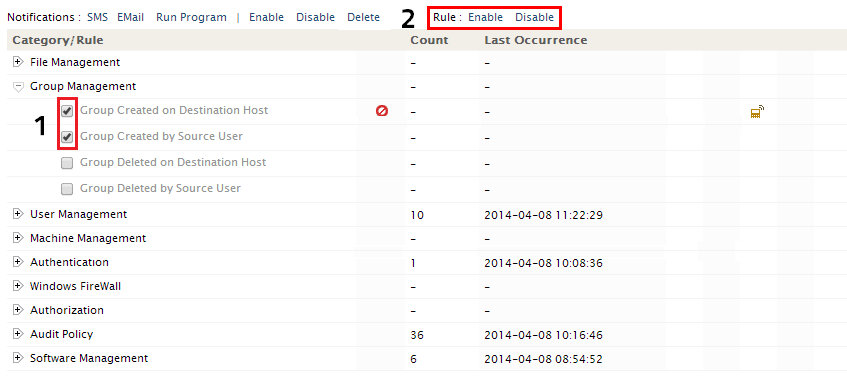
- Select the rule/group rules that you need to disable
- Rule Settings option will appear at the top of the Rules Table
Click on the Disable link. Similary to enable the disabled rule, the user can select the rule/set of rules and click on the Enable link to activate the rule(s)
Rules Report
To get the report of any correlation rule, click on that rule.
The Rules Report page provides you with the intuitive graphical dashboard on Event Count Vs Destination host
The detailed Rules report table lists you the Host type, Destination/Source host, Source user, Time of occurrence of the event, Message, Logon Type, Logon ID, and more depending on the correlation rule
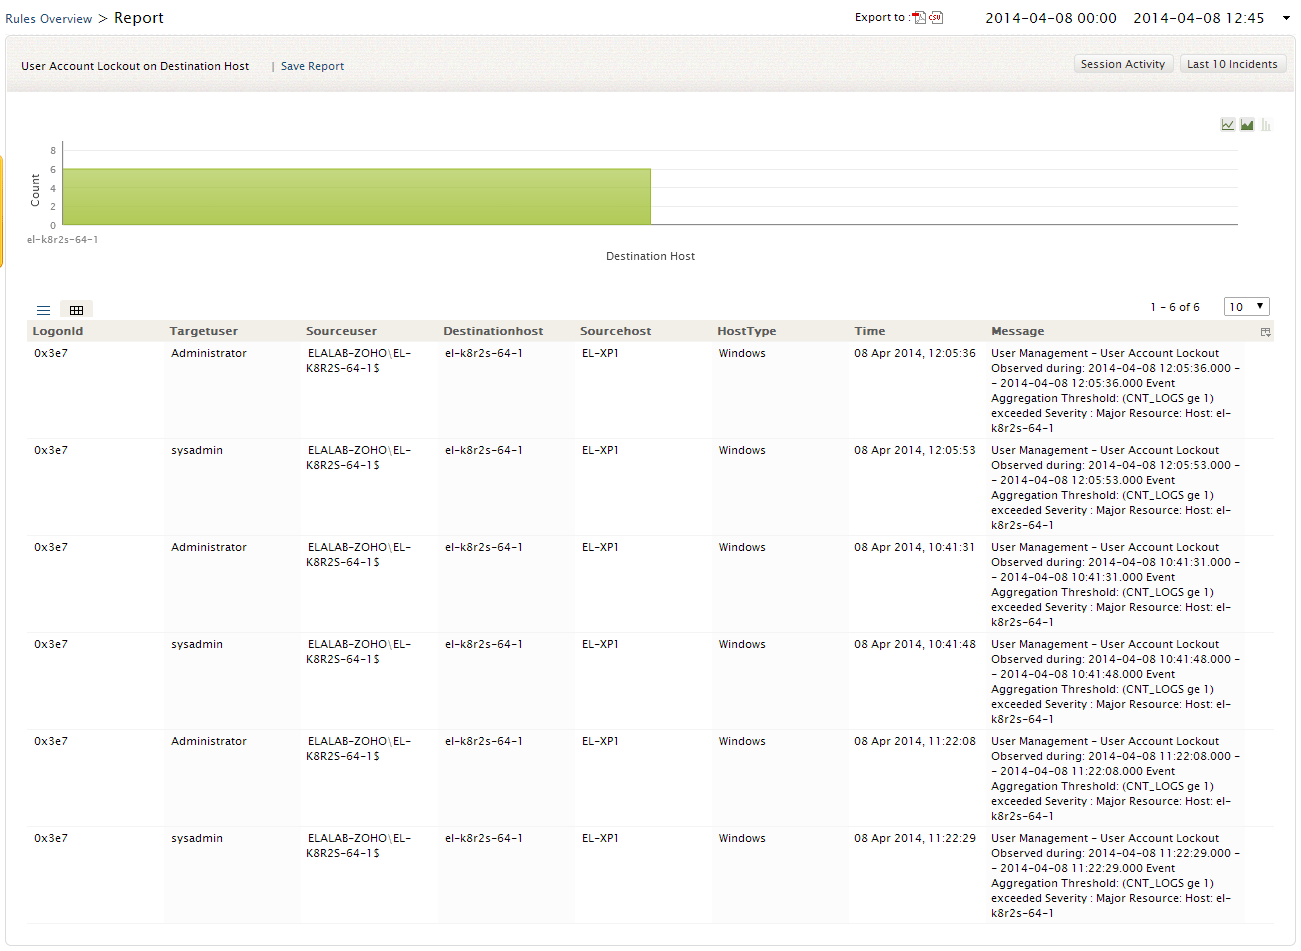
Note: The users can toggle between the List and the Grid report views
EventLog Analyzer enables the users to perform search on the correlation rule raw log with its interactive Search window
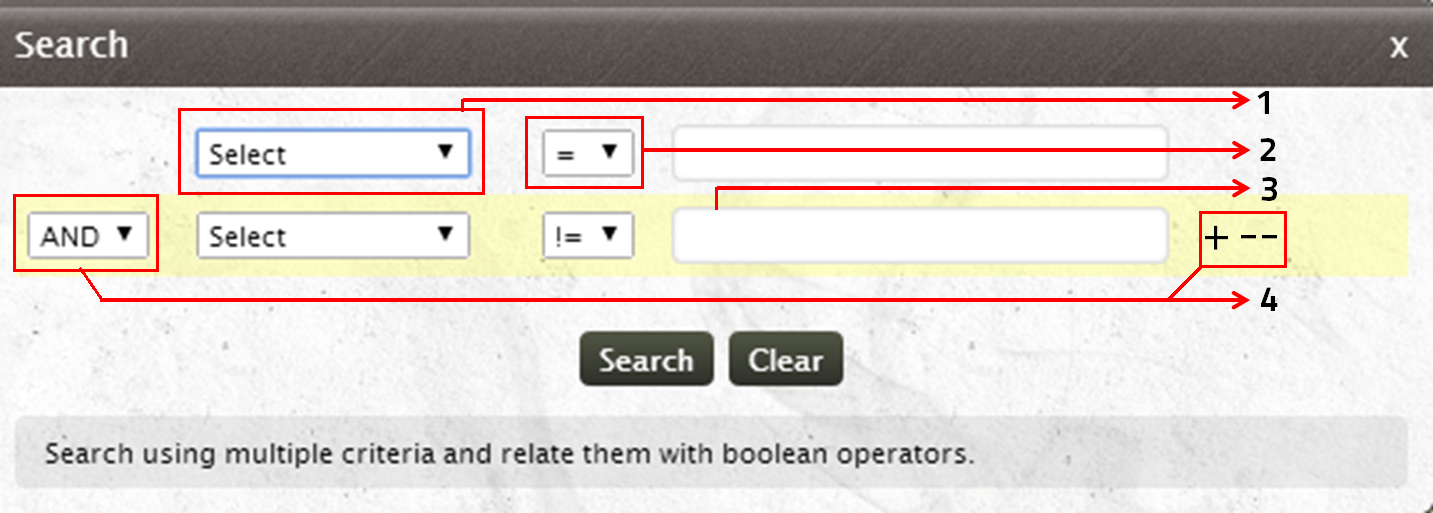
- Select the search criteria (Host type, Destination host, Source user Logon type and more) from the existing list
- Choose the relational operator
- Provide the search value for the specified criteria
- Search using multiple criteria and relate them with boolean operators
Note: You can save the search results as reports and schedule them
Saving and Scheduling rules reports

-
At any time you can also directly export the report in PDF and CSV format by clicking on the appropriate icons
- Click on the Save Report link to save and schedule the rules report/search results
Scheduling rules report
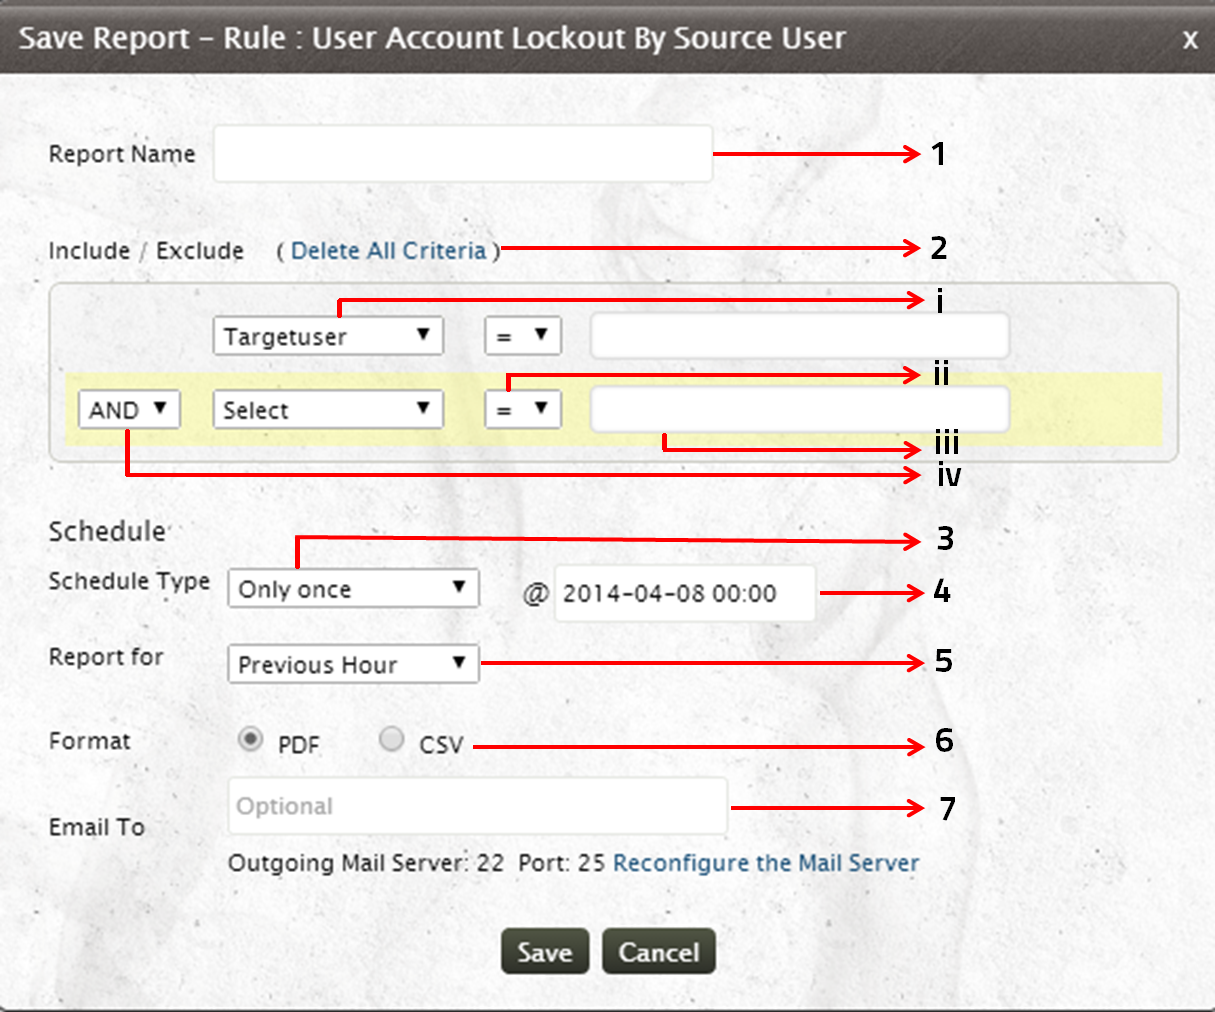
- Provide the name for the report
- You can refine your Rules Report by specifying Include/Exclude criteria
- Select the search criteria (Host type, Destination host, Source user Logon type and more) from the existing list
- Choose the relational operator
- Provide the search value for the specified criteria
- Search using multiple criteria and relate them with boolean operators
- Schedule the report generation on an hourly/daily/weekly/monthly basis. Choose the 'Only once' option if you want to generate reports once at a specified time.
- Specify the date and time at which the report is to be generated
- Select the time period for which the report is to be generated
- Choose the report format (PDF/CSV)
- You can also redistribute the report through email. Provide the email to which the report is to be sent. Specify multiple email ids separated by a comma
Note: If you have not configured the Email Server or if you want to reconfigure it, click on the Configure or Reconfigure link
Configuring Rule Filters
With EventLog Analyzer, the users can apply filters and customize the existing correlation rules to meet their internal security policy. To configure the rule filter,click on the Configure icon Rule Filter corresponding to the rule for which you need to apply the filters
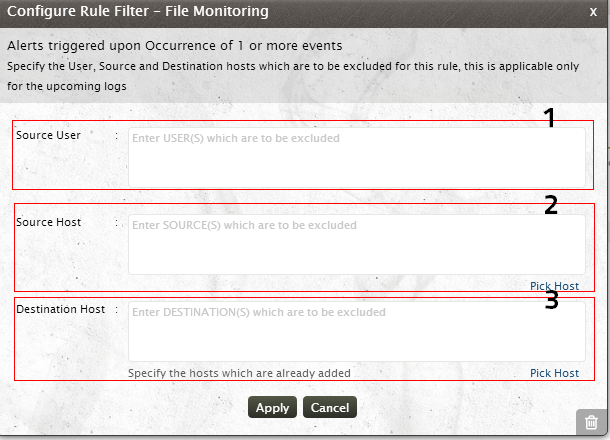
The Configure Rule Filter Window has the Rule Description and provides option to user to exclude user, source and destination hosts.
- Specify the Source User(s), who are to be excluded from the correlation rule processing.
- Specify the Source Host(s), which are to be excluded from correlation rule processing.
- Specify the Destination Host(s), which are to be excluded from correlation rule processing
Note:
- Specify the host which are already added to EventLog Analyzer server
- Click on Pick Host link to select the host from EventLog Analyzer server.
- Specify multiple user/host name separated by a comma
Source Host means the machine from which the event is originating
Destination Host means the machine at which the originated event is supposed to happen
Rule Notification
EventLog Analyzer helps you to mitigate security threats proactively with its real-time alert notifications. EventLog Analyzer's Real-time Correlation Engine provides you with two alert notification mechanisms
- Notification via Email
- Notification via SMS
Apart from these alert mechanisms, EventLog Analyzer also provides you with Automatic Alert Remediation method which triggers a script/program (which is specified by the user) that remediates alert condition
Note:
Each rule can have separate alert notification mechanism. You can also configure the alert mechanism for a specific rule or set of rules by,
- Selecting the rule(s) for which you need to configure the alert mechanism
- Select the appropriate Notification Mechanism (Email,SMS, Automatic Alert Remediation) from the Notification Settings link at the top of the Rules Table
Configuring Email Notification
To configure Email Notification settings, click on the Email icon Email Settings icon  corresponding to the rule for which you need to configure Email Alert. You can also configure Email Settings by selecting the rule/group of rules from the Rules Overview window and selecting the Email Option from the Notification Settings link.
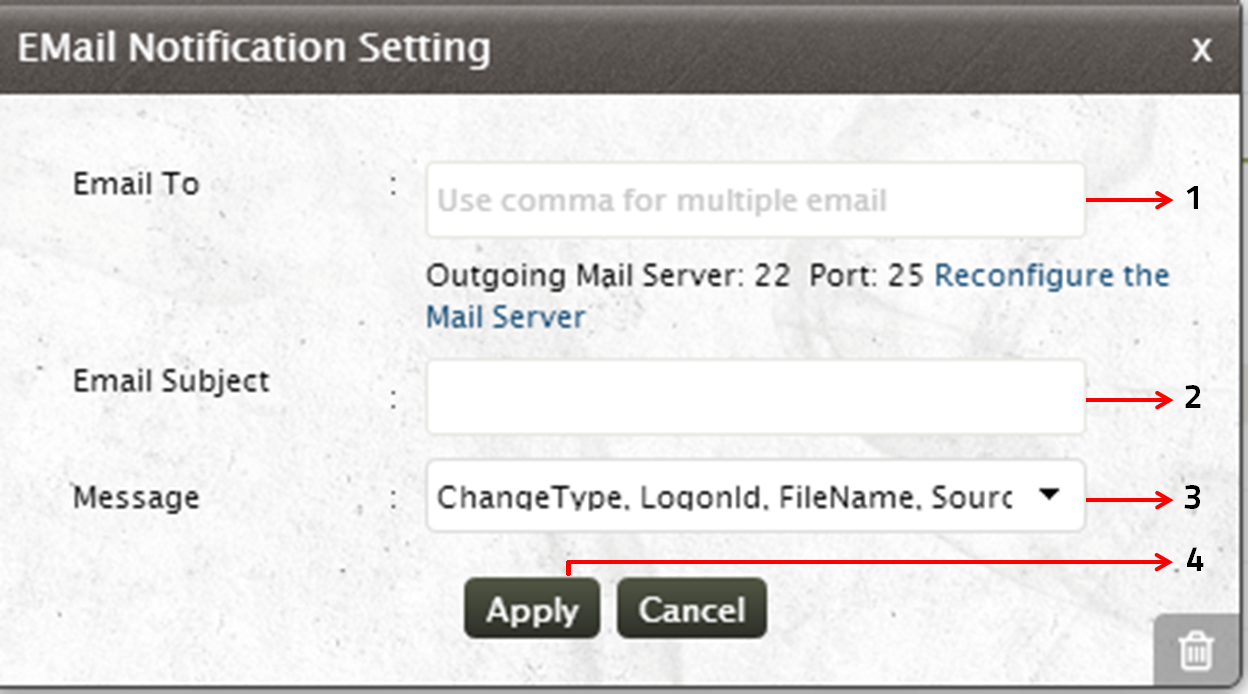
- Specify the Email id to which the alert has to be sent. If you want to enter multiple email ids, separate the email ids with a comma
- Specify the subject of the email
- Click on the drop down arrow to select the Message that has to be sent as an email alert, from the predefined list of messages
- Click on Apply to set the email alert notification for the selected rule
Configuring SMS Notification
To configure SMS Notification settings, click on the SMS Settings icon  corresponding to the rule for which you need to configure the SMS Alert. You can also configure SMS Settings by selecting the rule/group of rules from the Rules Overview window and selecting the SMS Option from the Notification Settings link.
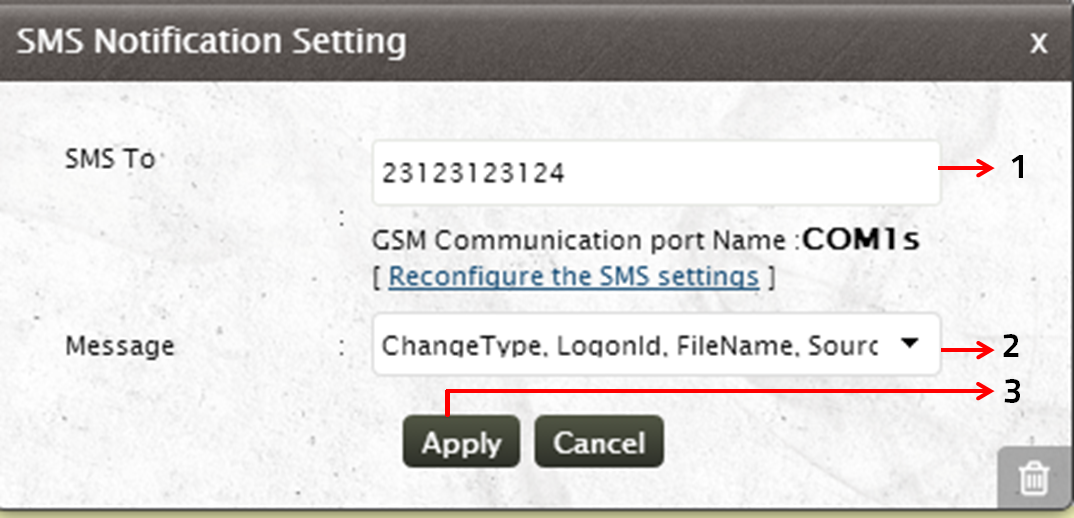
- Specify the number, to which the SMS has to be triggered
- Click on the drop down arrow to select the Message that has to be sent as an email alert, from the predefined list of messages
- Click on Apply to set the SMS alert notification for the selected rule
Configuring Automatic Alert Remediation
To configure automatic Alert Remediation with a script, click on the Automatic Alert Remediation icon  corresponding to the rule for which you need to remediate the alert automatically. You can also configure Automatic Alert Remediation Settings by selecting the rule/group of rules from the Rules Overview window and selecting the Run Program Option from the Notification Settings link.
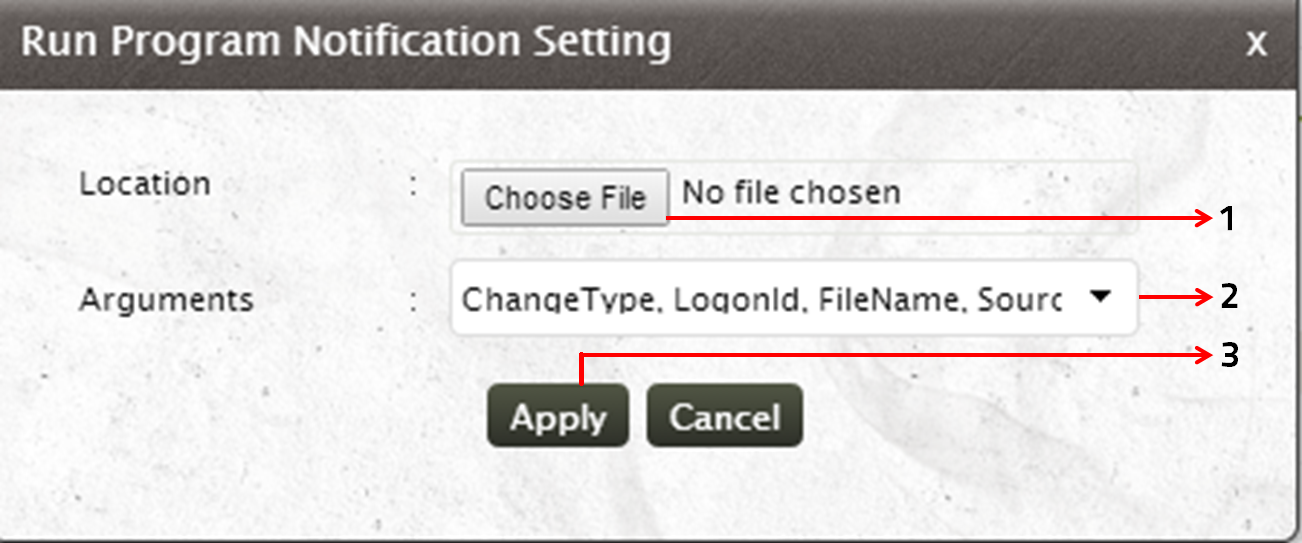
- Use the Choose File button to browse and load the program/script that can remediate the alert condition
- Click on the drop down arrow to select the Arguments that has to be passed
- Click on Apply to set automatic alert remediation mechanism for the selected rule
Note:
Alert notification can be enabled/disabled for a specific rules or a set of rules. To do this,
- Select the rule(s) for which alert notification has to be enabled/disabled
- Notification Settings link will appear at the top of the Rule Table
- Click on Enable/Disable link as per your requirement
Deleting Rule Notification
To delete notification for a specific rule or a set of rules,

- Select the rule or rules that are to be deleted
- Notifications Settings link will appear at the top of the Rule Table. In that, select Delete link to delete the notification for the corresponding rule(s)


 corresponding to the rule for which you need to configure Email Alert. You can also configure Email Settings by selecting the rule/group of rules from the Rules Overview window and selecting the Email Option from the Notification Settings link.
 corresponding to the rule for which you need to configure the SMS Alert. You can also configure SMS Settings by selecting the rule/group of rules from the Rules Overview window and selecting the SMS Option from the Notification Settings link.
 corresponding to the rule for which you need to remediate the alert automatically. You can also configure Automatic Alert Remediation Settings by selecting the rule/group of rules from the Rules Overview window and selecting the Run Program Option from the Notification Settings link.


