Features Password Manager » Features
  • General

  • Web Interface and Authentication

  • Security

  • Password Synchronization

  • Backup and Disaster Recovery

  • Licensing

  • SSH Key Management

  • SSL Certificate Management

General

01. Do I need to install any prerequisite software before using Password Manager Pro?
 

Although there are no prerequisite softwares required to install and start Password Manager Pro, you will need the following components in order to use Privileged account discovery and password reset features:

  • Microsoft .NET framework 4.5.2 or above must be installed in the server where Password Manager Pro is installed.
  • Microsoft Visual C++ 2015 redistributable must be installed.

To check if these software requirements are configured:

  • Go to Support >> Software Requirements and click Check Configuration.

In the pop-up box that opens, the configuration status will be displayed.

02. Can others see the resources added by me?
 

Except for super administrators (if configured in your Password Manager Pro set up), no one including admin users, will be able to see the resources added by you. However, if you share your resources with other administrators, they will be able to see them.

03. Can I add my own attributes to Password Manager Pro resources?
 

Yes, you can extend the attributes of the Password Manager Pro resource and user account to include details that are specific to your needs. Refer this document for more details.

04. What happens if a user leaves the organization without sharing their sensitive passwords with anyone?
 

If an administrative user leaves the organization, they can transfer the resources they own to other administrators. By doing so, they'll have no access to those resources themselves, unless they transfer the resources to themselves. Refer this document for more details.

05. How do I troubleshoot if importing users/resources from AD fails?
 

Verify the following:

  • Check if the user credentials are correct.
  • If you are trying with an admin user and it fails, try entering the credentials of a non-admin user. This is just to verify if connection could be established properly.

If the above verifications fail, please contact passwordmanagerpro-support@manageengine.com.

06. How to make the PMP application work with a MySQL database server installed in a separate machine (other than the one in which PMP server is running)?
 

It is always recommended to run the PMP application (built over Tomcat web server) and the MySQL database in the same machine for better security. We have configured the bundled MySQL database so as it is not visible outside the machine in which it is installed (it will accept connections requested only from localhost) and you will lose this aspect when you separate them. If there is a pressing need to run MySQL elsewhere, follow the procedure detailed below:

  • Shutdown PMP server if it is already running.
  • Install MySQL server in a different machine and create a database named 'PassTrix' (the casing is important, particularly in Linux).
  • Start the MySQL server and make sure you are able to connect to the database from remote (using the MySQL command line client).
  • Make the following configuration changes in PMP:
    • Go to <PMP_Install_Dir>\conf\Persistence folder.
    • Open the file persistence-configurations.xml and search for the entry 'StartDBServer' and set its value to 'false' (default will be 'true'). Save the file.
    • Go to <PMP_Install_Dir>\conf folder.
    • Open the file database_params.txt and make the following changes:
      • In the URL property, change the entries 'localhost' and '5768' to the hostname and port number corresponding to the remote MySQL server.
      • If you want to connect as root, leave the username property as it is., else, make appropriate changes to that property. Note that PMP requires root privileges in MySQL.
      • If you have set a password in the remote MySQL server specify it against the password property. Otherwise remove or comment out that line.
    • Save the file.
  • Now start the PMP server again and it should work with the remote database (which should be already running).
07. Can I run custom queries to generate results for integration with other reporting systems?
 

Yes, you can. Please contact us at with your specific request and we will help you with the relevant SQL query to generate XML output

08. Does domain SSO work across firewalls / VPNs?
 

The domain Single Sign On (Windows-integrated authentication) is achieved in the Windows environment by setting non-standard parameters in the HTTP header, which are usually stripped off by devices like firewalls / VPNs. Password Manager Pro is designed for use within the network. So, if you have users connecting from outside the network, you cannot have SSO enabled.

09. Can I rebrand Password Manager Pro with my own logo and organizational information?
 

Yes. Password Manager Pro provides you with the following options for customization and rebranding:

  • Using your own logo for web interface the mobile app. (Recommended image size is 210*50 pixels)
  • Setting a login page description for the product.
  • Changing the default color of the user interface.
  • Displaying a banner with customized legal content.
  • Customizing a privacy policy content and display an acceptance button for the same.

To carry out the above functionalities:

  • Navigate to Admin >> Customization >> Rebrand.
  • Under the Logo and Theme section, set up a customized logo and a login page description, and change the default skin tone.
  • Under Login Page Text, add policies and/or legal conditions to be displayed in the login page.

Note that at any point, this configuration can be disabled. Know how.

10. Does Password Manager Pro record Password viewing attempts and retrievals by users?
 

Yes, Password Manager Pro records all operations that can be possibly performed by an user- including password viewing and copying operations. From audit trails, you can get a comprehensive list of all the actions and attempts by the users with password retrieval. Know more

11. Why does the size of PostgreSQL wal_archive file increase at a rapid pace?
 

This issue occurs when the backup location specified in Password Manager Pro is no longer accessible to save the backup file. In simple terms, whenever the PostgreSQL database backup fails, wal_archive folder size will start increasing.

Solution:

  • Check if there is enough disk space available on the Password Manager Pro drive.
  • If not, remove the logs directory and a few files present inside directory.
  • You need to have only one or two backups to be present here.
  • Login to Password Manager Pro and navigate to Admin >> Configuration >> Database Backup.
  • Click on the 'Backup Now' button.

This will trigger an instant backup and automatically purge the wal_archive directory.

12. Does Password Manager Pro supports High Availability?
 

Yes, refer the High Availability document for more details.

Web Interface and Authentication

01. Can I change the default port 7272 where Password Manager Pro is listening?
 

Yes, you can change the default port as explained below:

  • Login to Password Manager Pro as an Administrator. Navigate to Admin >> Configuration >> Password Manager Pro Server.
  • Enter the required port beside the Server Port field, and click Save.
  • Restart Password Manager Pro for this configuration to take effect.
02. Can I change the IP address in which Password Manager Pro application is binding when I have multiple NIC cards and IP's available in the server?
 

Password Manager Pro comes bundled with a tailored version of TomCat webserver which allows users to access the webpage and also the JVM which performs the product operations. You can use the below steps to configure the Bind IP address for both these components.

Steps for changing webserver bind IP

  • Stop the Password Manager Pro service.
  • Navigate to <PMP installation folder>/conf directory and take a backup of the file named server.xml.
  • Open Wordpad as an administrator and open server.xml under <PMP installation folder>/conf directory.
    • Look for the port="7272" and add the entry address="<IP addresses of the application server>" next to it.
    • Save the file.
  • Start the Password Manager Pro service. This time the Tomcat webserver will start using the bind IP that you have specified.

Steps for changing JVM bind IP

  • Stop the Password Manager Pro service.
  • Navigate to <PMP installation folder>/conf directory and take a backup of the file named wrapper.conf.
  • Open Wordpad as an administrator and open wrapper.conf under <PMP installation folder>/conf directory.
    • Look for the word wrapper.app.parameter.1 and add the following line below wrapper.app.parameter.1.
      • wrapper.app.parameter.2=-Dspecific.bind.address=<IP addresses of the application server>
    • Save the file.
  • Now, rename <PMP installation folder>/logs folder to logs_older and start the Password Manager Pro service.
  • Connect to the login page and try using the product features such as Password reset. The source IP for these operations will be the IP Address that you have configured.
03. What if my users are not notified of their Password Manager Pro accounts?
 

In general, users are notified of their Password Manager Pro accounts only through emails. If a user does not get the notification emails, verify:

  • if you have configured the mail server settings properly, with the details of the SMTP server in your environment.
  • if you have provided valid credentials as a part of mail server settings, as some mail servers require the same for mails to be received.
  • if the 'Sender E-Mail ID' is properly configured, as some mail servers reject emails sent without the From address or mails originating from unknown domains.
04. What are the authentication schemes available in Password Manager Pro?
 

You can use one of the following three authentication mechanisms out of Password Manager Pro:

  • Active Directory: When enabled, the authentication request is forwarded to the configured domain controller and based on the result, the user is allowed or denied access into Password Manager Pro. The user name, password and the domain are supplied in the Password Manager Pro login screen. This scheme works only for users whose details have been imported previously from AD, and is available only when the Password Manager Pro server is installed on a Windows system.
  • LDAP Directory: When enabled, the authentication request is forwarded to the configured LDAP directory server and based on the result, the user is allowed or denied access into Password Manager Pro. The username, password and the option to use LDAP authentication are supplied in the Password Manager Pro login screen. This scheme works only for users whose details have been imported previously from the LDAP directory.
  • Password Manager Pro Local Authentication: The authentication is done locally by the Password Manager Pro server. Irrespective of AD or LDAP authentication being enabled, this scheme is always available for the users to choose in the login page. This scheme has a separate password for users and the AD or LDAP passwords are never stored in the Password Manager Pro database. However, for security reasons, we recommend that you disable the local authentication for users after enabling AD/LDAP authentication. For more information on this, refer to the 'User on-boarding and management' section in our best practices guide.
  • Azure AD: Once you integrate Password Manager Pro with Azure Active Directory (Azure AD) in your environment, you can allow users to use their Azure AD credentials to log in to Password Manager Pro in both Windows and Linux platforms. To use this authentication, Password Manager Pro should first be added as a native client application in your Azure AD portal.
  • Smartcard Authentication: Enabling this feature will mandate users to possess a smartcard, and also know their Personal Identification Number (PIN). Note that smartcard authentication will bypass other first factor authentication methods like AD, LDAP or Local Authentication.
  • RADIUS Authentication: You can integrate Password Manager Pro with RADIUS server in your environment and use RADIUS authentication to replace the local authentication provided by Password Manager Pro. The users who will be accessing Password Manager Pro using their RADIUS server credentials will have to be added as users in Password Manager Pro first. When you do so, you need to ensure that the "username" in Password Manager Pro is the same as the username used for accessing the RADIUS server.
  • SAML SSO: Password Manager Pro acts as the Service Provider (SP) and it integrates with Identity Providers (IdP) using SAML 2.0. The integration basically involves supplying details about SP to IdP and vice-versa. Once you integrate Password Manager Pro with an IdP, the users have to just login to the IdP and then, they can automatically login to Password Manager Pro from the respective IdP's GUI without having to provide the credentials again. Password Manager Pro supports integration with Okta, AD FS, OneLogin, and Azure AD SSO.
05. What are the user roles available in Password Manager Pro? What are their access levels?
 

Password Manager Pro comes with five pre-defined roles:

  • Privileged Administrator
  • Administrators
  • Password Administrator
  • Password Auditor
  • Password User

Apart from these default roles, any administrator can be promoted as a "Super Administrator" with the privilege to view and manage all the resources. Click here for details on the access levels of the default roles.

06. What if I forget my Password Manager Pro login password?
 

If you were already given a valid Password Manager Pro account, you can use the 'Forgot Password?' link available in the login page to reset your password. The username/email ID pair supplied should match the one already configured for the user. The password will be reset for that user and the new password will be sent to the respective email address. However, you wouldn't need this option if AD/LDAP authentication is enabled.

07. Why do I sometimes see a security warning while accessing the Password Manager Pro console via the browser?
 

The Password Manager Pro web console always uses the HTTPS protocol to communicate with the Password Manager Pro server.The Password Manager Pro server comes with a default self-signed SSL certificate, which the standard web browsers will not recognize, thereby issuing a warning. You can ignore this warning while you're testing or evaluating the product. However, if you're rolling it out in production, we recommend that you install an SSL certificate bought from an authorized Certificate Authority (CA) that is recognized by all standard web browsers. Know More

Security

01. How secure are my passwords in Password Manager Pro?
 

Ensuring secure storage of passwords and offering solid defense against intrusion are the top priorities of Password Manager Pro. The following measures ensure high level security for your passwords:

  • Passwords are encrypted using Advanced Encryption Standard (AES), and stored in the database. AES is currently the strongest encryption algorithm known, and has been adopted as an encryption standard by the U.S. Government.
  • The database which stores all the passwords accepts connections only from the host that it is running on, and is not visible externally.
  • Role-based, fine-grained user access control mechanism ensures that users can view and access passwords only based on the permissions granted to them.
  • All transactions between the Password Manager Pro console and the server take place through HTTPS.
  • Password Manager Pro's in-built password generator helps you generate strong passwords.

For detailed information, refer to our Security Specifications document.

02. How secure are Application-to-Application and Application-to-Database password management done through Password Management APIs?
 

Password Manager Pro offers RESTful APIs and SSH-based CLI APIs that can be used for Application-to-Application/Database password management. The applications connect and interact with Password Manager Pro through HTTPS. An application's identity is verified first by verifying the validity of its SSL certificate, and then by verifying the source IP/hostname in which it resides. Each application/database must be registered as an API User in Password Manager Pro. During this registration, the hostname/IP of the application server has to be supplied and a unique authentication token that uses the REST API will be generated. This token needs to be sent along with the API requests for authentication. In addition to these security checks, each application/database can only access the information that are explicitly delegated to them by an administrative user. Refer to this document to know more about sharing/delegating passwords.

03. Can we install our own SSL certificates?
 

Yes, you can install your own SSL certificates. Follow the steps below:

Note: The below steps are applicable for builds 9700 and above only.

  • Navigate to "Admin >> Configuration >> Password Manager Pro Server".
  • Choose the Keystore Type as "JKS" or "PKCS12", whichever you chose while generating the CSR.
  • Browse and upload the Keystore File.
  • Enter the same Keystore Password, you entered while generating the CSR.
  • Modify the Server Port, if required.
  • Hit Save. Restart the Password Manager Pro service once, for the certificate change to take effect.
04. How to generate signed SSL certificates? [OR] How to make the Password Manager Pro server trusted by web browsers and users?
 

Password Manager Pro runs as a HTTPS service. It requires a valid CA-signed SSL certificate with the principal name as the name of the host on which it runs. By default, on first time startup, it creates a self-signed certificate, which will not be trusted by the user browsers. Thus, while connecting to Password Manager Pro, you need to manually verify the certificate information and the host name of Password Manager Pro server carefully and should force the browser to accept the certificate.

To make the Password Manager Pro server trusted by web browsers and users:

  • Obtain a new signed certificate from a CA for the Password Manager Pro host. [OR]
  • Configure an existing certificate obtained from a CA with wild-card principal support for the Password Manager Pro host.

There are different ways to generate the signed SSL certificates:

  • By using the "Certificate Management" module of Password Manager Pro.
  • By using the OpenSSL or Keytool (bundled with Java) to create your certificates, get them signed by a CA and use them with Password Manager Pro.
  • By installing a wild card certificate.

You can decide the mode of generating the signed SSL certificates based on what your security administrators recommend. The detailed steps for using each of the above methods are provided under the links below.

Note: If you already have a certificate signed by a CA, then we recommend using OpenSSL to create the keystore and configure it in Password Manager Pro (steps 4 and 5 in the instructions below).

1. Generating Signed SSL certificates using the Certificate Management module of Password Manager Pro

You can generate signed SSL certificates through the Certificate Management module of Password Manager Pro and also apply the certificate changes (Certificate Keystore) directly from the Password Manager Pro console. This involves three processes:

1.1 Generating a Certificate Signing Request (CSR):

To request and acquire certificates from a Local CA through Password Manager Pro, you need to first generate a Certificate Signing Request (CSR). Here are the steps for the same:

  • Navigate to the "Certificates→ Create CSR".
  • Click the Create button. The Create CSR page is displayed.
  • Select either of the options Create CSR or Create CSR From KeyStore, based on whether you want to create a new CSR or create a CSR from an already existing private key, respectively.
    • If you have selected Create CSR, fill in the details, such as Common Name, SAN, Organization Unit, Organization Location, State, Country, Key Algorithm and Key Size. Select the Key Algorithm and Keystore Type. Enter the Validity and Store Password.


    • If you have selected Create CSR From KeyStore, browse and attach the required private key file along with the Private Key Password.
    • Click the Create button. You will be redirected to a window where the CSR content is displayed. You can copy the CSR content or export it to a mailbox.
      • Email – Select this option to send the certificate file via email to the specified mail id.
      • Export CSR / Private Key - Select this option to export the CSR or the corresponding private key alone based on your requirement.
    • View the saved CSRs under "Certificates >> Create CSR".


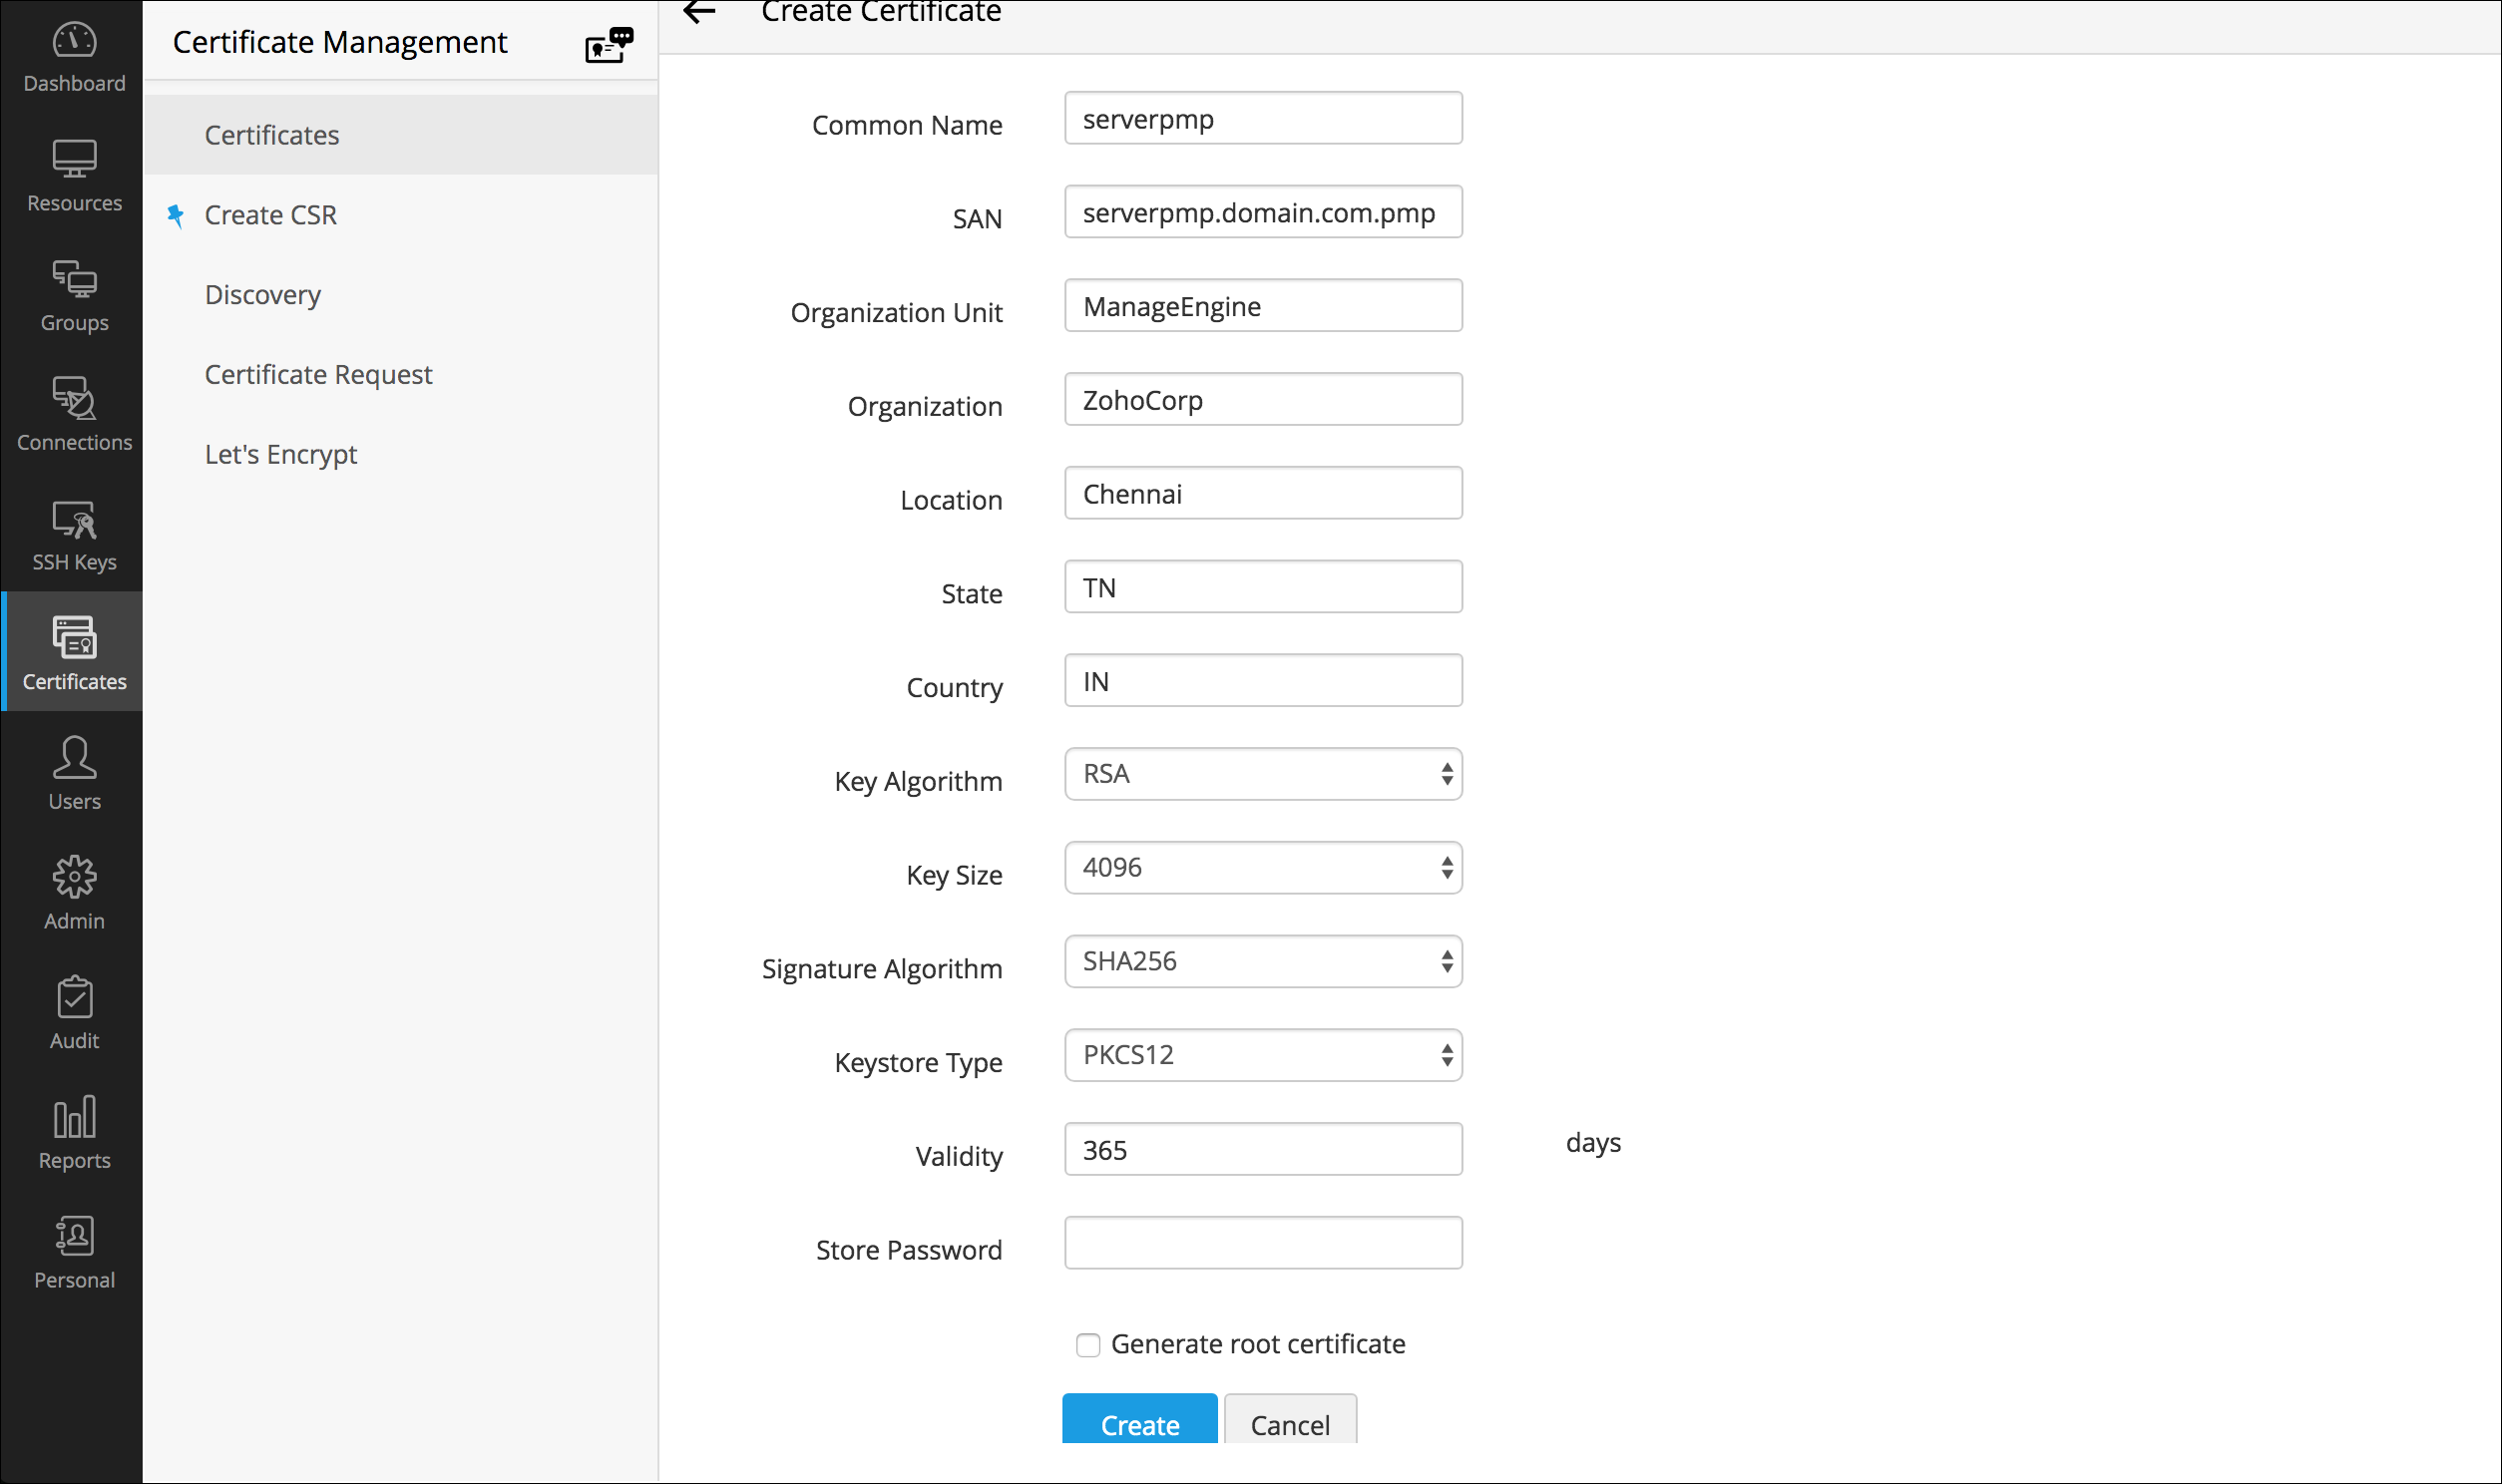
Note: The 'show passphrase' eye icon corresponding to each CSR allows the administrators to view the KeyStore passwords of the CSR files.

1.2 Signing the Certificate:

Password Manager Pro provides the option to sign and issue certificates to all clients in your network either from your Microsoft Certificate Authority or using a custom root CA certificate that is trusted within your environment.

Note: Remember, you should have generated a valid Certificate Signing Request (CSR) before getting your certificate signed from the local CA.

Follow the below steps to sign the certificate:

  • Navigate to "Certificates → Create CSR".
  • Select the required CSR from the table and click Sign from the top menu.
  • In the pop-up window displayed, provide the name of the server that runs the internal certificate authority, CA Name and choose the certificate template based on your requirement. Click Sign Certificate. The CSR is signed now and the issued certificate can be viewed under "Certificates >> Certificates".


1.3 Applying the Certificate Keystore for Password Manager Pro web server:

To apply the certificate Keystore, first you need to create it.

  • Navigate to "Certificates >> Certificates". Click the signed certificate link under the heading Common Name. In the certificate details page displayed, click the Export icon present at the top right corner of the screen. The certificate file will be downloaded to your local machine.
  • Now, navigate to "Certificates → Create CSR".
  • Click the Import Certificate icon corresponding to the CSR of the signed certificate. Browse and choose the certificate file downloaded in your local machine and click Import. Now, the certificate will be bonded with the private key to form a Keystore.
  • Now navigate back to "Certificates >> Certificates" and click the certificate link under the heading Common Name. In the certificate details page displayed, scroll down and click the Export link. This will download the certificate Keystore to your local machine.
  • The final step is to navigate to "Admin >> Configuration >> Password Manager Pro Server" and do the following:
    • Choose the Keystore Type as "JKS" or "PKCS12", whichever you chose while generating the CSR.
    • Browse and upload the Keystore File.
    • Enter the same Keystore Password, you entered while generating the CSR.
    • Modify the Server Port, if required.
    • Hit Save. Restart the Password Manager Pro service once, for the certificate change to take effect.
2. Generating Signed SSL certificates using OpenSSL

OpenSSL mostly comes bundled with the Linux distributions. If you are using the Windows server and do not have OpenSSL installed, download it from http://www.slproweb.com/products/Win32OpenSSL.html. Make sure the 'bin' folder under the OpenSSL installation is included in the 'PATH' environment variable.

2.1 Create the public-private key pair that will be used for the SSL handshake
  • Open the command prompt.
  • Execute 'openssl genrsa -des3 -out <privatekey_filename>.key 1024'
    <privatekey_filename> is the filename you specify to store the private key.
  • You will be prompted to enter a pass-phrase for the private key. Enter 'passtrix' or a pass-phrase of your choice. (Though it is not documented, Tomcat has issues with passwords containing special characters, so use a password that has only alpha characters)
  • A file will be created in the name <privatekey_filename>.key in the same folder.


2.2 Create a Certificate Signing Request (CSR) for submission to a certificate authority to create a signed certificate with the public key generated in the previous step
  • Execute 'openssl req -new -key <privatekey_filename>.key -out <certreq_filename>.csr'
    • <privatekey_filename>.key is the one used in the previous step.
    • <certreq_filename>.csr is the filename you specify to carry the certificate creation request to the CA (certificate authority).
  • You will be prompted to enter a series of values that are part of the distinguished name (DN) of the server hosting Password Manager Pro.
  • Enter values as required. Importantly, for the 'Common Name' supply the fully qualified name of the server hosting Password Manager Pro (with which it will be accessed through the browsers).
  • A file will be created in the name <certreq_filename>.csr` in the same folder.


2.3 Submit the CSR to a Certificate Authority (CA) to obtain a CA signed certificate

Some of the prominent CAs are Verisign (http://verisign.com), Thawte (http://www.thawte.com), RapidSSL (http://www.rapidssl.com). Check their documentation / website for details on submitting CSRs and this will involve a cost to be paid to the CA. This process usually takes a few days time and you will be returned your signed SSL certificate and the CA's root certificate as .cer files. Save them both in the same working folder where files from steps 1 and 2 are stored

2.4 Import the CA-signed certificate to a keystore
  • Open command prompt and navigate to the same working folder.
  • Execute 'openssl pkcs12 -export -in <cert_file>.cer -inkey <privatekey_filename>.key -out <keystore_filename>.p12 -name Password Manager Pro -CAfile <root_cert_file>.cer -caname Password Manager Pro -chain'
  • Where,

    • cert_file.cer is the signed SSL certificate with the .cer extension.
    • privatekey_filename.key is the private key file with a .key extension.
    • keystore_filename.p12 name is the keystore that will be generated with a .p12 extension.
    • root_cert_file.cer is the CA's root certificate with a .cer extension.
  • When prompted for a password, enter the same password, you used in step 1 for the private key. This requirement is due to an inherent limitation in tomcat, which requires the two passwords to match.
  • Now, a keystore file in the name <keystore_filename>.p12 will be generated in the same folder.


2.5 Configure the Password Manager Pro server to use the keystore with your SSL certificate

This is the final step in generating Signed SSL certificates using OpenSSL.

  • Copy the <keystore_filename>.p12 generated in step 4 to the <Password Manager Pro_Install_Folder>\conf folder.
  • Open command prompt and navigate to the <Password Manager Pro_Install_Folder>\conf folder.
  • Open the file server.xml and do the following changes:
    • Search for the entry 'keystoreFile', which will have the default value set to 'conf/server.keystore'. Change the value to 'conf/<keystore_filename>.p12'.
    • Starting from version 9700, the keystore password is encrypted and cannot be updated directly in the server.xml file.In order to manuallyupdate the keystore password in the .xml file, disable the encryption first,bychanging the value 'keystorePassEncrypted=true' to 'keystorePassEncrypted=false'.

    Note: step is applicable for builds 9700 and above only.

  • Now, set the value of 'keystorePass' to "passtrix" or the password you specified in the previous step while creating the keystore.
  • Add a new entry keystoreType="PKCS12" next to the keystorePass entry.
  • Save the server.xml file.
  • Restart the Password Manager Pro server and connect through the web browser. If you are able to view the Password Manager Pro login console without any warning from the browser, you have successfully installed your SSL certificate in Password Manager Pro.
3. Generating Signed SSL certificates using Keytool
3.1 Create the public-private key pair that will be used for the SSL handshake
  • Go to the <Password Manager Pro_Home>/jre/bin folder.
  • Execute the command:
    "./keytool -genkey -alias Password Manager Pro -keyalg RSA -sigalg SHA256withRSA -keypass <privatekey_password> -storepass <keystore_password> -validity <no_of days> -keystore <keystore_filename></keystore_filename>
    <keystore_password> is the password to access the keystore, <privatekey_password> is the password to protect your private key. Note that due to an inherent limitation in tomcat, these two passwords have to be the same. (Though it is not documented, Tomcat has issues with passwords containing special characters, so use a password that has only alpha characters)
    <no_of_days> is the validity of the key pair in number of days, from the day it was created
  • The above command will prompt you to enter details about you and your organization.
    • For the 'first and the last name', enter the FQDN of the server where Password Manager Pro is running.
    • For other fields, enter the relevant details.
  • A keystore file will be created in the name <keystore_filename> in the same folder, with the generated key pair.


3.2 Create a Certificate Signing Request (CSR) for submission to a certificate authority to create a signed certificate with the public key generated in the previous step
  • Go to the <Password Manager Pro_Home>/jre/bin folder.
  • Execute the command: "keytool -certreq -keyalg RSA -alias Password Manager Pro -keypass <privatekey_password> -storepass <keystore_password> -file <csr_filename> -keystore <keystore_filename>".
    Note: The <csr_filename> that you choose should have the .csr extension.
  • A CSR file in the name <csr_filename> will be created in the same folder.


3.3 Submit the CSR to a Certificate Authority (CA) to obtain a signed certificate

Some of the prominent CAs are Verisign (http://verisign.com), Thawte (http://www.thawte.com), RapidSSL (http://www.rapidssl.com). Check their documentation / website for details on submitting the CSRs. Please note that this is a paid service. This process usually takes a few days of time. You will receive your signed SSL certificate and the CA's certificate as .cer files. Save both the files in the <Password Manager Pro_Home>/jre/bin folder.

3.4 Import the CA-signed certificate to the Password Manager Pro server
  • Go to the <Password Manager Pro_Home>/jre/bin folder folder using command prompt.
  • If you have a single file as the certificate bundle(p7b), then run the below command:

"keytool -import -alias Password Manager Pro -keypass <privatekey_password> -storepass <keystore_password> -keystore <keystore_filename> -trustcacerts -file <your_ssl_bundle.p7b>"

Where,

  • <boundlessness> is the certificate bundle obtained from the CA, a .p7b file saved in the previous step. The <privatekey_password>,<keystore_password> and <keystore_filename> are the ones used in the previous steps.
  • If you have 3 files, the root, the intermediate and the actual certificates in .cer format, then you need to import each one of them using the below commands.
    • "keytool -import -alias root -keypass <privatekey_password> -storepass <keystore_password> -keystore <keystore_filename> -trustcacerts -file <rooter>"
    • "keytool -import -alias inter -keypass <privatekey_password> -storepass <keystore_password> -keystore <keystore_filename> -trustcacerts -file <inter.cer>"
    • "keytool -import -alias Password Manager Pro -keypass <privatekey_password> -storepass <keystore_password> -keystore <keystore_filename> -trustcacerts -file <your_ssl_cert.cer>"
  • Now, copy the <keystore_filename> to the <Password Manager Pro_Home>/conf folder.


3.5 Configure the Password Manager Pro server to use the keystore with your SSL certificate

This is the final step in generating Signed SSL certificates using Keytool.

  • Go tothe <Password Manager Pro_Home>/conf folder.
  • Open the file server.xml.
  • Search for the entry 'keystoreFile', which will have the default value set to "conf/server.keystore". Change the value to "conf/<keystore_filename>", where <keystore_filename> is the one used in the previous steps.
  • Starting from version 9700, the keystore password is encrypted and cannot be updated directly in the server.xml file.In order to manually update the keystore password in the.xml file, disable the encryption first, bychanging the value 'keystorePassEncrypted=true' to 'keystorePassEncrypted=false'.


Note: This step is applicable only if you're using the version 9700 or above.

  • Set the value of 'keystorePass' to "passtrix" or the password you specified in the previous step while creating the keystore.
  • Restart the Password Manager Pro server and connect through the web browser. If youare able to view the Password Manager Pro login console without any warning from the browser, you have successfully installed your SSL certificate in Password Manager Pro.


Note: Tomcat, by default, accepts only the JKS (Java Key Store) and PKCS #12 format keystores. In case, the keystore is of PKCS #12 format, include the following option in the server.xml file along with the keystore name, keystoreType="PKCS12? This notifies tomcat that the format is PKCS12. Restart the server after this change.

4. Generating Signed SSL certificates by installing an existing wild card supported SSL certificate:
  • Go to the <Password Manager Pro_Home>/conf folder.
  • Open the file server.xml.
  • Search for the entry 'keystoreFile', which will have the default value set to "conf/server.keystore". Change the value to "conf/<keystore_filename>" where <keystore_filename> belongs to the existing wild-card certificate.
  • Also search for the entry 'keystorePass' (found next to the keystoreFile), which will have the default value set to "passtrix". Change the value to "<keystore_password>", where <keystore_password> protects the existing wild-card certificate keystore.
  • Restart the Password Manager Pro server and connect through the web browser console. If you are able to view the Password Manager Pro login console without any warning from the browser, you have successfully installed your SSL certificate in Password Manager Pro.


Note: Please refer your CA's documentation for more details and troubleshooting.

05. How do I generate a unique SSL certificate for MySQL server? (Steps applicable from build 6500 onwards)
 

Follow the steps below to generate SSL certificate for MySQL Server. (If you want to have a self-signed key, follow all the steps. If you are using a CA signed certificate, skip steps 1, 2 and 5.)

Step 1 Create certificate authority key

  • Open a command prompt
  • Execute the command openssl genrsa -out ca.key 1024
  • This will create a key named ca.key


Step 2 Create a self-signed certificate authority certificate

  • Execute the command openssl req -new -x509 -days 365 -key ca.key -out CAcert.pem
  • Here ca.key is the file you created in step 1
  • This will create a file named CAcert.pem


Step 3 Generate private key

  • Open a command prompt
  • Execute the command openssl genrsa -out ServerKey.key 1024
  • This will create a file named ServerKey.key


Step 4 Generate a certificate request

  • Execute the command openssl req -new -key ServerKey.key -out server.csr
  • Here, ServerKey.key is the file you created in step 3
  • This will create a file named server.csr


Step 5 Create a Certificate Signing Request (CSR) for submission to a certificate authority (perform this step only if you are using a self-signed certificate. Otherwise, proceed to step 6)

  • Execute the command openssl x509 -req -days 365 -in server.csr -CA CAcert.pem -CAkey ca.key -set_serial 01 -out ServerCer.cer
  • Here, server.csr is the file you created in Step 4; CAcert.pem is the file created in Step 2; ca.key is the file created in Step 2
  • This will create a file named ServerCer.cer


Step 6 Generate .p12 file

  • Execute the command openssl pkcs12 -export -in ServerCer.cer -inkey ServerKey.key -out PMPKeyStore.p12 -name pmp -CAfile CAcert.pem -caname pmp -chain
  • Here, ServerCer.cer is the file you created in Step 5. If you are using a CA signed certificate, enter the signed SSL certificate with .cer extension; ServerKey.key is the one you created in Step 3; CAcert.pem is the file created in Step 2
  • This will create a file named PMPKeyStore.p12
  • Here, you will be prompted to enter 'Export Password'. The password specified here has to be entered in PMP configuration file in wrapper (in Windows installation) and wrapper_lin.conf (in Linux installation) as explained below.
  • Open wrapper (in Windows installation) and wrapper_lin.conf (in Linux installation) and search for the following line:

    wrapper.java.additional.22=-Djavax.net.ssl.keyStorePassword=passtrix

    In the above, replace passtrix with the password you have entered above.


Step 7 Configure the PMP server to use the keystore with your SSL certificate

  • By executing the above steps, you would have got four files namely CAcert.pem, ServerKey.key, ServerCer.cer and PMPKeyStore.p12. You need to copy and paste these files into <PMP-Installation-Folder>/conf directory


Step 8 Import CAcert.pem into PMP

  • Navigate to <PMP-Installation-Folder>/bin directory and execute the following command:

In Windows: importcert.bat <absolute path of the CAcert.pem file created in step 2>
In Linux: sh importcert.sh\bat <absolute path of the CAcert.pem file created in step 2>


Step 9 Put these files into MySQL

  • You need to copy the following three files created after Step 6 and rename them as below:

CAcert.pem to be renamed as ca-cert.pem
ServerKey.key to be renamed as server-key.pem
ServerCer.cer to be renamed as server-cert.pem

  • Then, put the renamed files into <PMP-Installation-Folder>/mysql/data directory

Important Note: If you are having High Availability setup, execute the steps 7, 8 and 9 in PMP secondary installation also.

06. Can we create server certificates with SubjectAlternativeName (SAN)?
 

Yes, you can create a certificate using SAN with an alias name and apply it in Password Manager Pro. Follow the below steps:

1. Creating a CSR using Password Manager Pro's SSL certificate management module, and submitting it to any CA for signing
1.1 Create a Certificate Signing Request (CSR)
  • Login to Password Manager Pro as an administrator.
  • Navigate to Certificates >> Create CSR.
  • Click on the 'Create' button.
  • Here, provide a name for your certificate.
  • The Subject Alternative Name (SAN) will be auto-filled when you click on it after providing the common name. You can include additional SANs in the text field.
  • Provide the other details including your organization details, location, validity, and a password.
  • Click on 'Create'.
  • Once done, you will find the option to export the certificate and the private key, or send the CSR to an email address that you specify.


1.2 Submit the CSR to a Certificate Authority (CA) to obtain a CA signed certificate

After creating the CSR, the next step is get the CSR verified and signed by a CA. There are two options to do this:

  • You can export the CSR file and manually send it to a third party CA to get it signed.
  • You sign and issue certificates to all clients in your network either from your Microsoft Certificate Authority or using a custom root CA certificate that is trusted within your environment. To do this, navigate to Certificates >> Create CSR, select a certificate, and click on 'Sign'. Refer to this document for more details on certificate signing.

Once signed, you can view the certificate under 'Certificates'.

1.3 Import the CA-signed certificate to the Password Manager Pro server

To import the certificates in your network:

  • Navigate to the Certificates.
  • Click on 'Add'.
  • Choose the required option:
    • File Based Certificate– Browse and import the required certificate file directly from your system.
    • Content Based Certificate – Copy the content of the required certificate file and paste it in the text box.
    • Keystore Based – Import all individual certificates available in keystore simultaneously. Upload the required keystore file and enter its corresponding password (if any).
  • Click on the 'Add' button.
2. Creating a certificate with SAN using Microsoft internal CA

Make sure you follow the below mentioned steps to create server certificate with SubjectAlternativeName using Microsoft Internal CA. Also, in Additional Attributes, specify the 'san:dns=<The URL which you use to access Password Manager Pro>', and then try creating the certificate.

  • Connect to the server where Microsoft Certificate Service is running.
  • Open a command prompt and execute certutil -setreg policy\EditFlags +EDITF_ATTRIBUTESUBJECTALTNAME2
  • Then, restart Microsoft Certificate Service(certsvc).
    Create the private key using the below command,"./keytool -genkey -alias Password Manager Pro -keyalg RSA -keypass <privatekey_password> -storepass <keystore_password> -validity <no_of days> -sigalg SHA256withRSA -keysize 2048 -keystore <keystore_filename>"
  • Here, when it prompts for first and last name, specify the name which you use to access Password Manager Pro.
  • Create the Certificate Signing Request(CSR) using the below command: 'keytool -certreq -keyalg RSA -alias Password Manager Pro -keypass <privatekey_password> -storepass <keystore_password> -file <csr_filename> -keystore Password Manager Pro.keystore'
    • Submit CSR request to Microsoft Internal CA
    • Open IE and go to your CA's certificate request page.
    • Request advanced certificate.
    • Submit a certificate request.
    • Copy and paste content of <csr_filename>.cer file.
    • Certificate template should be Web Server.
    • In "Additional Attributes", enter 'san:dns=passwordmanager&dns=passwordmanager.tcu.ad.local' and click on 'Submit'.
    • Download the certificate chain in base64 format as Password Manager Procert.p7b.
  • Import the downloaded 'Password Manager Procert.p7b' file into the Password Manager Pro.keystore "keytool -import -alias Password Manager Pro -keypass <privatekey_password> -storepass <keystore_password> -keystore Password Manager Pro.keystore -trustcacerts -file Password Manager Procert.p7b"
  • Note : If you receive the error message "Failed to establish chain from reply" with the above command, it means the root and intermediate certs of your CA are not available in the trusted store of the Password Manager Pro. So, before importing the actual certificate, you have to import the root certificate with a different alias and then import the actual certificate. Also, if you have multiple root certificates, then you have to import them one by one with the different alias names. For example,

    ./keytool -import -alias root1 -keypass Password123 -storepass Password123 -keystore Password Manager Pro.keystore -trustcacerts -file root1.cer

    ./keytool -import -alias root2 -keypass Password123 -storepass Password123 -keystore Password Manager Pro.keystore -trustcacerts -file root2.cer

    Based on the number of root or intermediate root certificates, you have to execute the above command with different alias names and then continue with the actual certificate.

    Note : The actual certificate should be in .cer or .crt format.

  • Applying the certificate keystore in Password Manager Pro.
    • Login to Password Manager Pro as an administrator.
    • Navigate to Admin >> Configuration >> Password Manager Pro Server.
    • Choose PKCS12 as the Keystore Type.
    • Click on 'Browse' and select your PFX/P12 file.
    • Provide the correct keystore password and save the configuration.
    • Restart Password Manager Pro service to bring the certificate change into effect.
3. Creating certificate with SAN signed by third party vendor like GoDaddy, Verisign, Commodo, etc.

Make sure you follow the below mentioned steps to get SAN certificate signed from the third party vendors.

  • Create the private key using the below command, './keytool -genkey -alias Password Manager Pro -keyalg RSA -keypass <privatekey_password> -storepass <keystore_password> -validity <no_of days> -sigalg SHA256withRSA -keysize 2048 -keystore <keystore_filename>"'
  • Here, when it prompts for first and last name, specify the name which you use to access Password Manager Pro.

  • Create the Certificate Signing Request(CSR) using the below command: 'keytool -certreq -keyalg RSA -alias Password Manager Pro -keypass <privatekey_password> -storepass <keystore_password> -file <csr_filename> -keystore Password Manager Pro.keystore'
  • Submit CSR request to third party signing tool and ensure to get the certificate signed using SAN name. Download the certificate chain in base64 format as Password Manager Procert.p7b
  • Import the downloaded 'Password Manager Procert.p7b' file into the Password Manager Pro.keystore keytool -import -alias Password Manager Pro -keypass <privatekey_password> -storepass <keystore_password> -keystore Password Manager Pro.keystore -trustcacerts -file Password Manager Procert.p7b
  • Note: If you receive the error message "Failed to establish chain from reply" with the above command. Then, the root and intermediate certs of your CA are not available in the trusted store of the Password Manager Pro. So, before importing the actual certificate, you have to import the root certificate with a different alias and then the actual certificate. Also, if you have multiple root certificates, then you have to import them one by one with different alias names. For example,

    ./keytool -import -alias root1 -keypass Password123 -storepass Password123 -keystore Password Manager Pro.keystore -trustcacerts -file root1.cer

    ./keytool -import -alias root2 -keypass Password123 -storepass Password123 -keystore Password Manager Pro.keystore -trustcacerts -file root2.cer

    Based on the number of root or intermediate root certificates, you have to execute the above command with different alias names and then continue with the actual certificate.

  • Applying the certificate keystore in Password Manager Pro.
    • Login to Password Manager Pro as an administrator.
    • Navigate to Admin >> Configuration >> Password Manager Pro Server.
    • Choose PKCS12 as the Keystore Type.
    • Click on 'Browse' and select your PFX/P12 file.
    • Provide the correct keystore password and save the configuration.
    • Restart Password Manager Pro service to bring the certificate change into effect.

Password Synchronization

01. Can I change resource passwords from the Password Manager Pro console?
 

Yes. Password Manager Pro can remotely reset the passwords of various end points. Password Manager Pro supports both agent-based and agent-less modes of changing passwords. Refer this document for more information.

02. When do I use the agent and agent-less modes for password synchronization?
 

Let us first look at the requisites for both the modes:

  • The agent mode requires the agent to be installed as a service in each end point and run with administrative privileges to perform password reset operations. The agent uses one-way communication using outbound traffic to reach the Password Manager Pro server.
  • For the agent less mode, you must supply administrative credentials to perform the password changes. For Linux, you must specify two accounts- one with root privileges and the other with normal user privileges that can be used to login remotely. Telnet or SSH service must be running on the resources. For Windows domain, you must supply the domain administrator's credentials. For Windows and Windows Domain, Password Manager Pro uses remote calls, so relevant ports must be open on the resource.

Based on this, you can choose which mode you want for your environment, indicated by the following tips:

Choose the agent mode when:

  • You do not have administrative credentials stored for a particular resource in Password Manager Pro,
  • You do not have the required services running on the resource (Telnet / SSH for Linux, RPC for Windows),
  • You run Password Manager Pro in Linux and want to make password changes to a Windows resource.

Choose agent less mode in all other cases as it is a more convenient and reliable way of doing password changes.

03. Can I enable agent less password reset if I add my own resource type for other distributions of Linux / other versions of Windows?
 

Yes, you can. As long as your resource type label contains the string 'Linux' or 'Windows', you can still configure agent less password reset for those resources.

Example of valid resource type labels to enable password reset:

Debian Linux, Linux - Cent OS, SuSE Linux, Windows XP Workstation, Windows 2003 Server

04. Is there a way to carry out remote password synchronization for custom resource types that do not come out of the box in Password Manager Pro?
 

Password Manager Pro supports remote password reset for custom resource types through SSH command sets, password reset plugins, and password reset listeners.

  • SSH Command Sets: For SSH-based devices, you can build command-based executables directly from Password Manager Pro using a set of default or customized SSH commands. These command sets can then be associated with the respective SSH device accounts that do not come out of the box with Password Manager Pro to perform their password resets without the need for a CLI.
  • Password Reset Plugin: You can build your own implementation class and run it via Password Manager Pro to enforce automatic password resets of custom resource types. With the plugin, you can also leverage access control for legacy accounts and automatically reset passwords instantly upon usage. This way, the passwords of these accounts will serve as one-time passwords that are reset after every use via the associated plugin.
  • Password Reset Listeners: Listeners are custom scripts or executables that can be invoked for local password changes, as well as to reset the passwords of custom resource types for which remote password reset is not supported out-of-the-box by Password Manager Pro. You can configure listener scripts individually for each resource type including the custom ones.
05. How do I troubleshoot when password reset does not happen?
 

In the agent mode:

  • Check if the agent is running by looking at the Windows active process list for the entry 'Password Manager ProAgent.exe' or the presence of a process named 'Password Manager ProAgent' in Linux.
  • Check if the account in which the agent is installed has sufficient privileges to make password changes.

In the agent less mode:

  • Check if the right set of administrative credentials have been provided and the remote synchronization option is enabled.
  • Check if the necessary services are running on the resource (Telnet / SSH for Linux, RPC for Windows).
  • Check if the resource is reachable from the Password Manager Pro server using the DNS name provided.
06. How do I reset domain passwords when Windows domain password reset fails with an error message: "The authentication mechanism is unknown"?
 

This happens when Password Manager Pro is run as a Windows service and the 'Log on as" property of the service is set to the local system account. Change it to any domain user account to be able to reset domain passwords. Follow the instructions below to effect that setting:

  • Go to the Windows Services Applet (from Control Panel --> Administrative Tools --> Services)
  • Select the 'ManageEngine Password Manager Pro' service, right-click --> choose 'Properties'.
  • Click the 'Log On' tab and choose 'This Account' radio button and provide the username and password of any domain user - in the format <domainname>\<username>.
  • Save the configuration and restart the server.
07. What are the prerequisites for enabling Windows Service Account Reset?
 

Before enabling windows service account reset, ensure if the following services are enabled in the servers where the dependent services are running:

  • Windows RPC service should have been enabled.
  • Windows Management Instrumentation (WMI) service should have been enabled.
08. Does domain SSO work across firewalls / VPNs?
 

The domain Single Sign On (windows integrated authentication) is achieved in the Windows environment by setting non-standard parameters in the HTTP header, which are usually stripped off by devices like firewalls / VPNs. Password Manager Pro is designed for use within the network. So, if you have users connecting from outside the network, you cannot have SSO this enabled.

Backup & Disaster Recovery

01. Can I move Password Manager Pro from one server to another?
 

Yes. you can migrate Password Manager Pro to another server by following the below steps:

  • Stop Password Manager Pro service, exit tray icon.
  • Make sure that the Postgres process is not running in Task Manager.
  • Copy and move entire Password Manager Pro directory to the new server.
  • Open command prompt with admin rights and navigate to <Password Manager Pro HOME>\bin directory. Execute the command Password Manager Pro.bat install. (This will install Password Manager Pro service.)
  • Move the encryption key(Password Manager Pro_key.key) to the new server and specify the correct location of it in Password Manager Pro/conf/manage_key.conf file. Click here for more information about the encryption key.
  • Go to services console, provide a service account and start Password Manager Pro service.
  • If you want the tray icon, Go to the <Password Manager Pro HOME>, right click on Password Manager Pro.exe and select "Run as Administrator". Now you should be able to access the Password Manager Pro web page using the new server name in the URL.
02. Can I setup disaster recovery for the Password Manager Pro database?
 

Yes, you can. Password Manager Pro can periodically backup the entire contents of the database, which can be configured through the Password Manager Pro console. Refer this document for more details.

03. Where does the backup data get stored? Is it encrypted?
 

All sensitive data in the backup file are stored in encrypted form in a .zip file under <Password Manager Pro_Install_Directory/backUp> directory. It is recommended that you backup this file in your secure, secondary storage for disaster recovery.

SSL Certificate Management

01. What is the Licensing Policy for Password Manager Pro?
 

There are three editions of Password Manager Pro

Evaluation Edition - Evaluation Edition allows you to have two administrators for 30 days. You can manage unlimited resources and evaluate all features of the Enterprise edition. You can also get free technical assistance during this period.

Free Edition - The download option is always valid for this edition. It can support only one administrator. You can manage a maximum of 10 resources and you can access all the functionalities of the Standard edition.

Registered Version - You need to buy a license based on the number of administrators required and the type of edition- Standard/Premium/Enterprise:

  • Standard - If your requirement is to have a secure, password repository to store your passwords and selectively share them among enterprise users, Standard edition would be ideal.
  • Premium - Apart from storing and sharing your passwords, if you wish to have enterprise-class password management features such as remote password synchronization, password alerts and notifications, application-to-application password management, reports, high-availability and others, Premium edition would be the best choice.
  • Enterprise - If you require more enterprise-class features like auto discovery of privileged accounts, integration with ticketing systems and SIEM solutions, jump server configuration, out-of-the-box compliance reports, and SQL server / cluster as backend database, the Enterprise edition will be ideal for you.

Note: Password Manager Pro comes with five user roles - Administrator, Password Administrator, Privileged Administrator, Password Auditor and Password User. The term 'administrator' denotes Administrators, Password Administrators and Privileged Administrators. So, licensing restricts the number of administrators as a whole, which includes Administrators, Password Administrators and Privileged Administrators. There is no restriction on the number of Password Users and Password Auditors. To get more details on the five user roles, refer this section of our help documentation.

See the below features comparison table for more clarity:

02. Can I buy a permanent license for Password Manager Pro? What are the options available?
 

Though Password Manager Pro follows an annual subscription model for pricing, we also provide perpetual licensing option. The perpetual license will cost three times the annual subscription price, with 20% AMS from the second year. Contact sales@manageengine.com and support@passwordmanagerpro.com for more details.

03. I want to have a High Availability setup with multiple servers. Will a single license suffice for this?
 

Yes, if you buy a single Premium or Enterprise Edition license, you are entitled to have the High Availability setup. You can apply the same license on the Primary as well as the Secondary servers. Follow the below steps:

  • Stop the PMP service in the Primary server.
  • Login PMP using the Secondary server URL as an Administrator.
  • Tap License under the User menu, at the top right corner of the console.
  • Update the same license file which you applied for the Primary server.
04. Can Password Manager Pro support more than 1000 administrators?
 

Yes, very much. If you want a license with more than 1000 administrator users, please contact sales@manageengine.com and support@passwordmanagerpro.com for more details.

05. Can I extend my evaluation to include more administrator users or for more number of days?
 

Yes. Fill in the required details in the website and we will send you the license keys.

06. Do I have to reinstall Password Manager Pro when moving to Premium or Enterprise Editions?
 

No. All the features of the Enterprise/Premium edition will automatically get activated when you apply the respective license over your current Password Manager Pro installation.

SSH Key Management

01. Are there any differences in the way SSH user accounts and SSH service accounts are managed using Password Manager Pro?
 

No. Password Manager Pro adopts the same approach for managing SSH user accounts and SSH service accounts. The only difference is that during resource discovery, if service / root account credentials are provided to establish connection with the resource, you acquire extended privileges to import and manage keys from all user accounts in the resource.

Whereas, when connection to the resource is established using user account credentials, you get key management privileges only for SSH keys present in that particular account.

02. Is there any way to view SSH keys that were not rotated?
 

Yes. We have a dashboard that displays the number of keys that were not rotated for the predefined time period as specified in the notification policy.

03. Does Password Manager Pro support management of digital keys other than SSH keys and SSL certificates?
 

Password Manager Pro houses a key vault called "Key Store" which facilitates the storage and management of any type of digital key. However, the option to discover and import is limited to SSH keys and SSL certificates only, and isn't available for other types of digital keys.

SSL Certificate Management

01. Is there any certificate type that Password Manager Pro is incompatible with?
 

No. Password Manager Pro supports all X.509 certificate types.

02. Is it possible to automatically identify and update the latest version of certificates in Password Manager Pro' certificate?
 

Yes. You can create scheduled tasks to perform automatic certificate discovery through which you can import and replace old certificates from target systems with their updated versions in Password Manager Pro' certificate repository. Click here for a detailed explanation on creating schedules.

03. Does the Linux version of Password Manager Pro support certificate discovery from Active Directory and MS Certificate Store?
 

No, it doesn't. The AD User Certificate and MS Certificate Store tabs appear only in the Windows version of Password Manager Pro.

04. Is it possible to track the expiry of certificates with the same common name in Password Manager Pro' certificate repository?
 

Password Manager Pro differentiates certificates by their common names and records certificates with same common names as a single entry in its certificate repository. We've designed it this way because Password Manager Pro licensing is based on the number of certificates and we don't want customers to spend many license keys for the same certificate.

However, if there's a need to manage both the certificates separately, you can do so by listing them as separate entries in Password Manager Pro' certificate repository. Once listed, the newly added certificate will be counted for licensing.

To add a certificate with the same common name as a separate entry in certificate repository,

  • Navigate to the Certificates tab and click Certificates, and click the Certificate History icon beside the certificate.
  • Click the 'Certificate Settings' icon beside the required version of the certificate and click on 'Manage Certificate'.
  • The selected version is listed as a separate certificate in the certificate repository.
  • In case you want to manage only one version of the certificate, click 'Certificate Settings' icon beside the required version and choose 'Set as current certificate' option.
05. How do I import private key for a certificate?
 

Follow the steps below to import a certificate's private key into Password Manager Pro.

  • Navigate to the Certificates tab and click Certificates.
  • Select the certificate for which you need to import the private key.
  • Click the Import Keys option from the More drop down menu at the top.

Browse for the file that contains the private key, enter the keystore password, and click on 'Import'. The private key will be imported and attached to the selected certificate.

06. How do I deploy a certificate to Certificate Store and map it to the application that uses the certificate?
 

Password Manager Pro facilitates certificate deployment through which you can deploy certificates from its repository to target server's Microsoft Certificate Store.

Click here for step-by-step explanation on certificate deployment.

To map the certificate to its corresponding application, you've to manually restart the server on which the application is running for the change to take effect.

07. Does Password Manager Pro support subnet based certificate discovery?
 

No. Password Manager Pro currently doesn't support subnet based SSL certificate discovery.

08. Does Password Manager Pro support automatic scheduling for certificate discovery from MS Certificate Store?
 

No. Currently, Password Manager Pro doesn't support automatic scheduling for certificate discovery from MS Certificate Store.

09. Are certificate related alert emails generated for all versions of a certificate (the ones that show in "Certificate History" also) or only for those certificates listed in Password Manager Pro's certificate repository?
 

Email notifications are generated ONLY for certificates listed in Password Manager Pro's certificate repository and NOT for different versions of a certificate displayed in "Certificate History" section.

10. Are the certificates issued by the company's internal Certification Authority (CA) counted for licensing?
 

Yes. All types of SSL certificates, SSH keys and any other digital key being managed using Password Manager Pro are taken into account for licensing. There's a dashboard widget "License Details" that provides insights on the type and number of digital identities being managed using Password Manager Pro that will be taken into account for licensing.

Eliminate the security risks posed by hard-coding of application credentials.

Download Password Manager Pro today!

Password Manager Pro - Enterprise Password Management Software trusted by

Get
Quote
Technical Support Request Demo