How to set up MFA for Microsoft Remote Desktop Gateway using ADSelfService Plus
Microsoft Remote Desktop Gateway (RD Gateway) helps enterprise users connect to their organization's internal resources, like Windows desktops and enterprise applications, from an external network beyond the corporate firewall.
Because the RD Gateway grants access to organizational resources from an external network, logins originating from it should be protected with an extra layer of security using MFA. ManageEngine ADSelfService Plus provides MFA for critical endpoints including Microsoft RDP. ADSelfService Plus leverages the RADIUS protocol to integrate with the RD Gateway, ensuring that users prove their identity using MFA before gaining entry.
This resource gives you step-by-step instructions to secure RD Gateway connections using MFA for RDP via ADSelfService Plus.
Prerequisites
ADSelfService Plus:
- You must have the Professional Edition of ADSelfService Plus with Endpoint MFA. To purchase it, visit the store.
- HTTPS must be enabled in ADSelfService Plus. Learn how.
- In ADSelfService Plus, the access URL you have configured at Admin > Product Settings > Connection > Configure Access URL will be used by the NPS extension to communicate with the ADSelfService Plus server. Make sure you have updated the access URL before installing the NPS extension.
- You must have a Windows server configured for Remote Gateway (Windows Server 2008 R2 and above).
- You must have another Windows server configured for RADIUS authentication (Windows Server 2008 R2 and above) with the Network Policy and Access Services (NPS) role enabled.
Note:
If you are using an untrusted certificate in ADSelfService Plus to enable HTTPS, you must disable the Restrict user access when there is an invalid SSL certificate option in Configuration > Administrative Tools > GINA/Mac/Linux (Ctrl+Alt+Del) > GINA/Mac/Linux Customization > Advanced.
RD Gateway server:
This will be the RD Gateway server, which we'll call the RDG server in this document.
Network policy server:
You'll install the ADSelfService Plus NPS extension on this server, which we'll call the Central NPS server in this document.
Steps to enable MFA for Microsoft RD Gateway
RD Gateway connections to protected resources are secured through an encrypted SSL tunnel managed by IIS, which uses NPS to enforce authorization policies and authenticate users. To secure these logins with modern MFA methods, you can extend the authentication process from the RDG server to the Central NPS server, which will use ADSelfService Plus to perform the actual authentication.
Enabling MFA for RD Gateway involves three steps:
Step 1: Configuring ADSelfService Plus
a. Enabling the required authenticators
You need to first configure the authenticators to be used for protecting RDP logins with MFA. The following authentication methods are supported:
You can learn how to enable these authentication methods by following the links above.
Note:
- These authenticators require the ADSelfService Plus mobile app. When you enable Push Notification Authentication or Biometric Authentication, make sure that the ADSelfService Plus server is reachable through the internet from users' mobile devices.
- The RADIUS authentication timeout should be set to at least 60 seconds in the RDG server's RADIUS authentication configuration settings.
b. Enabling MFA for RADIUS endpoints in ADSelfService Plus
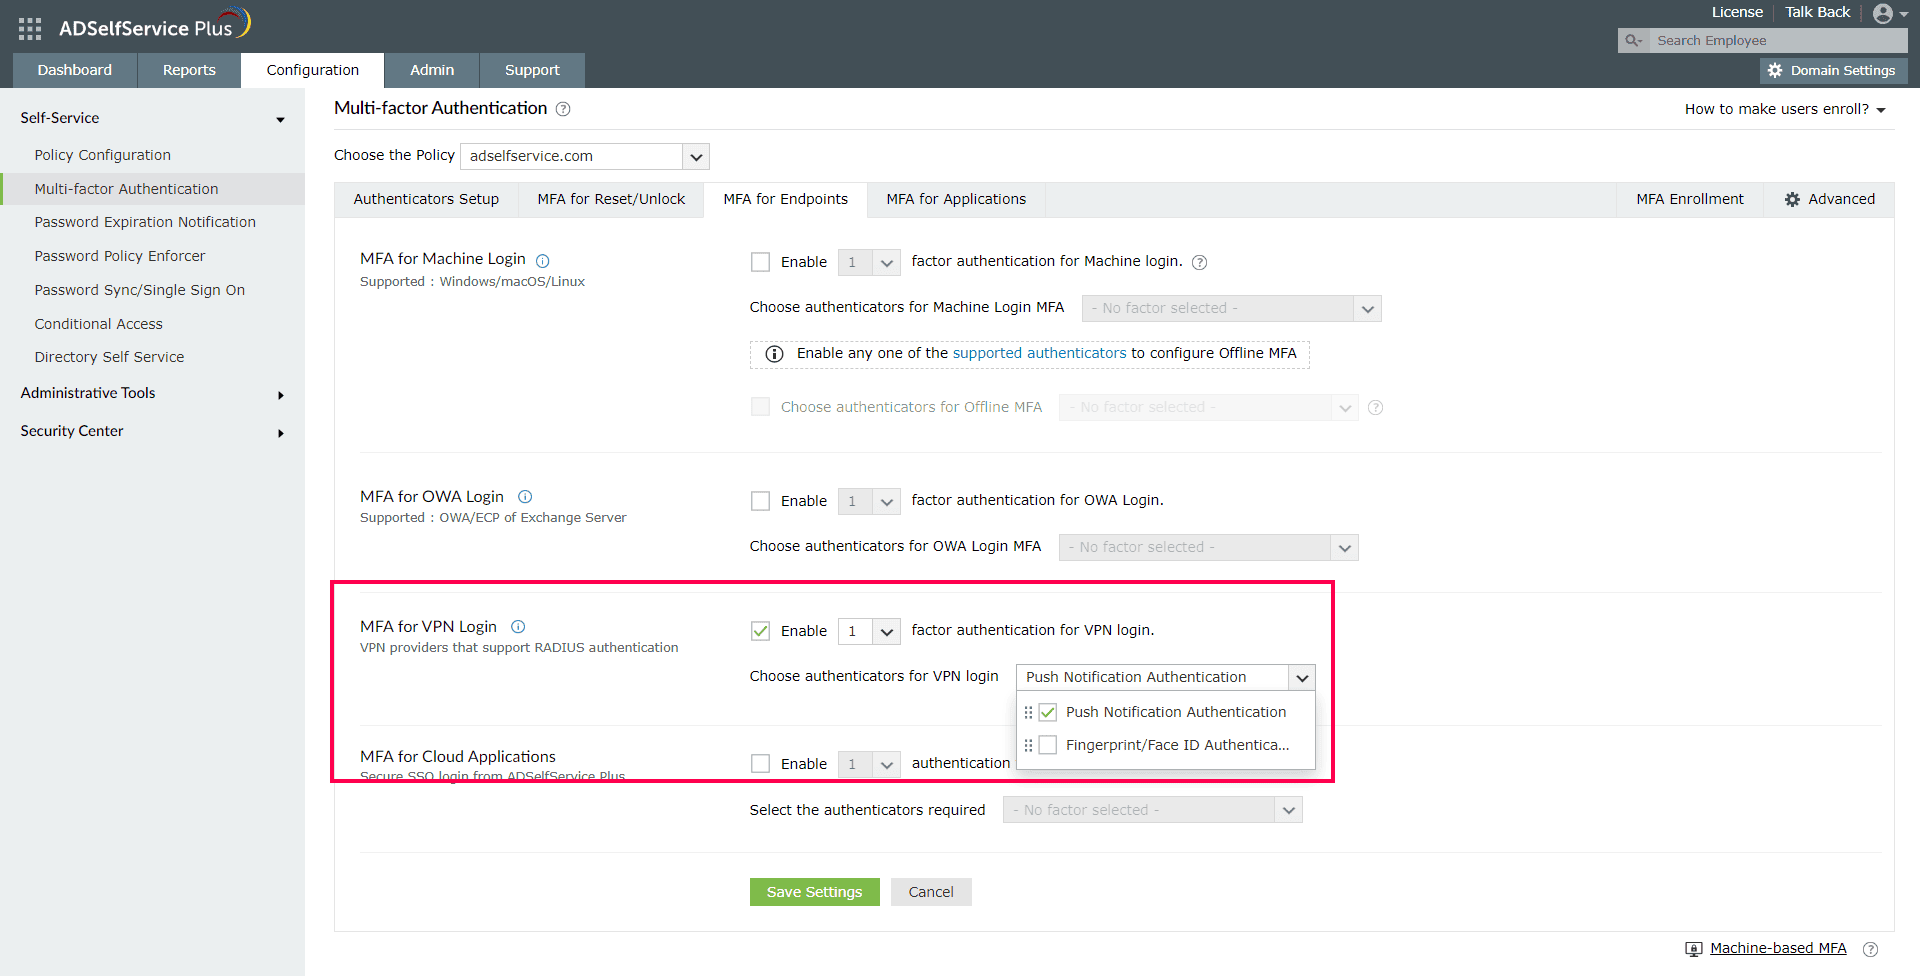
Once you've enabled the required authenticators, you must configure them to protect login requests to the Central NPS server (from the RDG server), which is a RADIUS endpoint. Use the MFA for VPN Logins (which supports RADIUS endpoints) configuration settings to enable this.
- Log into ADSelfService Plus with administrator credentials.
- Navigate to Configuration > Self-Service > Multi-Factor Authentication > MFA for Endpoints.
- Select a policy from the Choose the Policy drop-down menu. MFA for RD Gateway logins will be enabled for users under the policy you choose.
- In the MFA for VPN Logins section, check Select the authenticators required, choose the number of authentication factors to be enforced, and select the authentication methods to be used. The authentication methods listed can also be rearranged by dragging and dropping them until they're in the desired order.
- Click Save Settings.
c. Configuring RD Gateway MFA session limits
You can configure the RD Gateway MFA session limits under Advanced Settings. Ensure that the session is set to at least 60 seconds using the Keep the VPN MFA session valid for __ minutes setting under the VPN Login MFA configuration section. Here, you will also find settings to bypass MFA if ADSelfService Plus is not reachable or if the user is not enrolled.
Step 2: Configuring the Central NPS server
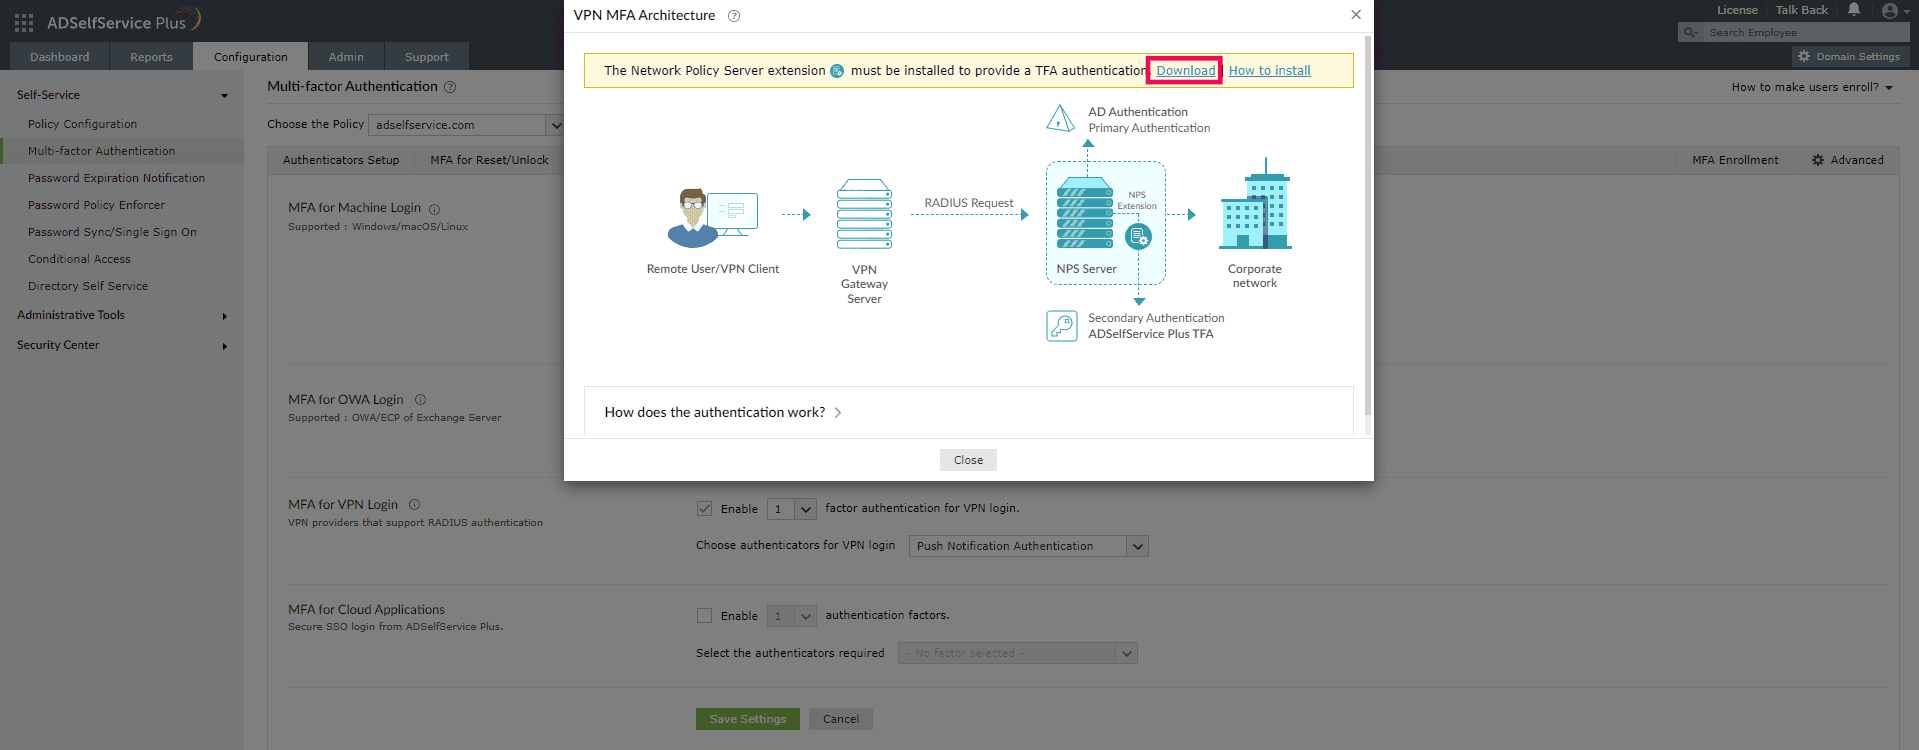
Next, you need to install ADSelfService Plus' NPS extension on the Central NPS server. This extension receives the authentication request from the RDG server and forwards it to ADSelfService Plus.
a. Installing the NPS extension
- Next, navigate to Configuration > Self-Service > Multi-Factor Authentication > MFA for Endpoints.
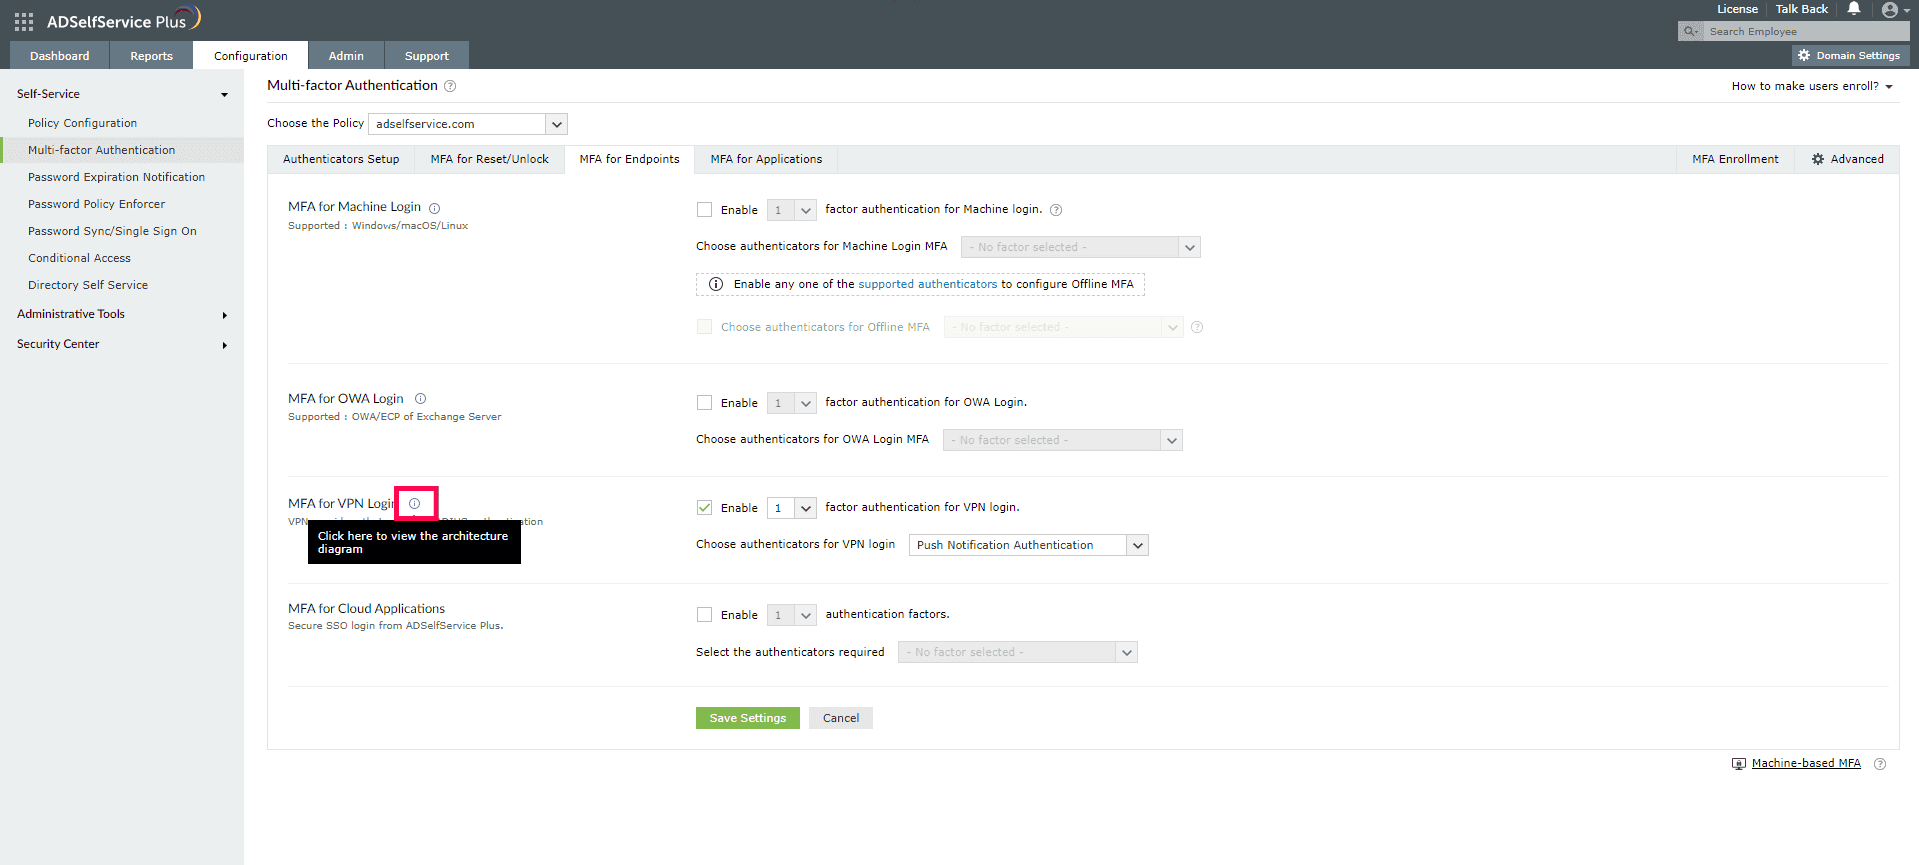
- Click the tooltip icon next to MFA for VPN Logins to display the architecture diagram and download the NPS extension using the link provided in the banner.
- Copy the extension file (ADSSPNPSExtension.zip) to the Central NPS server. Ensure that this is not the RDG server.
- Extract the ZIP file and choose a location to save its contents.
- Open Windows PowerShell as an administrator and navigate to the folder where the ZIP file’s content is located.
- Execute the following command:
- After installation, you will be prompted to restart the NPS (IAS) Windows service. Proceed with the restart.
where <operation> can be install, uninstall, or update.
Install: Installs the NPS extension plugin.
Uninstall: Uninstalls the NPS extension plugin.
Update: Updates the extension to newer versions and configuration data.
b. Enabling policy-based MFA on the Central NPS server
If you have set up connection request policiesor network policies while enabling your Central NPS server, you can enforce MFA for RD Gateway logins based on those policies. You can achieve this by editing the NPS Extension registry key on the Central NPS server to ensure that the requests forwarded to ADSelfService Plus by the NPS extension are based on the policy specified.
To enable MFA based on connection request or network policies:
- Open the Registry Editor (type regedit in the Run dialog box).
- Go to HKEY_LOCAL_MACHINE\SOFTWARE\ZOHO Corp\ADSelfService Plus NPS Extension.
- Make a backup of the registry key before editing it.
- Only members of the local Administrator group will have the privileges to edit this key.
- Double-click CRPolicies or NetworkPolicies based on the policy you want to configure.
- CRPolicies can be used to enforce MFA only for the users who fall under the selected connection request policies.
- NetworkPolicies can be used to enforce MFA only for the users who fall under the selected network policies.
- Enter the name of the policy in the Value Data field. If there are multiple policies, use a semicolon to separate them.
- Click OK.
Note:
Note:
When the Connection Request Policies and Network Policies are both configured, an authentication request will be considered for MFA only if both the Connection Request Policies and Network Policies of the RADIUS request match with the ones configured.
If the policies are not configured, MFA will be enforced for all the successful RADIUS requests sent to the Central NPS server.
c. Configuring the Central NPS server to receive authentication requests from the RDG server
You need to register the RDG server as a RAIDIUS client to the Central NPS server and ensure that the authentication requests forwarded by the RADIUS client are authenticated by the Central NPS server.
Registering the RDG server as a RADIUS client:
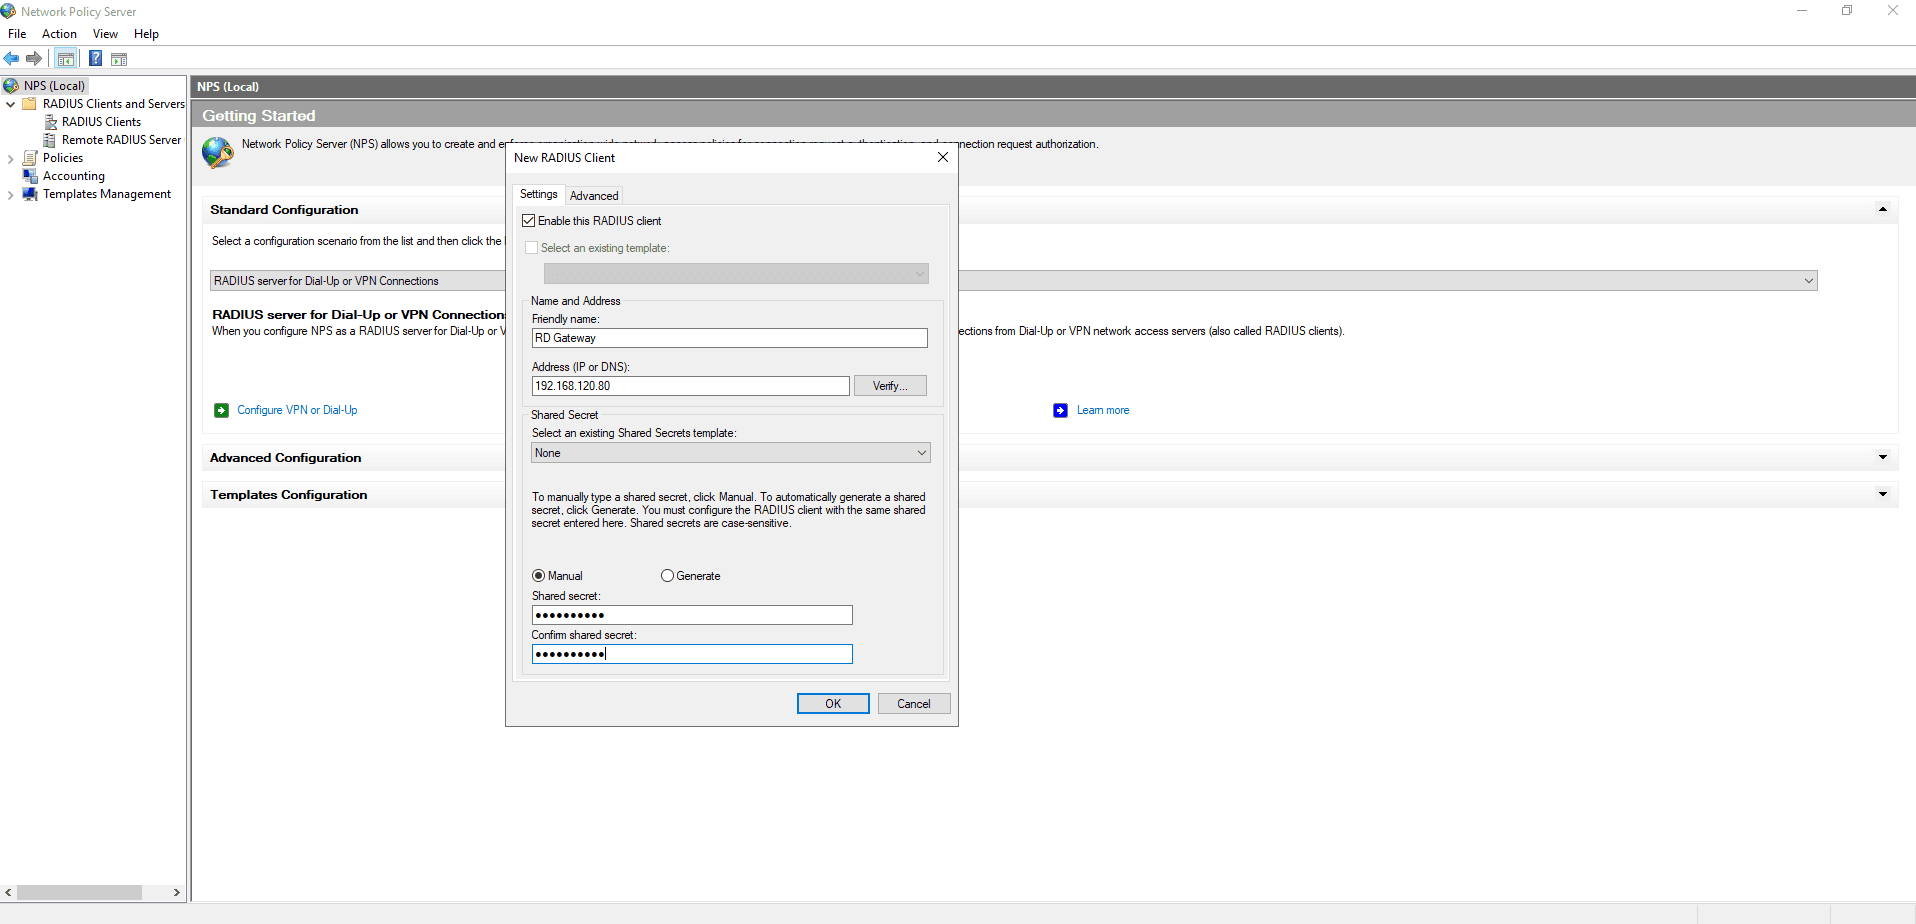
- Open Network Policy Server on the Central NPS server and navigate to RADIUS Clients > New.
- In the New RADIUS Client dialog box that opens, enter a Friendly name that makes the intended use clear and the IP address or DNS Name of the RDG server.
- Choose Manual or Generate for the Shared Secret.
- Click OK.
Configuring authentication to be on the Central NPS server:
- Navigate to Policies > Connection Request Policy.
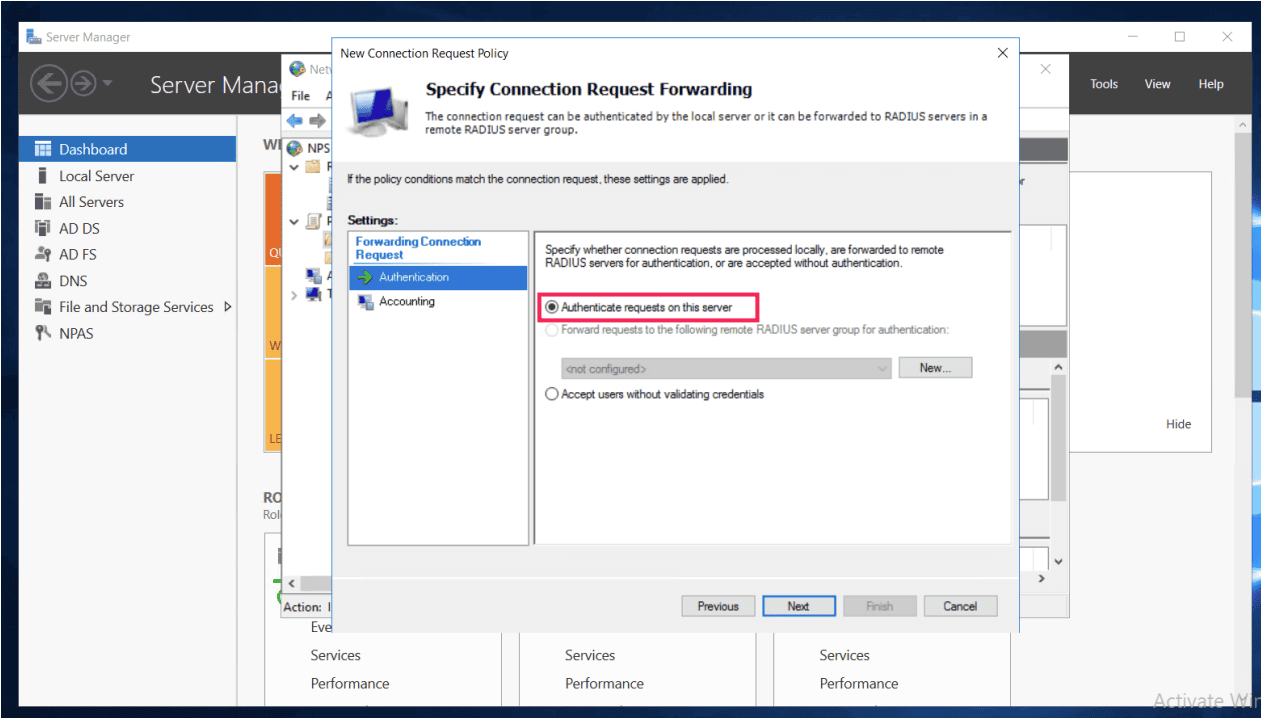
- Ensure that Authentication settings of the Connection Request Policy is set to Authenticate requests on this server. This will ensure that the authentication requests forwarded from the RDG server are authenticated on the Central NPS server. Since the ADSelfService Plus NPS extension is installed on the Central NPS server, the request will be forwarded to ADSelfService Plus, which will perform the actual authentication using the MFA methods configured in Step 1a.
- Open Active Directory Users and Computers on the Central NPS server and set the Network Access Permission for users using RDP to Control access through NPS Network Policy in their Dial-in properties.
Step 3: Configuring the RDG server
Finally, you need to configure your RDG server to forward authentication requests to the Central NPS server.
- Open RD Gateway Manager on your RDG server.
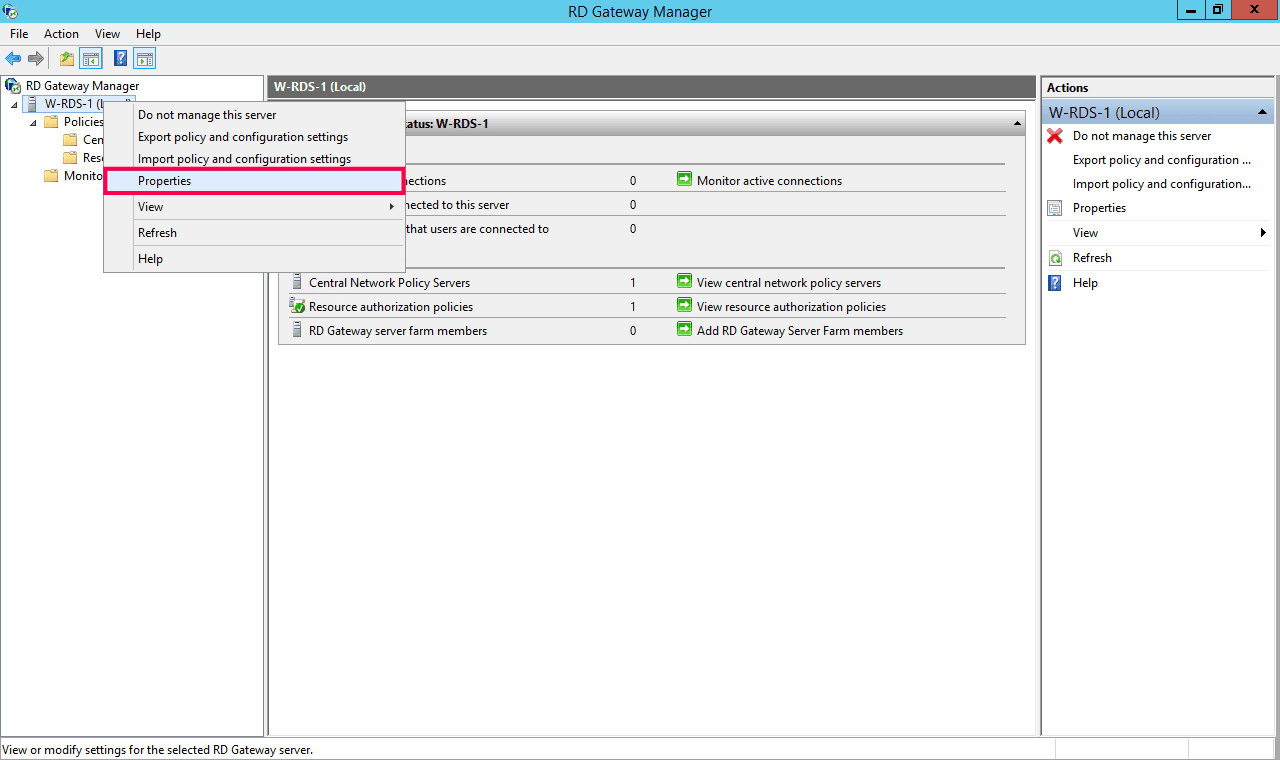
- Right-click the RDG server in the left sidebar and click Properties.
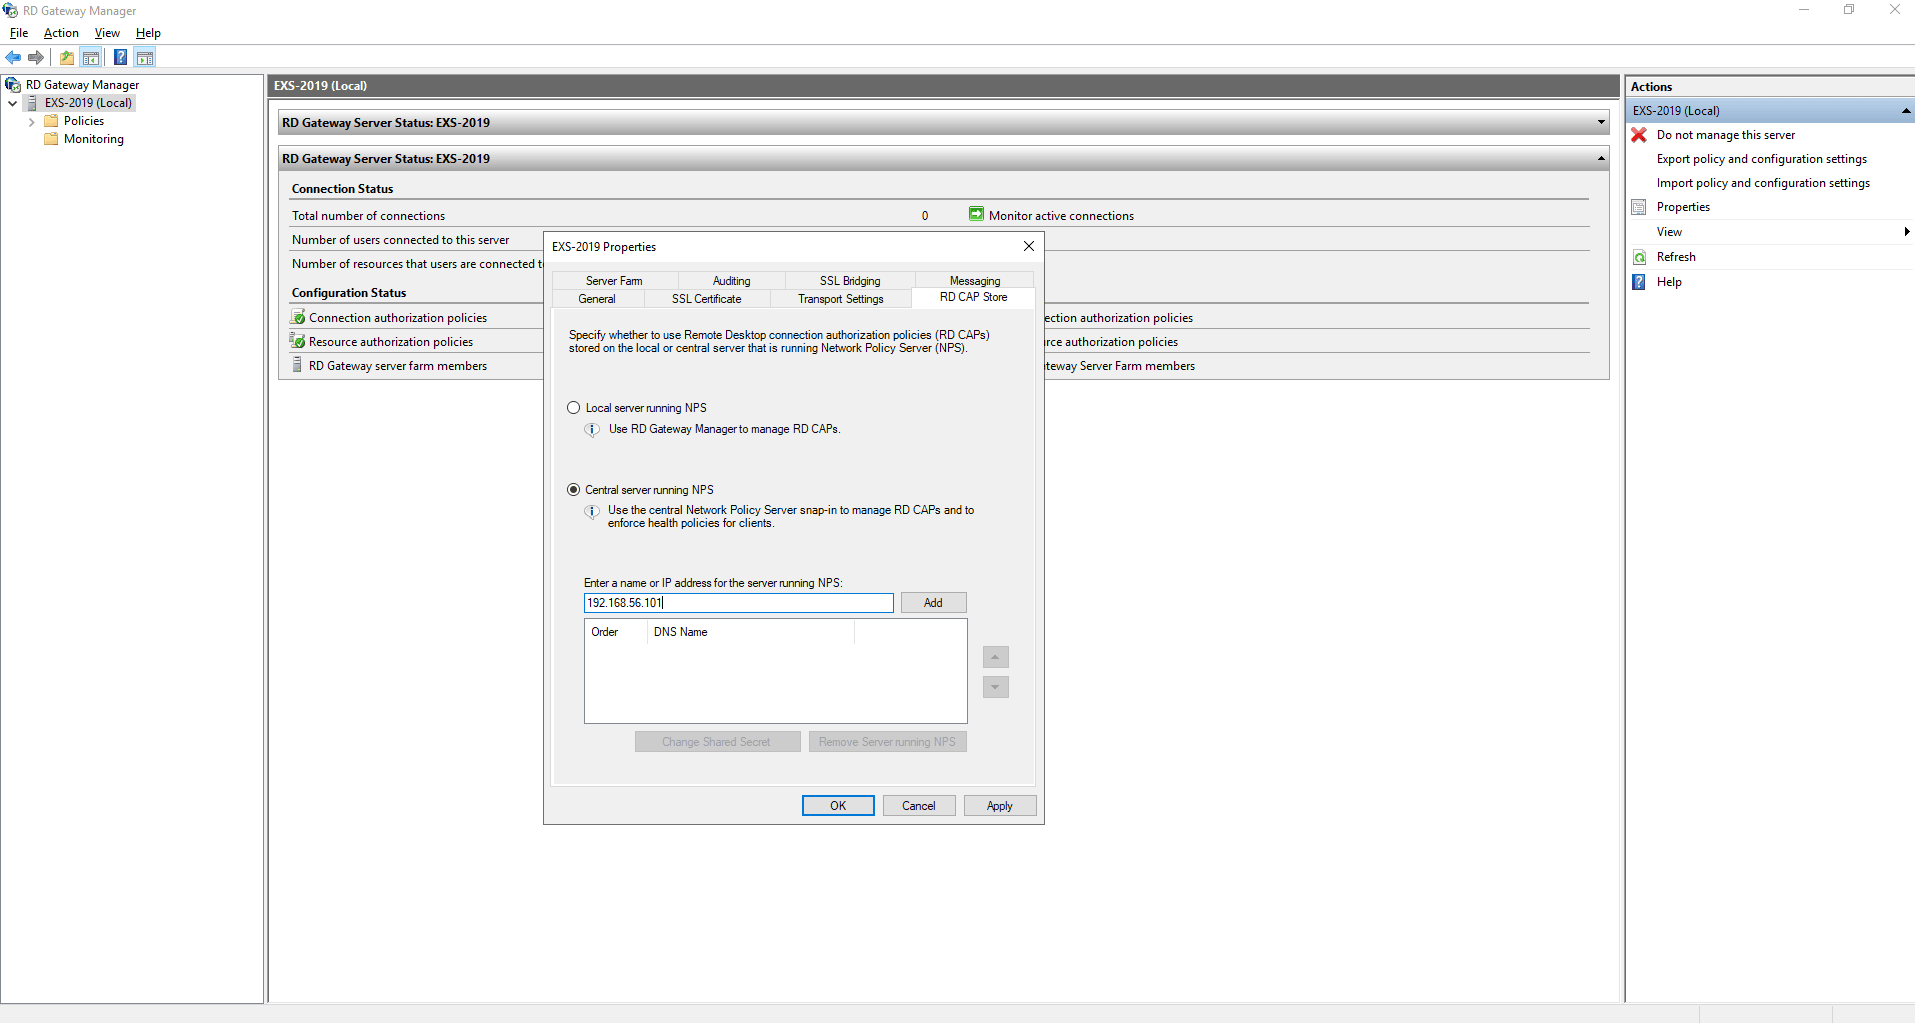
- In the pop-up window that appears, go to RD CAP Store.
- Select Central server running NPS.
- Enter the IP address of the server on which the ADSelfService Plus NPS extension has been installed (the Central NPS server) and click Add.
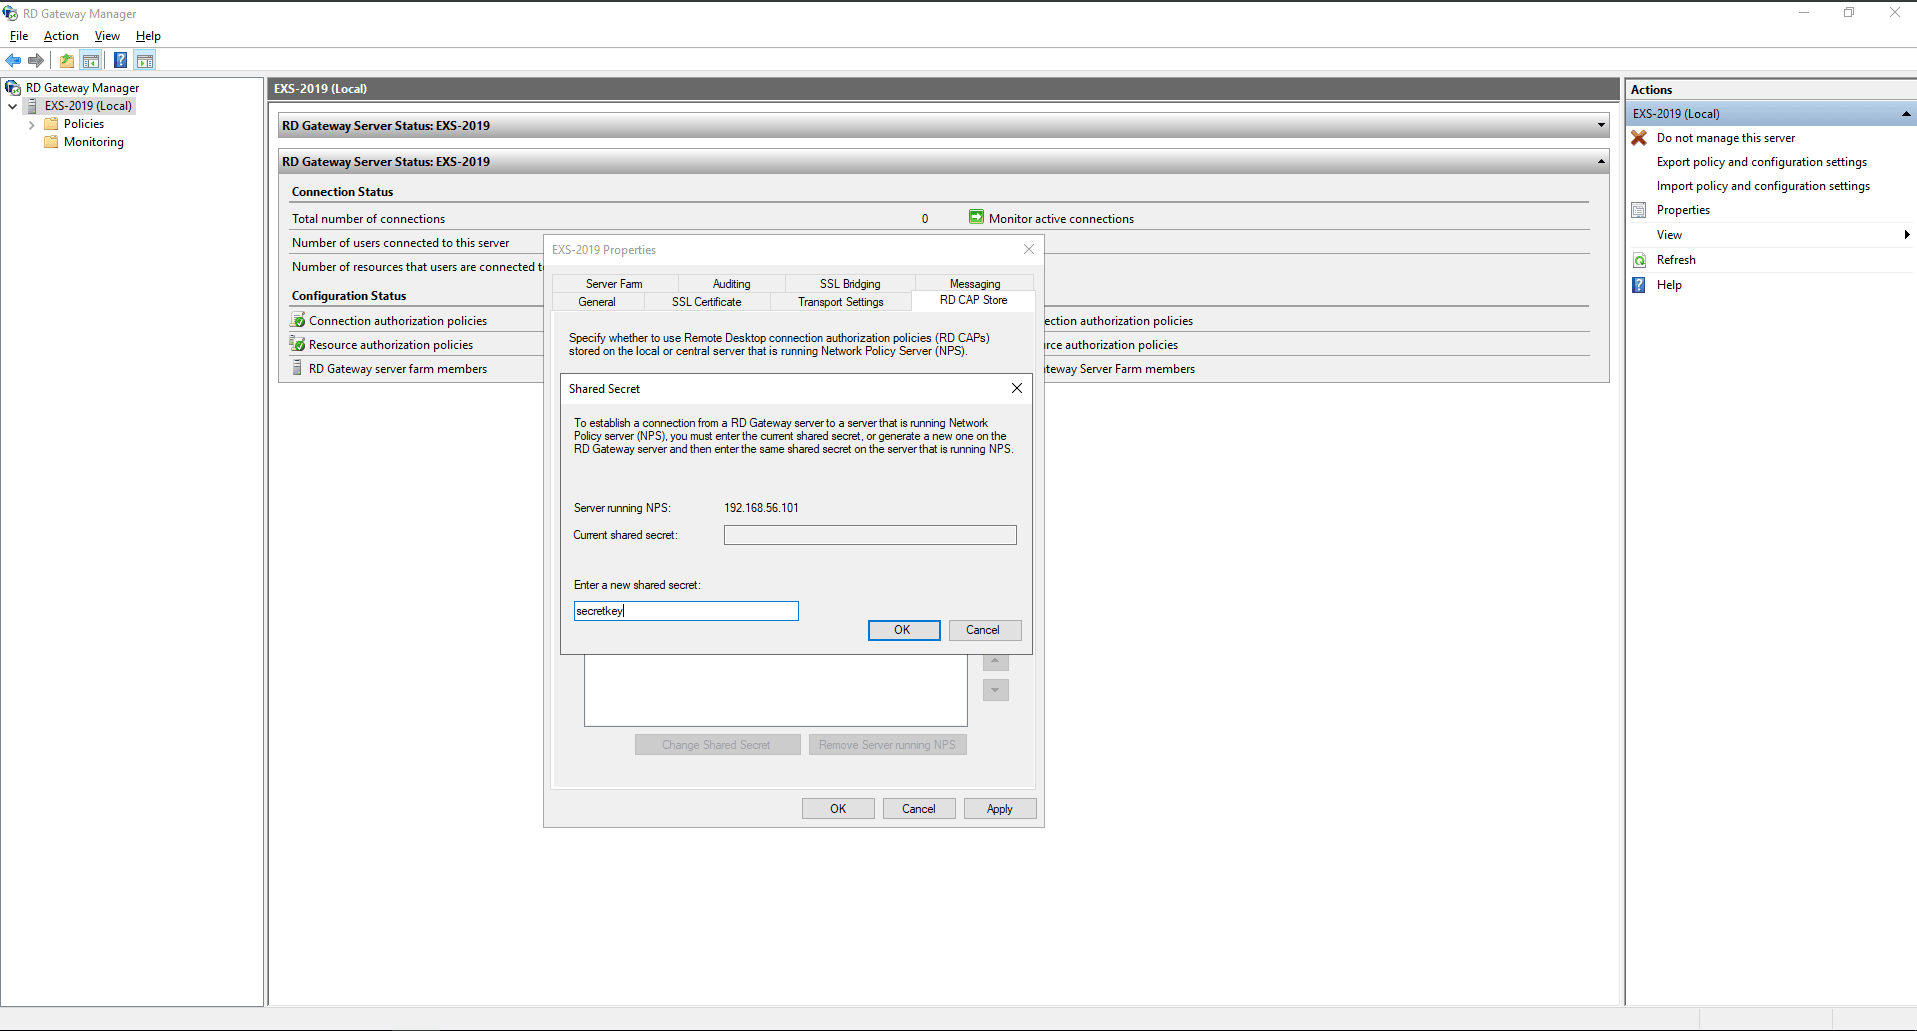
- Enter the Shared Secret that was configured while adding the RDG server as a RADIUS client to the Central NPS server in Step 2e, select Apply and OK.
- Open the Network Policy Server manager on the RDG server.
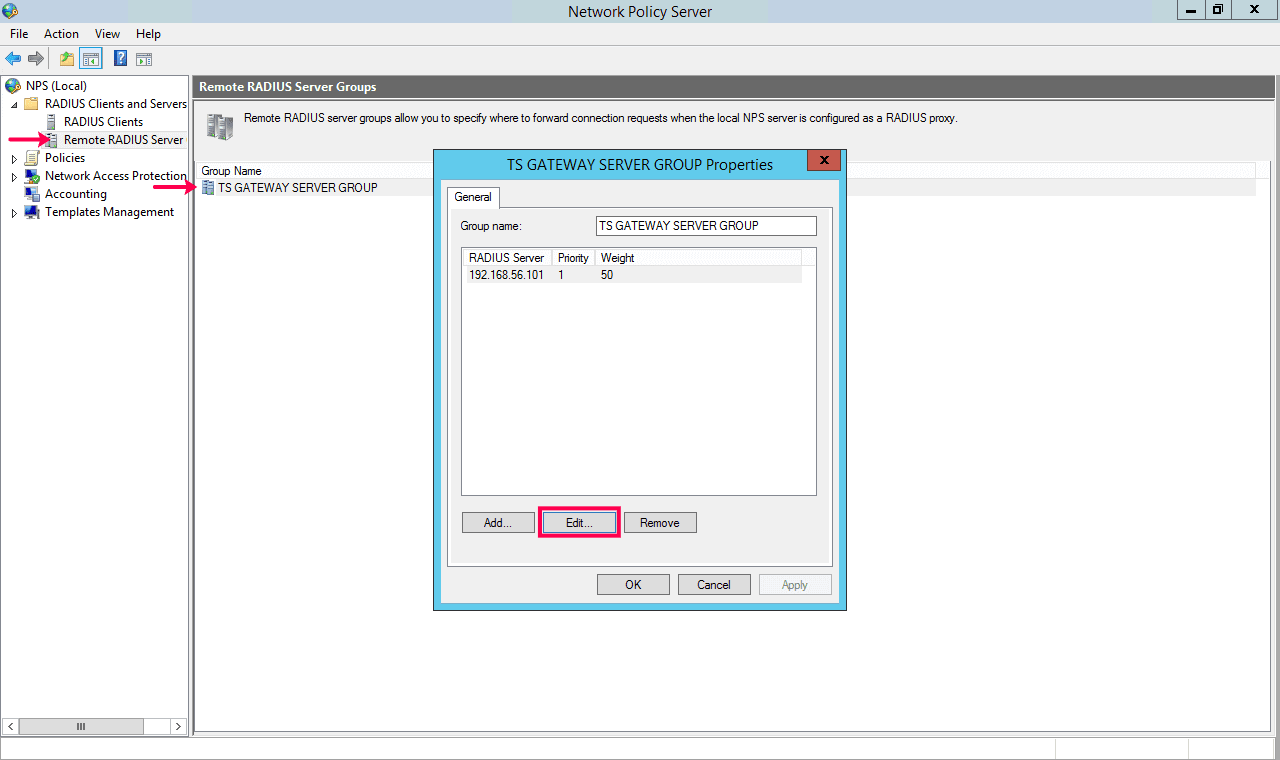
- Go to RADIUS Clients and Servers > Remote RADIUS Server.
- Right-click TS GATEWAY SERVER GROUP and select Properties.
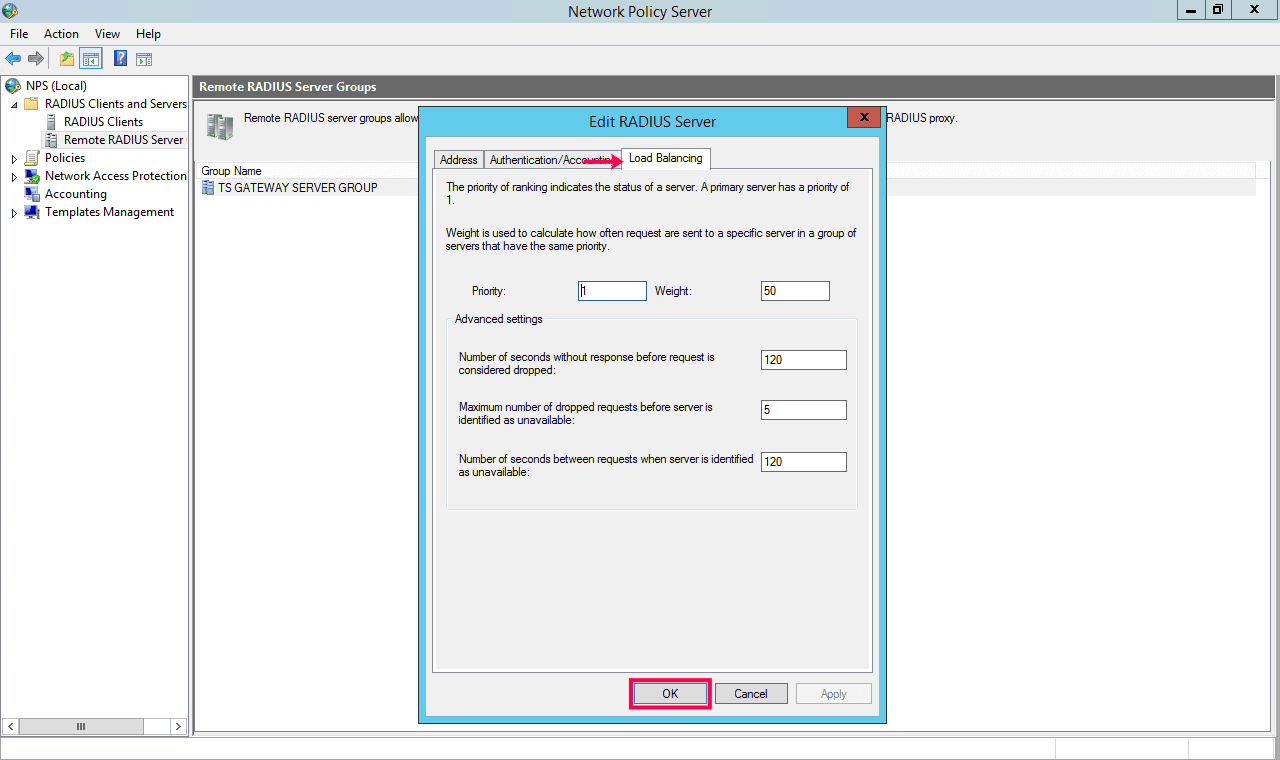
- In the window that appears, select the Central NPS server (i.e., the server where the ADSelfService Plus NPS extension has been installed) and click Edit.
- In the Edit RADIUS Server window that appears, go to Load Balancing.
- Set the timeout setting as less than or equal to the time set using the Keep the VPN MFA session valid for __ minutes option under Configuration > Self-Service > Multi-Factor Authentication > Advanced Settings in ADSelfService Plus. Ensure that the session time is at least 60 seconds.
- Click Apply and OK.
- Go to Policies > Connection Request Policies.
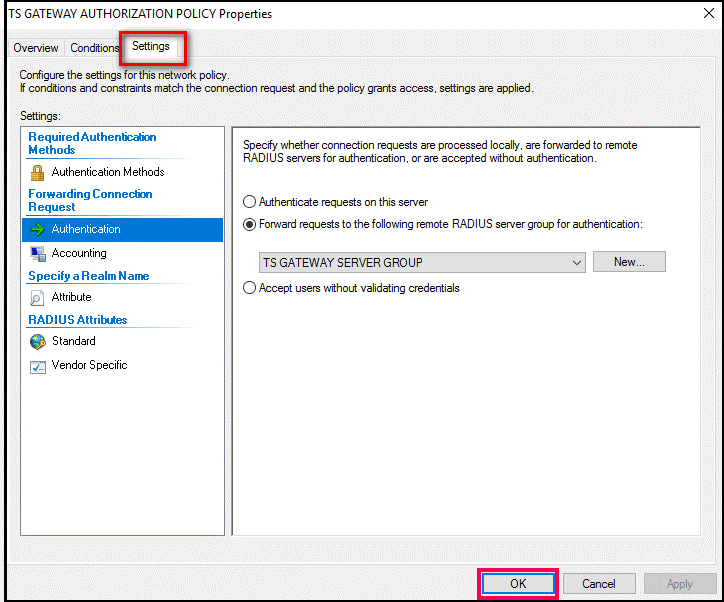
- In the section that appears, right-click TS GATEWAY AUTHORIZATION POLICY and click Properties.
- Go to Settings.
- Select Authentication and ensure that it is set to forward requests to the Central NPS server by selecting Forward requests to the following remote RADIUS server group for authentication.
- Click Apply and OK.
That's it! Now, the connection requests made to the RDG server will be forwarded to the Central NPS server for authentication, and from there to ADSelfService Plus via the NPS extension. Logins will be allowed after successful MFA verification via ADSelfService Plus.
Secure remote access through Microsoft Remote Desktop Gateway with MFA
Get Your Free Trial Fully functional 30-day trial

