User
I have purchased a 10 technician license. What is the maximum number of technicians that can be added?
You can add unlimited number of technicians in ServiceDesk Plus MSP. The license is based on the number of technician login (i.e) since you have purchased 10 technician license, only 10 technicians will be able to login to ServiceDesk Plus MSP and work with the application. The remaining technicians will be considered as Non-Login technicians.
You may wonder the purpose of these Non-Login technicians. Login permission cannot be enable to these technicians, but you can configure to send SLA violation emails, group notifications and scheduled reports to these technicians.
A typical case where Non-login technicians can be used is for your Field Technicians who need not log into the application but be notified about the issues which are assigned to them. When a Request is assigned to these technicians they will receive a notification email from ServiceDesk.
Plus in their Blackberries and when they reply to the notification email after completing their job, ServiceDesk Plus MSP appends this email into the original request automatically.
I would like to delete the default administrator account as it takes up a license? How do I go about it?
You can remove "Administrator" account from the application by following the instructions below.
- Login as a technician who has full administrative privileges on all modules of ServiceDesk Plus MSP (i.e. associated to SD-Admin role).
- Go to Admin -> Technicians. You can either delete the Administrator account or you can click on the Administrator and remove the login on selecting Yes.
Since ServiceDesk Plus MSP license is calculated based on number of technician login this will help you save a license for a technician in your organization.
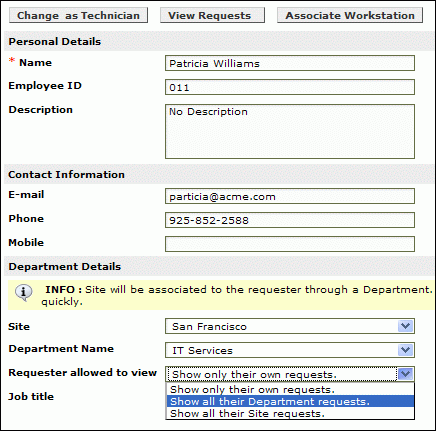
Is it possible for a requester to view all requests of his/her account without changing him/her as a technician?
Yes it is possible. Go to Admin -> Requesters -> Edit the particular requester -> In Requester allowed to view section, select the option 'Show all their account requests', which will give the requester the ability to view all the requests of his/her account.

I would like to delete a technician. But what will happen to the Requests associated to him?
When you delete a technician, all the closed Requests, will remain assigned to his name as a historic reference.
Requests in any other status (resolved, open, etc) except the closed status will move to unassigned status.
I have a technician who is no more with the organization. I do not want to delete him as there are some important data associated to him. Since ServiceDesk Plus MSP is taking up a license, is there any way to disable or de-activate his account? That way we can maintain our permitted number of technicians?
Yes, it is possible to de-activate the technician account. Since ServiceDesk Plus MSP is licensed based on the number of technician login, by removing the login you will be able to achieve your goal.
Go to Admin -> Technicians -> Edit the particular technician and -> remove the login on selecting Yes and save the configuration.
Now the old technician login account is disabled. You can add a new technician with login permission.
What is Dynamic user addition? How can I enable it?
Assume there is a new employee who has joined one of your accounts, you have created an entry for him in the Active directory of the account. But you have not imported him from AD into ServiceDesk Plus MSP, so he is not in the system yet.
All you have to do is to provide this user with the URL for ServiceDesk Plus MSP login screen. The moment the user enters his domain username, password, selects the domain he belongs to and clicks login he will be automatically added into ServiceDesk Plus MSP as a requester. This is called Dynamic user addition.
By using the Dynamic user addition feature new users are automatically added into ServiceDesk Plus MSP without performing an AD import. You can enabled or disabled this feature under Admin -> Self-Service Portal Settings.
Can requesters add tasks?
Configurations
What is Login URL for an account? What is the use of configuring a Login URL?
To create a login URL:
- Go to Admin->Accounts->Drill down the account->Enter a login URL (eg: account1).
- In the Accounts list view page, a login will be created and displayed as http://mspserver/account1
Uses of a login URL:
Requester: Give this URL to the requester for him to login
- When a requester logs-in using this URL, the account-specific images are displayed
- When a requester logs-in using this URL, the domains displayed on the login page will be specific to his account
Sys-admin for the account: Give this URL to the system administrator with the account. He can configure a URL alias eg: http://support which will point to this URL (i.e. http://mspserver/account1) so that when the requester from the account enters http://support in his browser, he will be redirected to his account specific URL.
Will domain names from all accounts that I manage get displayed when a requester tries to login?
No. When a requester logs in using an account specific URL, he will be displayed only the domains that belong to his account. To create an account specific URL for an account, go to Admin -> Accounts -> Drill down the account -> In the Login URL field, enter the account specific URL. Eg: account1 and Save.
In the Accounts List view page, the login URL is displayed as http://mspserver/account1. This is the account specific URL. Give this URL to requesters from account 1. When they use this URL in their browser, only the domains that belong to account 1 will be displayed
Can I enable both ActiveDirectory and LDAP login simultaneously?
No. Both ActiveDirectory and LDAP login cannot be enabled simultaneously. Only one of them can be enabled at a point of time.
How can I display different login images for each account?
When a requester logs in using an account specific URL, he will be displayed login images for the specified account. To create an account specific URL for an account, go to Admin -> Accounts -> Drill down the account -> In the Login URL field, enter the account specific URL. Eg: account1.
In the same page, under 'customize', you can specify images that are displayed on the Login screen and also on the top-left corner of the product after a successful login. Once you specify the images, click 'Save' In the Accounts List view page, the login URL you provided is displayed as http://mspserver/account1. This is the account specific URL for account1. Give this URL to requesters from account 1. When they use this URL in their browser, the images that you have specified under 'customize' for account 1 will be displayed to the requester
There are certain domains listed in 'Log on to' drop down menu in the initial login screen that I do not need. How do I remove these domains?
Check the domain names that are displayed when you use the account specific URL(login URL) and make note of the account under which the domains you do not need are displayed.
Click Admin -> Windows Domain Scan -> Choose the account which displays the domains you do not need. Edit the domains which you do not want to be shown in the login screen and uncheck the checkbox which says Public Domain. By this you can avoid these domains from showing up in the log in screen.
We have enabled Active Directory Authentication and requesters login into ServiceDesk Plus MSP using their AD credentials. Suppose we reset the requester password in AD, then how soon the same will be reflected into ServiceDesk Plus MSP, so that requesters will be able to login through their new AD credentials?
ServiceDesk Plus MSP does not store the AD password, it just authenticates the password with AD. While performing an AD import, ServiceDesk Plus MSP will import and store the Login information and Domain information from AD (ie) Login name and the domain to which the users belongs. So when the user enters his login name and enters the new password, the password is authenticated with AD and the user is allowed to log into ServiceDesk Plus MSP instantaneously.
Does ServiceDesk Plus MSP support LDAP? If so, how can it be configured?
Yes, ServiceDesk Plus MSP supports LDAP.
Login to ServiceDesk Plus MSP, click on the 'Admin' tab, select 'LDAP' under the 'Users' module to setup LDAP authentication.
Please find the details on how we have configured our Test machine to import users using LDAP.
| Domain Controller | : ldap://helpdesk-test1:389 |
| User Name | : CN=Administrator,CN=Users,DC=helpdesk-test1,DC=com |
| Password | : Password |
| Base DN | : CN=Users,DC=helpdesk-test1,DC=com |
| Search Filter | : (objectClass=person) |
| LDAP Server Type | : Microsoft Active Directory |
where 'helpdesk-test1' is the name of our Domain Controller .
In case if you are using Novell e-directory, you could select Novell e-directory from the drop down menu, save the settings and check whether you could import the users.
Can I schedule a periodic import of users from Active Directory?
Business Rules
What is the purpose of organizing business rules?
Organizing business rules will help us in decide the order in which the rules should be applied on the requests that are fetched by the application. Business rules have to be organized in such a way that the rules do not collide with each other (i.e) the criteria of the first rule should not coincide with the second one.
Here is a scenario which will help us understand the process better.
Scenario: The Category HARDWARE has 2 subcategories,
1) Server and 2) Workstation.
3 Business rules are configured as follows,
When a new request comes into ServiceDesk Plus MSP
- If the Category is Hardware Assign to Technician C and Group General
- If the Category is Hardware and subcategory is Workstation assign to technician B and Group Desktop support
- If the Category is Hardware and subcategory is Server assign to technician A and Group Servers.
In which order should the business rules be organized for it to work properly.
- 1,2,3
- 3,2,1
- 2,1,3
Answer -> b
Mail Server Settings
How do I setup a support e-mail address for each account?
- In your mail-server, create a user e-mail account to which all e-mails will be fetched.
- Create an e-mail alias for this e-mail account for each of your customer accounts.
- Go to Admin -> Accounts -> Drill-down an account -> Enter the corresponding mail alias in the 'support e-mail address' field. This is the address to which the requesters from an account will send their e-mail requests. Eg: support-account1@msp.com
- Once a requester sends a mail, ServiceDesk Plus MSP will fetch emails at regular intervals from your e-mail account and automatically convert them into tickets for the corresponding account.
How to let the requesters create requests in ServiceDesk Plus MSP through email directly under their corrsponding accounts by sending an email to their own organization's support email address?
- Go to Admin -> Accounts -> Drill-down an account -> Enter the 'support e-mail address'. This is the address to which the requesters from an account will send their e-mail requests. Eg: support@account1.com
- At the mail server of the said account, configure the server such that mails received on the support e-mail address (support@account1.com) are forwarded to the e-mail address that you have configured under Admin -> Mail Server Settings -> Incoming -> Email address (i.e. your e-mail address from which ServiceDesk Plus MSP will fetch e-mail requests)
- Once a requester sends a mail, it will be received at the corresponding account's support e-mail address, this will be forwarded to your e-mail address.
- ServiceDesk Plus MSP will fetch emails at regular intervals from your e-mail account and automatically convert them into tickets.
Any e-mails that are sent from the application should contain an account-specific e-mail address in the from field. How can I do this?
Go to Admin -> Accounts -> Drill-down an account -> Enter the 'support e-mail address'.
Once this is enabled, any replies to requests and notifications sent from ServiceDesk Plus MSP will contain this address as the 'from' e-mail address.
I do not want some mails to be fetched into SeviceDesk Plus - MSP such as, Out of office emails. Can this be enabled?
You can configure rules in Spam filter (Admin -> Mail server settings -> Spam Filter) in such a way that mails matching certain criteria will be fetched from the mailbox and dropped before it is fetched inside ServiceDesk Plus MSP.
If for some reason the mail fetching stops, how do I get to know about the problem immediately?
Enable the following notification which will alert you when mail fetching stops under Admin -> Notification Rules.

Notification Rules
How do I send self service login details to the user?
Click Admin -> Notification Rules -> Enable the notification which says Send Self-service login details and save the settings.
ServiceDesk Plus MSP will send self service login details to users created henceforth. ServiceDesk Plus MSP will not send in the details to users already created in the system. If Login URL for the account is configured, the mail sent will contain the account specific URL.
How do I avoid sending notification to some users or users belonging to a specific domain? (i.e) I do not want a notification to be sent for Out of Office replies.
Click Admin -> Notification Rules -> Click Edit criteria next to the following notification.

Survey
Where do I enable Survey in ServiceDesk Plus MSP?
Survey can be enabled under Admin -> Survey settings. You can configure the default values for welcome message, email content, survey success or failure message, and thank you message. You can also schedule the periodicity of conducting the survey.
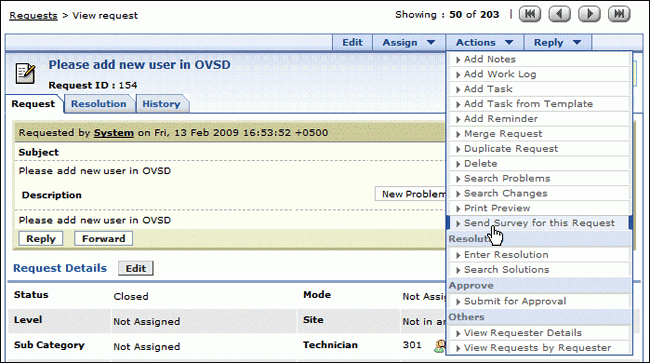
Is it possible to manually send survey for a request?
Yes it is possible. Once a request is closed click on the Actions button -> Send Survey for this request.

Helpdesk Customizer
I have deleted a category and it is grayed out now. How do I reactivate this category?
Click on Edit button beside the grayed out category -> Uncheck the checkbox 'Category not for further usage' and save the configuration. This will reactivate the category.
The same procedure can be followed to reactivate a Subcategory or an Item.
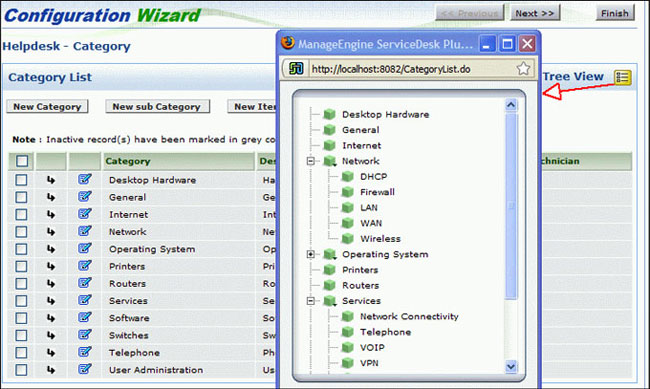
Where can I view all the Categories, Sub-categories and Items configured in ServiceDesk Plus MSP in a single page?
The Category Tree View helps you accomplish this goal ! You can view all Categories, Sub-Categories and Items configured in ServiceDesk Plus MSP.
Go to Admin -> Helpdesk Customizer -> Category -> at the extreme right corner of this screen you have the Tree view icon -> click on this icon to display all the Category, Sub category and Item in ServiceDesk Plus MSP.

Was your question answered here?
Check the other FAQ modules or you can contact our support team at msp-servicedeskplus-support@manageengine.com