Theme Settings
You can modify theme settings to customize the application's default color, font, and browser title. You can choose to apply the theme settings for all users or allow each user to select their preferred color and font. This is an instance-specific configuration.
Role Required: SDAdmin for instance-wide configuration.
Customizing Application's Colors and Fonts
Color customization is available for the application's body background, header background, texts, tabs, and buttons. Font selection is common for all UI texts.
To modify the color theme:
1. Navigate to Admin  > General Settings > Theme.
2. Under the Theme tab, do one of the following.
Use preset color combination:
-
To select a preset color combination, click one of the four preset colors and then click Save.
Use custom color combination:
-
To select a custom color combination, click Custom Colors.
-
Click the color selection box against the UI element you want to customize.
-
Choose a preferred color from the color gamut.
-
Finally, click Save.

Font Customization
You can customize the application font by selecting your preferred font from the font list. The font list is a subset of fonts available in the font library that includes both preloaded fonts and custom/third-party fonts that you have added.
To change the font used in the application,
1. Go to Admin > General Settings > UI Customization > Theme.
2. Select your preferred font from the drop-down list under the Font section.
3. Finally, click Save.
Upload Fonts
To upload a new font to the library,
-
Go to Admin > General Settings > UI Customization > Theme.
-
Click Customize on the Font section header.
-
In the font customization pop-up, click Add.
-
To add a font from the OS library:
-
Specify the name of the font that you want to add.
-
To add a font that is not available in the OS library
-
Provide a unique name for the font.
-
Upload the required file in the supported format.
-
Finally, click Add.
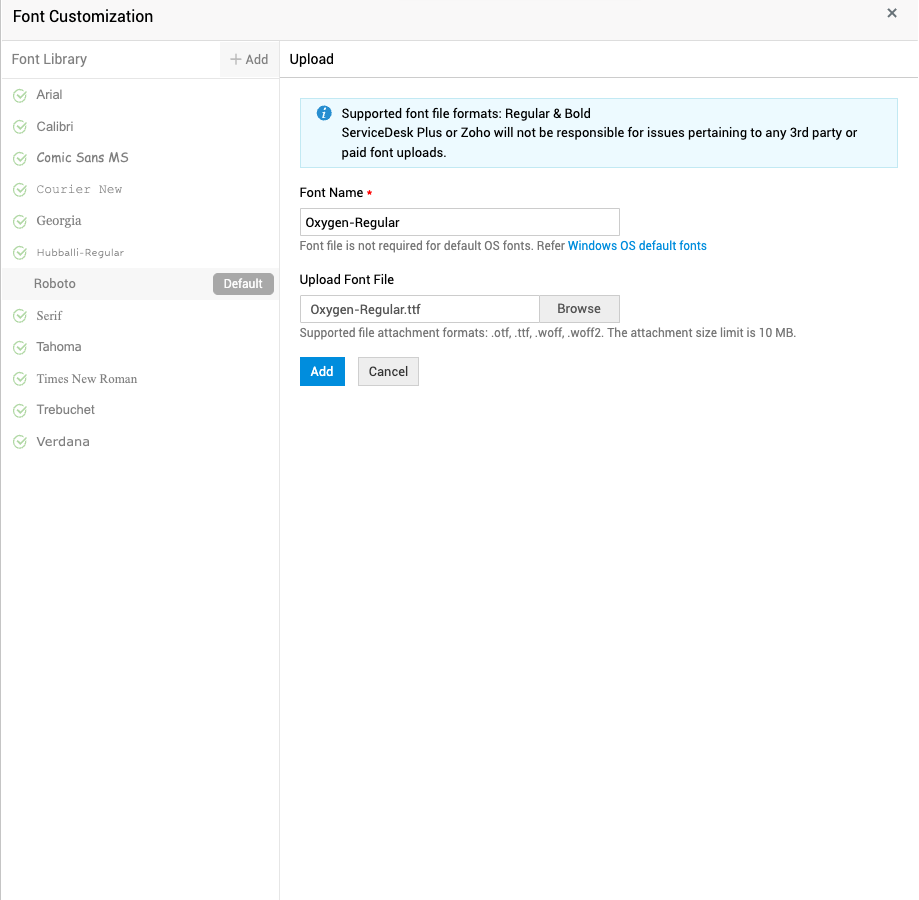
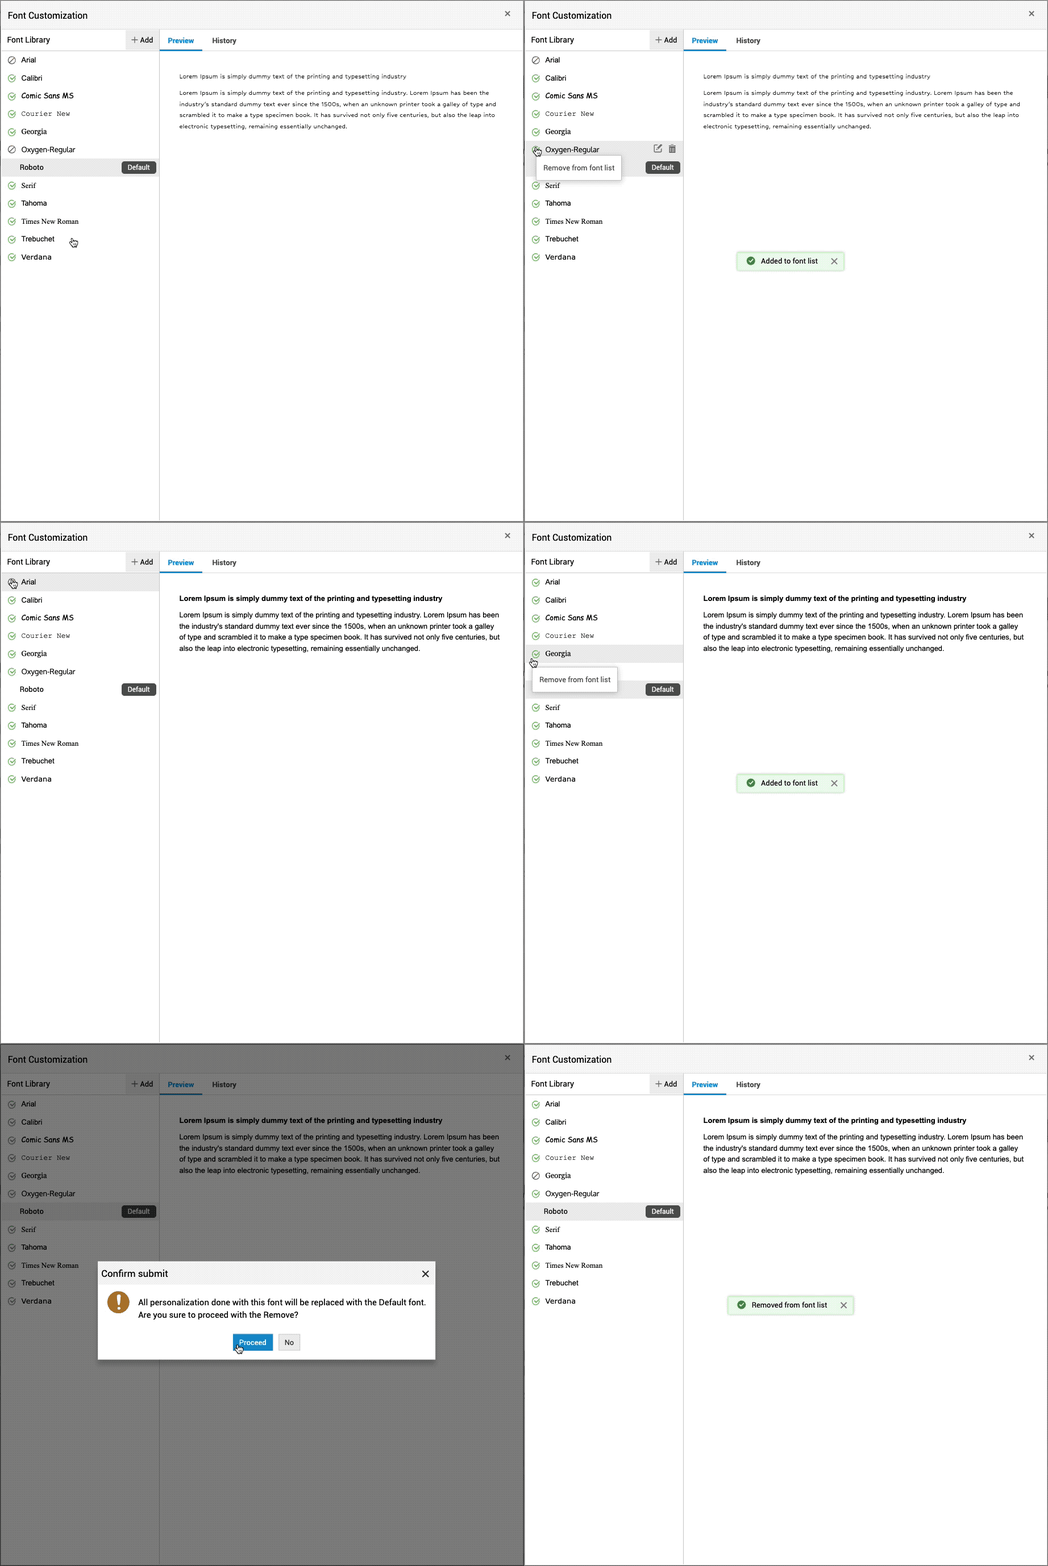
Once the font is added to the library, it will be shown on the left pane. By default, the newly added fonts will be in the disabled state and will not be available for use. To make it available for use, click the status-switch icon against the name of the font. Theicon indicates that the font is enabled for use and the
icon indicates that the font is not available for use.
Note:
When a font is disabled, all customizations applied using the font will be removed and replaced with the default font.
The default font is indicated with the label against the name and it cannot be modified.
Font Preview
To preview a font,
-
Go to Admin > General Settings > UI Customization > Theme.
-
Click Customize on the Font section header.
-
In the font customization pop-up, click the name of the font you want to preview and then go to the Preview tab on the right-side pane.
Edit fonts
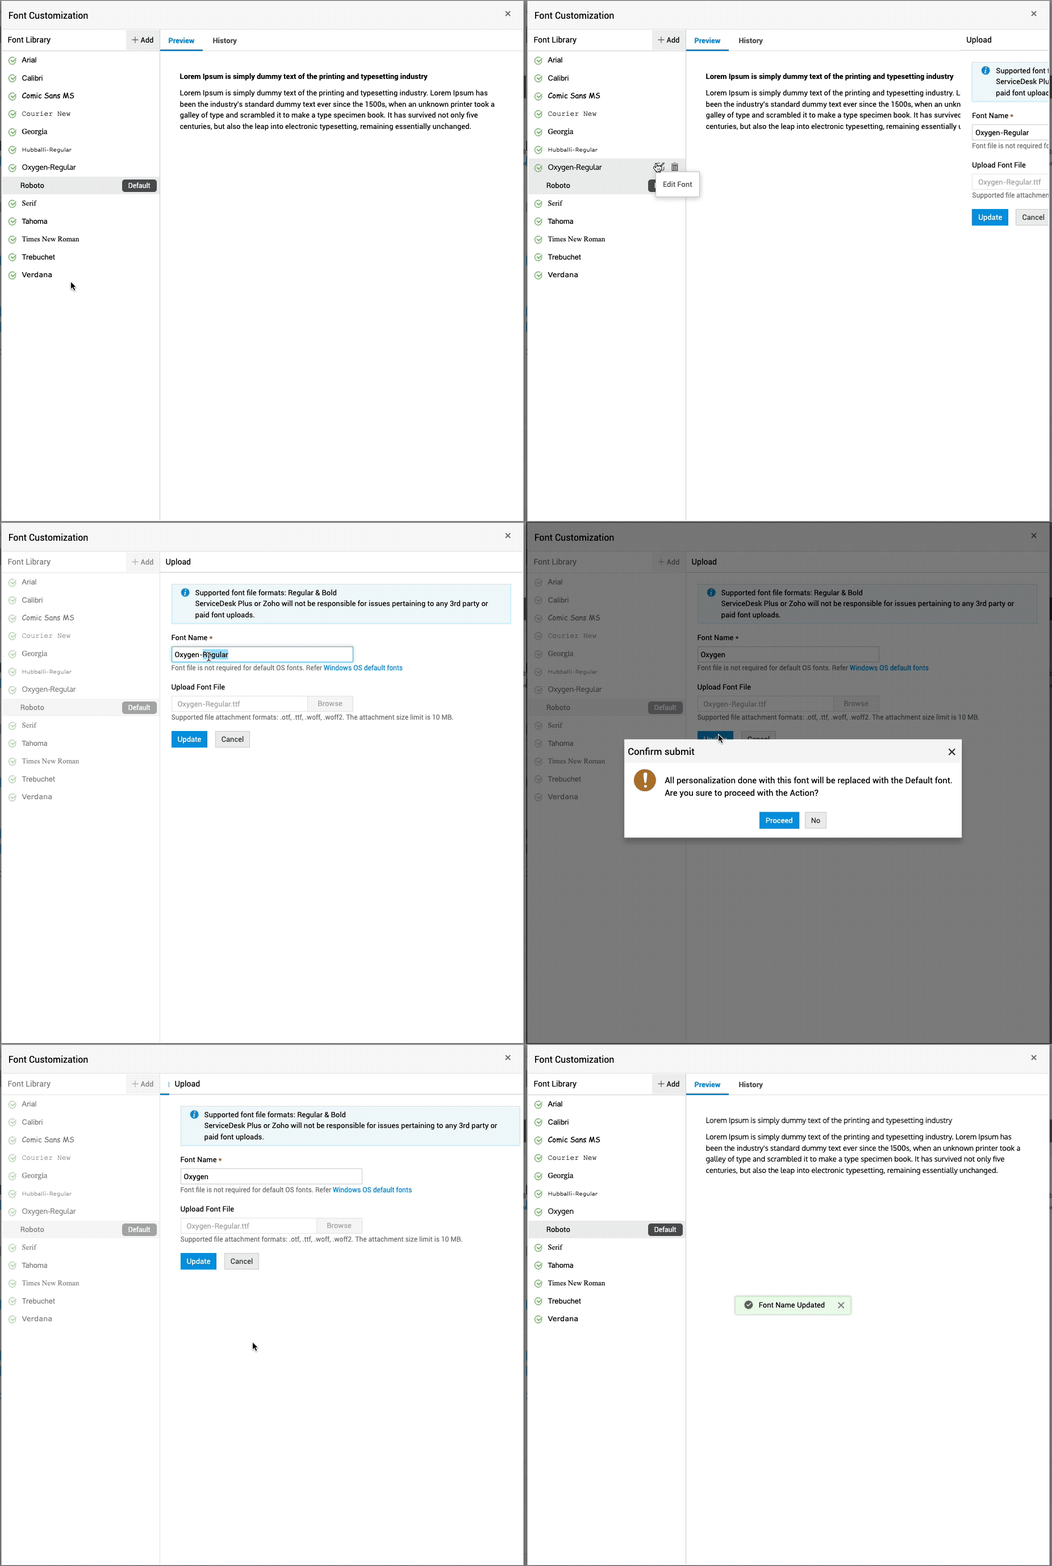
You can edit the font name or upload a new font file for the fonts that you have added to the library.
To do this,
-
Go to Admin > General Settings > UI Customization > Theme.
-
Click Customize on the Font section header.
-
In the font customization pop-up, hover over the custom font that you want to edit and click Edit Font.
-
Make the necessary changes.
-
Click Update.
-
Finally, click Proceed to confirm your action.
Notes
Preloaded fonts cannot be edited.
When a font is edited, all customizations applied using the font will be removed and replaced with the default fault.
Delete Fonts
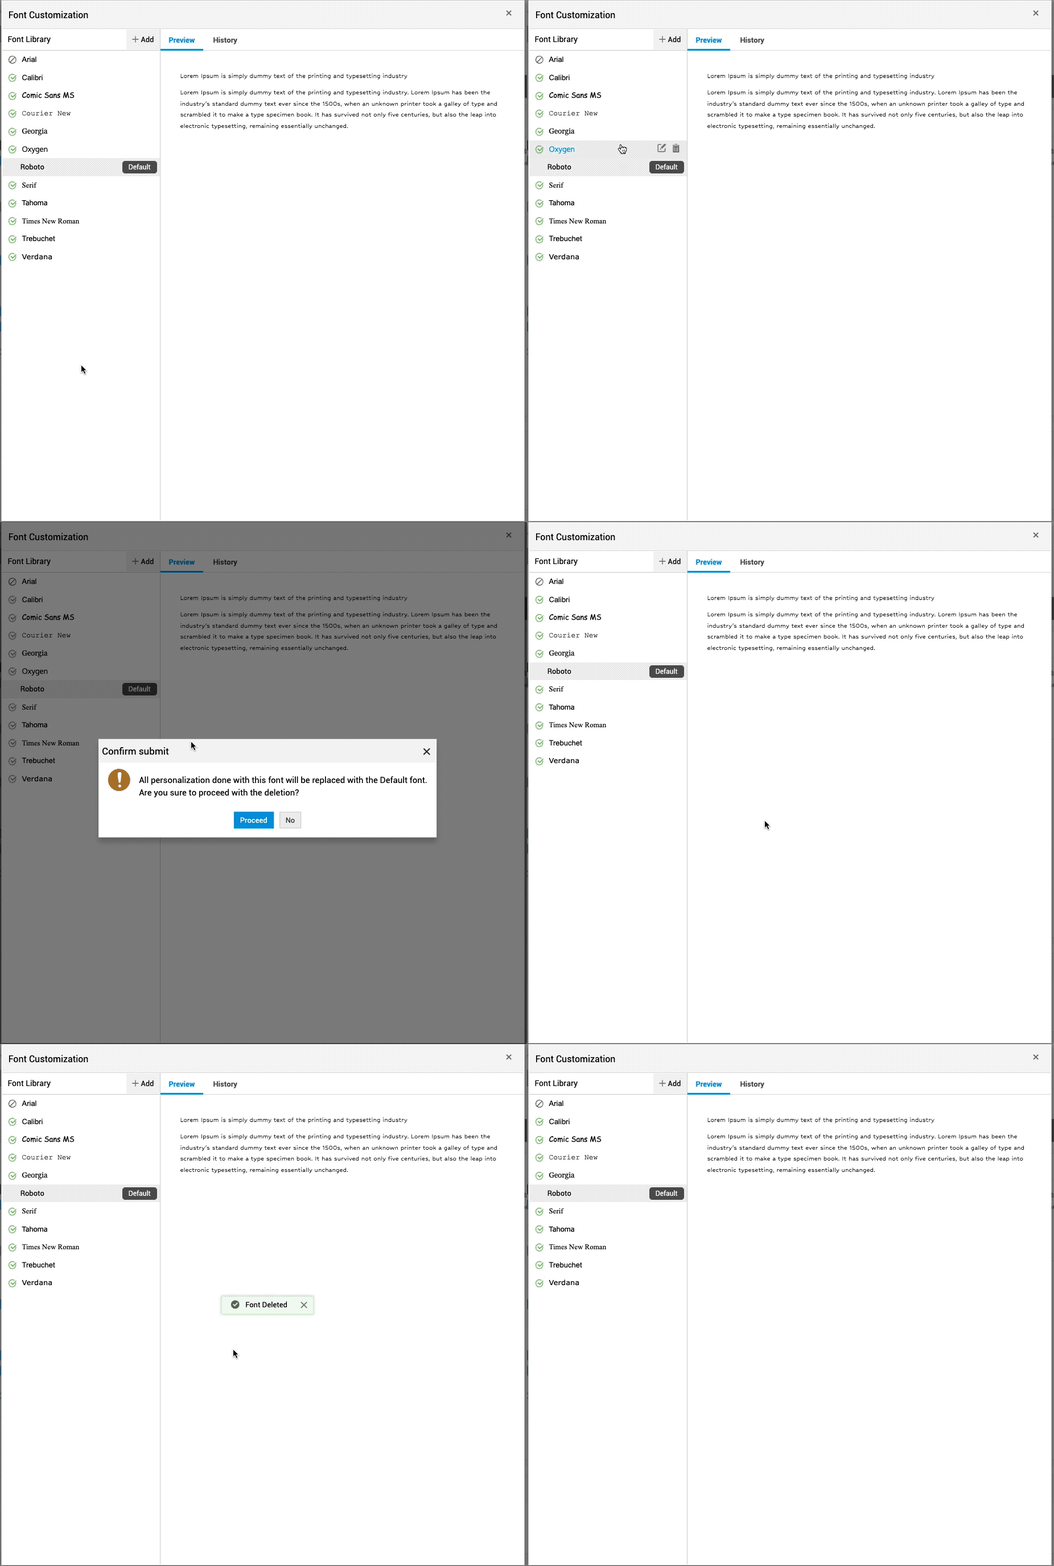
You can delete fonts that you have added to the font library.
To do this,
-
Go to Admin > General Settings > UI Customization > Theme.
-
Click Customize on the Font section header.
-
In the font customization pop-up, hover over the custom font that you want to delete and click Delete Font.
-
Finally, click Proceed to confirm your action.
Note
Deleting preloaded fonts is not supported.
When a font is deleted, all customizations applied using the font will be removed and replaced with the default fault.
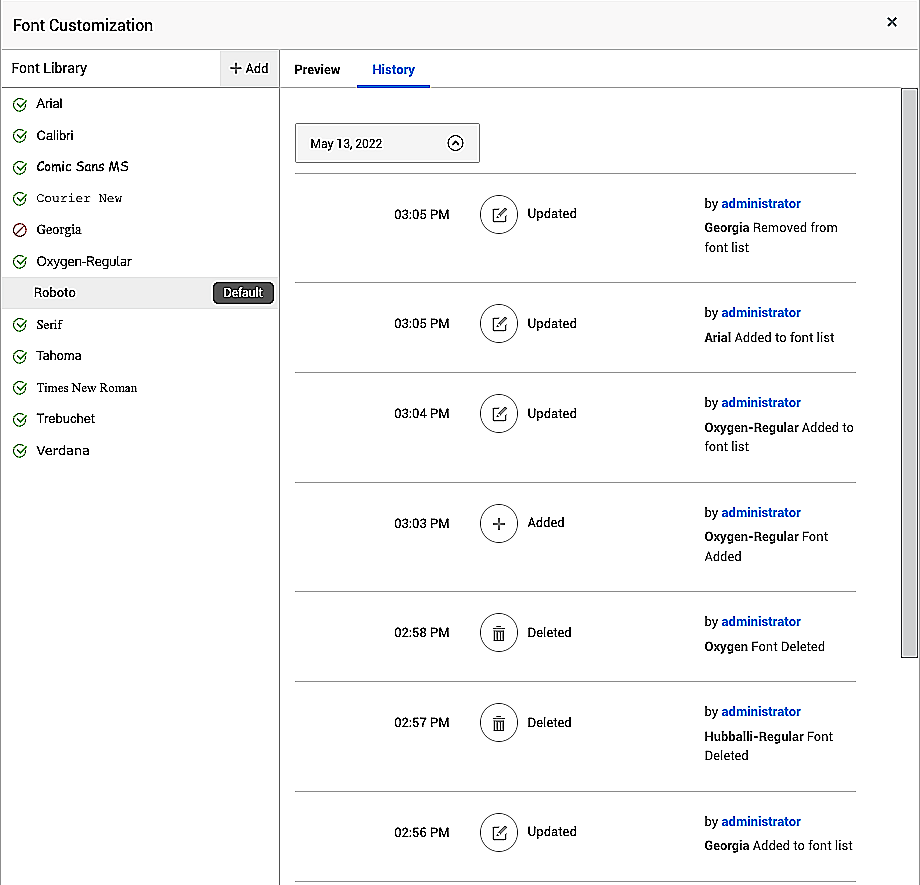
Font Library History
Changes made to the font library such as adding to the font list, removing from the font list, adding font, deleting a font, etc are recorded in history.
To view font library changes,
-
Go to Admin > General Settings > UI Customization > Theme.
-
Click Customize on the Font section header.
-
In the font customization pop-up, click History on the right-side pane.
Note
You can preview your customizations using the interactive preview on the right side.
SDAdmin can permit any user to customize the application's color and font.
Make sure that the checkbox Allow other users to personalize their theme and font is enabled to permit all users to choose their preferred color and font. When the checkbox is enabled, technicians and requesters can personalize color and font from their respective portals. Click the appropriate links below to learn more.
-
Technician personalization (All technicians and users with SDAdmin Role)
Browser Title Customization
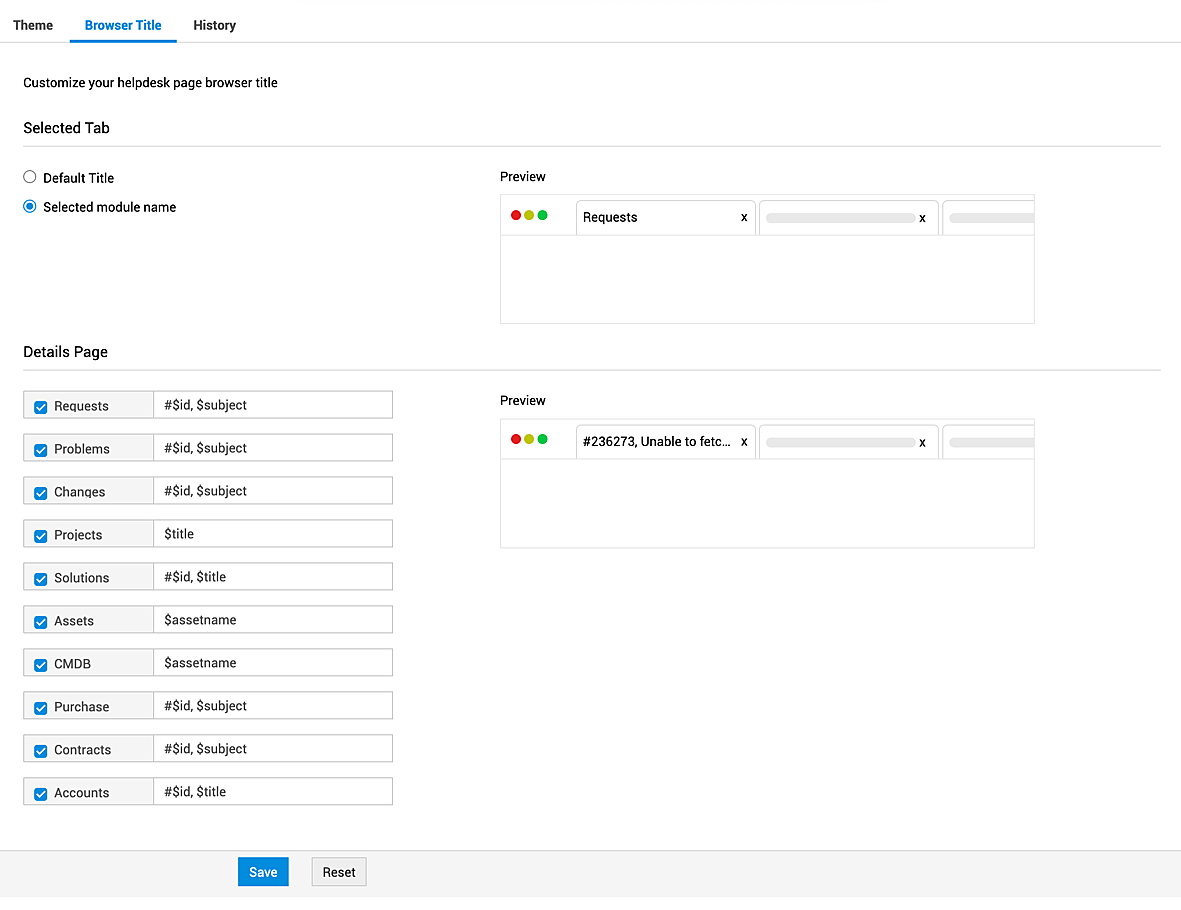
The default browser title can be customized to display the selected module name. For details page, the browser title can be configured to display customized dynamic titles using variables such as request id, asset name etc.
To customize browser title:
1. Navigate to Admin  > General Settings > Theme.
2. Under the Browser Title tab, choose Default Title or Selected Module Name. The former sets the title to "ManageEngine ServiceDesk Plus MSP" and the latter sets the title based on the module name of the current page. For example, if the current page is in Admin module, then the title will be Admin.
3. You can also configure titles of details page separately. To do this, click the respective checkbox and enter the custom title. Add variables using the dollar sign for dynamic custom titles. For example, if you want the browser title of the request details page to display request id and subject enter #$id, $subject in the text box. Below is the module-wise list of supported variables available for browser title customization.
|
Module |
Supported Variable(s) |
|
Requests |
$id, $subject |
|
Problems |
$id, $subject |
|
Changes |
$id, $subject |
|
Projects |
$title |
|
Solutions |
$id, $title |
|
Assets |
$assetname |
|
CMDB |
$assetname |
|
Purchase |
$id, $subject |
|
Contracts |
$id, $subject |
|
Accounts |
$id, $title |
4. Finally, click Save.
Note:
- Browser title customization is common for all users.
- The browser title preview is displayed on the right-side.
Configuration History
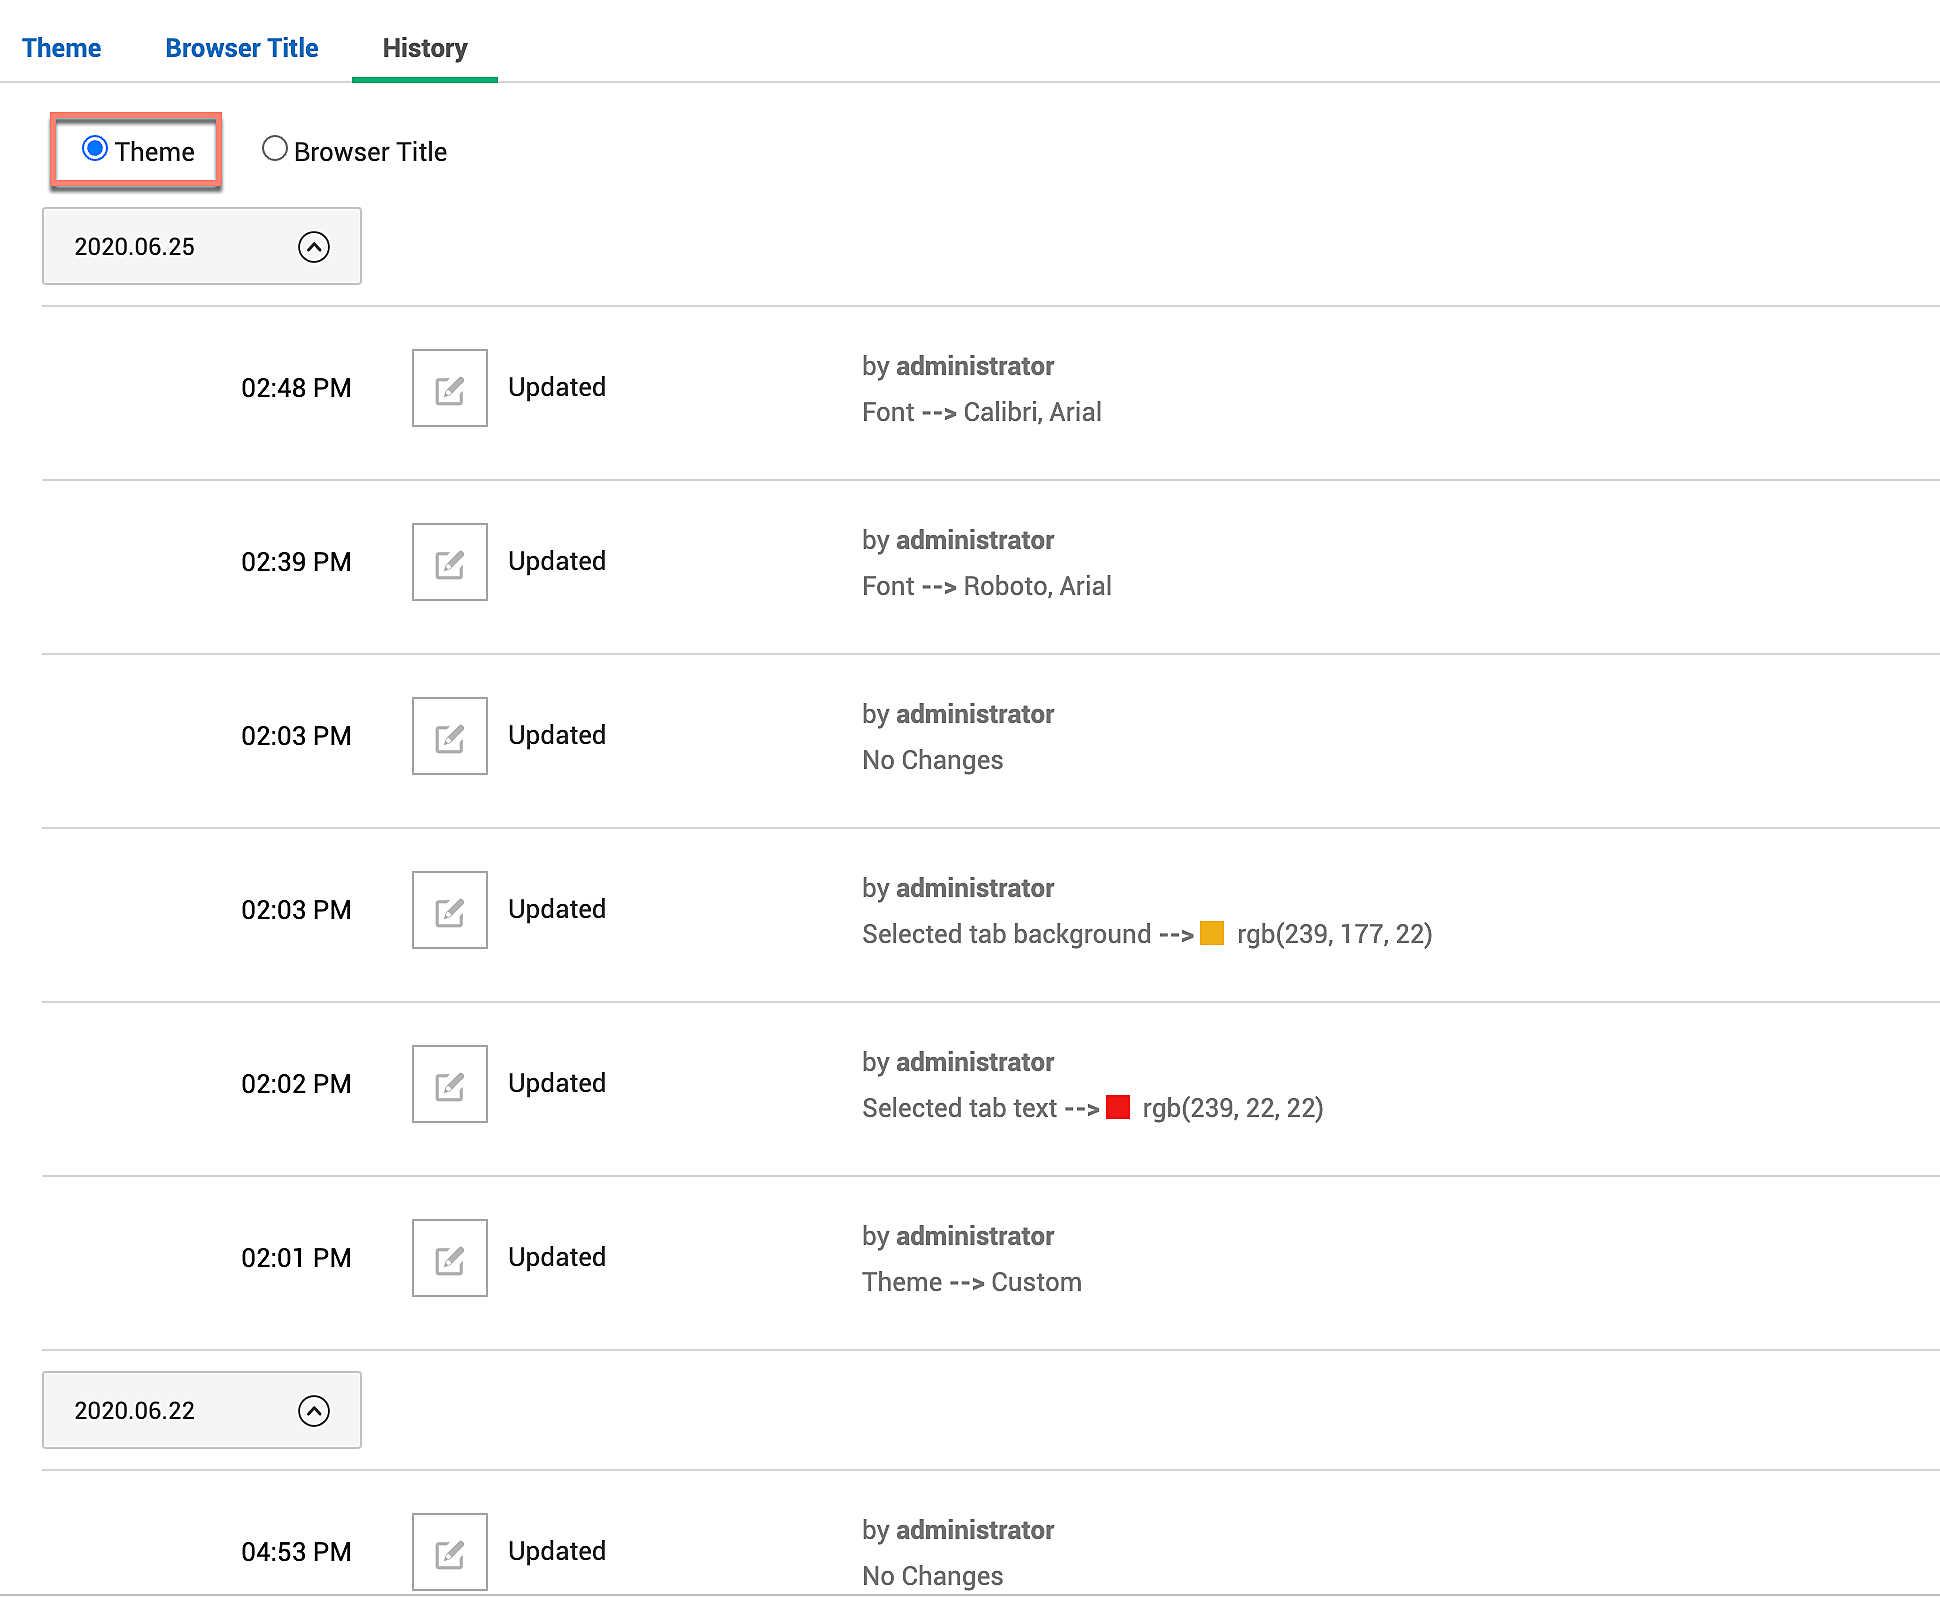
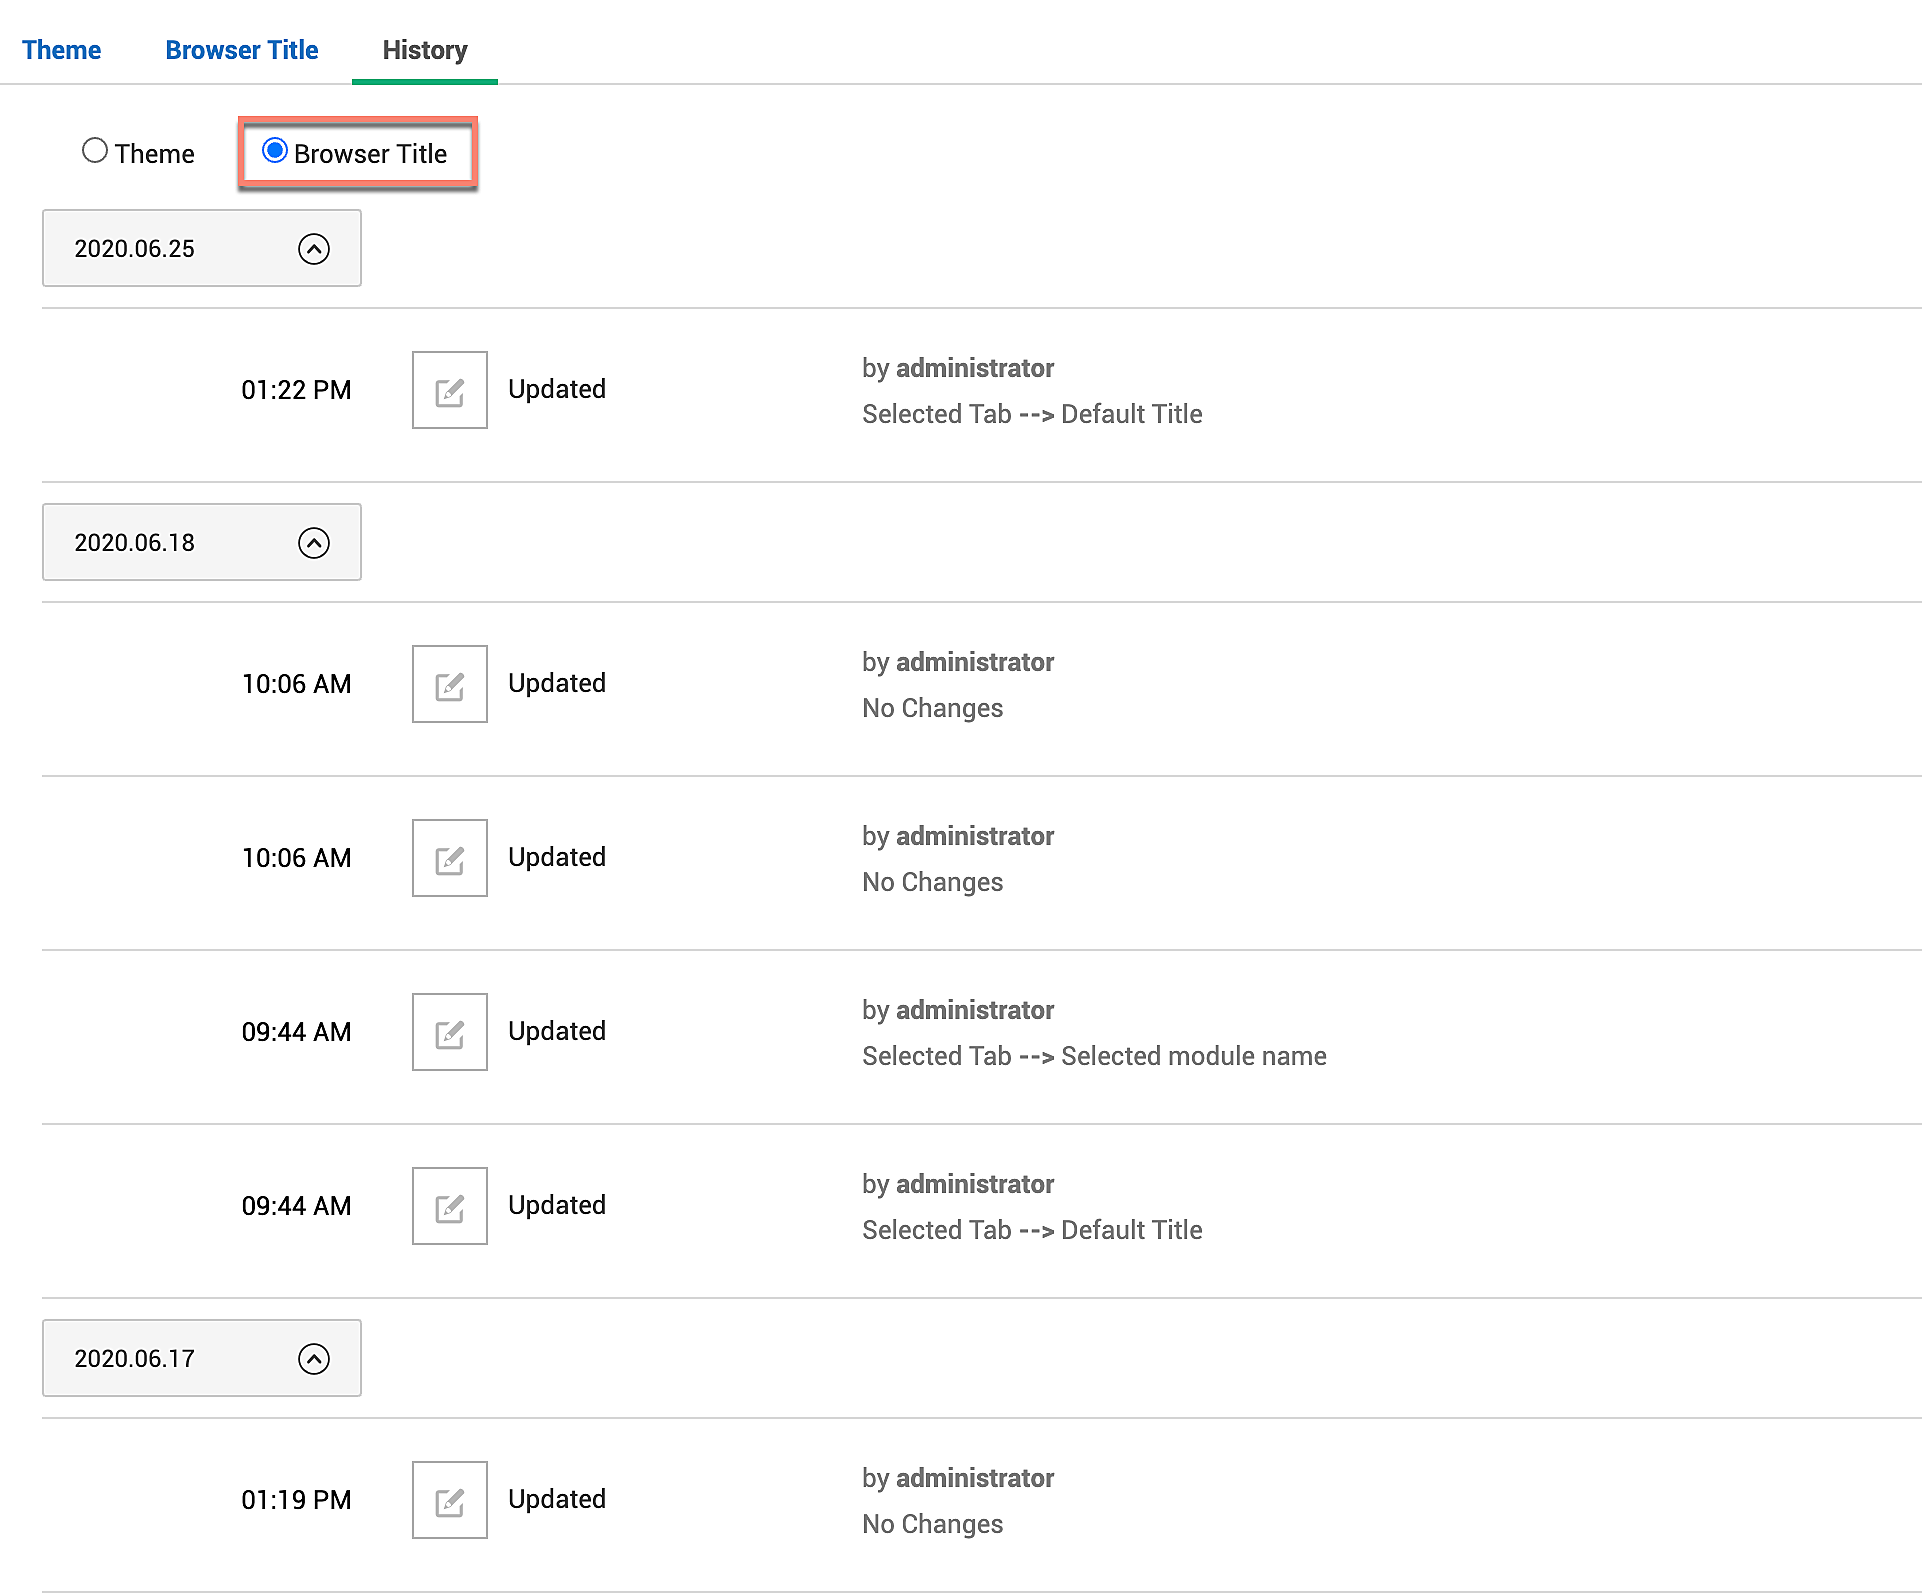
All color, font, and browser title changes are recorded by the application. You can access it under Admin  > General Settings > Theme > History.
To view history of color and font changes, click Theme radio button.
To view history of browser title changes, click Browser Title radio button.
Note:
Only instance-wide changes are recorded in the history. User-specific changes are not recorded.

