
Configuring Business Rules for an MSP's site
You can define Business Rules for various sites of your organization. Business Rules enable you to organize incoming requests (via web form and e-mail) and perform actions such as delivering them to groups, assigning status and other request parameters. Business Rule can be applied to a request when it is created (or received), edited or both. Notification can also be sent to the technicians once the Business Rule is executed.
To open the Business Rule configurations page,
-
Login to the ServiceDesk Plus - MSP application with admin username and password.
-
Click the Admin tab in the header pane.
-
On the MSP Details block, click Organization Details
 icon.
icon. -
Click on 'MSP Business Rule' from the menu on the left side to open the MSP Business Rules page
|
|
Note: The Site Admin can add and view the business rules to the site which he is associated. To view the business rules of a site, select the site from the Business Rules for combo box. |
To add a Business Rule,
-
Select the site to which you want to add the business rule from the Business Rules for drop-down list.
-
Click Add New Business Rule link available at the top right corner of the Business Rules List page.
-
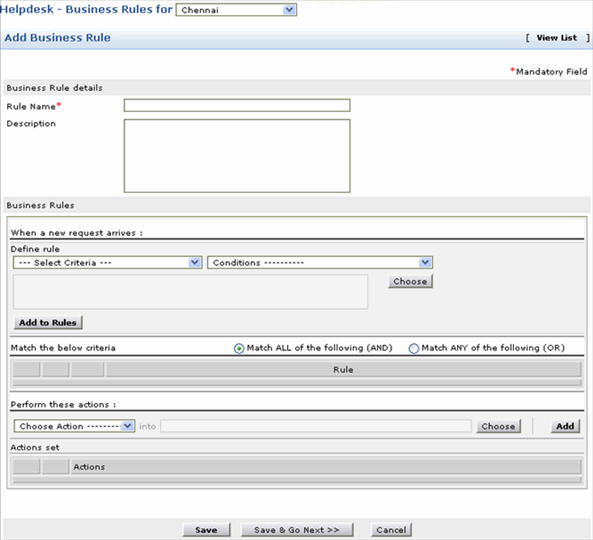
The Add Business Rule form consists of three blocks to be configured namely, Business Rule Details, Criteria and Actions and Notification.
Business Rule Details
The details of the Business Rule are exclusively for the newly added business rule.
-
Specify a unique Rule Name in the given text field. It is a mandatory field.
-
The Site selected in Business Rules for drop down box is displayed as non-editable text.
-
Provide the content to describe the business rule in the Description text field.
-
Business Rule can be executed on a request when it is created via web form (or received via email), edited or both on choosing the options from Execute when a request is drop-down list. By default, the 'Created' option is selected.
-
You can disable a Business Rule by selecting Disable Business Rule check box. On disabling a Business Rule, the rule will not get executed on any new or edited request. The disabled business rule will be marked in grey in the list view.
-
By default, the execution of the business rule will stop once a rule is applied on a request. To continue execution of successive business rules even after a business rule is applied on a request, select Turn on Cascade Execution check box.
-
By default, when a business rule is applied, the request values will be changed with the values in the business rule only if the request value is empty. If the request value is not empty, the business rule value will not be applied. To override the request values with the values in the business rule enable Override request values with Business Rule values.
Example: If the Priority in a request is set to 'High' and the Actions Set in the business rule is 'Set Priority to Low', then the priority is automatically set to 'Low' when the business rule is applied.
|
|
Note: Bulk actions such as delete, disable/enable business rules, turn on/off cascade execution can be performed on a business rule by selecting the check box beside the business rule and click Actions drop down button. To turn on/off cascade execution to a business rule from the list view, click the icon |
Criteria and Actions
Under this block, define the rules and criteria that need to be satisfied by the incoming request.
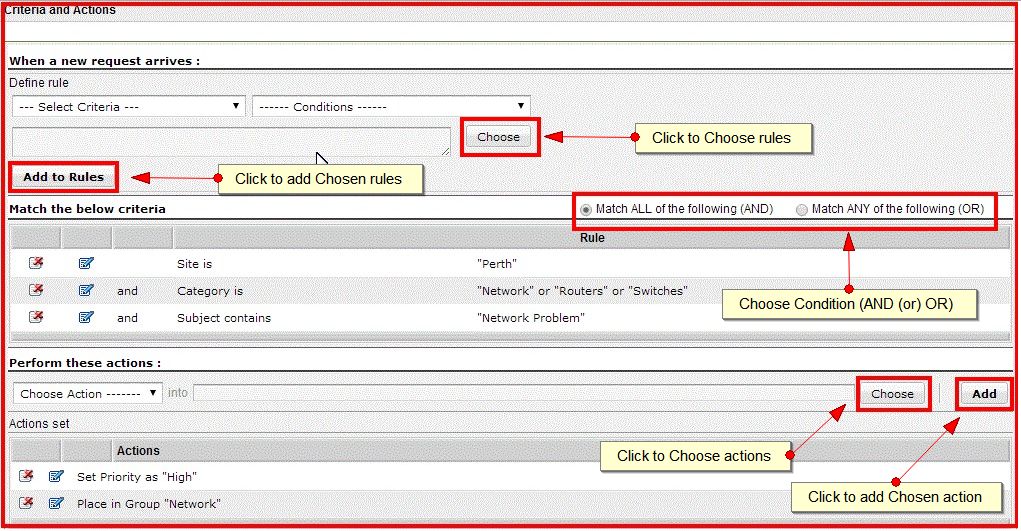
-
Select the Criteria and Condition from the respective drop-down list, and then the individual values that needs to be matched by clicking the Choose button. The values from the database for that particular parent criteria that you chose from the drop down list opens. Choose the values you want and click Ok.
Example: If you want to match the requester name John, then select Requester Name in the Select Criteria drop down box. Now select the condition is or is not from the drop down list. The list varies for each criteria. Click Choose button to open the list of requesters in a pop-up window. Select the requester name from the list and click Ok. For multiple selection, press Shift or Ctrl key while selecting the names. The selected names appears in the text box just beside the choose button. -
Click Add to Rules to add the defined rule to the rules table.
-
By default, the radio button Match ALL of the following is selected. If you do not want all of them to be checked but if it is enough if any one of the rules are matched, then select the radio button Match ANY of the following.
-
After defining the rules, you need to define the actions that need to be performed on the request matching the criteria. Choose the action from the Choose Action drop down list.
-
Click Choose button to select the values for the chosen action.
Example: If the action you had chosen was to Place in Group, then click the Choose button to display the list of groups available in the corresponding site. Select the group to which the request has to be placed and click Ok. -
Click Add to add the action in the actions table.
Notification
You can send Email and SMS notification to technicians once a business rule is applied.
Caution: Configure Mail Server Settings before enabling Notification.
To enable Email notification,
-
Select the check box beside Email. Click Add to select the list of technicians from Select Assign to Technicians pop up window. Click Ok to add the technicians.
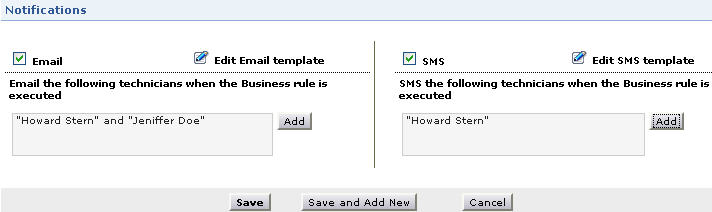
To enable SMS notification,
-
Select the check box beside SMS. Click Add to select the list of technicians from Select Assign to Technicians pop up window. Click Ok to add the technicians.
To edit the Email Template,
-
Click Edit Email Template link to open the email template form. Make the required changes in the Subject and Message text field. Click Ok.
Click Save. If you want to add more than one business rule, then click Save and Add New. At any point, if you do not wish to add the business rule and would like to get back to the business rules list from the add business rule form, click Cancel.
To edit an existing business rule,
-
In the Business Rules List page, click the edit icon
 beside the Business Rule Name that you wish to edit.
 -
In the Edit Business Rule form, you can modify all the fields mentioned in the add business rule form.
-
To edit the Match the below criteria set, click the edit icon
beside the individual criteria. The respective selection window is opened in a separate pop-up. You can choose more values or remove a few values by de-selecting them. -
You can also delete a criteria completely. To delete a criteria, click the delete icon
 beside the individual criteria.
 -
In the actions to be performed, you can add new actions, edit or delete the existing actions.
-
Click Save to save the changes performed. At any point you wish to cancel the operation that you are performing, click Cancel. Even while editing a business rule, if you wish to add another new business rule, then click Save and Add New button.
-
From the Business Rule List page, enable the check box beside the Rule Name you wish to delete.
-
Click Actions drop down button, and select the Delete option. A confirmation dialog opens.
-
Click Ok to proceed with the deletion. If you do not wish to delete the business rule, then click Cancel.
Organizing the business rules decide the order in which the rule is applied on the incoming request. You can organize the business rule to appear in a particular order in the list view,
-
Select the site for which you wish to rearrange the order of the business rule from the Business Rules for combo box.
-
Click Organize Business Rules link at the top tight hand corner of the Business Rules List view page. A pop-up window opens displaying the list of available business rules in the order that is appearing in the list view.
-
Select a business rule, and click Move up or Move Down button beside the list.
-
Click Save.