Service Catalog - Service Items
The day-to-day IT services such as installation, relocation, internet access, email access, virus protection, provision of hardware and software, mail server and so on are configured under this section. The service items are classified and grouped under Service Categories, which are displayed in the Home page.
The Service Request form consists of a drag and drop template that should be configured in order to meet the end-user requirement. If the service involves the need of any resources, then the same can be configured under the Resource Info block. Furthermore, you can configure multiple stages of Approvals, set Service Level Agreement and assign Tasks for individual service request.
To configure Service Items,
-
Go to Admin
 > Service Catalog > Service Catalog.
 -
Hover over the category under which you want add a new service and click Add Service button.
|
The following are explained under this section: |
Configuring Form - Technician View
- Header: The header consists of the Service Name and Description.
-
Body: It consists of untiteled sections with default fields such as Status, Priority, Techician, Group, Subject, Description etc.
-
Resource Info: In this section, you can add questiosn or fields specific to the resouces of interest.
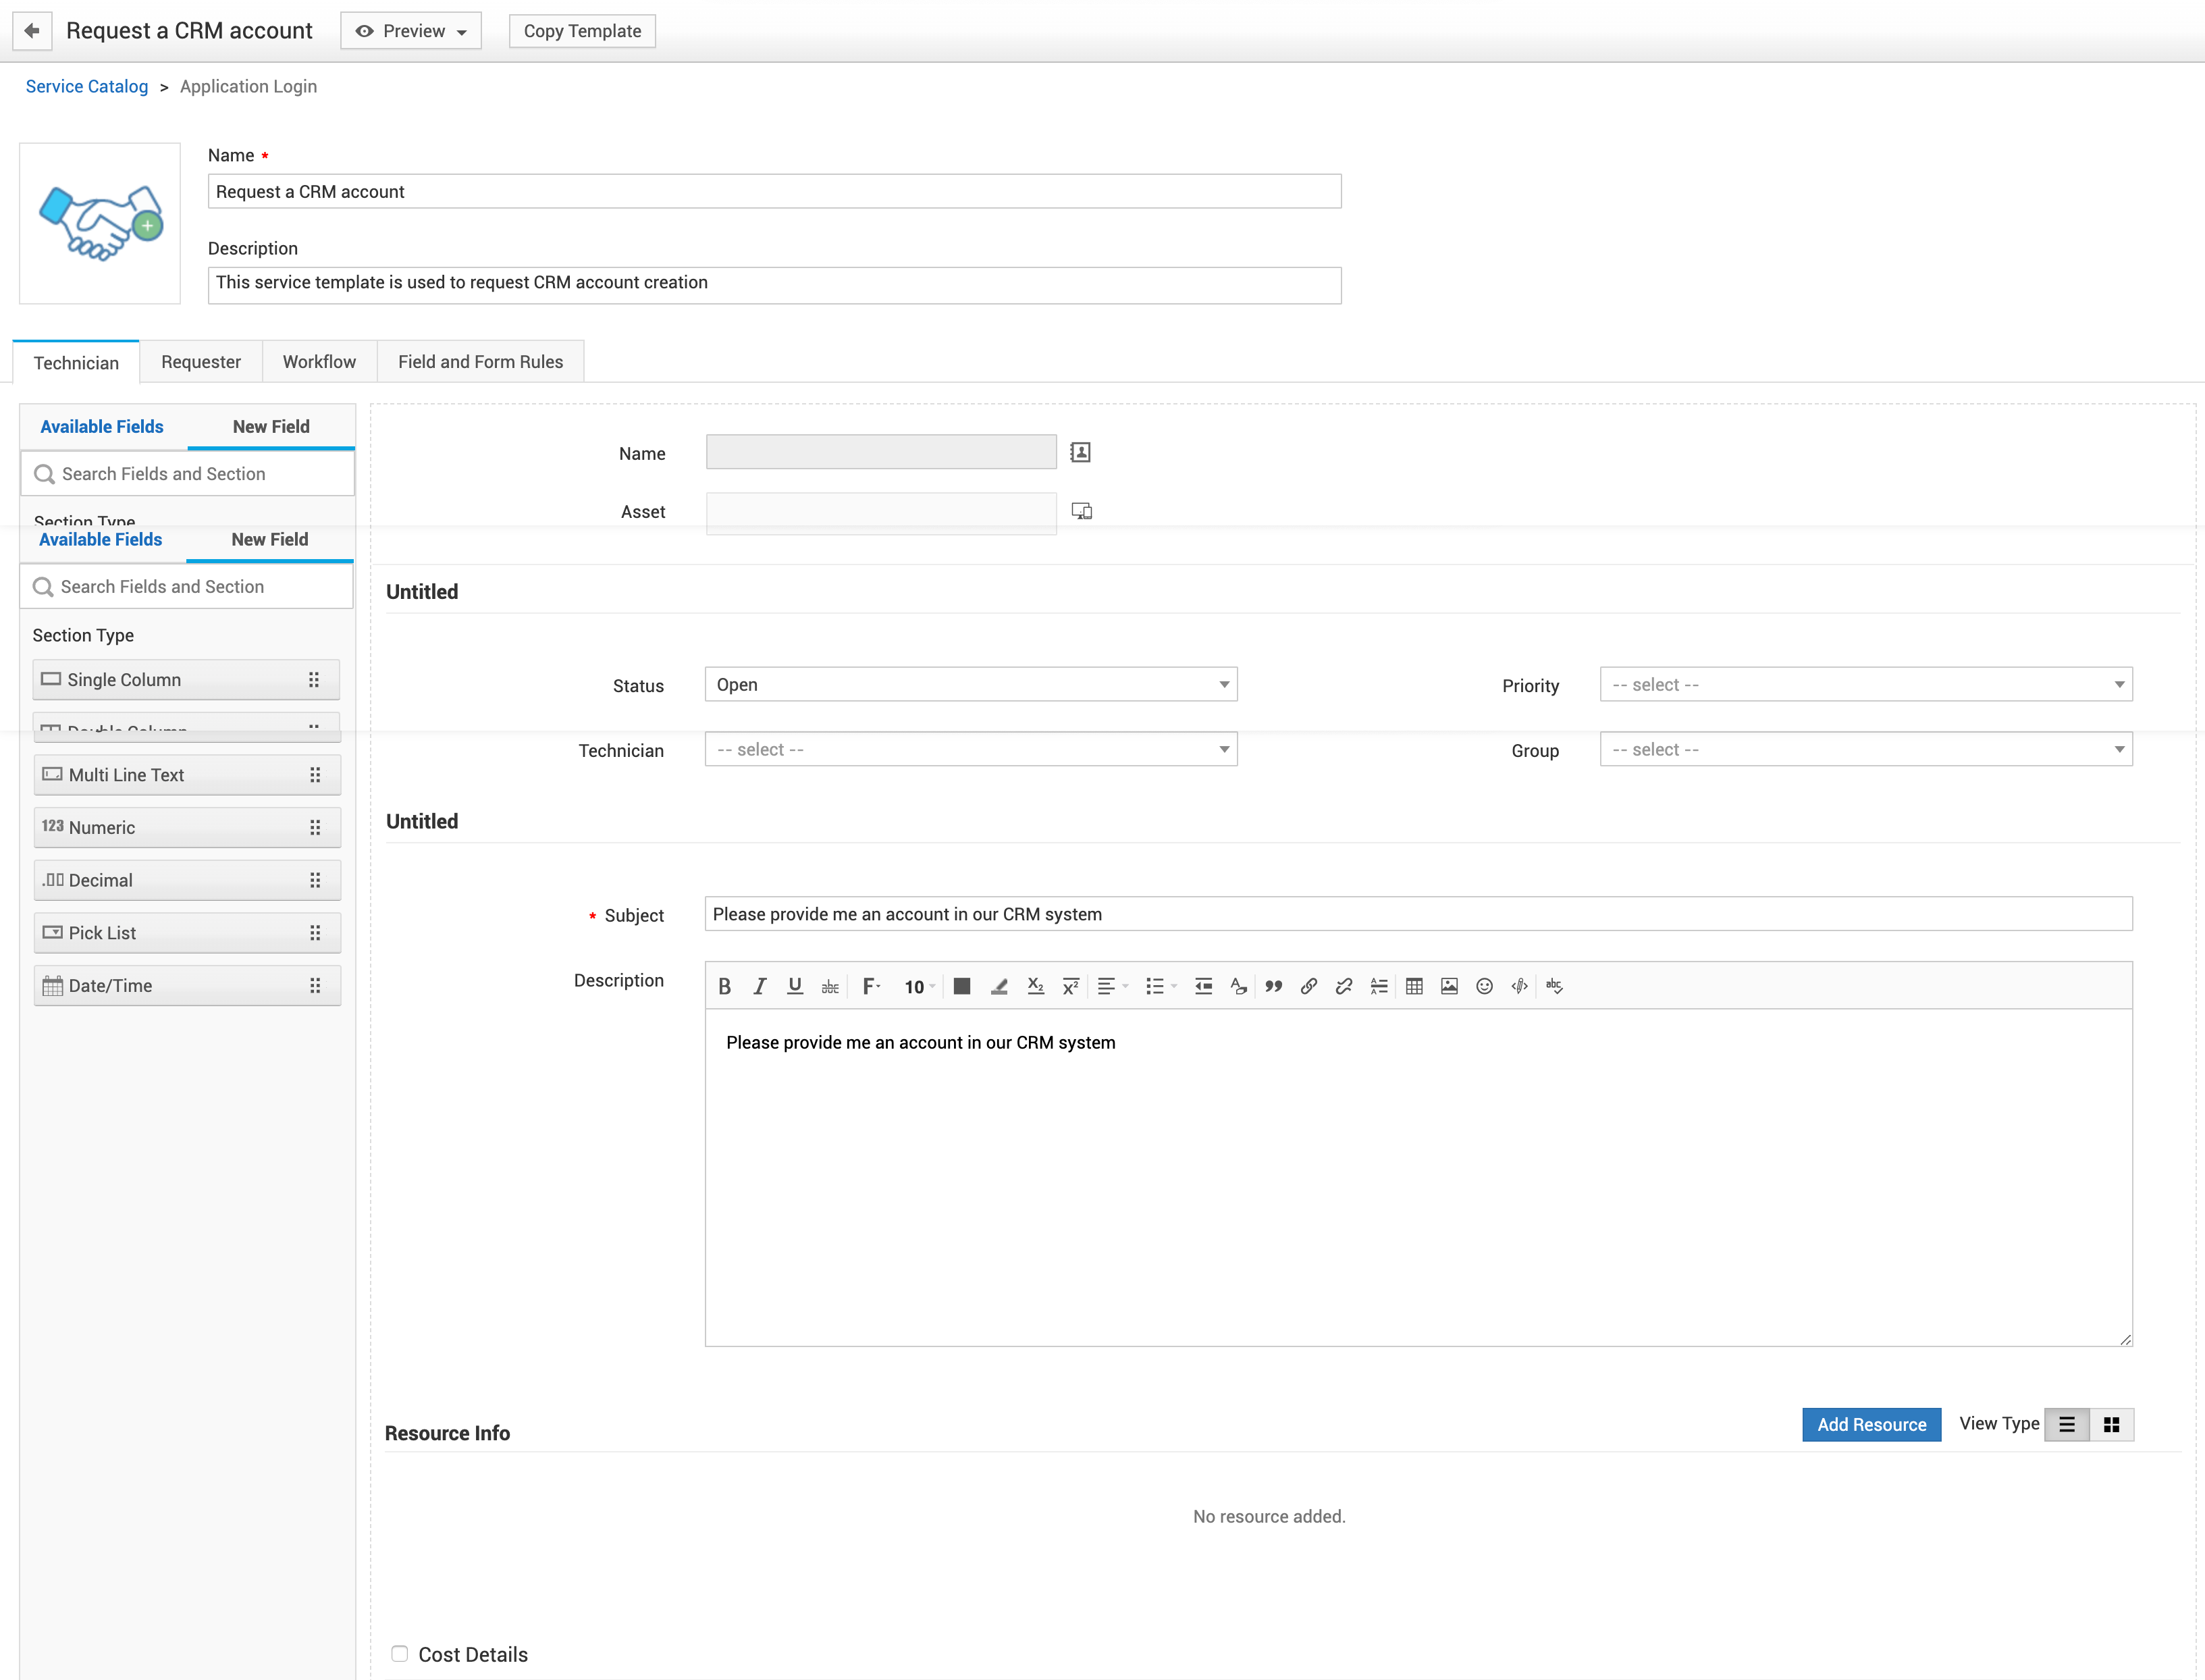
You can add a new fields simply by drag-nad-drop from the left pane. You can either chose files from Available list or create Custom field.
To create a custom field,
- Click New Field on the left pane.
- Drag-and-drop the type fo field of your choice to to a preferred section in the form.
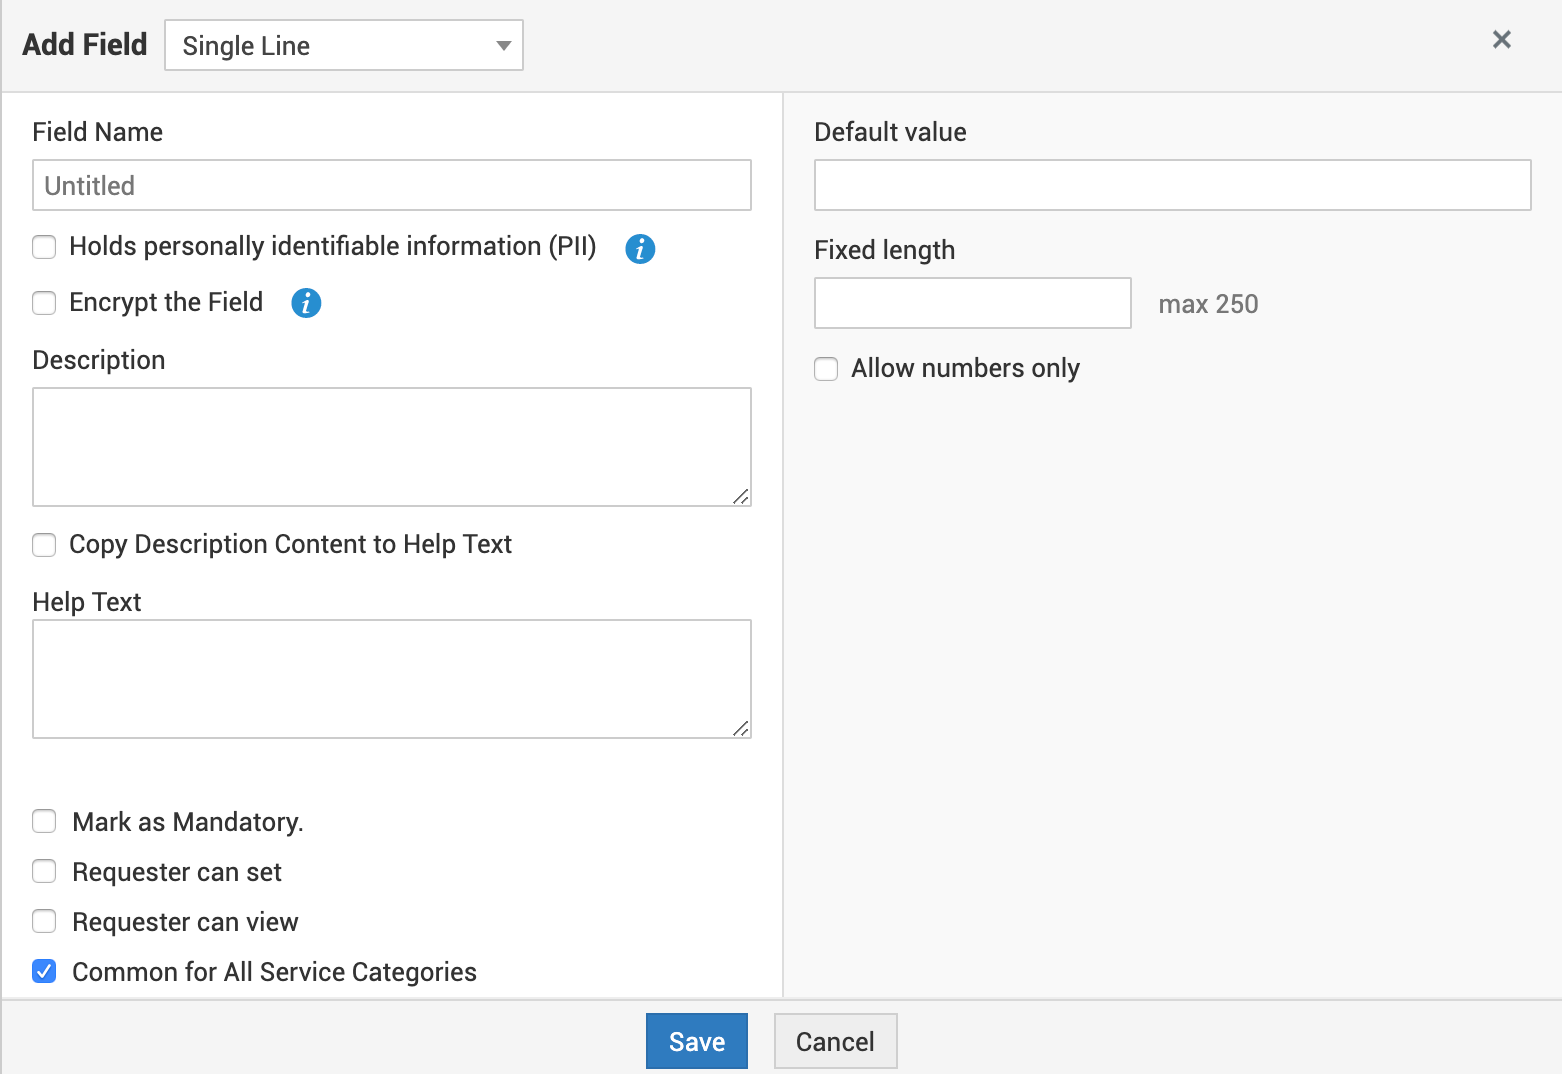
- In the Add Field editor, provide Filed Name, Description and configure various options as required.
- Click Save.
Note:
1. If the Item field is marked as mandatory then the corresponding Category and Sub category will be automatically marked as mandatory. Similarly, if the Impact details are marked as mandatory then the Impact field will also be marked as mandatory.
2. The fields such as Requester Details, Subject and Site do not have Edit Field Properties icon and hence these fields can only be re-arranged.
3. Fields such as Status, Description, Requester Details, Site and Subject do not have Remove Field icon.
Configuring Resource Information
If the service involves any resources then you can mention them under the Resource Info block. The process of adding resources involves a series of questions, and the resources can be displayed in either of the following formats - check box, drop down, plain text or with simple yes/no. You can also add cost to individual options in resource questions.
Take the case of a new employee joining your organization. The resources provided to the new employee would be, providing a desktop/laptop, installing the necessary software, provision of any additional hardware resource, communication device, entry into application logins like Active Directory, VPN, Email, Payroll, CRM and so on. These resources are entered under Resource Info block of the service request.
To add resources,
-
Click Add Resource button in the Resource Info section.
-
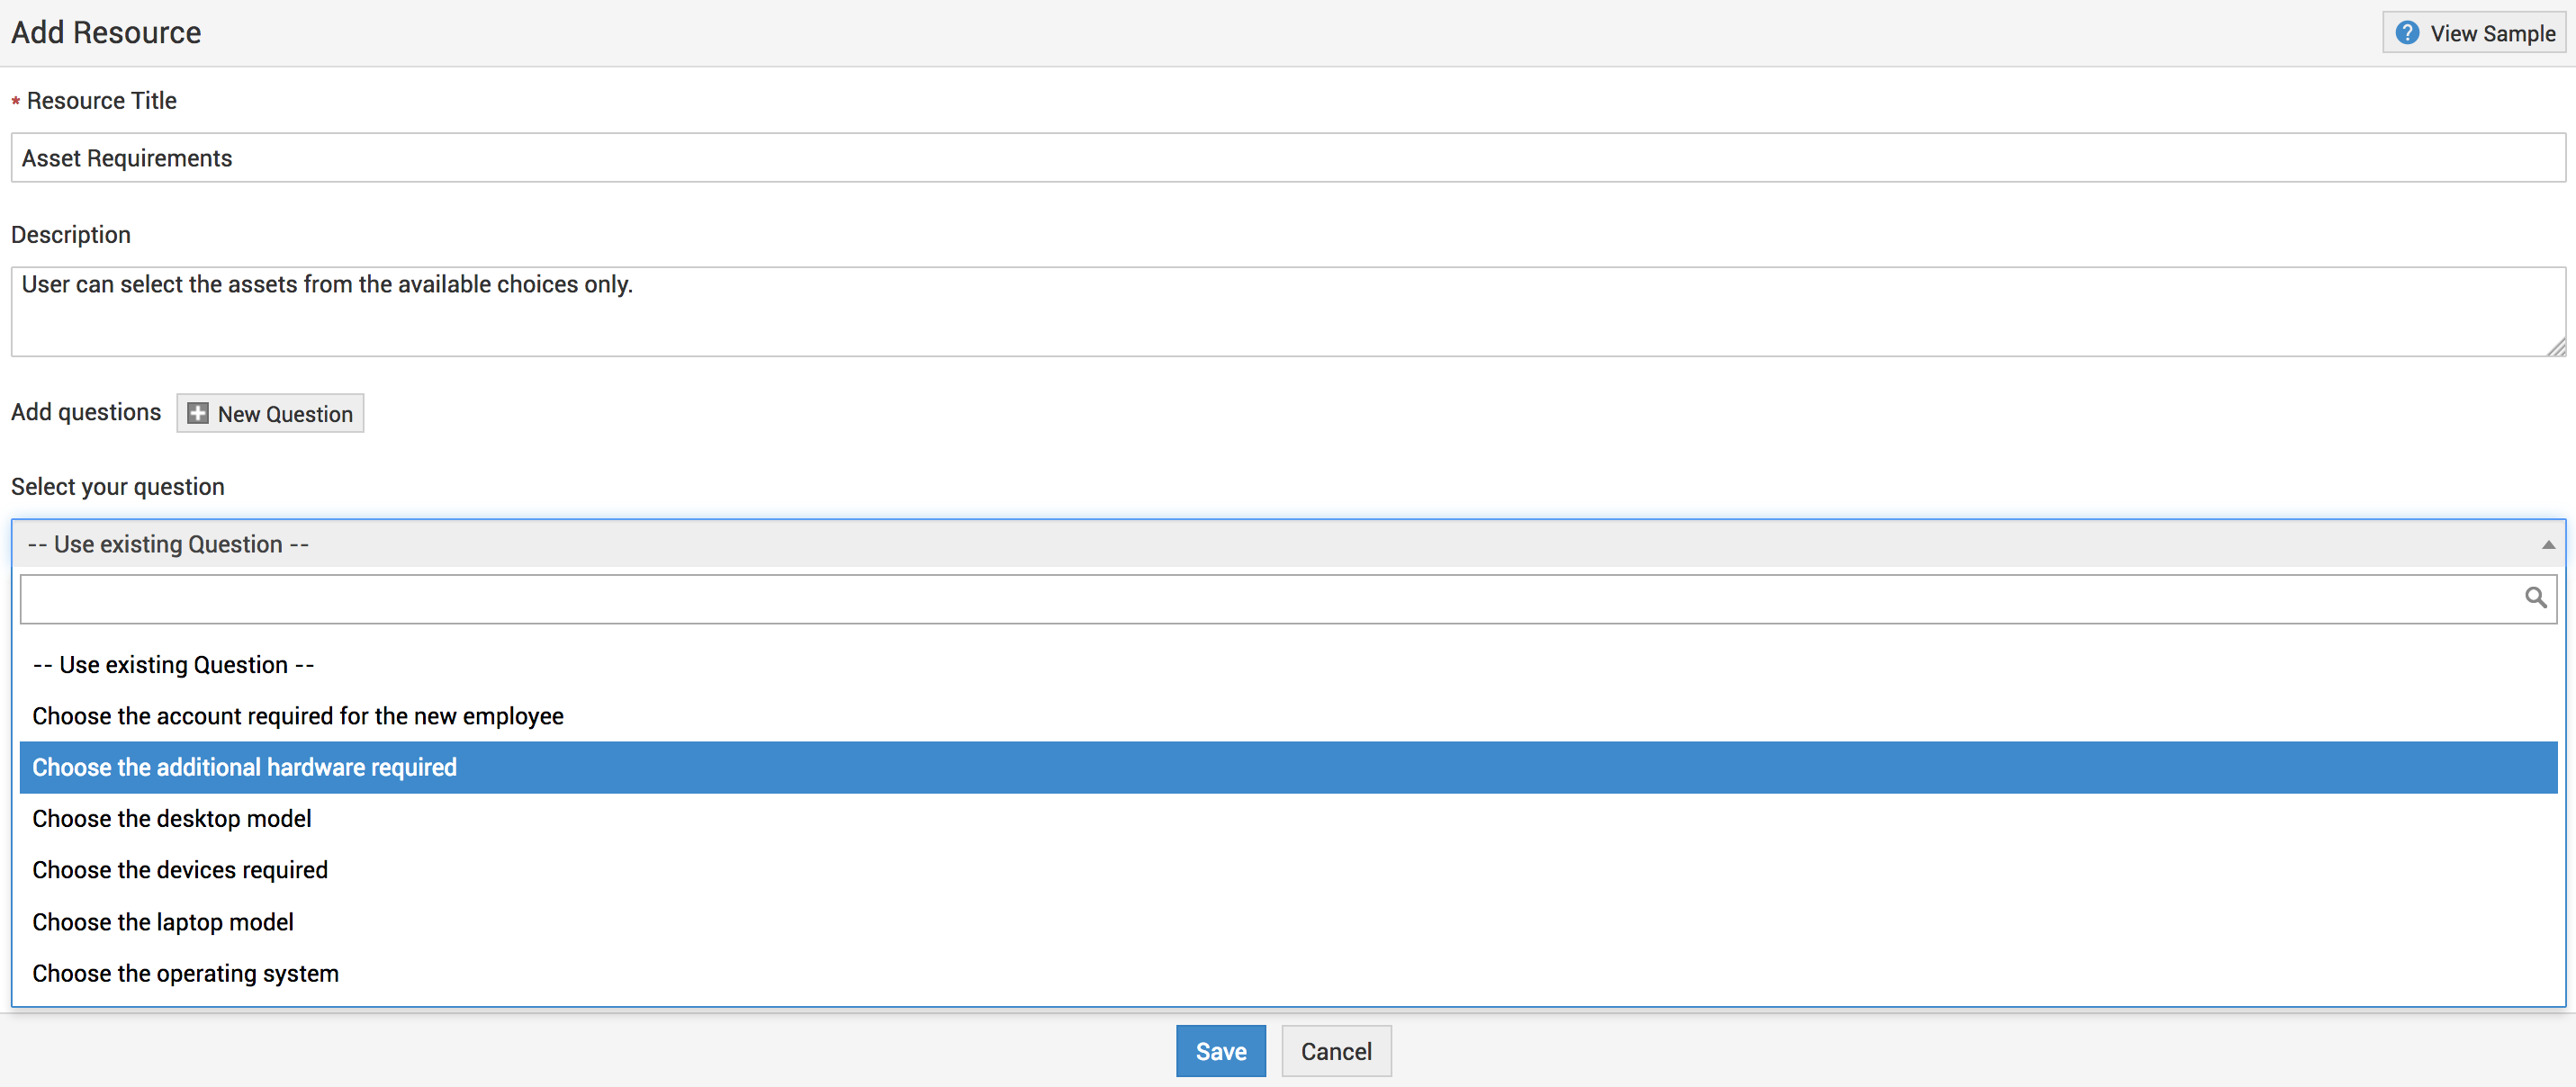
In the Add Resource pop up, specify the Resource Title and a brief Description on the purpose for adding this resource.
-
Next, you can either choose to select the question from the existing question list or create a new question.
-
To select a question from the existing question list, click Select your question drop-down, select a question, edit it if required, and click Save.
Adding New Question:
To add a new question,
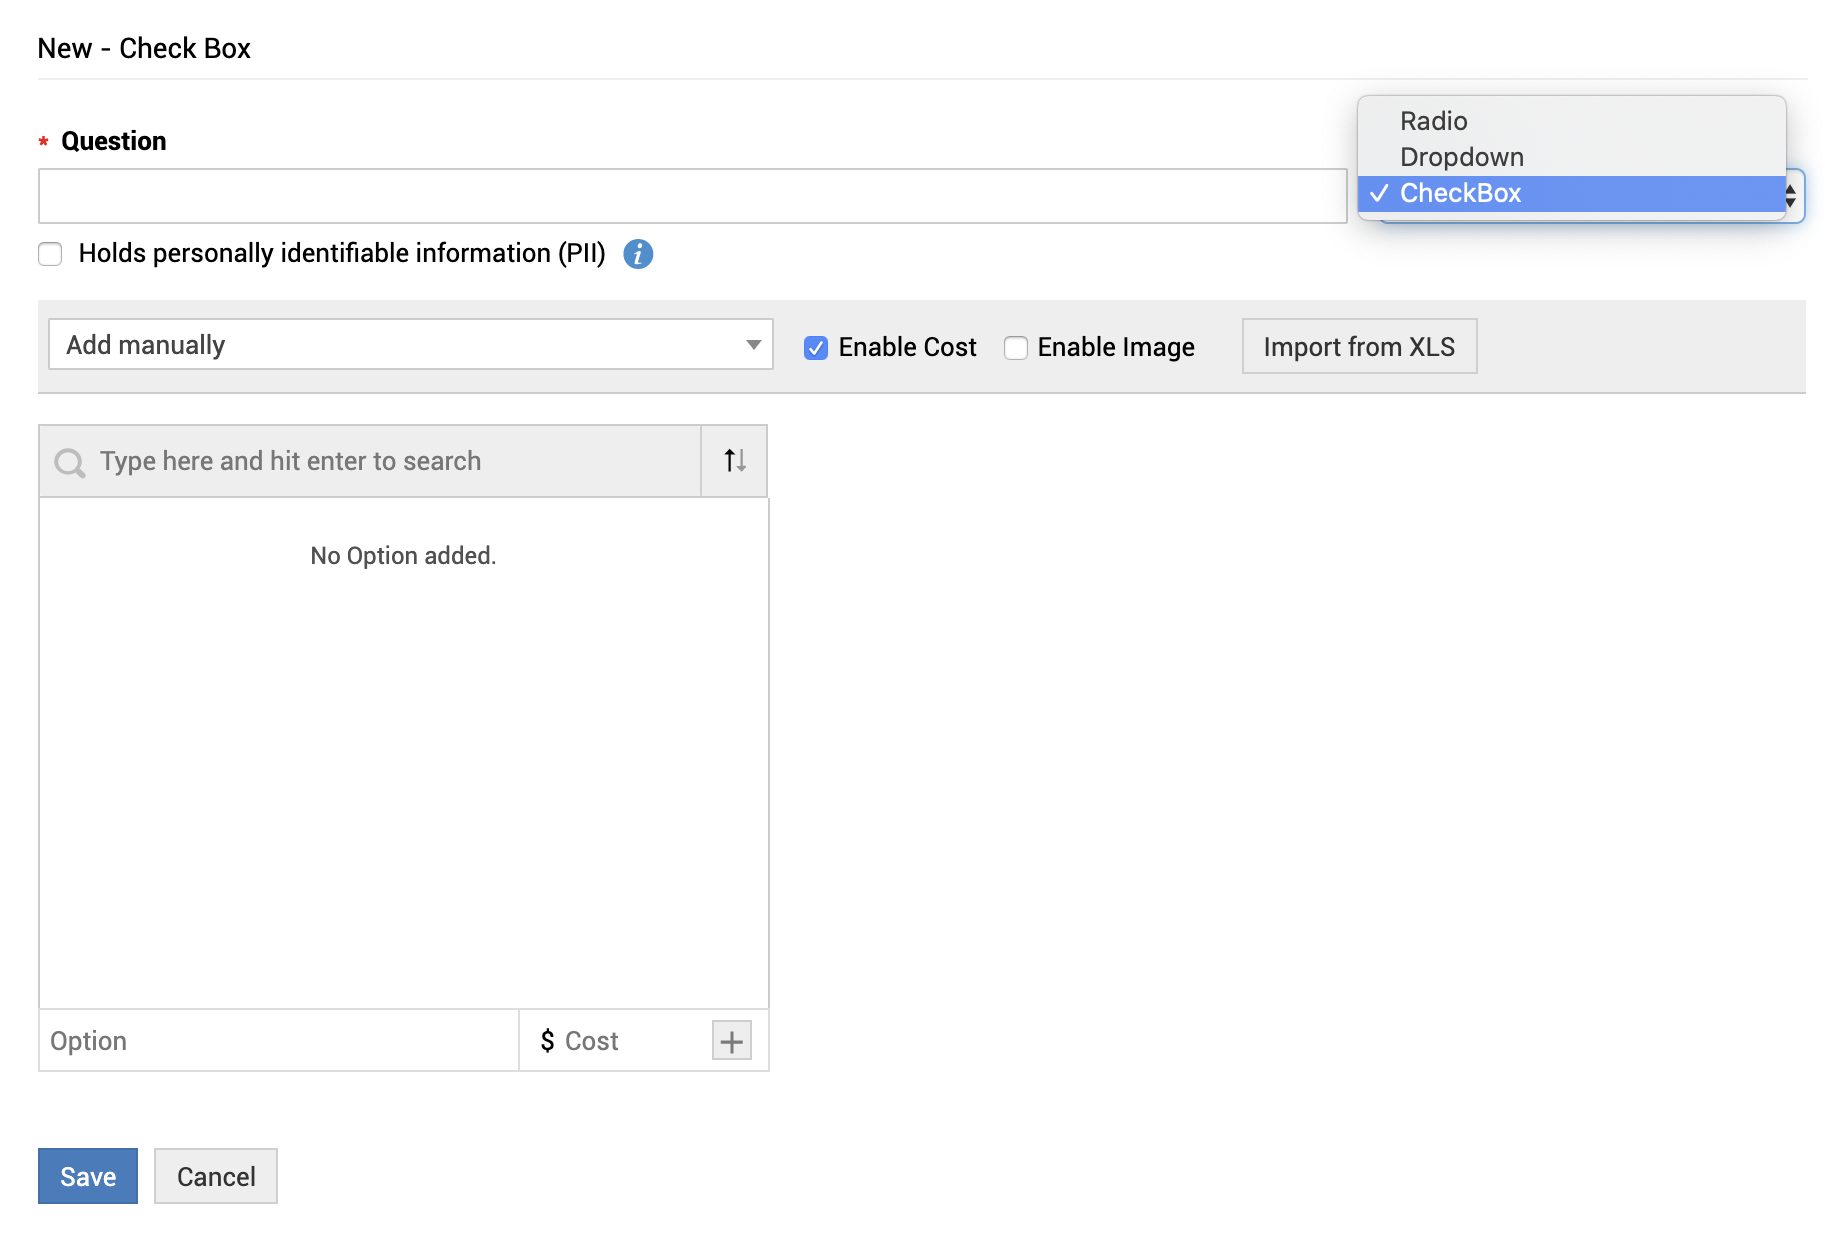
- Click New Question button and choose the type.

- Depending on the type fill in the question details and click Save.
For Plain Text questions:

Manual addition of Resources:
Apart from resources in the application, you can manually add resources that are not configured in the application. To add resources manually in the application, select Add manually from Add options drop-down. Enter the resource in the text field as shown in the image.
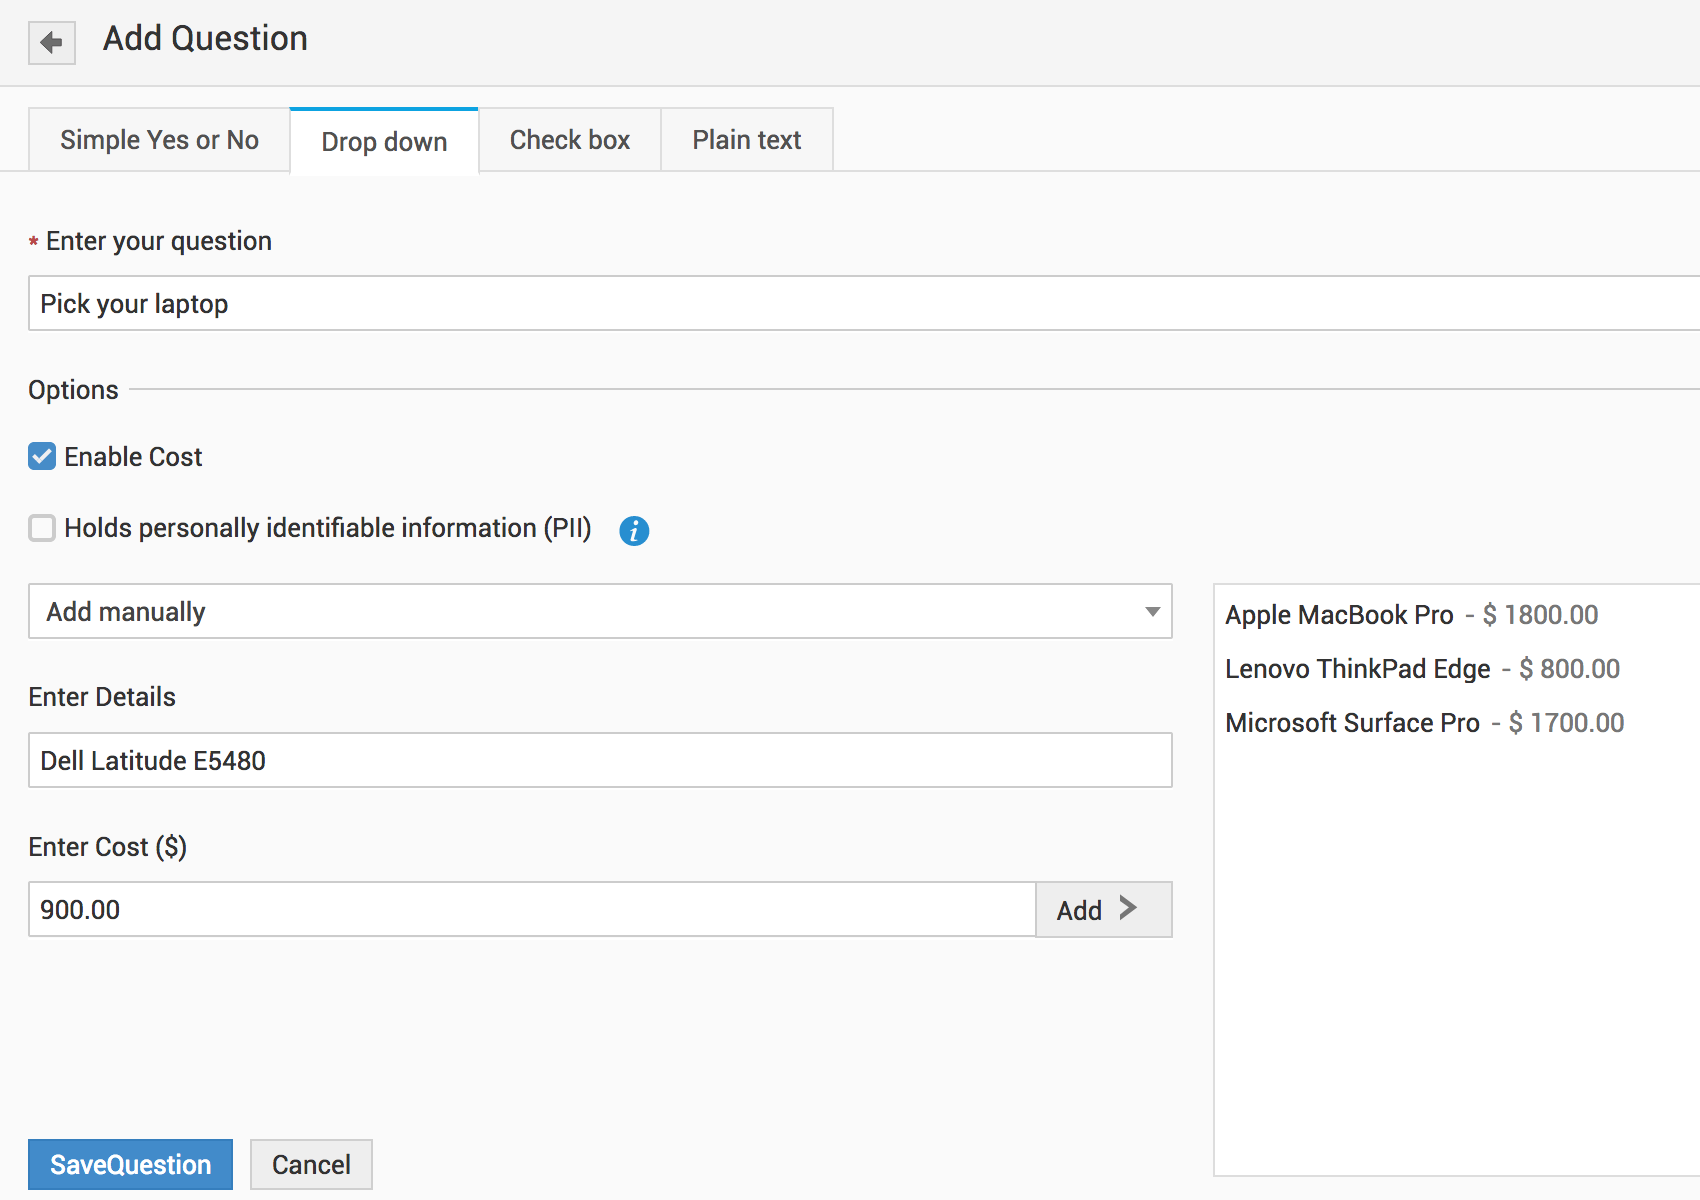
In this case the resource is "HP Pavilion" and click Add >> to make the resource available in the question. Click Ok to save the question. To add another question, click New Question and follow the process as above.
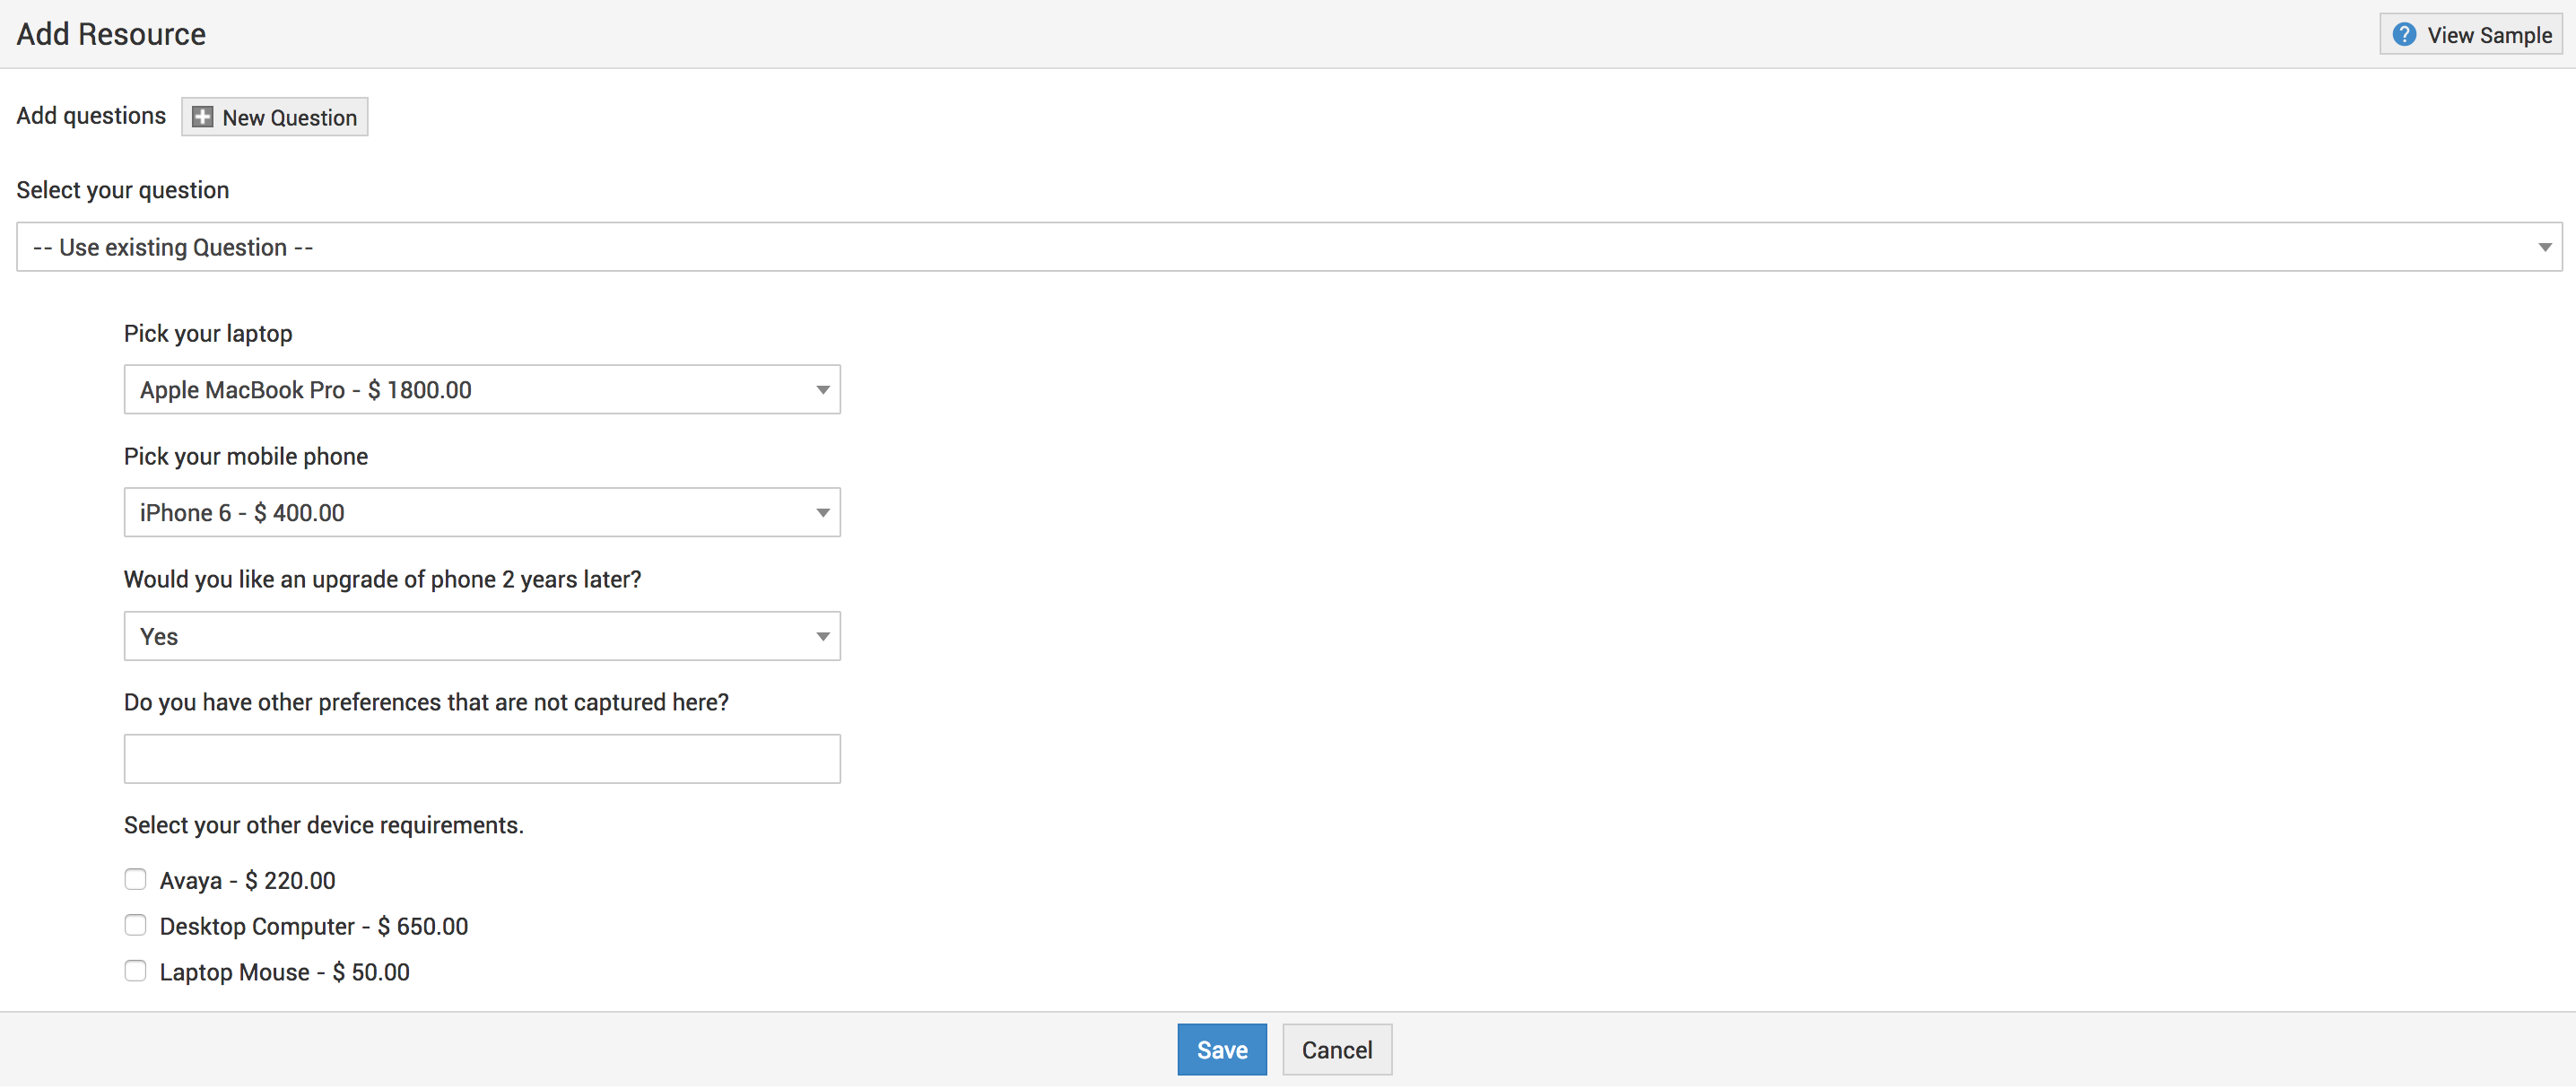
- Click Save to save the resource information. The questions are displayed in the Resource Info block of the service preview form from where you can also edit or delete the added resources.
Show to Requester
To make the service request accessible in the requester's login, select Show to Requesters check box. If User Groups are configured in the application, then you can select specific user groups to whom the service request should be made available too. Selecting the user groups makes a clear indication of the end users who can subscribe to the services.
Say for instance, if a service request should be shown to the requesters in the Sales department, then, configure the user group by selecting the "Department" as "Sales" under Admin -> User Management -> User Groups. Once the user group is configured, enable "Show to Requester" check box in the service item form and select the user group as "Sales User Group". To know more on configuring user groups, refer User Groups.

Click Save to save the details. Click Save and Configure Workflow button, to configure the service request workflow.
Configuring Form - Requester View
The "Requester View" tab is available in the service form only if the requesters have permission to view the service request. Click the Requester View tab to view the requester preview of the service request.
The service form is similar to the technician preview except,
-
The header section is grayed indicating that its non-editable,
-
The service fields has limited parameters and the option to add new field is unavailable
-
Parameters such as Mode, Request Type, Level, Impact, Impact Details and Urgency are unavailable for the requester preview.
-
The Edit Field Properties option is absent for the fields.
You can drag the available service fields onto the service preview form. Place the field only in the yellow highlighted area of the form. You can also rearrange the existing fields in a similar manner. In addition, you can also set default values for the fields to appear while raising the service request.
Click Save to save the configured details. Click Cancel to exit the form.
Work Flow
The Work Flow tab consists of options to select the approvers, map Service Level Agreement and assign Tasks for individual service requests.
Approver Details
Certain service request raised in the application requires approvals from the concerned users to go ahead with the request. The approvers can be technicians or requesters with the permission to Approve Service Requests, and should possess an email address in the application. You can configure up to 5 stages of approvals for a service request. Each stage may possess one or more approvers.
Select the Approvers for the service request using the icon ![]() . The approver(s) can also be the department head to which the requester belongs provided the approver has the permission to approve service requests.
. The approver(s) can also be the department head to which the requester belongs provided the approver has the permission to approve service requests.
On selecting the approver, the appropriate notifications have to be selected.
-
Send approval notification automatically when a service request is raised - Enable this check box to send an approval notification to the concerned authority each time a service request is raised. If you have configured multiple stages of approvals, then the notification is sent to the next consecutive stage only on approval from the previous stage.
-
All configured approvers have to approve the Service Request - Enabling this check box makes it mandatory for all the configured approvers to approve the service request. If anyone of the approver (at any stage) rejects the service request, then the request does not proceed to the next stage.
NOTE: If you have selected more than one approver in a stage, then all the approvers in that stage should approve the request.
-
Do not assign technician before Service Request is approved - This option is enabled only on selecting "Send approval notification automatically when a service request is raised" check box. On selecting this option, a technician is assigned to a service request only when the service request is approved by the concern authority.
Each service request created in the application is assigned with a specific SLA to set the due by date. Select the SLA for the service request from the drop down. You can also add new SLAs using Add New SLA link.
Adding Tasks to Service Requests
You can add tasks to a service request if the request involves multiple technician work.
To add Tasks to service requests,
-
Click the Tasks tab -> click Add Task button from the tasks list view page.
-
In the Add Task form, specify the Title of the task. The Title is a mandatory field.
-
Specify relevant information about the tasks in the Description field.
-
Select the Group to which task has to be assigned. Select the Technician of the task from the combo box. Tasks can be assigned either:
-
to a Group alone,
-
to a Group and a specific Technician in the group,
-
to a Technician alone without selecting the group,
-
to no Group and no Technician.
-
If there are multiple tasks for a service request, the implementation of one task may be dependent on the completion of another. In this case, the dependencies on tasks can be captured by clicking on the relevant tasks under Task Dependency block.
-
Select the Status of the task from the drop down.
-
Specify any relevant comment about the task in the Comments field.
-
Click Save to save the details. Click Save and Add New, to save the details and open another Add Task form. Click Cancel to go back to the tasks list view.
You can also organize tasks from the list view to suit your desired priority. Click Organize Tasks button and change the order of the tasks using the up and down buttons.
The tasks for a service request are automatically created and assigned to the configured technician each time the service request is raised.
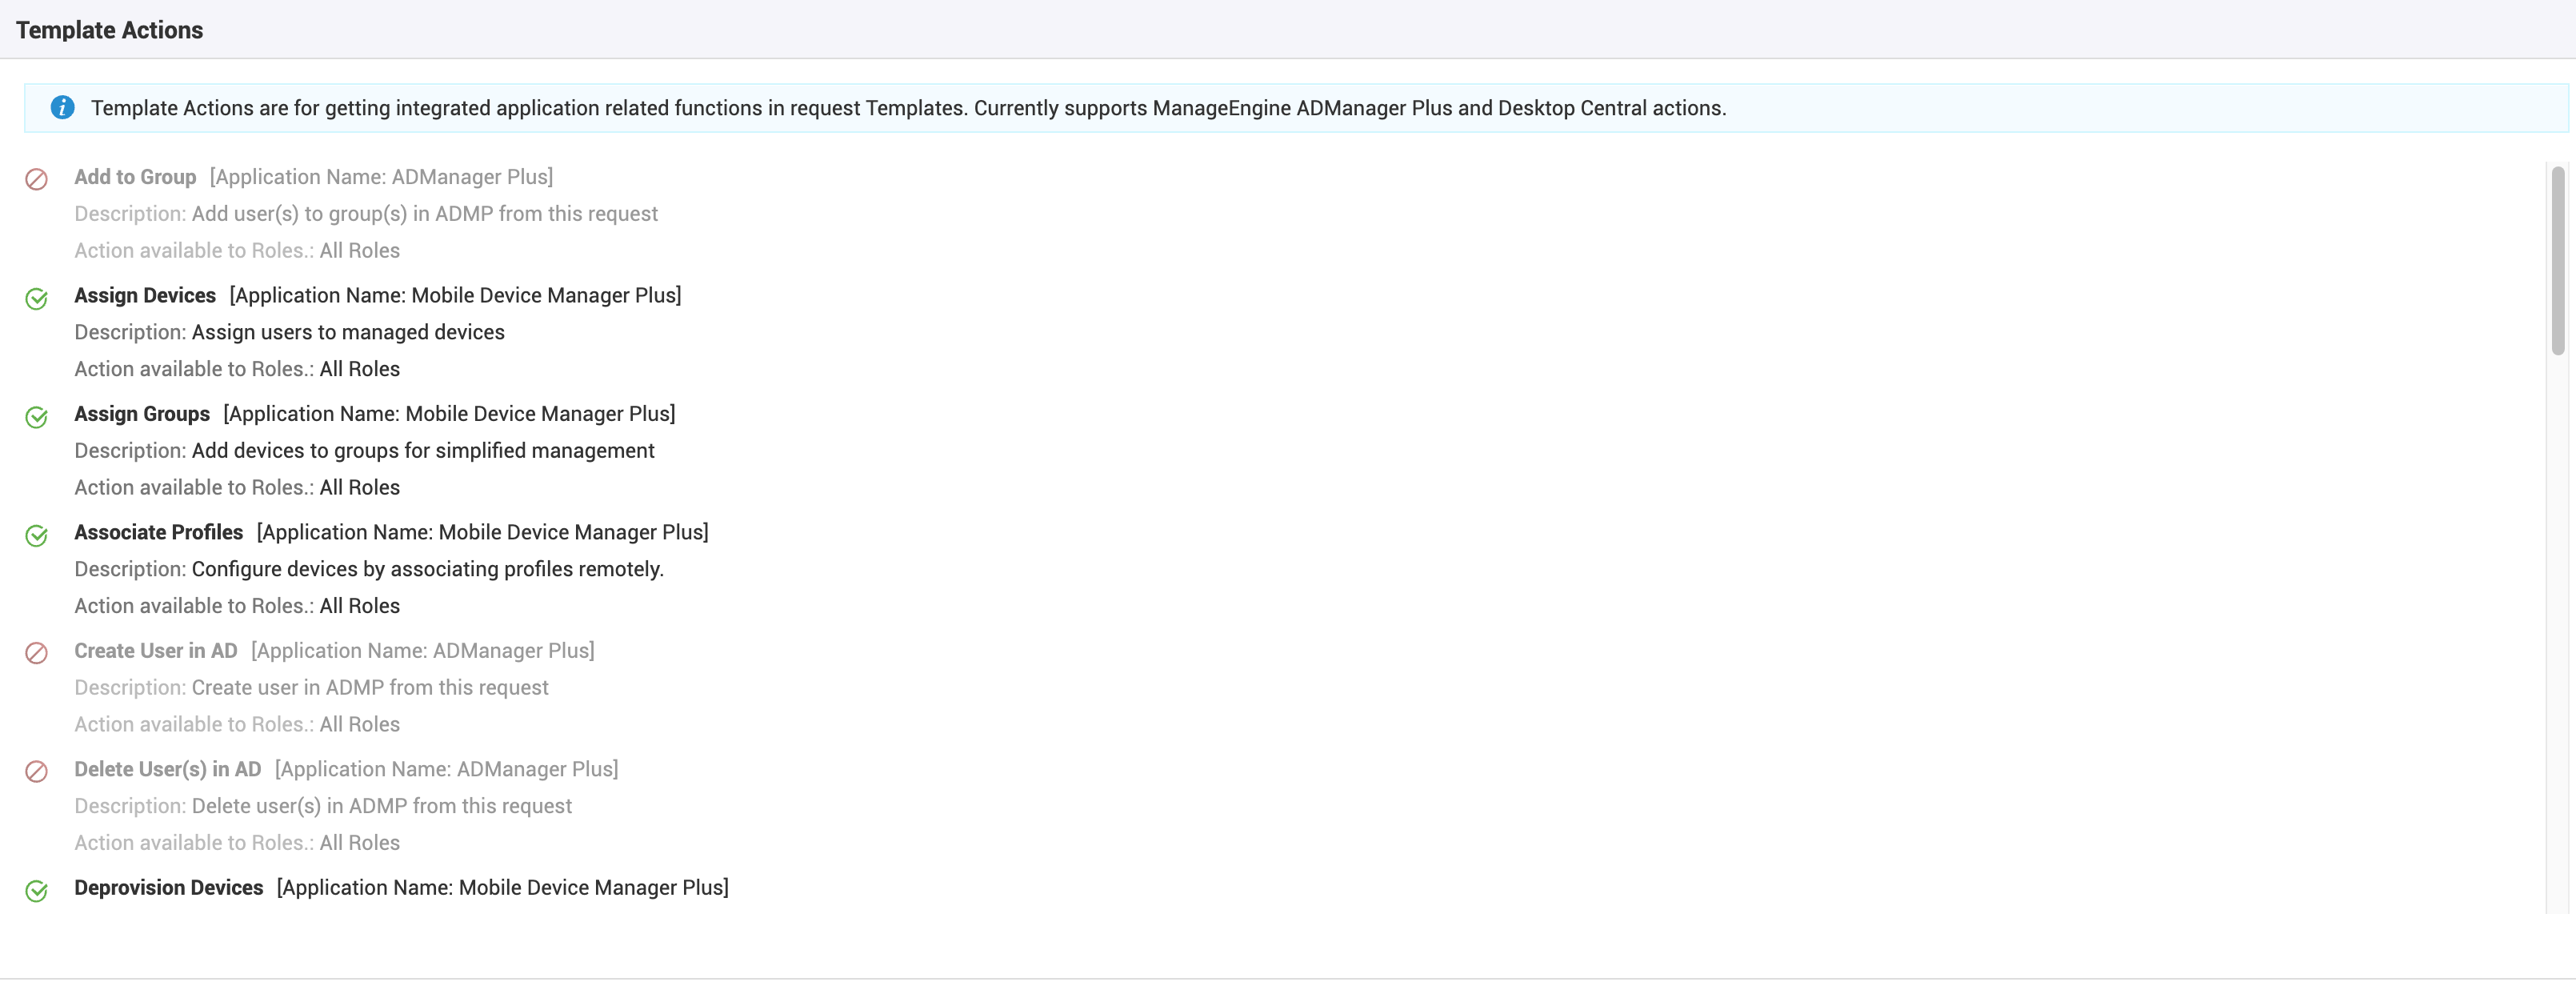
If the service request involves installing/uninstalling software or executing scripts, then the same can be performed from the centralized server through Endpoint Central (Formerly Desktop Central) Integration. The Endpoint Central (Formerly Desktop Central) activities are performed with the aid of a Endpoint Central (Formerly Desktop Central) Agent that should be installed in the Windows workstation.
To avail this functionality, configure the Server Name and Port number of the Endpoint Central (Formerly Desktop Central) server in SDP application. Since all service requests do not require Endpoint Central (Formerly Desktop Central) operations, this activity is limited by providing a Template Action check box in each service item form. This functionality is attainable only when Endpoint Central (Formerly Desktop Central) 7.0 and above is integrated with SDP. Refer Endpoint Central (Formerly Desktop Central) Integration to know more.
Sample Image:
Disabling/Enabling Services
By default, a newly added service is enabled in the list view. To disable a service,
-
Click the
 icon beside the service category to list the services under them.
 -
Hover over the service to disable. Click disable service icon
 . The service is grayed and will not be listed along with the existing services in the home page.
To enable a service.
-
Click the
 icon beside the service category to list the services under them.
 -
Hover over the service to enable. Click enable service icon
 . The service is enabled and is listed along with the existing services in the home page.
Editing Services
To edit a service under a service category,
-
Click the
 icon beside the service category to list the services under them.
 -
Hover over the service item to edit. Click the edit icon
 . The service form for a technician opens where you can add new fields, rearrange the existing fields and edit the default values.
 -
Click Save to save the configurations. Similarly, you can edit all the remaining tabs from the service catalog page.
Click Save and Configure Requester button, to configure service request form for requesters. To add tasks, click Save and Add Tasks.
Deleting Services
To delete services under a service category,
-
Click the
 icon beside the service category to list the services under them.
 -
Hover over the service item to delete. Click the delete icon
. A confirmation dialog appears.
-
Click OK to proceed. The service item is deleted from the list.
For Information on configuring Field and form rules click here.

