OpManager Integration
ManageEngine OpManager is a comprehensive network monitoring software application that provides network administrators with an integrated console to manage routers, firewalls, servers, switches, and printers along with extensive fault management and performance management functionalities. To learn more about features and functionalities of OpManager, click here.
With this integration, alerts specific to an MSP account can be logged in as tickets in ServiceDesk Plus.
Prerequisites
The integration of OpManager with ServiceDesk Plus MSP requires technician key from ServiceDesk Plus MSP.
To obtain technician key,
-
Log in to ServiceDesk Plus MSP.
-
Select the user-profile icon on the top-right and click API Key Generation.
-
Choose an expiry type (Never Expires or choose date for Expires on) and click Generate.
-
Copy the generated API Key.
Note: The generated API key serves as the Technician Key and it is user-dependent.
Configuration in OpManager
-
Open OpManager.
-
Navigate to Settings >> General Settings >> Third Party Integrations.
-
Click
 against the ServiceDesk Plus card.
 -
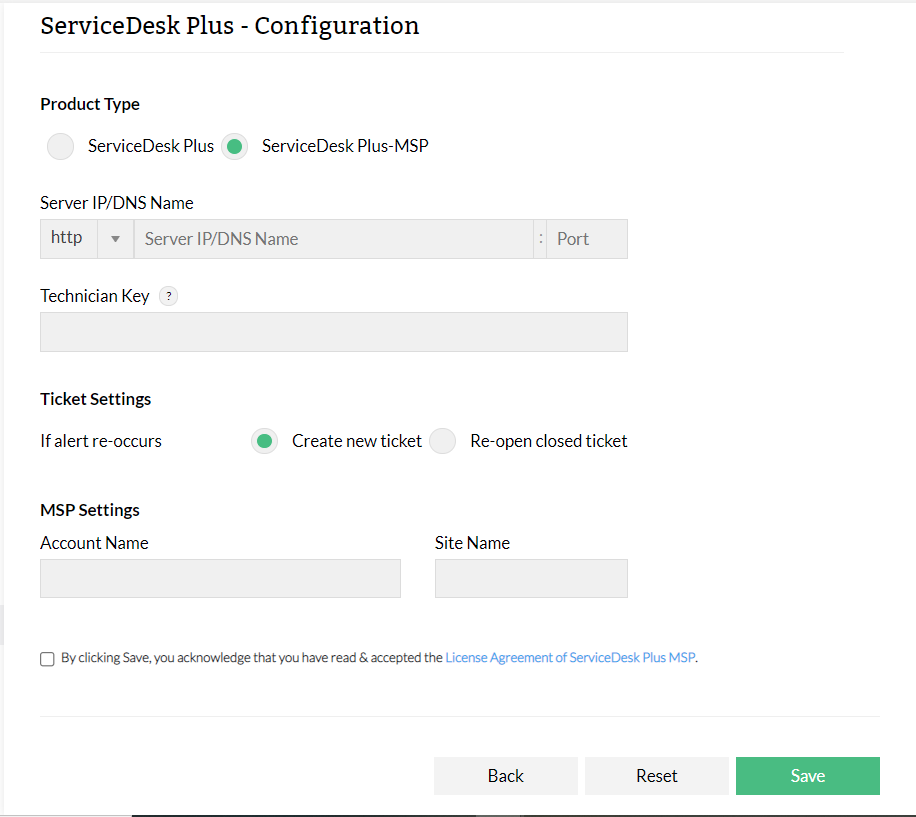
In the configuration page, select ServiceDesk Plus MSP and provide the following details.
-
Provide Server IP/DNS Name along with Port No.
-
Technician Key as obtained from ServiceDesk Plus MSP
-
Ticket Settings: Choose an option, as required, if an alert re-occurs: Create New Ticket or Re-open closed Ticket.
-
MSP Settings: Provide Account Name and Site Name.
-
Finally, click Save.

Configuration in ServiceDesk Plus MSP
For logging tickets based on OpManager alerts in ServiceDesk Plus MSP, the configuration in OpMnager is sufficient. However, to create a quick-launch access to OpManager within SeriviceDesk Plus MSP, follow these steps:
-
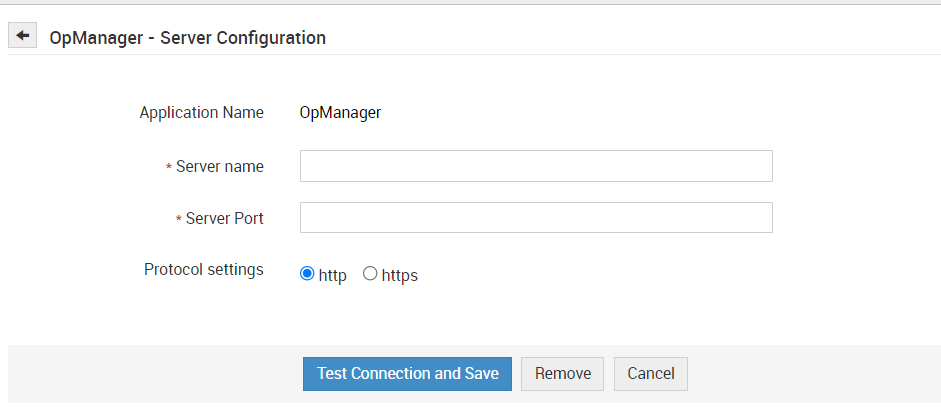
Go to Admin >> Integrations >> OpManager.
-
Provide Server Name, Port No, and choose the preferred protocol (http or https). Additional configuration is required for https protocol-based integration. To learn more, click here.
-
Finally, click Test Connection and Save.

Integrating with other ManageEngine Products over HTTPS mode
-
Download the .zip file from the link given below and extract it to "ManageEngine\ServiceDesk":
-
For Linux: https://uploads.zohocorp.com/Internal_Useruploads/dnd/ServiceDesk_Plus/o_1af3b3o2010mg10kbj961mdt18sq1/lincertgeneration.zip
-
For Windows: https://uploads.zohocorp.com/Internal_Useruploads/dnd/ServiceDesk_Plus/o_1af360niepdjr7j1flk1o323fa1/wincertgeneration.zip
-
Connect to the command prompt. Go to "ManageEngine\ServiceDesk" and run the batch file with following format:
-
For Linux:
C:>ManageEngine\ServiceDesk>gencert.sh servername:portnumber -
For Windows:
C:>ManageEngine\ServiceDesk>gencert.bat servername:portnumber -
On running the command, you will receive an exception PKIX and then it will ask you to enter a value. Provide value 1, which will generate a file named jssecacerts under "ManageEngine\ServiceDesk".
-
Copy the jssecacerts file under "ManageEngine\ServiceDesk\jre\lib\security" folder and then restart the ServiceDesk Plus application.

