Integrate your Azure Account with CloudSpend
CloudSpend allows you to integrate your Azure account and manage your cloud bills. You can connect your Azure account with CloudSpend by following the steps below:
- Register an application in Microsoft Entra ID
- Provide programmatic access to CloudSpend for Exports or Consumption API
- Connect your Azure account
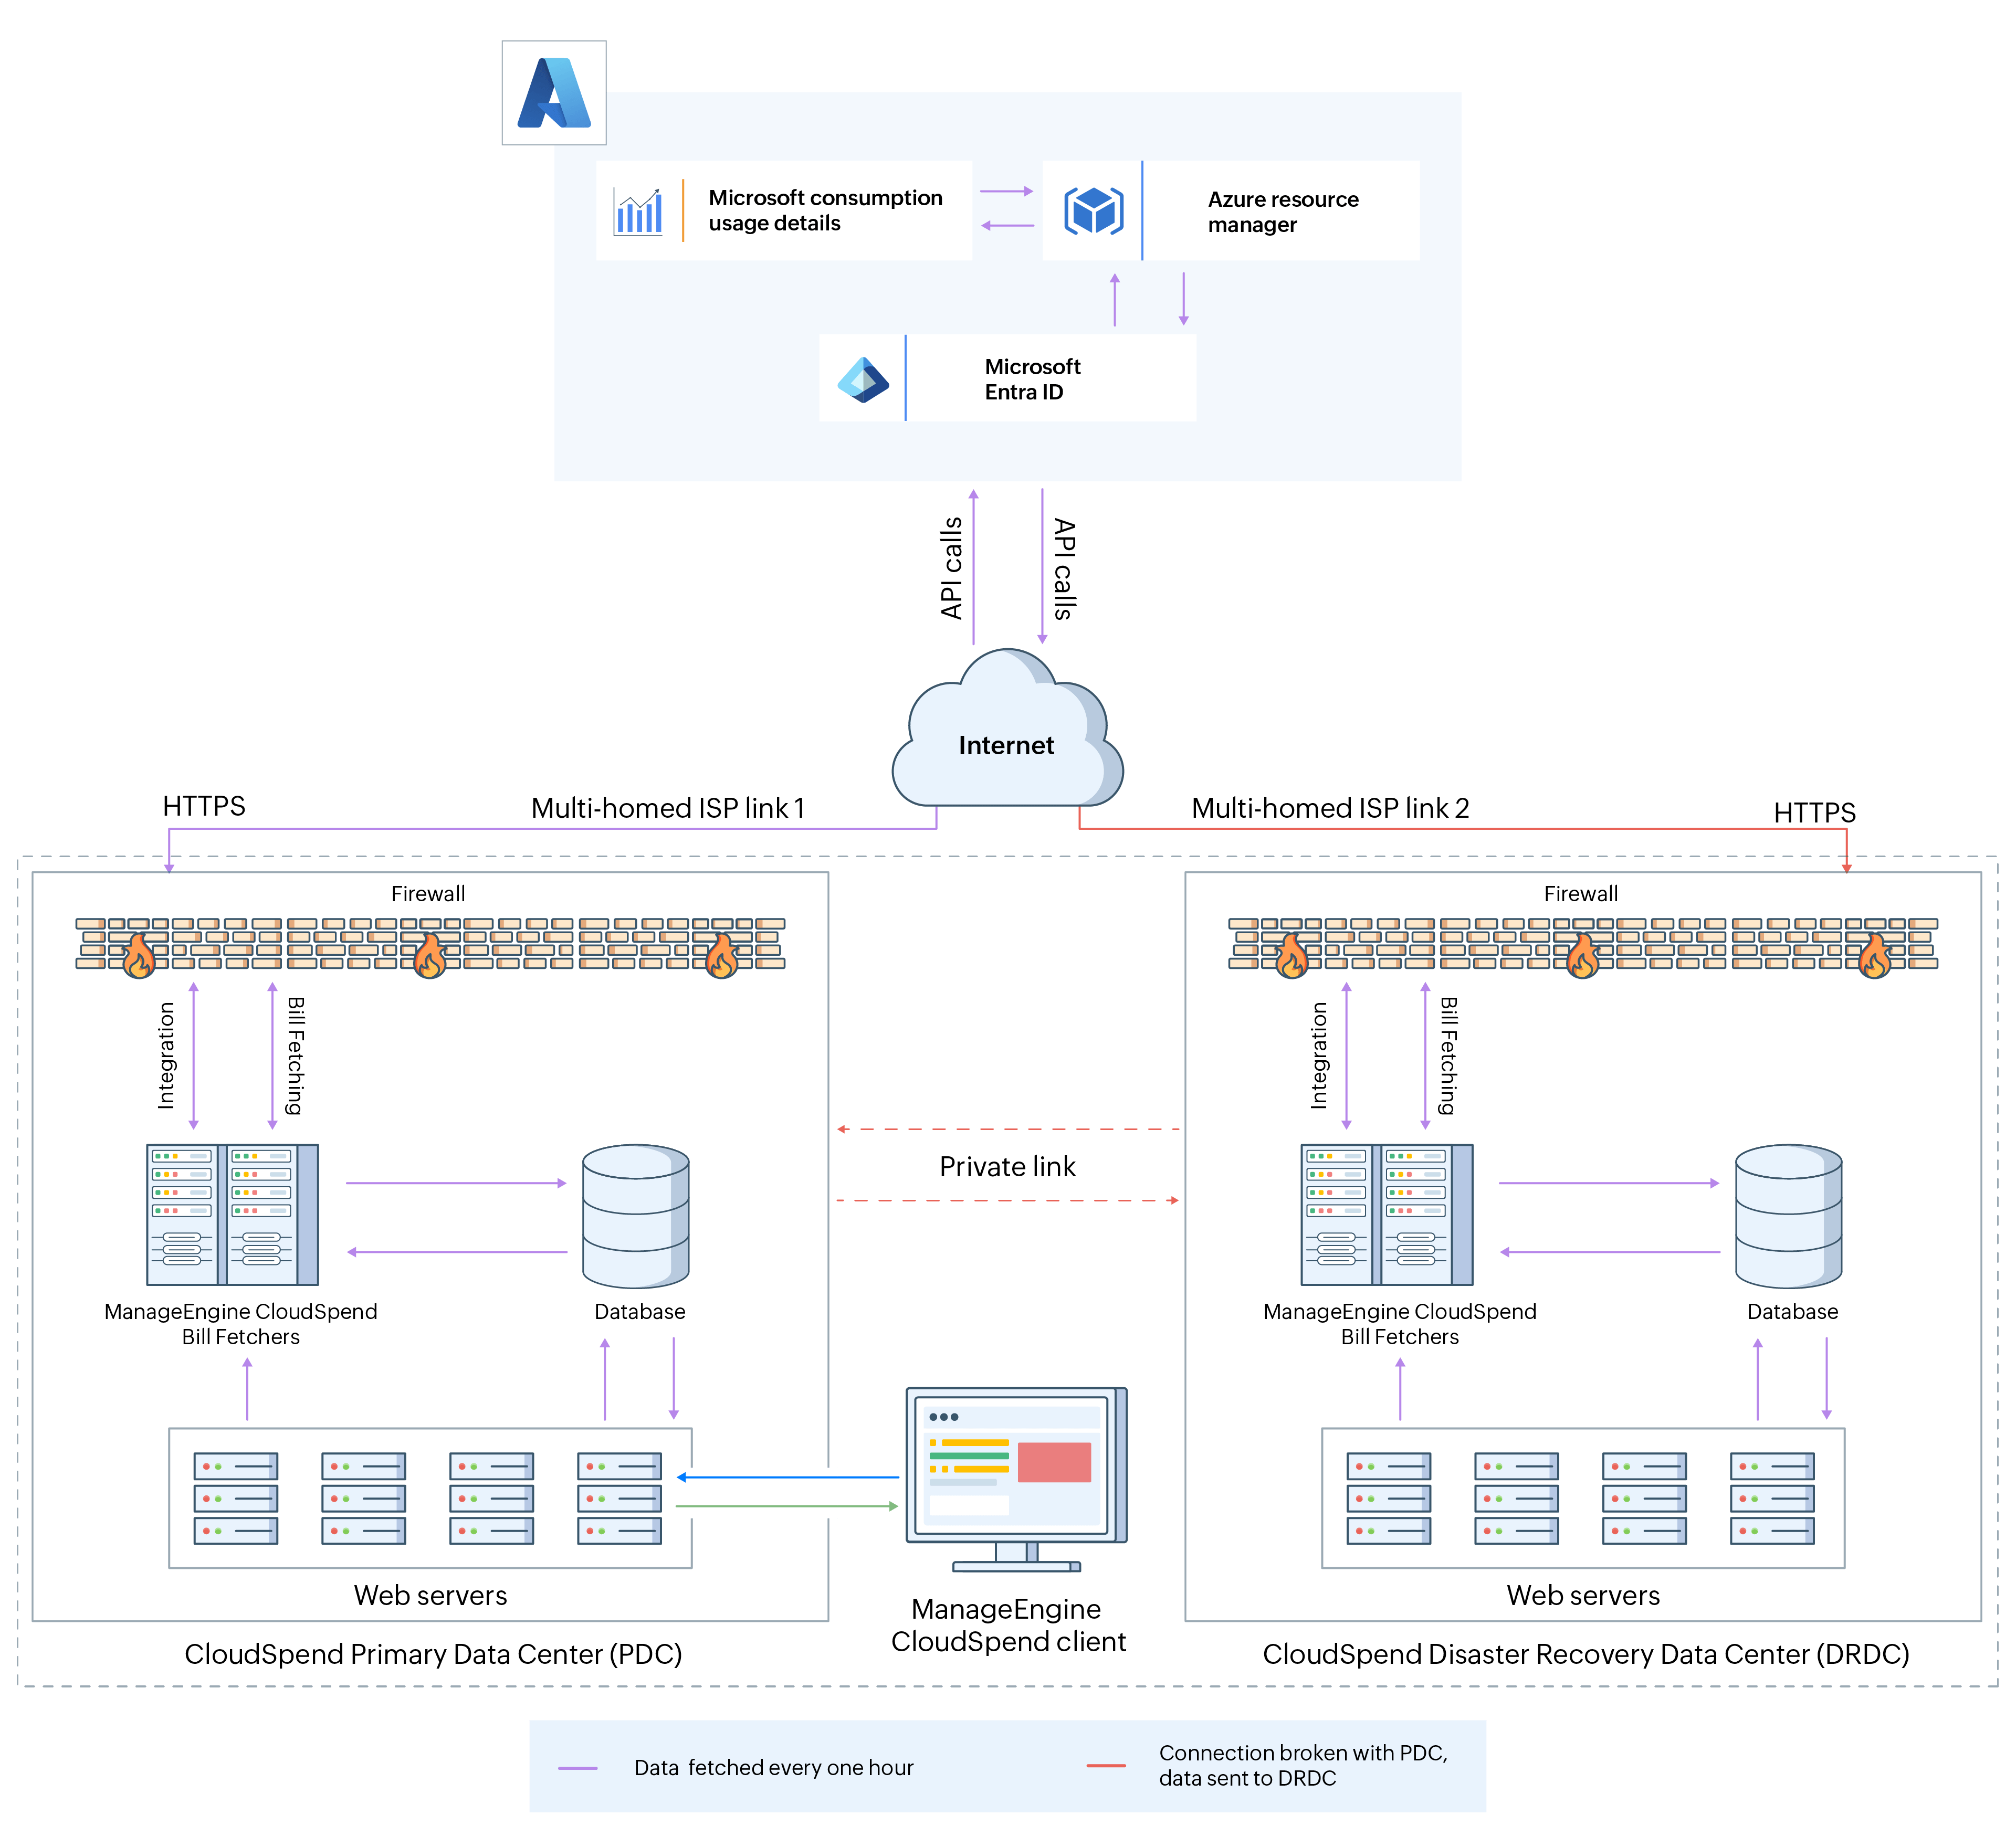 CloudSpend-Azure integration architecture
Register an application in Microsoft Entra ID
Register an application in Microsoft Entra ID to provide CloudSpend programmatic access to your Azure account.
Follow the steps below to complete the application registration process.
- Log in to the Microsoft Azure portal and navigate to the Microsoft Entra ID section.
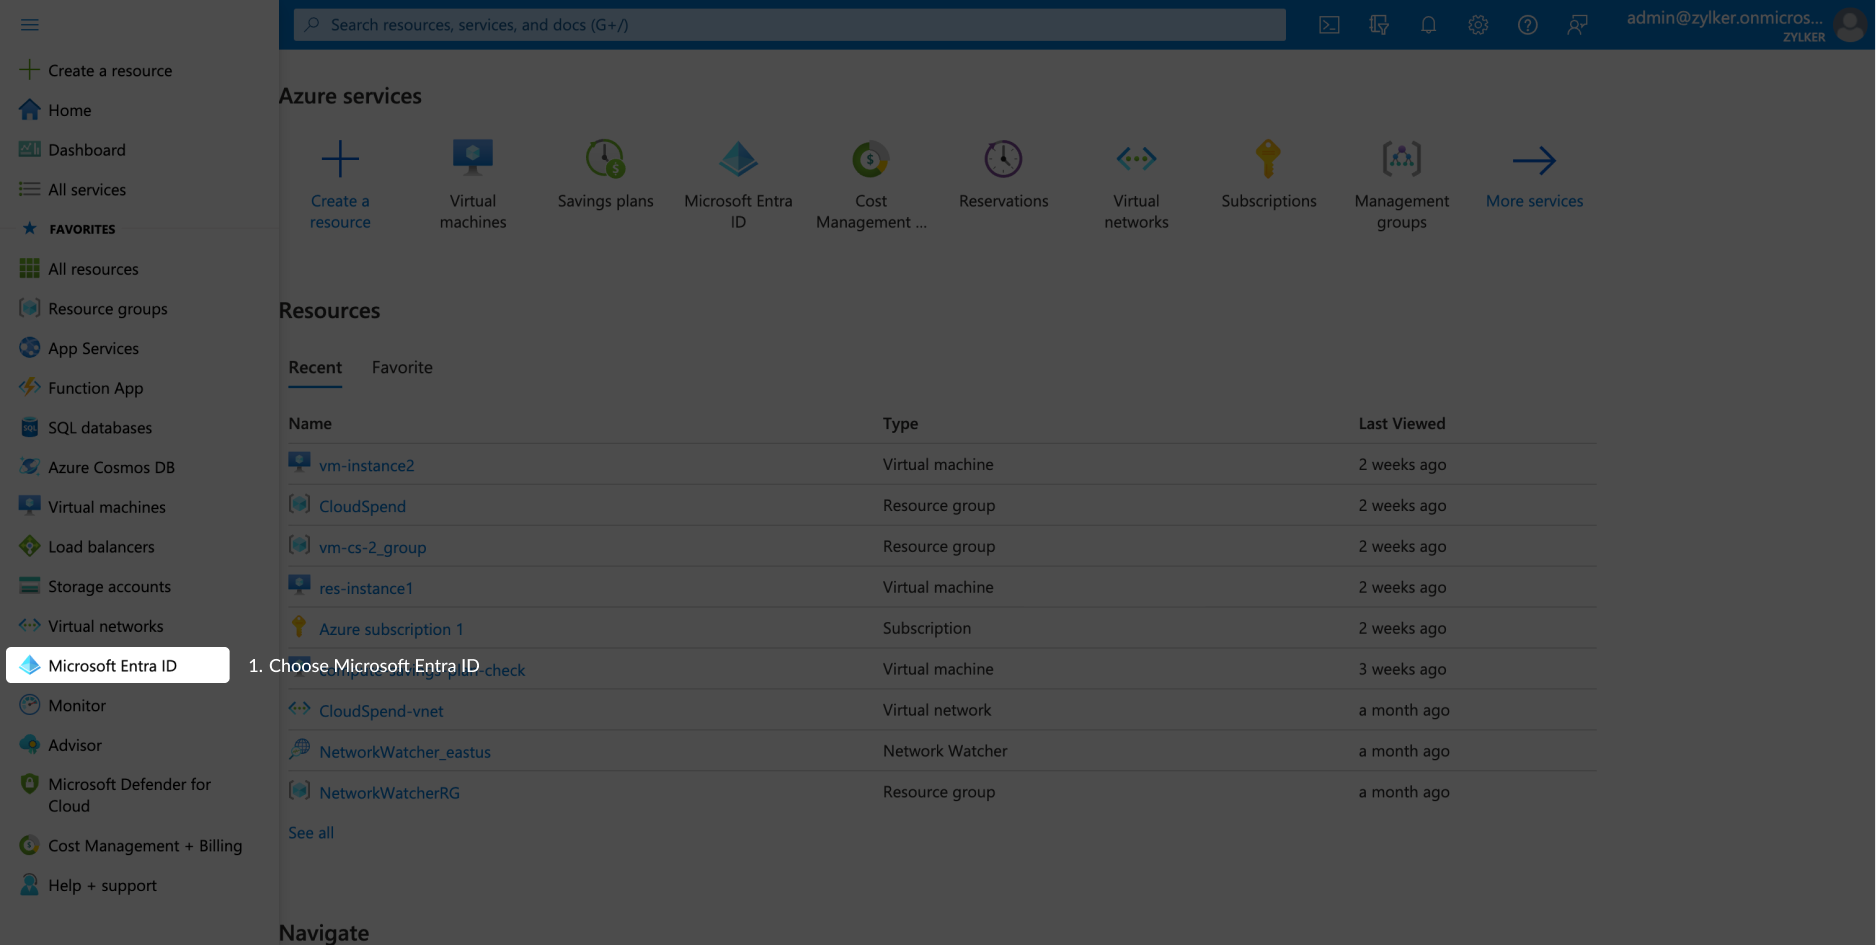
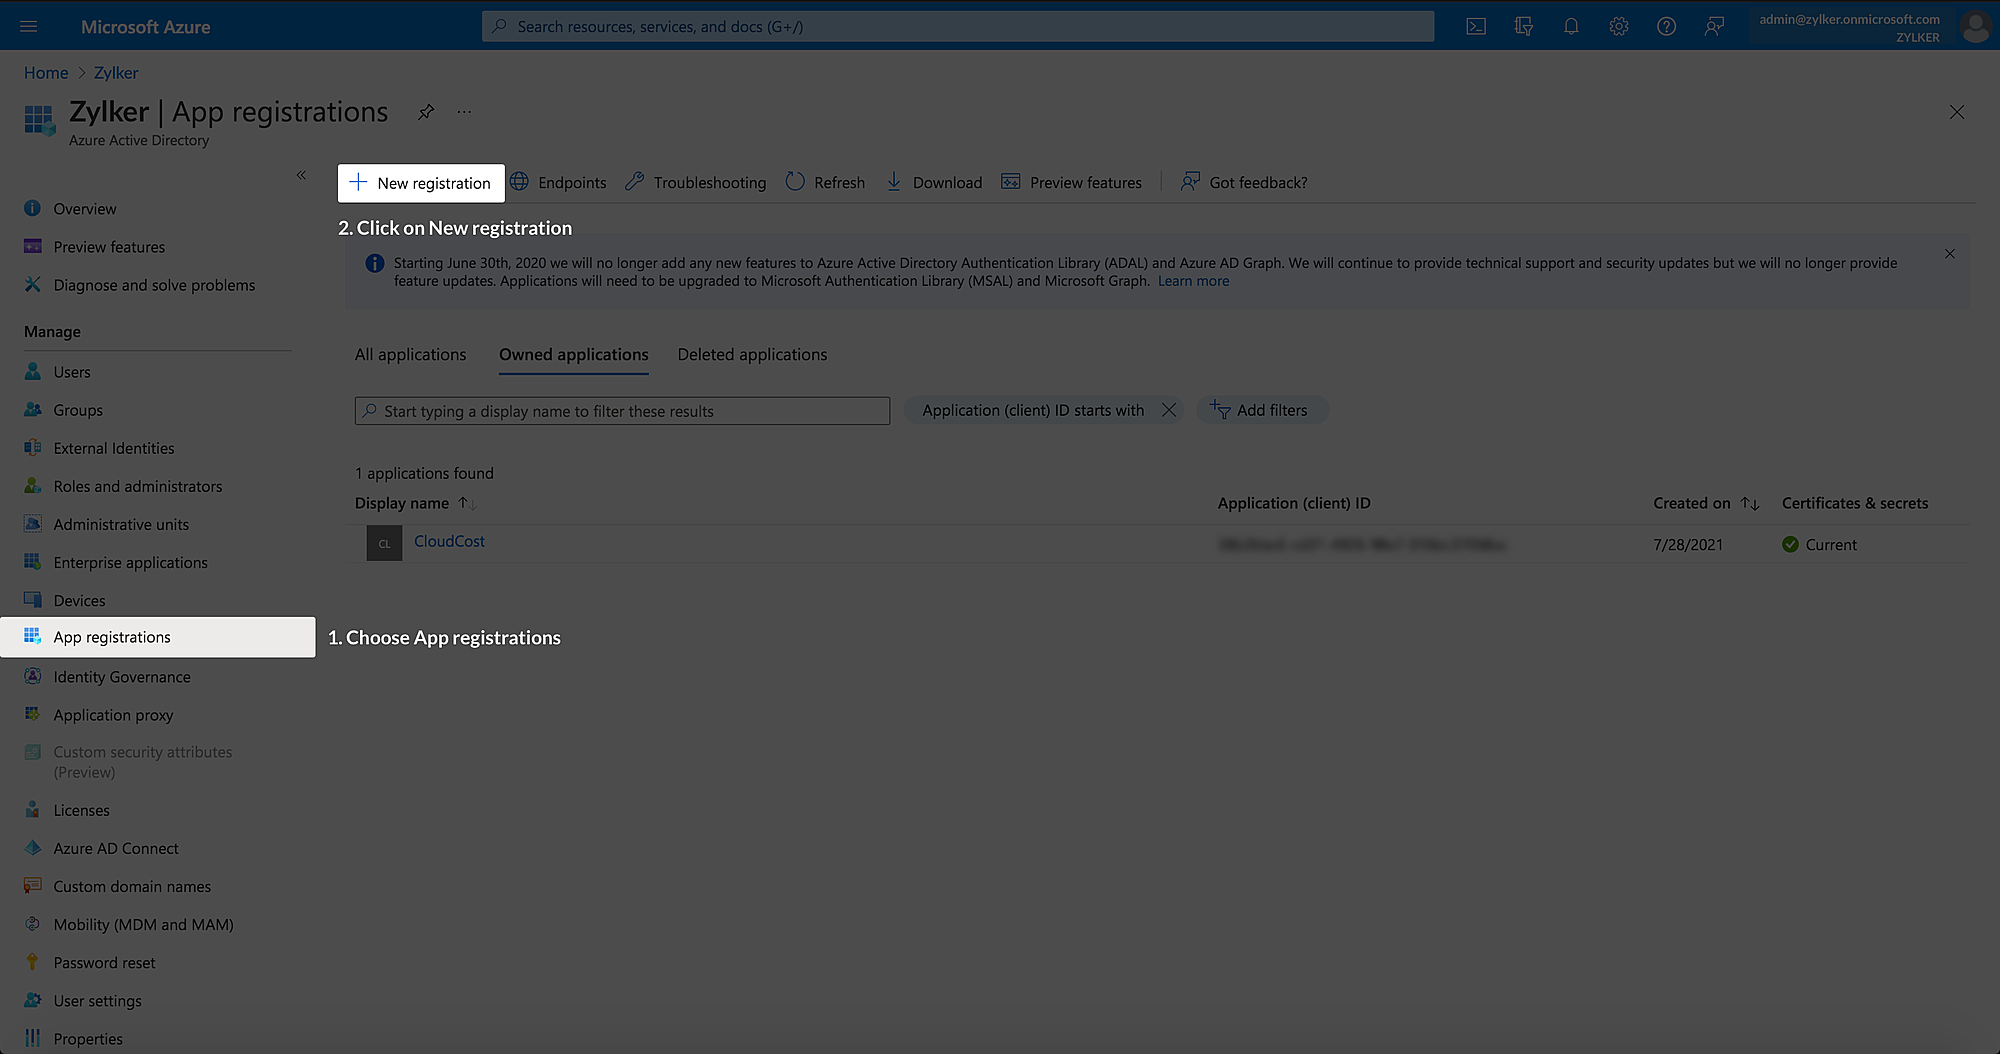
- Click New registration in the App Registrations tab.
In the Register an application window, enter the following details:
Field Description Name The unique name of the application.
Example: CloudSpend Azure AppSupported account types The account types supported by the application. Select Accounts in any organizational directory or Accounts in this
organizational directory only.Redirect URI A valid web URI. This is an optional field.
Example: https://localhost:8080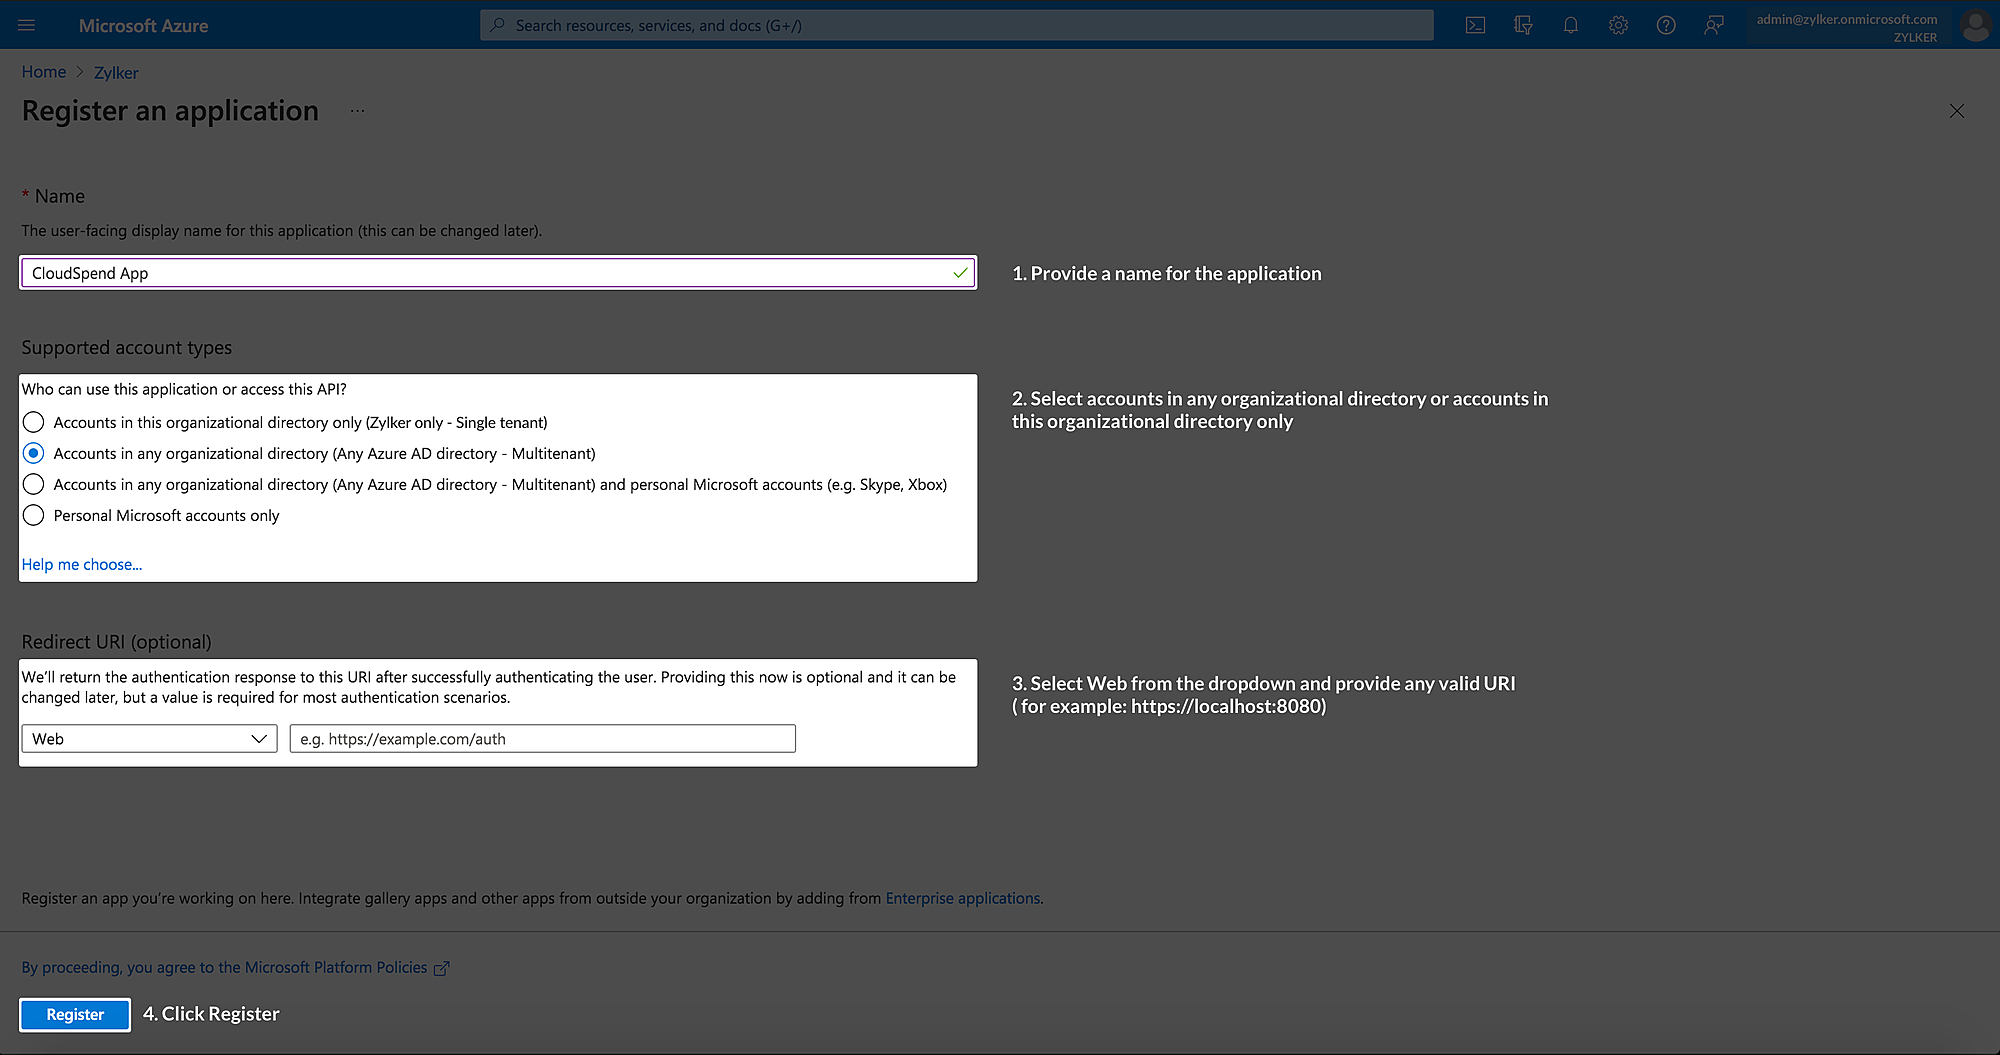
- Click Register.
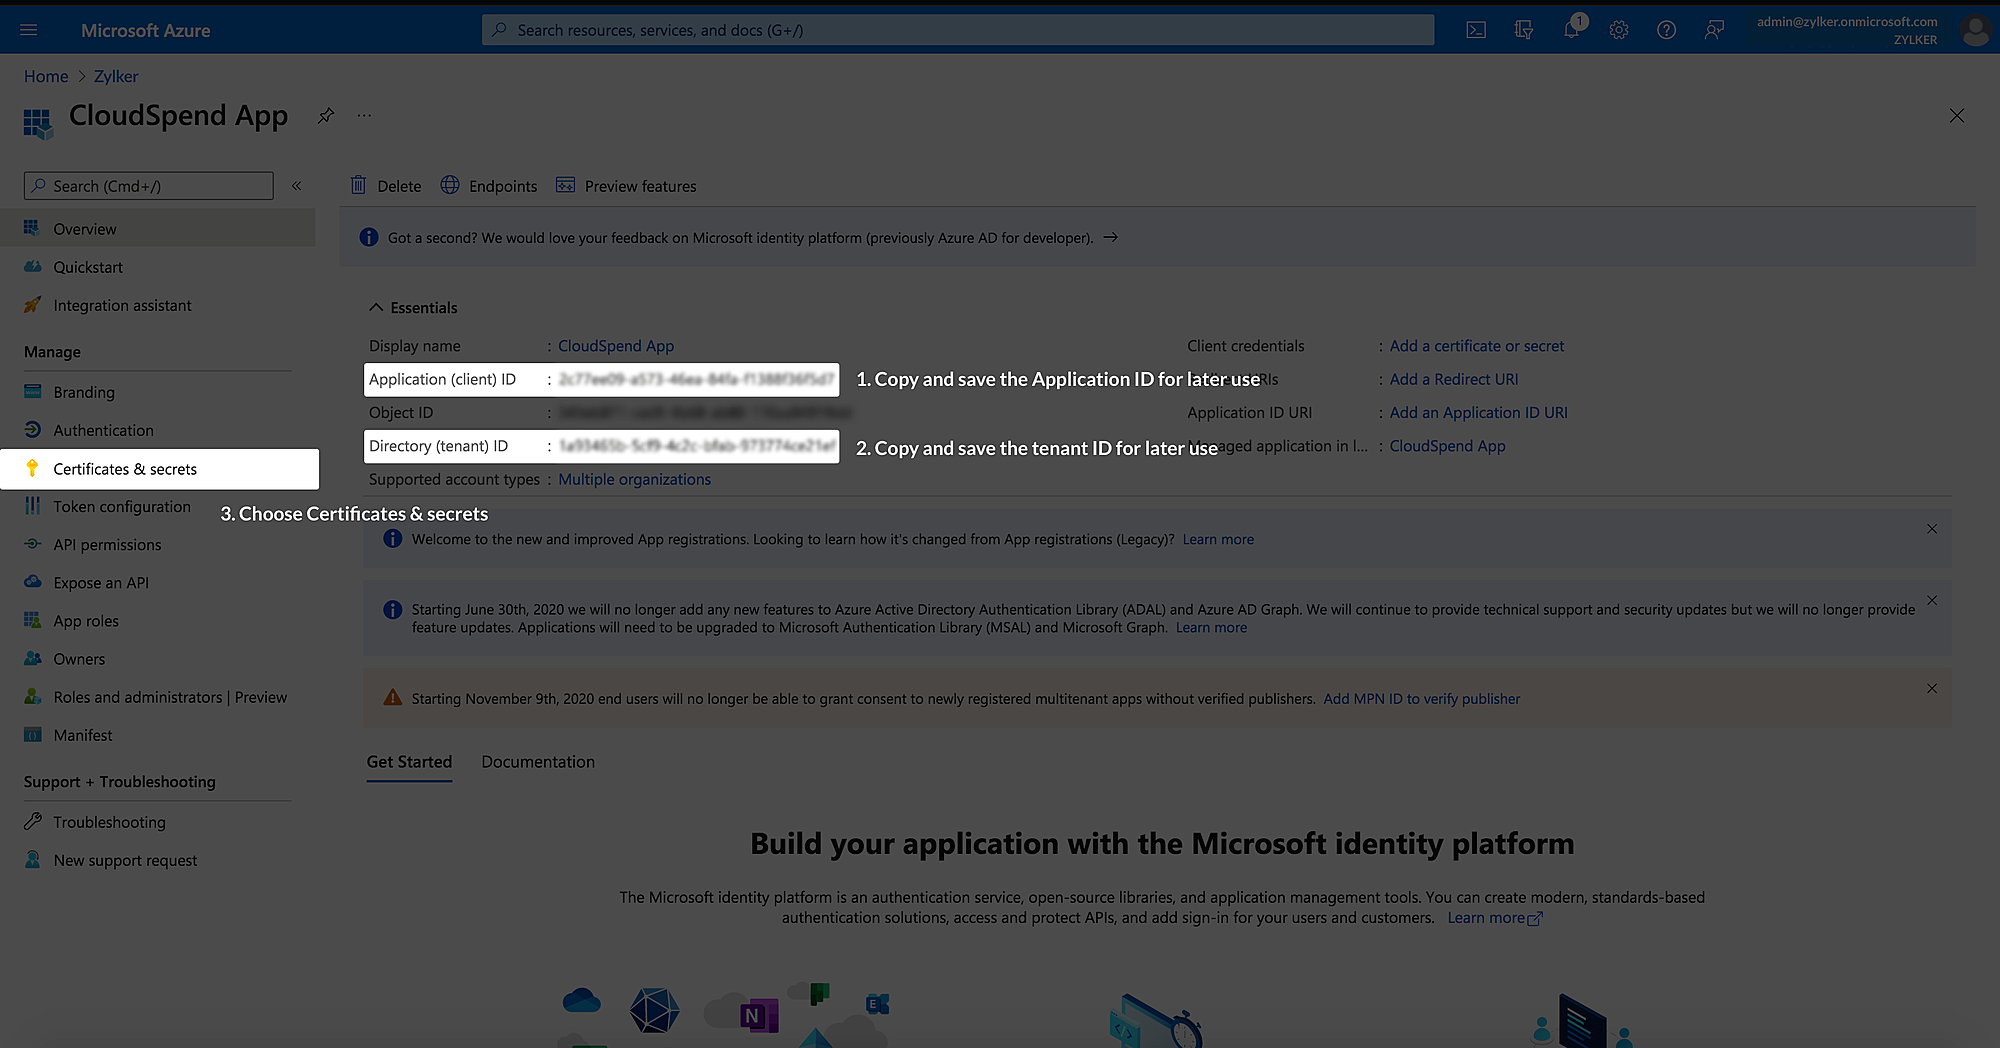
- After registering the application in the Azure portal, you will be redirected to the Essentials section with the application details. Copy the Application (client) ID and Directory (tenant) ID to save them for later use.
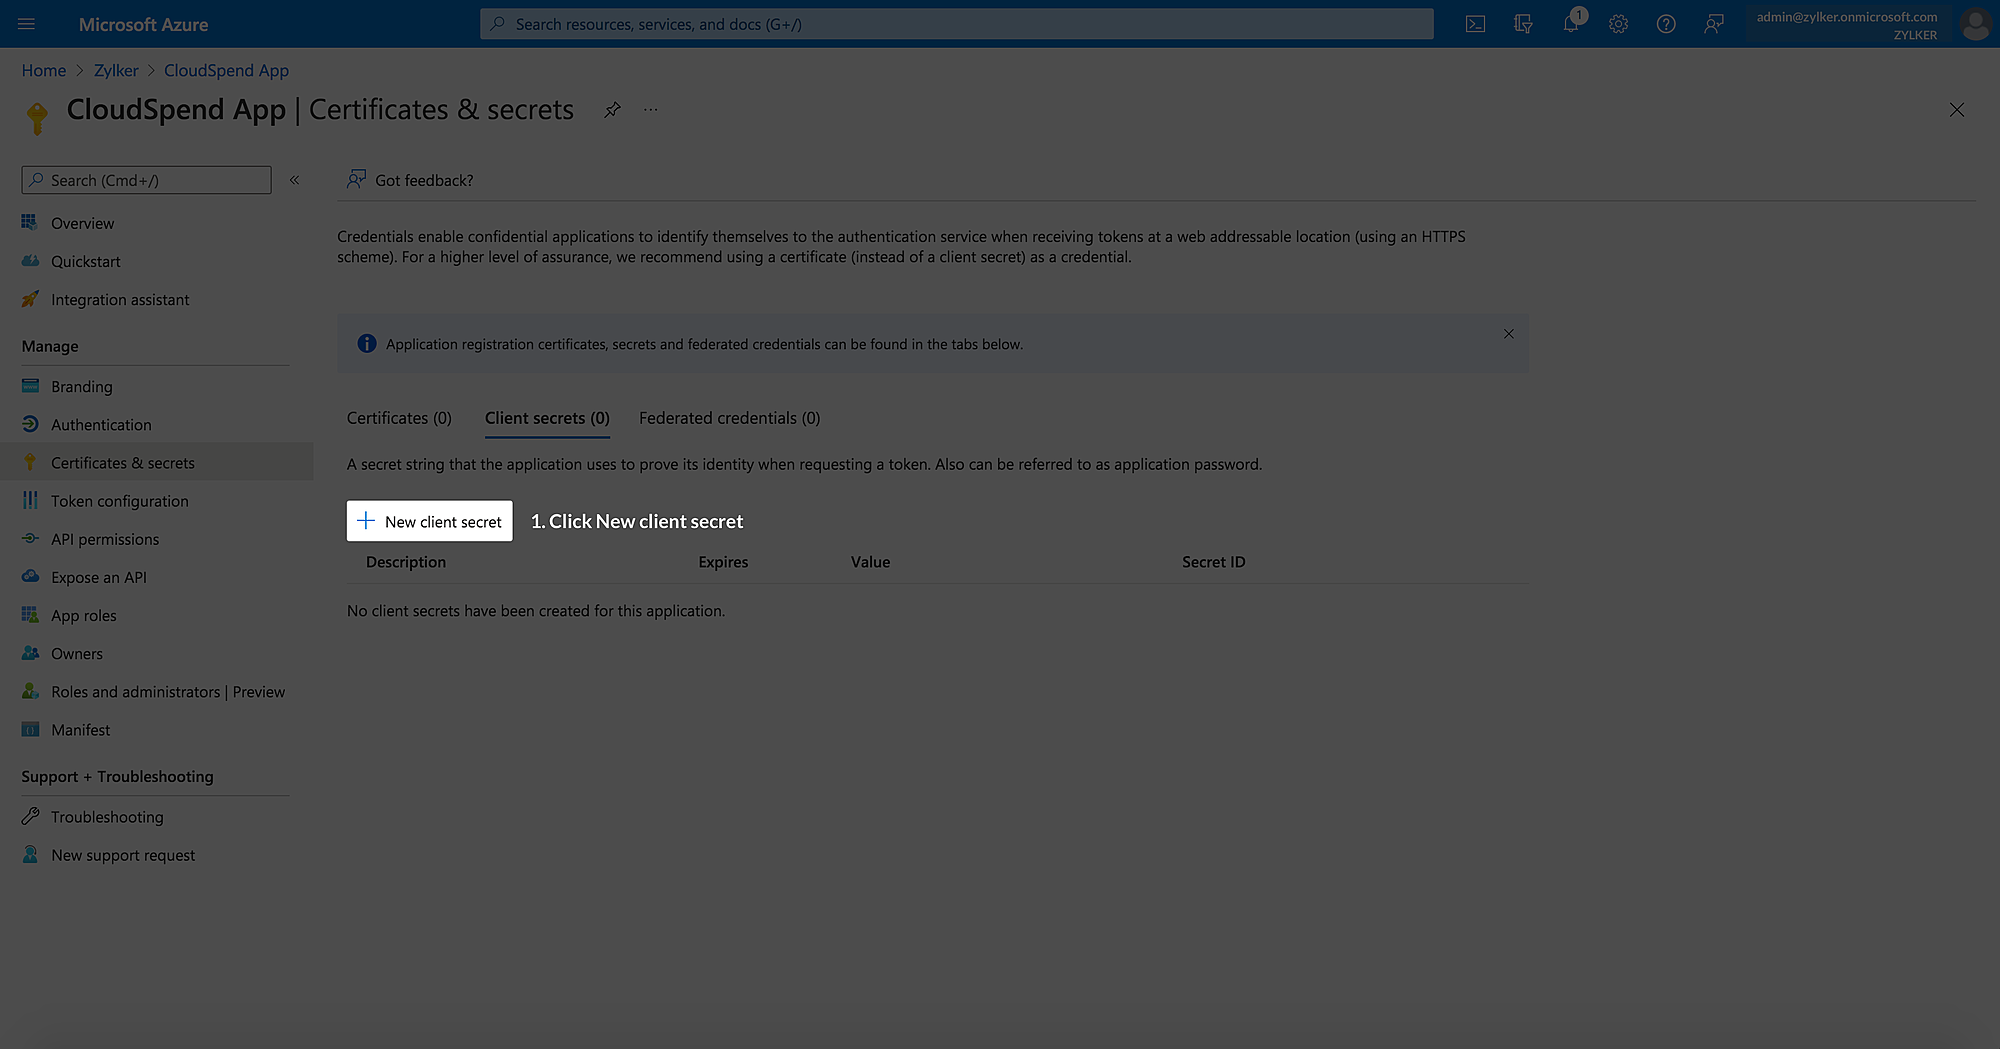
- Navigate to Manage > Certificates & secrets.
- Click +New client secret in the Client secrets section.
In the Add a client secret window, enter the following details:
Field Description Description The client secret description. Expires The expiry date. Select Custom from the drop-down list. Start The start date. End The end date. Select the maximum end date. 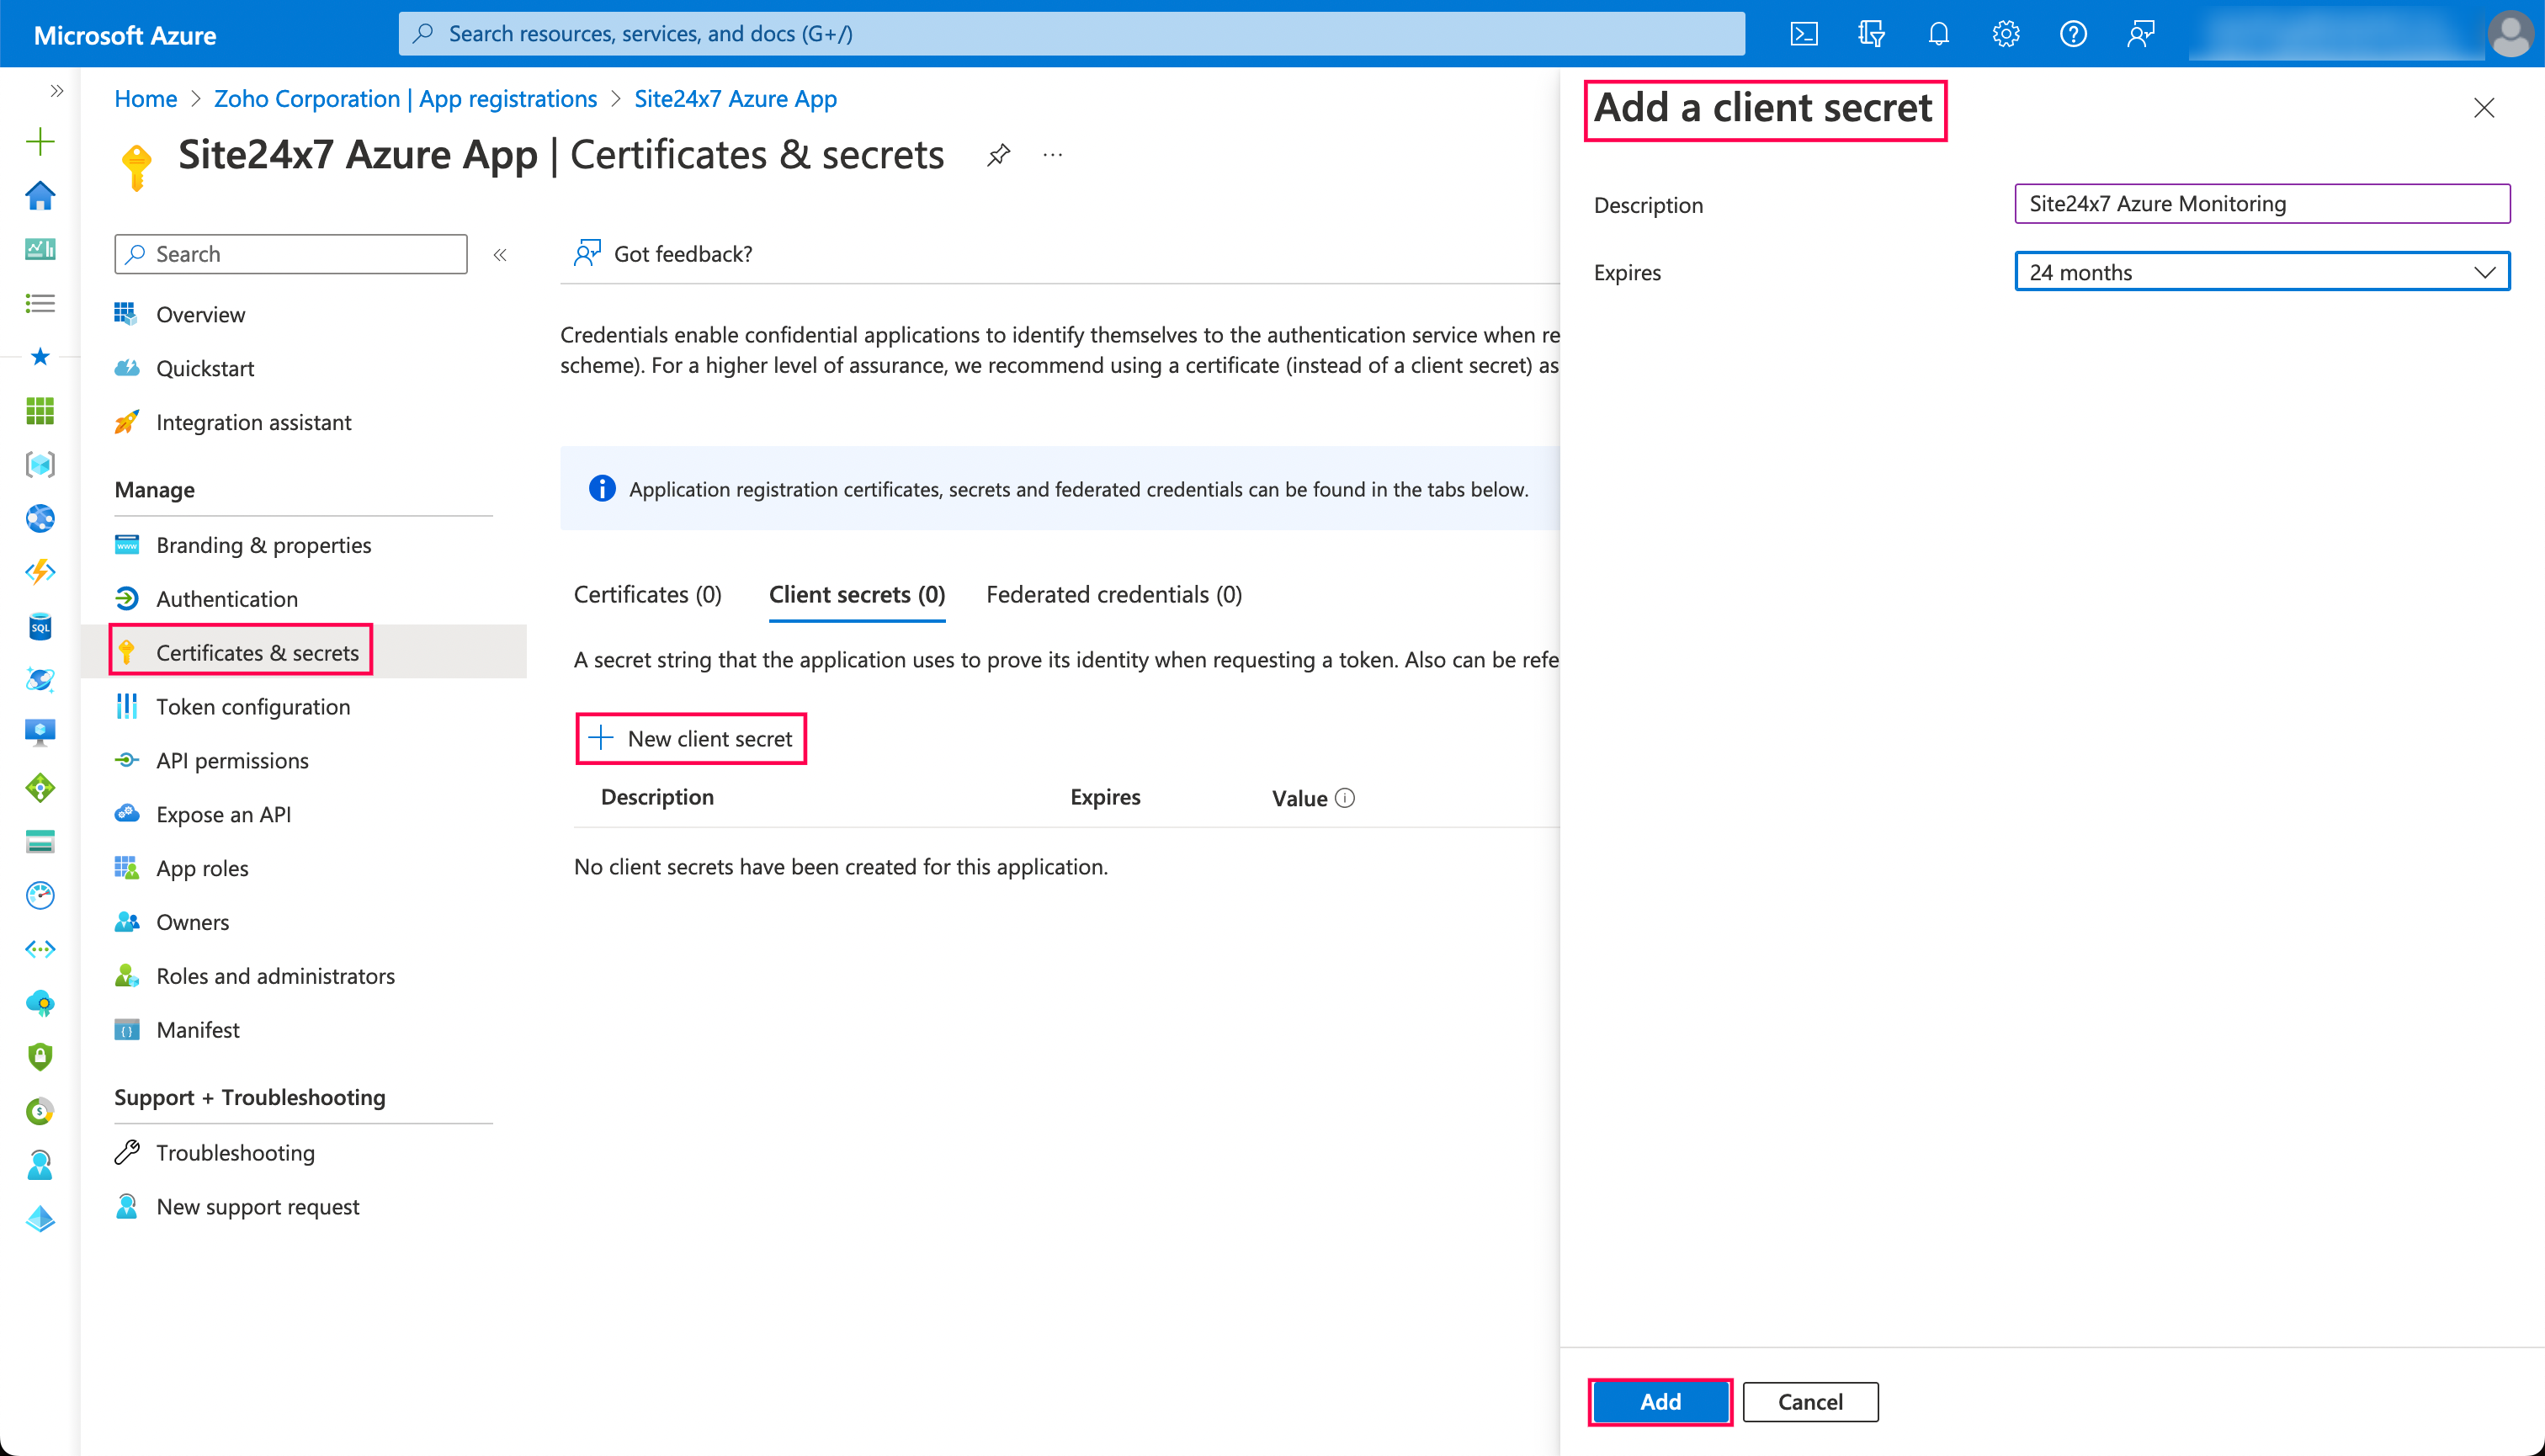
- Click Add.
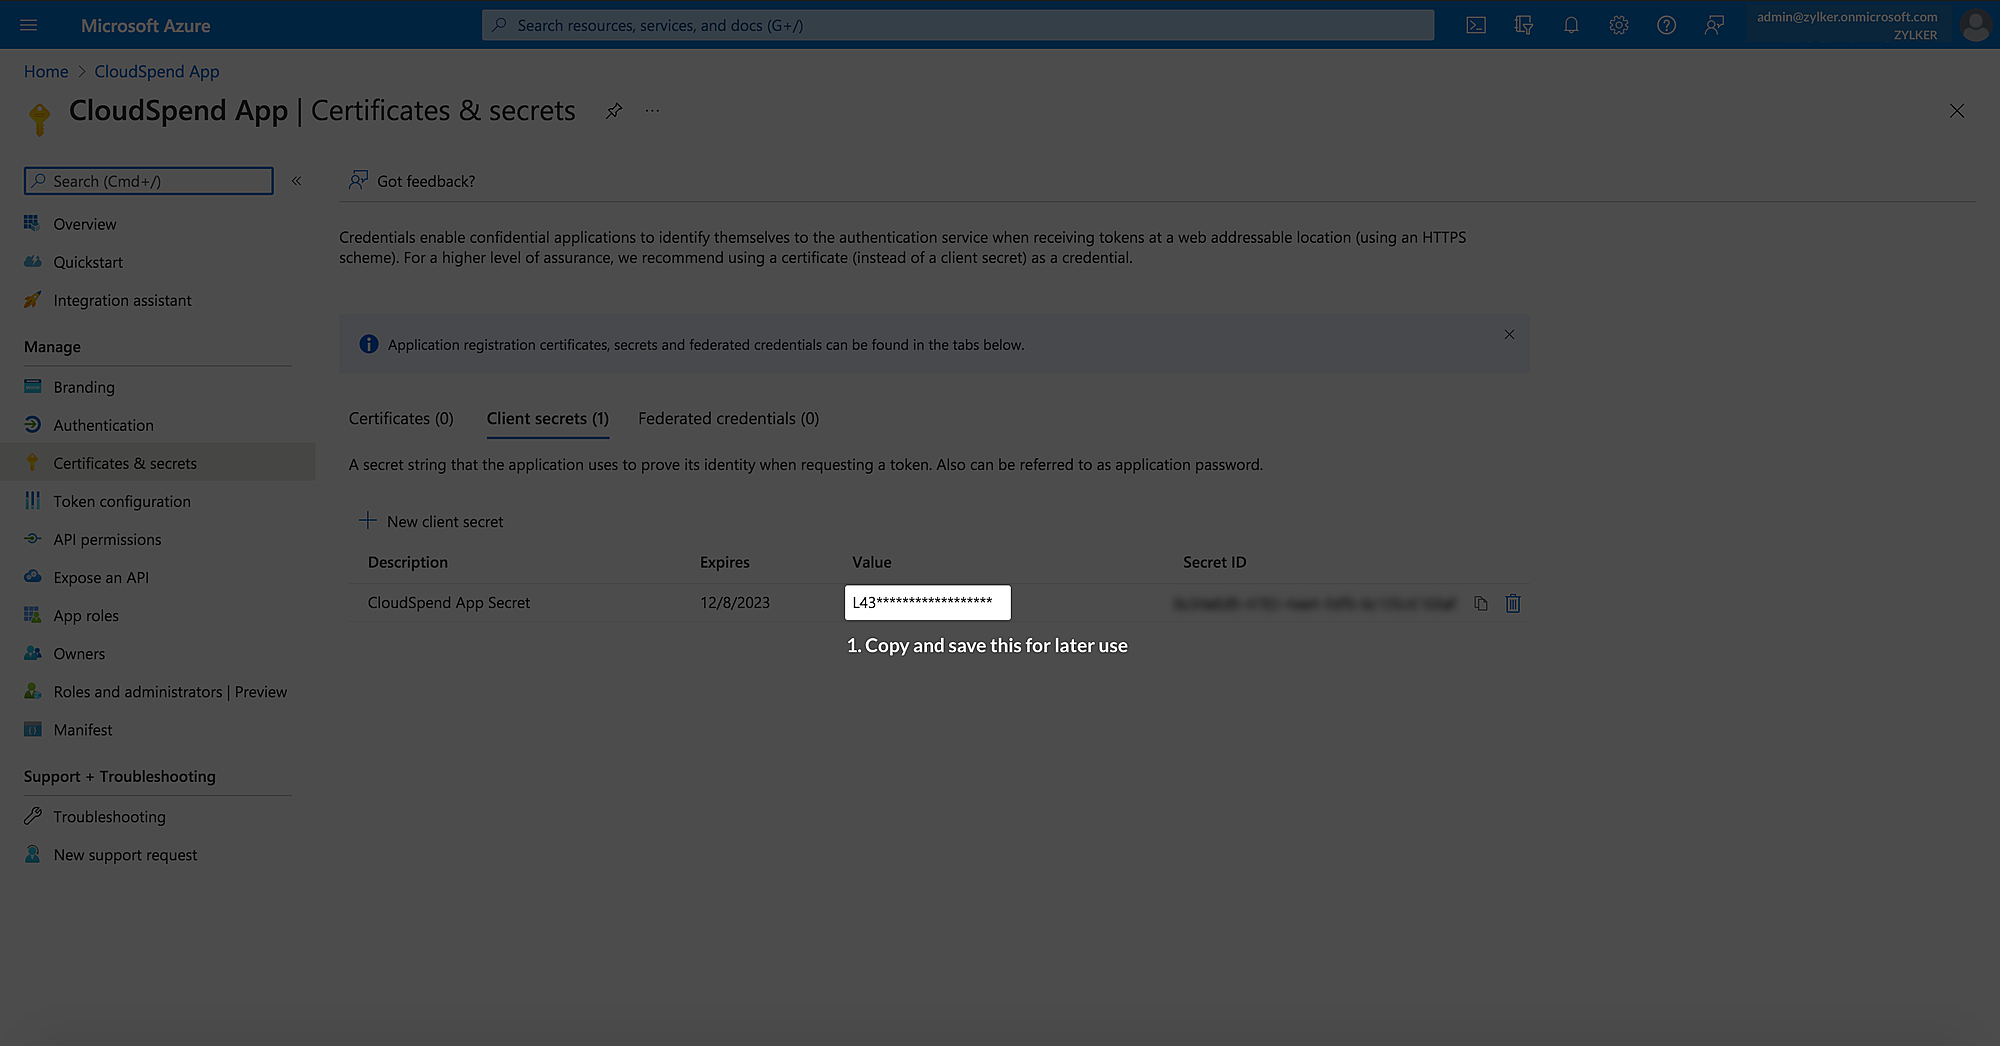
- Copy the Value that appears under the New client secret section and save it for later use. Note that this value will disappear after a while, so copy and paste the value as soon as you save it.
Provide programmatic access to CloudSpend for Exports
After successfully registering an application in Microsoft Entra ID, you have to add the required roles to the registered application. You can add the Storage Blob Data Reader role to a registered application for the storage account after creating exports.
| Azure account type | Required role |
|---|---|
| Pay As You Go (PAYG) | Reader, Reservations reader, Savings plan reader |
| Microsoft Customer Agreement (MCA) | Reader, Billing account reader, Reservations reader, Savings plan reader |
| Enterprise Agreement (EA) | Reader, Enrollment reader, Reservations reader, Savings plan reader |
Ensure that you enable:
- Reservations reader role across all reservations and the Savings plan reader role across all savings plans in your Azure account.
- Billing account reader role for MCA and Enrollment reader role for EA Azure account type at the billing account level.
Create Exports
To create and configure exports, follow the steps below:
- Log in to the Microsoft Azure portal and navigate to the Cost exports section.
- Ensure that you're on the Billing account billing scope.
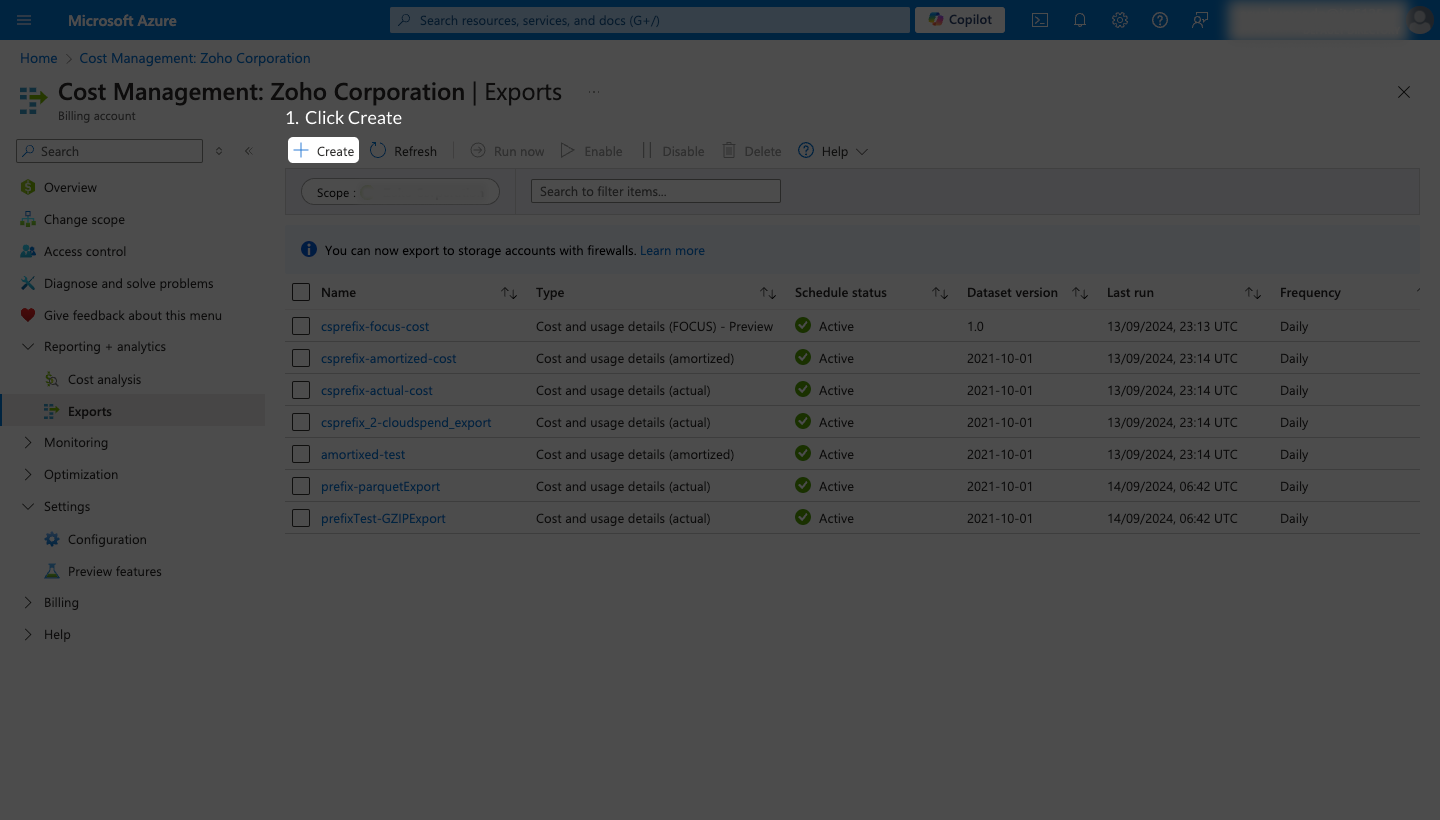
- Click Create.
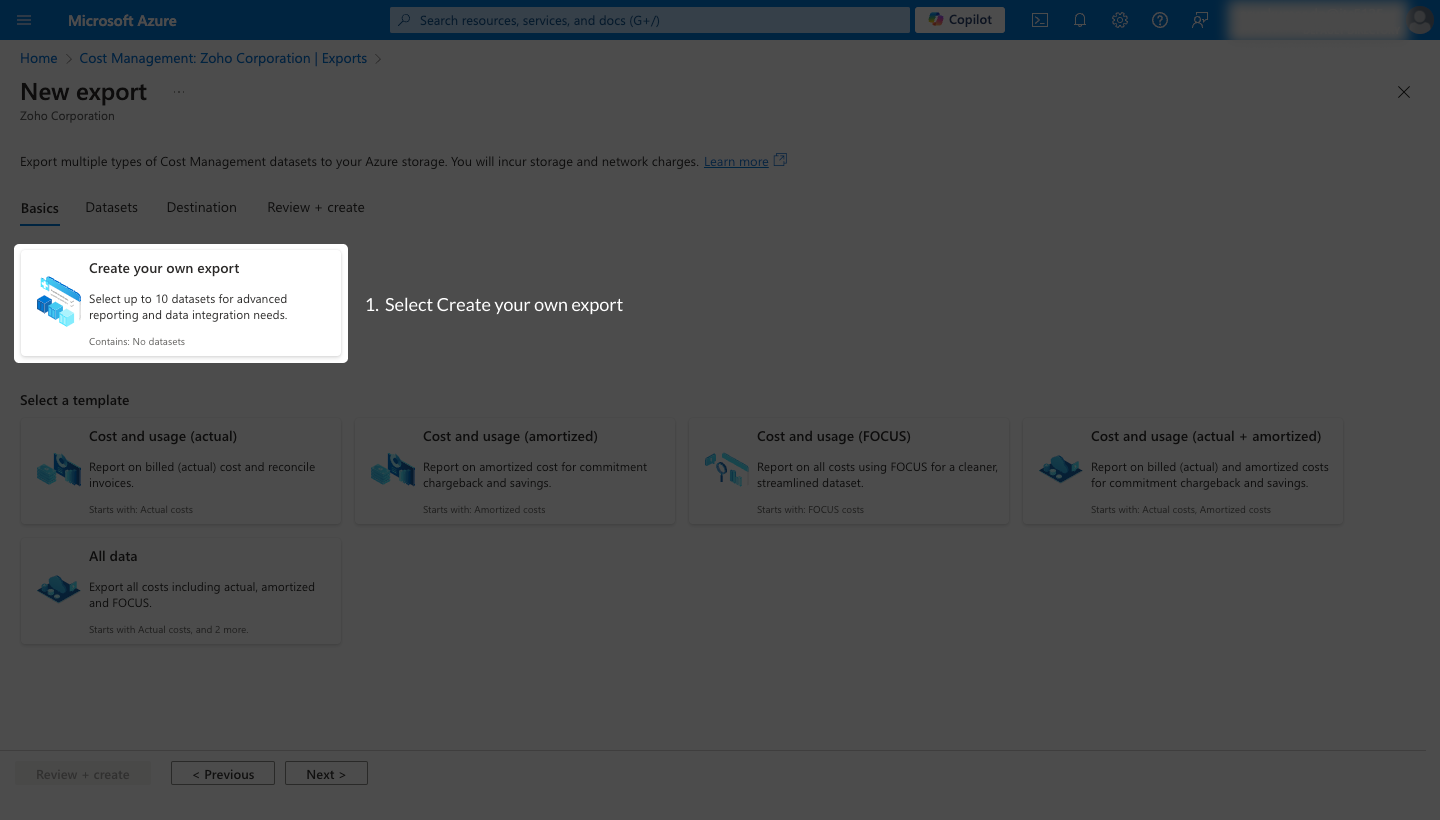
- Select Create your own export.
- In the Add export section, enter the following details:
- Type of data: Select Cost and usage details (actual).
- Export name: Enter an export name. Note down the export name for configuration in CloudSpend.
- Dataset version: Select the latest dataset version.
- Frequency: Select Daily export of month-to-date costs.
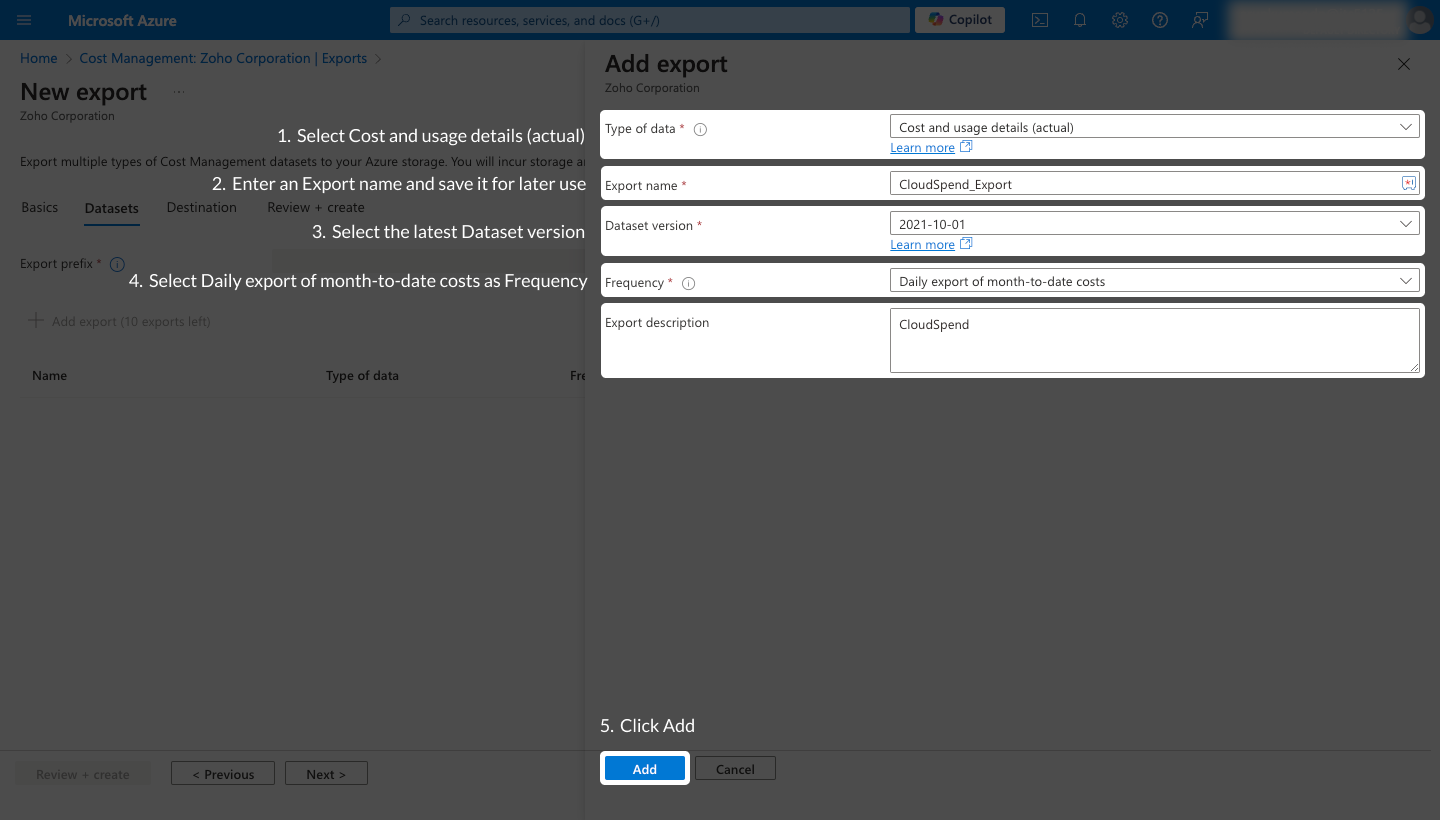
- Click Add.
- Enter the Export prefix and click Next.
- Select Azure blob storage as the Storage type for your export.
- If you have an existing storage account, select the Use existing option. To create a new storage account, select Create new and follow the prompts to create a storage account.
- Select a Subscriptionfrom which you want to export cost data and provide the following details:
- Storage account: Select the applicable storage account. Note down the storage account name for configuration in CloudSpend.
- Container: Provide a container name. Note down the container name for configuration in CloudSpend.
- Directory: Enter a directory path within the container where the exported data will be placed. Note down the directory path for configuration in CloudSpend.
- Format: Select CSV as the format for the exported data.
- Compression type: Select Gzip as the compression type.
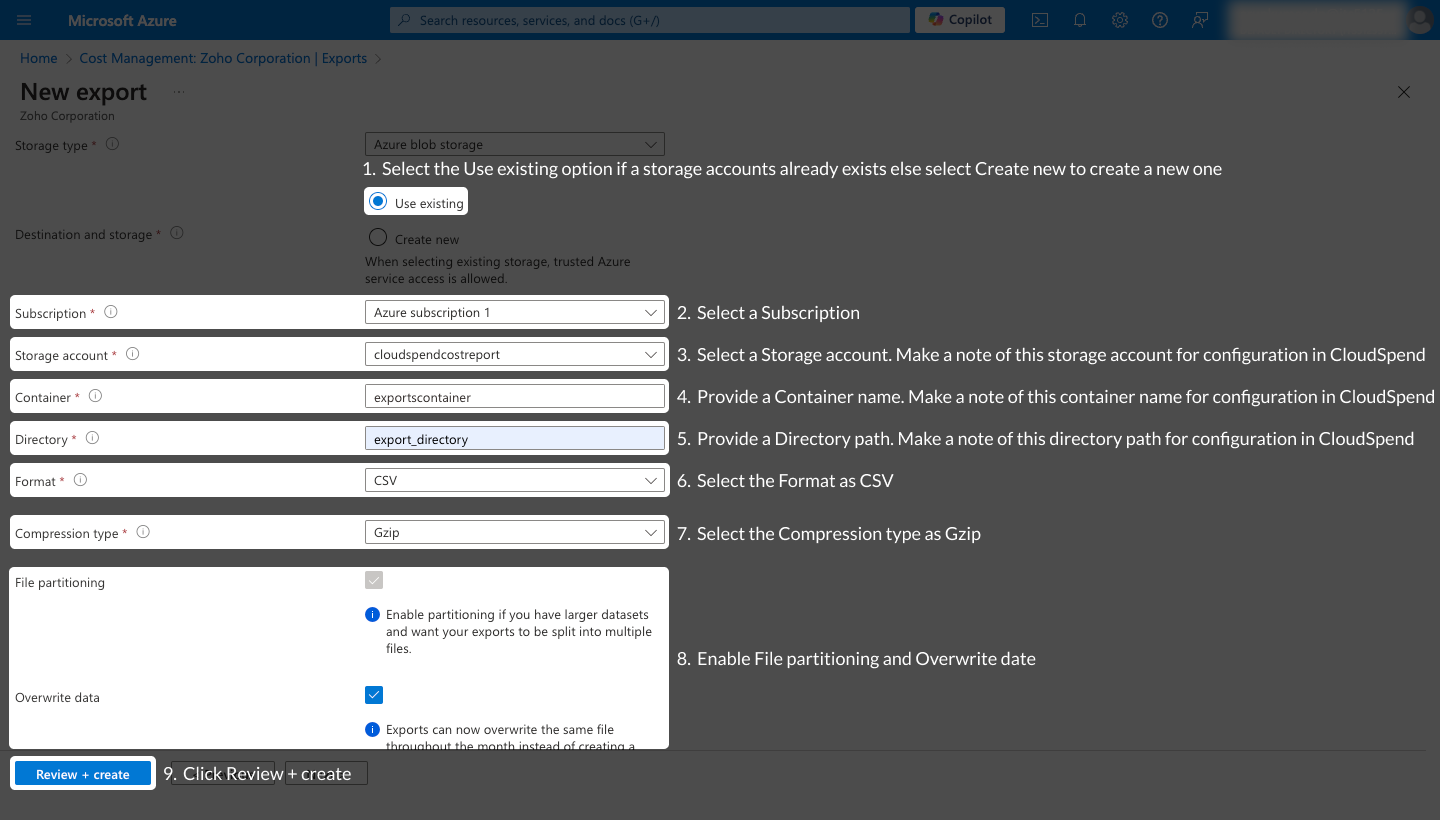
- Enable the File partitioning and Overwritedata options.
- Click Review + create to verify your settings and start the export process.
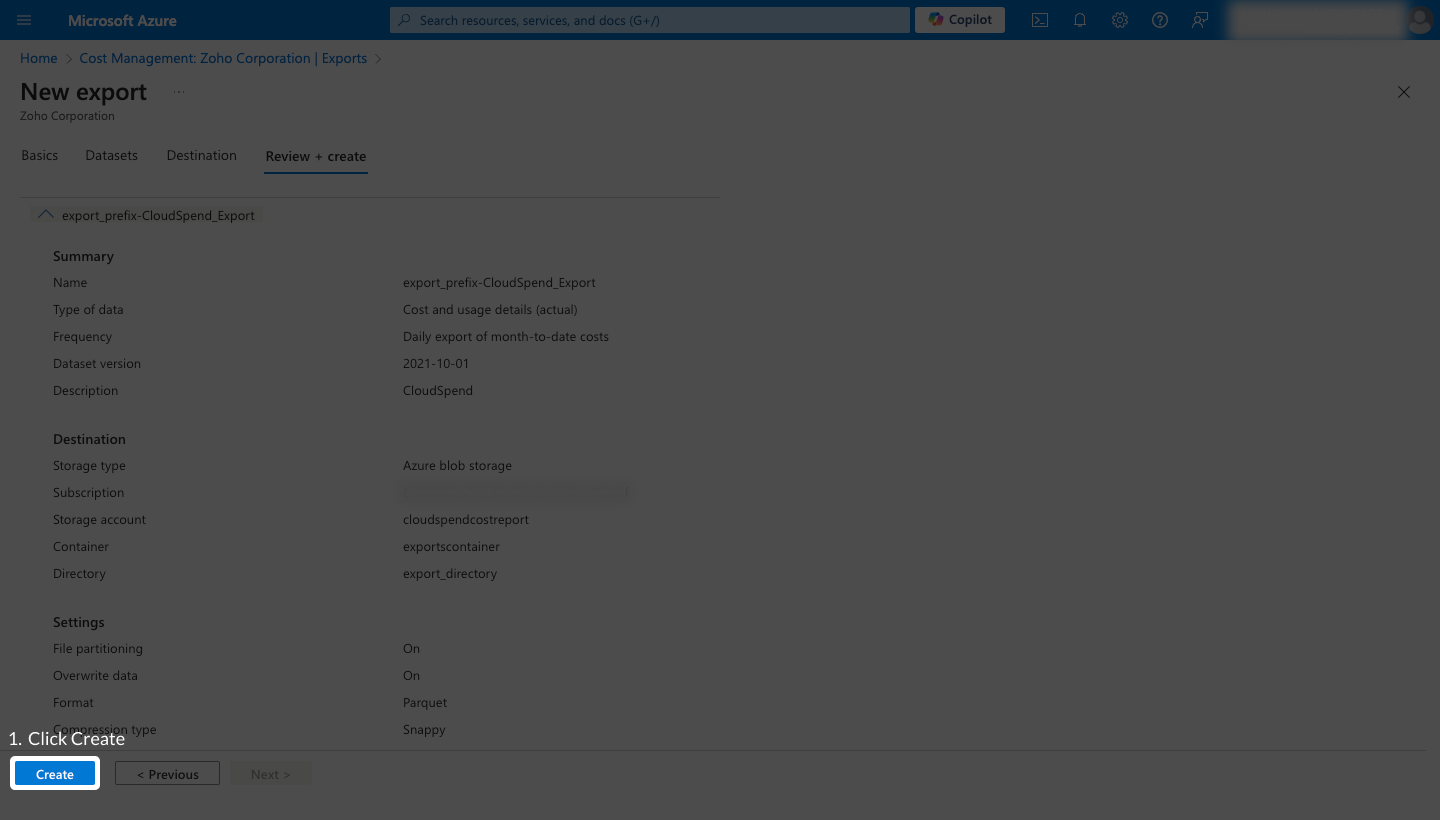
Assign roles to the application for storage account
To assign roles to the application for storage account follow the below steps:
- In the Microsoft Azure portal search for Storage accounts and select the it from the search results.
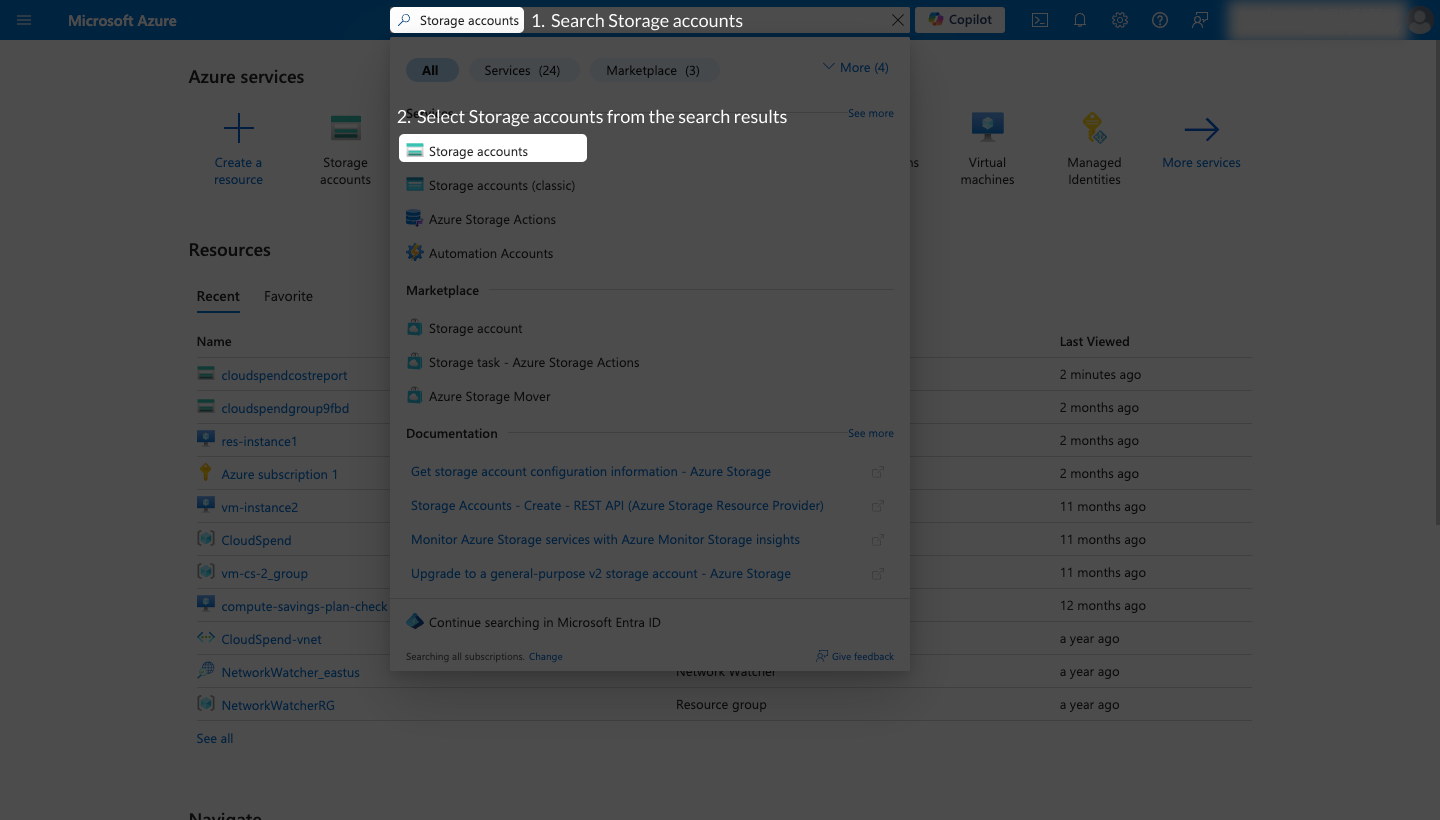
- Select the storage account that you created during the export.
- Select Access control (IAM) from the left navigation menu.
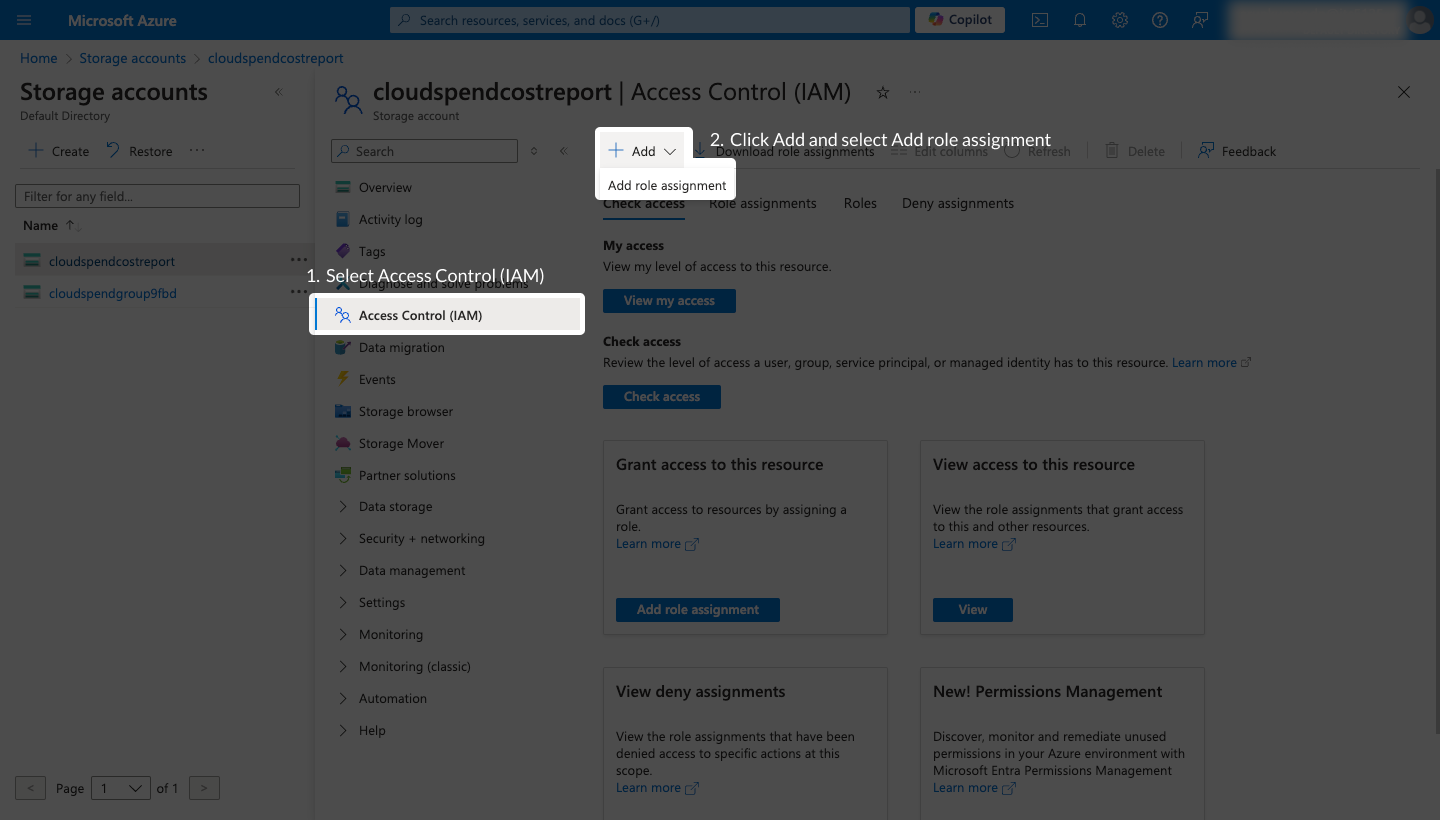
- Click Add and select Add role assignment.
- On the Role tab, search for and select the Storage Blob Data Reader role.
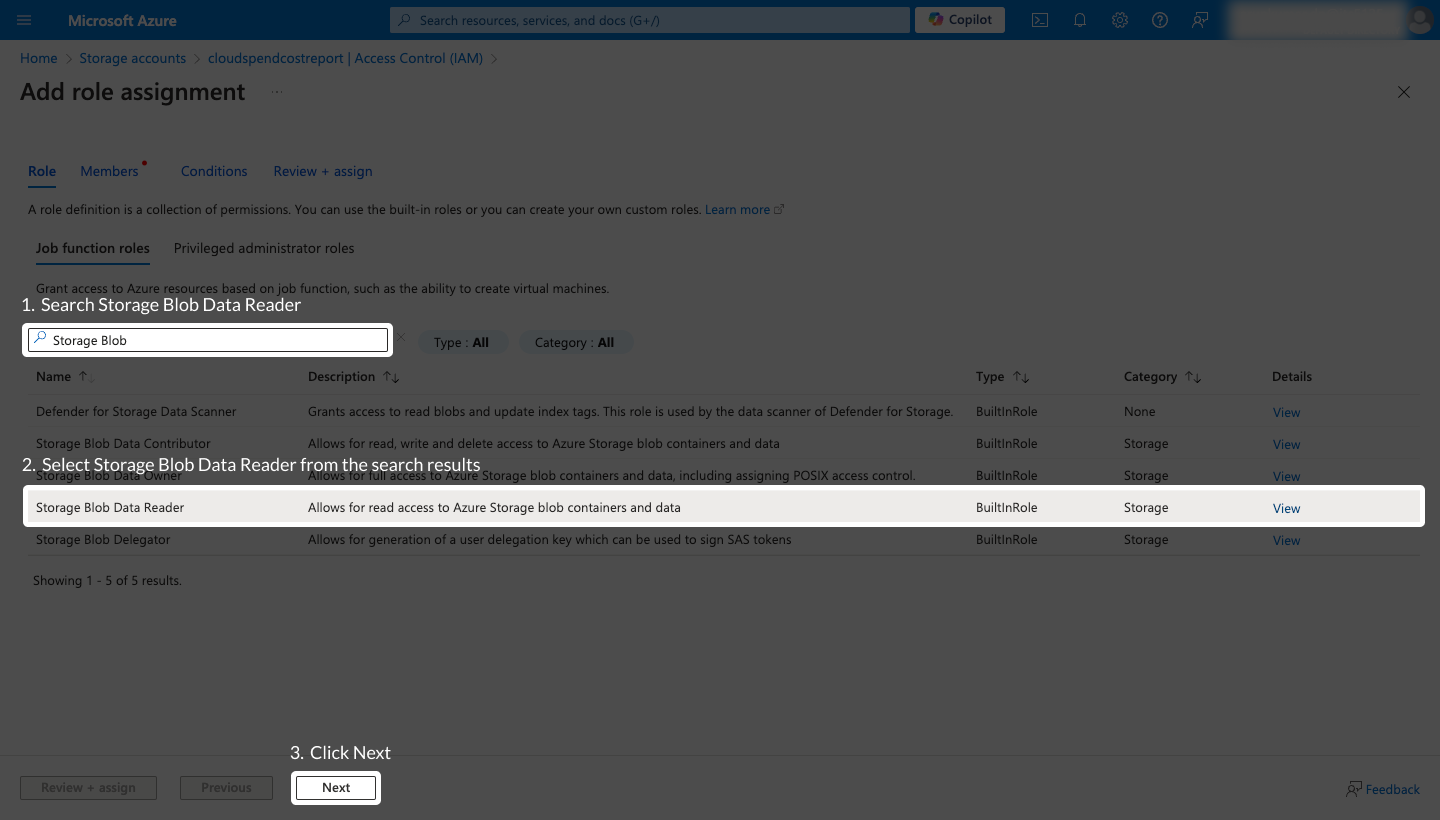
- Click Next.
- On the Members tab, choose User, group, or service principal for the Under Assign access to option.
- Click Select members, and search the application which has to be integrated in CloudSpend.
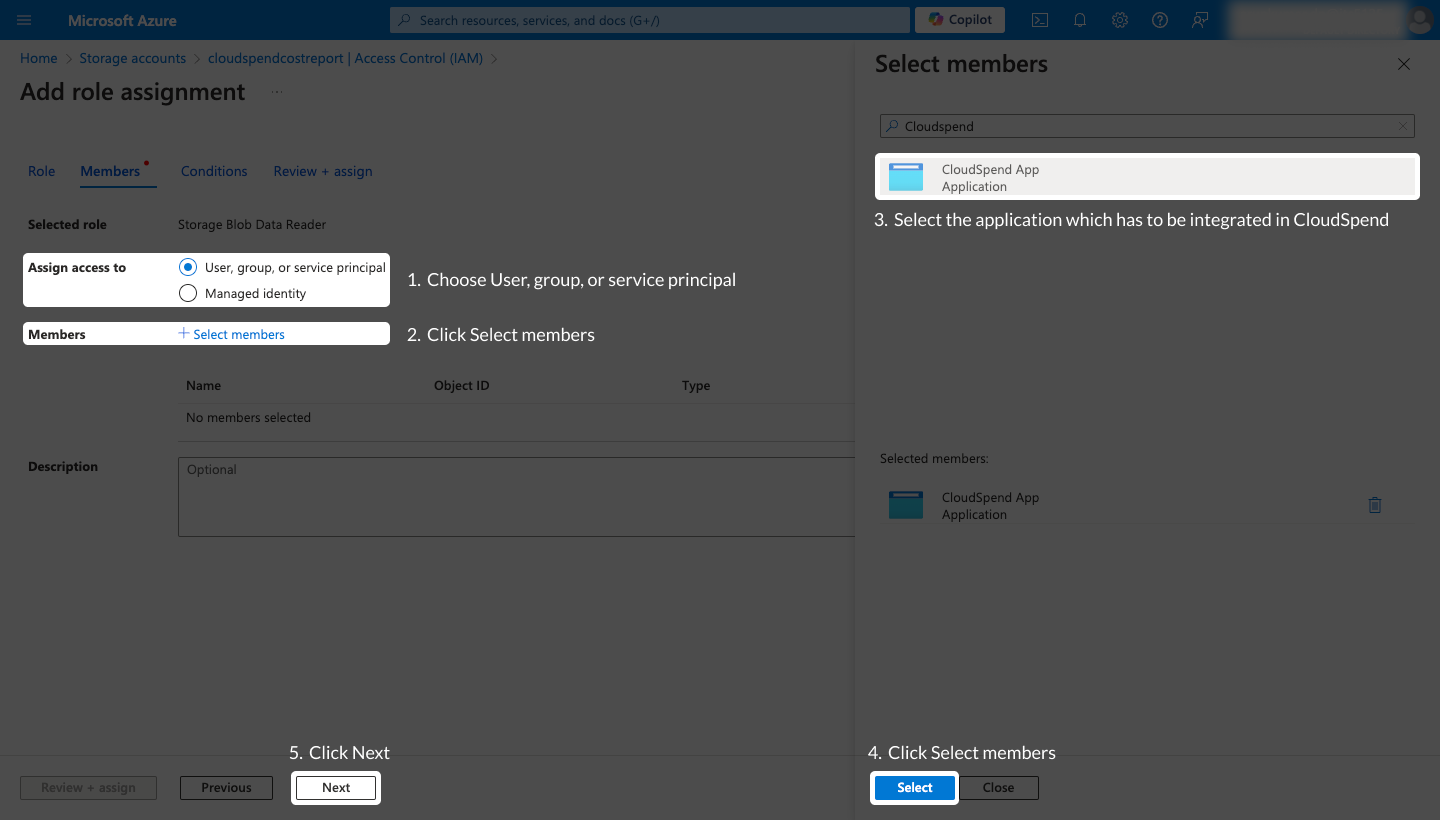
- Select the application from the search results and Click Select.
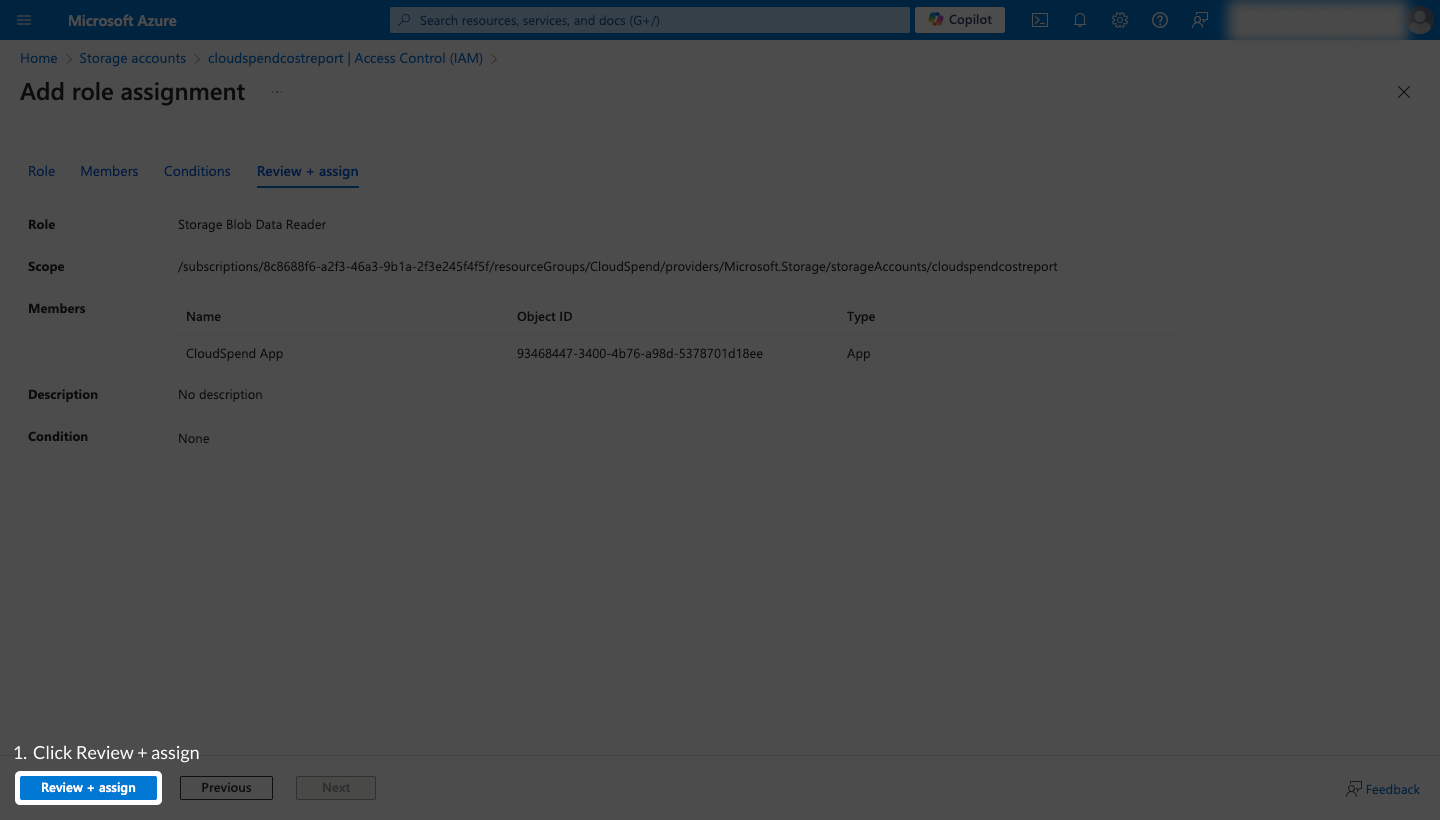
- Click Next and review your selection.
- Click Review + assign to complete the role assignment.
Provide programmatic access to CloudSpend for Consumption API
After successfully registering an application in Microsoft Entra ID, you have to add the required roles to the registered application. You can add the following roles to a registered application either through Subscriptions or Managementgroups based on the Azure account type.
Ensure that you enable:
- Reservations reader role across all reservations and the Savings plan reader role across all savings plans in your Azure account.
- Billing account reader role for MCA and Enrollment reader role for EA Azure account type at the billing account level.
Obtaining the required permissions through Management groups
To obtain the required permissions through Management groups, follow the steps below:
- Go to Management groups.
- Select the management group that has all the required subscriptions you want to track costs for. If you do not have a management group, follow the steps in the Creating a new Management group section below to create a new management group.
- Select Access Control (IAM) tab.
- Click Add role assignment.
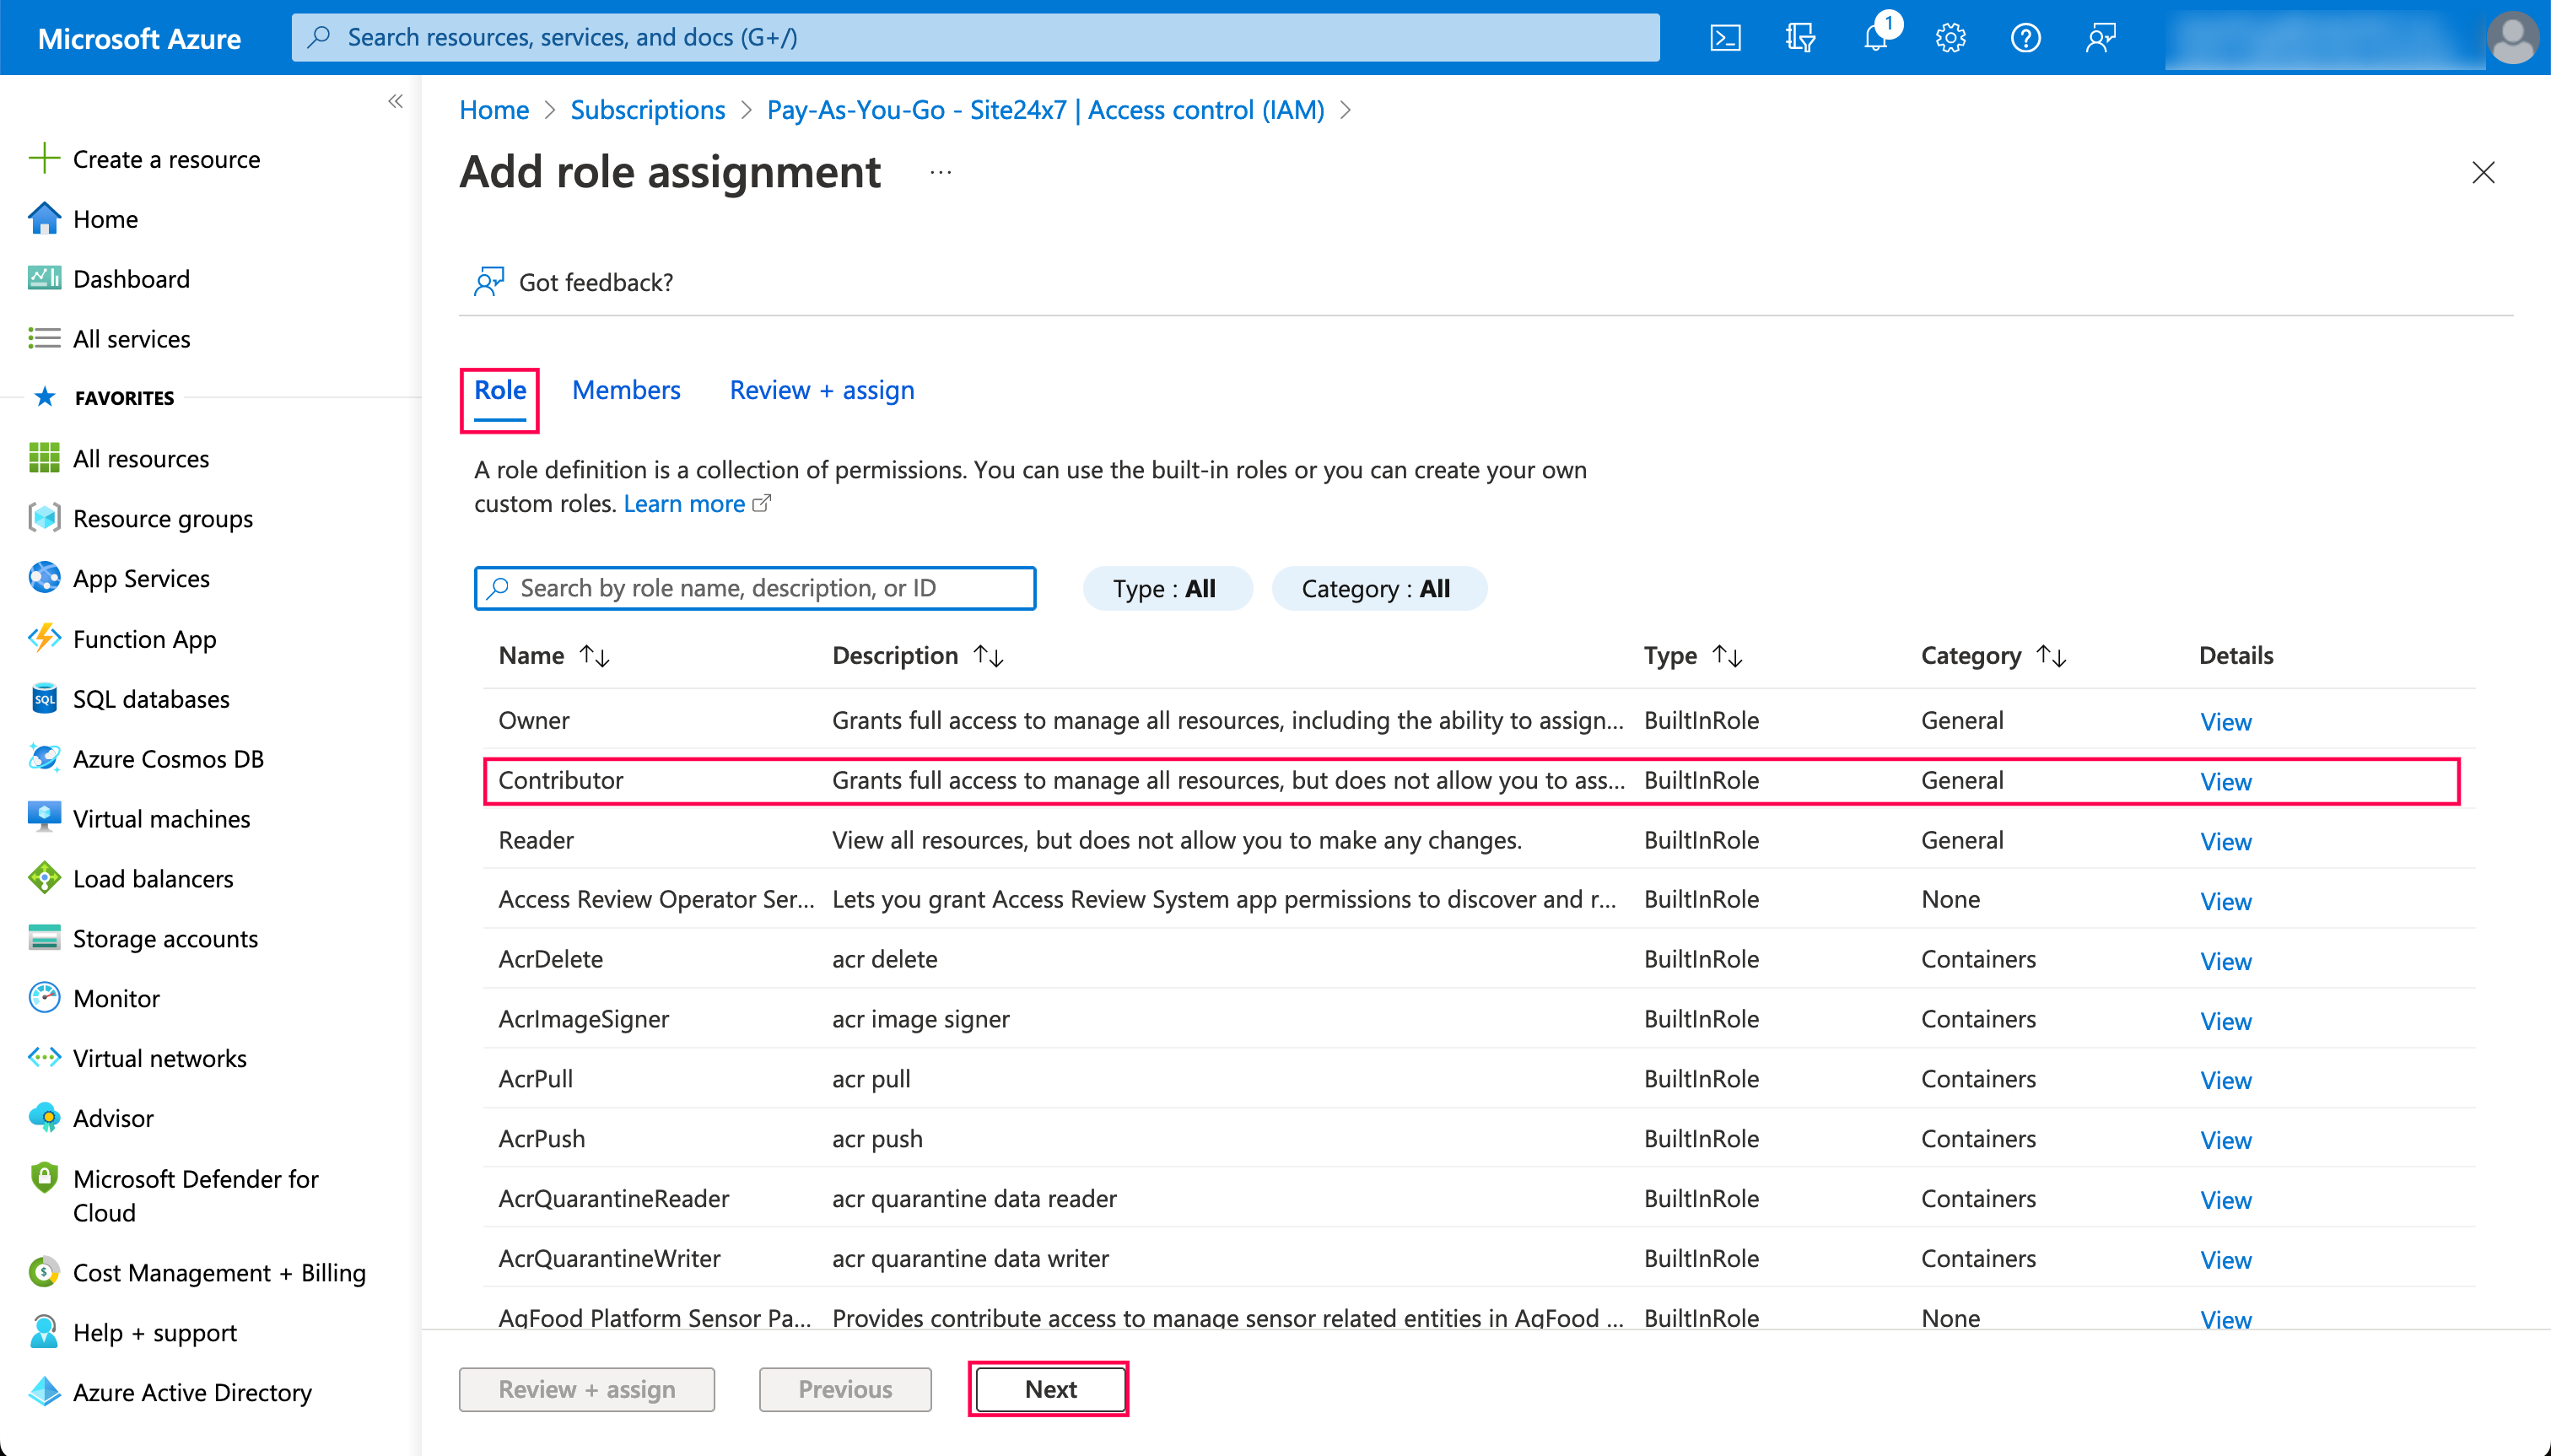
- On the Add role assignment page, select the required role based on the account type from the Roles section.
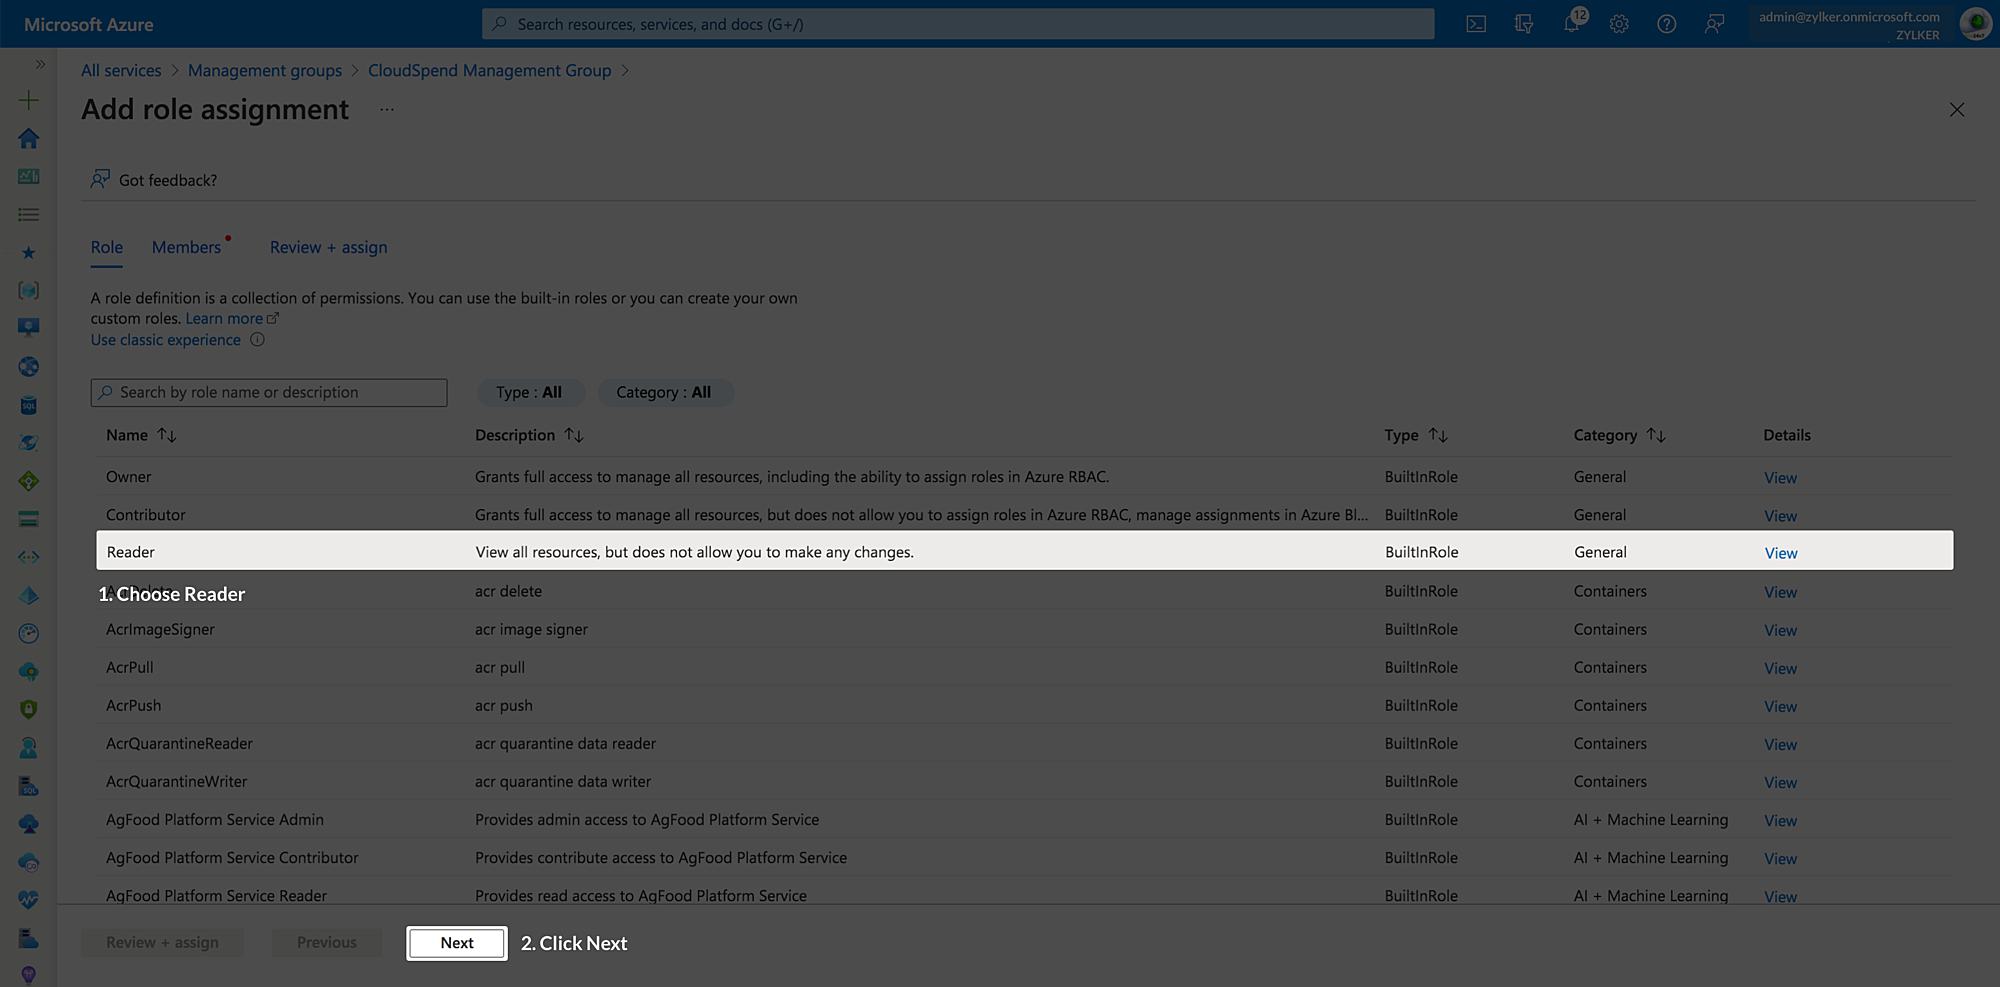
- Click Next.
- Select the custom application that you created from the Members > Select members drop-down list.
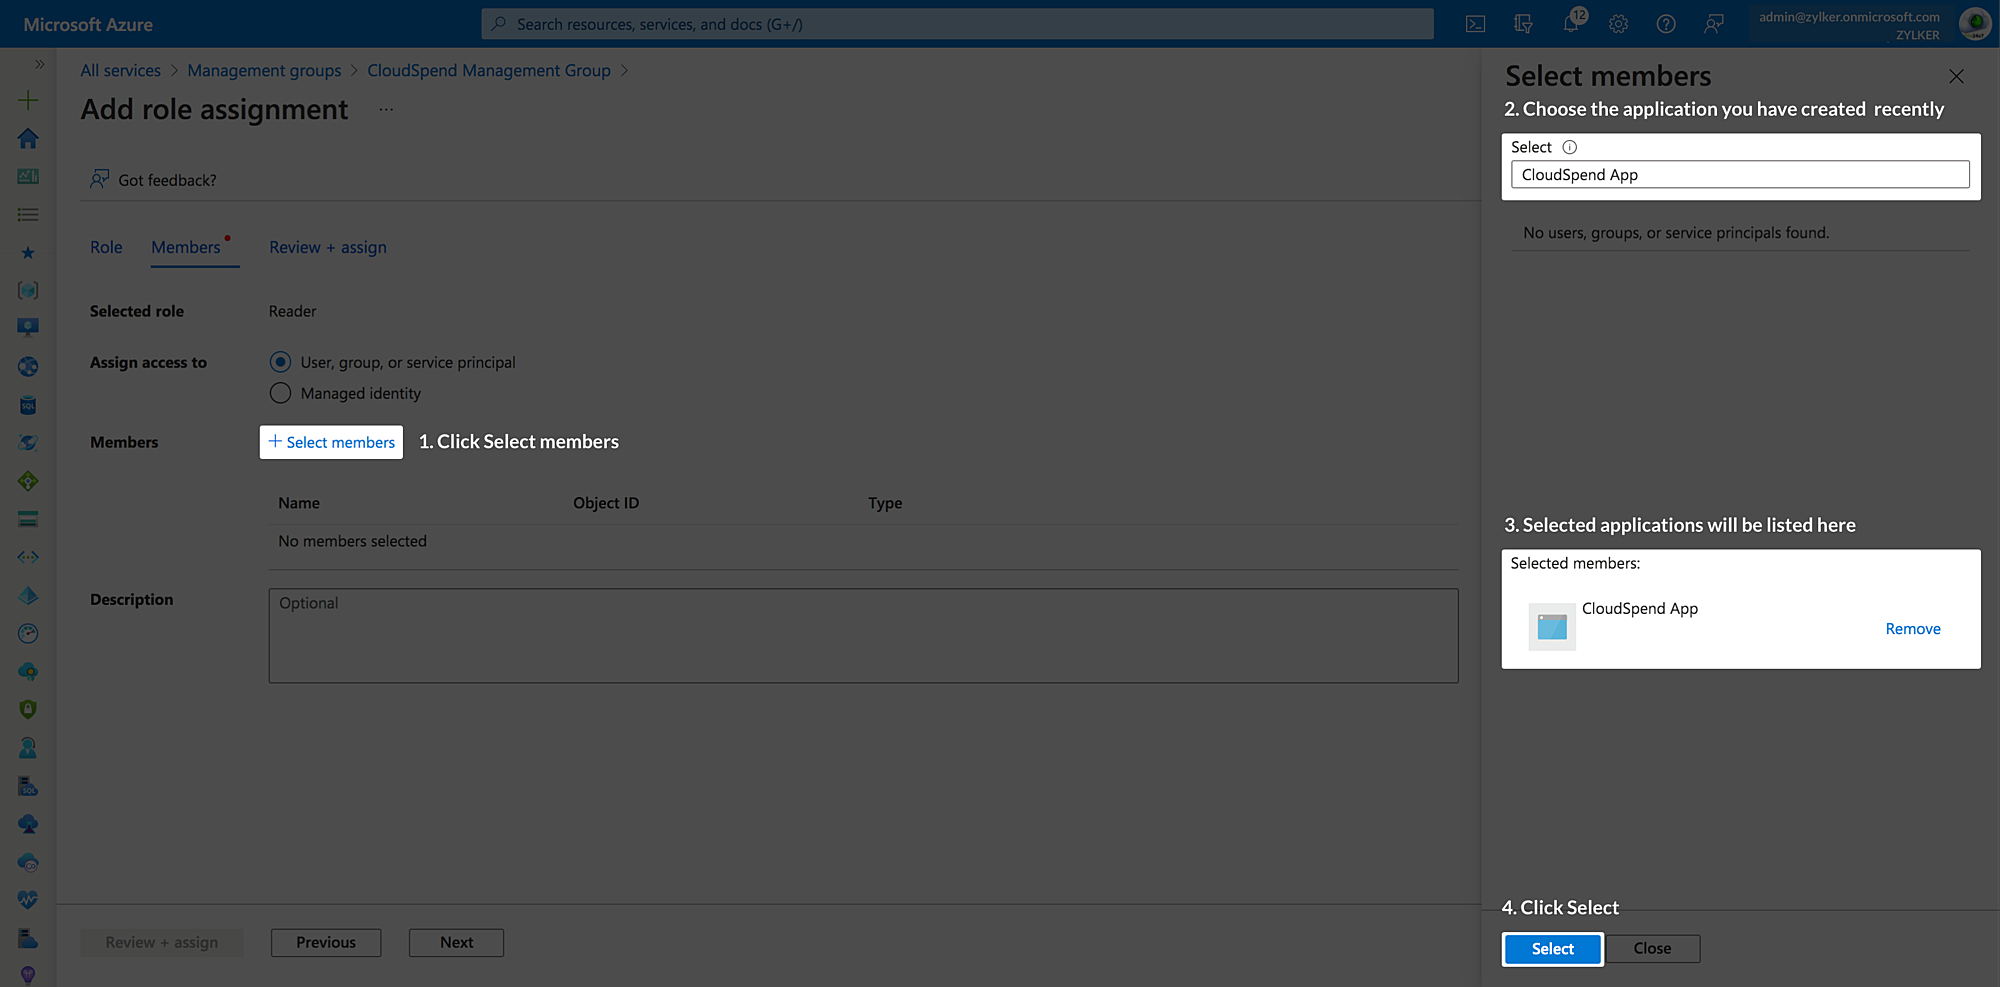
- Click Select.
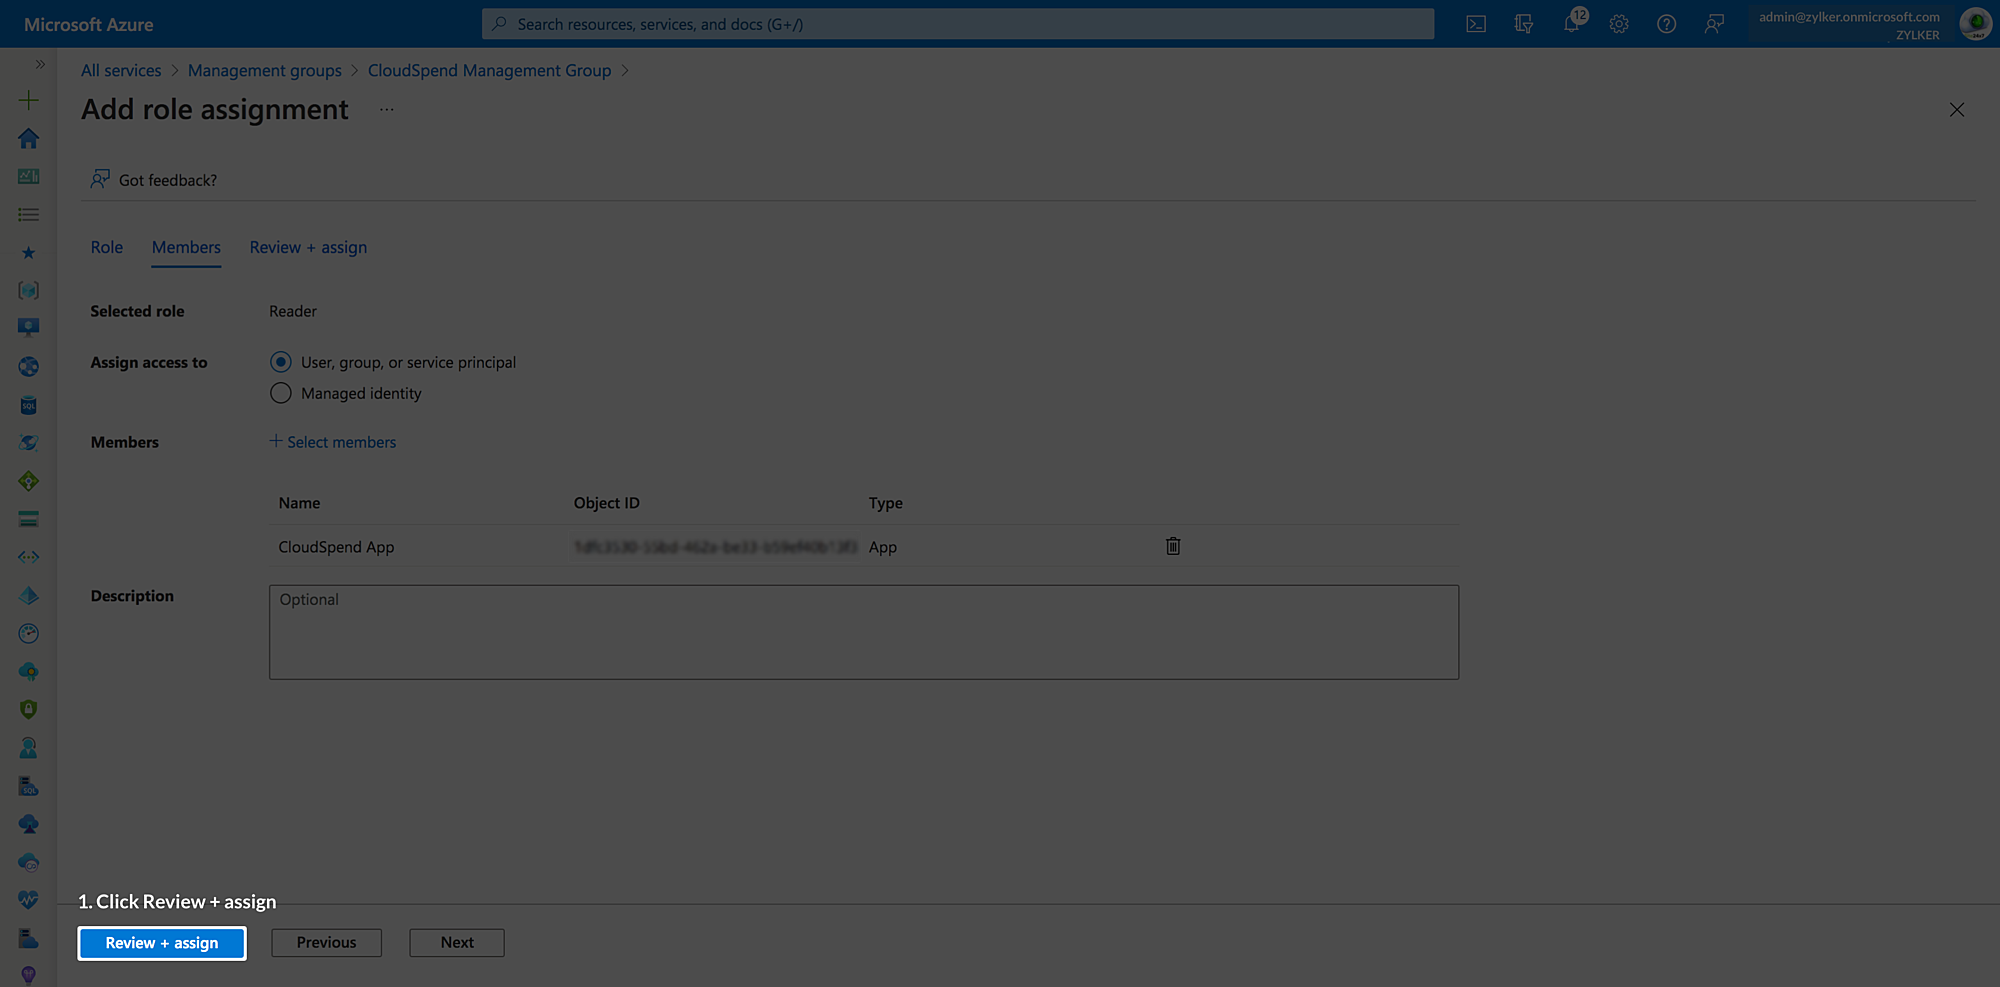
- Click Review+assign. The required permissions will be added to the registered application.
Obtaining the required permissions through Subscriptions
To obtain the required permissions through Subscriptions, follow the steps below:
- Go to Subscriptions.
- Select the subscription for which you want to track costs.
- Select the Access Control (IAM) tab.
- Click Add role assignment.

- On the Add role assignment page, select the required role based on the account type from the Roles section.
- Click Next.
- Select the custom application that you created from the Members > Select members drop-down list.
- Click Select.
- Click Review + assign. The required permissions will be added to the registered application.
Obtaining the additional permissions for MCA or EA account
In addition to the permissions obtained through Management groups or Subscriptions, the Microsoft Customer Agreement (MCA) and Enterprise Agreement (EA) account requires further role permissions.
To obtain the necessary permissions through Cost Management and Billing for Microsoft Customer Agreement (MCA) account type, follow the steps below:
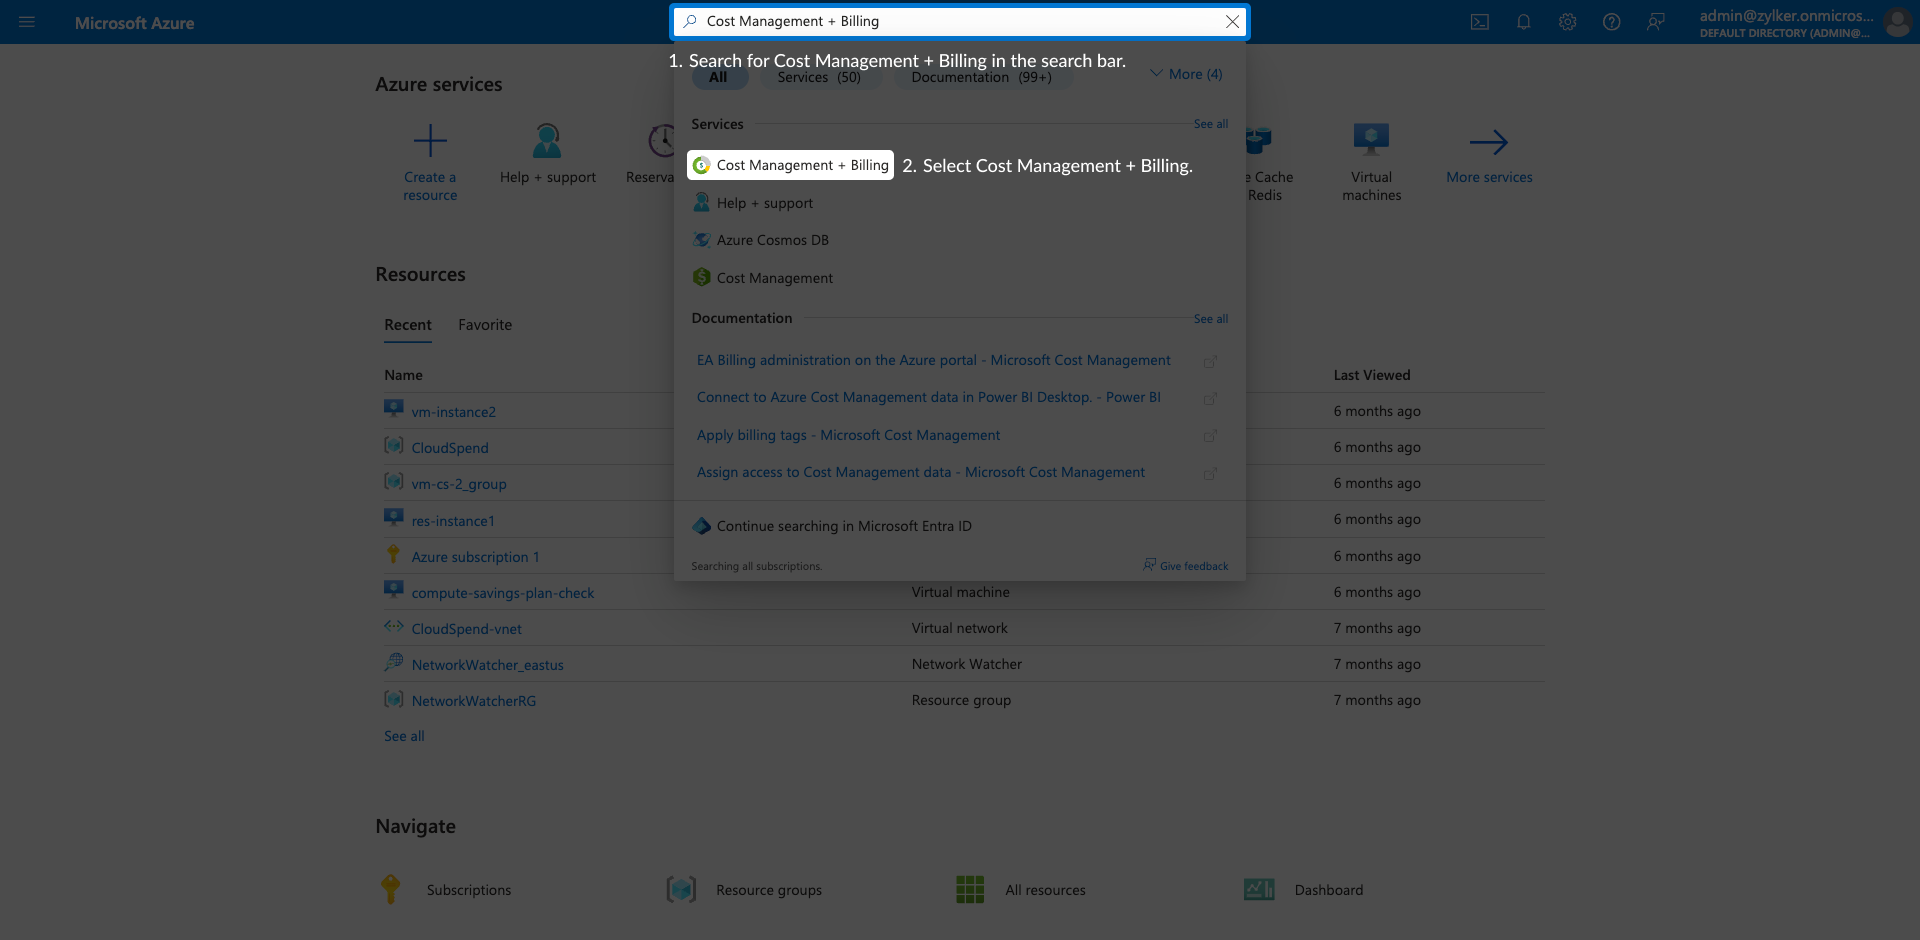
- Search for Cost Management + Billing in the Search bar and select Cost Management + Billing from the search results.
- Select Access Control (IAM).

- Click Add.
- Select Billing account reader role from the Add role assignment page.
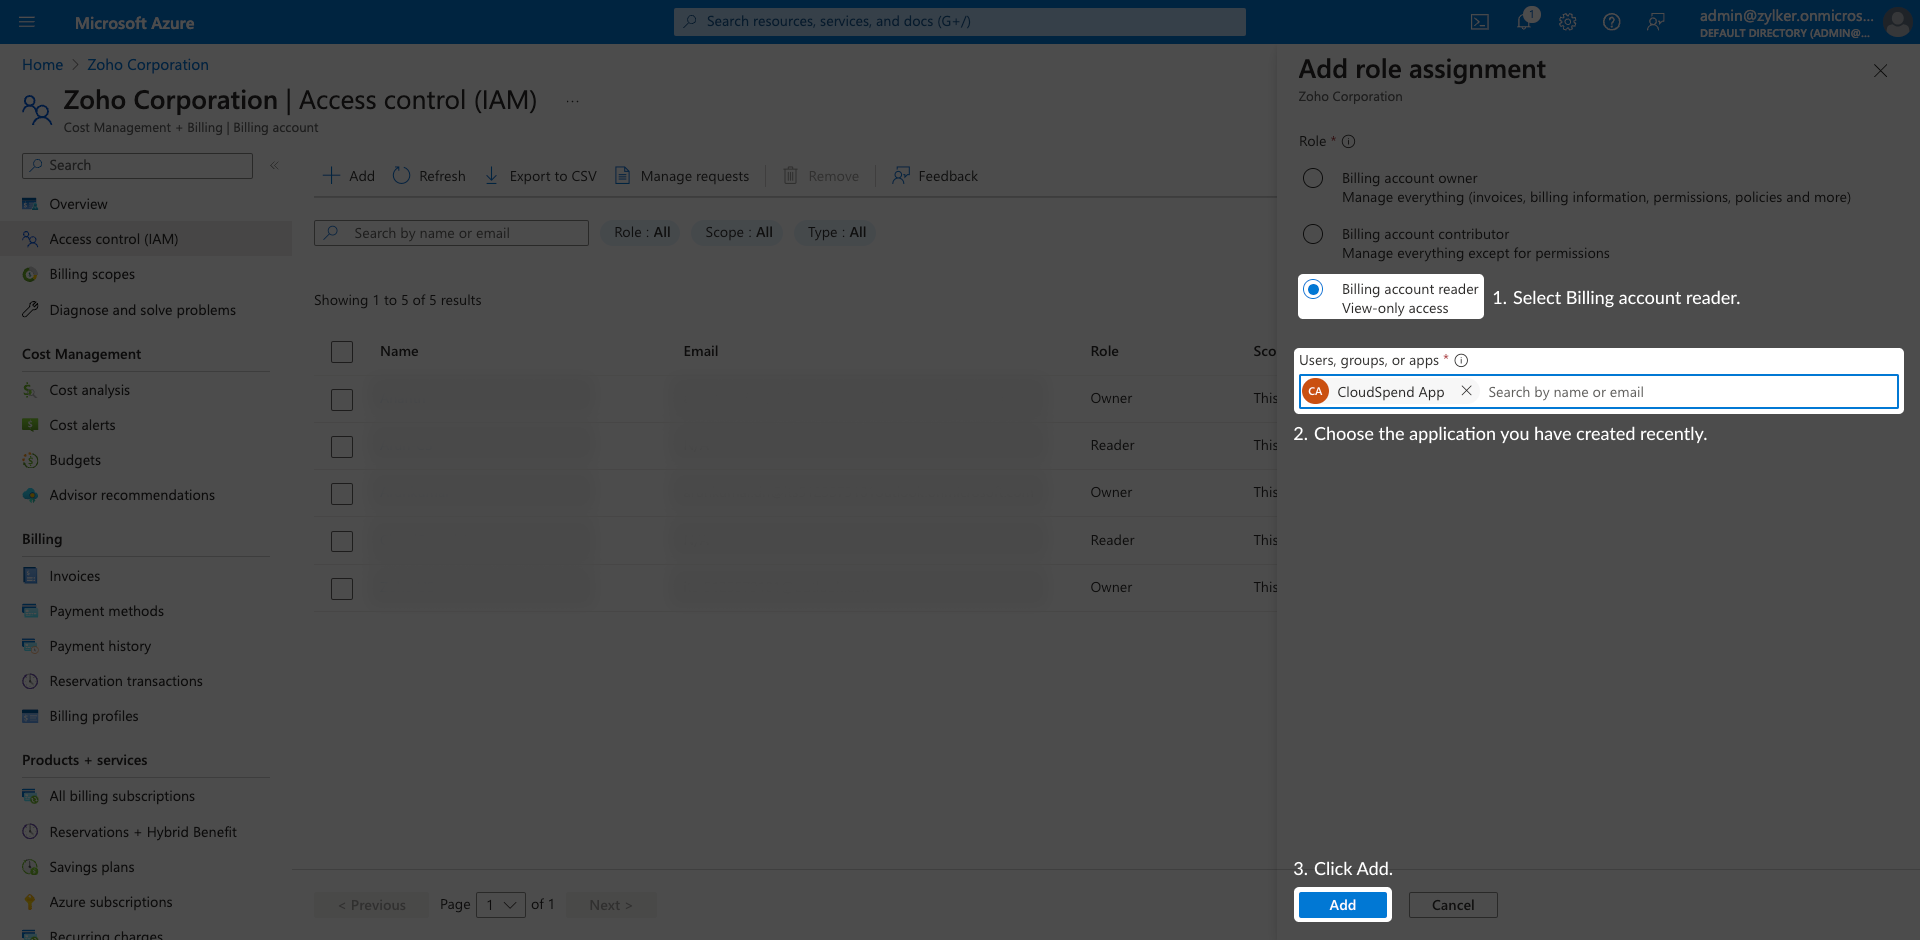
- Choose the application you have created recently from the Users, groups, or app drop-down list.
- Click Add.
To assign Enterprise reader role to service principal follow the steps mentioned in the Azure documentation portal.
Creating a new Management group
To create a new Management group, follow the steps below:
- In the Microsoft Azure portal, navigate to the Management groups section.
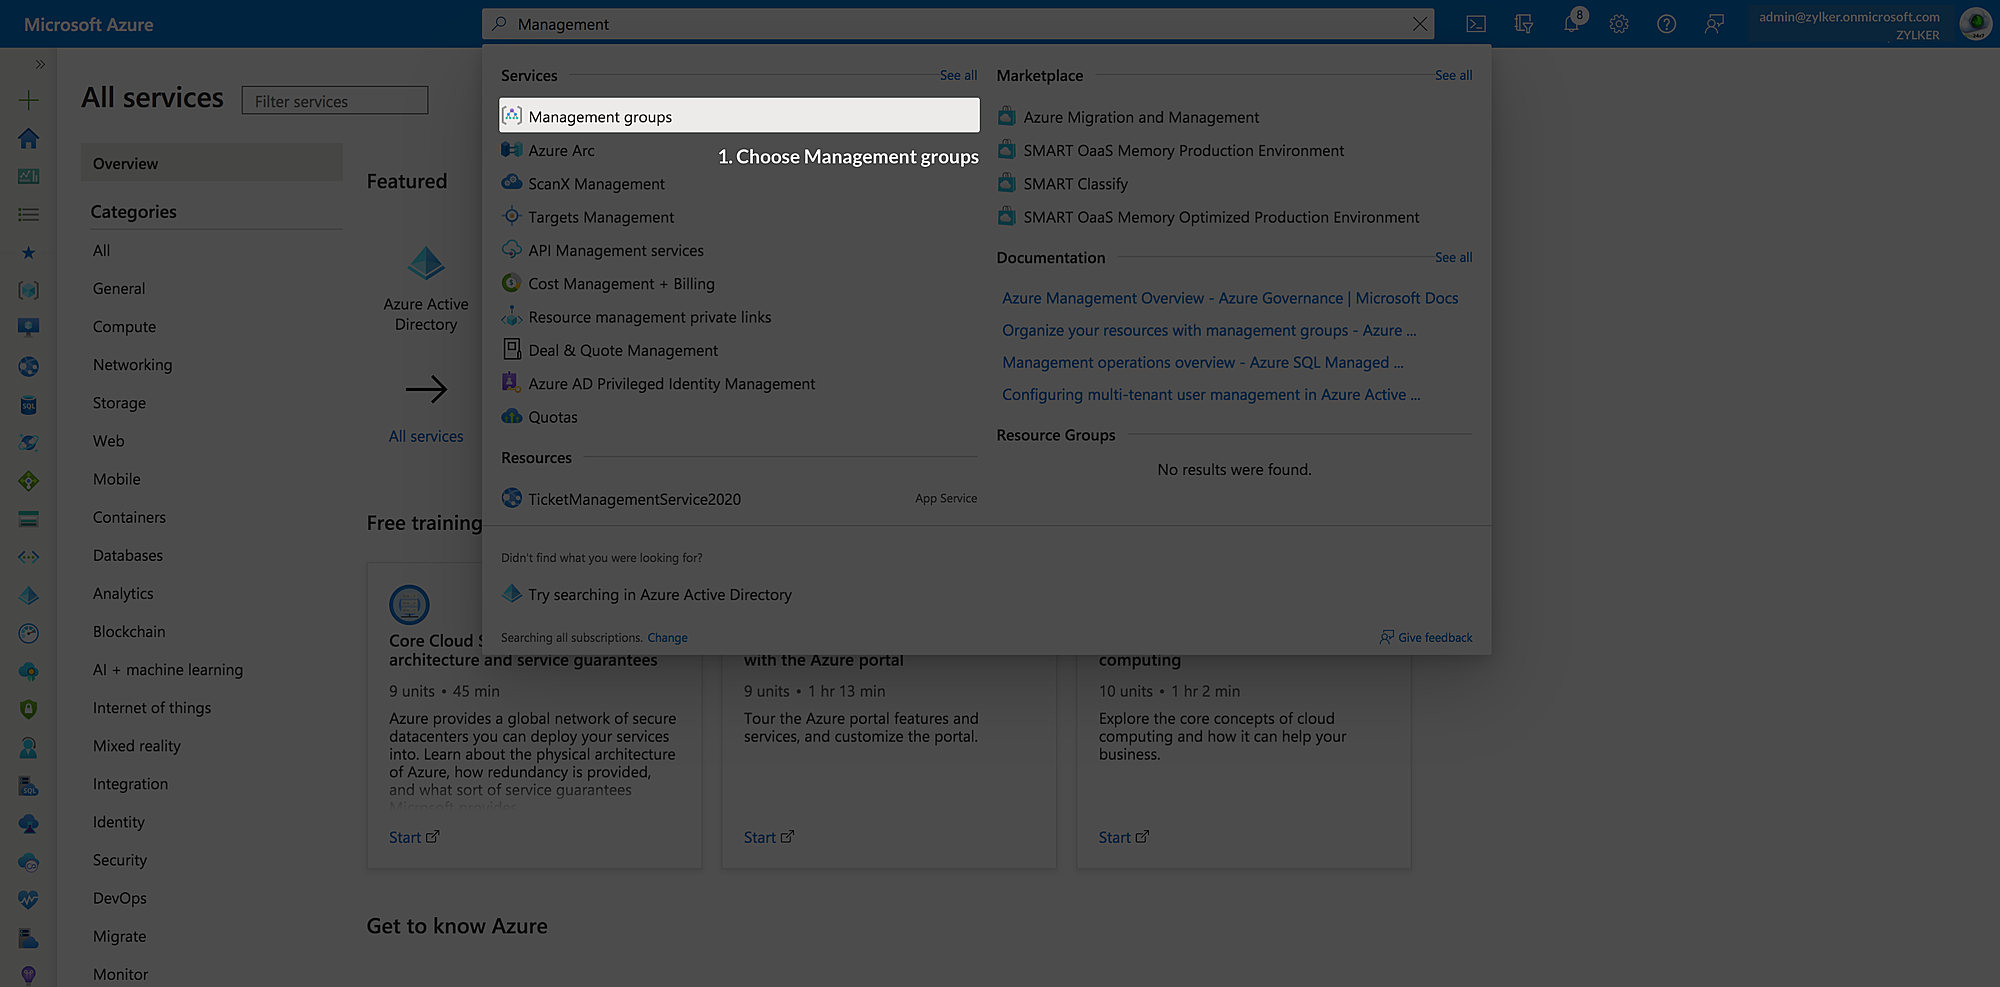
- Click Create to create a new management group.
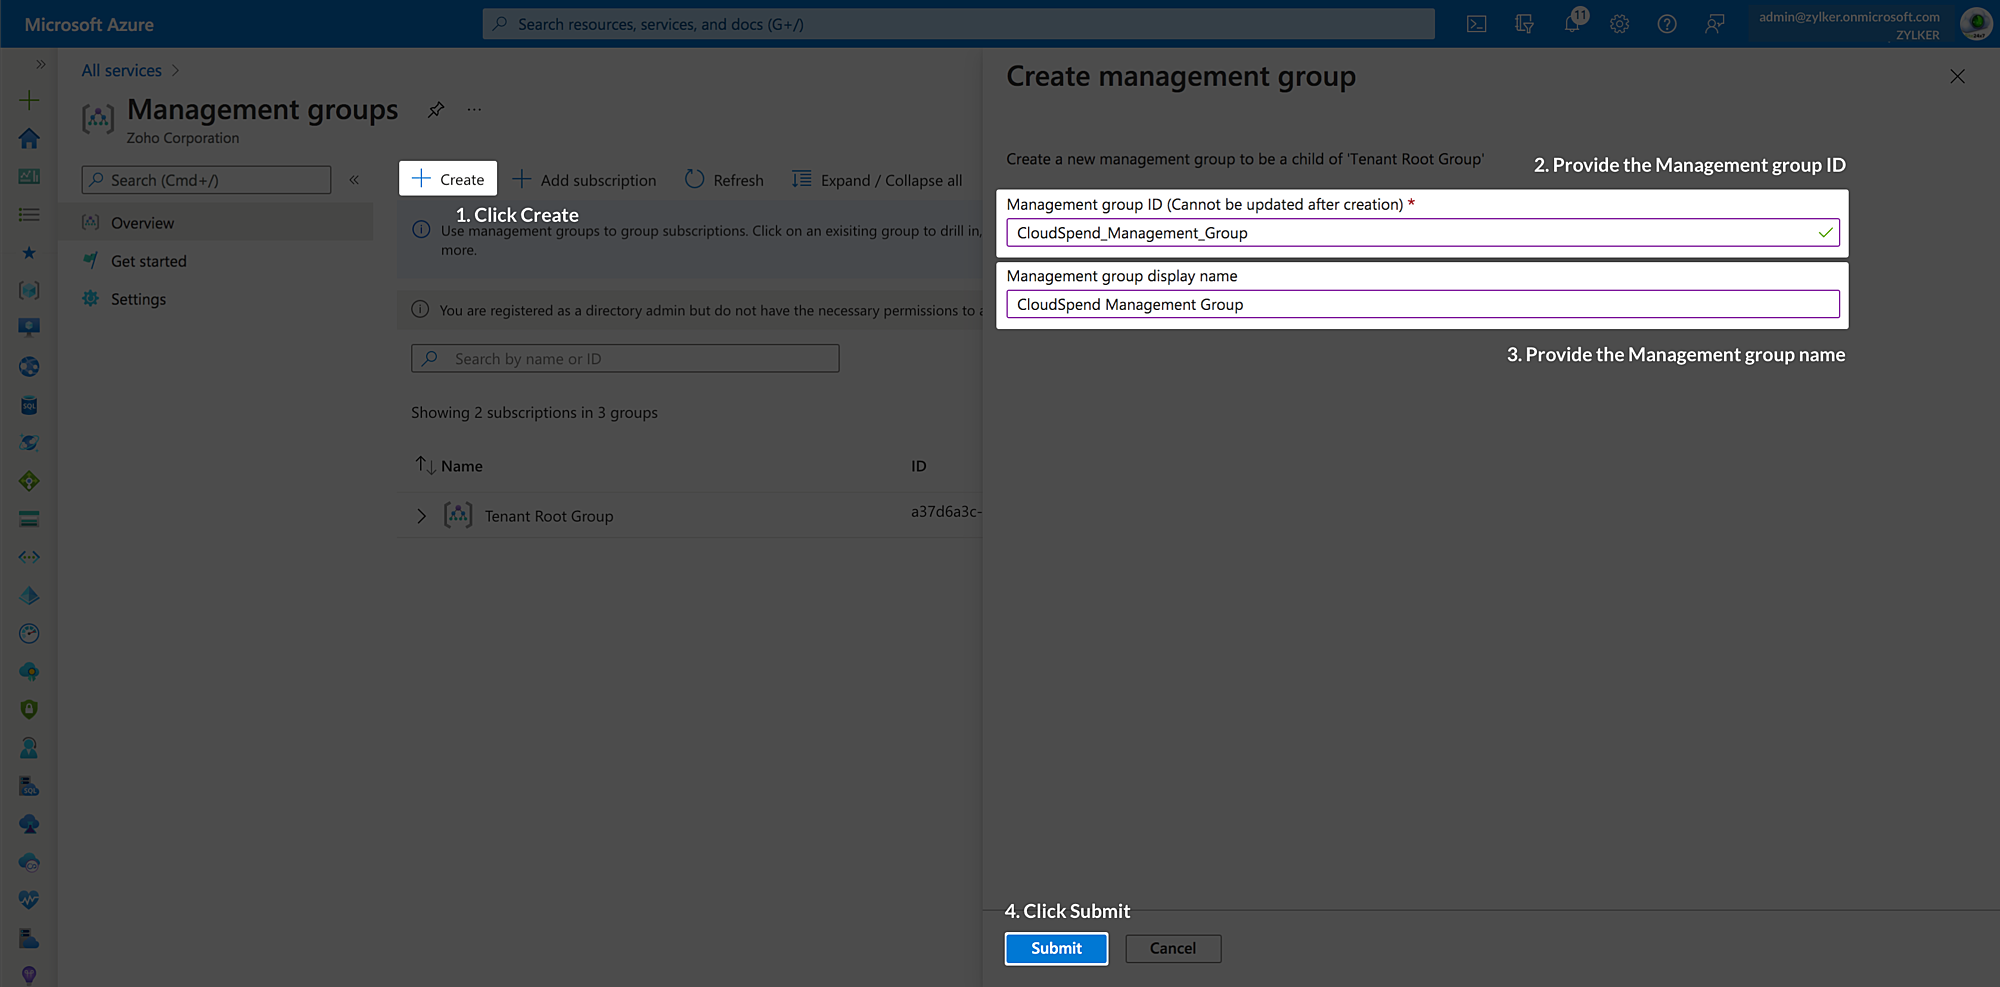
- In the Create management group window, enter the Management group ID and Management group display name.
- Click Submit.
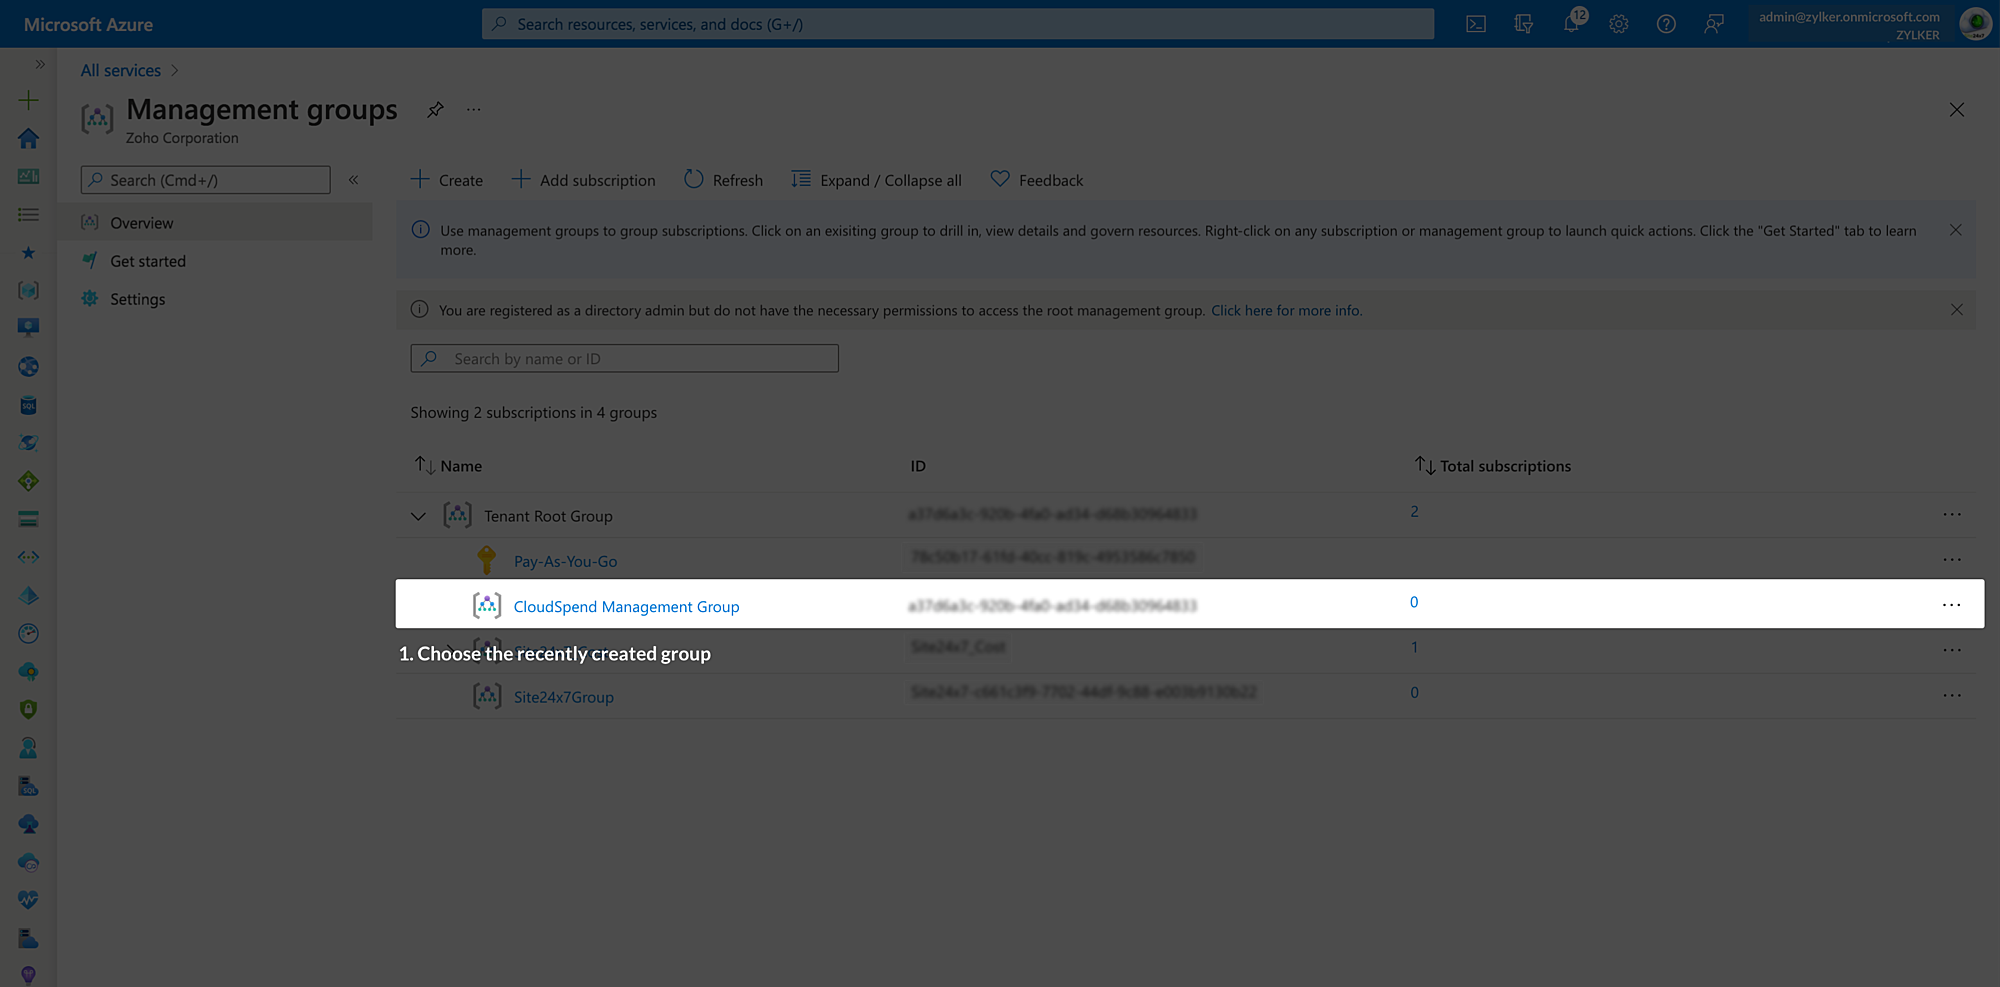
- Click the management group that you created on the Management groups page.
- Click + Add subscription and add all required subscriptions to the management group to analyze the cost data.
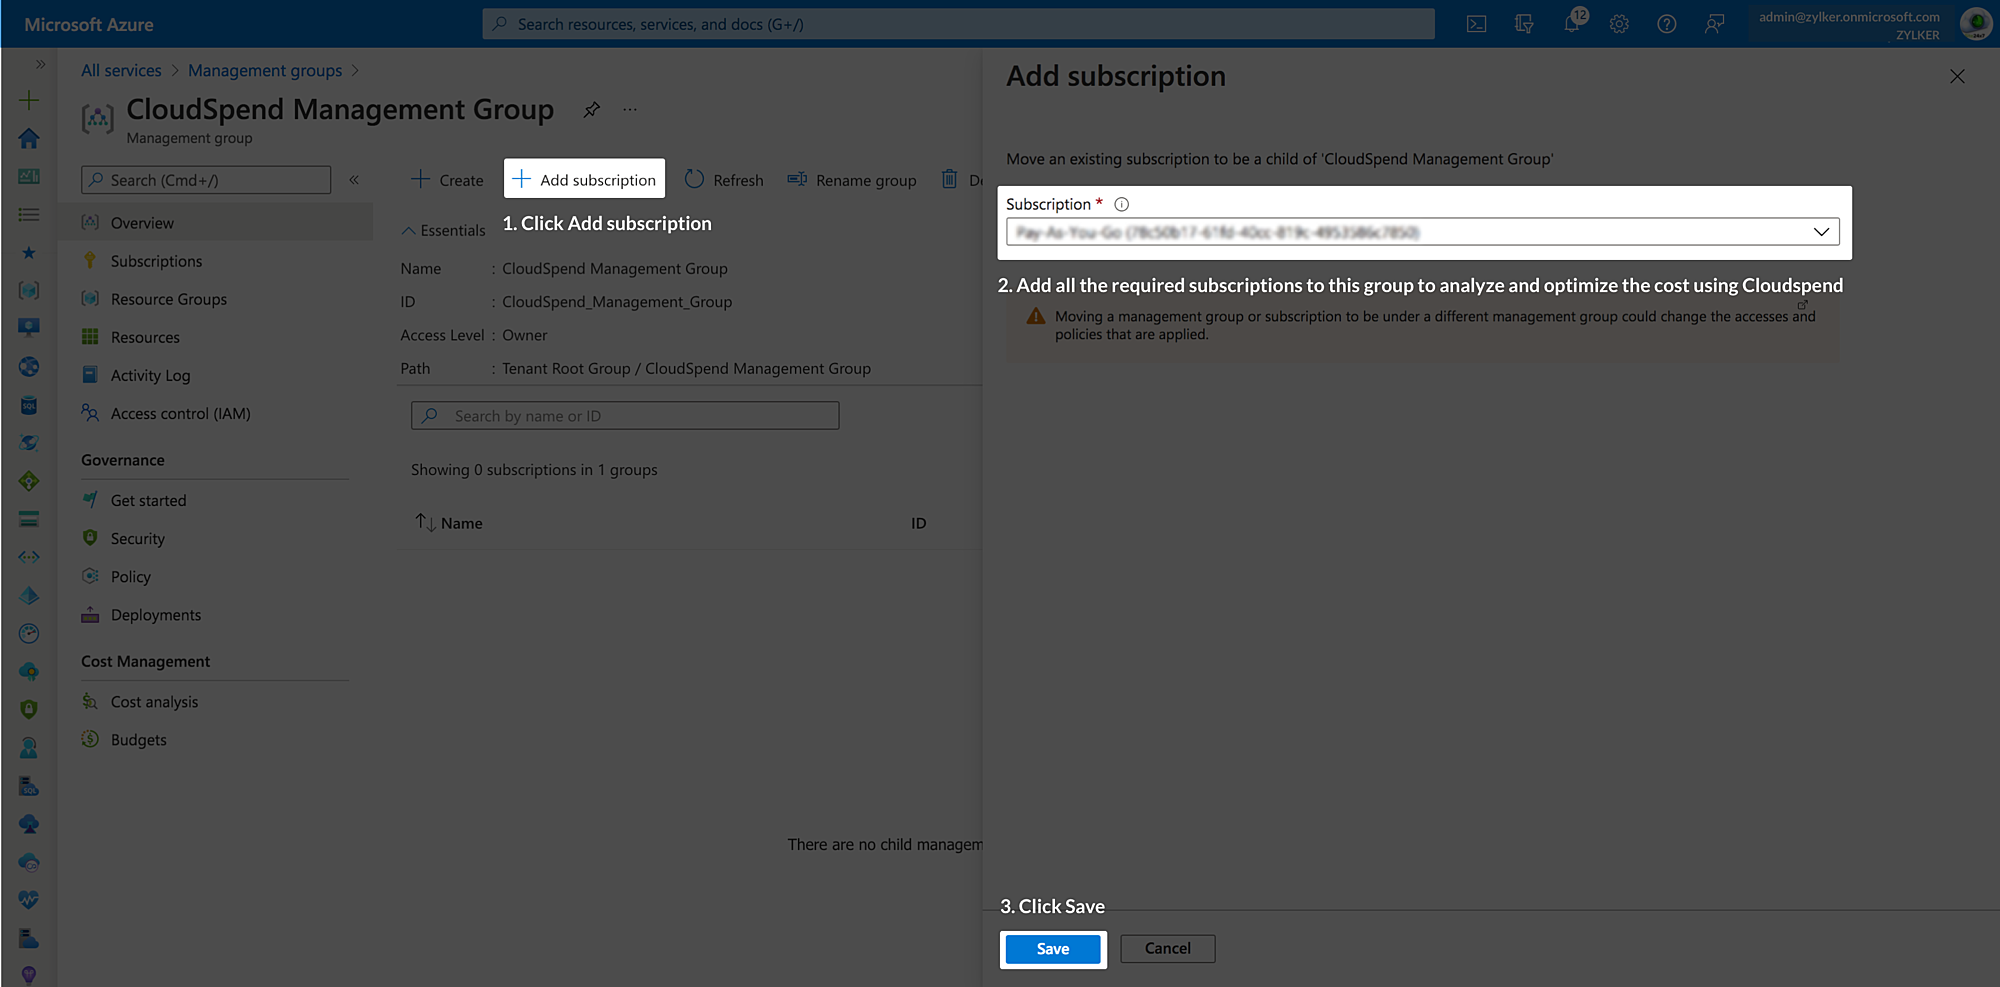
- Click Save.
Connect your Azure account with CloudSpend
After registering an application in Microsoft Entra ID and adding the required roles to the registered application, you can connect your Azure account with CloudSpend.
To connect your Azure account with CloudSpend:
- On the CluodSpend Integrate Account page, provide a DisplayName.
- Set the Public Cloud Provider as Azure.
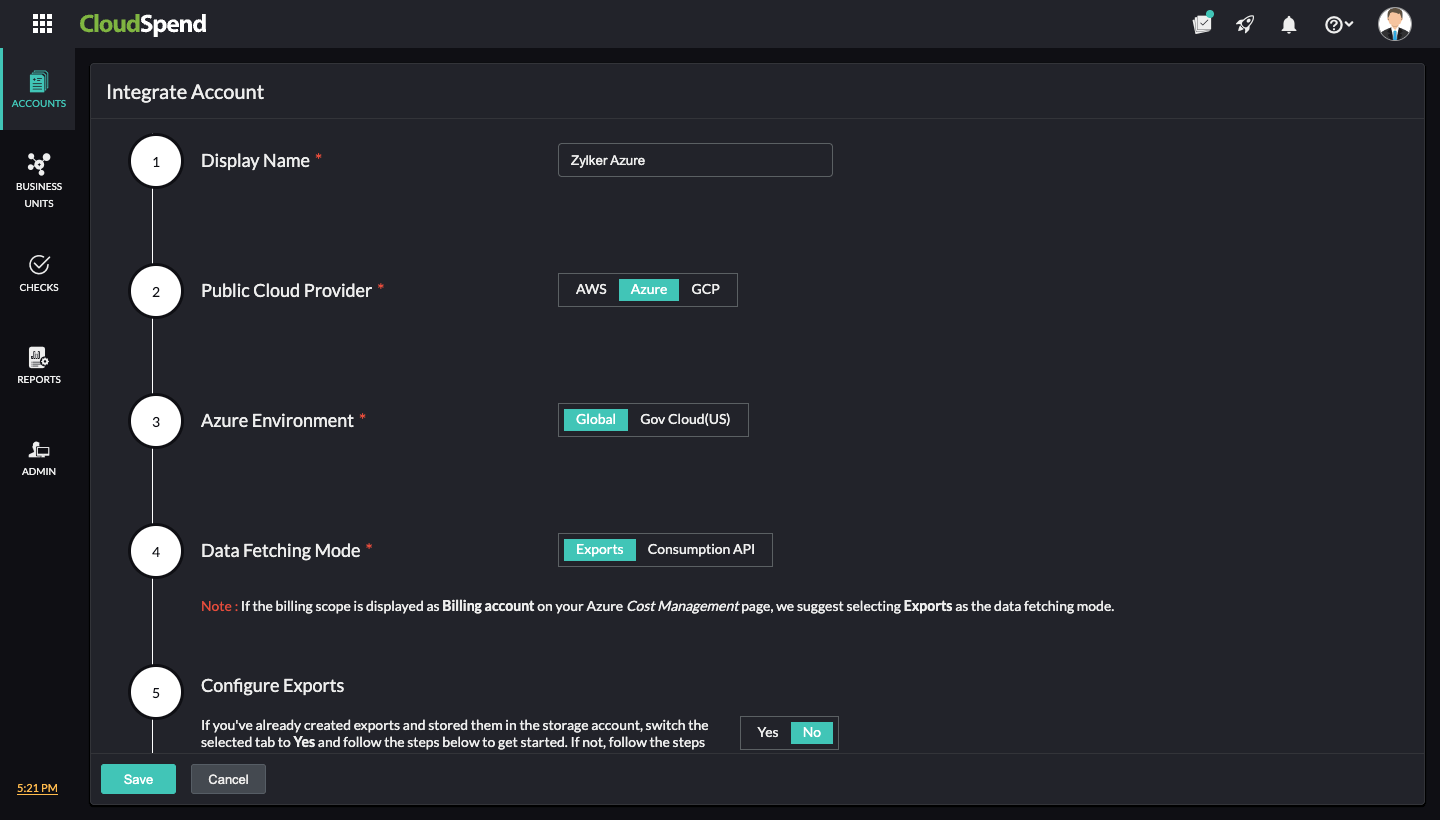
- Select the applicable Azure Environment. The available options are:
- Global: Select this option for commercial Azure subscriptions hosted on the public Azure cloud.
- Gov Cloud (US): Choose this for Azure Government subscriptions intended for U.S. government agencies and contractors.
- Select the Data Fetching Mode. The available options are Exports and Consumption API.
- For Exports option:
- If you've already created exports and stored them in the storage account, toggle the Configure Exports option to Yes and fill in the below fields. If you have not created exports and stored them in the storage account, follow the steps provided in the creating exports and then fill in the below fields.
- Storage Account Name: Paste the Storage Account name obtained from Azure portal.
- Storage Container Name: Paste the storage Container name obtained from Azure portal.
- Directory Path: Paste the Directory path obtained from Azure portal.
- Export Name: Paste the Export name obtained from Azure portal.
- Set the Azure Account Type as Pay As You Go, EA, MCA, or your Site24x7 Account.
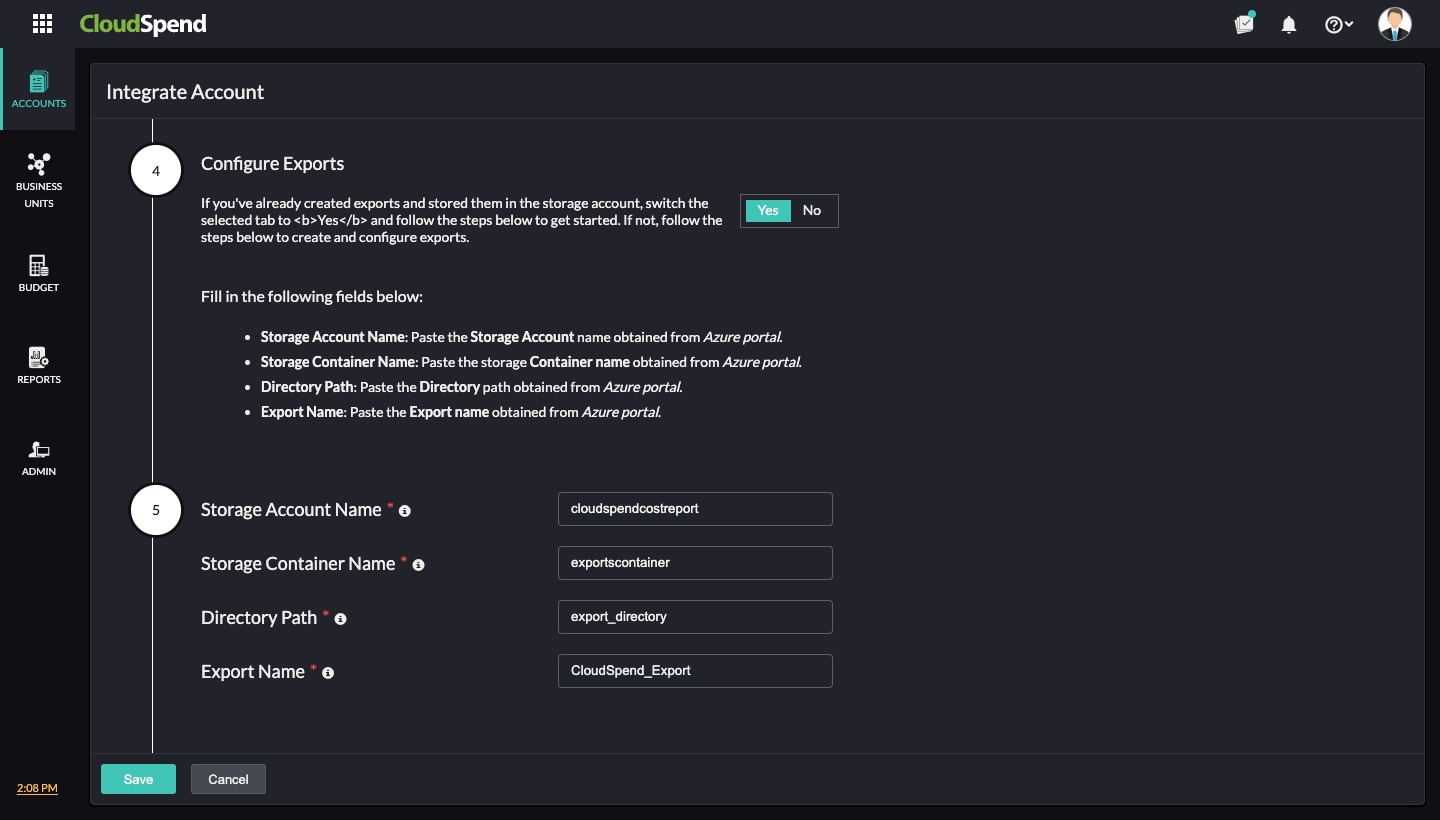
- If you've already created exports and stored them in the storage account, toggle the Configure Exports option to Yes and fill in the below fields. If you have not created exports and stored them in the storage account, follow the steps provided in the creating exports and then fill in the below fields.
- For Consumption API option:
- Set the Azure Account Type as Pay As You Go, EA, MCA, or your Site24x7 Account.
- Choose your Access Type as Subscriptions or Management Group.
- If you've already created a management group and added subscriptions to that management group, switch the selected tab to Yes and follow the steps mentioned in the UI. If not, create a management group and add subscriptions to that management group.
- For Exports option:
- Enter the Tenant ID, Application ID, Application Secret Key, and Application Secret Key Expiration Date, which you created in the above steps.
- Enter the Start Date for Bill Processing. The starting date for bill processing determines the date from which your bills get processed.
- Click Save.
