Configure DHCP server on Cisco devices
DHCP is widely used in LAN environments to dynamically assign host IP addresses from a centralized server, which significantly reduces the overhead of administration of IP addresses. DHCP also helps conserve the limited IP address space because IP addresses no longer need to be permanently assigned to hosts; only those hosts that are connected to the network consume IP addresses. The DHCP server assigns IP addresses from specified address pools on a router or router to DHCP clients and manages them.
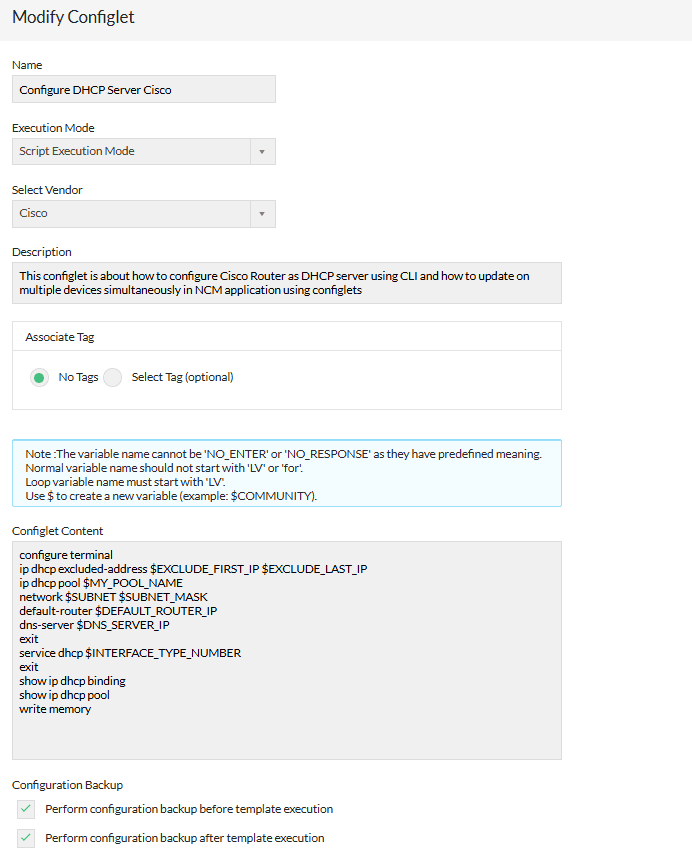
In this article, you will learn how to configure Cisco Router as DHCP server using CLI and to update it on multiple devices simultaneously in NCM application using configlets. If you don't have NCM installed, please click here to download and install the application.
Steps to configure DHCP server through CLI.
- Login to the device using SSH / TELNET and go to enable mode.
- Go into the config mode.
Router#configure terminal
Enter configuration commands, one per line. End with CNTL/Z.
Router(config)# - Exclude IP addresses from being assigned by DHCP by using the ip dhcp excluded-address FIRST_IP LAST_IP
Router(config)#ip dhcp excluded-address 192.168.0.1 192.168.0.50
Router(config)# - Create a new DHCP pool with the ip dhcp pool NAME command
Router(config)#ip dhcp pool Floor1DHCP
Router(dhcp-config)# - Define a subnet that will be used to assign IP addresses to hosts with the network SUBNET SUBNET_MASK command.
Router(dhcp-config)#network 192.168.0.0 255.255.255.0
Router(dhcp-config)# - Define the default gateway with the default-router IP command
Router(dhcp-config)#default-router 192.168.0.1
Router(dhcp-config)# - Define the DNS server with the dns-server IP address command.
Router(dhcp-config)#dns-server 192.168.0.1
Router(dhcp-config)# - Return to privilege config mode
Router(dhcp-config)#exit
Router(config)# - Configure DHCP servers on multiple Cisco devices simultaneously with Configlet.
- Schedule Configlet deployments for the exact date and time you need.
- Monitor your Cisco device configurations for changes and compliance.
- Enable DHCP server on the interface using service dhcp interface-type number command
Router(config)#service dhcp vlan1
Router(config)# - Exit config mode
Router(config)#exit
Router# - To view information about the currently leased addresses, you can use the show ip dhcp binding command
Router#show ip dhcp binding
IP address Client-ID/ Lease expiration Type
Hardware address
192.168.0.51 0060.5C2B.3DCC -- AutomaticIn the output above you can see that there is a single DHCP client that was assigned the IP address of 192.168.0.51. Since we’ve excluded the IP addresses from the 192.168.0.1 – 192.168.0.50 range, the device got the first address available – 192.168.0.51.
- To display information about the configured DHCP pools, you can use the show ip dhcp pool command
Router#show ip dhcp pool
Pool Floor1DHCP :
Utilization mark (high/low) : 100 / 0
Subnet size (first/next) : 0 / 0
Total addresses : 254
Leased addresses : 1
Excluded addresses : 1
Pending event : none
1 subnet is currently in the pool
Current index IP address range Leased/Excluded/Total
192.168.0.1 192.168.0.1 - 192.168.0.254 1 / 1 / 254This command displays some important information about the DHCP pool(s) configured on the device – the pool name, total number of IP addresses, the number of leased and excluded addresses, subnet’s IP range, etc.
- Copy the running configuration into startup configuration using below command
Router#write memory
Building configuration... [OK]
Router#
Simplify your Cisco DHCP server configuration
Corresponding configlet can be created in NCM application as shown in below screenshot.

Also you can click the below button to download the Configlet as XML and import it into NCM application using file import option.
| Configlet Name | Configure DHCP Server Cisco |
|---|---|
| Description | This article is about how to configure Cisco Router as DHCP server using CLI and how to update on multiple devices simultaneously in NCM application using configlets. |
| Execution Mode | Script execution mode |
| Configlet Content | configure terminal |