Providing Credentials for Devices
Contents |
Overview
Once you add the device to the Network Configuration Manager inventory, you need to provide device credentials to establish communication between the device and Network Configuration Manager. Details such as the mode (protocol) through which communication is to be established, port details, login name, password etc. are to be provided.
Guidelines on choosing credentials for a Single Device
To establish credentials for a single device,
Go to "Inventory"
Click 'Credentials' icon against the device for which communication has to be established
In the Credentials UI, provide the following details:
Choosing the Protocol
Based on the type of device, you can select any of the following combinations of protocols to establish communication between Network Configuration Manager and the device:
TELNET-TFTP (Establishing communication with the device via Telnet and transferring the configuration via TFTP)
TELNET (Establishing communication with the device via TELNET and executing show commands on the device to get configuration details)
SSH-TFTP (Establishing communication with the device via SSH and transferring the configuration via TFTP)
SSH-SCP (Establishing communication with the device via SSH and transferring the configuration via SCP)
SSH (Establishing communication with the device via SSH and executing show commands on the device to get configuration details)
SNMP-TFTP (Establishing communication with the device via SNMP and transferring the configuration via TFTP)
Based on the protocol choice, you need to provide other credentials.
For TELNET-TFTP, TELNET, SSH-TFTP, SSH-SCP & SSH
User Credential Profile
If you have downloaded Network Configuration Manager and carrying out the settings for the first time, you may skip this 'User Credential Profile' step.
Network Configuration Manager offers the flexibility of creating common credentials and sharing the common credentials among multiple devices. The Common Credentials are known as profiles. For more details click here.
Credentials for TELNET-TFTP, TELNET, SSH-TFTP, SSH-SCP & SSH.
Credentials have been split into two divisions:
- Primary Credentials - deal with parameters that are necessary to establish communication with the device. Details such as Login Name, Password, Prompt, Enable UserName, Enable Password and Enable Prompt are classified as basic details.
- Additional Credentials - certain parameters usually take standard values. All such parameters have been classified under 'Additional Credentials'. Port, login prompt, enable userprompt, password prompt, enable password prompt values are usually assigned with certain Standard Values by default. Such standard values have been filled for these parameters. Most of the devices would work well with these values and you need not edit these details unless you want to provide different set of details. Providing TFTP Server Public IP / SCP Server Public IP if the device is behind NAT/firewall has also been classified under Additional Credentials.
Primary Credentials
S.No | Credential | Description |
1 | Login Name | While establishing connection with a device, if the device asks for a Login Name, set a value for this parameter. This parameter is Optional. |
2 | Password | To set the Password for accessing the device. |
3 | Prompt | The prompt that appears after successful login. Example: >|#. Note: For TELNET, only a single prompt should be provided (> or #), not a regex (>|#). |
4 | Enable UserName | When entering into privileged mode, some devices require UserName to be entered. Provide the username if prompted; otherwise leave this field empty. |
5 | Enable Password | This is for entering into privileged mode to perform configuration operations like backup/upload. This parameter is mandatory. |
6 | This is the prompt that will appear after going into enable mode. |
Explanatory Screenshots
CISCO IOS device - Password and Enable Password configured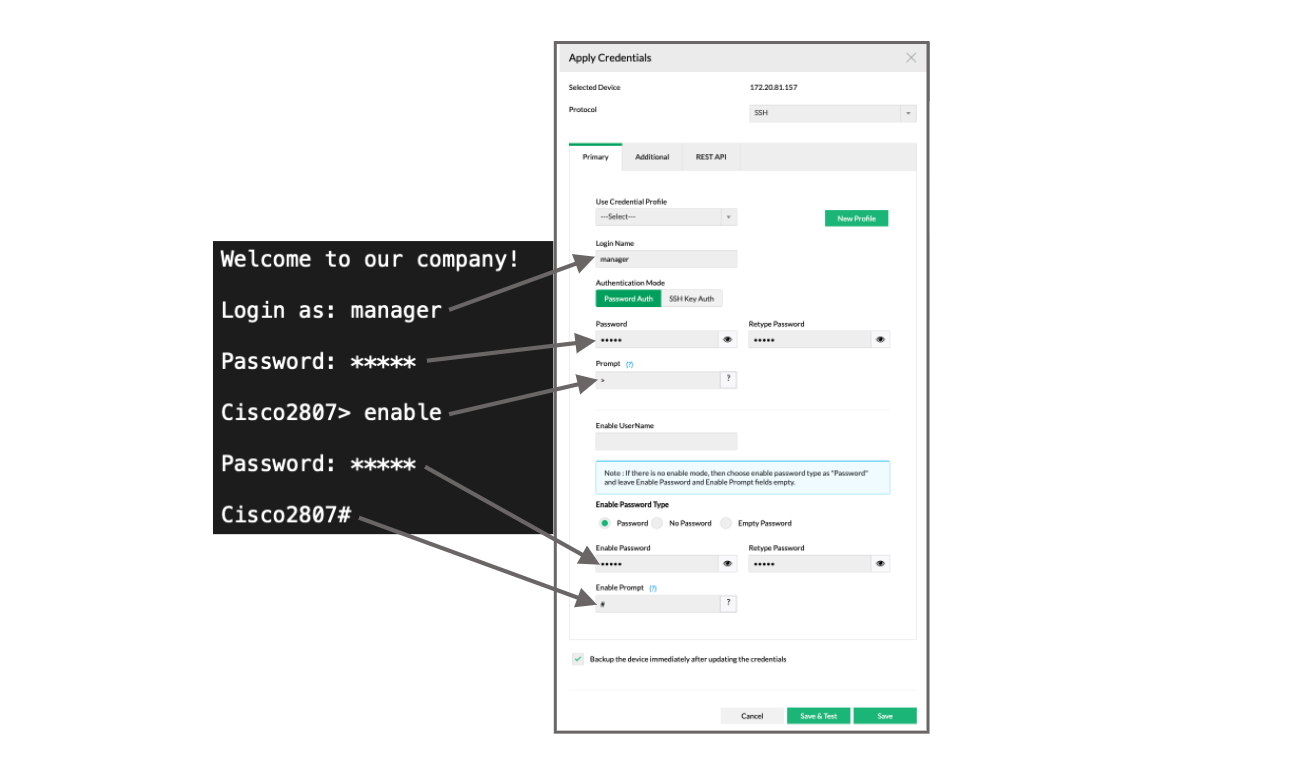
CISCO IOS device - Directly going into Enable mode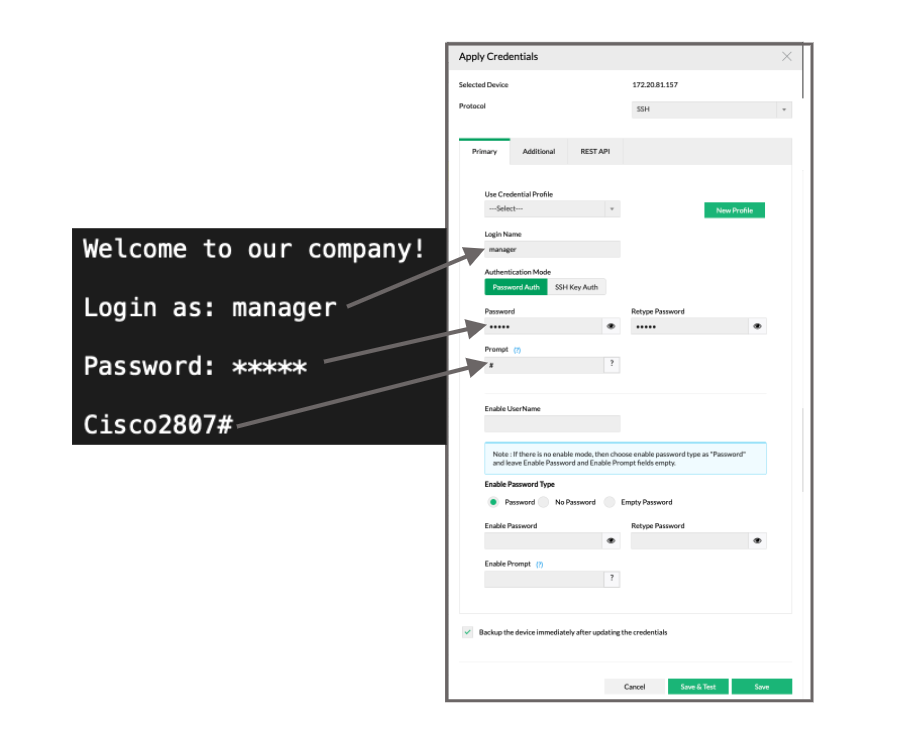
Password and No Password configured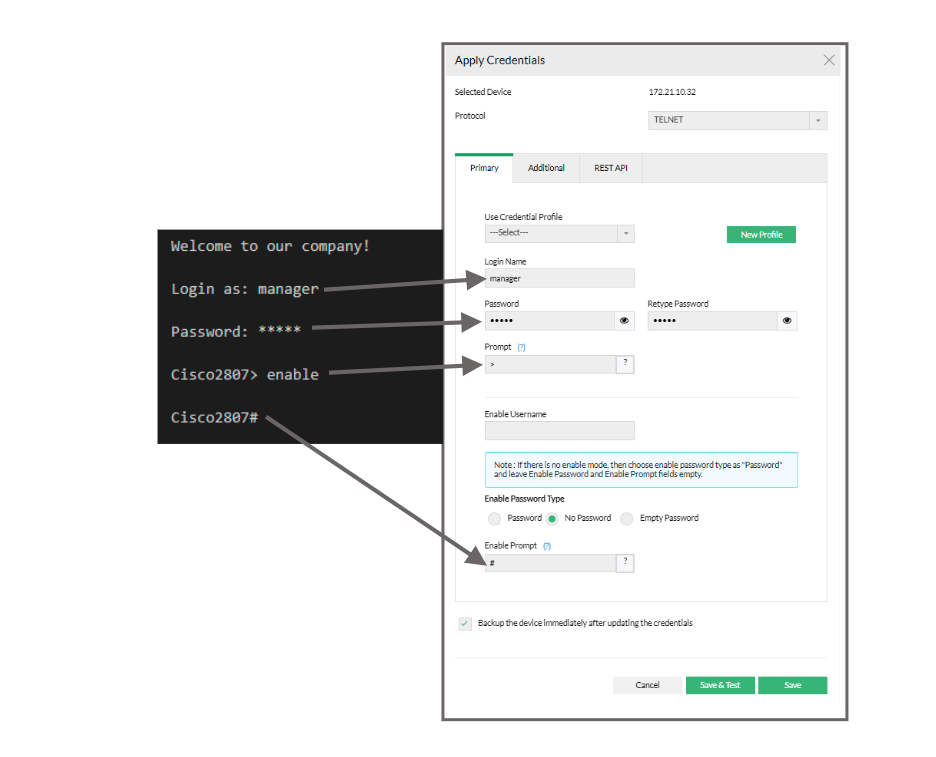
Password and Empty Password configured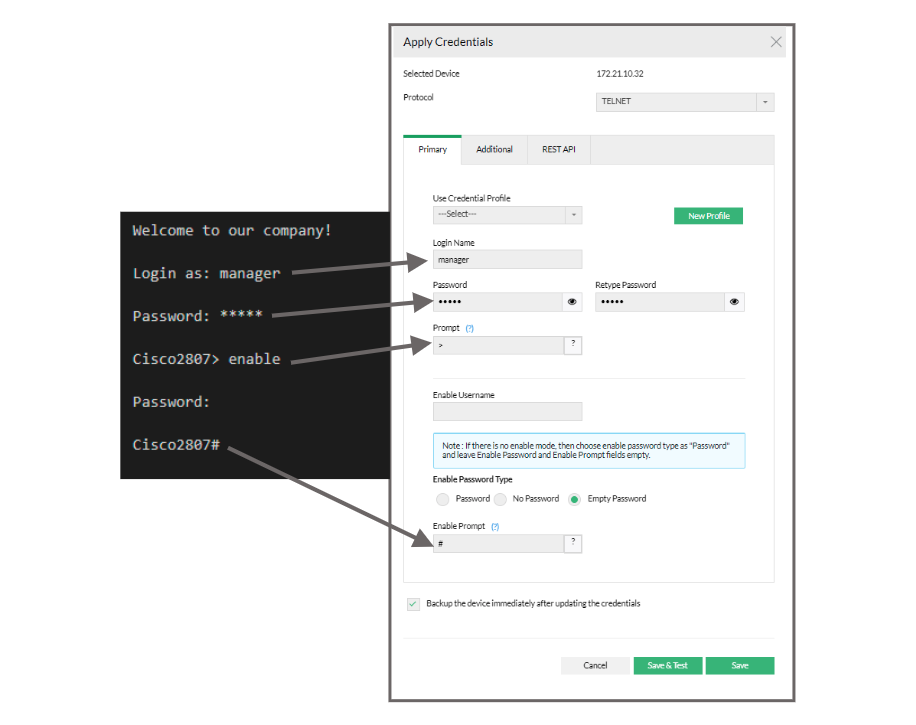
3Com Router - Password and Enable password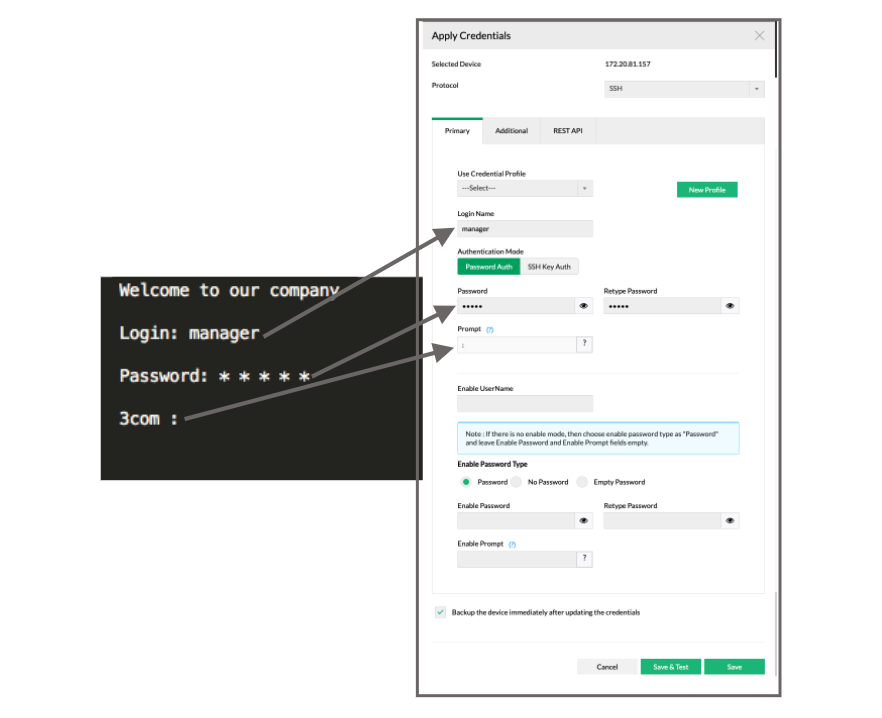
Additional Credentials
Click the link "Additional Credentials" to view/enter values for these parameters. Except TFTP/SCP Server Public IP, all other parameters are usually assigned with certain Standard Values by default. Such standard values have been filled for these parameters. Most of the devices would work well with these values and you need not edit these details unless you want to provide different set of details.
S.No | Credential | Description |
1 | TFTP / SCP Server Public IP | When the device is present outside the private network (i.e. when the private IP of Network Configuration Manager is not reachable for the device) this parameter can be used to provide the public IP of the Network Configuration Manager server (NAT'ed IP of Network Configuration Manager). This IP will be used in Configuration backup via TFTP / SCP. |
2 | Telnet/SSH Port | Port number of Telnet/SSH - 23 (for Telnet) and 22 (for SSH) by default. |
3 | Login Prompt | The text/symbol that appears on the console to get the typed login name is referred as login prompt. For example, Login: |
4 | Password Prompt | The text displayed on the console when asking for password. For example, Password: |
5 | Enable User Prompt | The text displayed on the console when asking for Enable UserName. For example, UserName: |
6 | Enable Password Prompt | The text displayed on the console when asking for password. For example, Password: |
- After providing the credentials, if you want to take a backup of the device immediately after updating the credentials, select the 'backup' checkbox
- Click "Save" to apply the values
- The chosen credentials would be applied to the Device
Once you complete this step - that is, providing credentials, you will find the credentials icon beside the device name in the inventory. |
For SNMP-TFTP
User Credential Profile
If you have downloaded Network Configuration Manager and carrying out the settings for the first time, you may skip this 'User Credential Profile' step.
Network Configuration Manager offers the flexibility of creating common credentials and sharing the common credentials among multiple devices. The Common Credentials are known as profiles. For more details click here.
Primary Credentials for SNMP-TFTP
S.No | Credential | Description |
1 | SNMP Port | Port number of SNMP - 161 by default. |
2 | Read Community | An SNMP community is a group of managed devices and network management systems within the same administrative domain. Each SNMP request packet includes a community name. When a request packet is received, the remote access server looks for the name in its community table:
The SNMP Read Community string is like a user id or password that allows Read-only access to the device. |
3 | Write Community | The SNMP Write Community string is like a user id or password that allows Read and Write access to the devices. |
Additional Credentials
Click the link "Additional Credentials" to view/enter values for these parameters. Except TFTP/ SCP Server Public IP, all other parameters are usually assigned with certain Standard Values by default. Such standard values have been filled for these parameters. Most of the devices would work well with these values and you need not edit these details unless you want to provide different set of details.
S.No | Credential | Description |
1 | TFTP / SCP Server Public IP | When the device is present outside the LAN (i.e. when the private IP of Network Configuration Manager is not reachable for the device) this parameter can be used to provide the public IP of the Network Configuration Manager server (NAT'ed IP of Network Configuration Manager). This IP will be used in Configuration backup via TFTP. |
Testing the Validity of Credentials
Credential values entered through the Credentials GUI should be accurate. Otherwise, Network Configuration Manager will not be able to establish connection with the device. To ensure the correctness of credential values, Network Configuration Manager provides the testing option.
After entering the credentials, you can test the values during which Network Configuration Manager will indicate if the values entered are valid. It will pinpoint the invalid values and you can carryout corrections accordingly.
To test the validity of credentials,
After providing the credentials, click 'Save & Test'
This updates the credential values in the DB and then carries out the testing.
The testing result indicates valid credential values with a green mark. The invalid values are marked as red mark. You need to change the invalid values.
If you want to test the validity of credentials of a device which has already been given credentials, select the particular device in the inventory, click 'Credentials'. In the Device Credentials page that opens up, click "Save & Test". Rest is same as above.
Note: The credential testing option is provided only for TELNET-TFTP, TELNET, SSH and SSH-TFTP protocols. |
Sharing Common Credentials Across Devices
In practical applications, you may find that the same set of credentials could well be applied 'as they are' to many devices. In such cases, to avoid the cumbersome task of entering the credentials for each device separately, Network Configuration Manager offers the flexibility of creating common credentials and sharing the common credentials among multiple devices. This is called as 'Credential Profile'.
Credential Profile can be created as a ready-to-use format called simply as 'Profiles'. You can create a profile with a specific name. Once you create a credential profile, its name will automatically be listed in the drop-down menu in the "Credentials" UI for the field "Use Profile". When you wish to use the profile, if you just choose the corresponding profile in the drop-down menu, all the credential information will be automatically filled-up.
Creating Credential Profiles
To create Credential Profiles,
Go to Settings >> Discovery >> "Credentials" >> "Add Credential" (Alternatively, you can click the "New Profile" action item present beside the 'Use profile" drop-down in the Inventory ---> Credentials GUI).
In the 'Add Credential Profile' GUI that opens,
- Select the credential type.
- Provide a Name for the new credential profile that has to be created. This is the name that will appear in the "Use Profile" drop-down
- Provide a description for the profile. Though this is for reference purpose, filling up this field is mandatory to avoid confusion at any future point of time
- Fill-up credential values for the desired protocol and click on "Save". The New Credential Profile is created
Managing Credential Profiles
Go to Settings >> Discovery >> "Credentials" to edit/remove a profile.
Thank you for your feedback!