Configuring SAML Single Sign-On for Google Workspace Users
ManageEngine PAM360 integrates seamlessly with Google Workspace (formerly G Suite), enabling organizations to leverage Google's robust identity and access management capabilities for secure Single Sign-On (SSO). By configuring PAM360 as a Service Provider (SP) and Google Workspace as an Identity Provider (IdP), users can centralize authentication processes, streamline access management, and enhance security through Google's advanced authentication mechanisms. This integration ensures that users can log in once via Google and gain access to PAM360 without re-authentication, providing a simplified and secure user experience. This help documentation covers the following topics in detail:
- Prerequisites
- Adding PAM360 to Google's Admin Console
- Creating a Custom NameID Attribute
- Enabling User Access
1. Prerequisites
To configure PAM360 as an SP in the Google Cloud Console, you need SP details displayed on the Configuration For Single Sign-On Using SAML page, under the Service Provider Details section. These details are necessary for setting up PAM360 as an SP on the Google Cloud Console, ensuring a seamless integration between PAM360 and Google. Explore this link for the detailed steps to obtain the required SP details for configuring PAM360 as an SP on the Google Cloud Console.
2. Adding PAM360 to Google's Admin Console
Follow these steps to add PAM360 as a custom SAML application in Google's admin console.
- Log into the Google Admin Console with administrator credentials.
- Click the Menu icon on the top left corner of the screen to reveal the Main menu and select Apps >> Web and mobile apps.
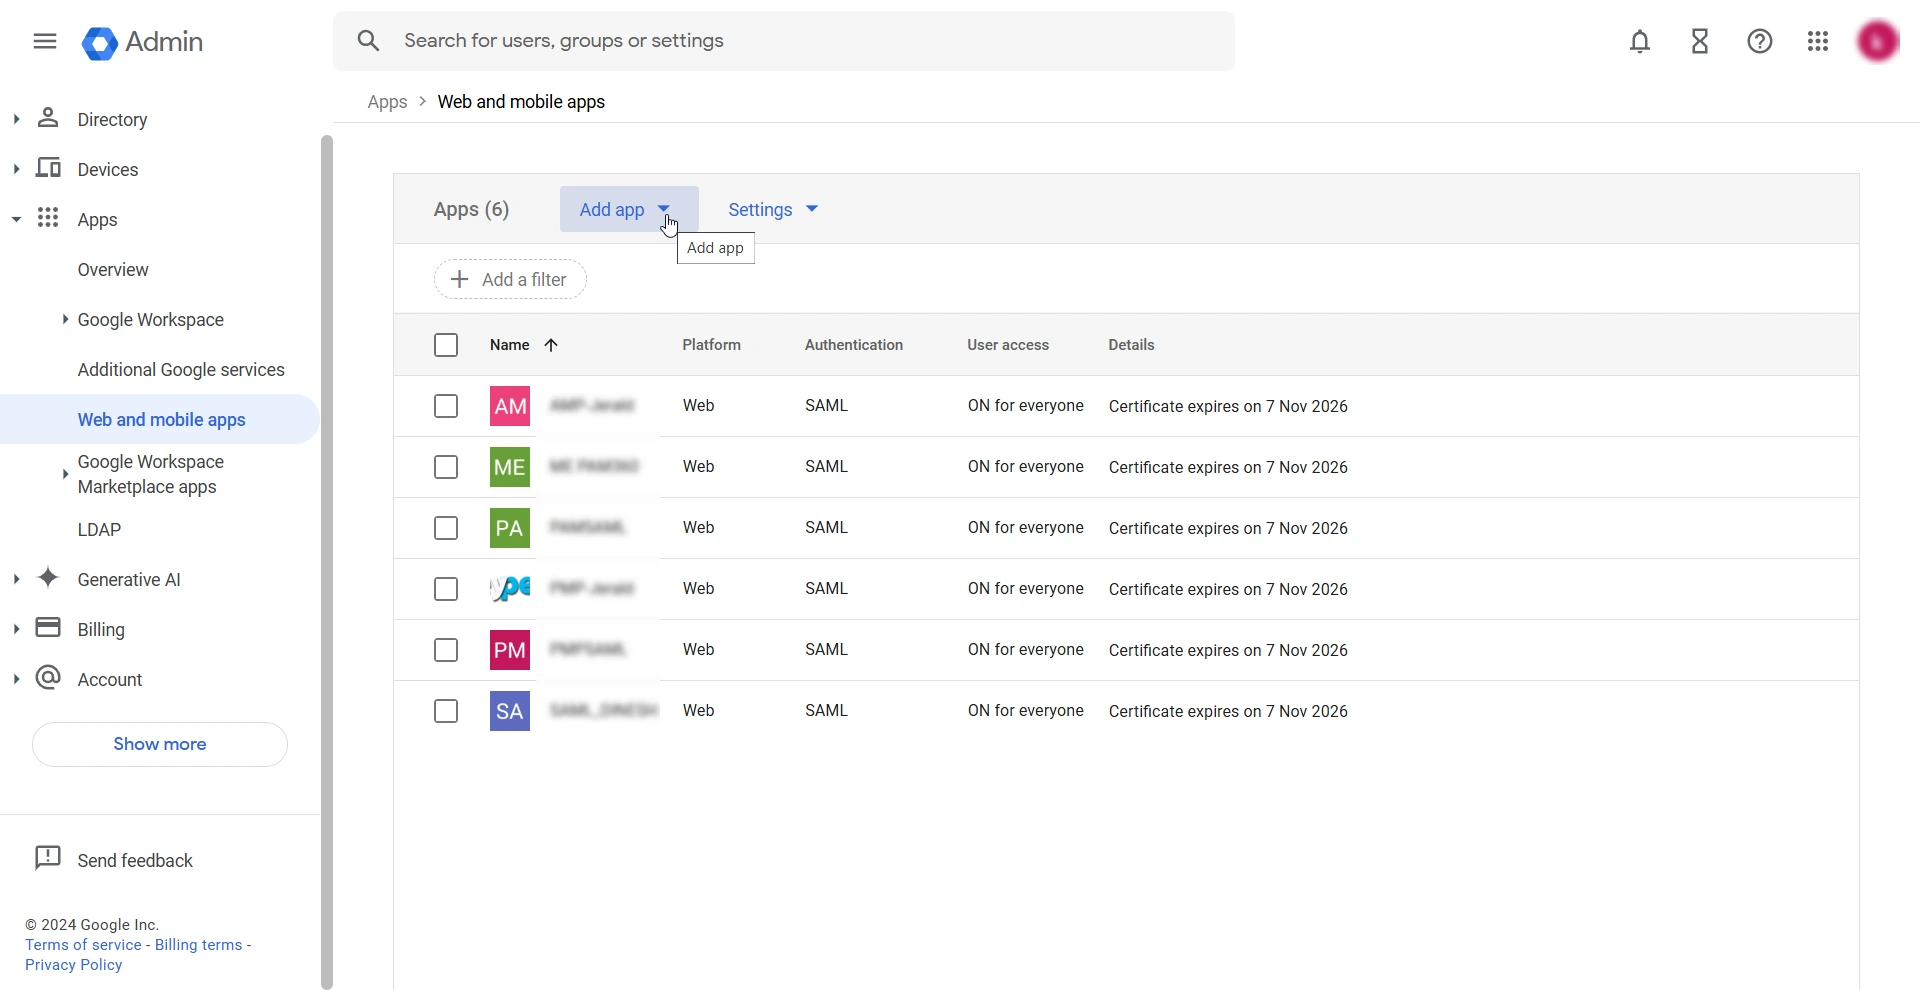
- On the Web and mobile apps page, select Add app >> Add custom SAML app.
- On the Add custom SAML app page, under the App details section enter the following details:
- App name - Enter a custom name for the application, e.g., PAM360. This name uniquely identifies the PAM360 SAML application on the Web and mobile apps page.
- Description - Enter a brief description of the application in the provided field.
- App icon - Click the camera icon under the App icon field to upload a logo for the PAM360 SAML application
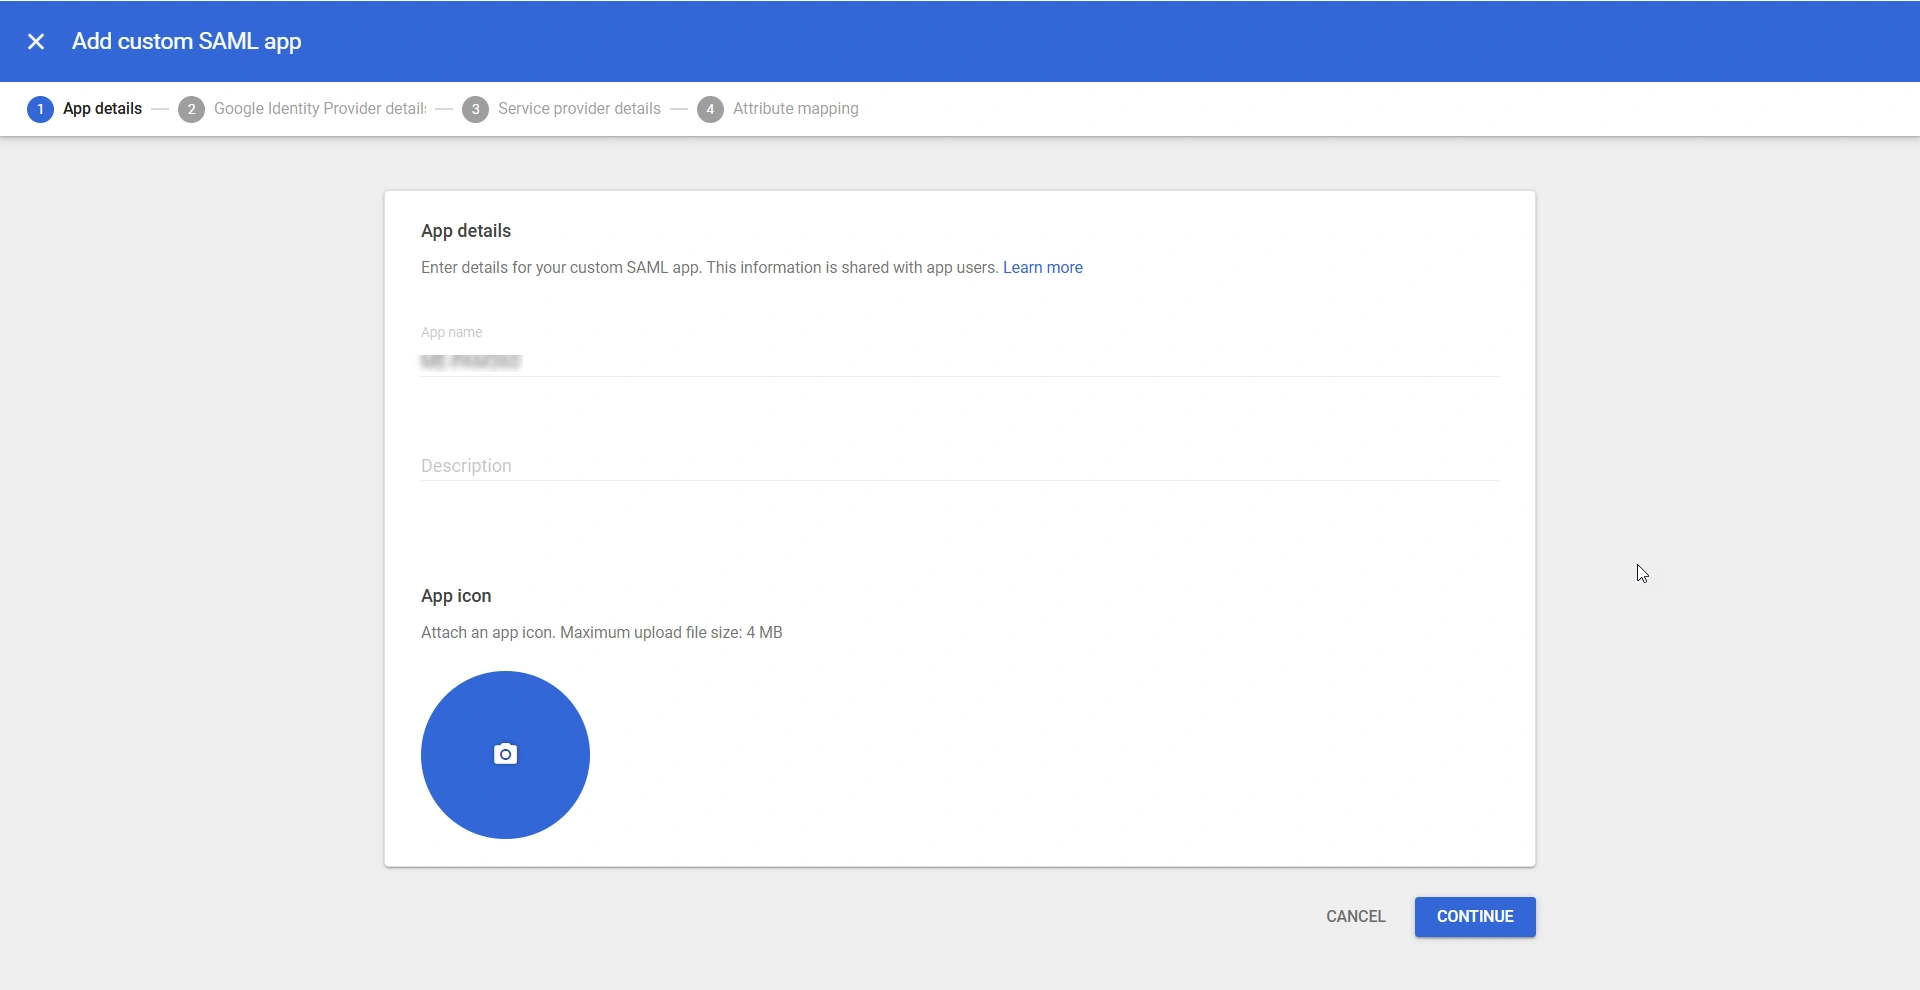
- Click Continue to proceed to the next step.
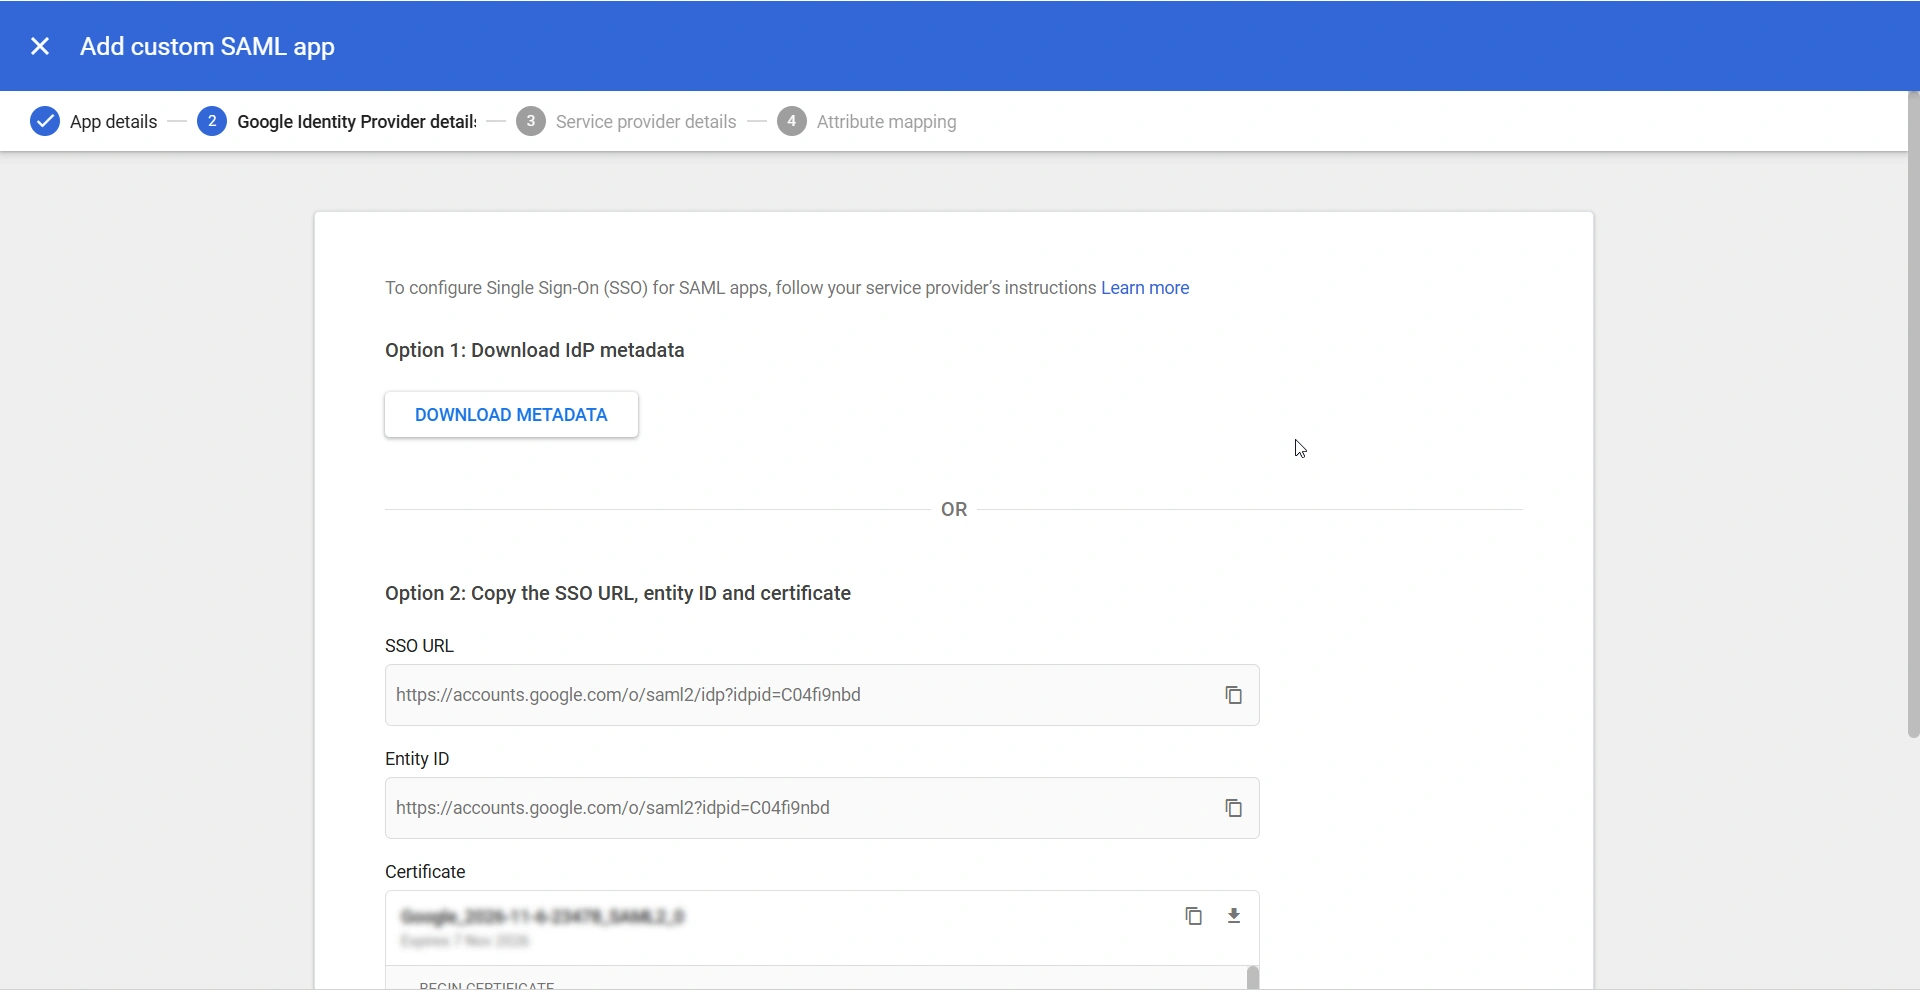
- On the Google Identity Provider details section, click the DOWNLOAD METADATA button under Option 1 to download the IdP details as an XML file. Alternatively, you can manually populate the IdP details on PAM360 while configuring Google as an IdP. Click Continue to proceed to the next step.
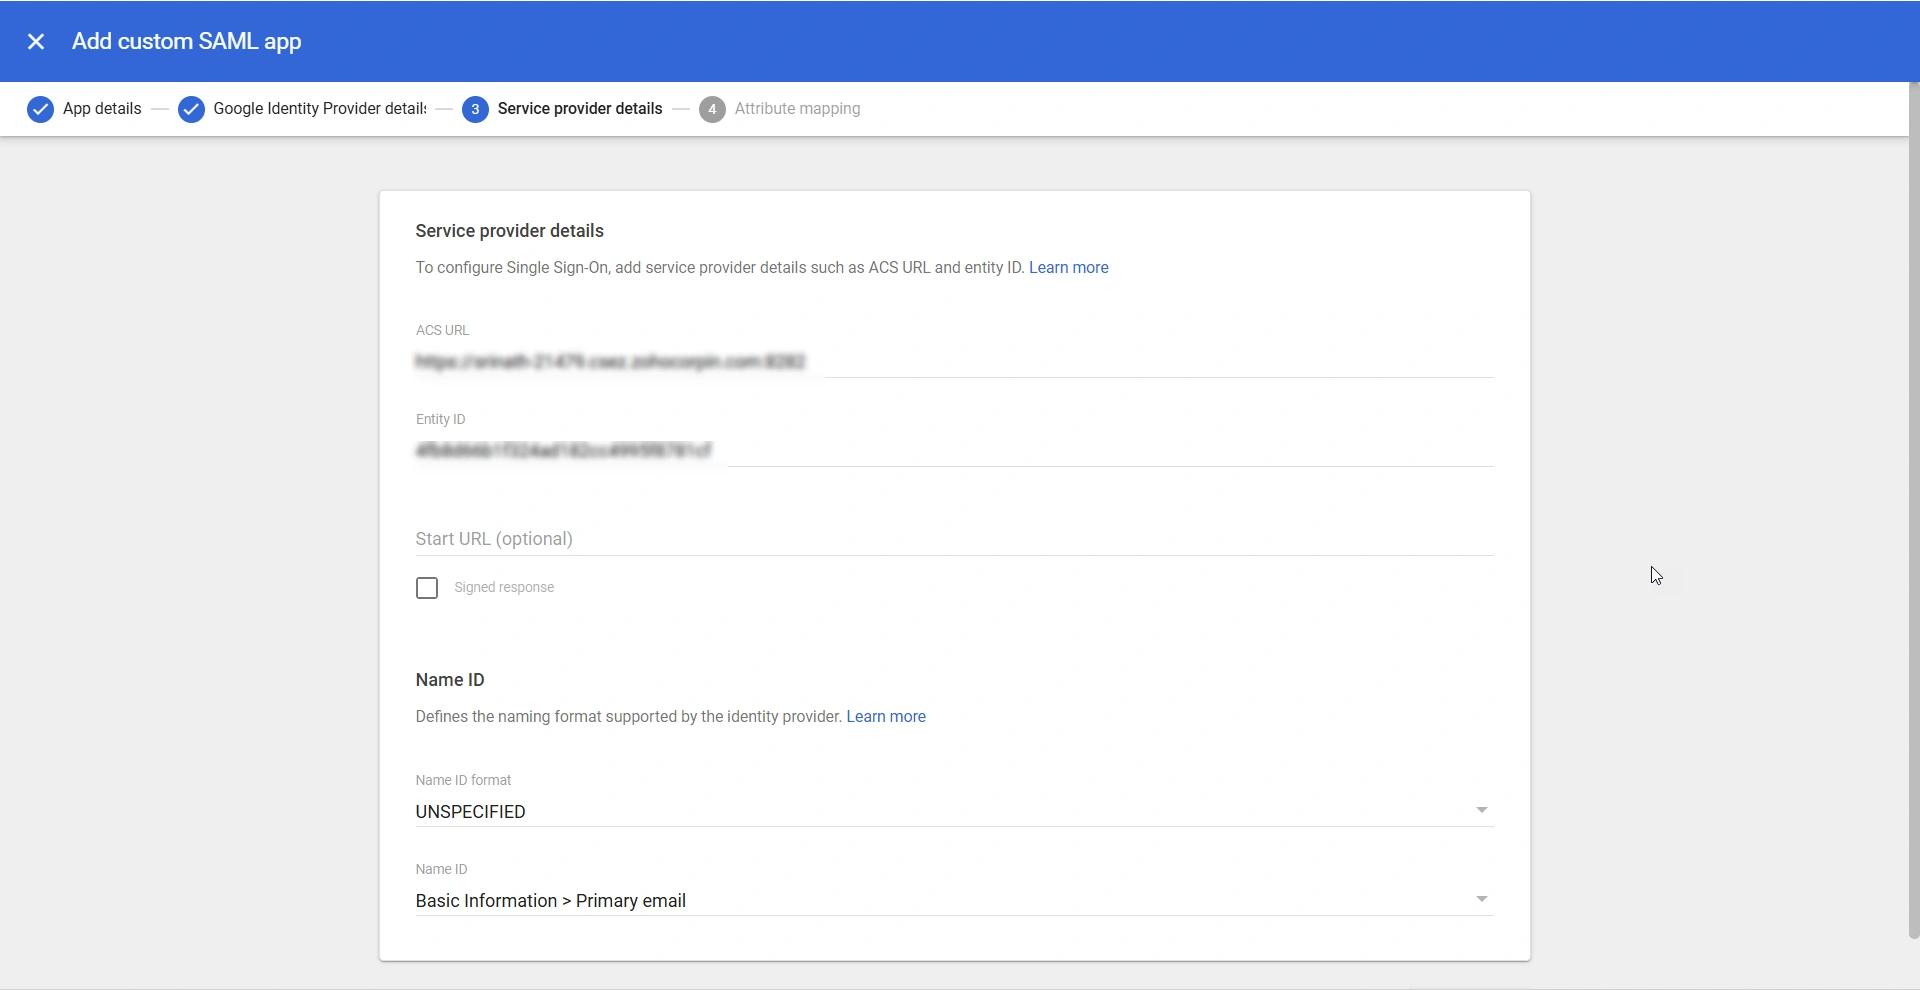
- On the Service provider details page, enter the following details:
- ACS URL - Enter the PAM360's ACS URL in this field. You should enter the URL in the https://Hostname.DNS Suffix:Port Number/saml2 format.
- Entity ID - Enter PAM360's entity ID in this field.
- Start URL - Leave this field blank.
- Name ID format - Select the desired NameID Format from the drop-down field.
- Name ID - Select the desired NameID from the available options. The selected NameID should match the PAM360 username of the users in your environment to ensure a seamless login experience.
- Case 1 - If the username in PAM360 is an email address that matches the primary email address in the Google Account, select Basic Information > Primary email.
- Case 2 - If the username in PAM360 is just the username and matches either the first or last name in the Google Account, select Basic Information > First name or Basic Information > Last name.
- Case 3 - If you are configuring SAML SSO for the users imported to PAM360 from AD, you must create a custom NameID attribute that matches the PAM360 username of the AD users. For detailed steps to add a custom NameID attribute in the Google Admin Console, refer to the Creating a Custom NameID Attribute section.
- After configuring the Service provider details, click Continue to proceed to the next step, Attribute mapping.
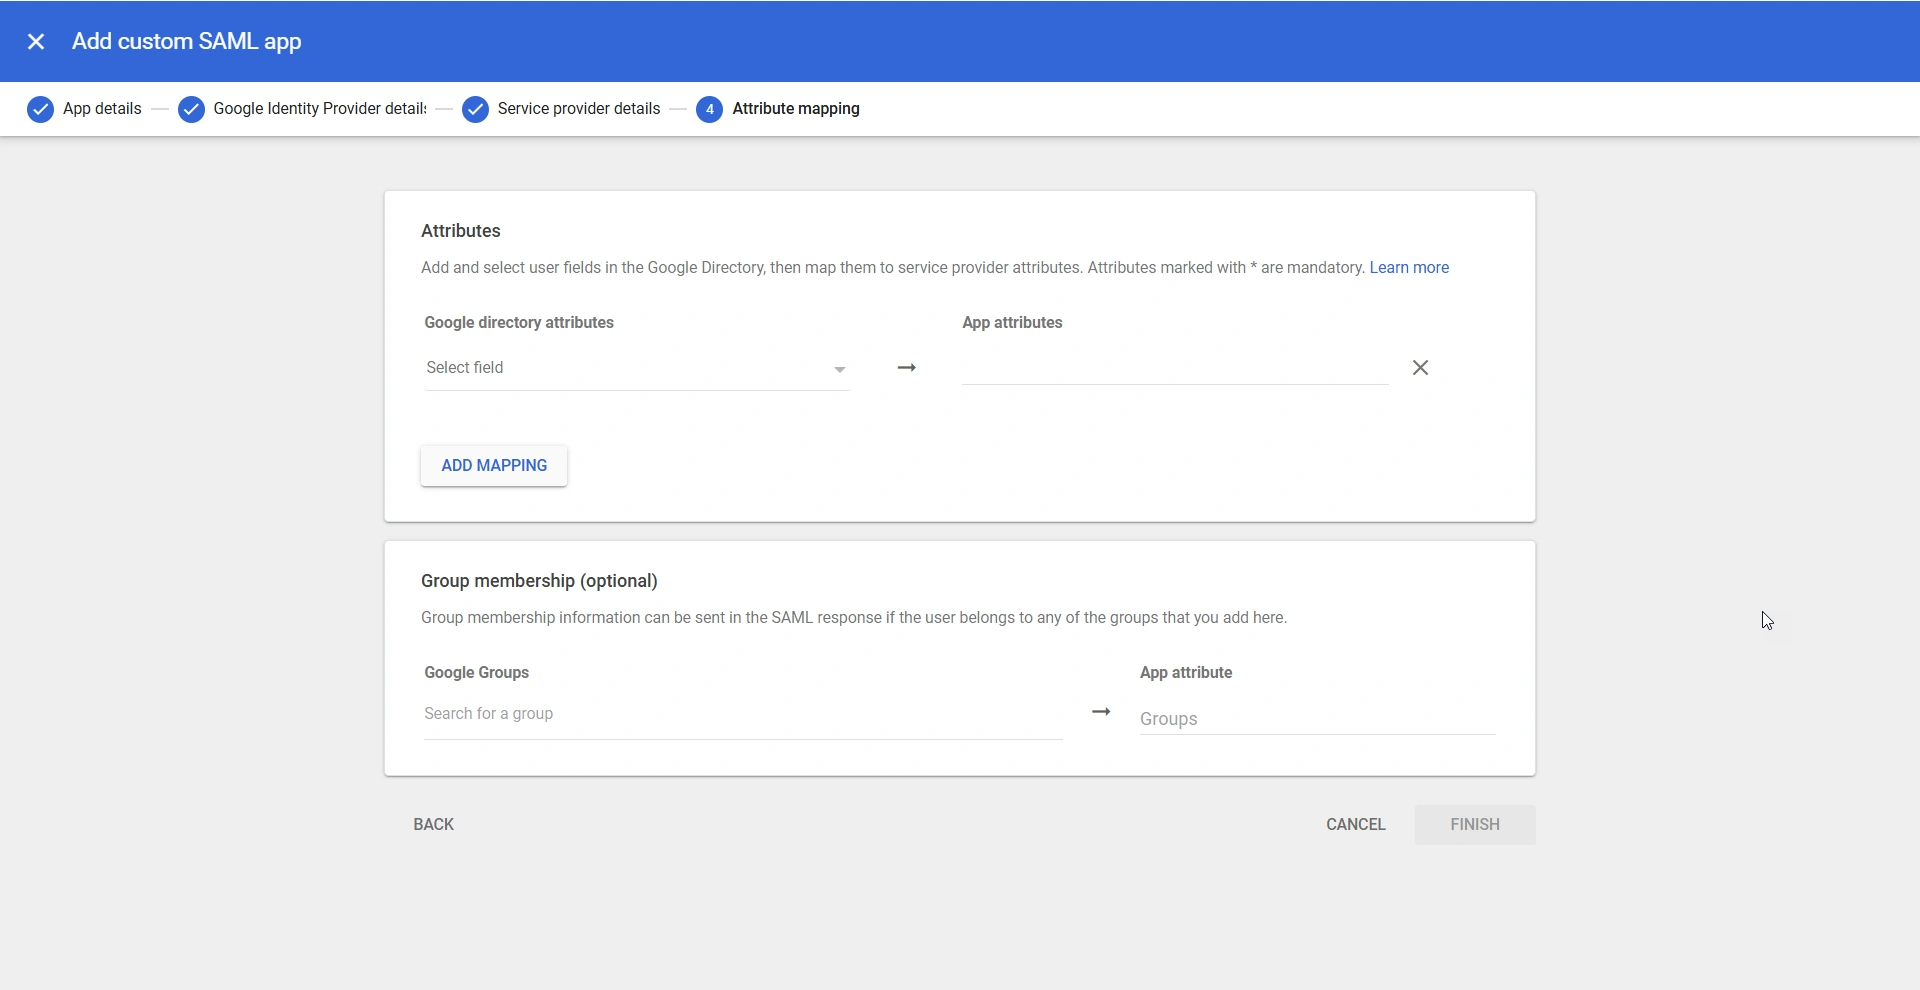
- On the Attribute Mapping page, click the ADD MAPPING button under the Attributes section to map the Google directory attributes with the App attributes.
- Click the Select field drop-down to select the desired Google directory attribute from the available list of options and enter the corresponding PAM360 user attribute in the field under the App attributes column. You can add multiple user attributes. Refer to Google's help document for more details about attribute mapping.
- After mapping the required attributes, click Finish to add PAM360 as an SP in Google Workspace.
3. Creating a Custom NameID Attribute
This section guides you through the steps to add a custom NameID attribute in the Google Admin Console, ensuring that the SAML assertions are correctly mapped and authenticated. Follow the instructions below to configure the required custom attribute for your AD users imported to PAM360.
- Go to Directory >> Users from the Main menu.
- On the Users page, select More options >> Manage custom attributes.
- On the Manage user attributes page, click the ADD CUSTOM ATTRIBUTE button in the top-right corner of the screen.
- In the Add custom fields section, enter the following details:
- Category - Enter a relevant category name for the custom attribute.
- Description - Provide a brief description of the custom attribute in this field.
- Name - Specify a unique name for the custom attribute.
- Info type - Select the appropriate information type for the custom attribute. Select Text from the available options.
- Visibility - Set the visibility level for the custom attribute.
- No of values - Indicate the number of values the custom attribute can hold, for example, single or multi-value.
- After entering the required details, click the ADD button to add the custom attribute successfully.
After creating the custom attribute, it is essential to populate its value in the Domain\username format to ensure seamless authentication for AD users accessing PAM360. Follow these steps to update the attribute value:
- Navigate to Directory >> Users from the Main menu.
- Select a user from the list to access the User details page and click anywhere inside the User information section. On the page that appears, scroll down and locate the newly created custom attribute.
- Hover over the custom attribute and click the Edit icon.
- Enter the attribute value in the format Domain\username in the provided field. Ensure the value matches the PAM360 username for the selected user.
- Click Save to save the attribute value successfully.
4. Enabling User Access
After setting up SAML SSO, you must enable user access to the PAM360 custom SAML application within the Google Admin Console to allow users to log into PAM360 using SAML SSO. User access to the PAM360 custom SAML application is turned off by default. Follow these steps to enable user access:
- Access the custom PAM360 SAML application from the Web and mobile apps page.
- On the PAM360 application page, click anywhere on the User access section to view the applications' service status.
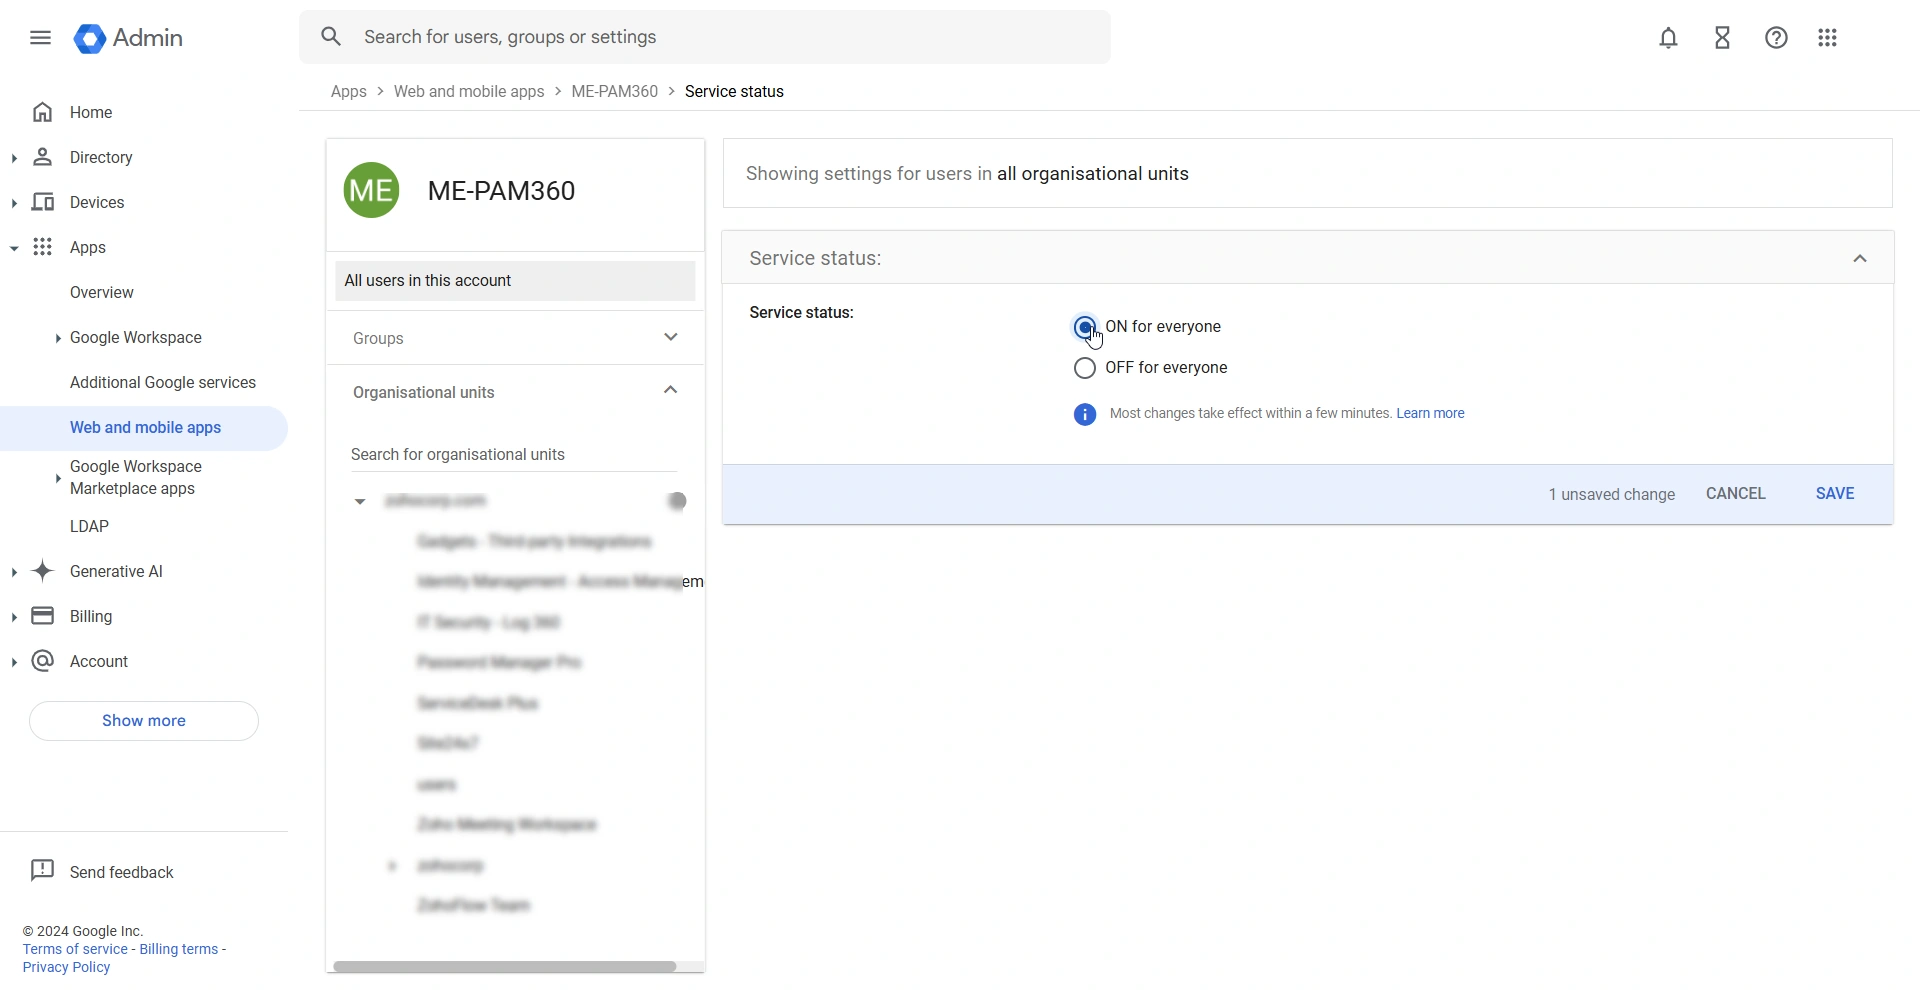
- On the page that appears, enable the ON for everyone radio button and click Save.
You have successfully enabled user access for the custom PAM360 SAML application.
After setting up PAM360 as an (SP) in the Google Admin Console, you must configure Google as an IdP in PAM360 to establish it as a trusted entity. Access the PAM360 browser window and proceed with the IdP configuration starting from Step 2 - Configure Identity Provider Details. Explore this link for the detailed IdP configuration steps. Based on the provided steps, configure Google as an IdP and enable SAML Single Sign On on the PAM360 interface.