NetFlow Analyzer Enterprise Edition - Installation and Uninstallation

    Central Server Installation

    Windows

    The Windows download for NetFlow Analyzer is available as an EXE file at https://www.manageengine.com/products/netflow/download.html#ent Download the EXE file for the Central Server to your local machine, and double-click it to start installation.Follow the instructions as they appear on screen to successfully install NetFlow Analyzer on to your machine.

    Step1: On the Welcome Screen, Click ‘Next’ to continue.
    Step2: Read the License agreement carefully and click ‘Next’ to proceed to the next step.
    Step 3: Verify the destination folder and Click ‘Next’ to continue.
    Step 4: Select your desired server type.
    There are two options for server-type:
    1) Central Reporting Server 2) Collector Server
    Step 5: Select your desired port and language and click ‘Next’ to continue
    Step 6: Provide proxy server host, server port, proxy user- name and password. Click ‘Next’ to continue. Step 7: Choose your desired Program Folder
    Step 8: Register for technical support by providing the information in the respective fields in the registra- tion form.
    This is an optional form. Click ‘Next’ to continue.
    Step 9: Review the Settings information that appears and Click ‘Next’ to begin the installation.
    Step 10: Please wait till the installation is completed.
    Step 11: Please wait till the files are extracted.
    Step 12: The installation procedure is now complete. Click ‘Finish’ to start NetFlow Analyzer as a service.

    Linux:

    The Linux download for NetFlow Analyzer is available as a BIN file at https://www.manageengine.com/products/netflow/download.html#ent

    1. Download the BIN file and assign execute permission using the command: chmod a+x <file_name>.bin.where <file_name> is the name of the downloaded BIN file.
    2. Execute the following command: sudo ./<file_name>.bin
    3. During installation if you get an error message stating that the temp folder does not have enough space, try executing this command with the -is:tempdir <directoryname> option, where <directoryname> is the absolute path of an existing directory. sudo ./<file_name>.bin -is:tempdir <directory_name>
    4. Follow the instructions as they appear on the screen to successfully install NetFlow Analyzer on to your machine.

    Collector Installation

    Windows

    Step 1: On the Welcome Screen, Click ‘Next’ to continue.
    Step 2: Read the License agreement carefully and click ‘Next’ to proceed to the next step.
    Step 3: Verify destination folder and Click ‘Next’ to continue.
    Step 4: Select your desired server type.
    There are two options for server-type:
    1) Central Reporting Server 2) Collector Server
    Step 5: Select your desired port and language and click ‘Next’ to continue.
    Step 6: Provide communication details such as Host Name, HTTPs port number etc. for both Central Server & Collector. Click ‘Next’ when you are done.
    Step 7: Please enter server details such as Name, user-name and password. Click ‘Next’ to continue.
    Step 8: Mention the default SNMP community and port information. This is an optional step.
    Click ‘Next’ to continue.
    Step 9: Provide proxy server host, server port, proxy user- name and password. Click ‘Next’ to continue.
    Step 10: Choose your desired Program Folder.
    Step 11: Registration for technical support. An optional form to register yourself for technical support would appear. You may choose to skip this form.
    Step 12: Review the information that appears and click ‘Next’ to begin the installation.
    Step 13: Please wait till the installation is completed.
    Step 14: Once installation is complete, click on ‘Finish’. This will start NetFlow Analyzer as a service.

    Linux

    The Linux download for NetFlow Analyzer is available as a BIN file at https://www.manageengine.com/products/netflow/download.html#ent

    1. Download the BIN file and assign execute permission using the command: chmod a+x <file_name>.bin.where <file_name> is the name of the downloaded BIN file.
    2. Execute the following command: sudo ./<file_name>.bin
    3. During installation if you get an error message stating that the temp folder does not have enough space, try executing this command with the -is:tempdir <directoryname> option, where <directoryname> is the absolute path of an existing directory. sudo ./<file_name>.bin -is:tempdir <directory_name>
    4. Follow the instructions as they appear on the screen to successfully install NetFlow Analyzer on to your machine.

    Note: While Installing the collector please give the proper entries in the communication panel and in the proxy server settings so that the collector can communicate with the central server properly.

    Once you have successfully installed NetFlow Analyzer, start the NetFlow Analyzer server for central and collector.

    Installing NetFlow Analyzer Enterprise Edition on Linux using Console mode/ Silent mode

    Central Server

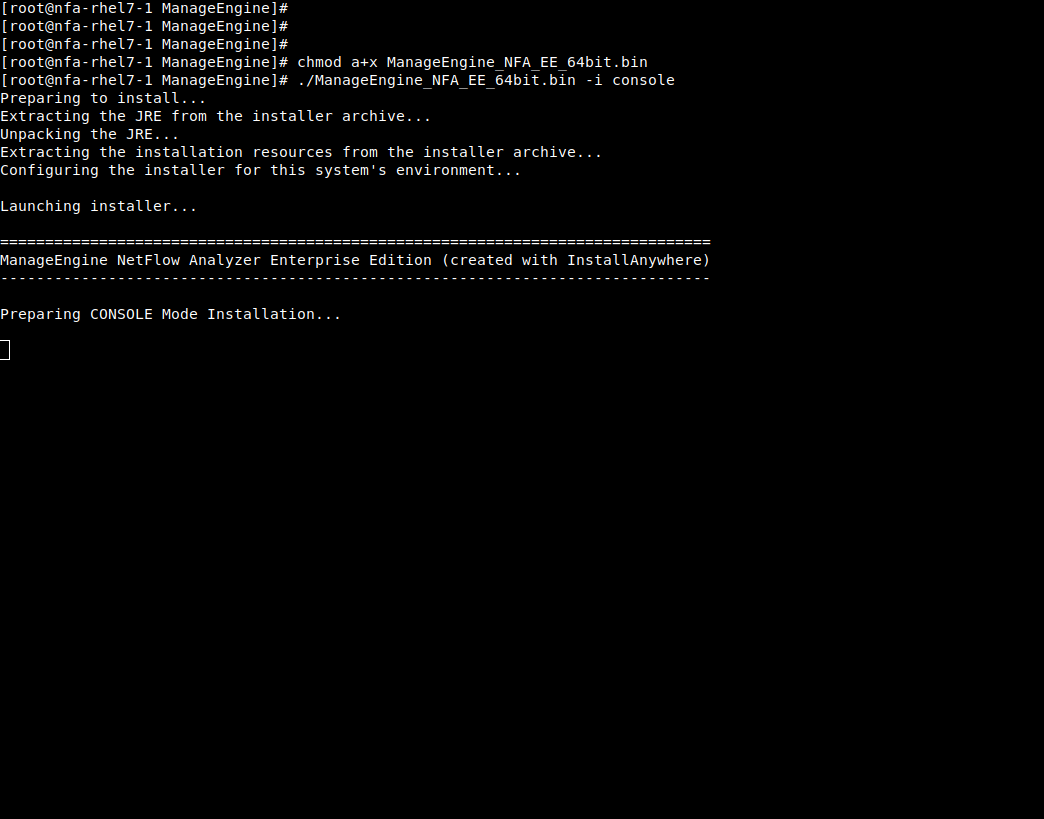
    Step 1: Execute ManageEngine_NFA_DE_64.bin with administrator privileges (sudo) and -i console option.
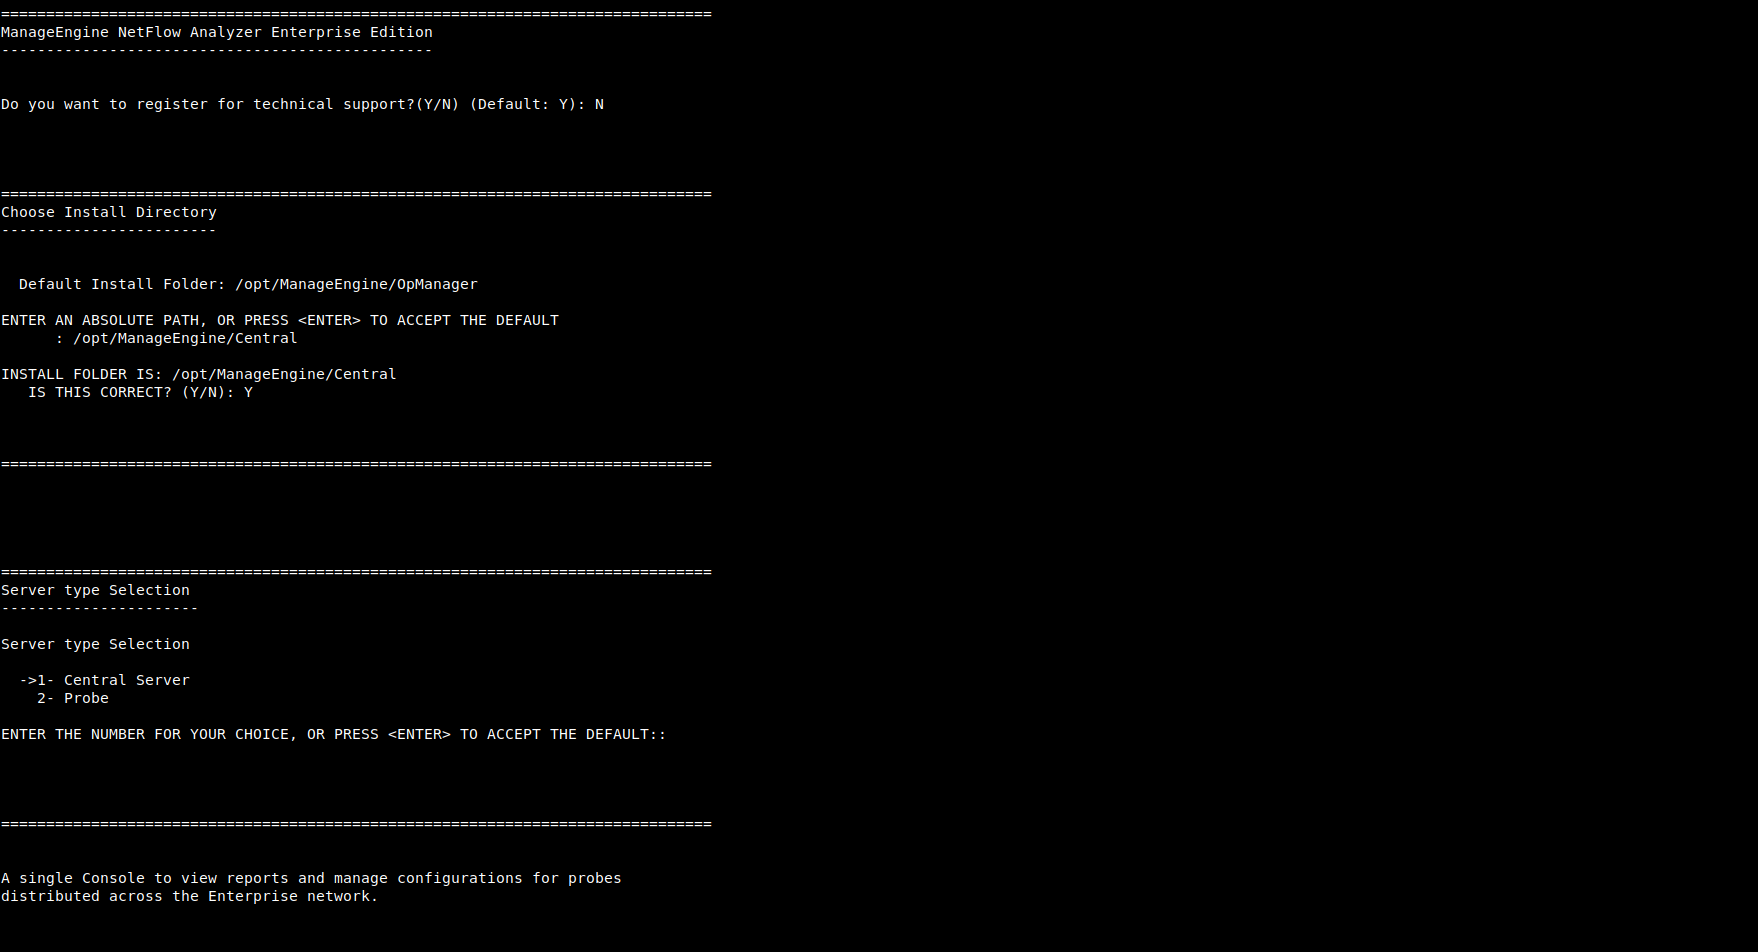
    Step 2: Go through the license agreement and enter 'Y' to proceed. You can register for technical support by providing the required details. (Name, E-mail ID, Phone, Company Name)

    Step 3: Select the location.

    Step 4: Choose the installation directory


    Step 5: Configure the Webserver and HTTP Ports


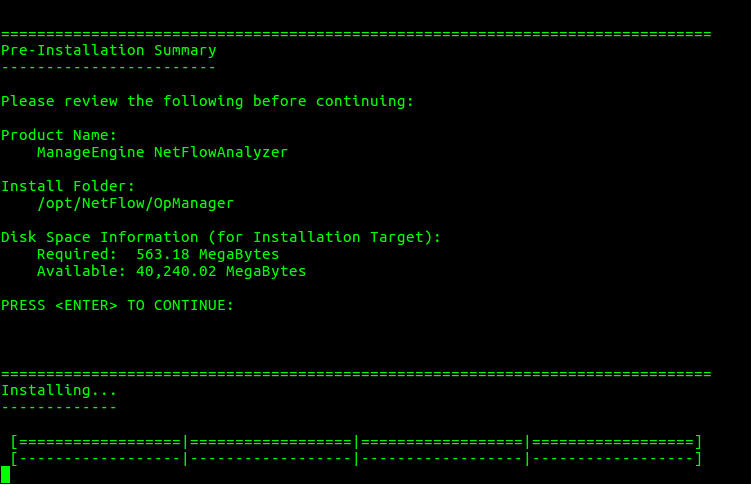
    Step 6: Verify the installation details and press 'Enter' to complete the installation.


    Probe Server

    Step 1: Execute ManageEngine_NetFlowAnalyzer_Probe_64bit.bin with security privileges (sudo) and -i console option.


    Step 2: Go through the license agreement and enter 'Y' to proceed. You can register for technical support by providing the required details. (Name, E-mail ID, Phone, Company Name)
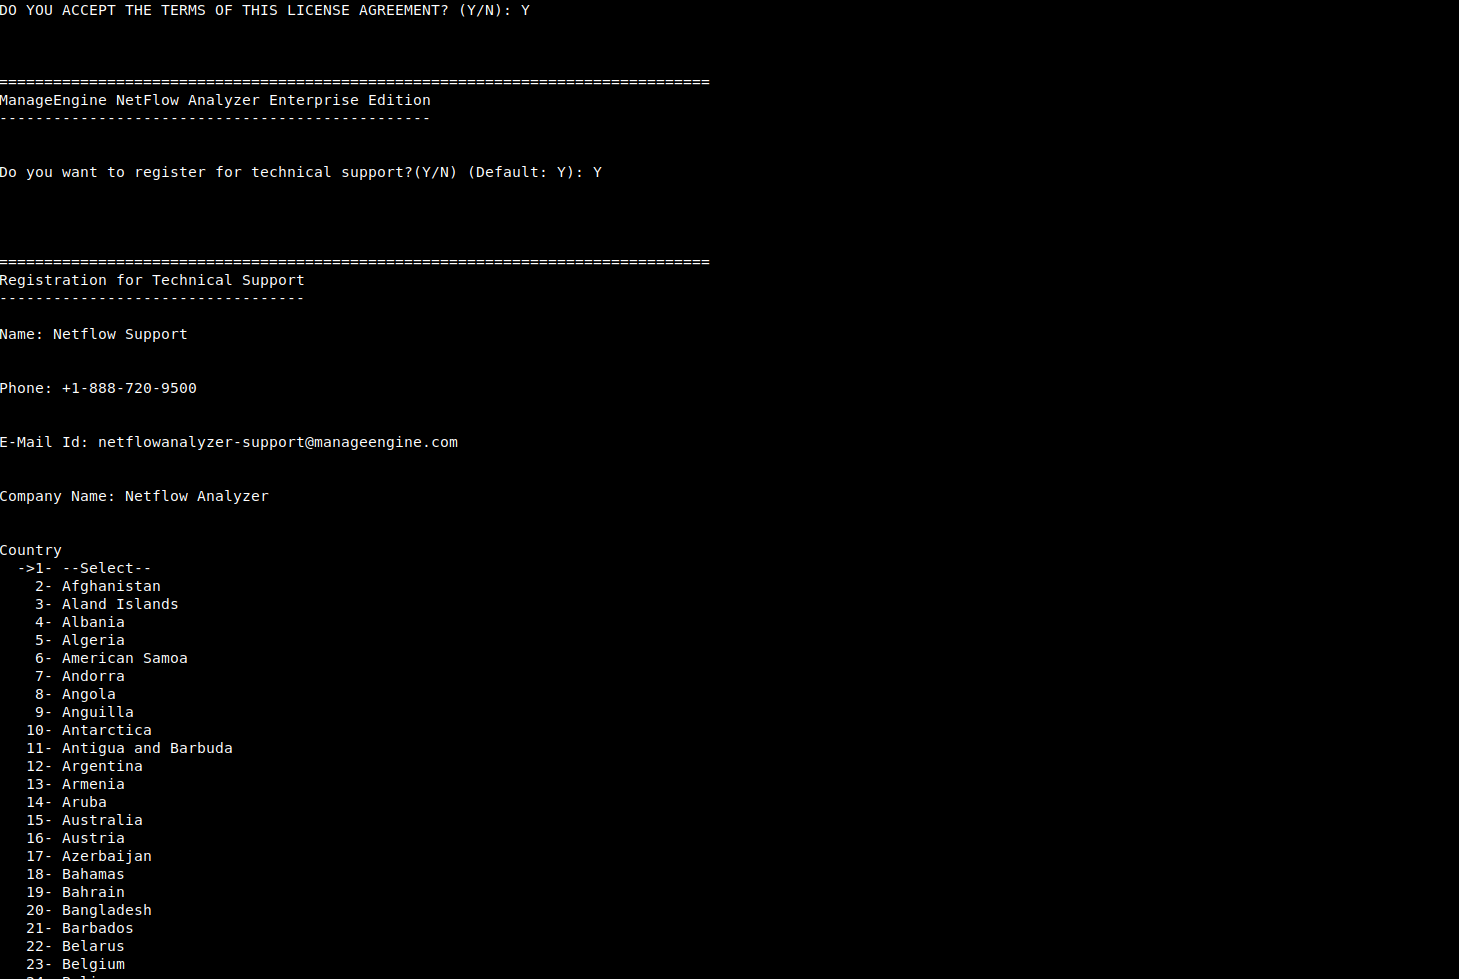
     

    Step 3: Select the location.
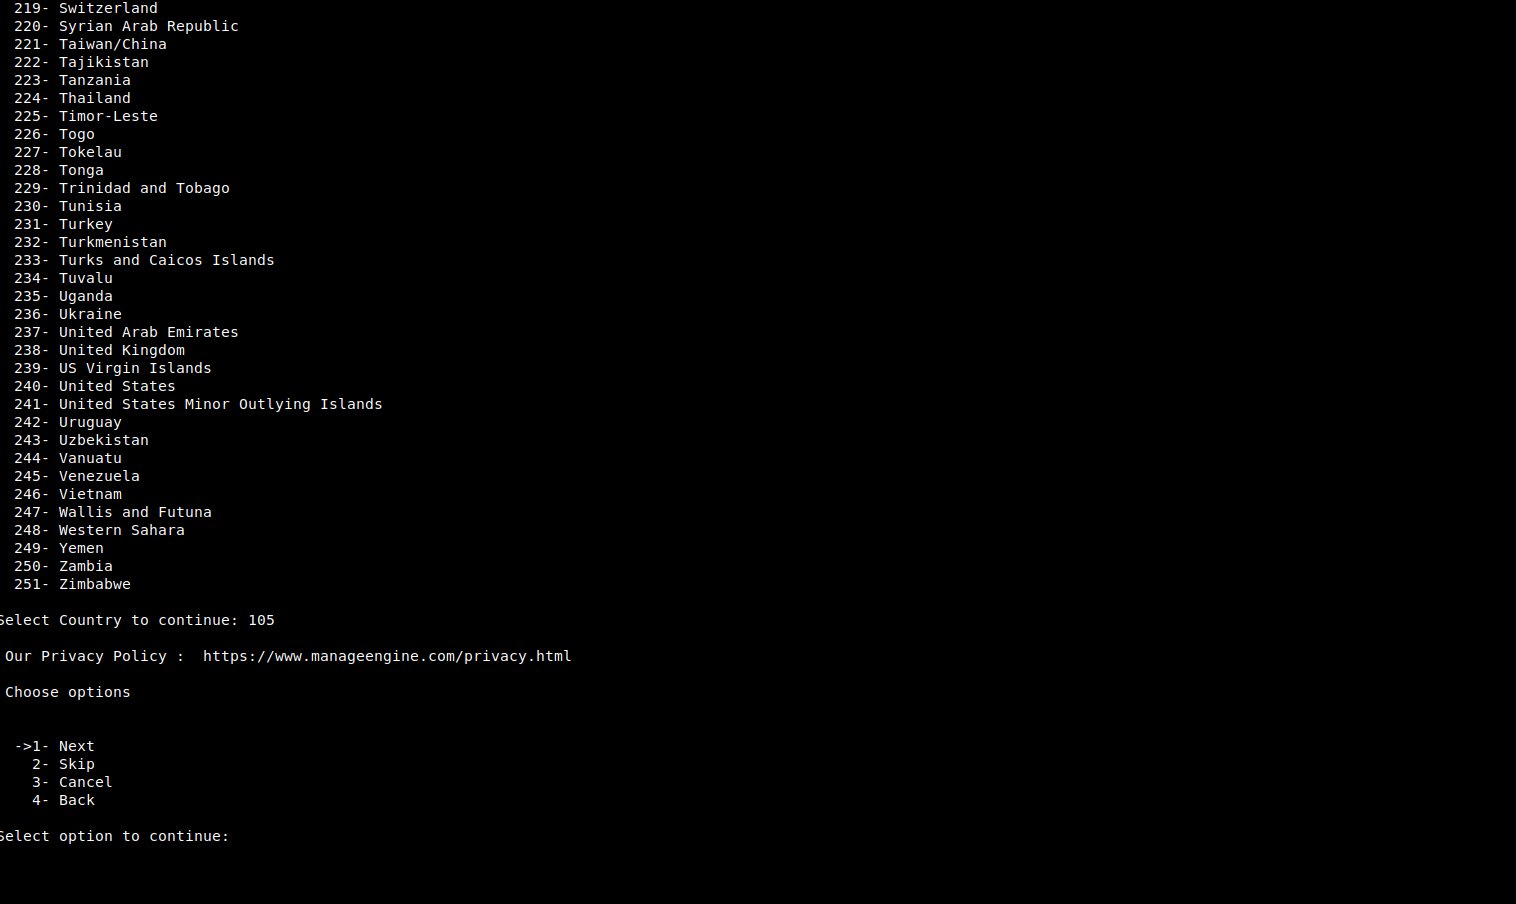


    Step 4: Choose the installation directory, and configure the Webserver and Listener Ports.
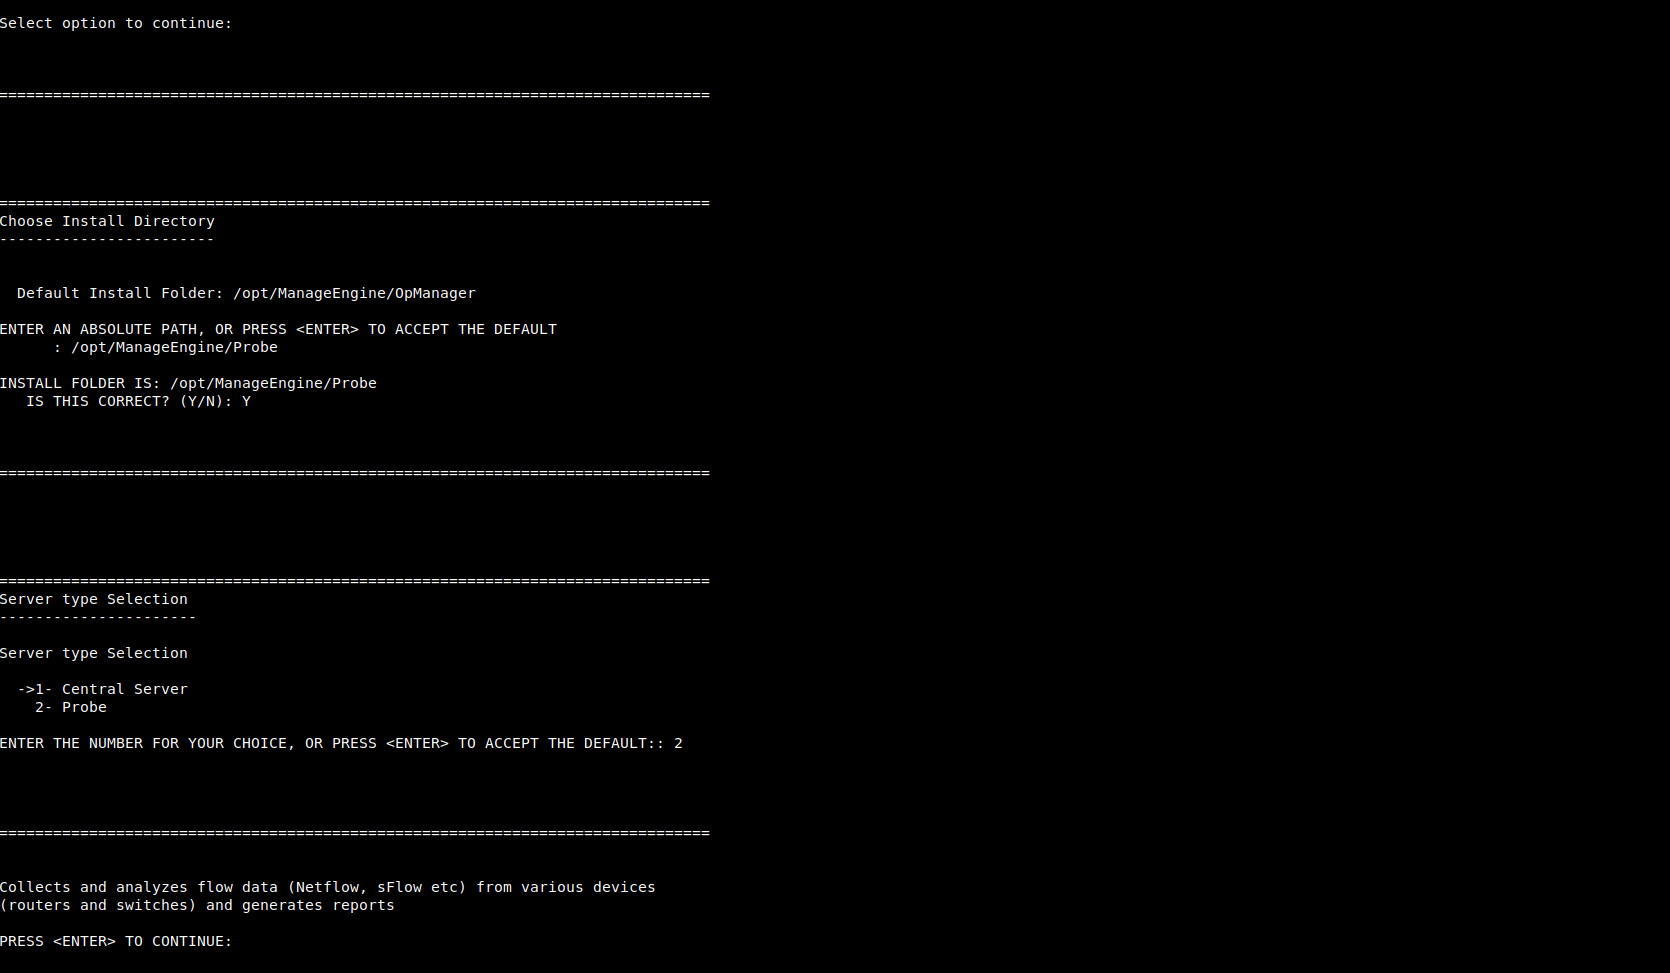
     

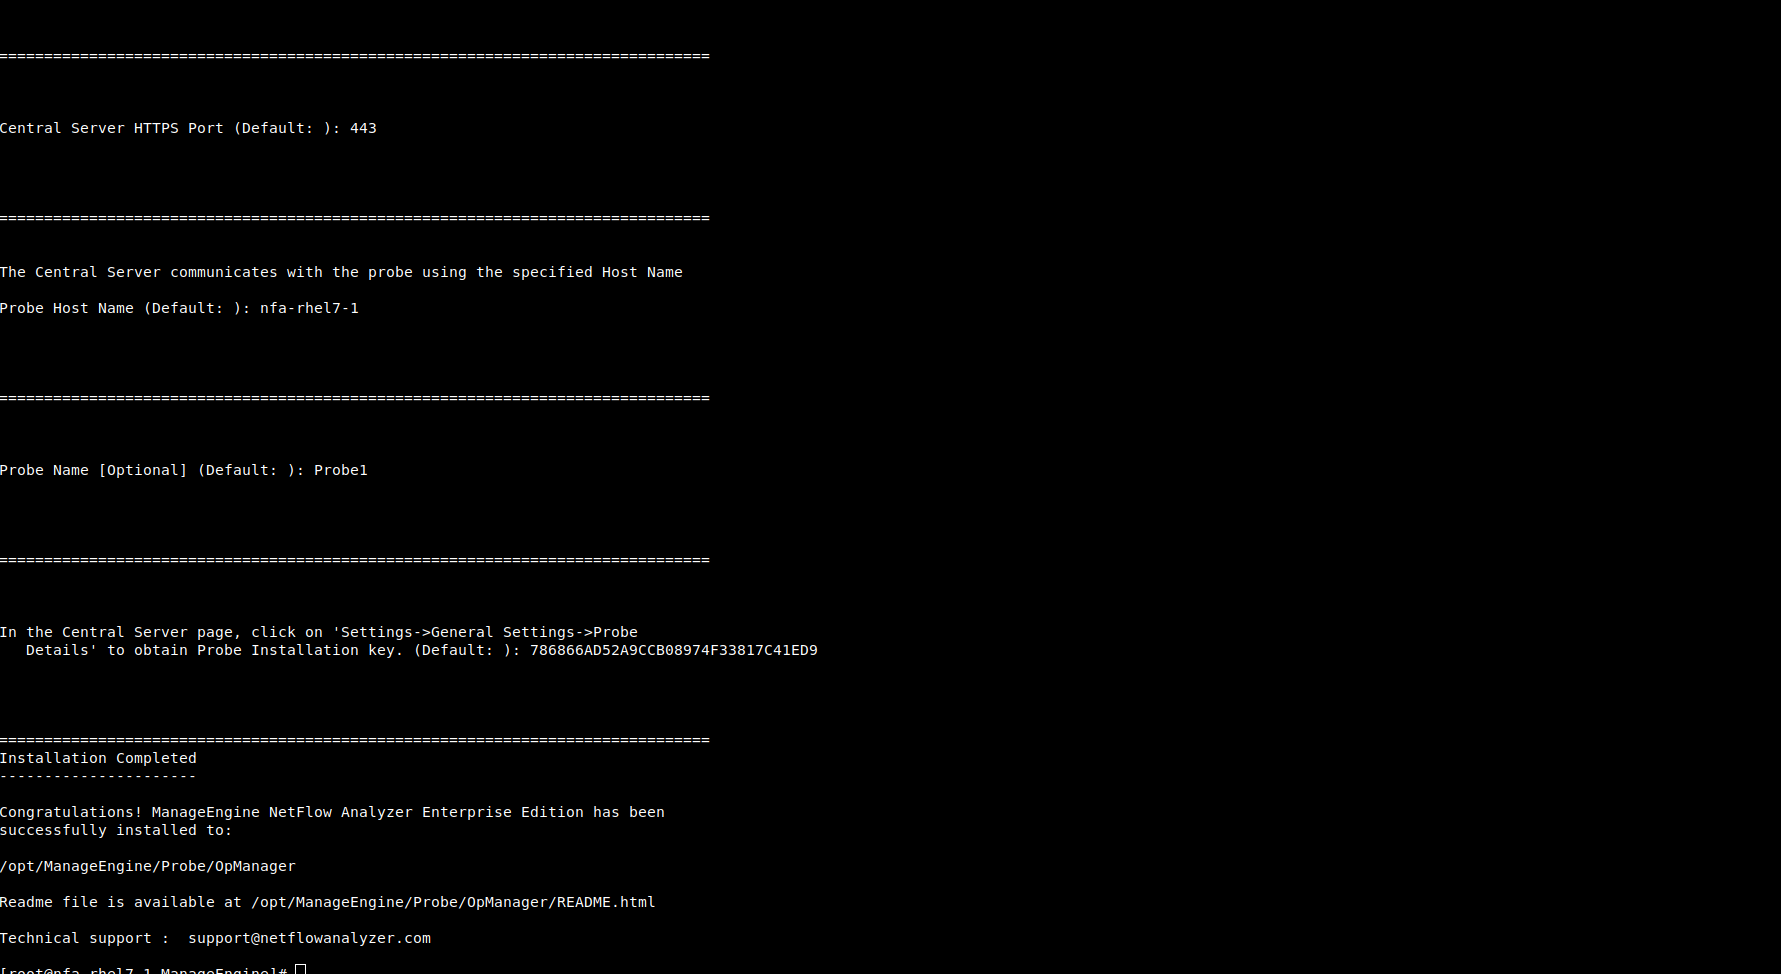
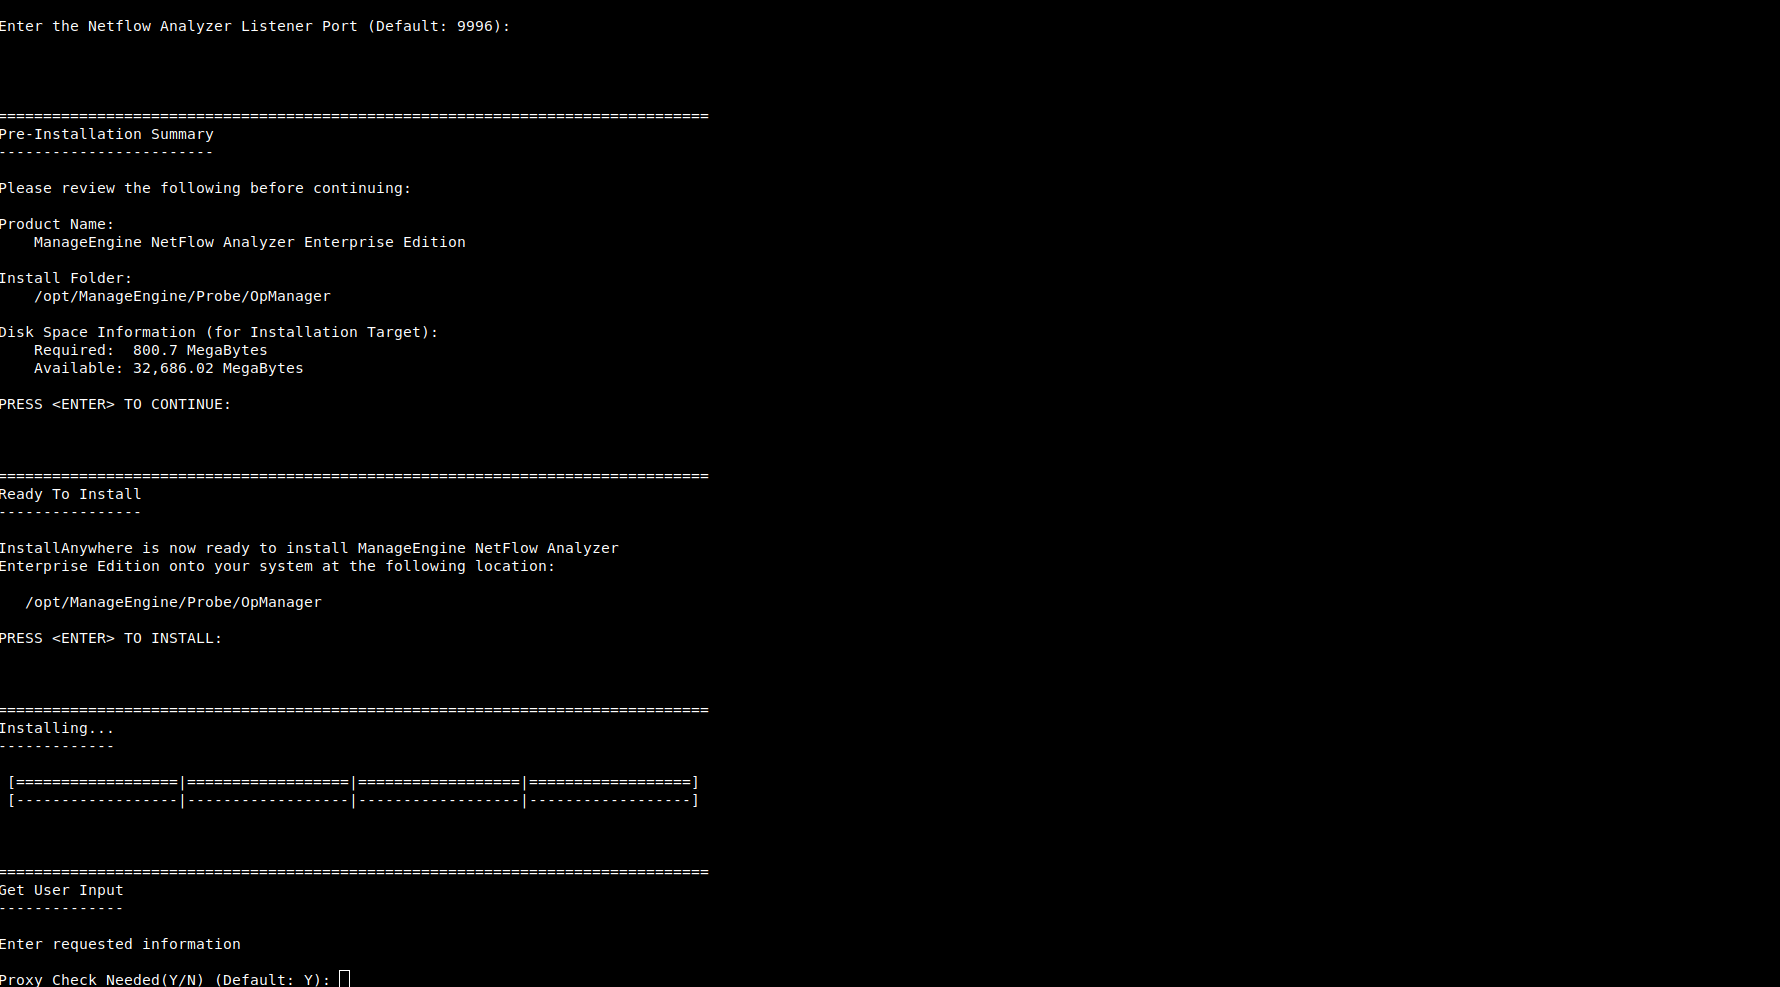
    Step 5: Verify the installation details, the installation status and press 'Enter' to complete the installation.
    Starting NetFlow Analyzer Central Server

    Windows

    Click on Start > Programs > ManageEngine NetFlow Analyzer Central Reporting Server > Central Server.
    Alternatively you can navigate to the \bin folder and invoke the run.bat file.

    Linux

    Navigate to the /bin directory and execute the run.sh file.
    When the server is started, a command prompt window opens up showing startup information on several modules of NetFlow Analyzer. Once all the modules have been successfully created, the following message is displayed:

    Server started.
    Please connect your client at https://localhost

    where 8060 is replaced by the port you have specified as the web server port during installation.

    Starting NetFlow Analyzer Collector

    Windows

    Click on Start > Programs > ManageEngine NetFlow Analyzer Collector > Collector Server. Alternatively you can navigate to the \bin folder and invoke the run.bat file.

    Linux

    Navigate to the /bin directory and execute the run.sh file.
    When the server is started, a command prompt window opens up showing startup information on several modules of NetFlow Analyzer. Once all the modules have been successfully created, the following message is displayed:

    Server started.
    Please connect your client at http://localhost:8060

    where 8060 is replaced by the port you have specified as the web server port during installation.

    Starting as a Service

    Windows

    If you have chosen the Start as Service option during installation, NetFlow Analyzer will run as a service on Windows.

    Linux

    1. Login as root user.
    2. Navigate to the \bin directory.
    3. Execute the linkAsservice.sh file.
    4. Then execute the command systemctl start OpManager.service.

    This starts NetFlow Analyzer as a service on Linux.