Configuring Alerts in Switch Port Mapper
Switch Port Mapper Settings
Click the Settings -> Switch Port Mapper -> Configure Alerts.
General Settings
Click the General tab under Switch Port Mapper settings to configure the following:
Resolve DNS - Select this option to resolve the DNS name of the connected devices during every scan.
Show all the Interfaces - The Switch Port Mapper, by default, will only list the ports that have a matching port in the Bridge MIB. All the other ports will be excluded from the result view. To view all the switch ports even if no matching port is available in the Bridge MIB, select this option.
Remember MAC address on port - Select this option to enable OpUtils to retain the information of the previously connected device until a new device is detected on the same port.
Show Sys Name of switches on Tree View - OpUtils displays the system name (Sys Name) of switches in the tree view interface, rather than showing the switch name or IP address. When selecting the 'Choose interface label in port view' option, specify whether to display the port number or the interface name in the port view. When configuring the 'Choose interface count in port block' option, determine the total number of interfaces to be displayed within each port block.
Exclude Uplink Ports while Scanning - Choose this option to disregard the trunk ports (commonly known as uplink ports) on switches during the scanning operation.
Exclude Uplink Ports while Scanning - Choose this option to disregard the trunk ports (commonly known as uplink ports) on switches during the scanning operation.
Exclude Uplink Ports while Exporting - Selecting this option ensures that trunk ports are omitted from the exported results during the exporting process.
Publish Mapping Results
OpUtils provides an option to auto-publish the switch port mapping results to a csv file. This helps to view the history of port mapping details later. Click the Publish tab under Switch Port Mapper settings to publish the results of the scan to a csv file automatically.
Enable Auto-Publish - Select this option to enable publishing the results to a CSV file automatically. This option is selected by default.
Publish Directory - Specify a location to store the published results. The default location is <OpUtils_Home>/webapps/SPMHistory
Create a consolidated CSV file for all the switches - Select this option to create a consolidated CSV file containing the mapping results of all the switches scanned. It may be noted that you will be getting a consolidated reports only at the group-level, i.e., a single report for all the switches in a particular group. Also, the consolidated report will only be created whenever a scheduled scan happens for a particular group and not during manual scans.
Configure Email Alerts to Notify Port State Changes
Switch Port Mapper generates alerts to notify various events. Click the Alert tab under Switch Port Mapper settings to configure alert settings:
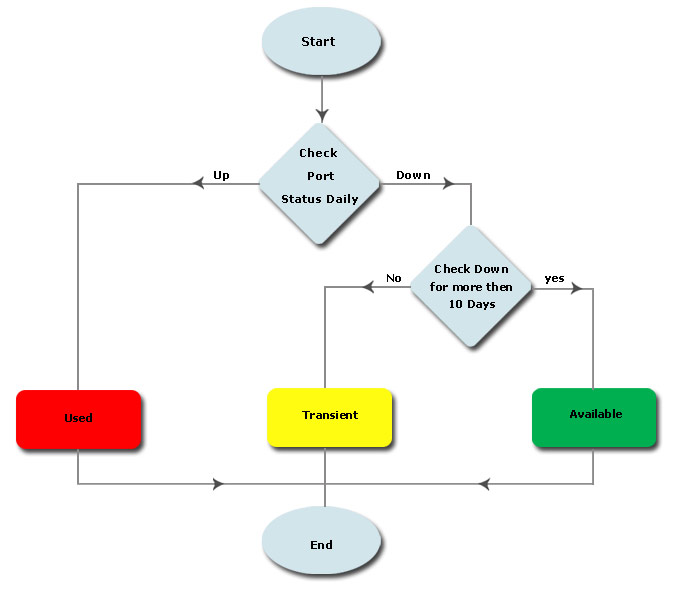
Policy to move a port from "Transient" to "Available" state - Specify the continuous period of inactivity after which the ports will be declared as Available. If the ports are currently down and are down for less than the period specified here, the ports are shown as Transient.
Enable Email Alert - Select this option and specify the email addresses. You can select to receive the alerts on the following cases:
A port becomes 'Available' or 'Used'
The device connected in a port changes
A new device is added to a port (Ex: VoIP device is added along with computer)
A device is removed from a port (Ex: VoIP device is removed)
A port is administratively disabled (by a source other than OpUtils)
Multiple devices are detected in a port
Virtual IP Addresses are detected for a device
The Switch do not respond to SNMP queries
The port utilization falls below a defined value.
Alert Cleanup Policy: Specify the maximum number of Alerts to be stored in the database, the default being 2000. When you delete the older alerts, you have an option to save them as a csv file for future reference.
Thank you for your feedback!
