User Management
Not all the administrators in an organization will have access to all the switches, routers, and other core devices in the network. The access to passwords, SNMP community strings, etc., of these core devices will be available only to few senior administrators as any minor configuration errors may bring down the whole network or affect the business activities. In such cases, it is required to have different roles within the product to differentiate different users.
You can also authenticate users via Active Directory.
- User Roles
- Access restrictions for administrator and operator roles
- Steps to add a user
- Steps to modify a user
- Steps to delete a user
User Roles
OpUtils allows you to create users in two different roles in administering the product:
Administrator Role
Users in the Administrator Role can perform all the activities in OpUtils. They can add, modify, delete any devices in all the tools and can set up specific configuration parameters like configuring email alerts.
Operator Role
Users in read-only role will only have read access to the tools. They will not be able to add or delete any devices and or initiate scanning or other configurations.
Custom Roles
OpUtils enables you to create custom user roles that allows you to define different access privileges to different users associated with your OpUtils console. To know more about how to create custom role. Click here.
Access restrictions for administrator and operator roles
The table below will list the various operations and the access levels of different roles:
| Tool | Operations | Admin Role | Operator |
Switch Port Mapper | Add Switch | Yes | No |
Schedule Scanning | Yes | No | |
Changing Settings | Yes | No | |
Manual Scanning | Yes | No | |
Deleting a Switch | Yes | No | |
Adding Custom Column | Yes | No | |
| At Port Level |
| |
Disable Interface | Yes | No | |
Enable Interface | Yes | No | |
Modify Alias Name | Yes | No | |
Get Port Status | Yes | No | |
Exclude Port | Yes | No | |
IP Address Manager | Adding Subnets | Yes | No |
Discovering Subnets | Yes | No | |
Changing Settings | Yes | No | |
Scheduling Scan | Yes | No | |
| IP Level |
| |
Changing Reserved Status (Reserved, Not Reserved) | Yes | No | |
Changing Used Status (Used, Available, Transient) | Yes | No | |
Changing Authenticity (Trusted, Guest, Rogue) | Yes | No | |
Adding Custom Column | Yes | No | |
Rogue Detection | Changing Authenticity (Trusted, Guest, Rogue) | Yes | No |
Block/Unblock Port | Yes | No | |
Configure Alert | Yes | No | |
Ping | Adding a Device | Yes | No |
Modifying/Deleting a Device | Yes | No | |
Configuring Alerts | Yes | No | |
Scheduling Monitoring | Yes | No | |
Administrative Functions | Add or modify any users in OpUtils. | Yes | No |
Configuring general OpUtils Settings | Yes | No | |
Configuring SMTP Settings (Settings tab) | Yes | No | |
Changing or Resetting the Password | Yes | No | |
Configuring Scheduled Backup of the OpUtils Database. | Yes | No |
Steps to add a user:
Only the default admin user can add any new users, modify user details, or delete them.
To add a user
- Go to Settings > Basic Settings and click on User Management
- Under User Management, click on the Add Users button.
- Select user role in Role as Administrator, Operator or the desired custom role from the drop down list
- Select User Typefrom the drop down list,
- Local Authentication
- Radius Authentication
- AD Authentication
- Enter the required user details.
- User Details:
- Email ID - Email ID for the user
- Phone Number: Enter the user's phone number
- Mobile Number: Enter the user's mobile number
- Password: Create a password for the above user
- Re-type Password: Retype the password for confirmation
- Time Zone: Enter the Time zone of the user's location
- Domain Name - Select the desired AD domain from the list of available domains or Click Add Domain to add a new domain
- Note: This Email ID will be used in password recovery when the user clicks the Forgot Password option in the login page.
- User Details:
- Click on Next.
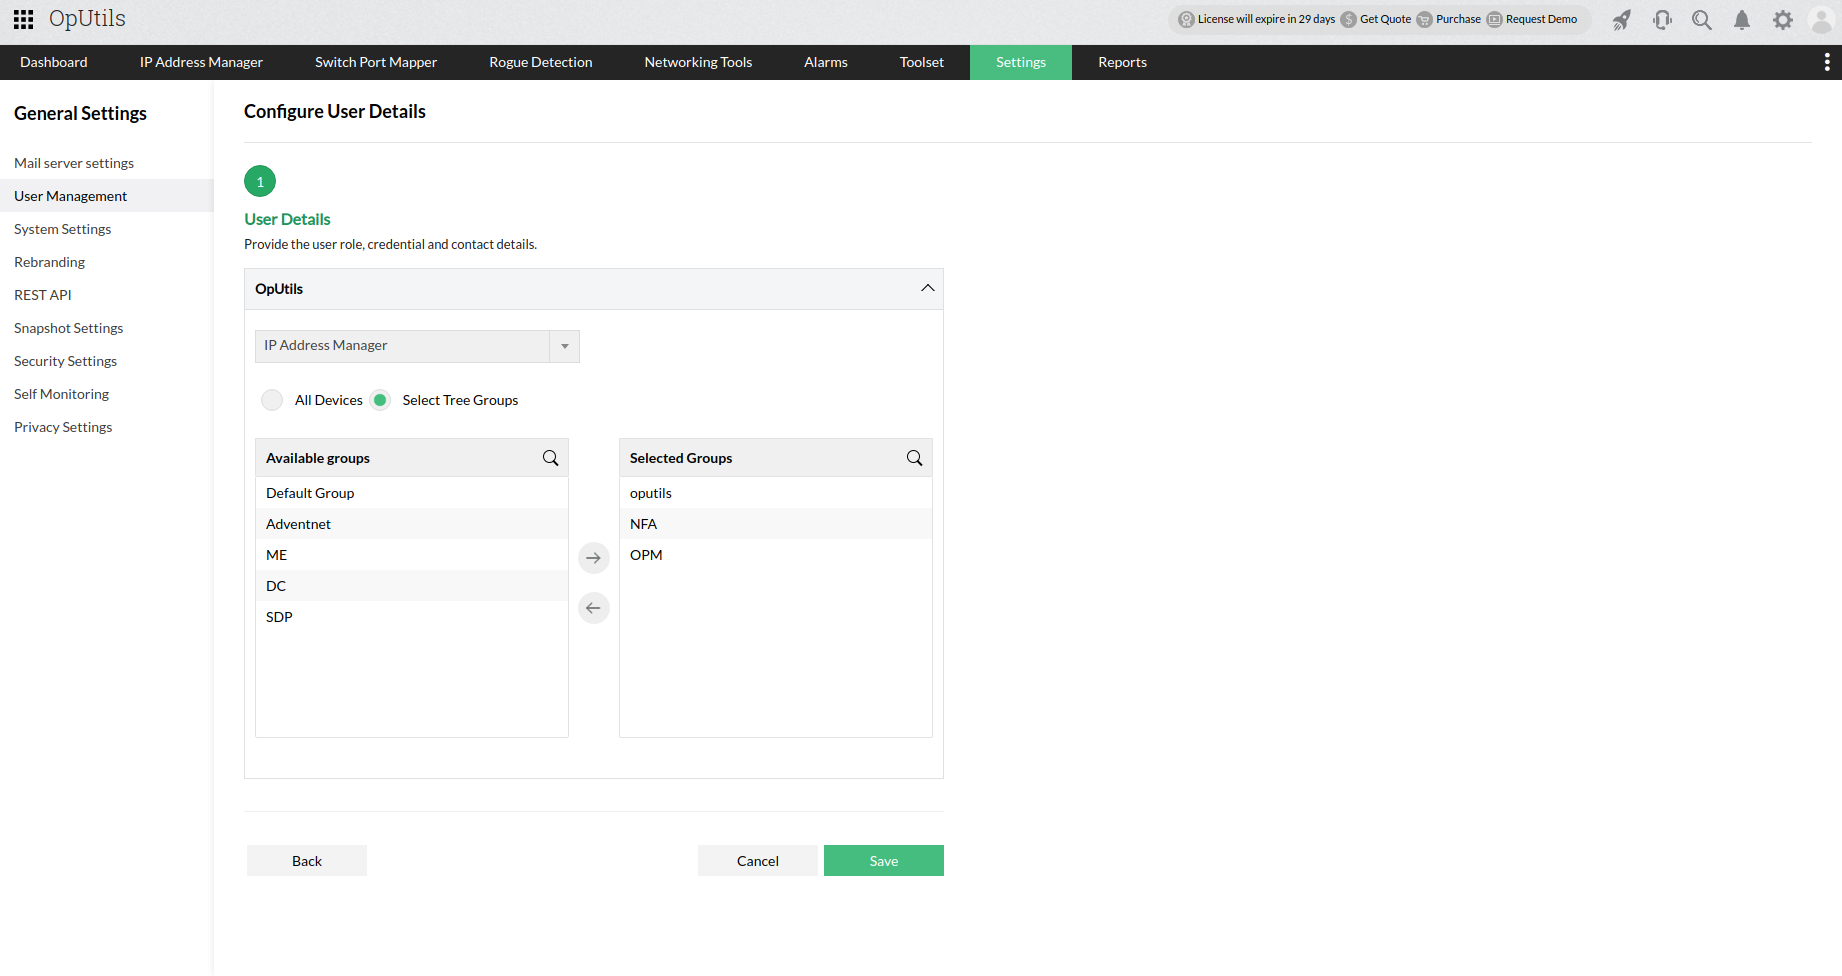
- In the following screen, enter the scope details for the new user.
- Scope:
- Modules - You can select the module that you want the user to have access to. This can be your IP Address Manager or Switch Port Mapper.
- Select Tree Groups - You can provide this user access to either all IP and switch port (All Devices), or only select tree groups(IPs and switch port groups in your module's LHS tree). If Select Tree Groups is selected, you can give access the required groups by selecting them from the managed groups list under Available Groups.

This adds users to OpUtils with the specified user details, and scope.
To modify a user
- Go to Settings > Basic Settings and click on User Management.
- Under the list displayed under Users tab, click on the username you want to modify.
- Change the access privileges of the user as desired.
- Click on Save.
To delete a user
- Go to Settings > Basic Settings and click on User Management.
- Under the list displayed under Users tab, click on the delete icon present against the username you want to delete.
The user will be removed from OpUtils once and for all
Thank you for your feedback!