Password Manager Pro Agents
(Feature available only in Premium and Enterprise editions, steps applicable only for build 10302 and later)
For steps to install the agent for versions 10301 and earlier, click here.
Notes:
- From build 12122 onwards, Password Manager Pro will no longer support both the 32 and 64-bit versions of the C++ agent for Windows and Windows Domain systems and the C Agent for Linux. The C and C++ agents may be functional in older versions of Password Manager Pro past this date. However, we recommend using the C# agent for Windows and Windows Domain machines and the Go agent for Linux machines. Refer to the forum post to learn more about the end of support announcement.
- Click here to learn how to install and uninstall agents in bulk using a script file invoked via the Windows GPO.
- Password Manager Pro agent will work only on Redhat versions up to 7.9, and CentOS (upto build 11300).
- For Go agent, from build 11301, the AMD64 version is supported for Ubuntu, Centos, RedHat, Debian, and other Linux flavors, and the ARM64 version is supported for Redhat.
- Password Manager Pro agent will work only on Windows OS versions: Windows 10, Windows 11, and Windows Server 2016 & above.
- Overview
- Communication between the Password Manager Pro Server and the Password Manager Pro Agent
- Steps to Install Password Manager Pro Agents
3.1 Prerequisite
3.2 Downloading Password Manager Pro Agents
3.3 Installing Windows Agent/Windows Domain Agent - 32bit, 64bit and C#
- Discovering Local Accounts using the Password Manager Pro Agent
- Finding Tasks Awaiting Execution by the Password Manager Pro Agent
- Associating and Disassociating Password Manager Pro Agents
- Deleting a Password Manager Pro Agent
- Remapping a Password Manager Pro Agent
- Frequently Asked Questions
1. Overview
Deploying the Password Manager Pro agent allows you to establish connections with remote resources that are not connected to the Password Manager Pro server, and manage them from Password Manager Pro. The Password Manager Pro agent is available for Windows, Windows domain, and Linux servers. The agent package, available for download in the Password Manager Pro web interface, contains the necessary executable/configuration files and an SSL certificate used for the HTTPS communication between the agent and the Password Manager Pro web server. Once deployed in the target machines, the agents will communicate with Password Manager Pro and effect password changes. By using this option, you can change the password of a remote resource directly from the Password Manager Pro web interface.
The Password Manager Pro agent is useful in the following cases:
- When the Password Manager Pro server runs in a Linux system, and password reset has to be carried out for a Windows machine.
- If the target systems are in a Demilitarized Zone(DMZ) or a different network to which Password Manager Pro server does not have direct connectivity.
- If the required administrative credentials are not stored locally in the Password Manager Pro server to execute remote password resets.
- To change the password of domain accounts without the domain controller's admin credentials.
2. Communication between the Password Manager Pro Server and the Password Manager Pro Agent
All password-related communication between the Password Manager Pro server and the agent is carried out securely over HTTPS. Since the agent always initiates the connection, the communication is one-way. The agent residing in the target machines only needs access to the Password Manager Pro web interface, thereby only the Password Manager Pro web server needs to be available for the agent. Since the agent uses the outbound traffic to reach the login page of Password Manager Pro, there is no need to punch firewall holes or create VPN paths to allow inbound traffic for the server to reach all the deployed agents.
The agent will periodically ping the Password Manager Pro web server through HTTPS to check if any operation is pending for execution. By default, the agent pings the server once every 60 seconds but the interval can be changed according to requirements. Once the agent contacts the Password Manager Pro web server, the server will trigger the list of tasks to be carried out by the agent in the remote resource. Once the tasks have been executed, the agent will notify the results to the Password Manager Pro web server.
Note: Since the tasks are triggered by the web server only upon contact from the agent, the time taken for successful task execution will depend on how quickly the agent can connect with the Password Manager Pro web server.
3. Steps to Install Password Manager Pro Agents
3.1 Prerequisite
Before installing the agent, ensure that the account that you use to install the agent in the remote host has sufficient privileges to carry out password modifications.
3.2 Downloading Password Manager Pro Agents
- Navigate to Admin >> PMP Agents.
- You will see the agent packages for both 32-bit and 64-bit versions of the following operating systems:
- Windows
- Windows Domain
- Linux
- Click the required agent package.
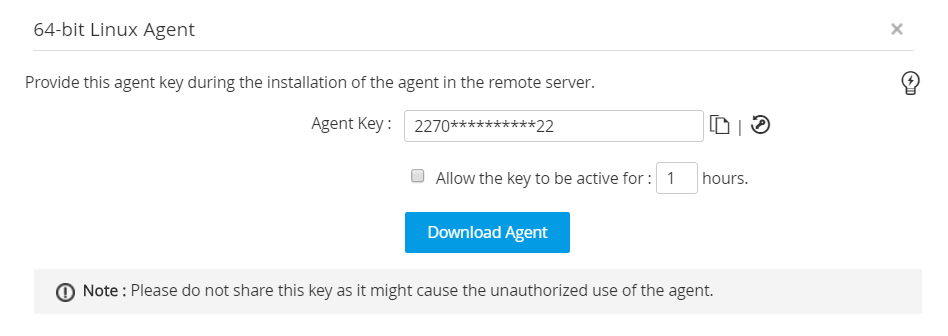
- In the pop-up that appears, copy the Agent Key using the copy icon beside it. This Agent Key is necessary to install the Password Manager Pro agent in the target system and it can be used one time only. Once the Agent Key is supplied for an installation, it will become invalid. (Supplying the Agent Key is applicable from build 10302 and above only)
- To keep a single key active for a specified amount of time, select the option Allow the key to be active for: X hours and specify the number of hours (up to 24). Now, the same Agent Key can be used for any number of agent installations within the specified time.
- Click Download Agent. Once the agent package .zip file is downloaded, unzip the contents.
3.3 Installing Windows Agent/Windows Domain Agent - 32bit, 64bit and C#
The following are the commands to be executed in the target system for the Windows agent and the Windows Domain agent.
- Install
- Start
- Update
- Stop
Notes:
- You need administrative privileges in the target system to execute the above commands.
- Despite having similar installation steps, the agents for Windows and Windows Domain are not interchangeable, i.e., do not install the Windows agent in a Domain Controller machine and vice versa. The reason is as follows:
- Once the Windows agent is installed in a machine, it will discover and list all local accounts available in that machine so that password reset can be done for those accounts.
- Whereas, Windows Domain agent is meant for a domain controller machine and it will not discover any accounts from the machine in which it is installed.
3.3.1 Using Command Prompt
(C# Agent is applicable from build 11301 and later only)
The following steps are applicable for Windows Agent/Windows Domain Agent - 32bit, 64bit and C#.
i. To Install the Agent and Start as a Windows Service:
- Open a command prompt and navigate to the Password Manager Pro agent installation directory.
- Execute the command 'AgentInstaller.exe install <Agent Key copied from the PMP UI>'.
- Now, the agent will be successfully installed in your machine.
ii. To Start the Agent as a Windows Service:
- Open a command prompt and navigate to the Password Manager Pro agent installation directory.
- Execute the command 'AgentInstaller.exe start' to start the agent.
iii. To Update the Windows Agent:
In case the Password Manager Pro agent was previously installed by a different admin user, use this command to update the user account under which the agent server will be added as a resource. The agent server will be added as a resource under the new admin user without the need to uninstall and reinstall the agent. However, the new admin will not have access to the accounts that were previously under the agent server. To gain access to the accounts, the previous admin has to transfer the ownership of the resource to the new admin.
- Open a command prompt and navigate to the Password Manager Pro agent installation directory.
- Execute the command 'AgentInstaller.exe update <Agent Key copied from the PMP UI>'.
- The agent will be added as a resource in the server.
- Open a command prompt and navigate to the Password Manager Pro agent installation directory.
- Execute the command 'AgentInstaller.exe stop' to stop the agent.
- Open a command prompt and navigate to the Password Manager Pro agent installation directory.
- Execute the command 'AgentInstaller.exe remove'.
- Now, the agent will be uninstalled from your machine.
3.3.2 Using Password Manager Pro Agent Installer
(C# Agent is applicable from build 11301 and later only)
The following steps are applicable for Windows Agent/Windows Domain Agent - C# only.
After downloading the C# agent, extract the folder and navigate to PMPAgent >> bin.
i. To install the Agent in windows or Windows Domain:
- Right-click AgentInstaller.exe and select Run as administrator.
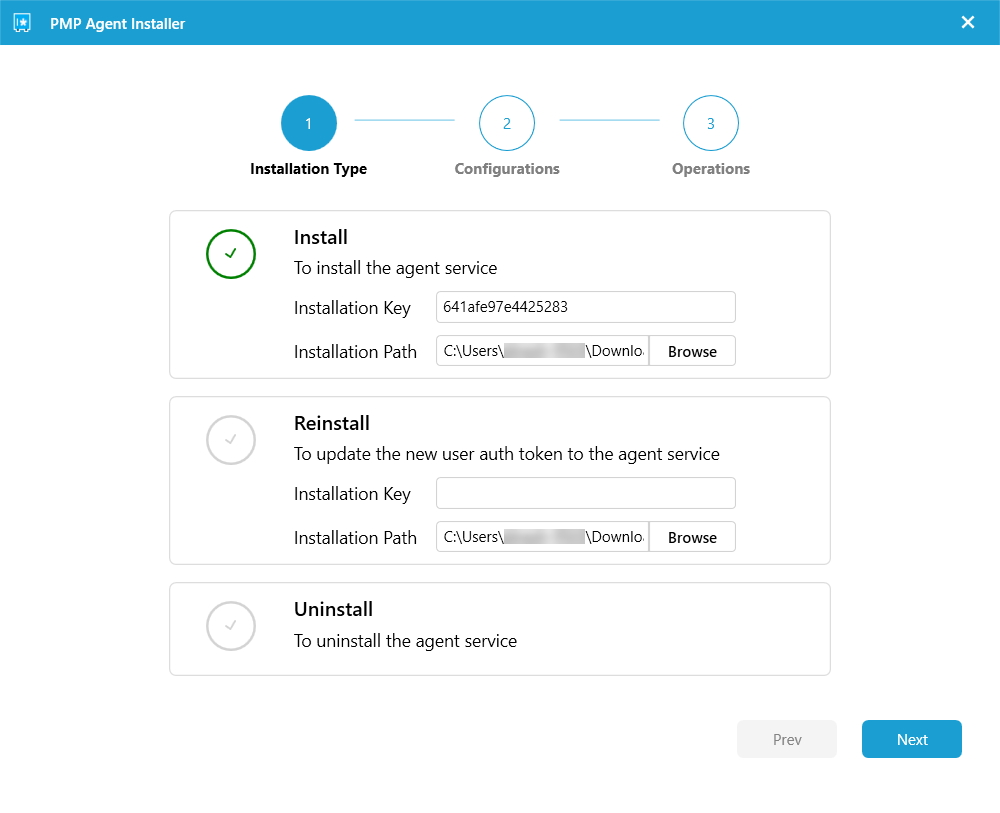
- The PMP Agent Installer wizard appears on the screen.
- Select the Install option.
- Mention the Installation Key and Installation Path. Click Next.
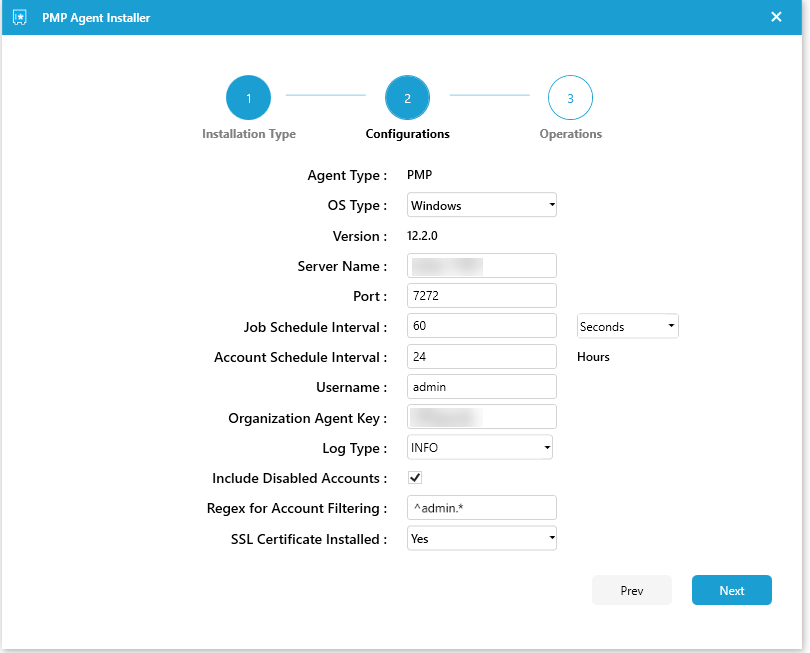
- On the Configurations page, mention the required details and click Next.
- By default, the SSL Certificate Installed field will be selected with Yes.If there is no valid SSL certificate installed in the Password Manager Pro server, change this SSL Certificate Installed field to No.
Note: The Test Server Connection status will be failed if selected Yes in the SSL Certificate Installed field, with no valid SSL certificate installed in the Password Manager Pro server.
- In the Operations page, check if the first two conditions are met and click Install.
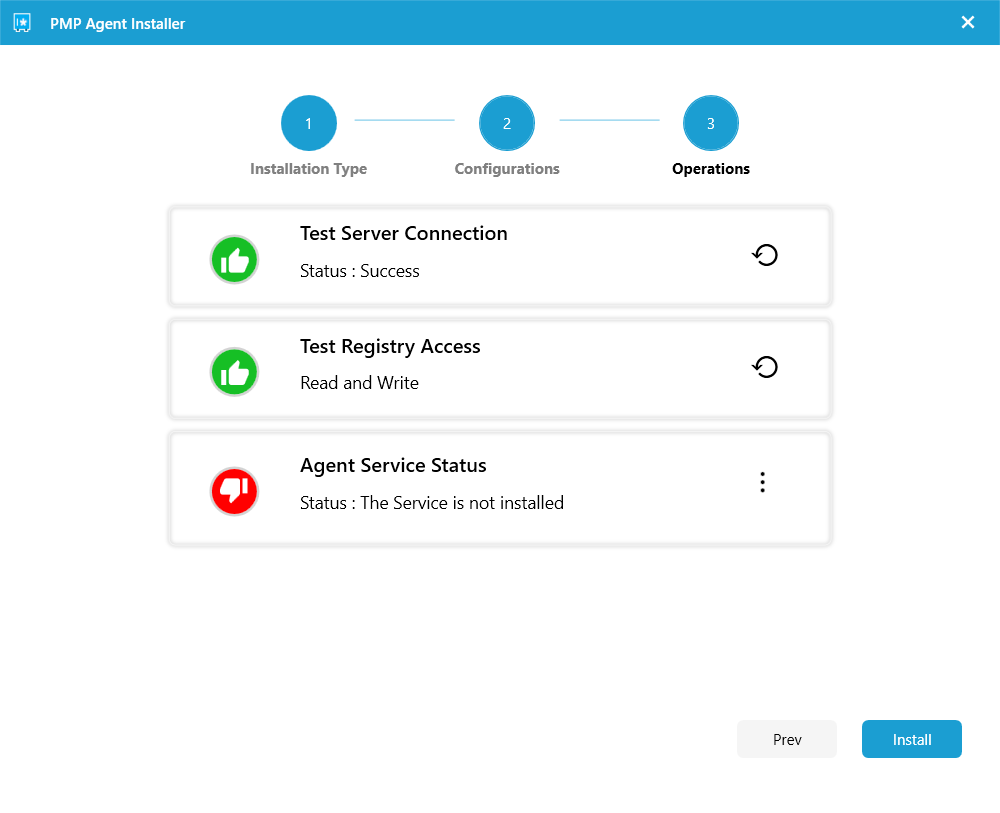
You have now successfully installed the C# agent.
ii. To Start the Agent as a Windows Service:
- Right-click AgentInstaller.exe and select Run as administrator.
- The PMP Agent Installer wizard appears on the screen.
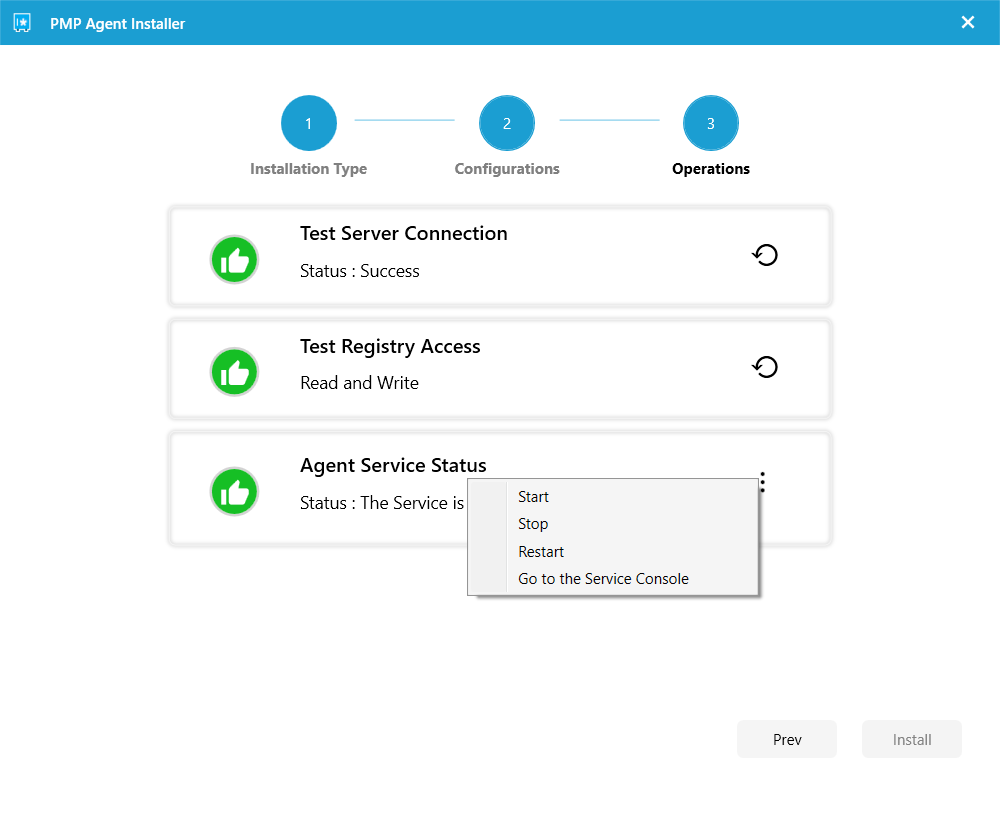
- Click the Operations icon.
- Right-click the three dots beside Agent Service Status and click Start.
- From here, you can also Stop, Restart the agent and Go to the Service Console.
iii. To Update the Agent in Windows or Windows Domain:
- Right-click AgentInstaller.exe and select Run as administrator.
- The PMP Agent Installer wizard appears on the screen.
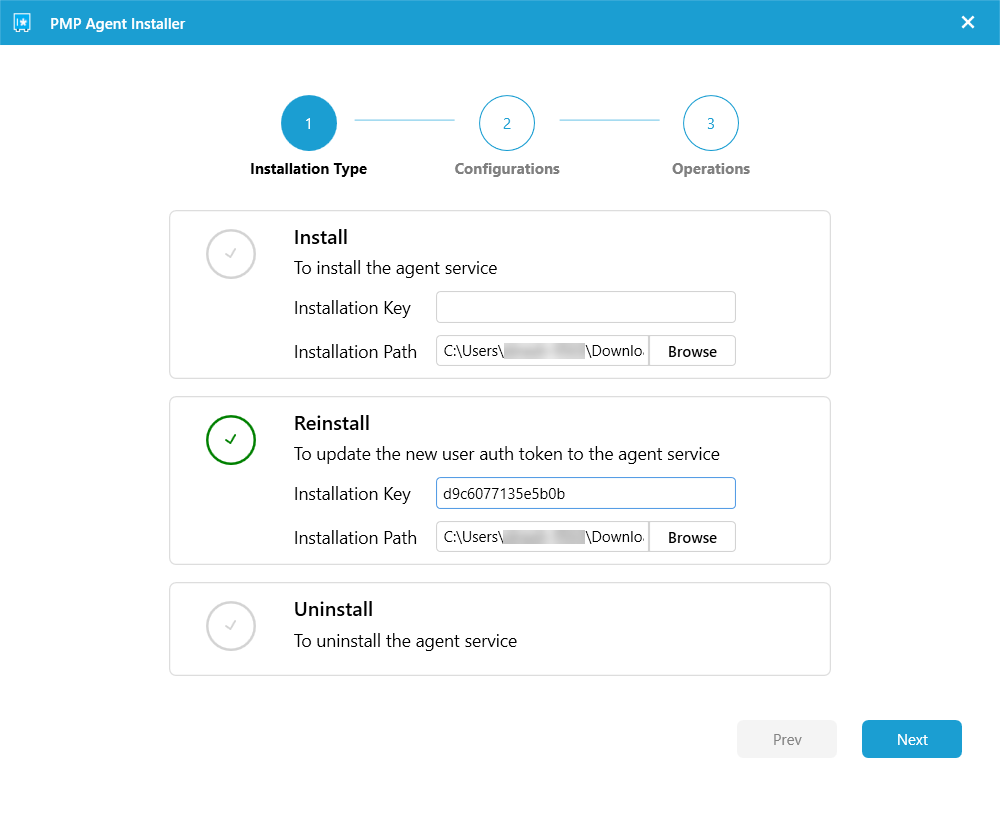
- Select the Reinstall option.
- Mention the Installation Key and Installation Path. Click Next.
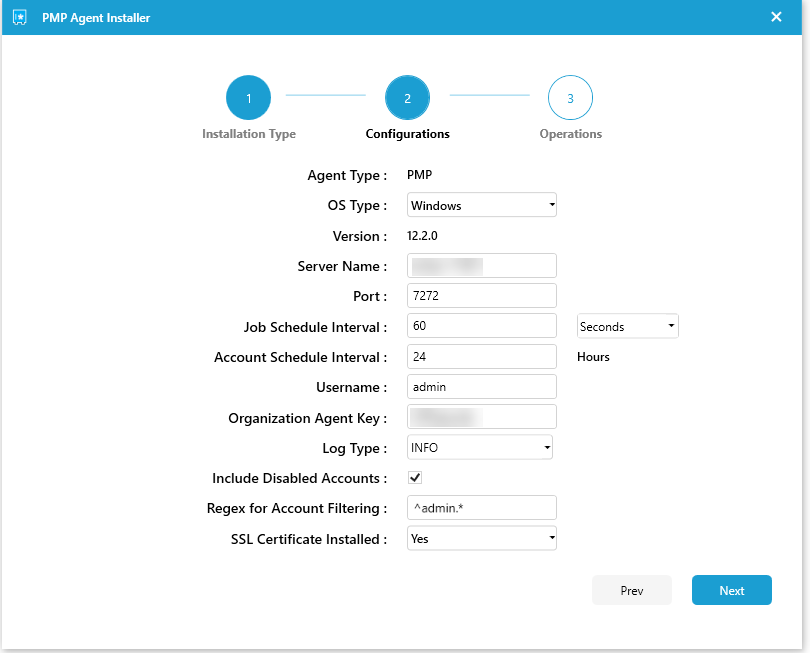
- In the Configurations page, mention the required details and click Next.
- By default, the SSL Certificate Installed field will be selected with Yes. If there is no valid SSL certificate installed in the Password Manager Pro server, change this SSL Certificate Installed field to No.
Note: The Test Server Connection status will be failed if selected Yes in the SSL Certificate Installed field, with no valid SSL certificate installed in the Password Manager Pro server.
- In the Operations page, check if the first two conditions are met and click Next to reinstall the agent.
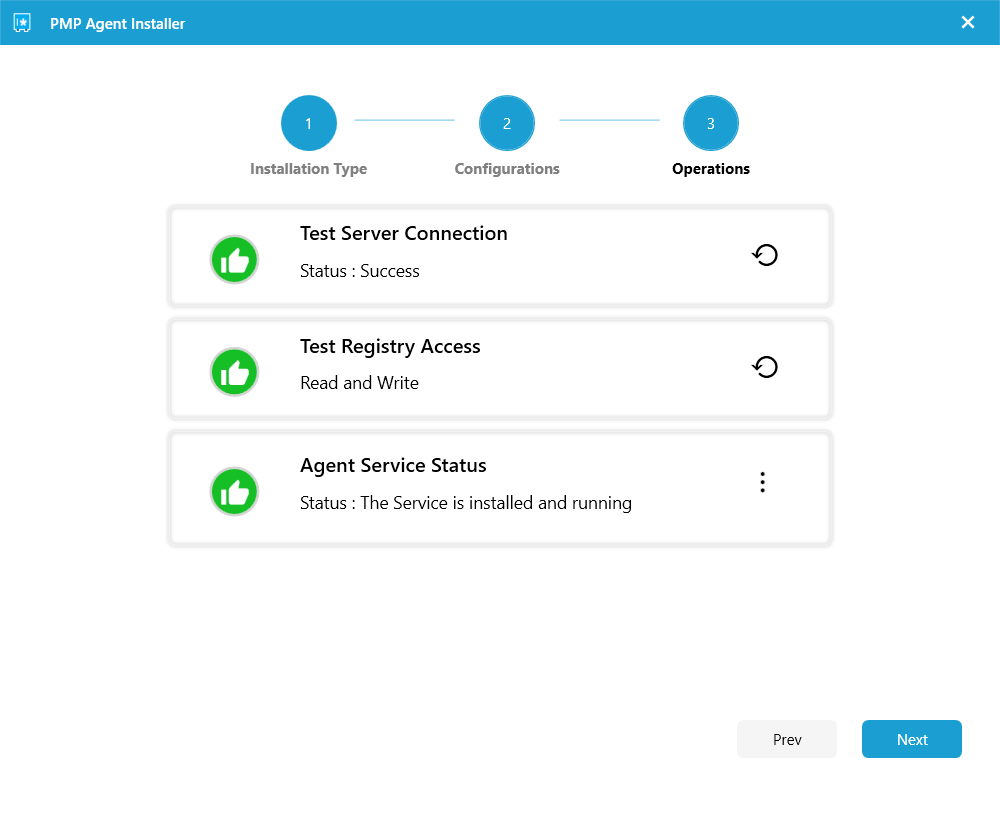
You have now successfully reinstalled the C# agent.
iv. To Uninstall the Agent in Windows or Windows Domain:
- Right-click AgentInstaller.exe and select Run as administrator.
- In the wizard that appears, select Uninstall and click Next.
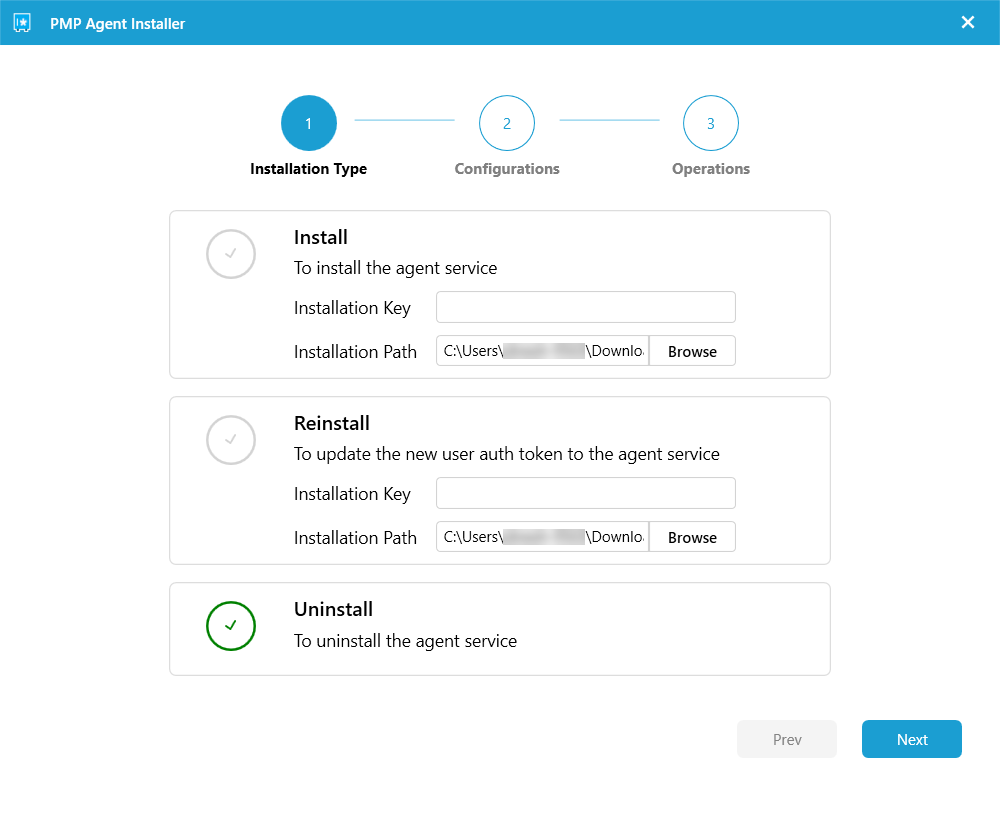
- On the Operations page, check if the first two conditions are met. Click Uninstall.
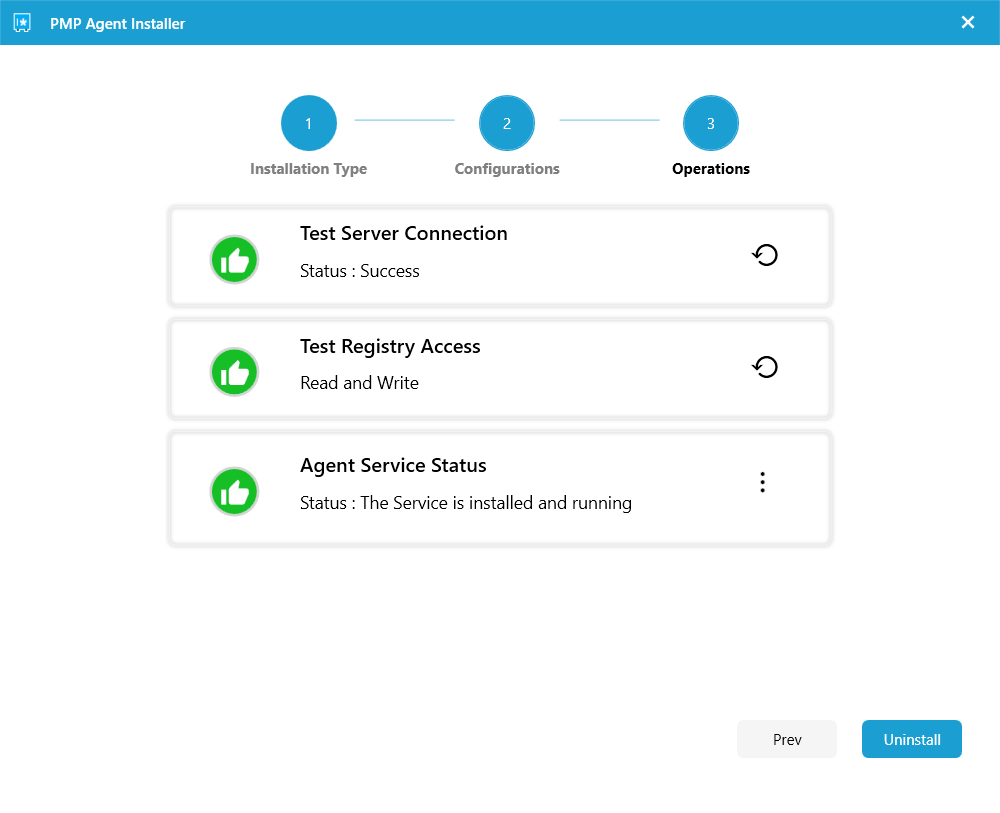
You have now successfully uninstalled the C# agent.
3.4 Installing Linux Agent - 32bit, 64bit and Go
(Go Agent is applicable from build 11301 and later only)
The following are the commands to be executed in the target system for the Linux agent.
- Install
- Start
- Update
- Stop
- Remove
Notes:
- You need root privileges in the target system to execute the above commands.
- Password Manager Pro Agent supports the Linux flavors with default OpenSSL library only.
- Go Agent supports all Linux flavors.
i. To Install the Linux Agent:
- Open a command prompt and navigate to the Password Manager Pro agent installation directory.
- Execute the command 'sh installAgent-service.sh/bash installAgent-service.bash install <Agent Key copied from the PMP UI>'. (bash command applicable for Go Agent only)
- Now, the agent will be successfully installed in your machine.
ii. To Start the Agent as a Linux Service:
- Open a command prompt and navigate to the Password Manager Pro agent installation directory.
- Execute the command 'sh installAgent-service.sh/bash installAgent-service.bash start' to start the agent. (bash command applicable for Go Agent only)
iii. To Update the Linux Agent:
In case the Password Manager Pro agent was previously installed by a different admin user, use this command to update the user account under which the agent server will be added as a resource. The agent server will be added under the new admin user without the need to uninstall and reinstall the agent. However, the new admin will not have access to the accounts that were previously under the agent server. To gain access to the accounts, the previous admin has to transfer the ownership of the resource to the new admin.
- Open a command prompt and navigate to the Password Manager Pro agent installation directory.
- Execute the command 'sh installAgent-service.sh/bash installAgent-service.bash update <Agent Key copied from the PMP UI>'. (bash command applicable for Go Agent only)
iv. To Stop the Agent Running as a Linux Service:
- Open a command prompt and navigate to Password Manager Pro agent installation directory.
- Execute the command 'sh installAgent-service.sh/bash installAgent-service.bash stop' to stop the agent. (bash command applicable for Go Agent only)
v. To Uninstall and Remove the Agent:
- Open a command prompt and navigate to the Password Manager Pro agent installation directory.
- Execute the command 'sh installAgent-service.sh/bash installAgent-service.bash remove'. (bash command applicable for Go Agent only)
- Now, the agent will be uninstalled from your machine.
3.5 Configuring Agent Settings
Open the agent.conf file available in the downloaded agent package. The following are the parameters listed in the .conf file:
- AgentType: This indicates that it is a Password Manager Pro agent.
- ServerName: This is the server/IP Address which the Password Manager Pro agent will try to reach to contact the Password Manager Pro server.
- ServerPort: This indicates the port in which the Password Manager Pro server is running. If you have changed the default port of Password Manager Pro to any other port such as 443, the same port number must be updated here.
- ScheduleInterval: By default, the agent pings the server once in every 60 seconds. To configure the time interval at which the agent should ping the Password Manager Pro web server, modify the time interval value in seconds.
- UserName: This is the admin user account under which the agent server will be added as a resource.
- OSType: Denotes the OS which the agent belongs to - Windows/Windows Domain/Linux.
- TrustedCertifcate: By default, this value will be 'yes'. If there is no valid SSL certificate installed in the Password Manager Pro server, edit this value to 'no'.
Password Manager Pro allows the restriction of user accounts that are added via agents (C# and Go) during account discovery, using regex patterns. To do the same, use the below UserQuery and accountFilter commands:
- UserQuery: To filter the accounts in Linux (Go Agent).
UserQuery = awk -F: '$1 ~ /^ *admin/ {print$1}' /etc/passwd// to discover accounts that starts with admin.
- accountFilter: To filter accounts in Windows/Windows Domain (C# Agent).
accountFilter = ^*admin
// to discover accounts that starts with admin.
Note: Windows Domain agent will not automatically add user accounts unless you specify the pattern in the account filter.
- fetchDisabledAccount: To fetch disabled accounts in Windows/Windows Domain (C# Agent).
fetchDisabledAccount = True
The commands UserQuery, accountFilter and fetchDisabledAccount are applicable from build 11301 and later only.
Once any of the above parameters are modified, restart the agent service.
4. Discovering Local Accounts using the Password Manager Pro Agent
When the agent is started for the first time on the target machine, it will automatically add the machine as a resource in Password Manager Pro and discover the local accounts. After the discovery, you can reset the passwords of the local accounts. To learn more about resetting passwords using the Password Manager Pro agent, click here.
5. Finding Tasks Awaiting Execution by the Password Manager Pro Agent
Follow the below steps to find the tasks have been triggered by the user but awaiting execution by the Password Manager Pro agent.
- Click the bell icon in the top panel of the interface for viewing Notifications.
- Under Agent Alerts, you will find the different statuses of the agent:
- The number of password reset and password verify actions triggered.
- Status of password reset actions triggered earlier.
- Status of password verify actions triggered earlier.


- The notifications are user-specific i.e., users will be notified of only those tasks that they have triggered.
6. Associating and Disassociating PMP Agents
(This feature is available from PMP build 12300 for C# and Go Agents only)
Password Manager Pro allows users to associate and disassociate agents to/from their resources. Associating an agent will allow the agent to perform remote operations on the resource, while disassociating the agent will pause all the operations performed by it.
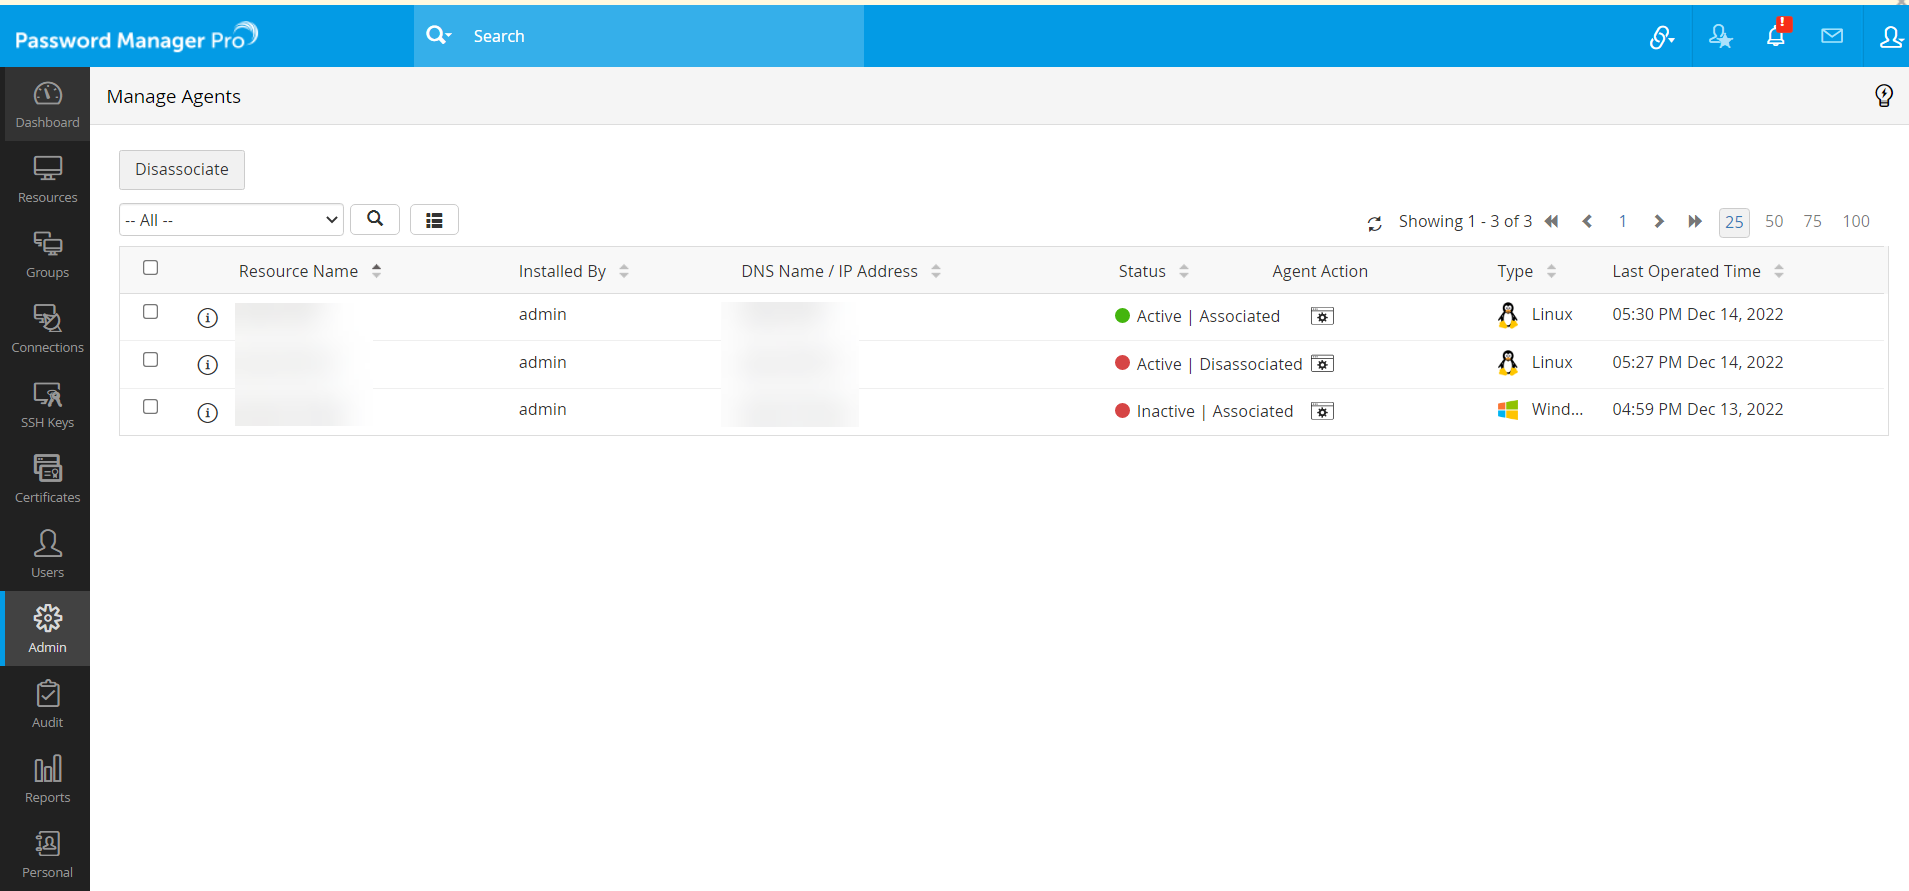
- Navigate to Admin >> PMP Agents >> Manage Agents. Here, you will be able to view a list of agents mapped with their resources.
- To Disassociate a resource from an agent,
- Click the agent action icon beside the desired resource name and click Disassociate .
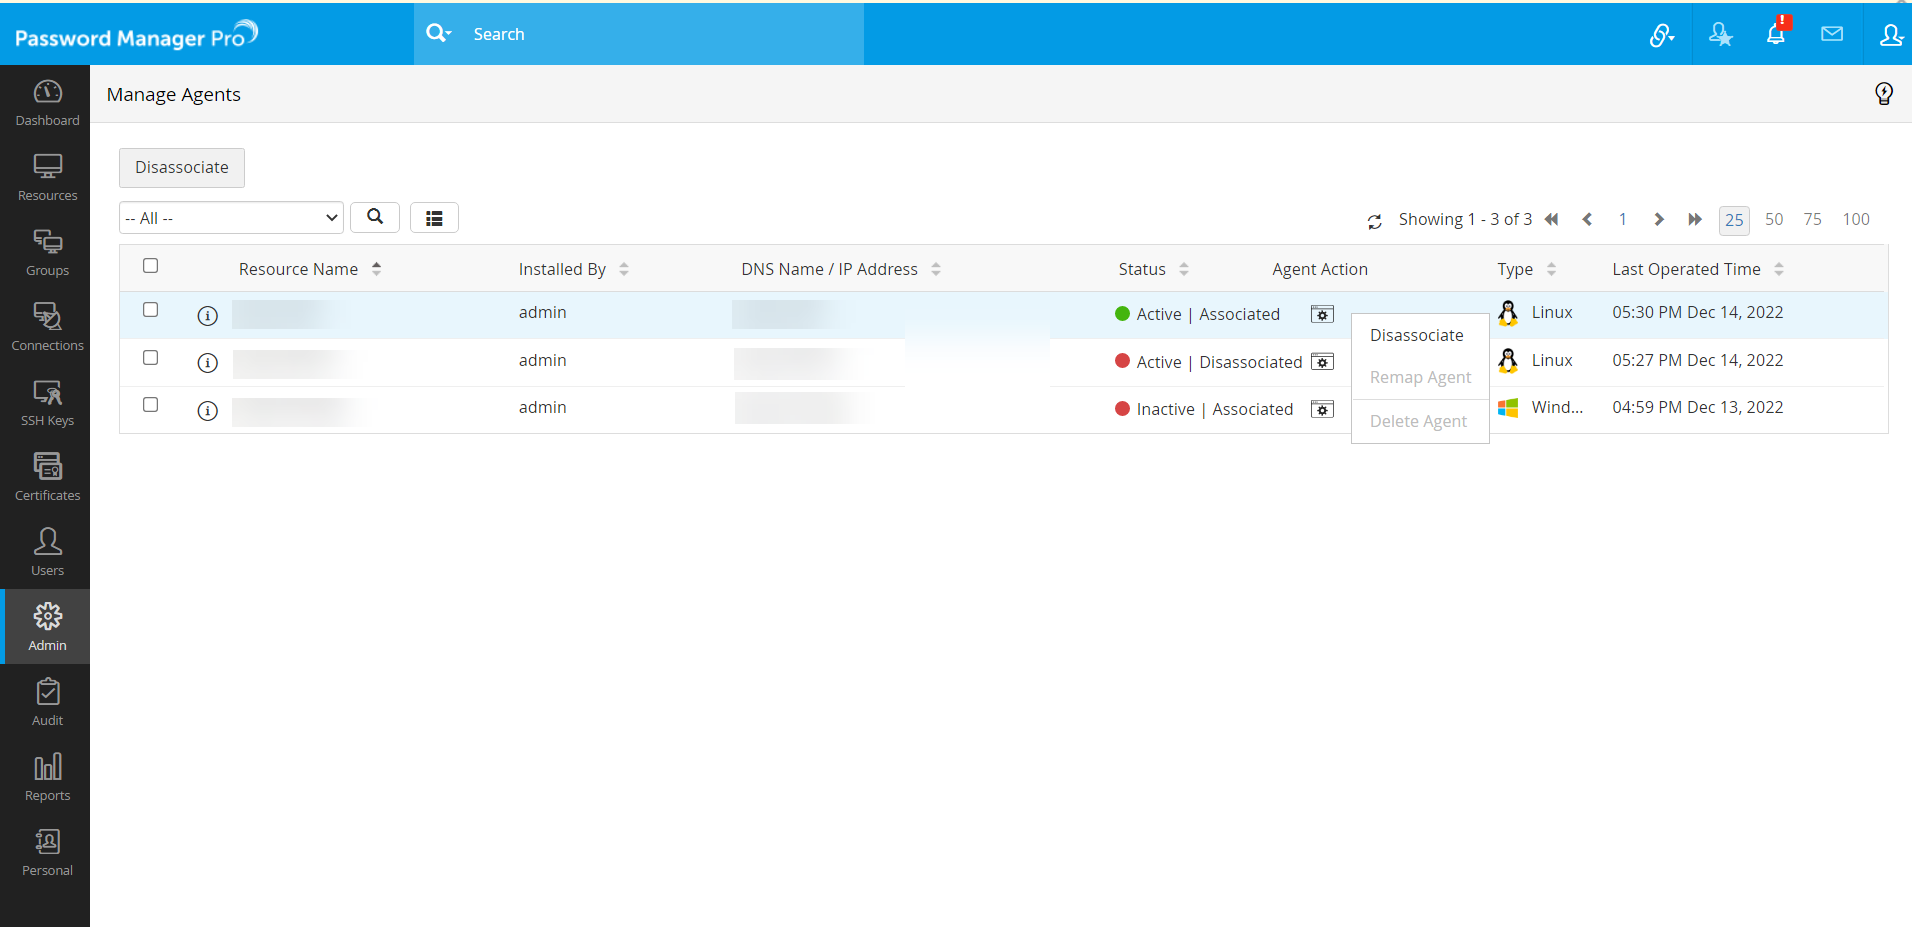
- In the popup that appears, mention the time interval (in minutes) between which the agent should check its status.
- Click Disassociate to disassociate the selected agent. You have successfully disassociated the resource from the agent.
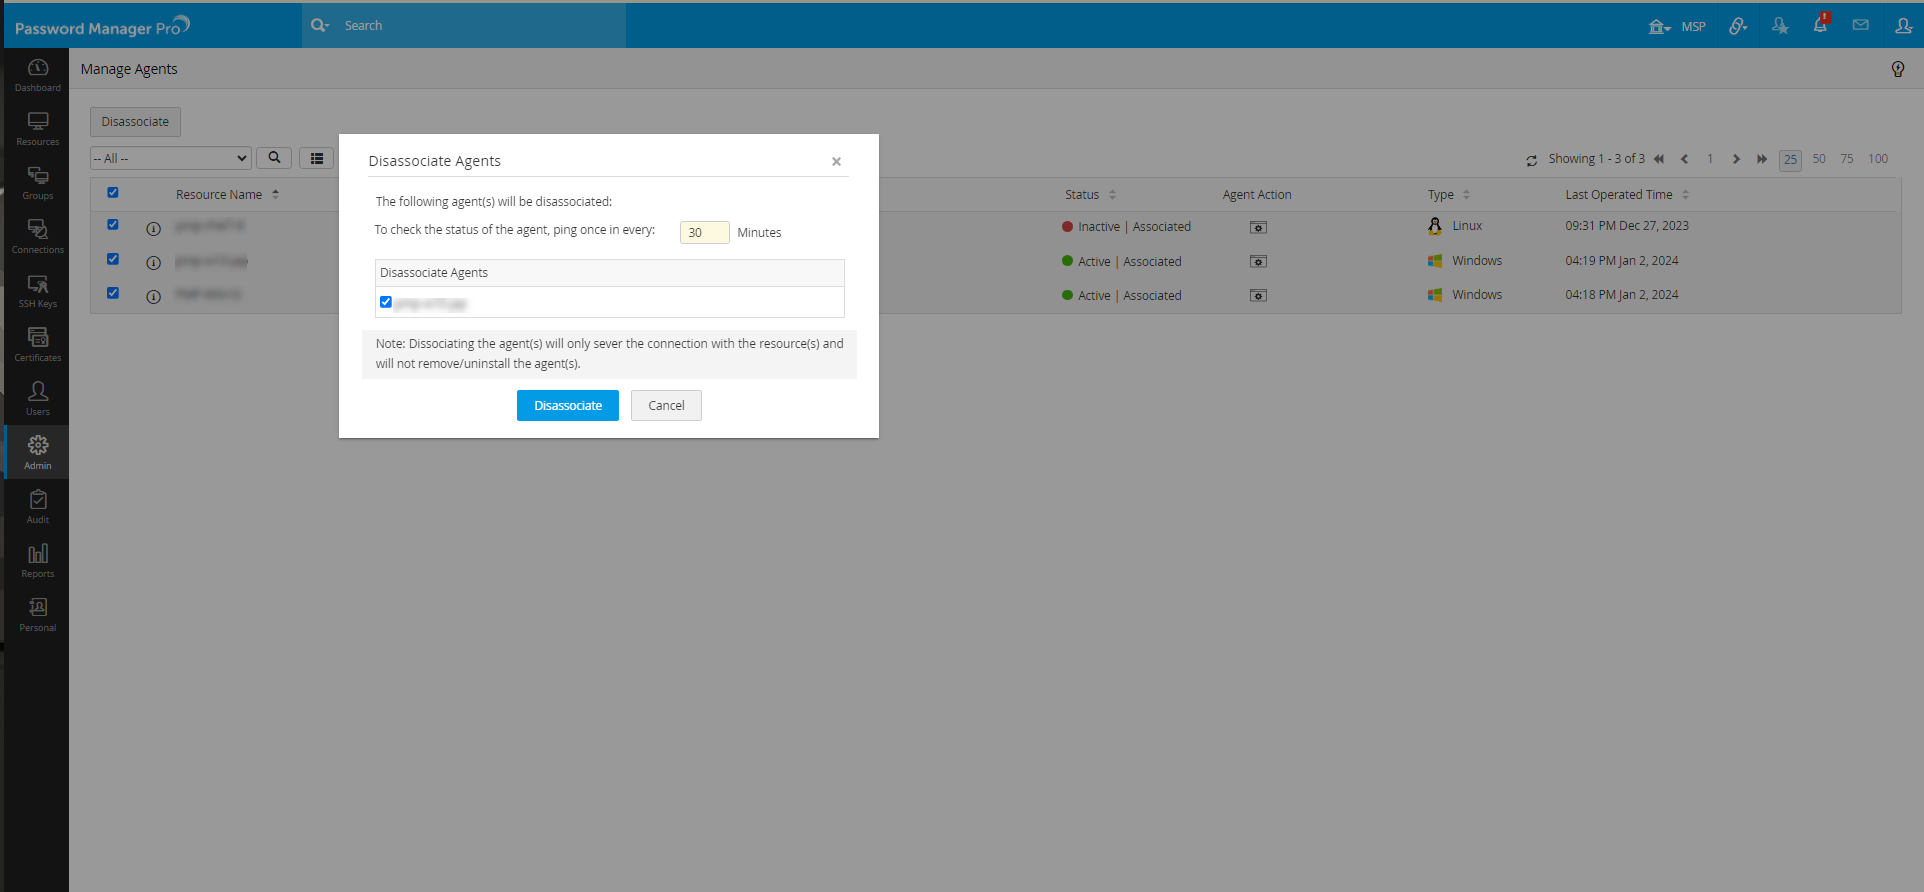
- To Disassociate agents in bulk,
- Select the required resources to be disassociated and click the Disassociate button from the top pane.
- Mention the time interval (in minutes) between which the agent should check the status.
- Click Disassociate to disassociate the selected agent. You have successfully disassociated the resource from the agent.
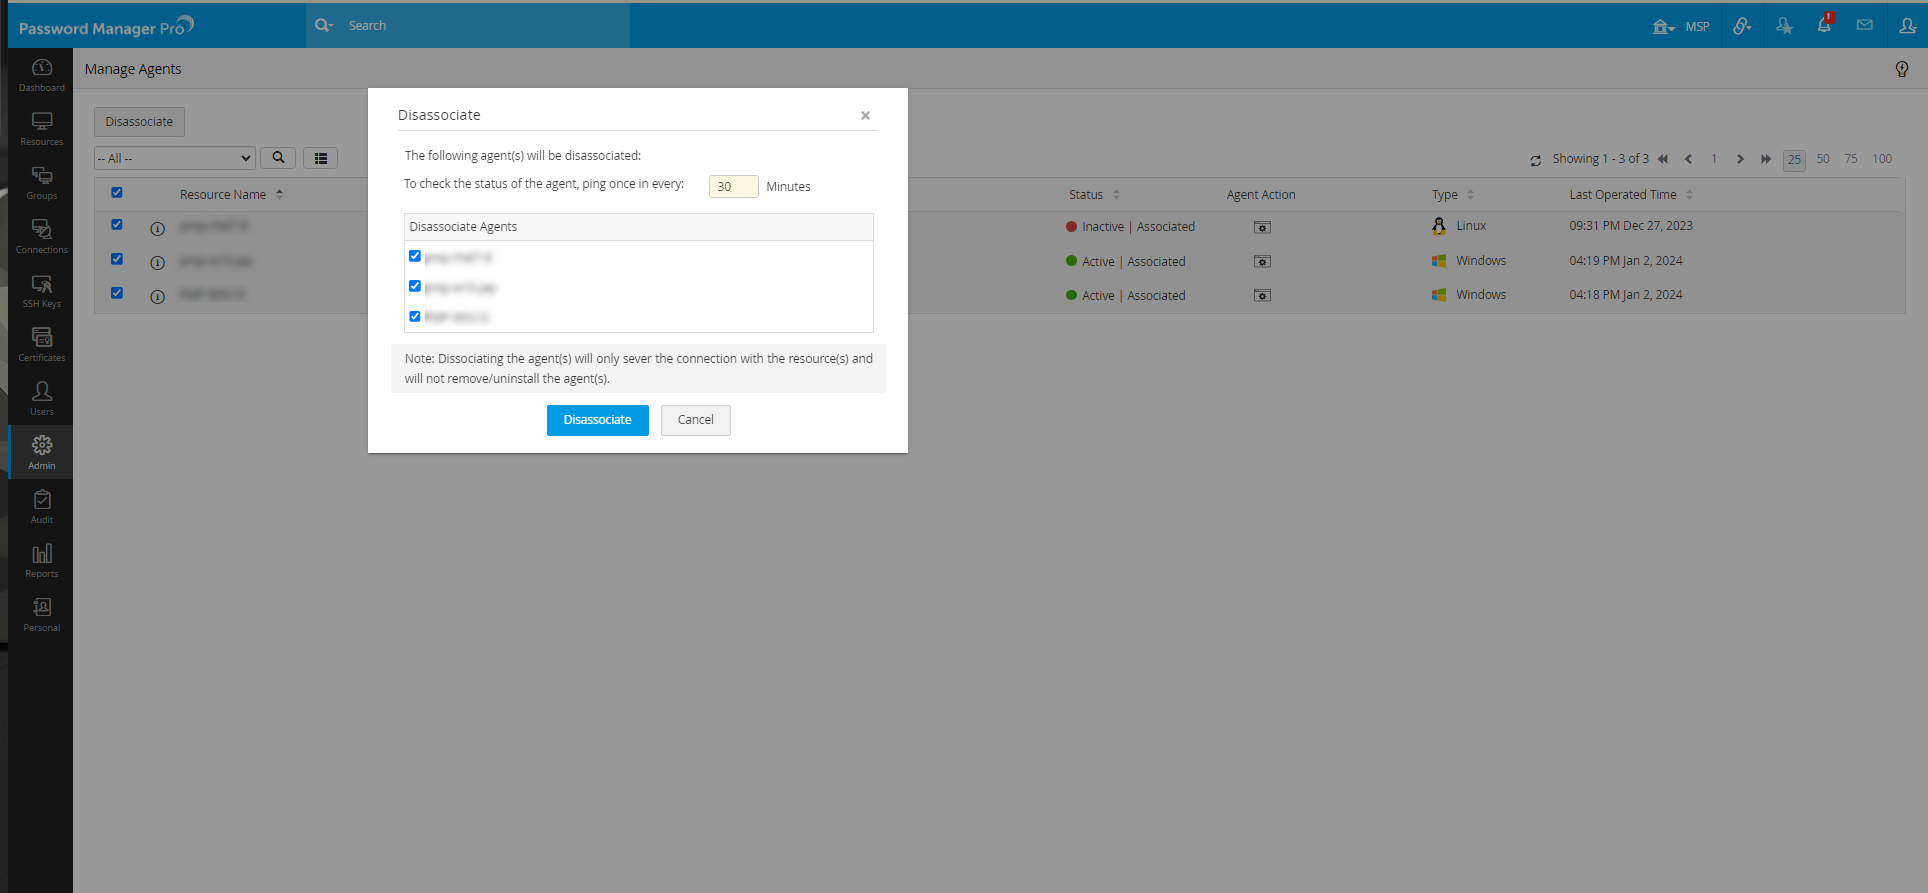
- To Associate a resource with an agent,
7. Deleting a Password Manager Pro Agent
(This feature is available from PMP build 12300)
- Navigate to the Resources tab and delete the resource whose agent you wish to delete.
- Now, navigate to Admin >> PMP Agents >> Manage Agents.
Note: The 'Resource Name' for the agent whose resource got deleted will be displayed as 'N/A'.
- Click the Agent Action icon beside the agent whose resource you deleted and click Delete Agent.
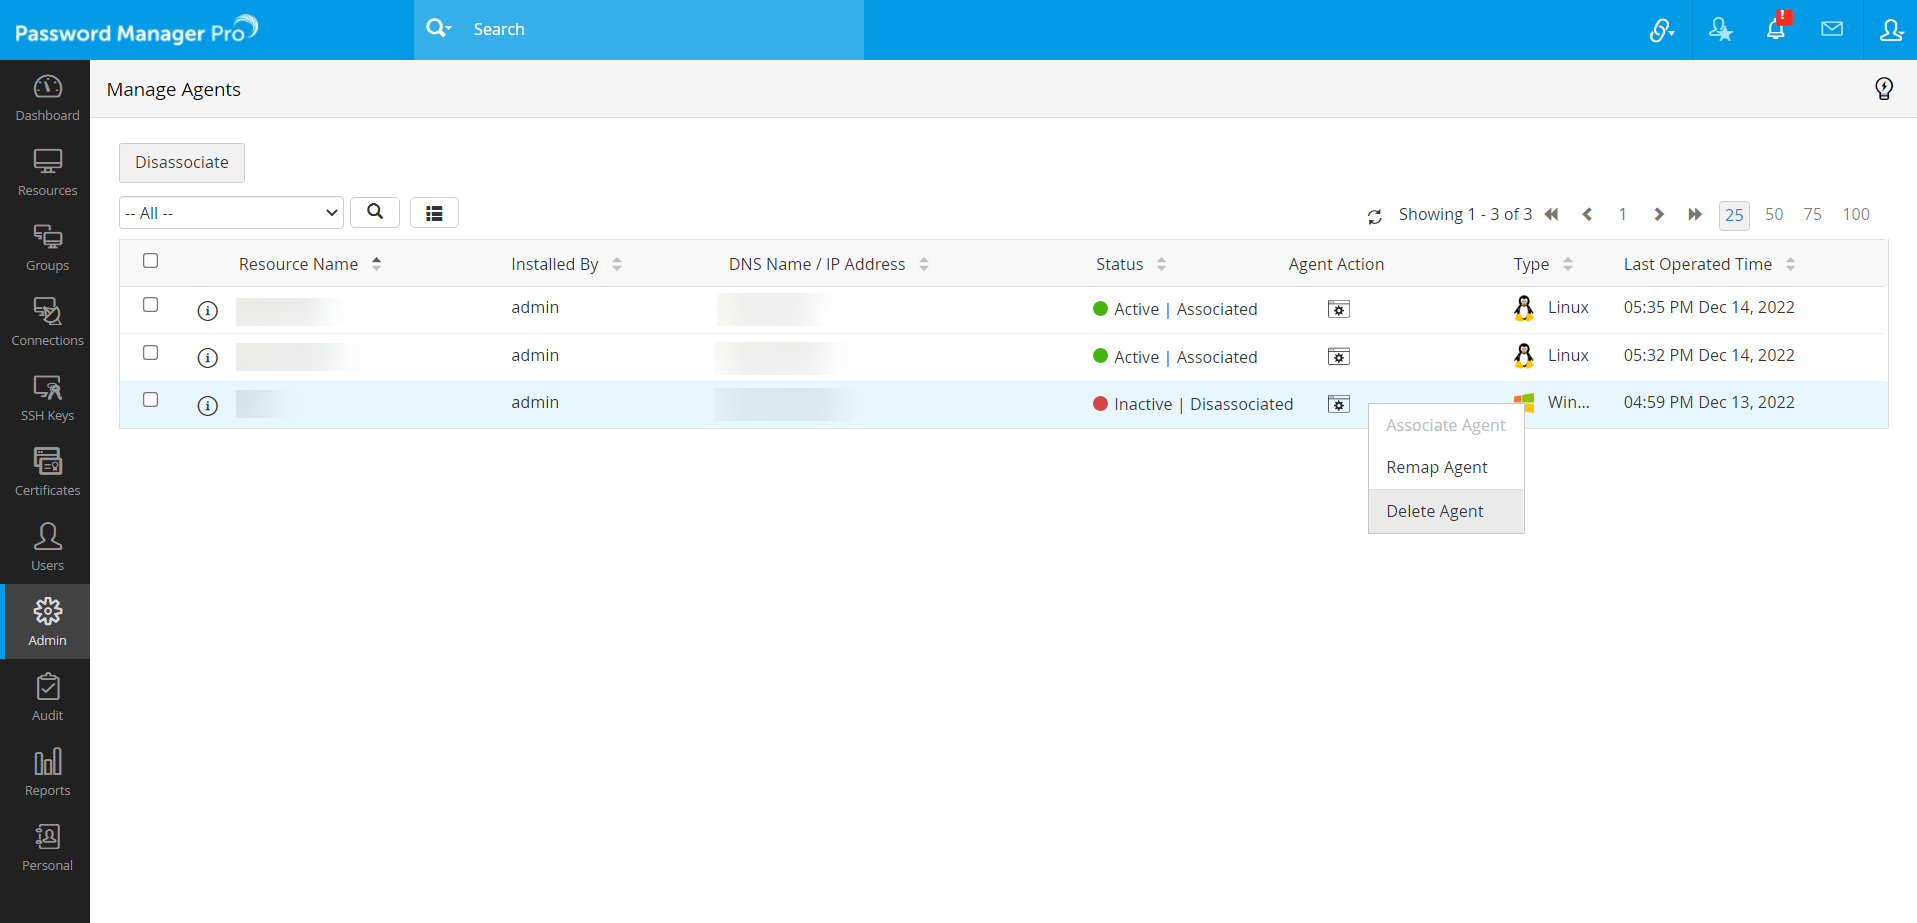
- In the pop-up that appears, click Delete.
You have successfully deleted the agent.
- The resource gets deleted along with the agent, so it is recommended for the resource owner to take a copy of the resource before deleting the agent.
- This operation will only remove the agent from the Password Manager Pro server and will not uninstall the agent from the resource.
- To add a deleted agent to the PMP server, reinstall the agent in the target machine.
8. Remapping a Password Manager Pro Agent
(This feature is available from PMP build 12300 for C# and Go Agents only)
The 'Remap Agent' option is used when the resource of an agent is accidentally deleted. Administrators will be able to remap the agent to its resource using the following steps:
- Navigate to the Resources tab and add a resource with the same DNS name as the agent.
- Now, navigate to Admin >> PMP Agents >> Manage Agents.
- Click the resource action icon beside the agent belonging to the added resource and click Remap Agent.
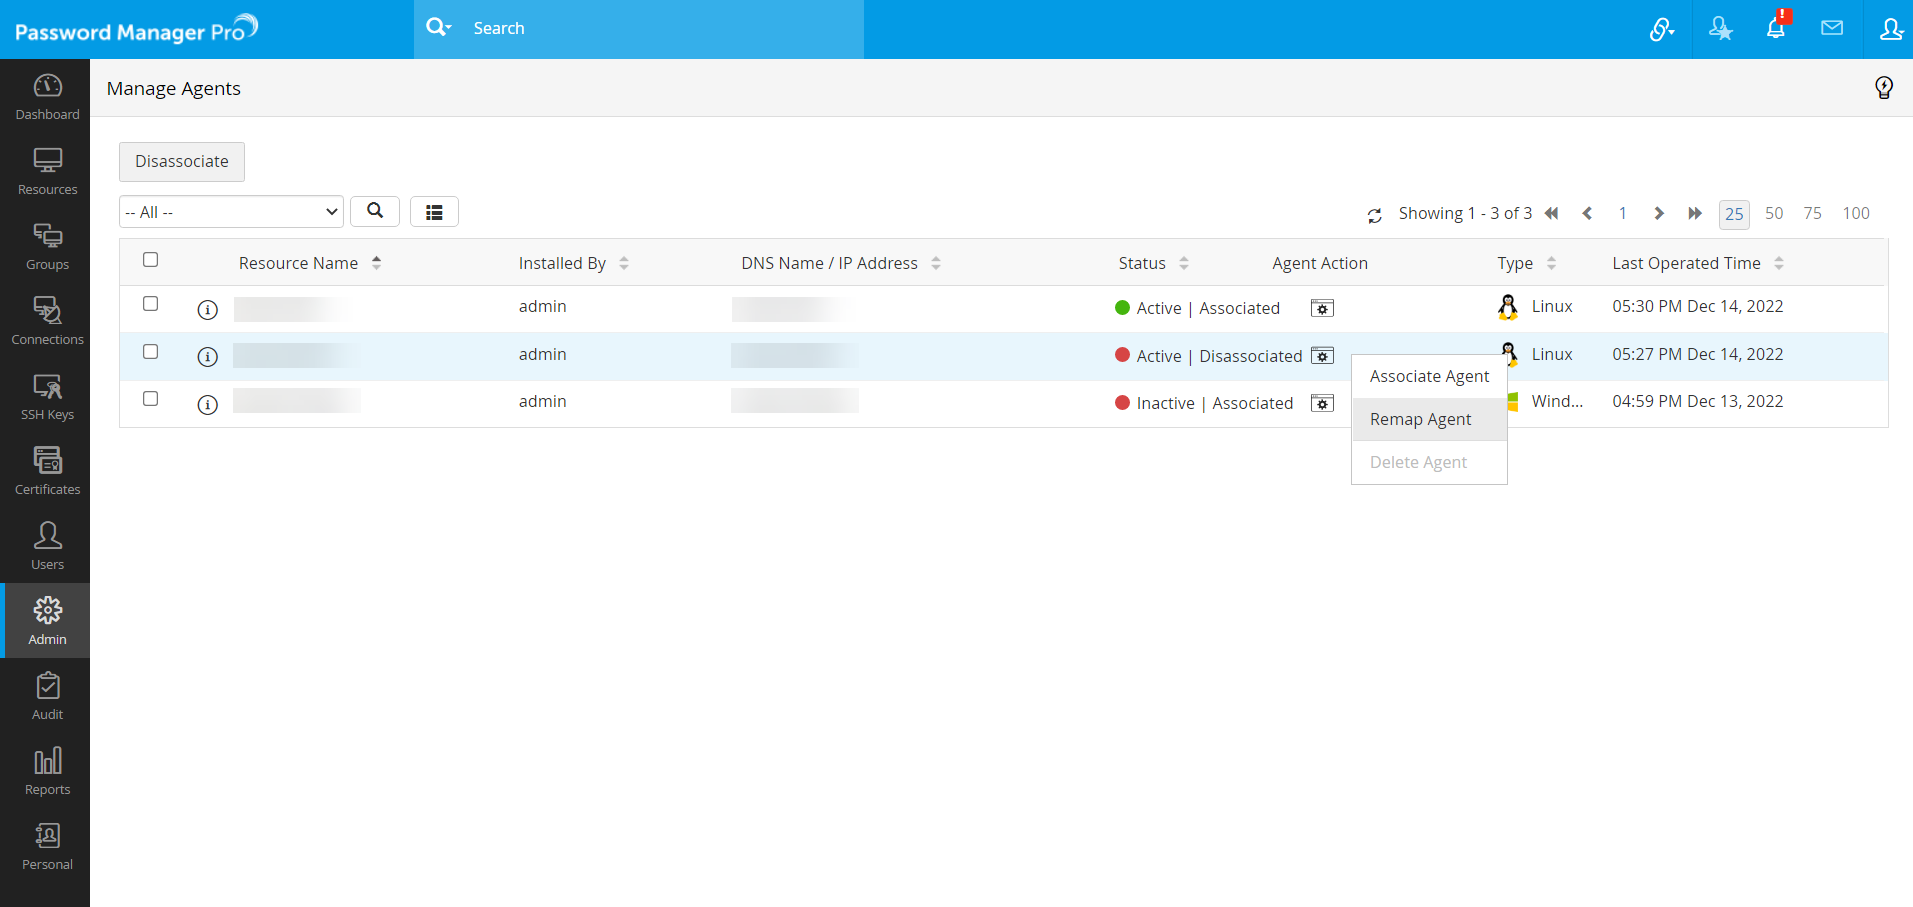
- In the pop-up that appears, select the resource with which you want to remap the agent and click Remap Agent.
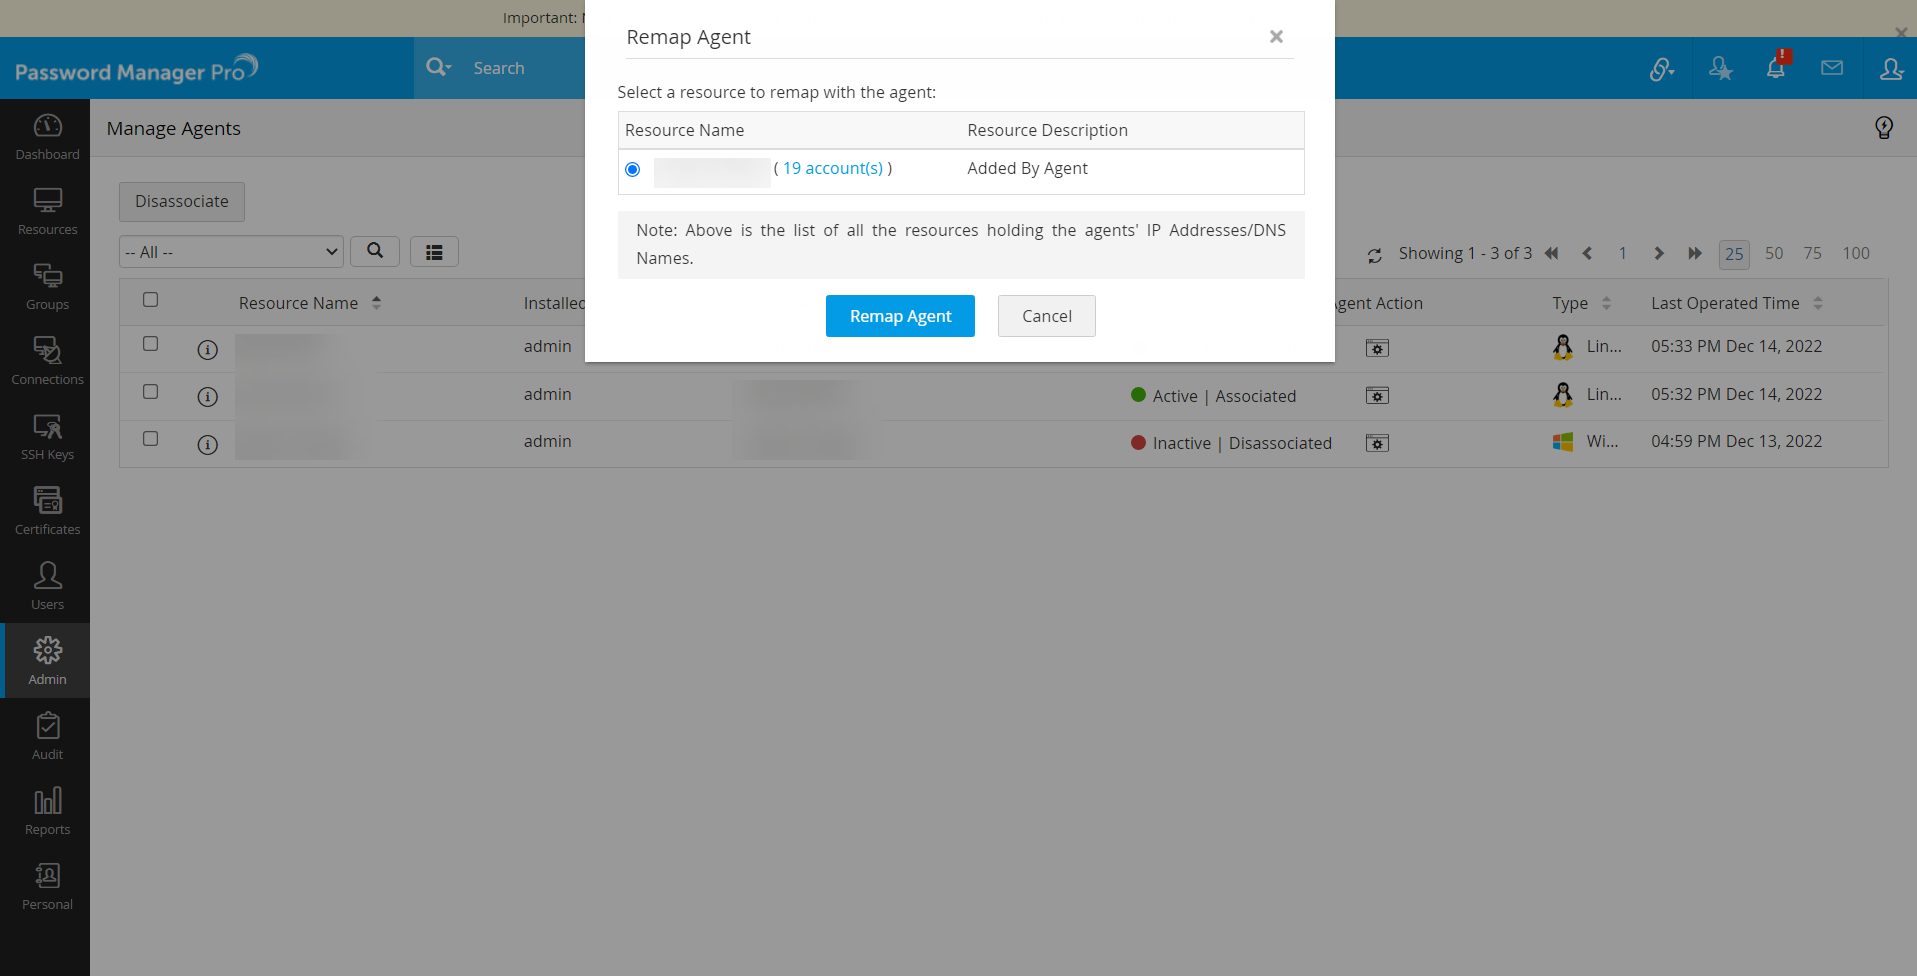
You have successfully remapped the agent to the resource.
9. Frequently Asked Questions
- How to create a custom role to manage agents?
To manage agents, the user must have Add and Edit permission to the Resources and permission to Download PMP Agents. Follow the below steps:
- Navigate to Admin >> Customization >> Roles.
- Click Add Roles. In the pop-up that appears,
- Mention the Name and Description.
- Click Password >> Resource and enable Add and Edit.
- Click Custom Settings and enable Download PMP Agents.
- You have successfully created a role to manage agents.
Note: The user will have to be the owner of the resource in which the agent is installed.
- Are there any reports for Manage Agents?
Navigate to Reports >> Query Reports >> Resources and search for 'Agents Installed'. This report will contain a list of agents installed in their respective resources.
- What will happen to the existing agents & what functionalities are applicable after upgrading to 12300?
- When PMP is upgraded to build 12300, all the existing agents from the older build will be added to Admin >> PMP Agent >> Manage Agent.
You will only be able to view and Delete the old agents from the Manage Agents window. - It is recommended that you reinstall the latest agent in the target machine to use other functionalities such as Associate, Disassociate and Remap.
- What will happen in the Manage Agents window if the agent is removed/uninstalled from the target machine?
The status of the agent is updated once every 30 min by default. If the agent is inactive for that period of time, the status of that agent will be marked as inactive.
- If a resource is shared with an admin with full access, will the agent be displayed under the Manage Agents window?
No, the agent details will be displayed under the Manage Agents page only when the resource ownership is transferred to a different admin-privileged user.
- What will happen when the ownership of the agent-installed resource is transferred to a different admin-privileged user?
The agent installed in the resource will be displayed in the Manage Agents window to the user to whom the ownership of the resource is transferred.
