How to create a SharePoint group
In this article:
- Objective
- Prerequisites
- Steps to follow
- Limitations of using SharePoint Online
- Tips
- Related topics and articles
Objective
This article shows how you can create a group in SharePoint using the native SharePoint tool and ManageEngine SharePoint Manager Plus. Creating a SharePoint group will help you efficiently manage permissions for multiple users simultaneously. This simplifies access control and promotes effective collaboration.
Prerequisites
- The user must have the Site owner privilege.
- Ensure a few users are pre-created and ready to be added to a group.
Steps to follow
The below table lists the steps on how to create a SharePoint group using SharePoint Online and SharePoint Manager Plus.
SharePoint Online
- Open your SharePoint site.
- Click on the Settings icon
 and select Site Permissions.
 - On the Permissions pane, click Advanced permissions settings.
- Click Create Group from the PERMISSIONS tab.
- Enter the necessary details on the Create Group page:
- Name and About me fields: Type a name and description for the new group.
- Group owner field: Specify a single owner.
- Group Settings section: Specify who can view and edit the membership of the group.
- Membership Requests section: Choose the settings for requests to join or leave the group.
- Give Group Permissions to this Site section: Select the permission level that the group members will get.
- Click Create.
SharePoint Manager Plus
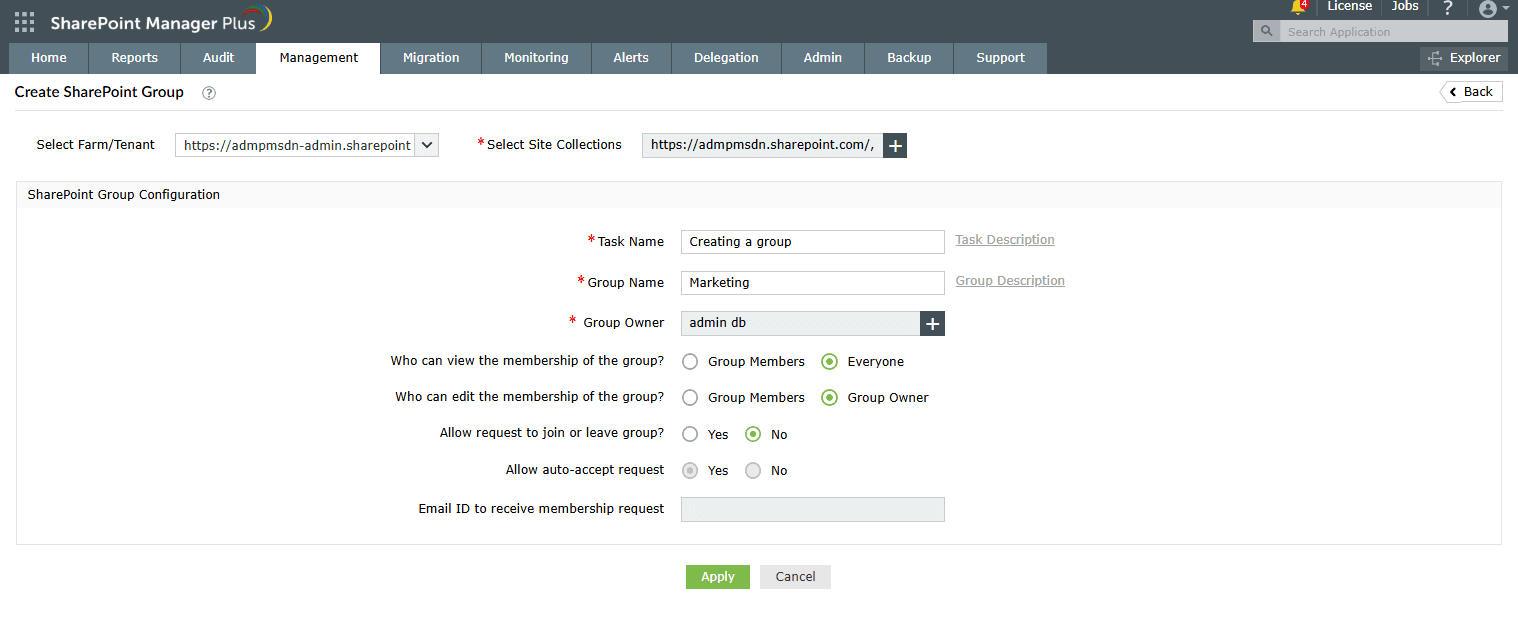
- Log in to SharePoint Manager Plus and navigate to Management > Groups Management > Create SharePoint Group.
- Select your farm or tenant and site collections.
- Enter the group name and click the Add + icon to select the group owner. Use the search bar to find the user and click Select.
- Select if Everyone or only the Group Members can view and edit the group membership.
- If required, configure the group request settings.
- Click Apply.

Limitations of using SharePoint Online
- A group can only be created for one site at a time, making the task repetitive when admins need to create multiple groups for multiple sites simultaneously. SharePoint Manager Plus solves this issue by letting you create groups for multiple sites in one go.
- Group creation is slowed down by the need to navigate through separate windows for each step. SharePoint Manager Plus' group creation can be achieved from a single, intuitive window.
Tips
Understand your SharePoint group configurations and track all group changes effectively with detailed audit logs and insightful reports provided by SharePoint Manager Plus.
Related topics and articles
Related Links
- An overview of SharePoint
- How to create a SharePoint group?
- How to change SharePoint group permissions?
- How to check permissions of SharePoint users and groups?
- How to configure audit logging for a SharePoint site collection?
- How to check the size of a SharePoint site?
- How to check the size of SharePoint storage?
- How to migrate sharepoint on premises to online?


